






Ready To Learn?
Revel Systems Point of Sale Application

Introduction
“Hello my name is David Kraynik and I want to thank you for choosing Delaware Business Systems & Revel Systems Point of Sale! We want you to get the most out of your point of sale experience and have created these guides and videos for your learning convenience. If at any time you have questions or need additional training and support, please do not hesitate to contact us by email at primo@dbs4pos.com, by LiveChat on our website, or by phone at 302.395.0900 then extension 5.
Thank you again for choosing DBS & Revel Systems Point of Sale and we look forward to a great partnership!”

Brand Manager
Delaware Business Systems, Inc.
Updated 06/15/2022

Summary
Each point of sale station is automatically refreshed overnight outside of business hours. A refresh will download any changes that have been made on the Management Console since the last refresh. These changes can include menu updates, employee updates, settings changes and more. It is not recommended to do a refresh during business hours. Depending on the amount of changes, a refresh download could take anywhere from a few seconds to 20 minutes. If a manual refresh is needed, it should be done when the business is slow and one station at a time.
Refreshing All Stations
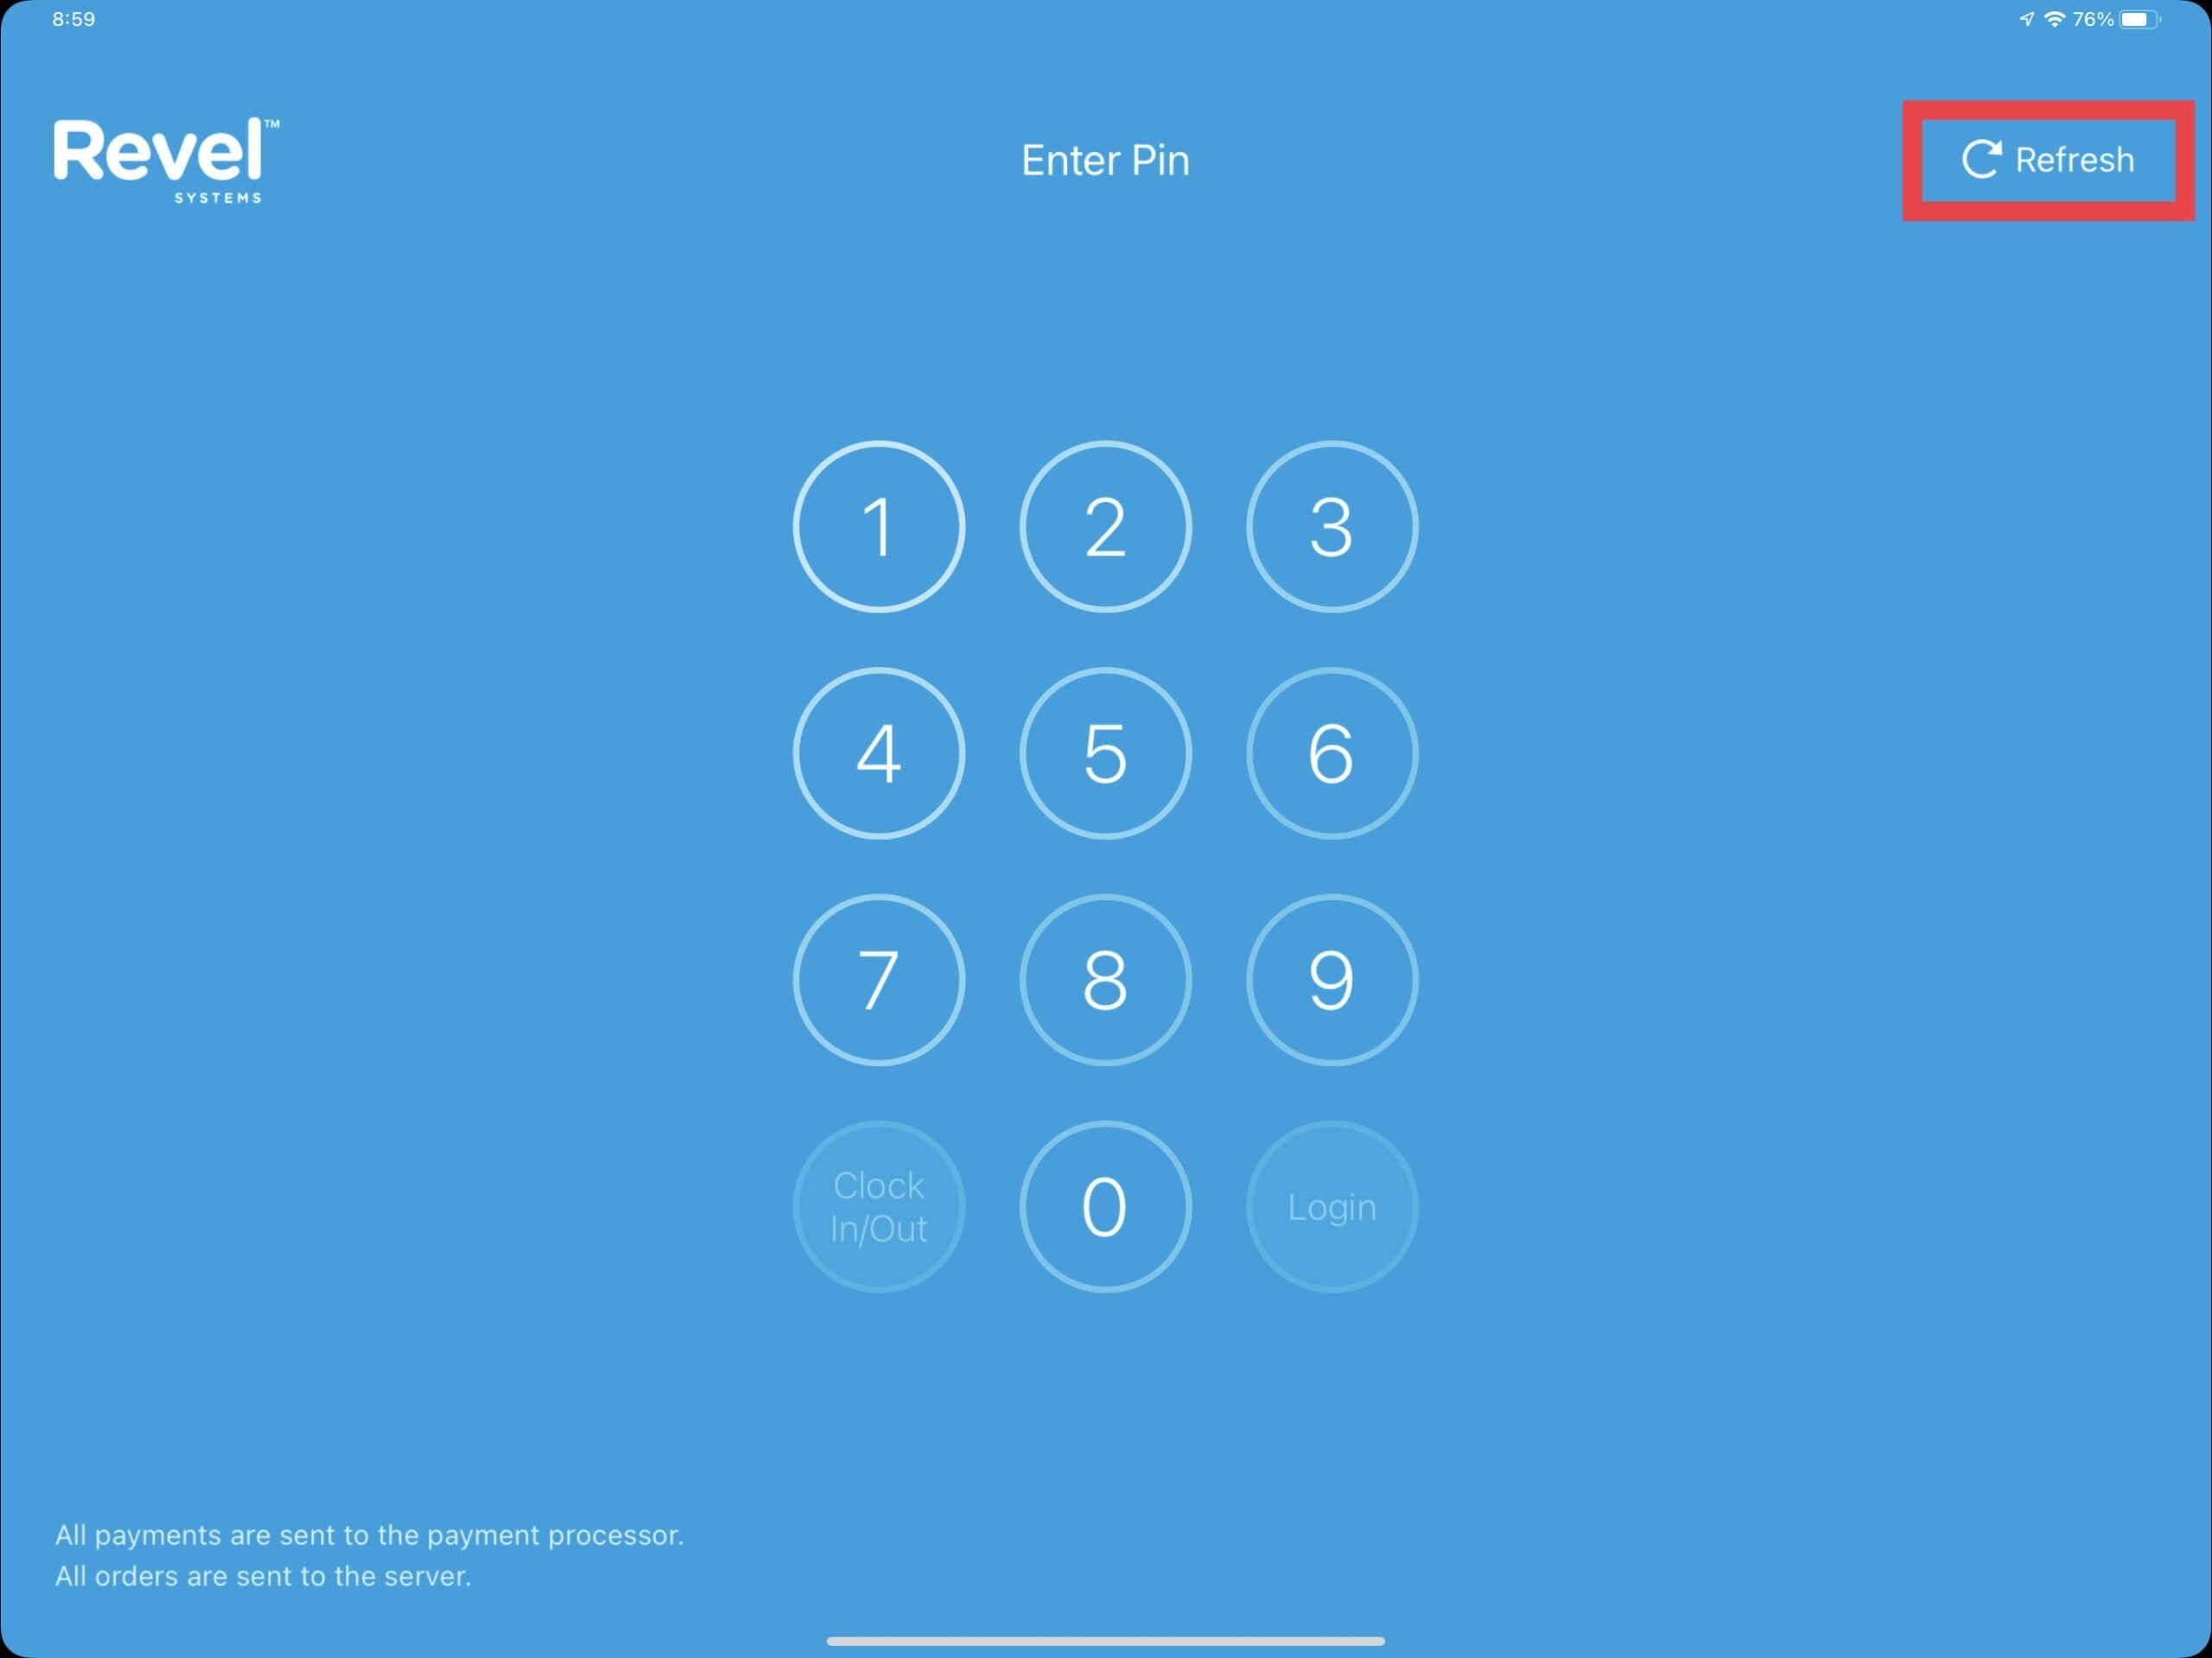
To refresh a stations navigate to the PIN entry screen starting with POS1 (cashier left station). Select Refresh from the top right.
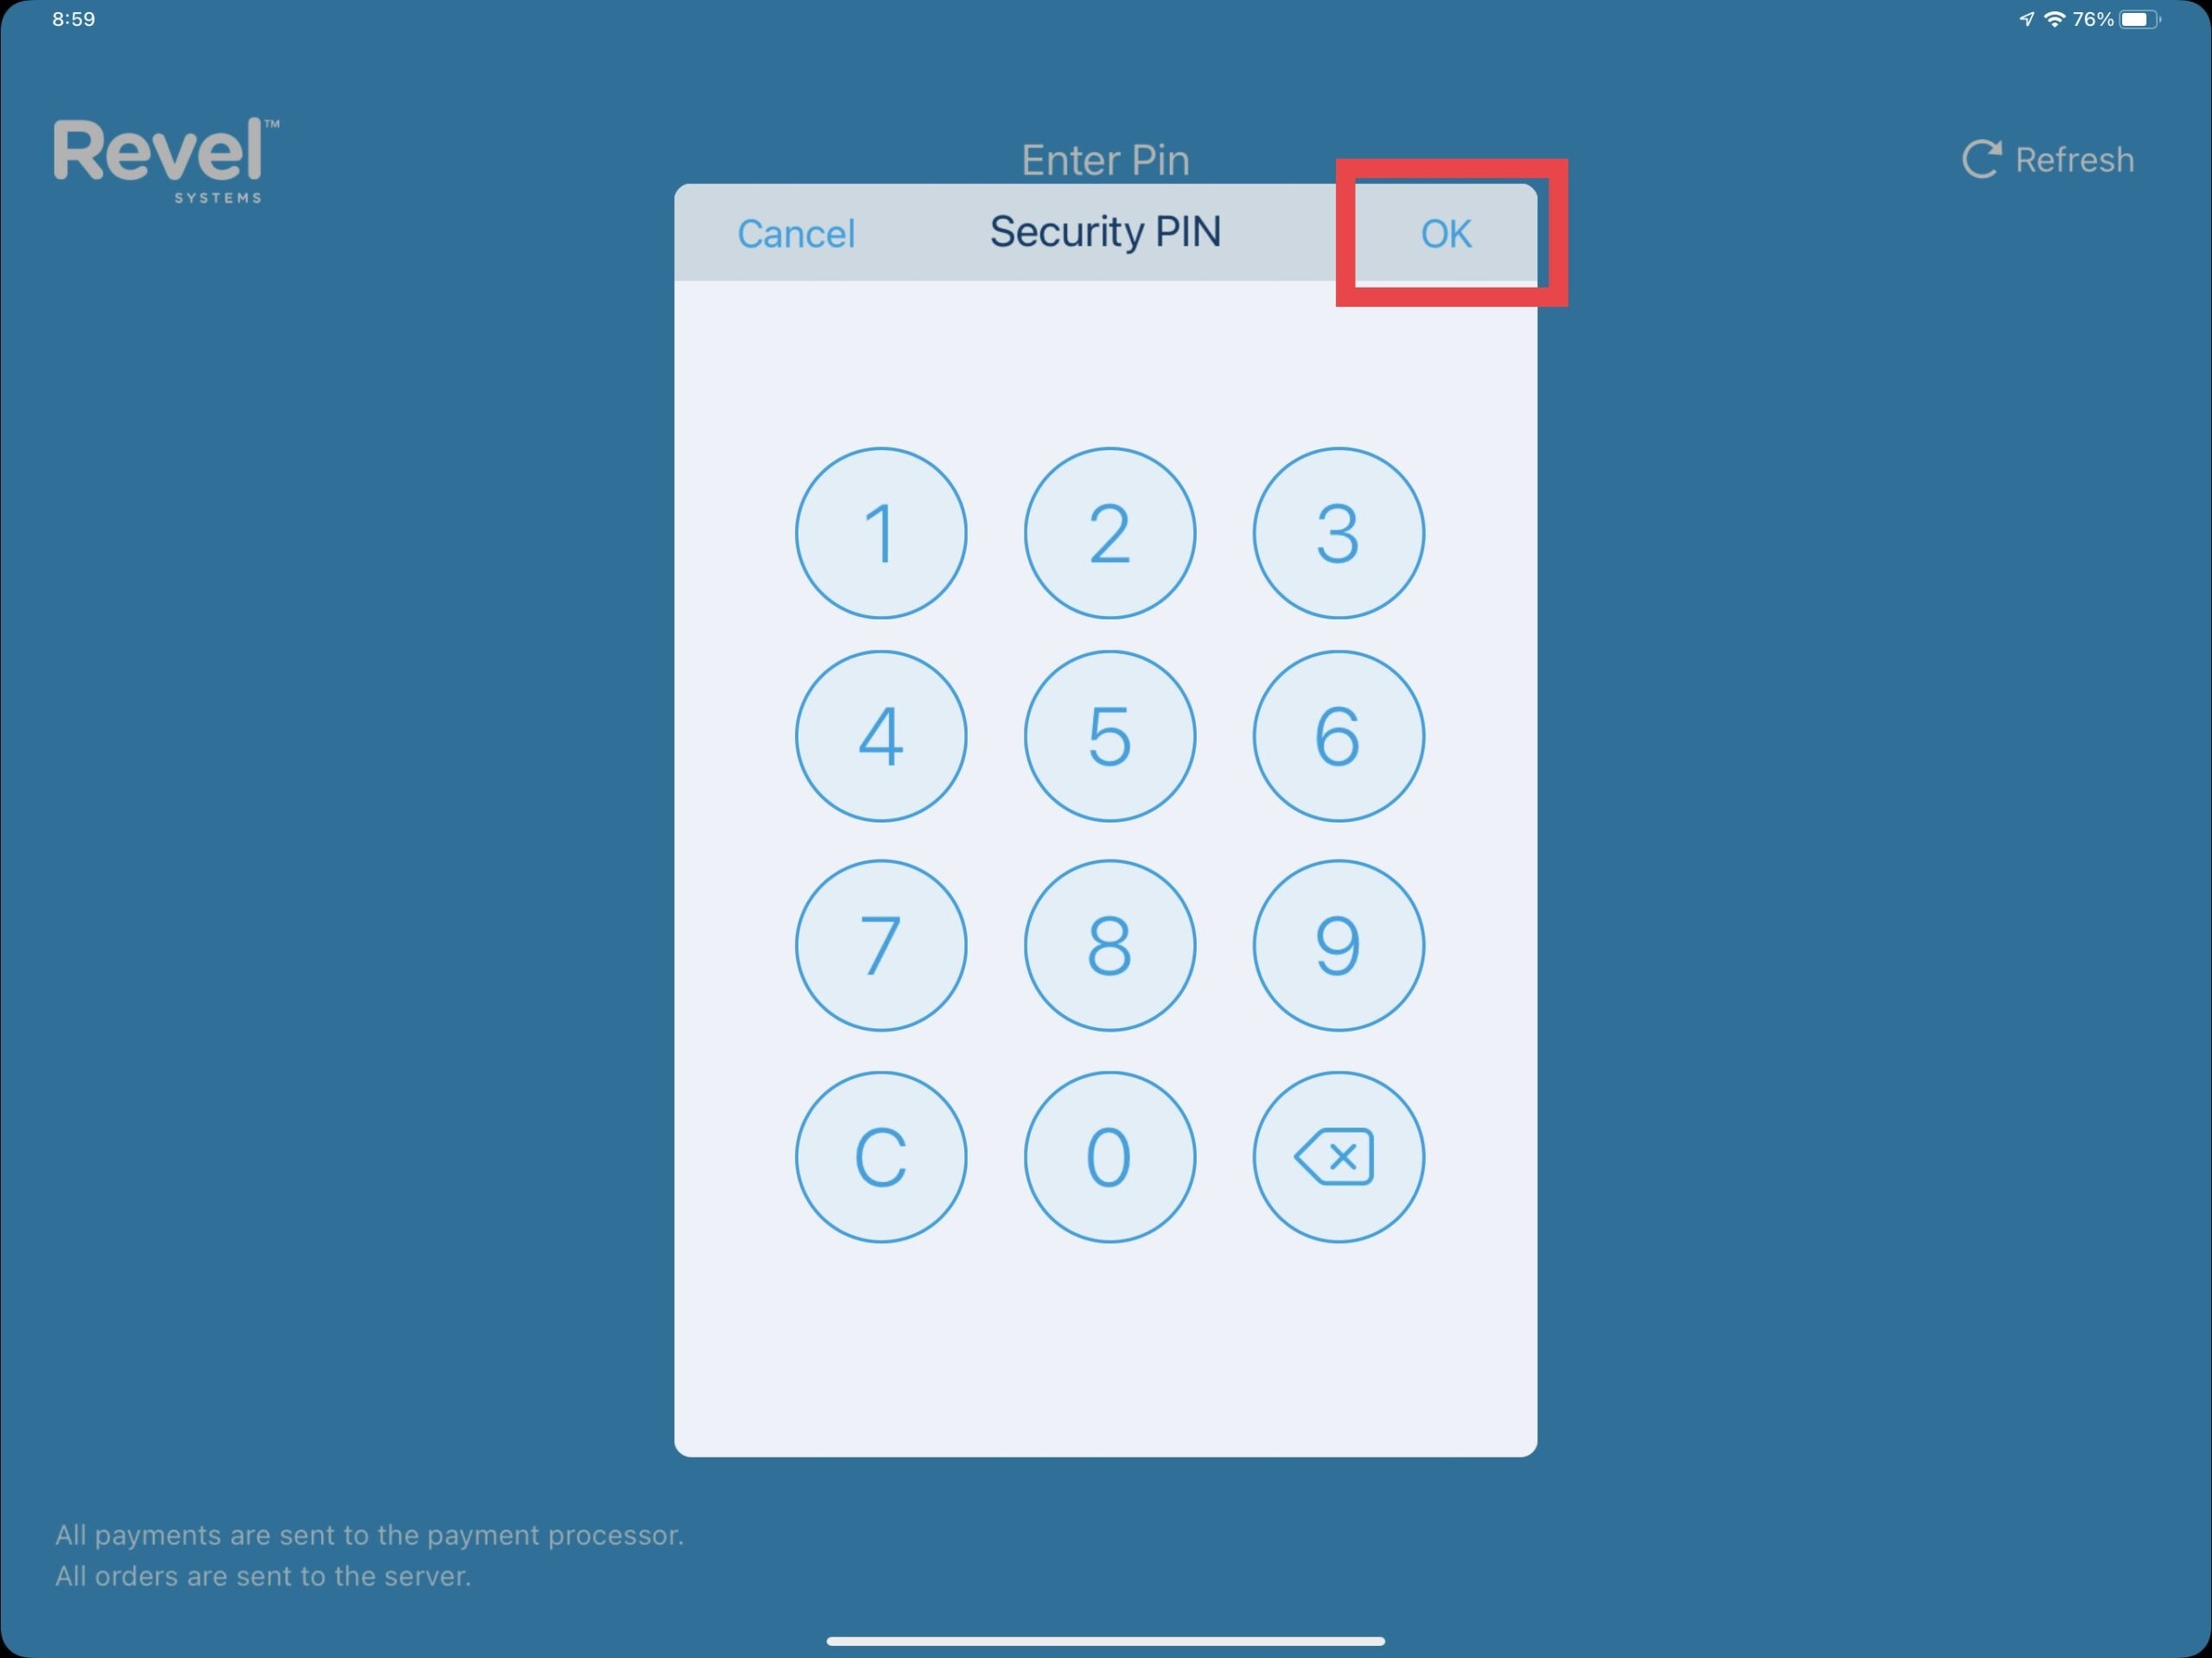
Enter the PIN of a manager or higher then select OK.
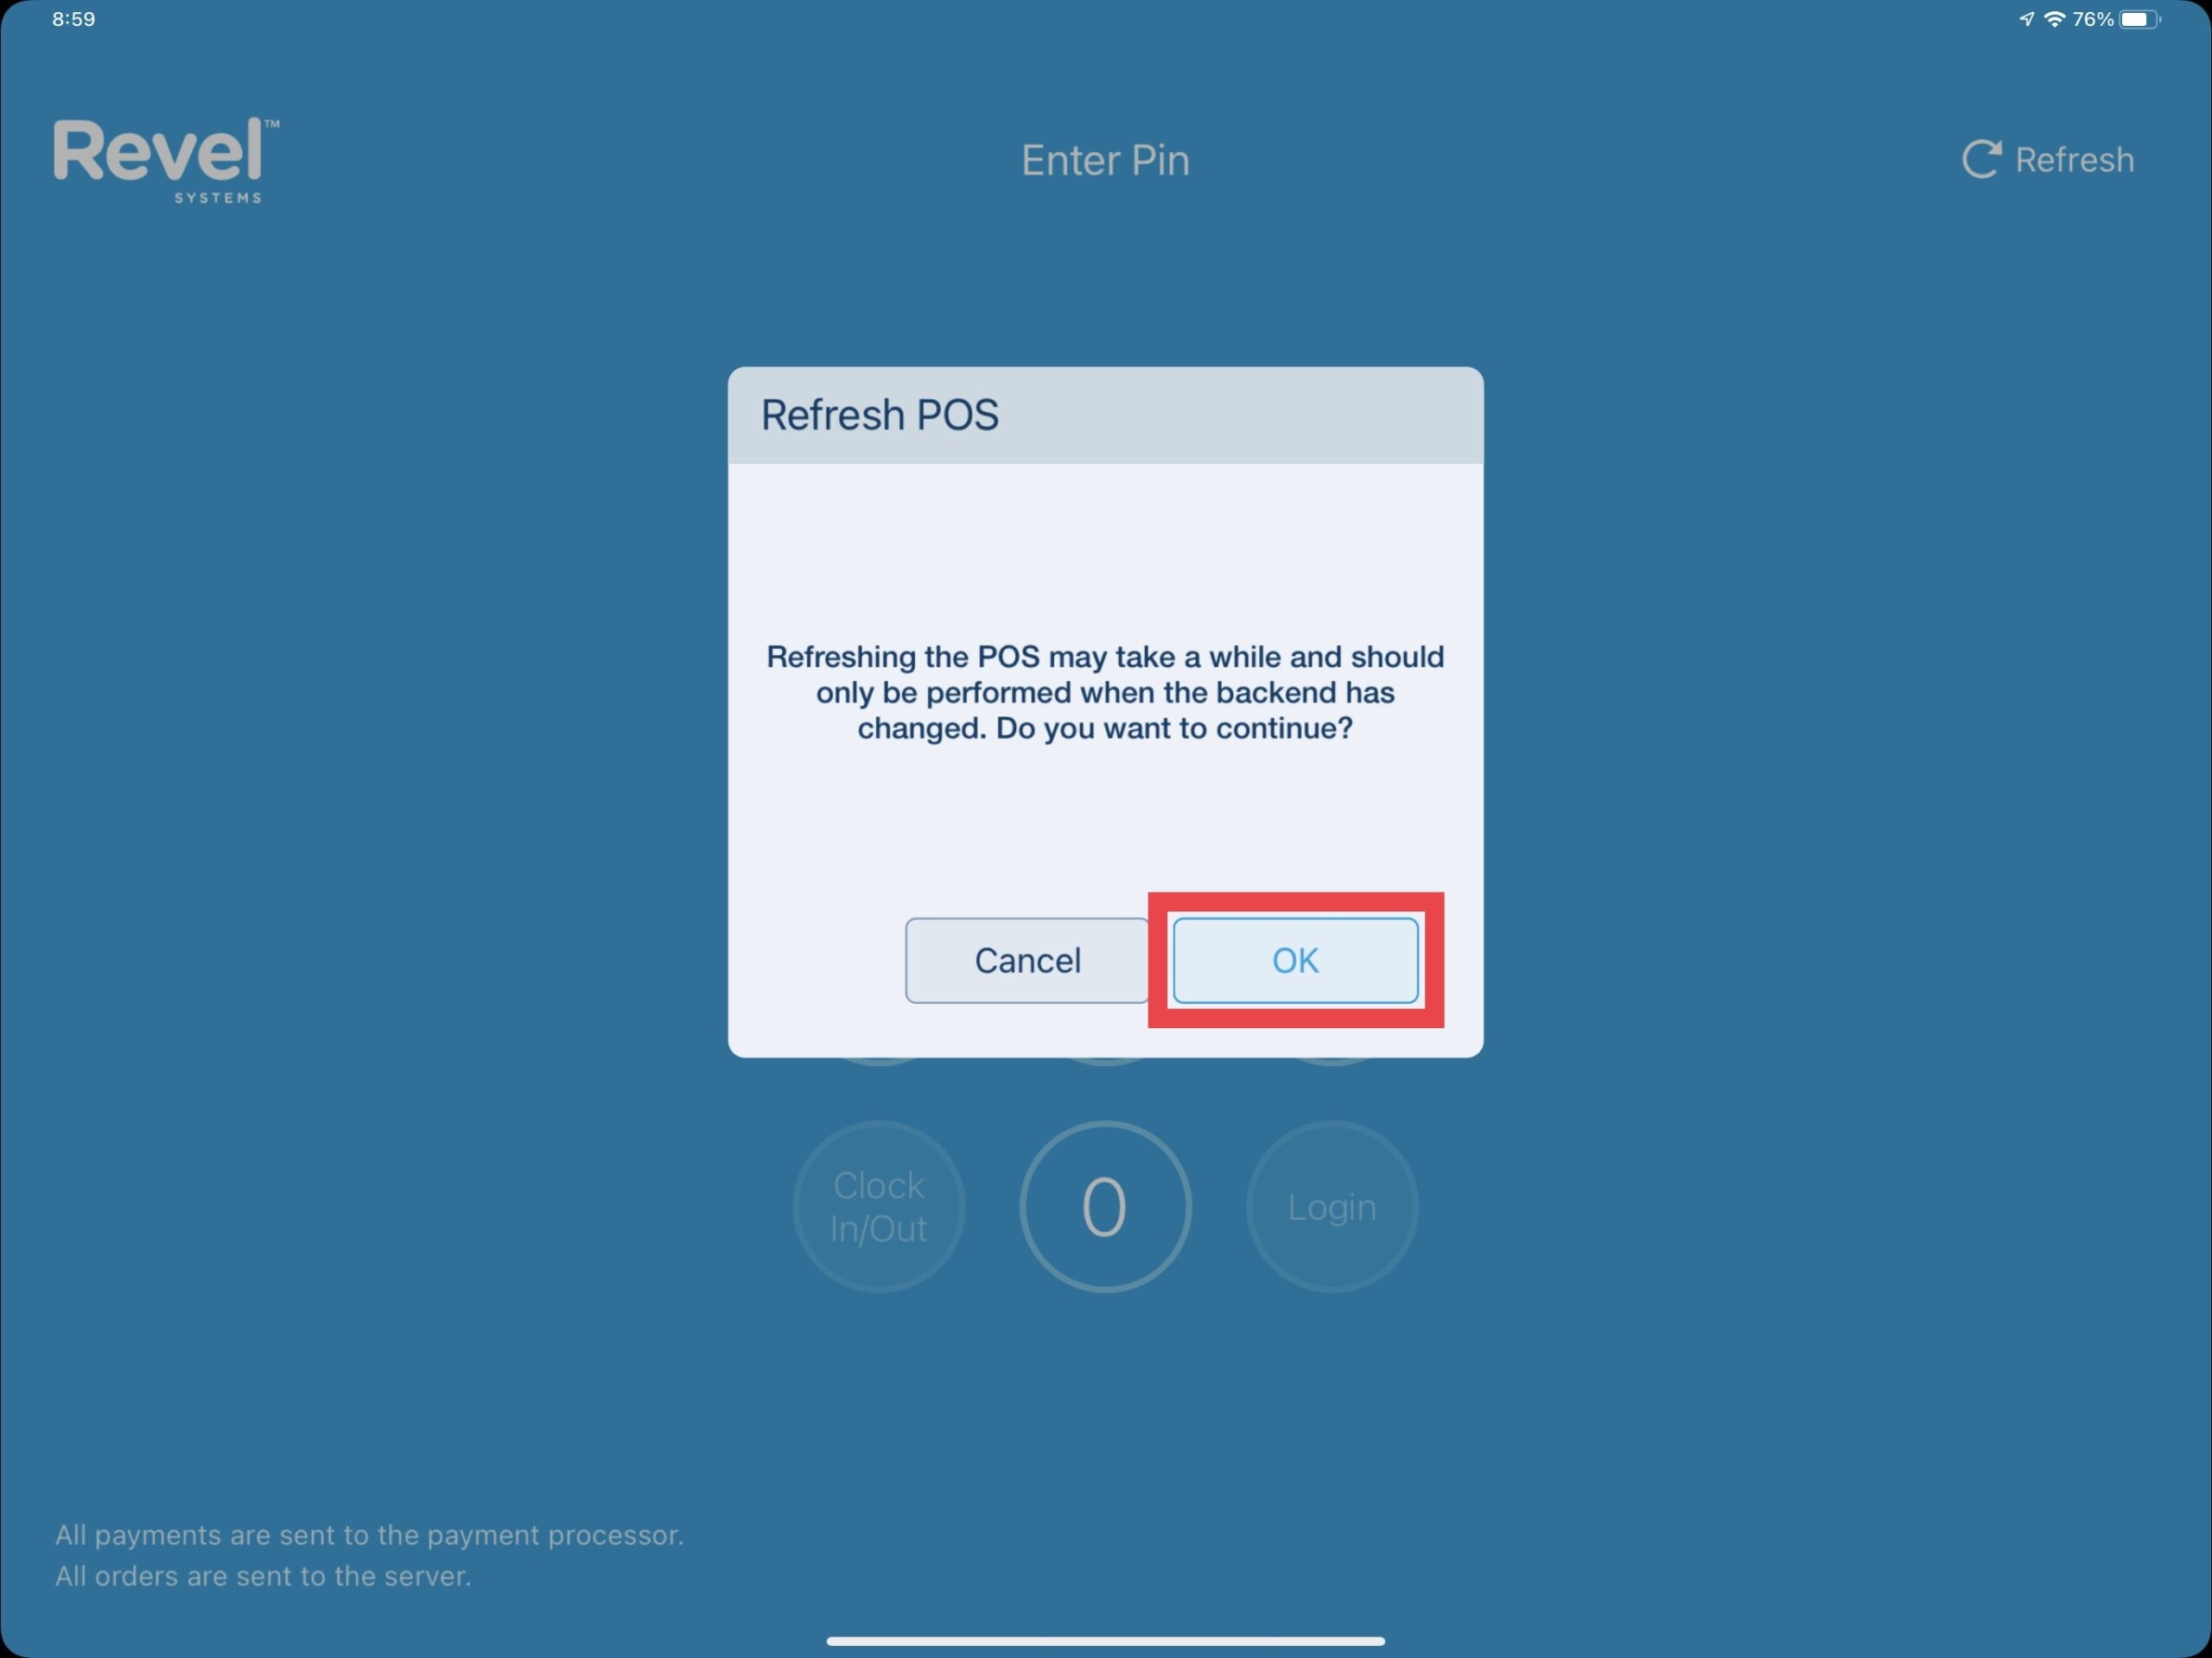
Confirm the refresh prompt and wait for the download to complete.
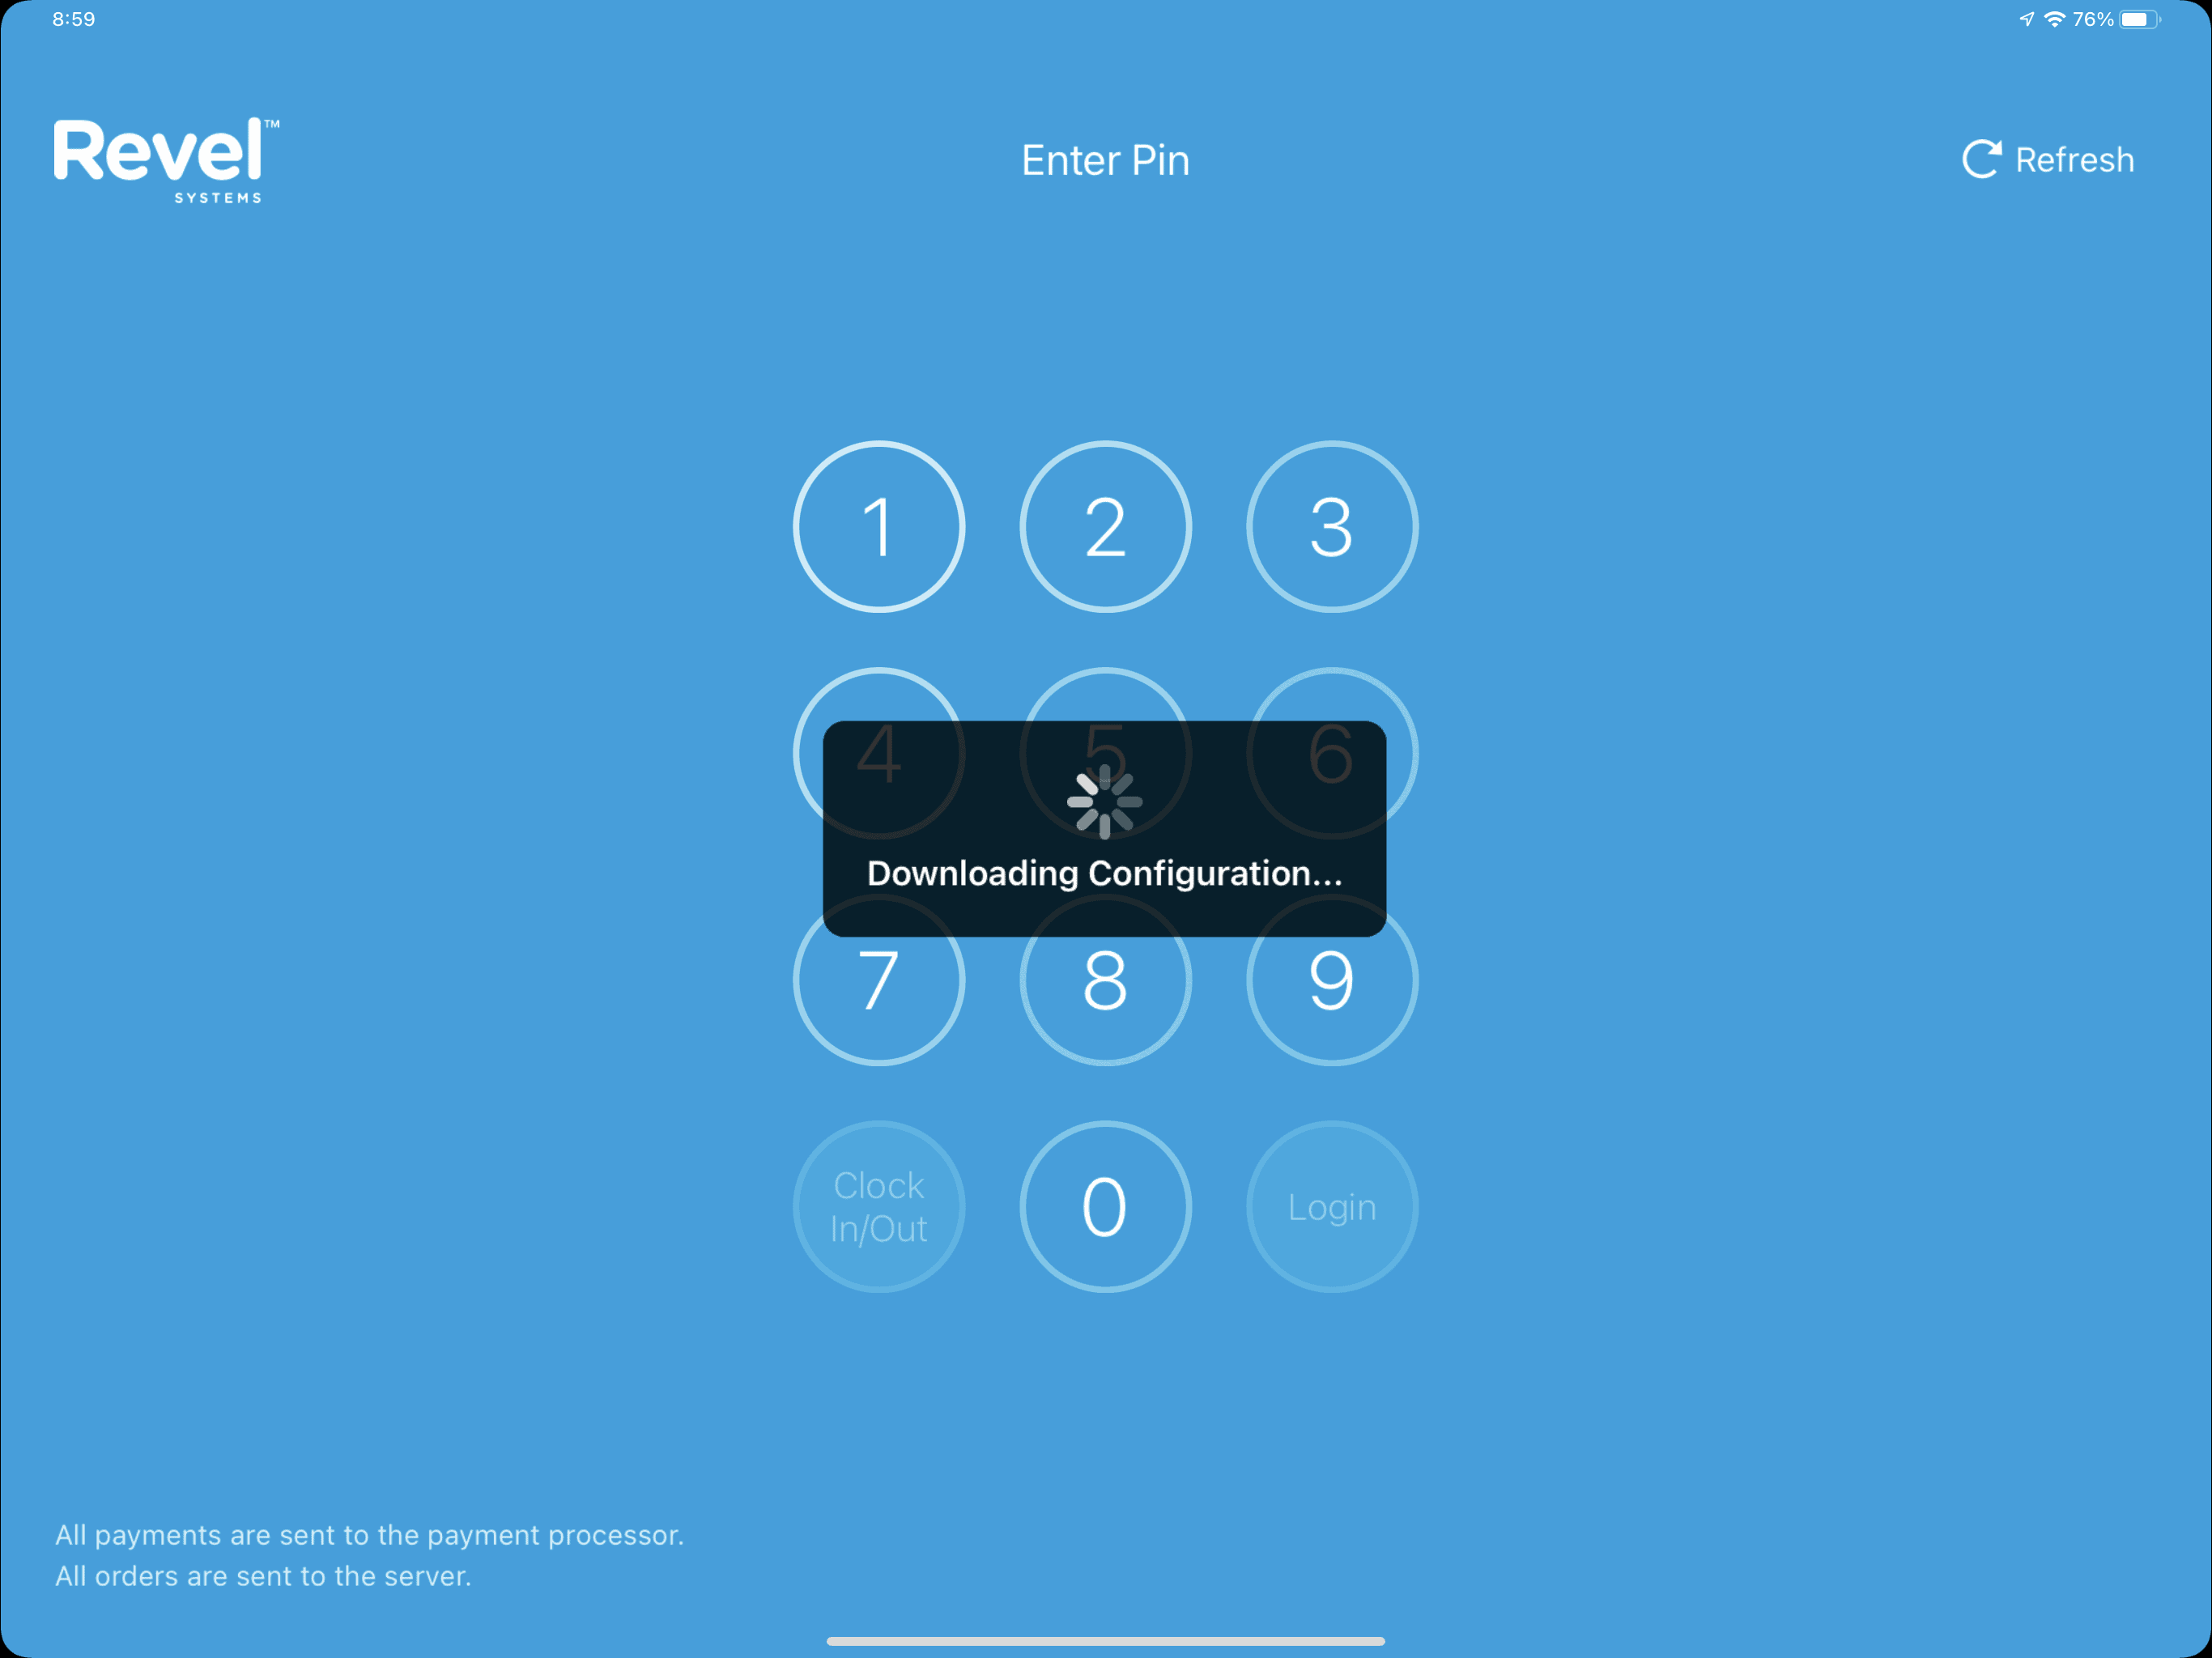
Repeat the refresh for all other ordering stations.
Refreshing Individual Stations
There may be an instance where you do not need to refresh all stations. An example would be if a credit card terminal is not synced (may show TriPOS on the screen) or a customer display is not synced. In both of these examples, performing a refresh of the cashier iPad on the station with the issue may resolve it.
Updated 06/15/2022

Summary
Depending on a logins security level, the POS Dashboard will display various blocks of information and is the “Hub” of the iPad features and settings. We will explore the POS Dashboard as seen as a manager login or higher. These logins will have access to things like Setting Tills, Running End of Day, Starting & Reopening Orders, Gift Card Management & much more.
POS Dasboard Blocks
Navigate to the POS Dashboard by selecting the back arrow on the top left of the point of sale order screen. Logging in as a manager or higher may go directly to the POS Dashboard as well. For this tutorial we will be viewing the POS Dashboard as a manager.
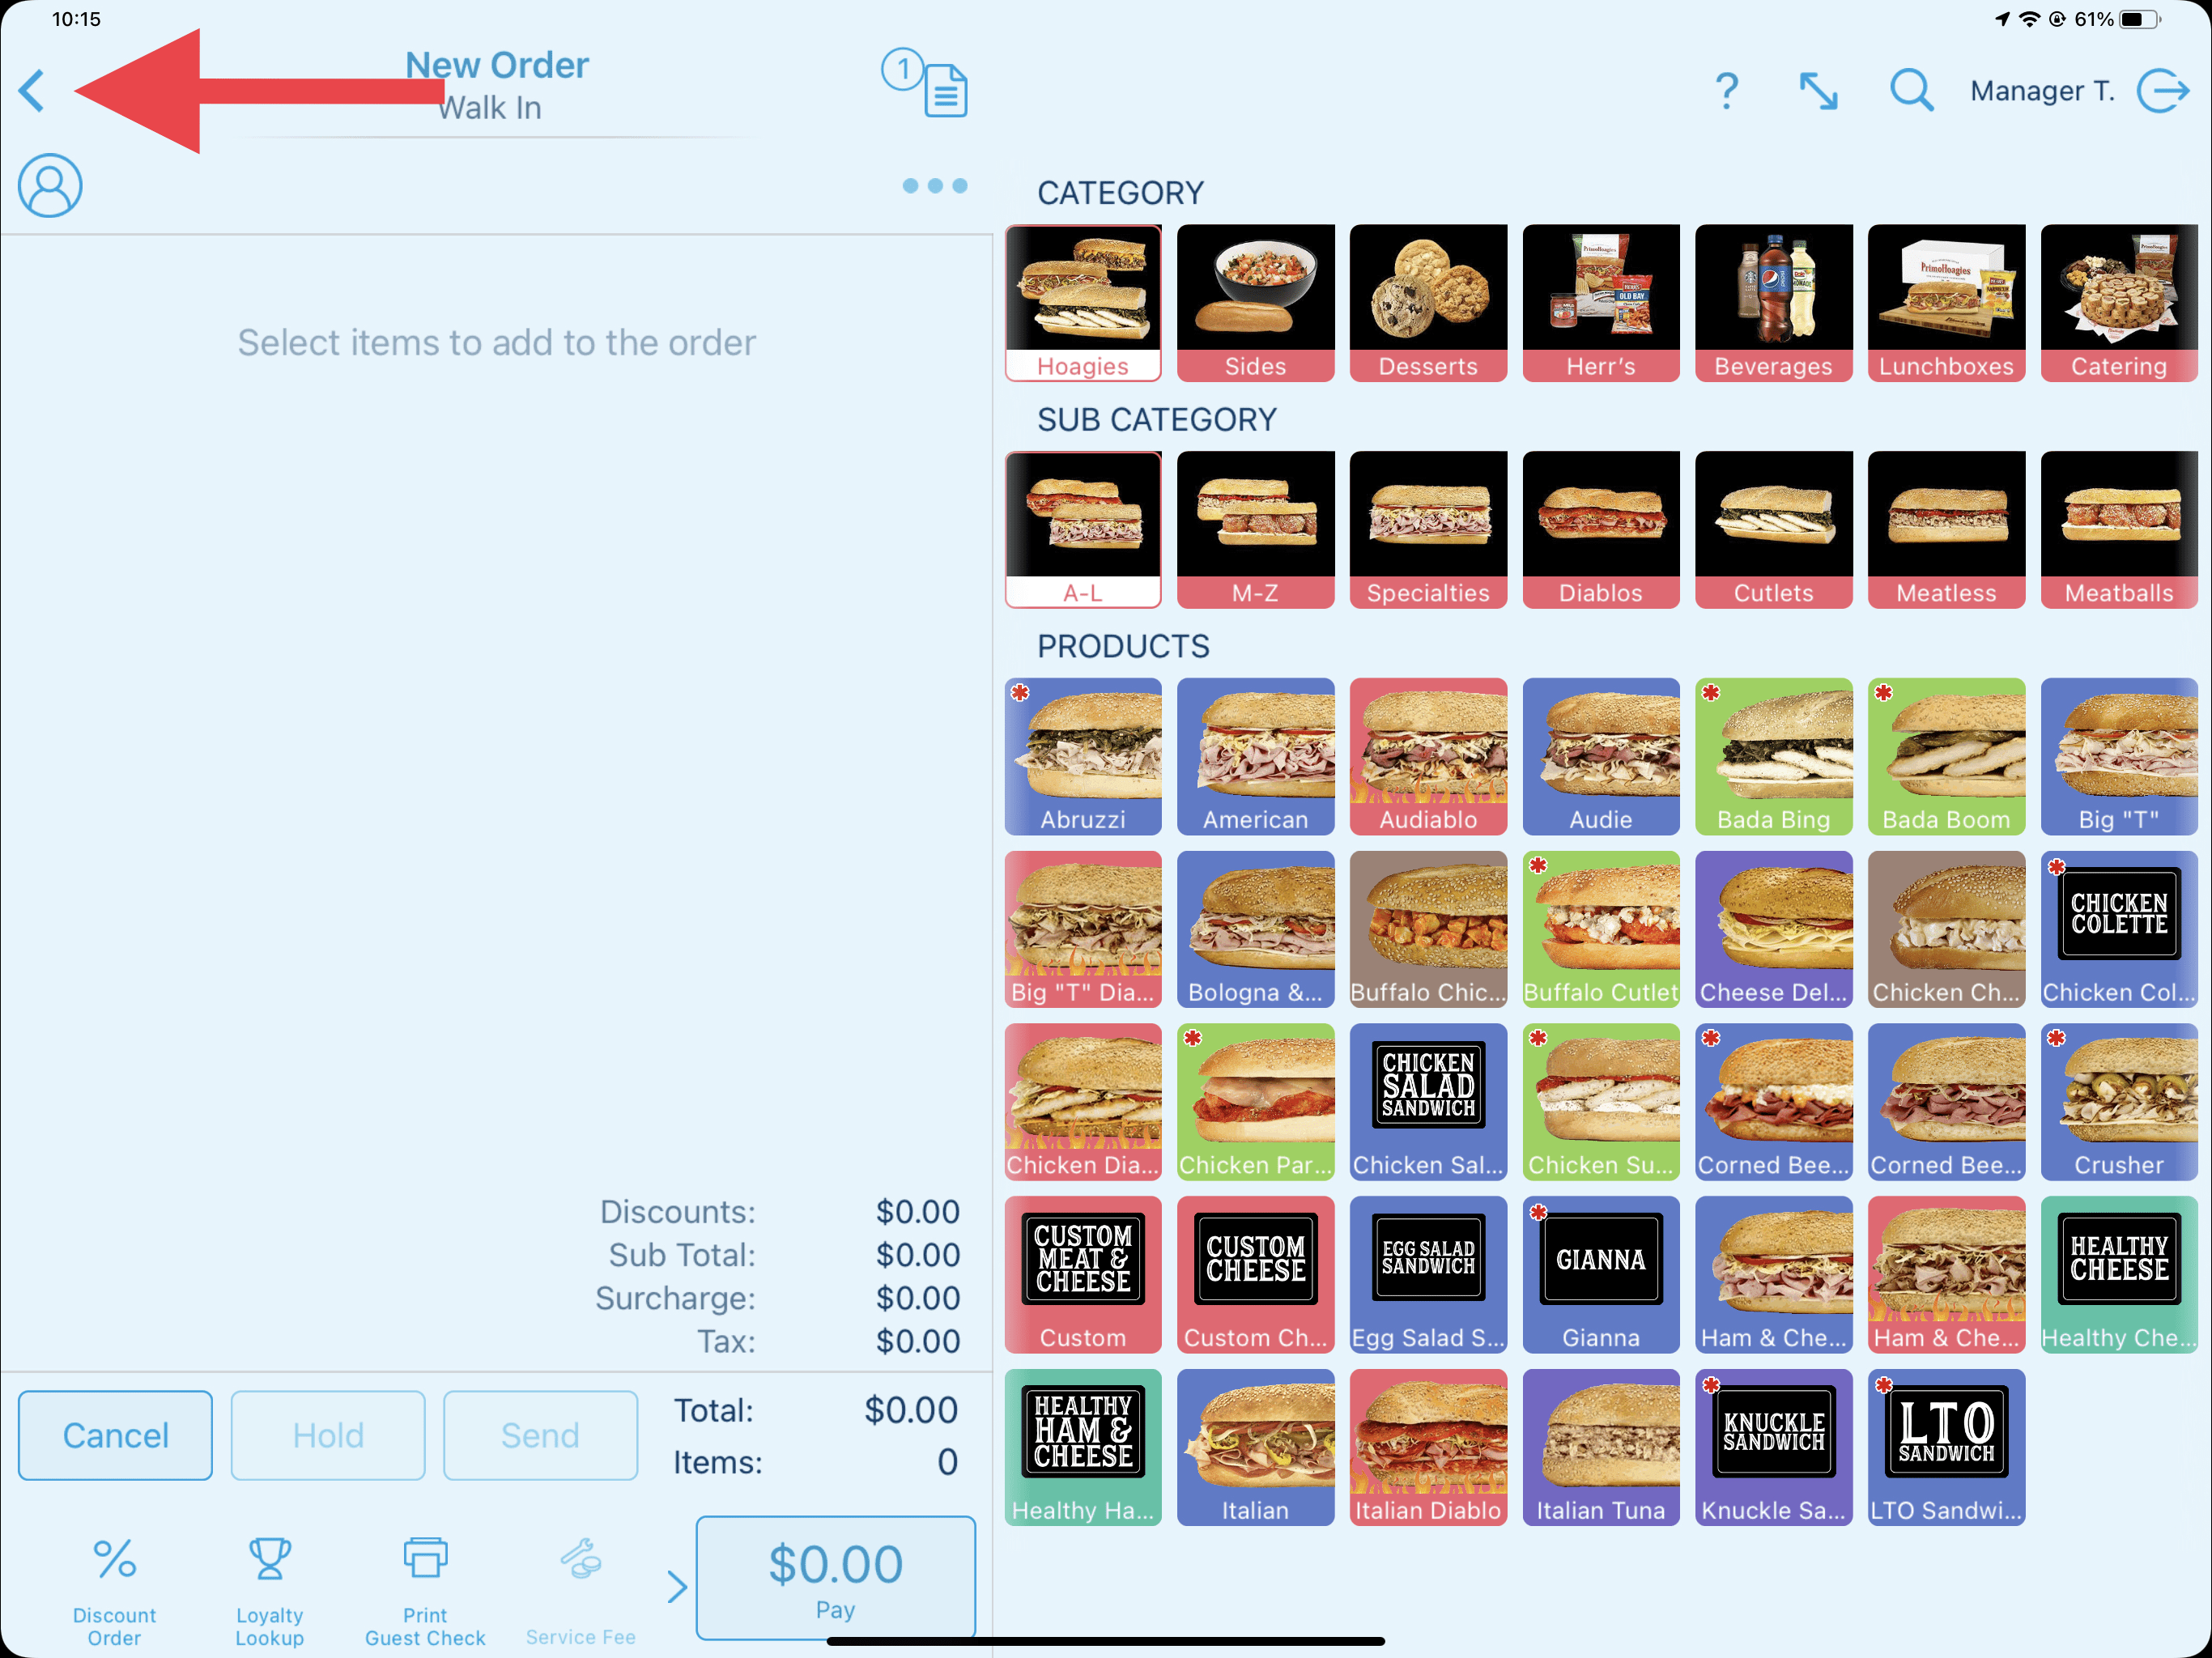
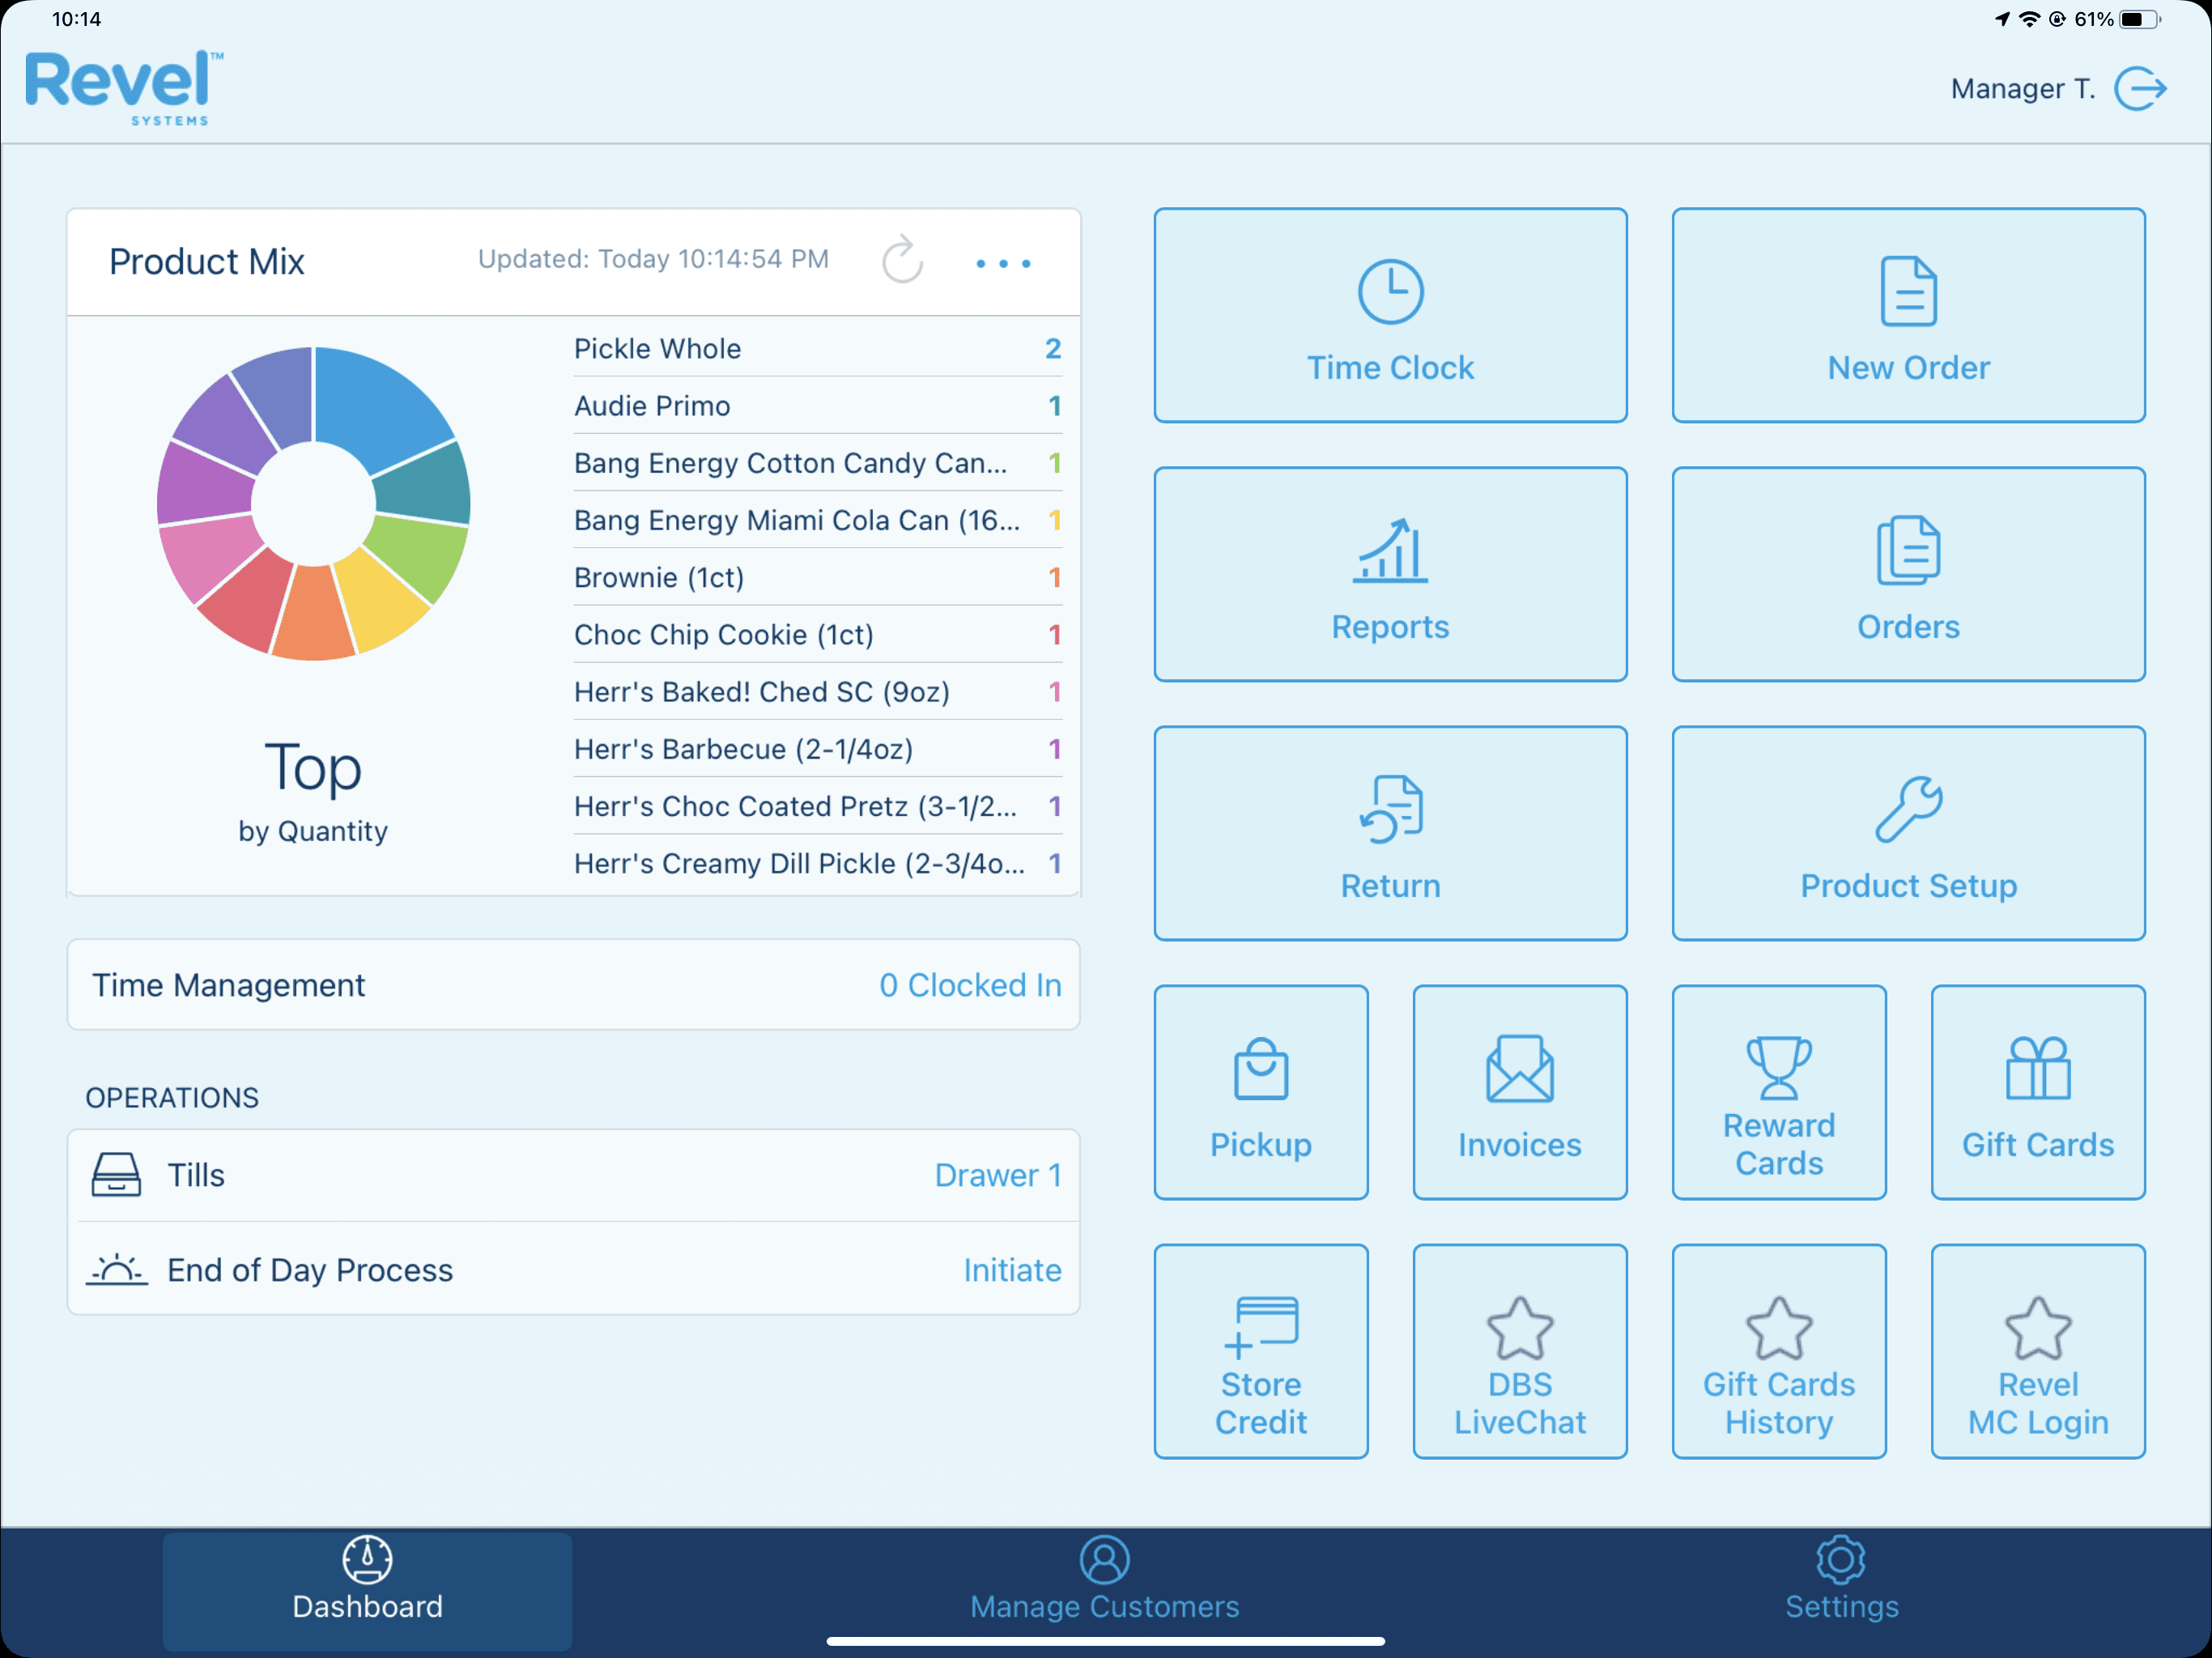
Starting at the top left, let's take an overview look at the different dashboard blocks. We will cover additional details for each block in other PrimoHoagies University topics later on. Information on the POS Dashboard is only for the current day.
Statistical Charts: There are four charts which give a quick glance at daily statistics such as the Sales Summary, Hourly Sales, Product Mix, & Labor. Use the elipsis icon to switch between the charts.
Time Management: The Time Management block allows for the editing of employee clock in/outs or adding missing punches. You may edit Start Times, End Times, End Statuses, & Roles.
Tills: The Tills block allows you to do various till related functions such as enter the starting amount, enter paid in's and paid out's, tip out employees, perform a safe drop to remove cash from the till, open the cash drawer, print a cash log, and perform a final till checkout.
End of Day Process: The End of Day Process is designed to assist in the final completion of the business day or shift. This block section performs various functions which can include closing $0.00 balance orders, reconciling open orders, checking for offline payments & declined payments, processing all credit cards, closing all open tills, confirm employee time cards (confirming employees have clocked out), and printing your final closeout report.
Time Clock: Allows employees to clock in and out for their shift. Employees that are set to salaried or exempt do not have access to this functionality.
New Order: Start an order by selecting the New Order block.
Reports: Run various point of sale level reports including your Daily Cash Log, Daily Payments Summary, Payment Log, & Sales Report. Certain reports can be filtered and emailed as well.
Orders: This block is used to search for any open or closed order in the point of sale. Search for orders by Order ID, Customer, or scroll through the list of orders. The advanced search allows for additional order recall functions such as searching by credit card number or by a specific date range. Open invoices are also available under the Orders block.
Return: Allows for the return of products and orders by Order ID, Barcode Scanning or No Receipt.
Product Setup: This block is currently not used. All product setup is completed by DBS from the Revel Management Console.
Pickup: Pickup orders can be viewed here. This function looks at pickup orders related to online ordering and the SMS functionality if used. SMS allows for customers to indicate that they have arrived at your location for pickup.
DoorDash Drive: View all of your DoorDash Drive orders in one screen. You can also toggle between any other online orders from this window.
Invoices: View any outstanding invoices by Invoice #, Customer, Date Opened, Employee Name, and Total. Select an invoice to open the details of that particular invoice.
Reward Cards: Lookup Loyalty Users (Como Loyalty) information with this block. All loyalty members are searchable by phone number. Existing users will show account details such as their name, rewards number (phone number), total points & credit points, birth date (if provided), and more.
Gift Cards: Simple gift card balance checks can be done in this block with the manage gift card function. Certain users may also have the ability to activate gift cards. When activating gift cards in this section, payments are not available to be made towards the gift card. This type of activation can be used for the selling of promotional cards where the business is not taking in payment for the activation. Note that PrimoHoagies does not allow for the activation or reload of a gift card that previously had a balance. A new gift card will need to be issued.
Store Credit: Store credit is currently not used.
3rd Party Access: The 3rd Party Access point of sale dashboard button allows you to add or remove employee logins from DBS supported 3rd party applications.
Como Loyalty: The Como Loyalty point of sale dashboard button takes you to the login page of the Como Loyalty portal.
DBS LiveChat: Access the DBS LiveChat page to chat with a DBS Support Team Member.
Gift Card History: This block loads the StoreCard URL. This is an additional tool for gift cards allowing the business to look up the history of a gift card including the activation date and all redemptions on a particular card.
Revel MC Login: Log into the Revel Management Console from the iPad.
Submit Discounts: If you have a local store discount that is not in the point of sale, you can send a request to have it added to the database from this form. Please note, we request 1-2 business days to get the discounts added to the system after approval and then the changes will be pulled down at the next nightly refresh.
Submit Products: In the event that you receive a scannable product that will not scan into the point of sale, you can send a request to have it added to the database from this form. Please note, we request 1-2 business days to get the products added to the system after approval and then the changes will be pulled down at the next nightly refresh.
Video Training: Access to this PrimoHoagies University for helpful guides and videos on everything point of sale related.
Manage Customers: This tab located along the bottom of the dashboard allows for the adding and editing of customers in the point of sale database. By selecting an existing customer, you can also view past orders or create a new order with the customer automatically assigned to it.
Inventory: This tab at the bottom of the dashboard is currently not used.
Settings: This tab along the bottom of the dashboard holds various settings and information about the point of sale station and network. The Online Ordering section allows the business to adjust the Estimated To Go Pickup Time In Minutes as well as the Estimated Delivery Time In Minutes for the online ordering application. By default, both are set to 30 minutes. A refresh of the POS will be needed after making a change to this section.
Updated 06/15/2022

Summary
At the start of the business day, a manager login or higher will need to be used to enter the cash value being added to each cashier station drawer till. This amount will be pre-configured to the establishments default amount however it may be overwritten using the numeric keypad. Once the cash value has been confirmed, the till will need to be assigned to the corresponding login (example: Cashier 1 or Cashier 2). When the previous steps are completed, log off and log in the corresponding cashier login. Repeat for any cashier stations with a physical till.
Setting The Cashier Station Till
On a cashier station with a physical till, log in as a manager or higher. If a till has not previously been set, you will be prompted to set the till with the default pre-configured amount.
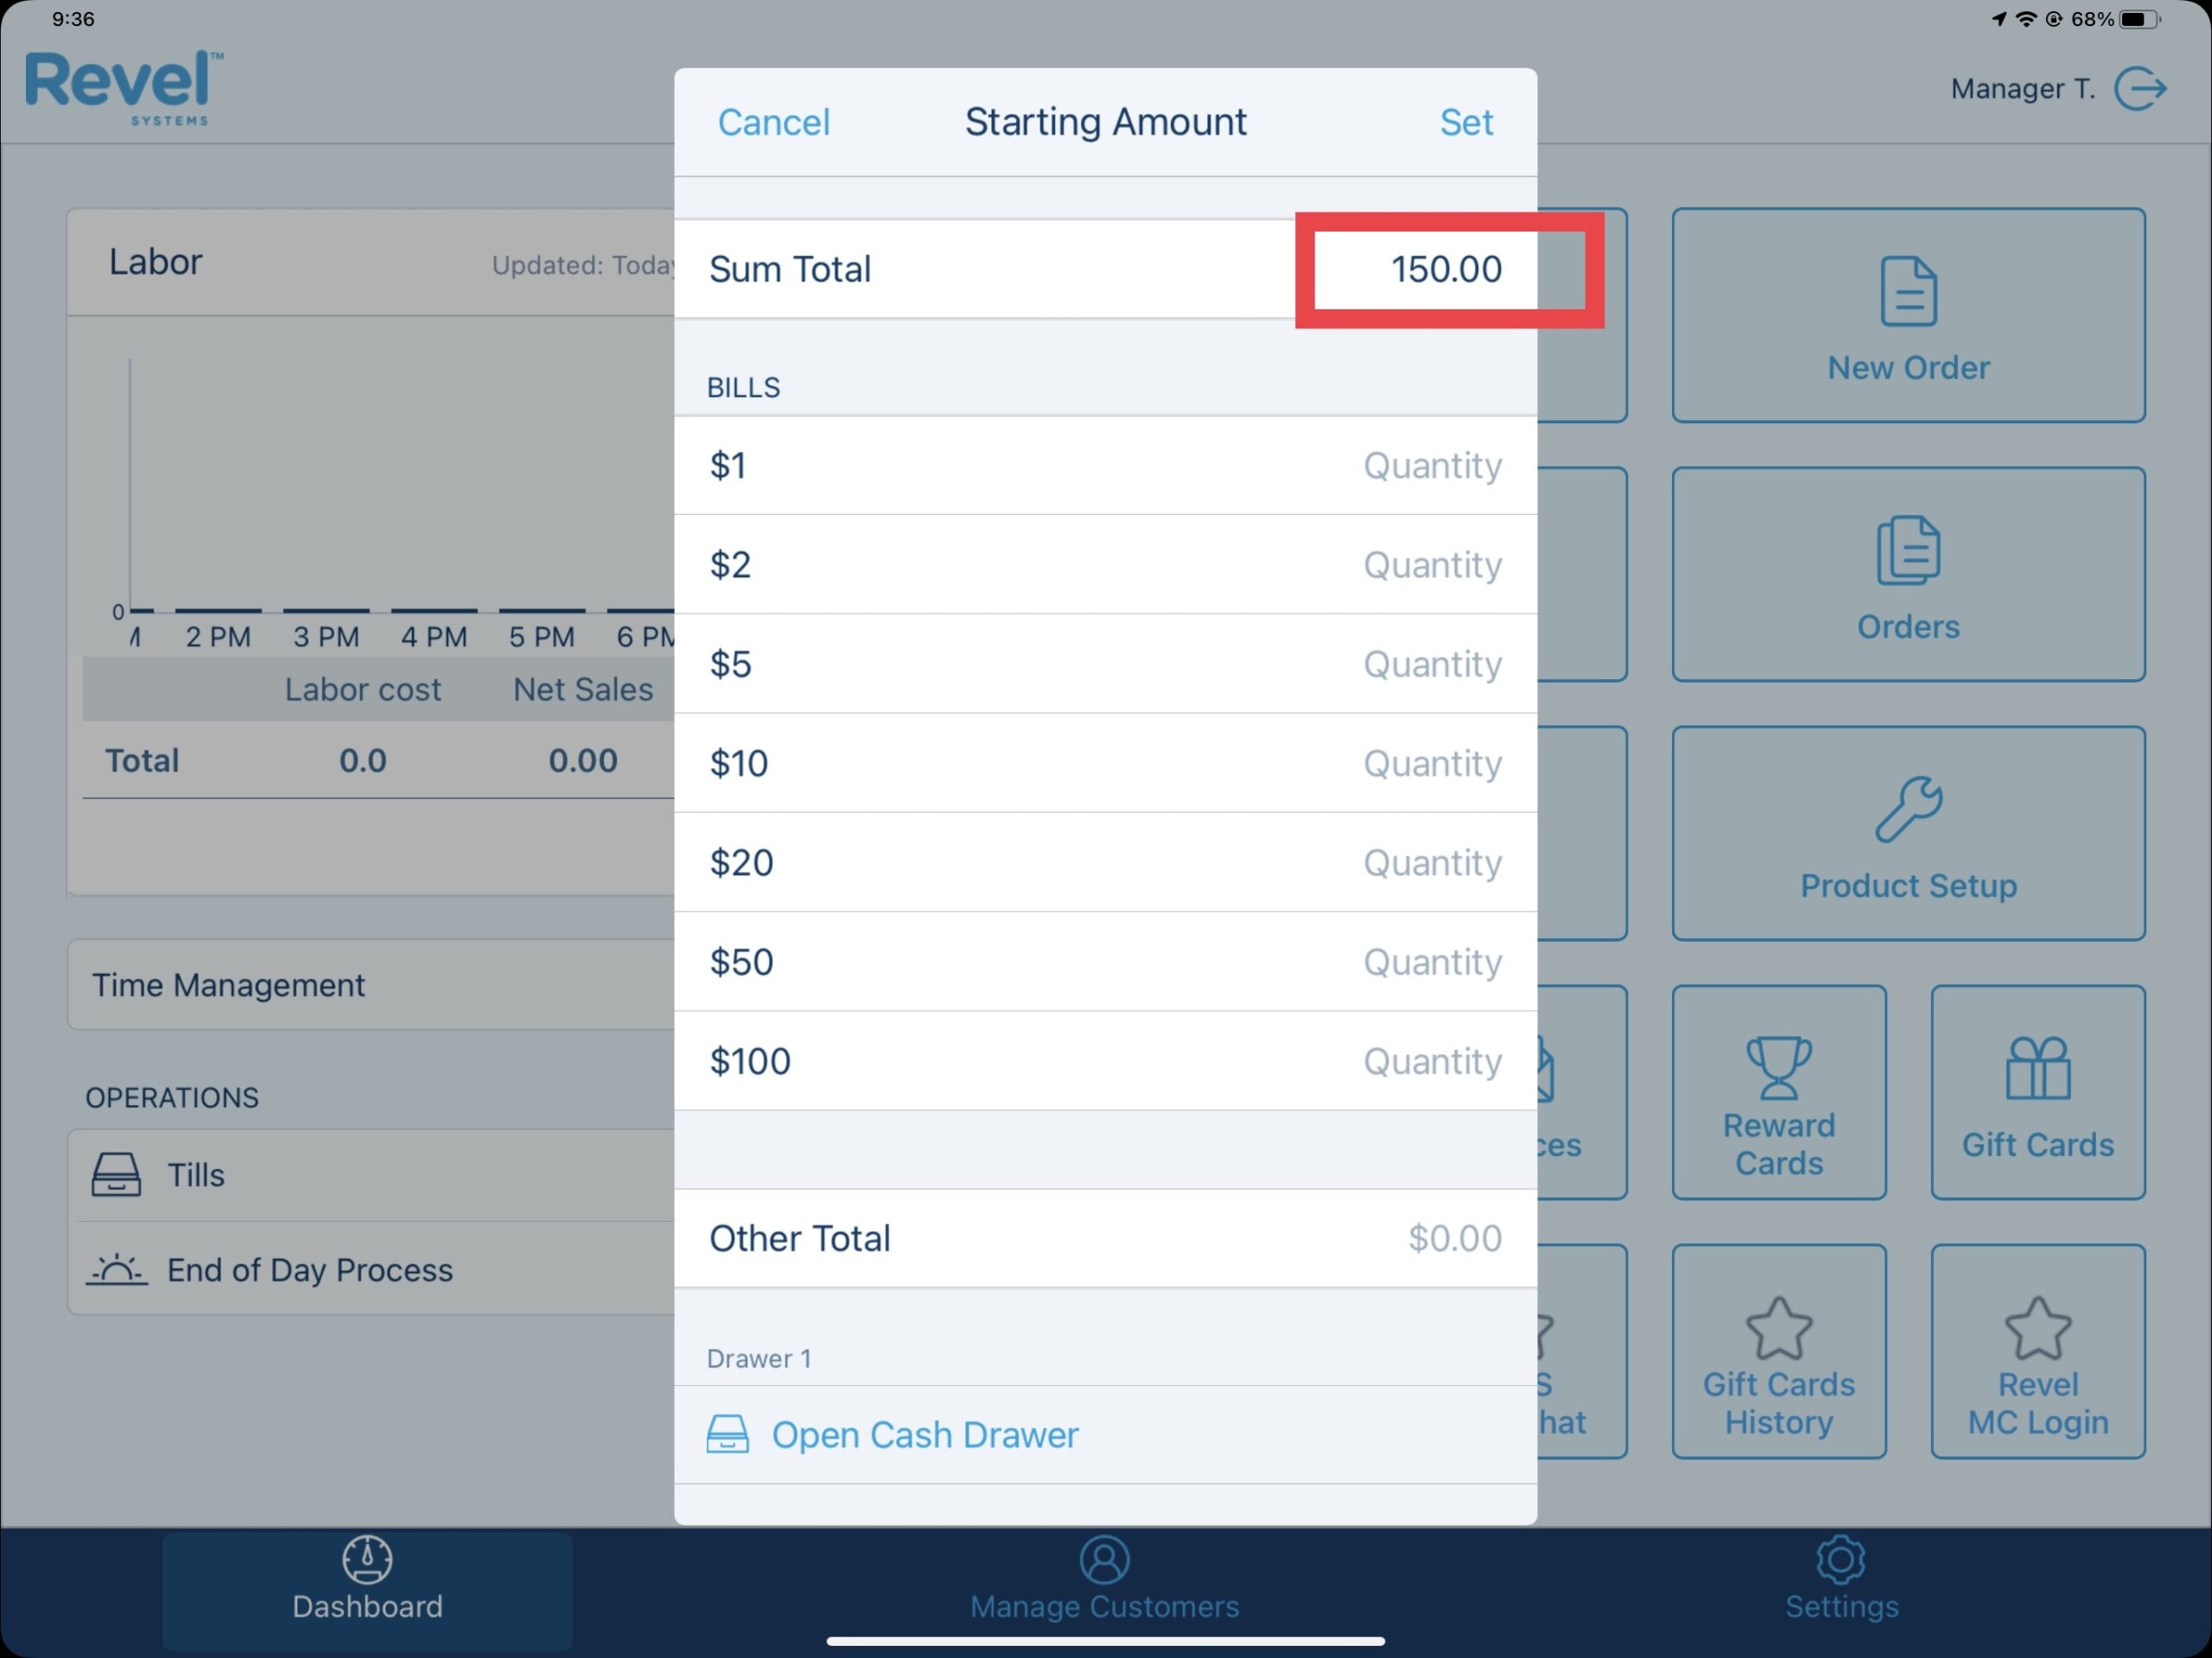
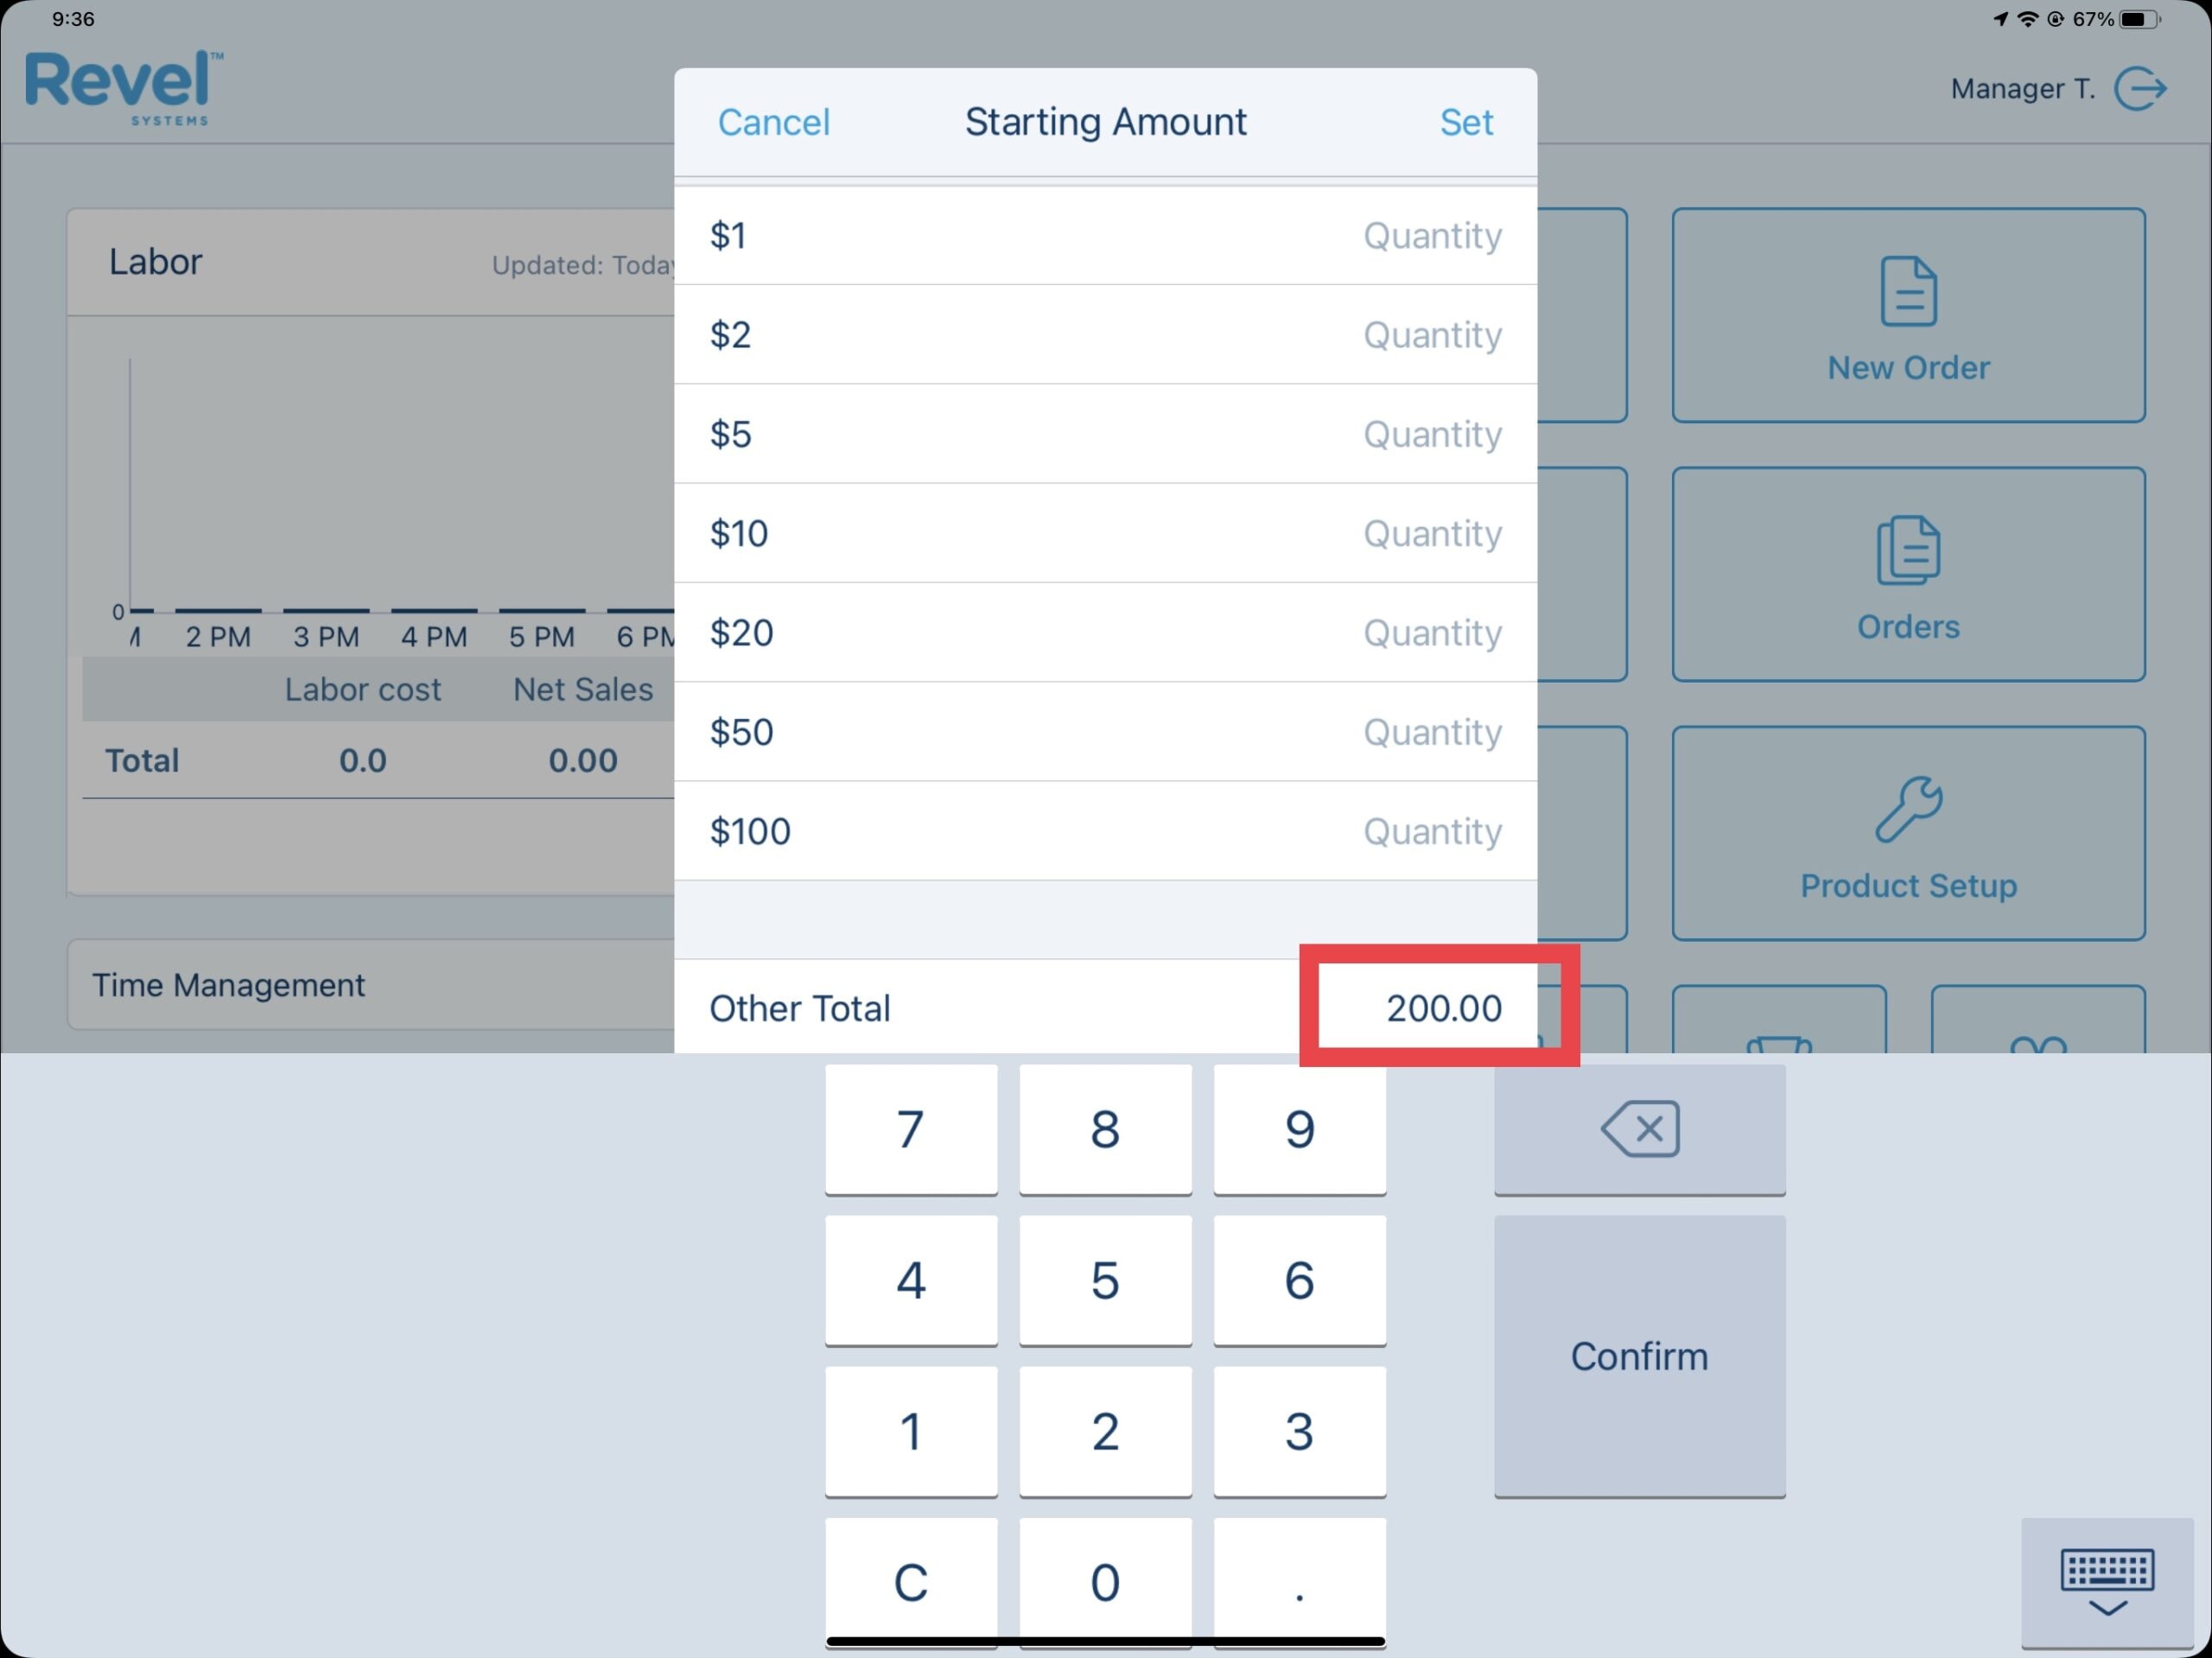
Select Set to confirm the amount or enter the desired amount in the Other Total section or Sum Total section prior to selecting Set.
Select the cashier station till you are setting then select Done. Log out and log in the corresponding cashier station.
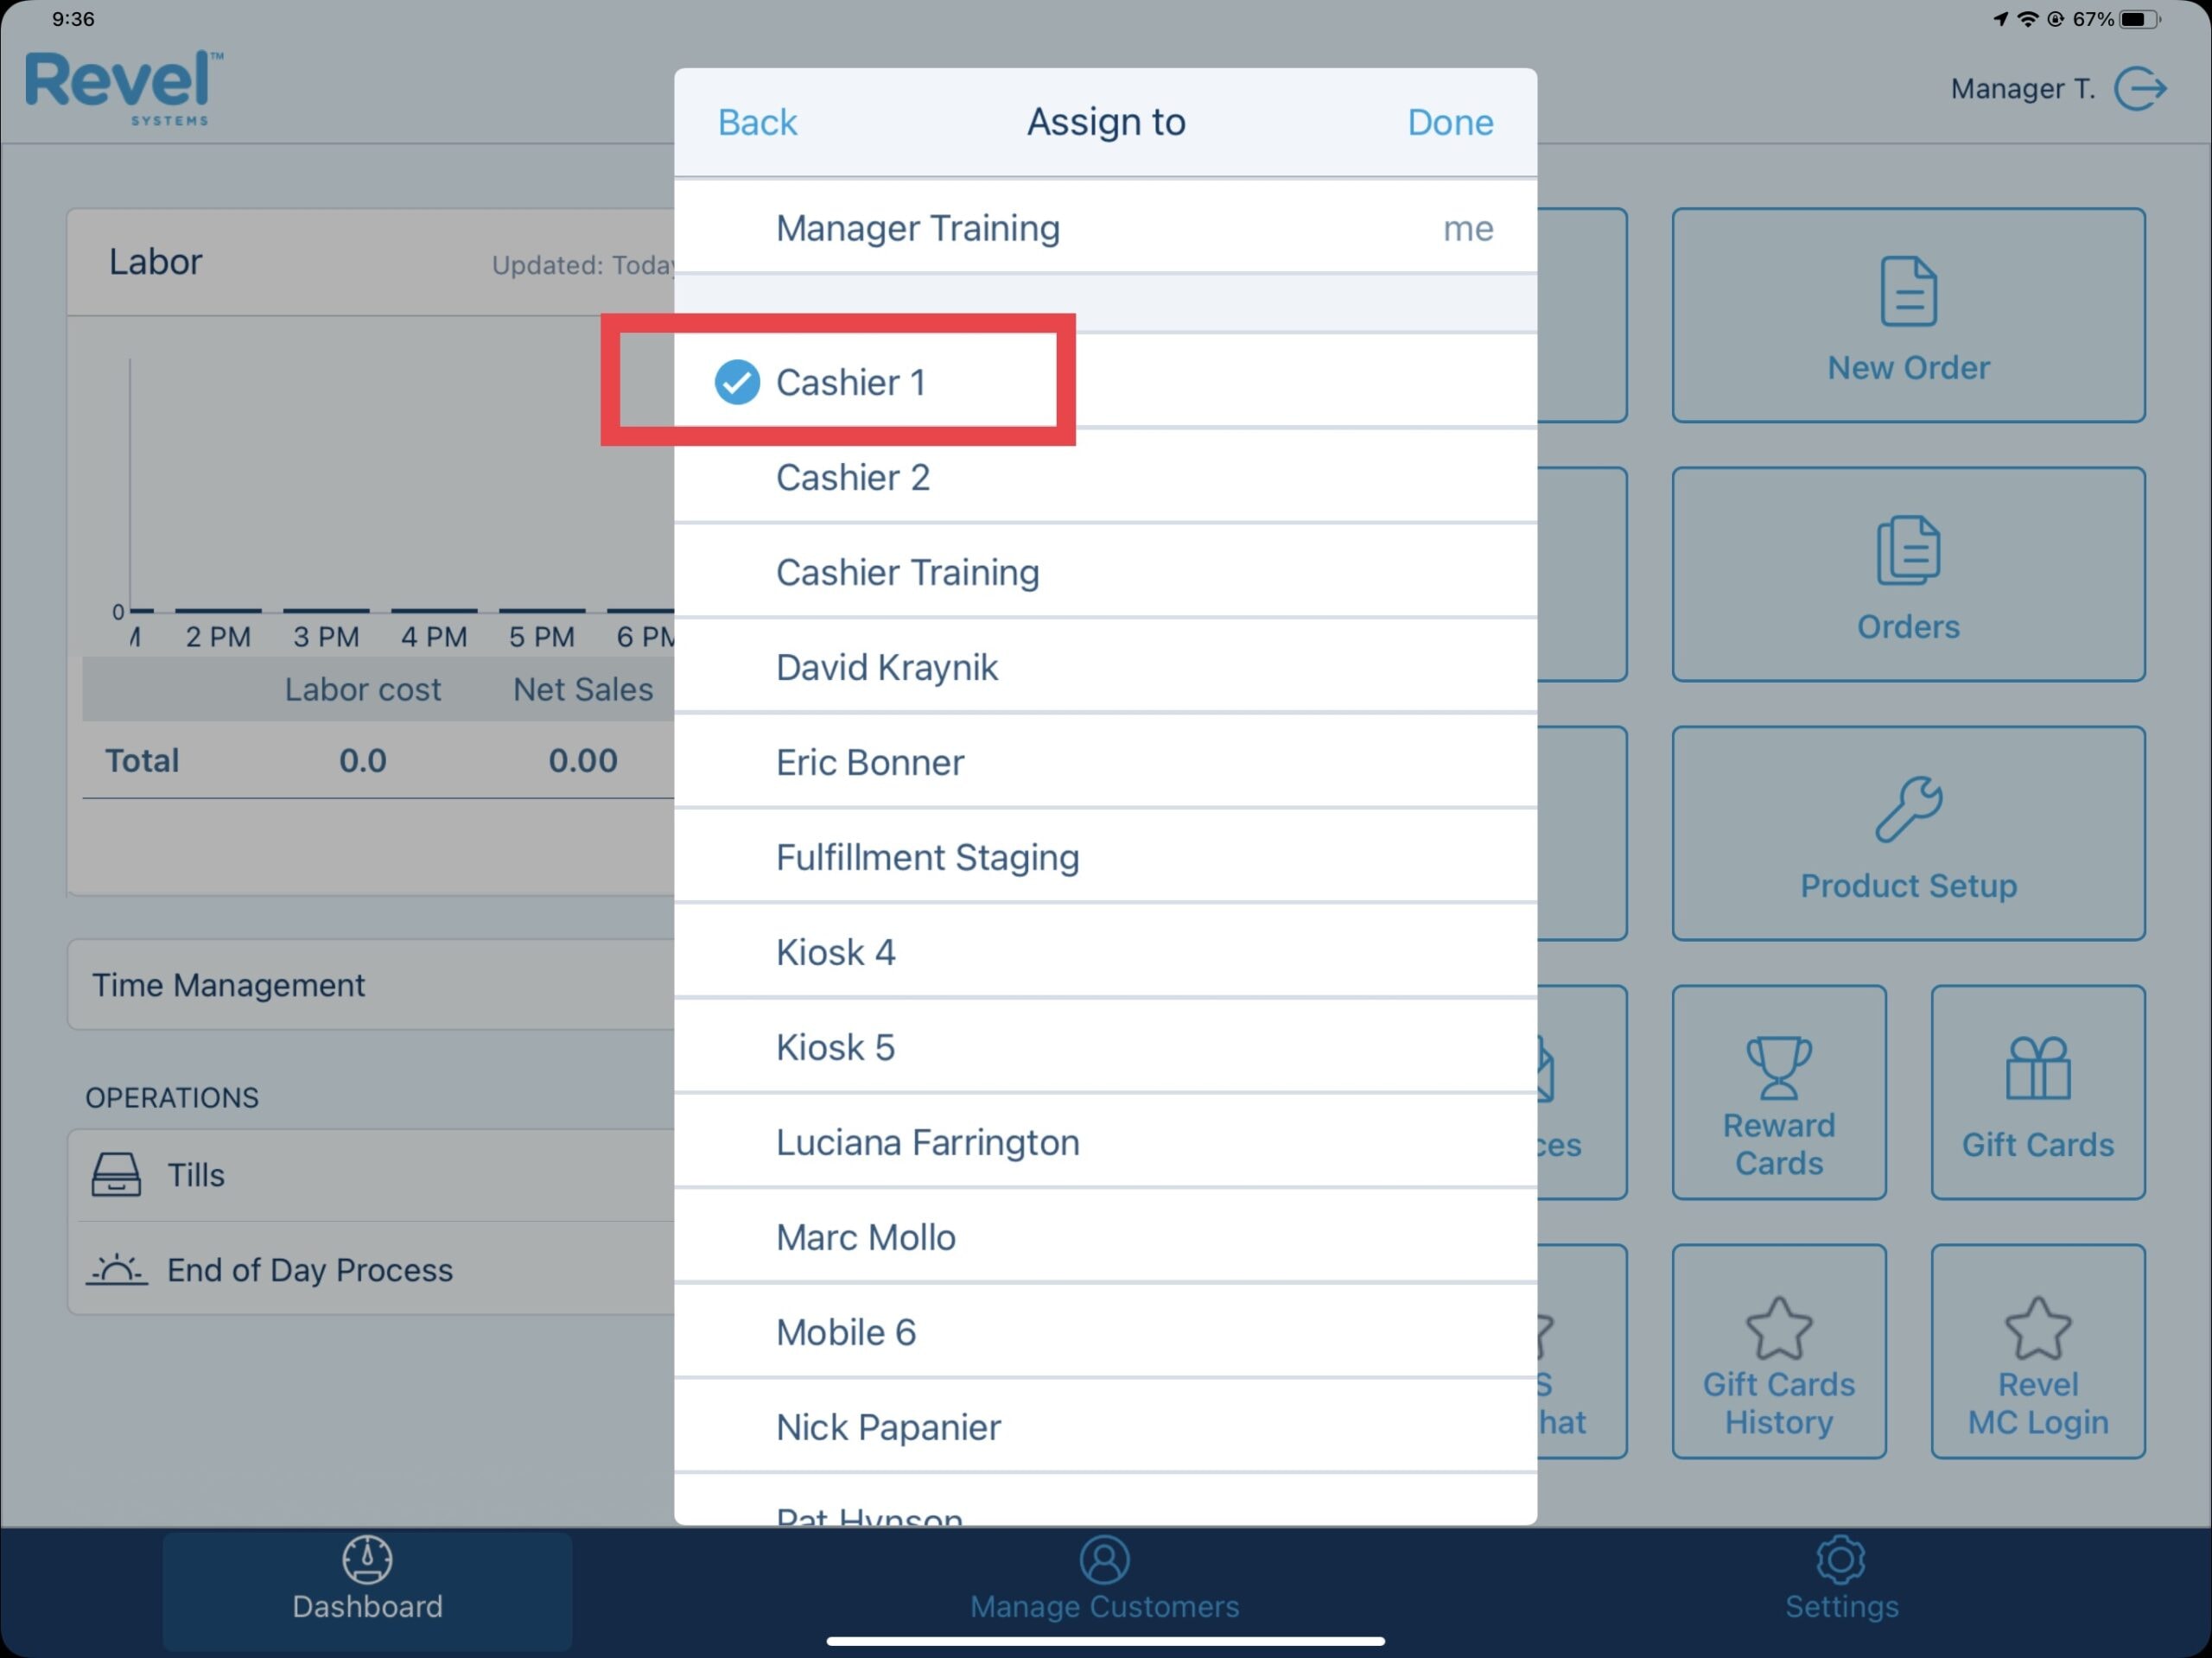
Repeat these steps at any cashier station that has a physical cash till.
Updated 06/15/2022

Summary
Every order requires either a Call Name or Customer Name. The differences between the two naming conventions are outlined here.
Call Name: Added to an order as a one-time use guest name or company name and will not be stored in the Revel Systems CRM. This is common for quick service and does not require a phone number or any other information.
Customer Name: Referred to as any guest name or company name that will be saved in the Revel Systems CRM. This action is common for phone orders, frequent guests or companies, house accounts, or delivery service orders and will require an associated phone number (address and email are optional).
Adding Call Names & Customer Names
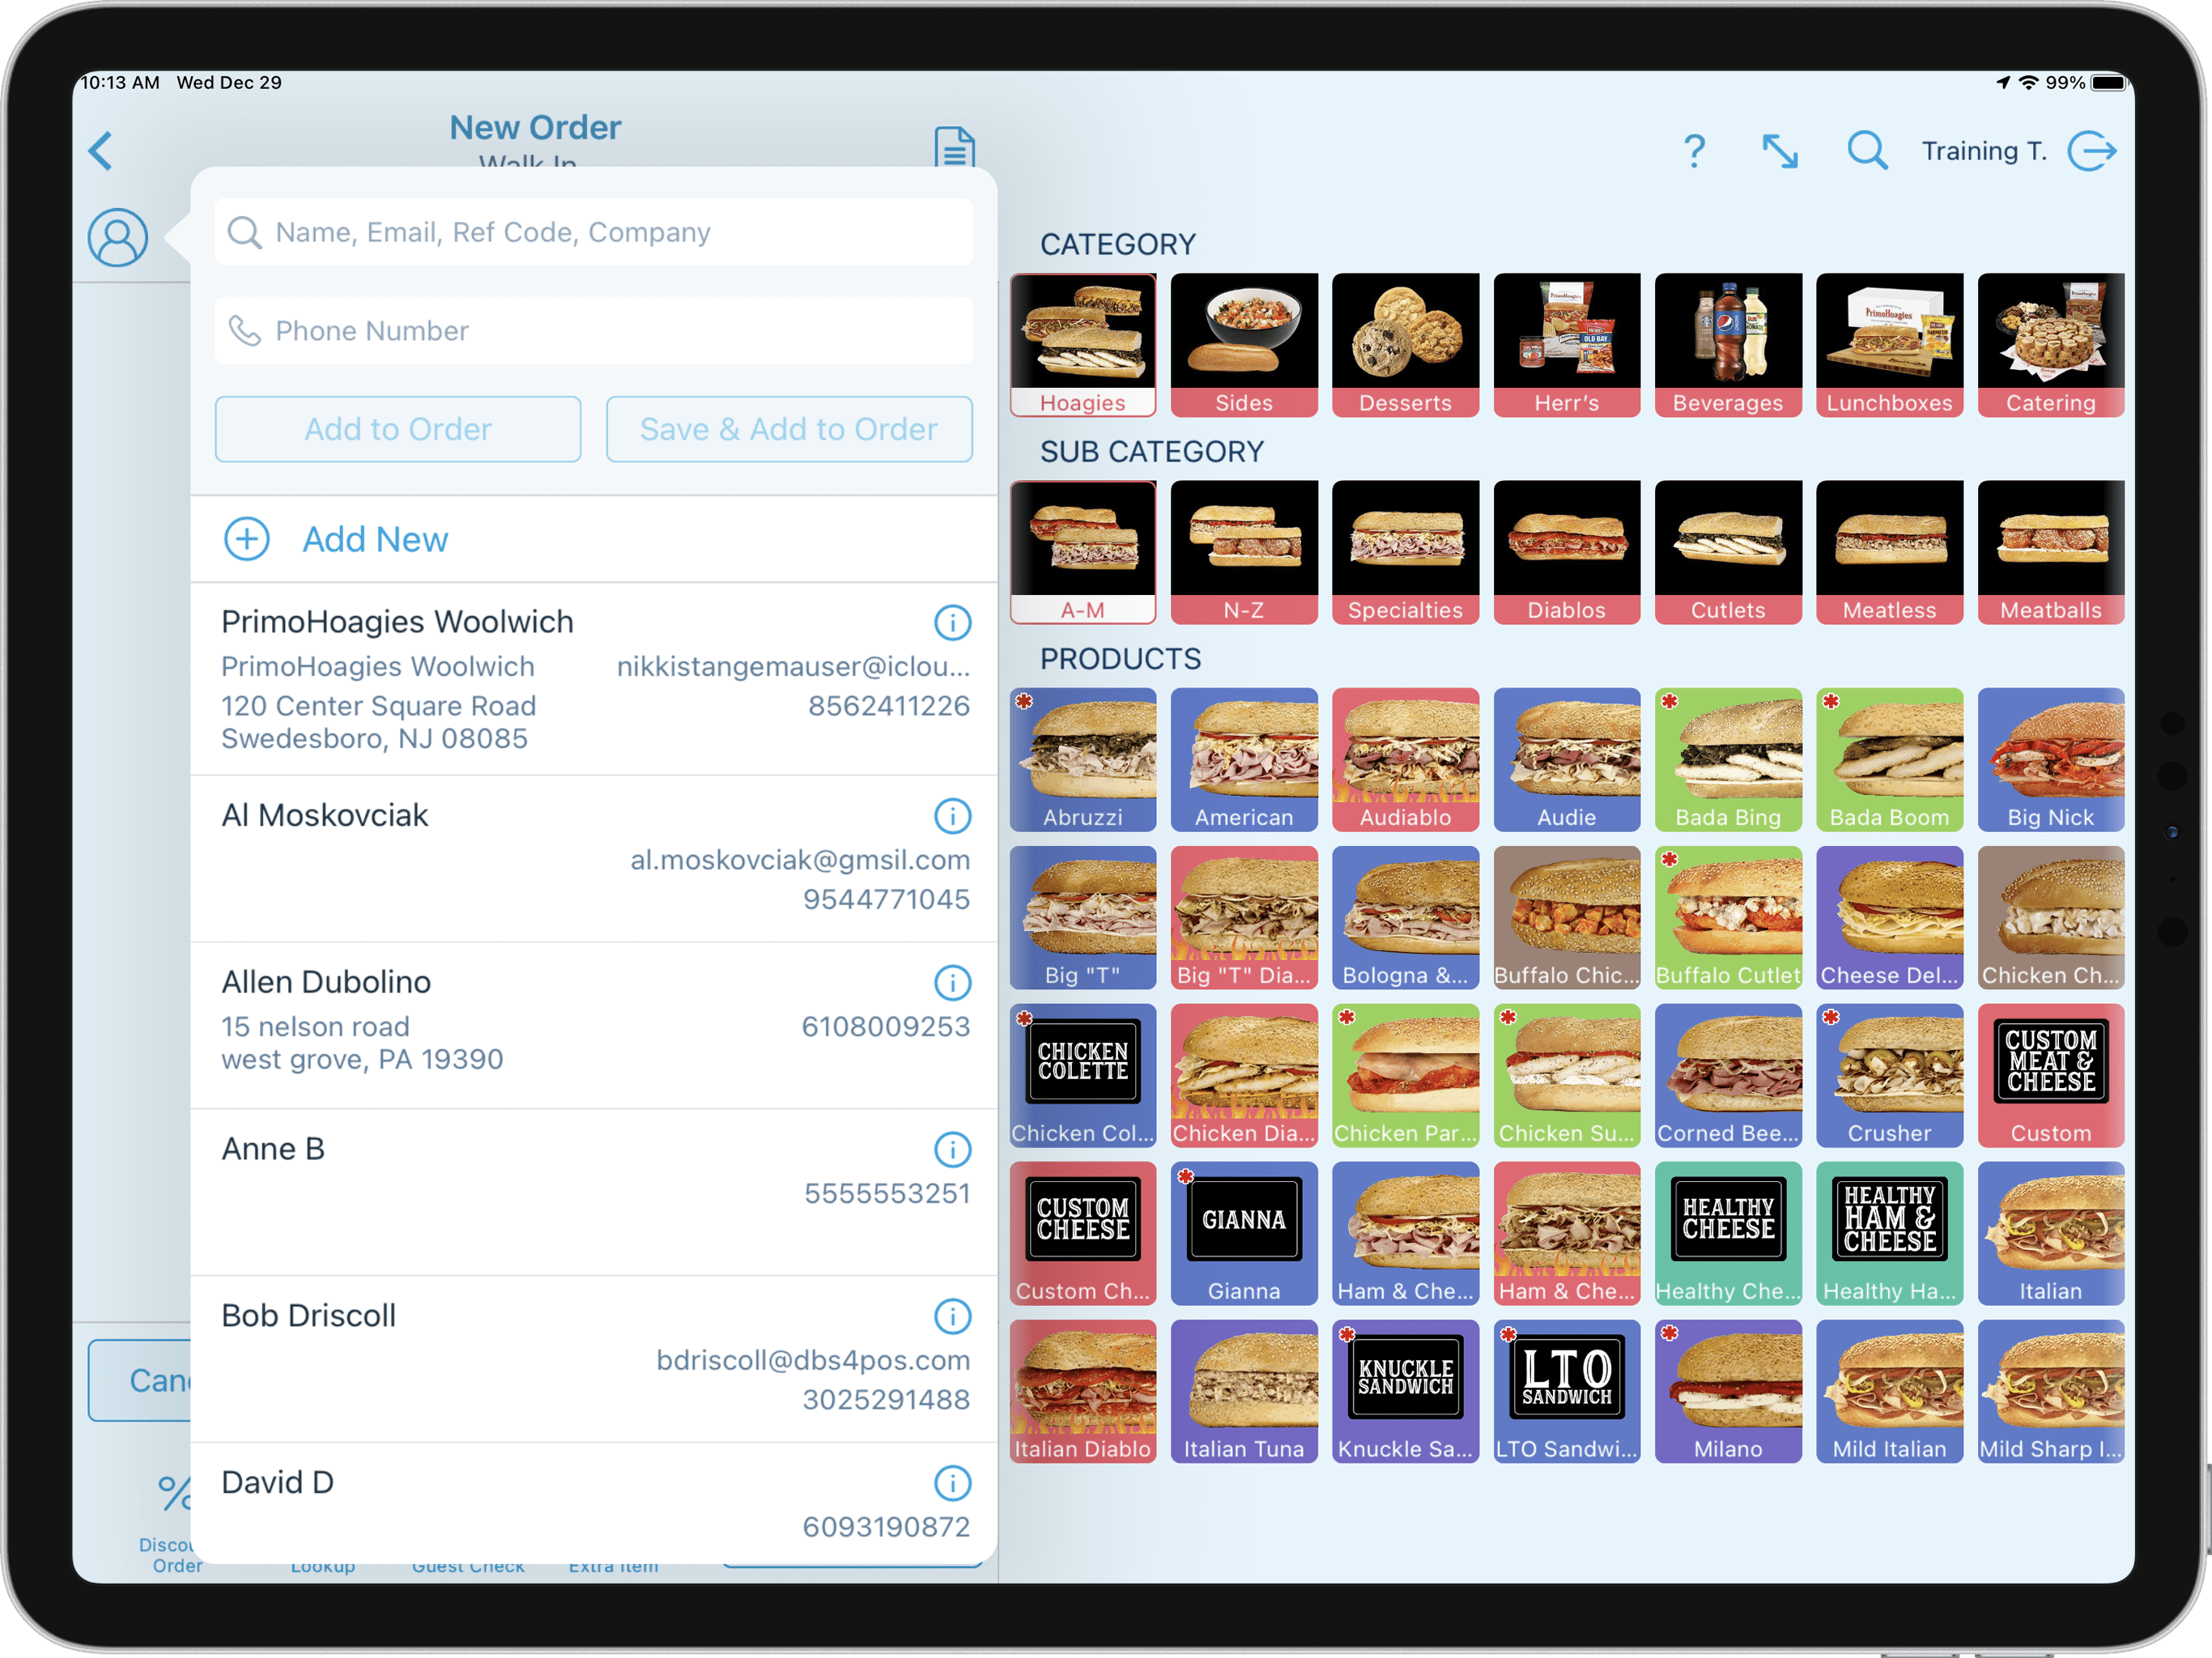
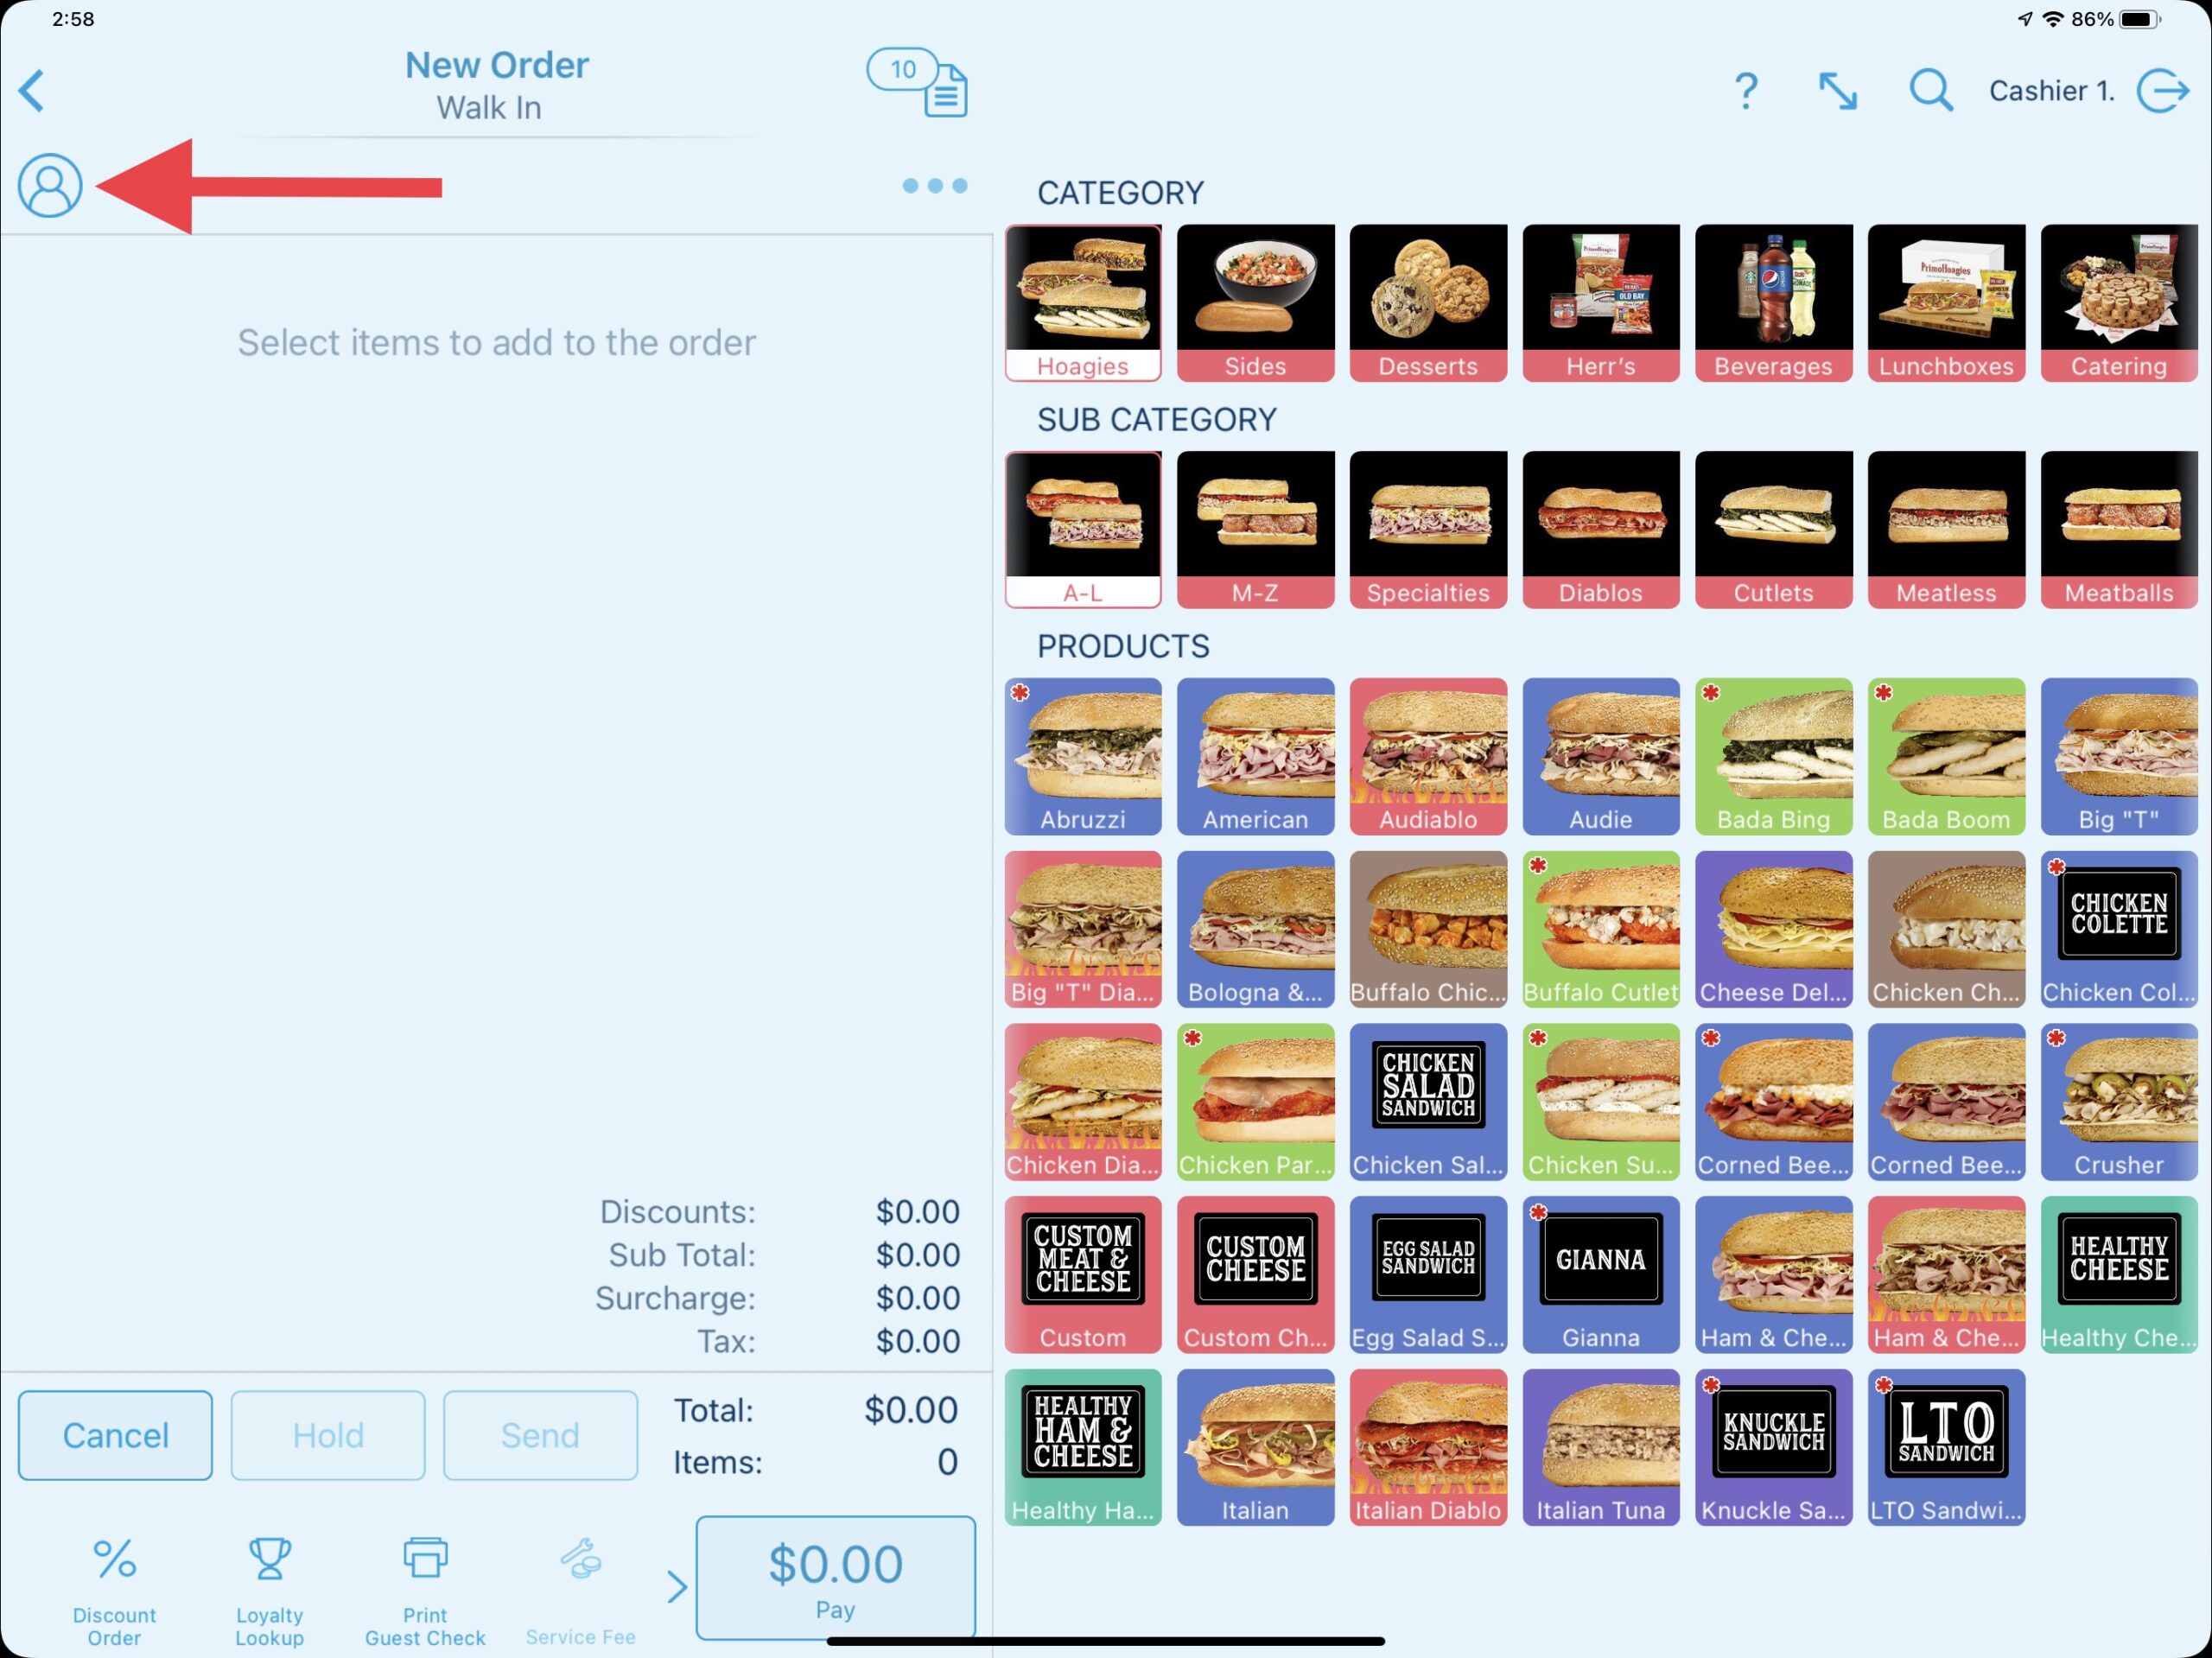
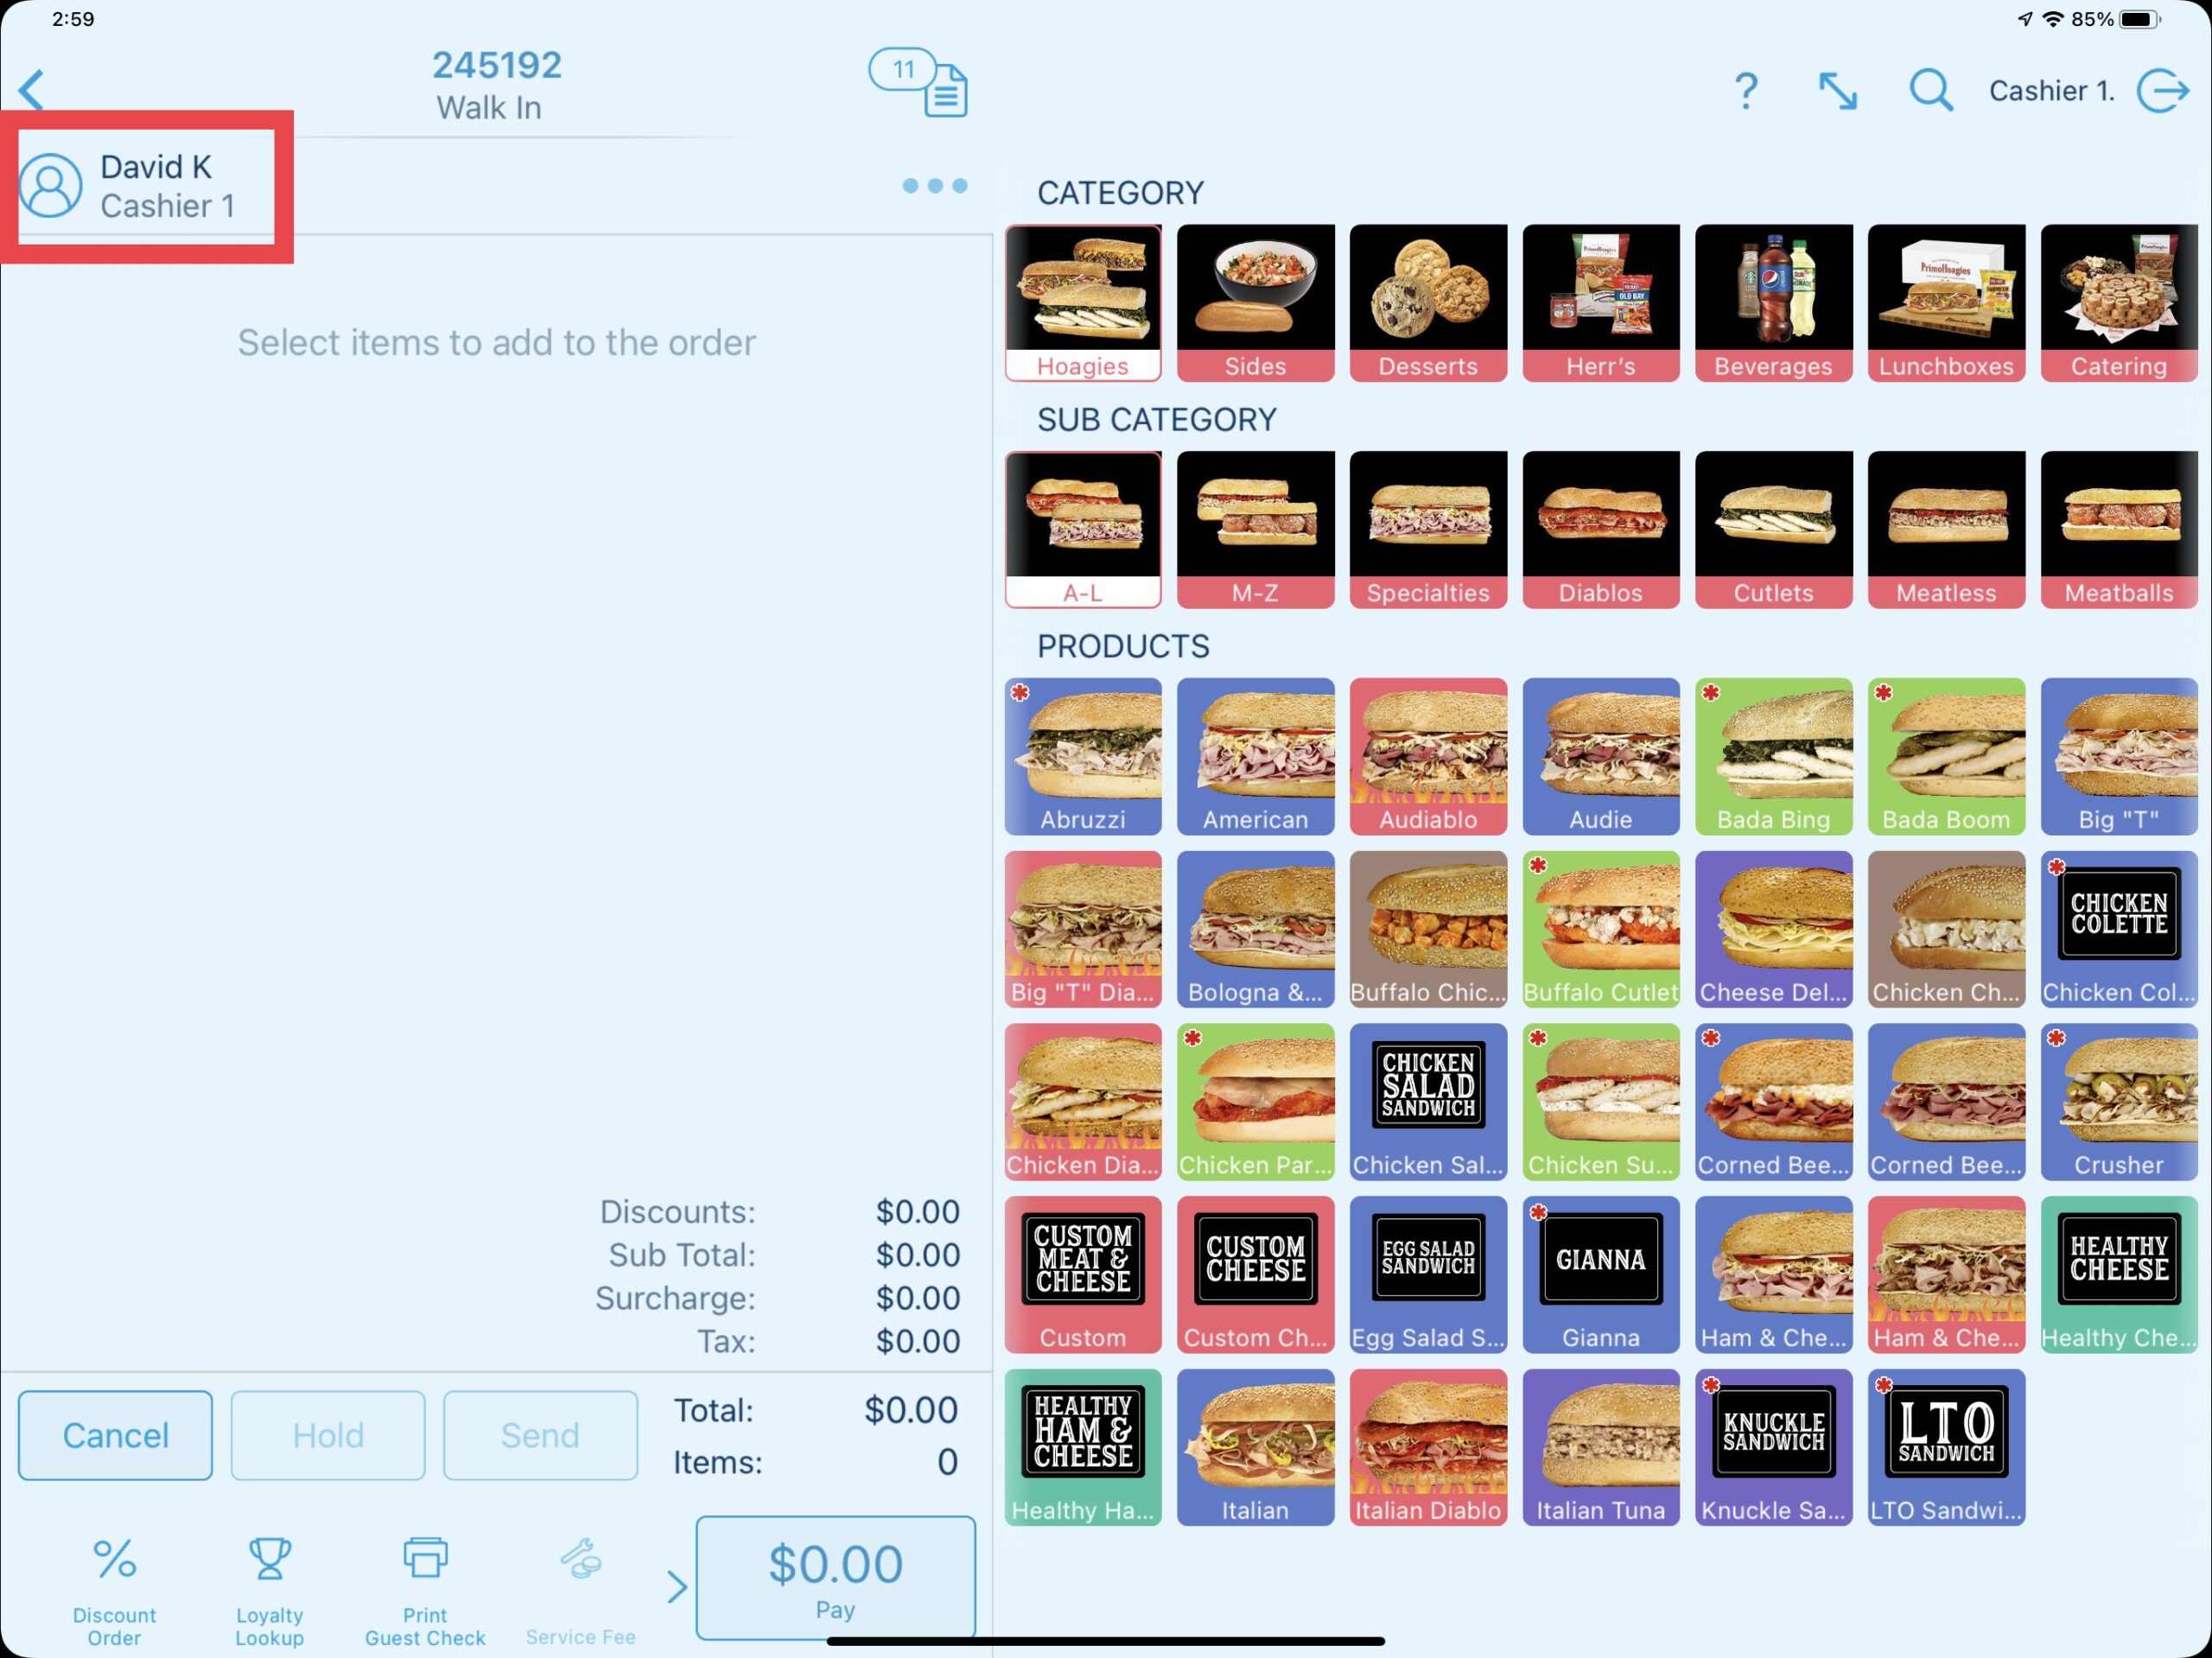
To add a Call Name or Customer Name to an order, select the customer icon located at the top left of the point of sale. This can be done at any time during the ordering process however it is common practice to add the name after confirming the dining option to start the order.
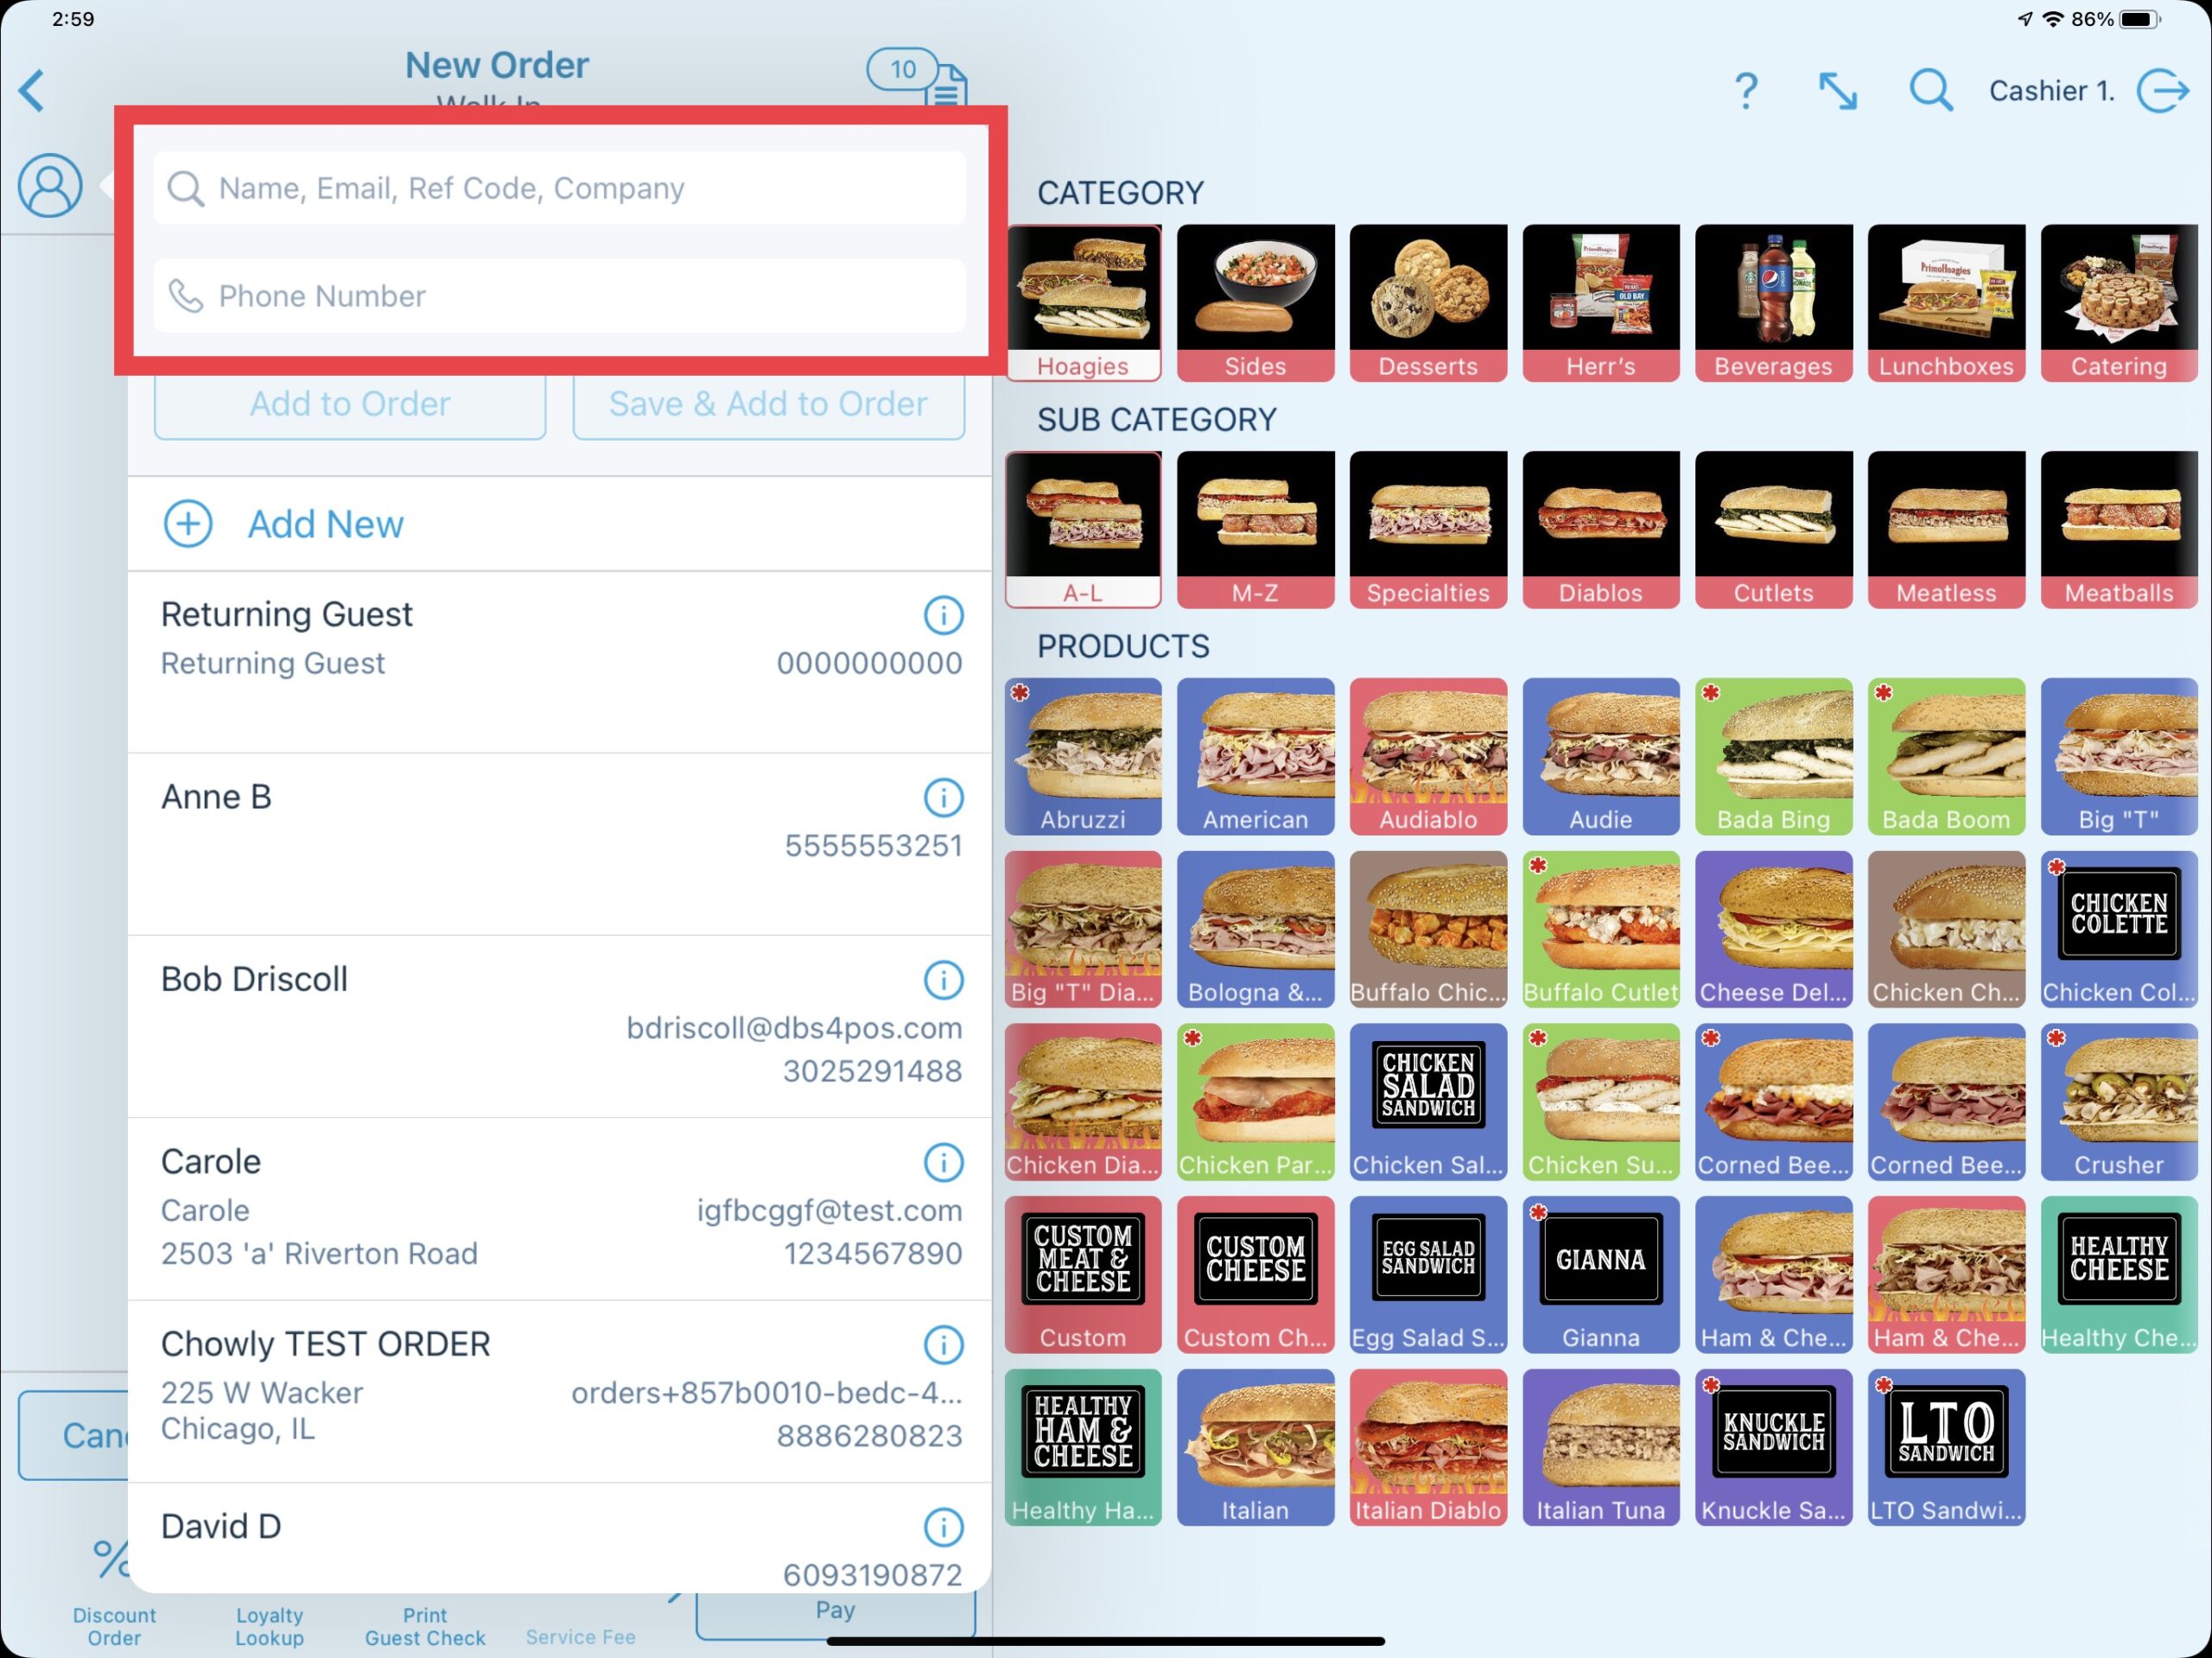
Using the “Name, Email, Ref Code, Company” field or the “Phone Number” field, begin typing the customer information.
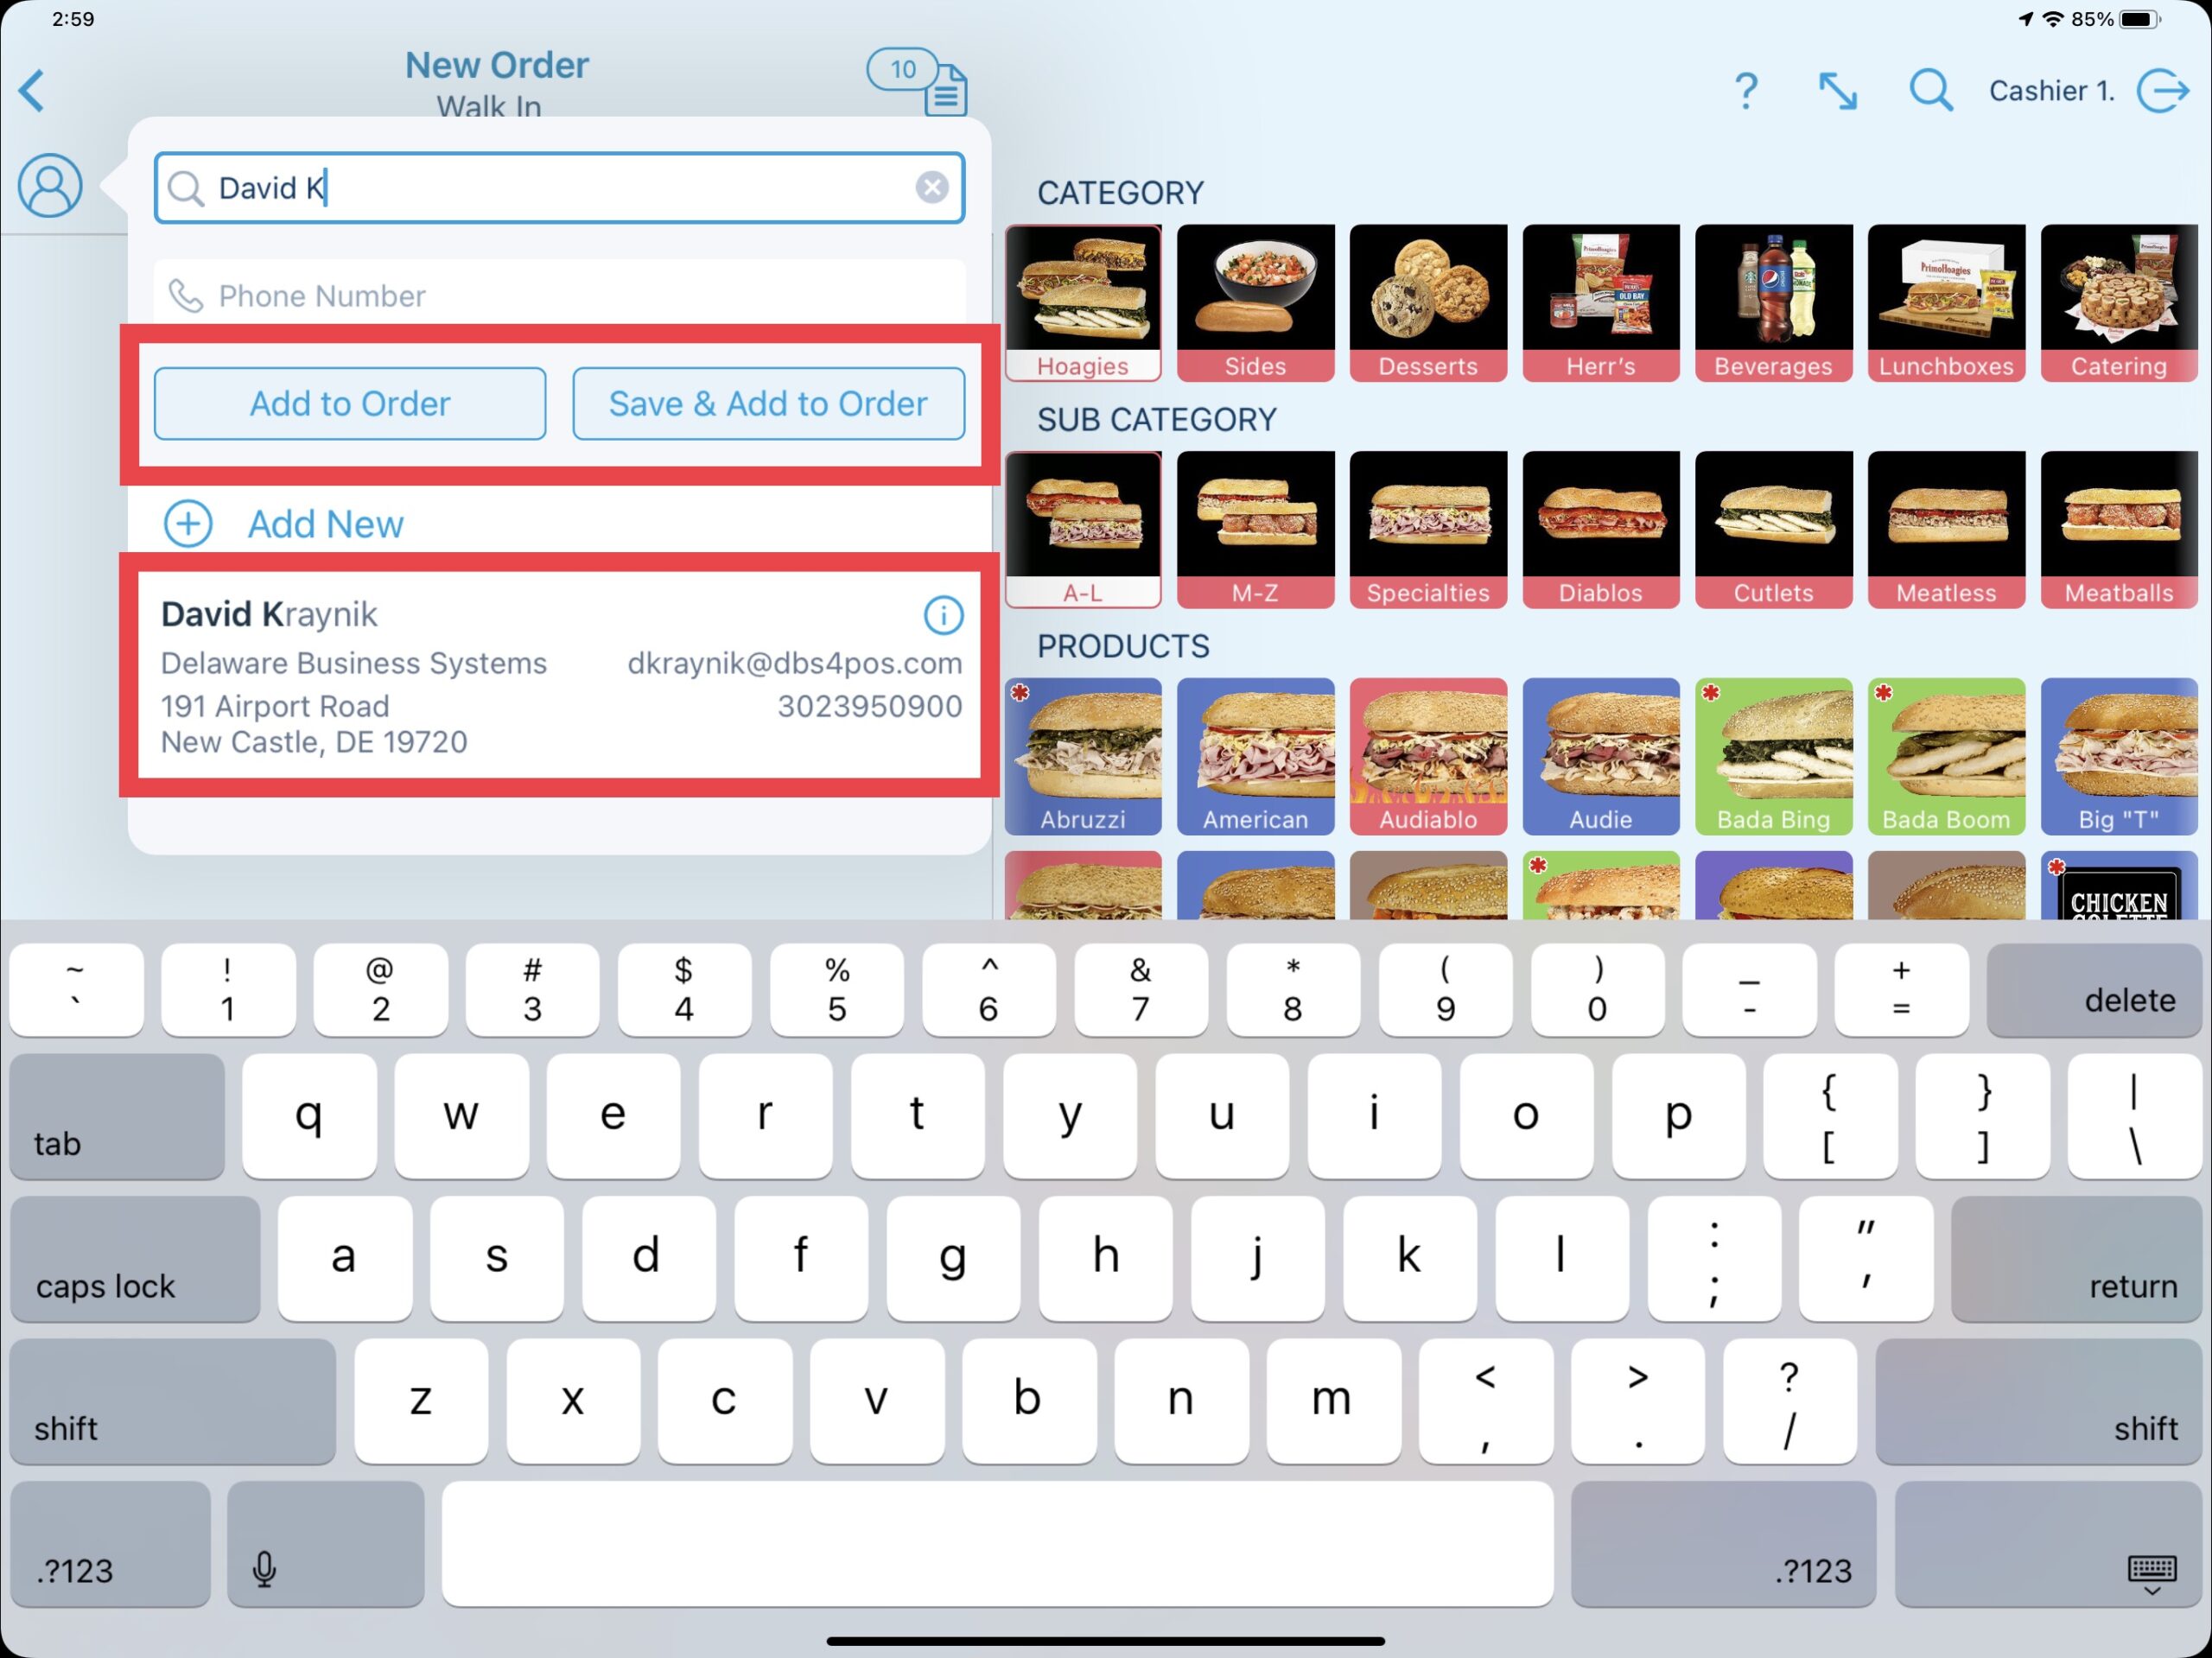
If the customer information has previously been saved in the Revel Systems CRM, their associated account will be filtered in the database list. Simply select the customer from the list to add them to an order.
If the customer record has not been created, you may choose the “Save & Add to Order” button thus creating the customer in the Revel Systems CRM (full name and phone number required), or choose the “Add to Order” button to simply add a call name.
Once either method has been completed, the call name or customer name will be indicated next to the customer icon.
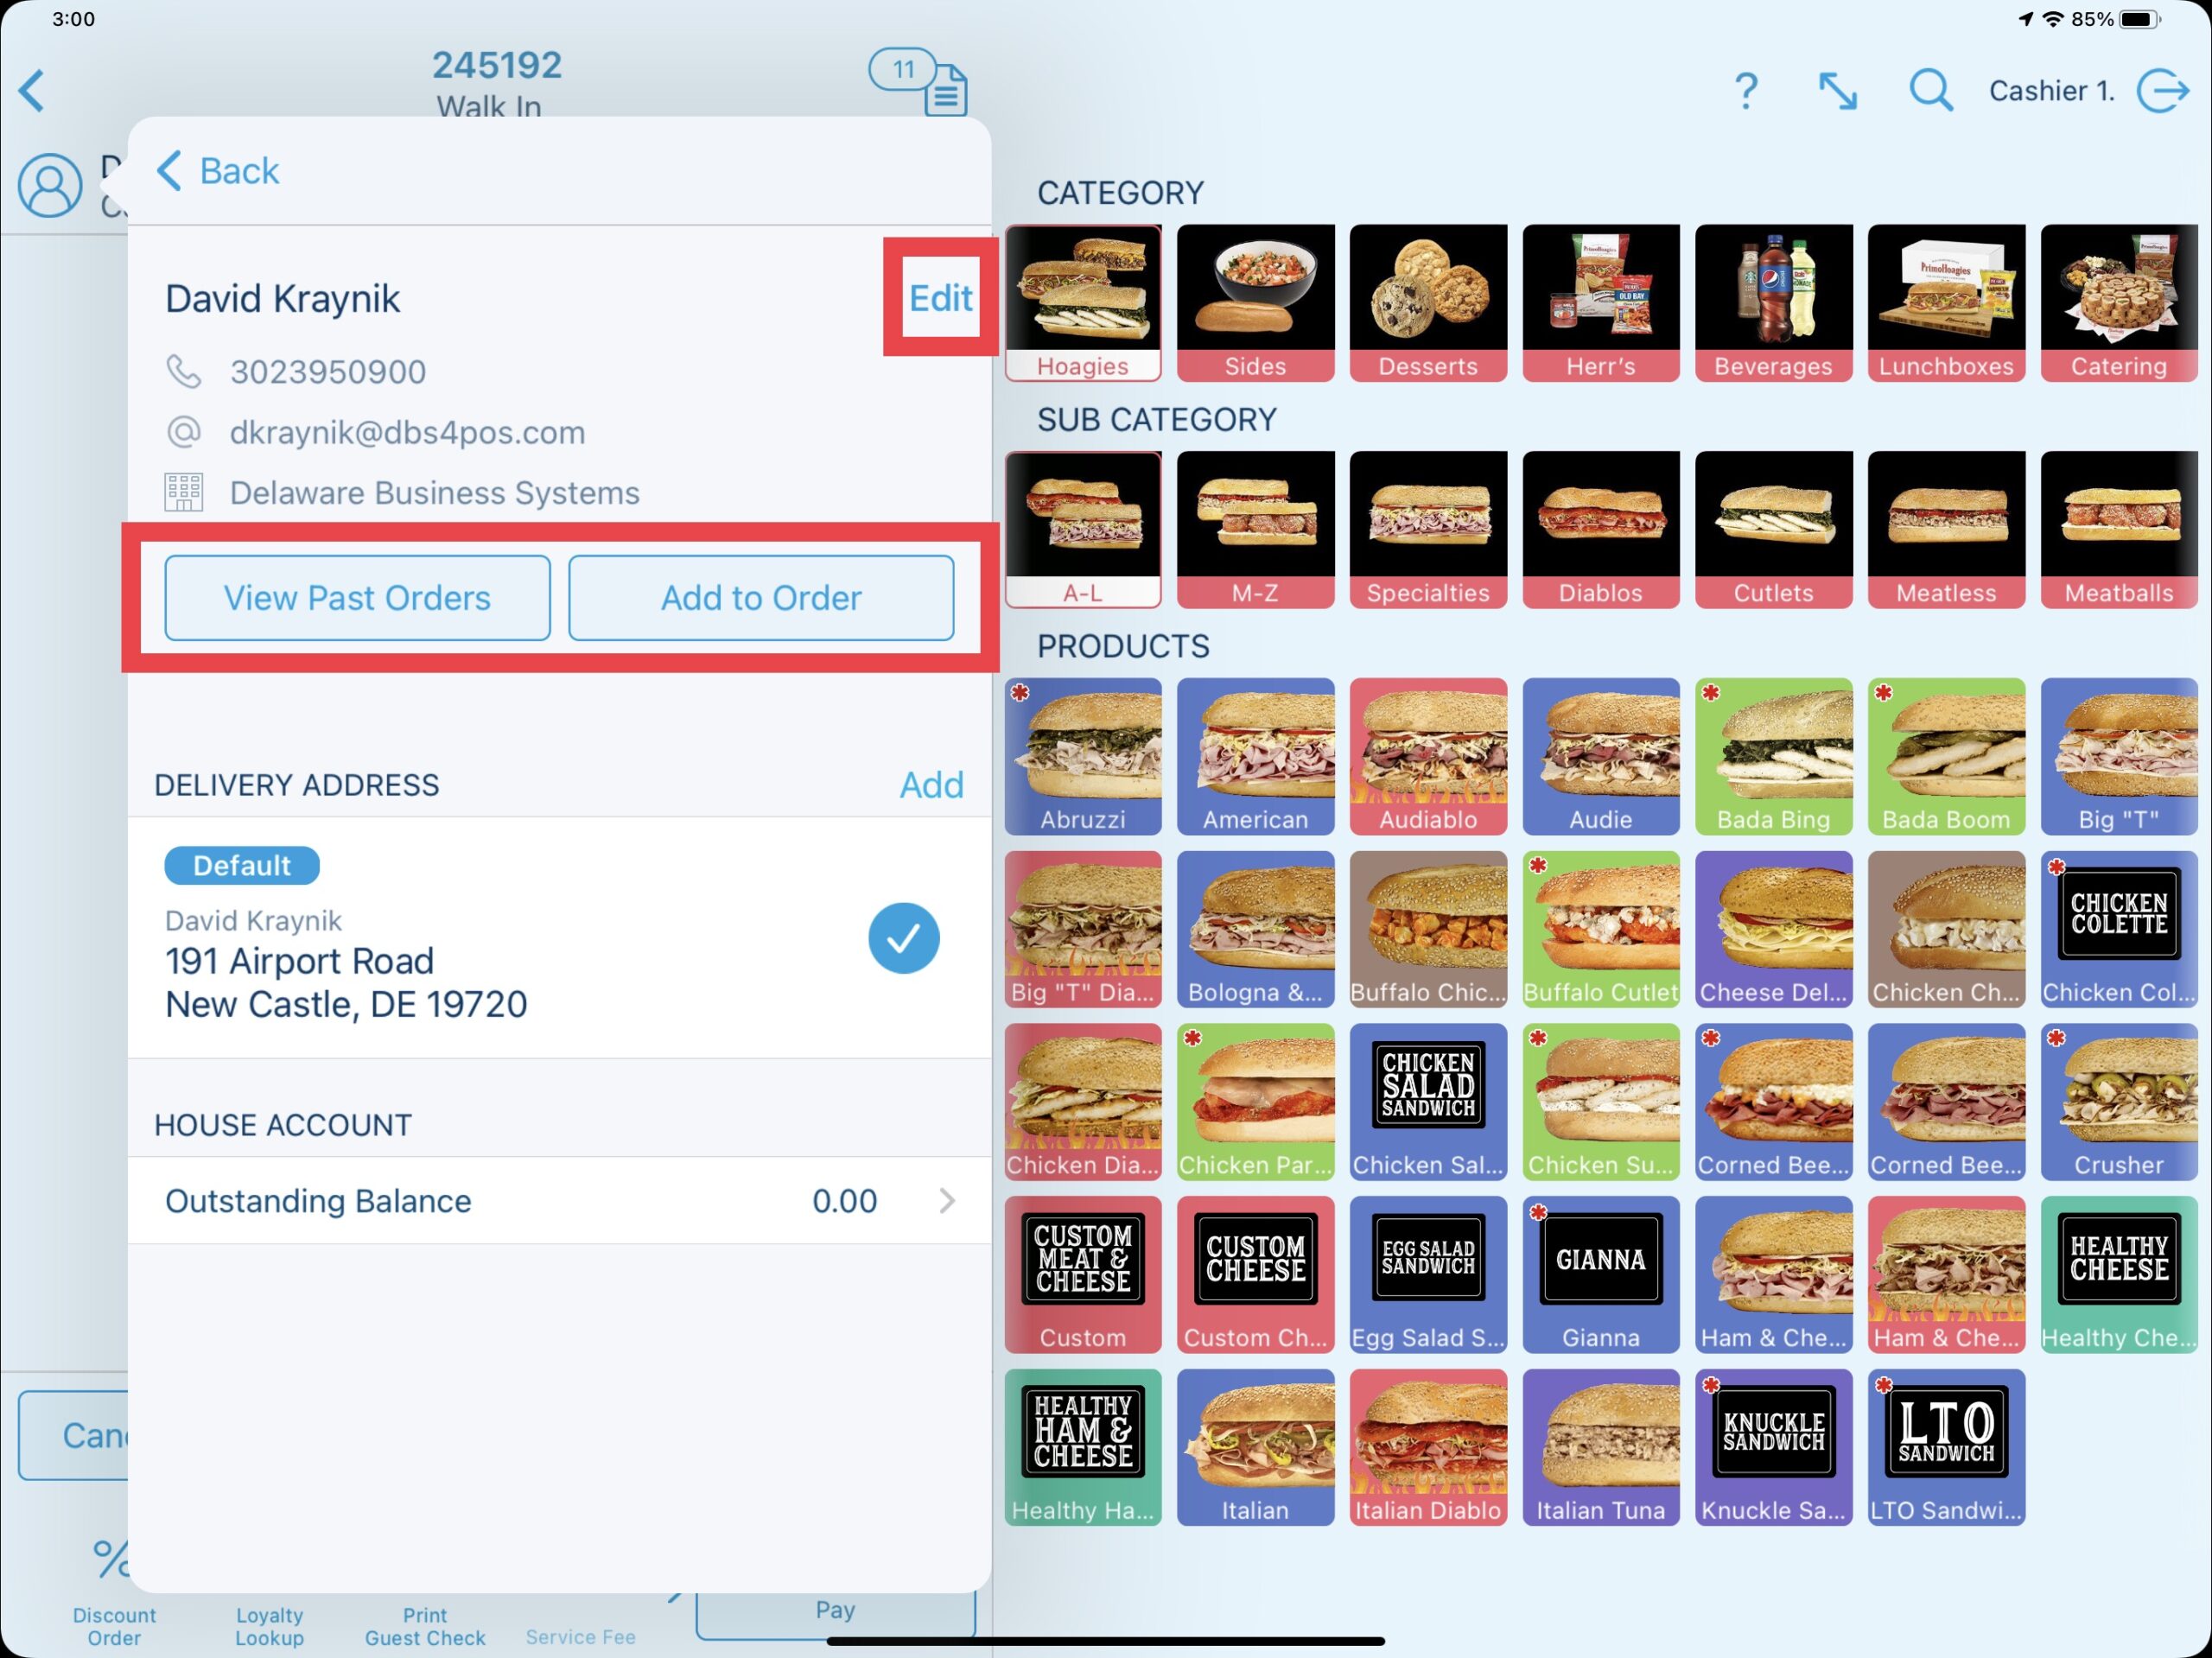
Customer Details
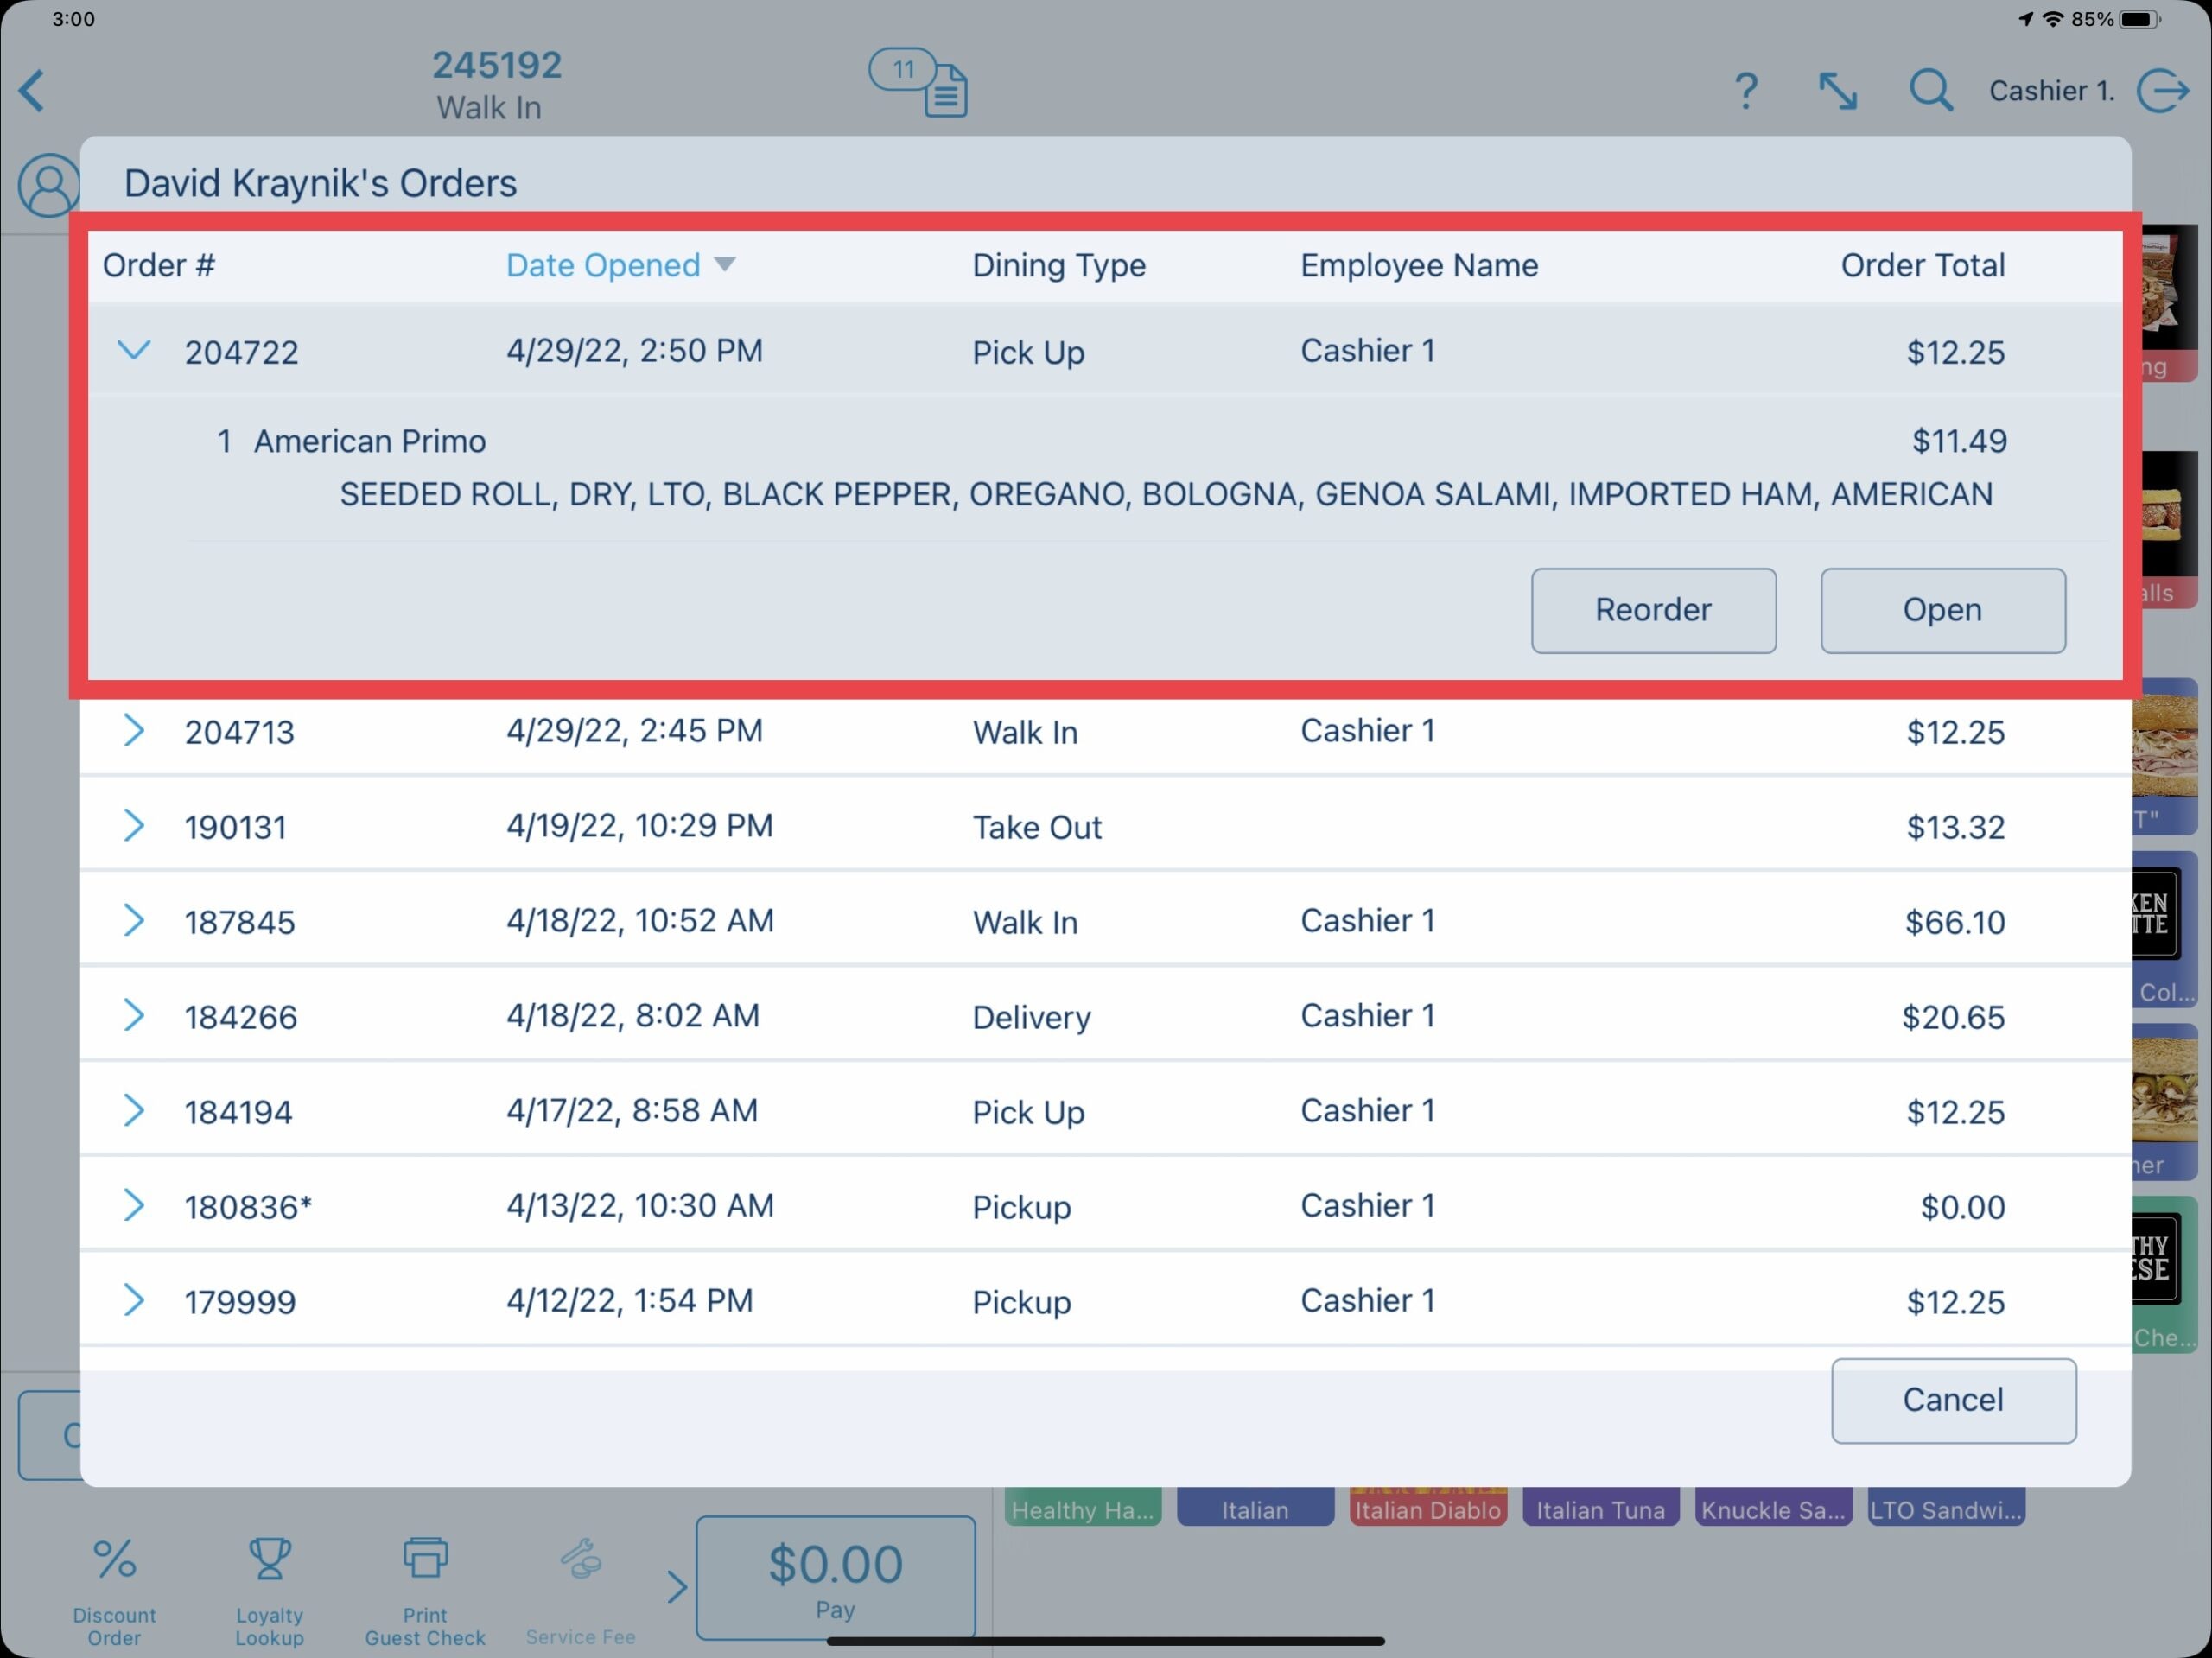
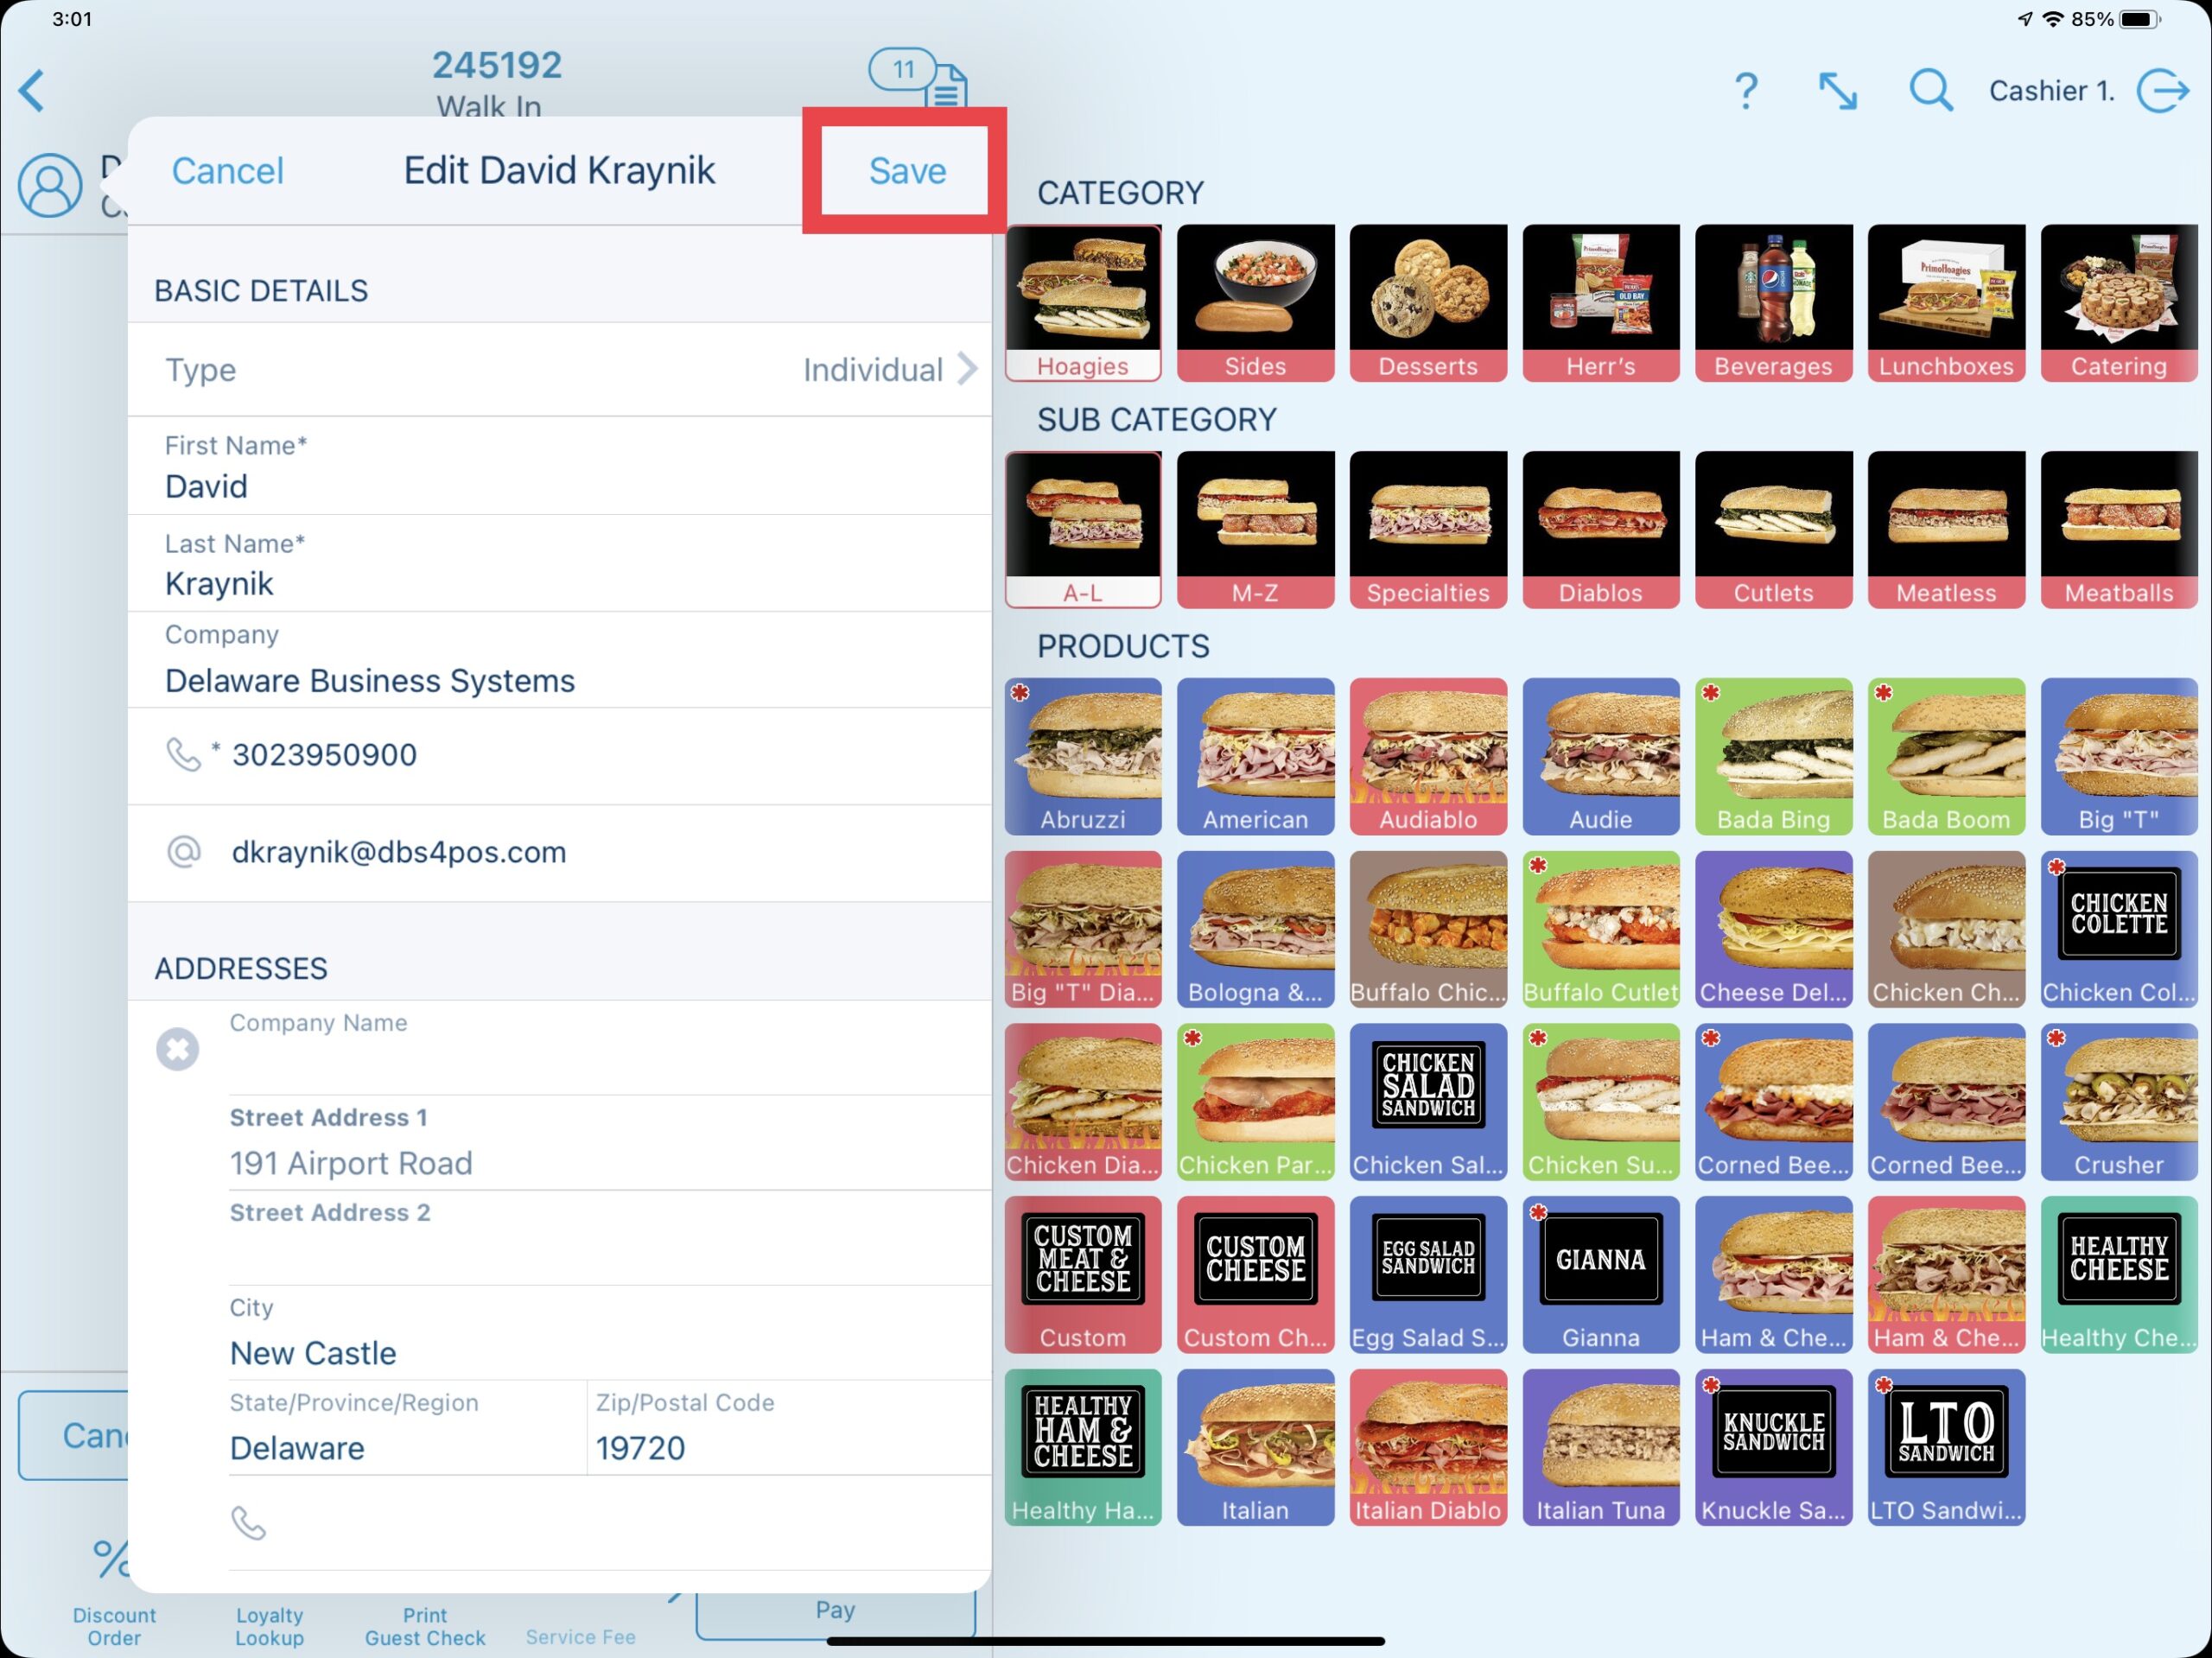
Various other customer functions can be found by selecting the blue information button to the right of the customer in the filtered database list. These functions include the ability to view past orders (and choose to add the products to an order), dd the the customer record to the order (if not previously added), or edit the customer record details.
By selecting to view past orders, a window will show all orders associated with the customer allowing for reordering or opening the order.
Selecting to edit opens the customer record details allowing for the editing of the customer information.
Updated 06/15/2022

Summary
Products sold in Revel Systems are organized using a Category, Subcategory, Parent Product and Child Product structure. Selecting a Category such as Hoagies will expand to show any available Subcategories and then the Parent Products. In some cases, products may be organized into an A-Z type Subcategory alphabetically and then also available under an additional Subcategory such as the hoagie type (example: Specialties or Cutlets).
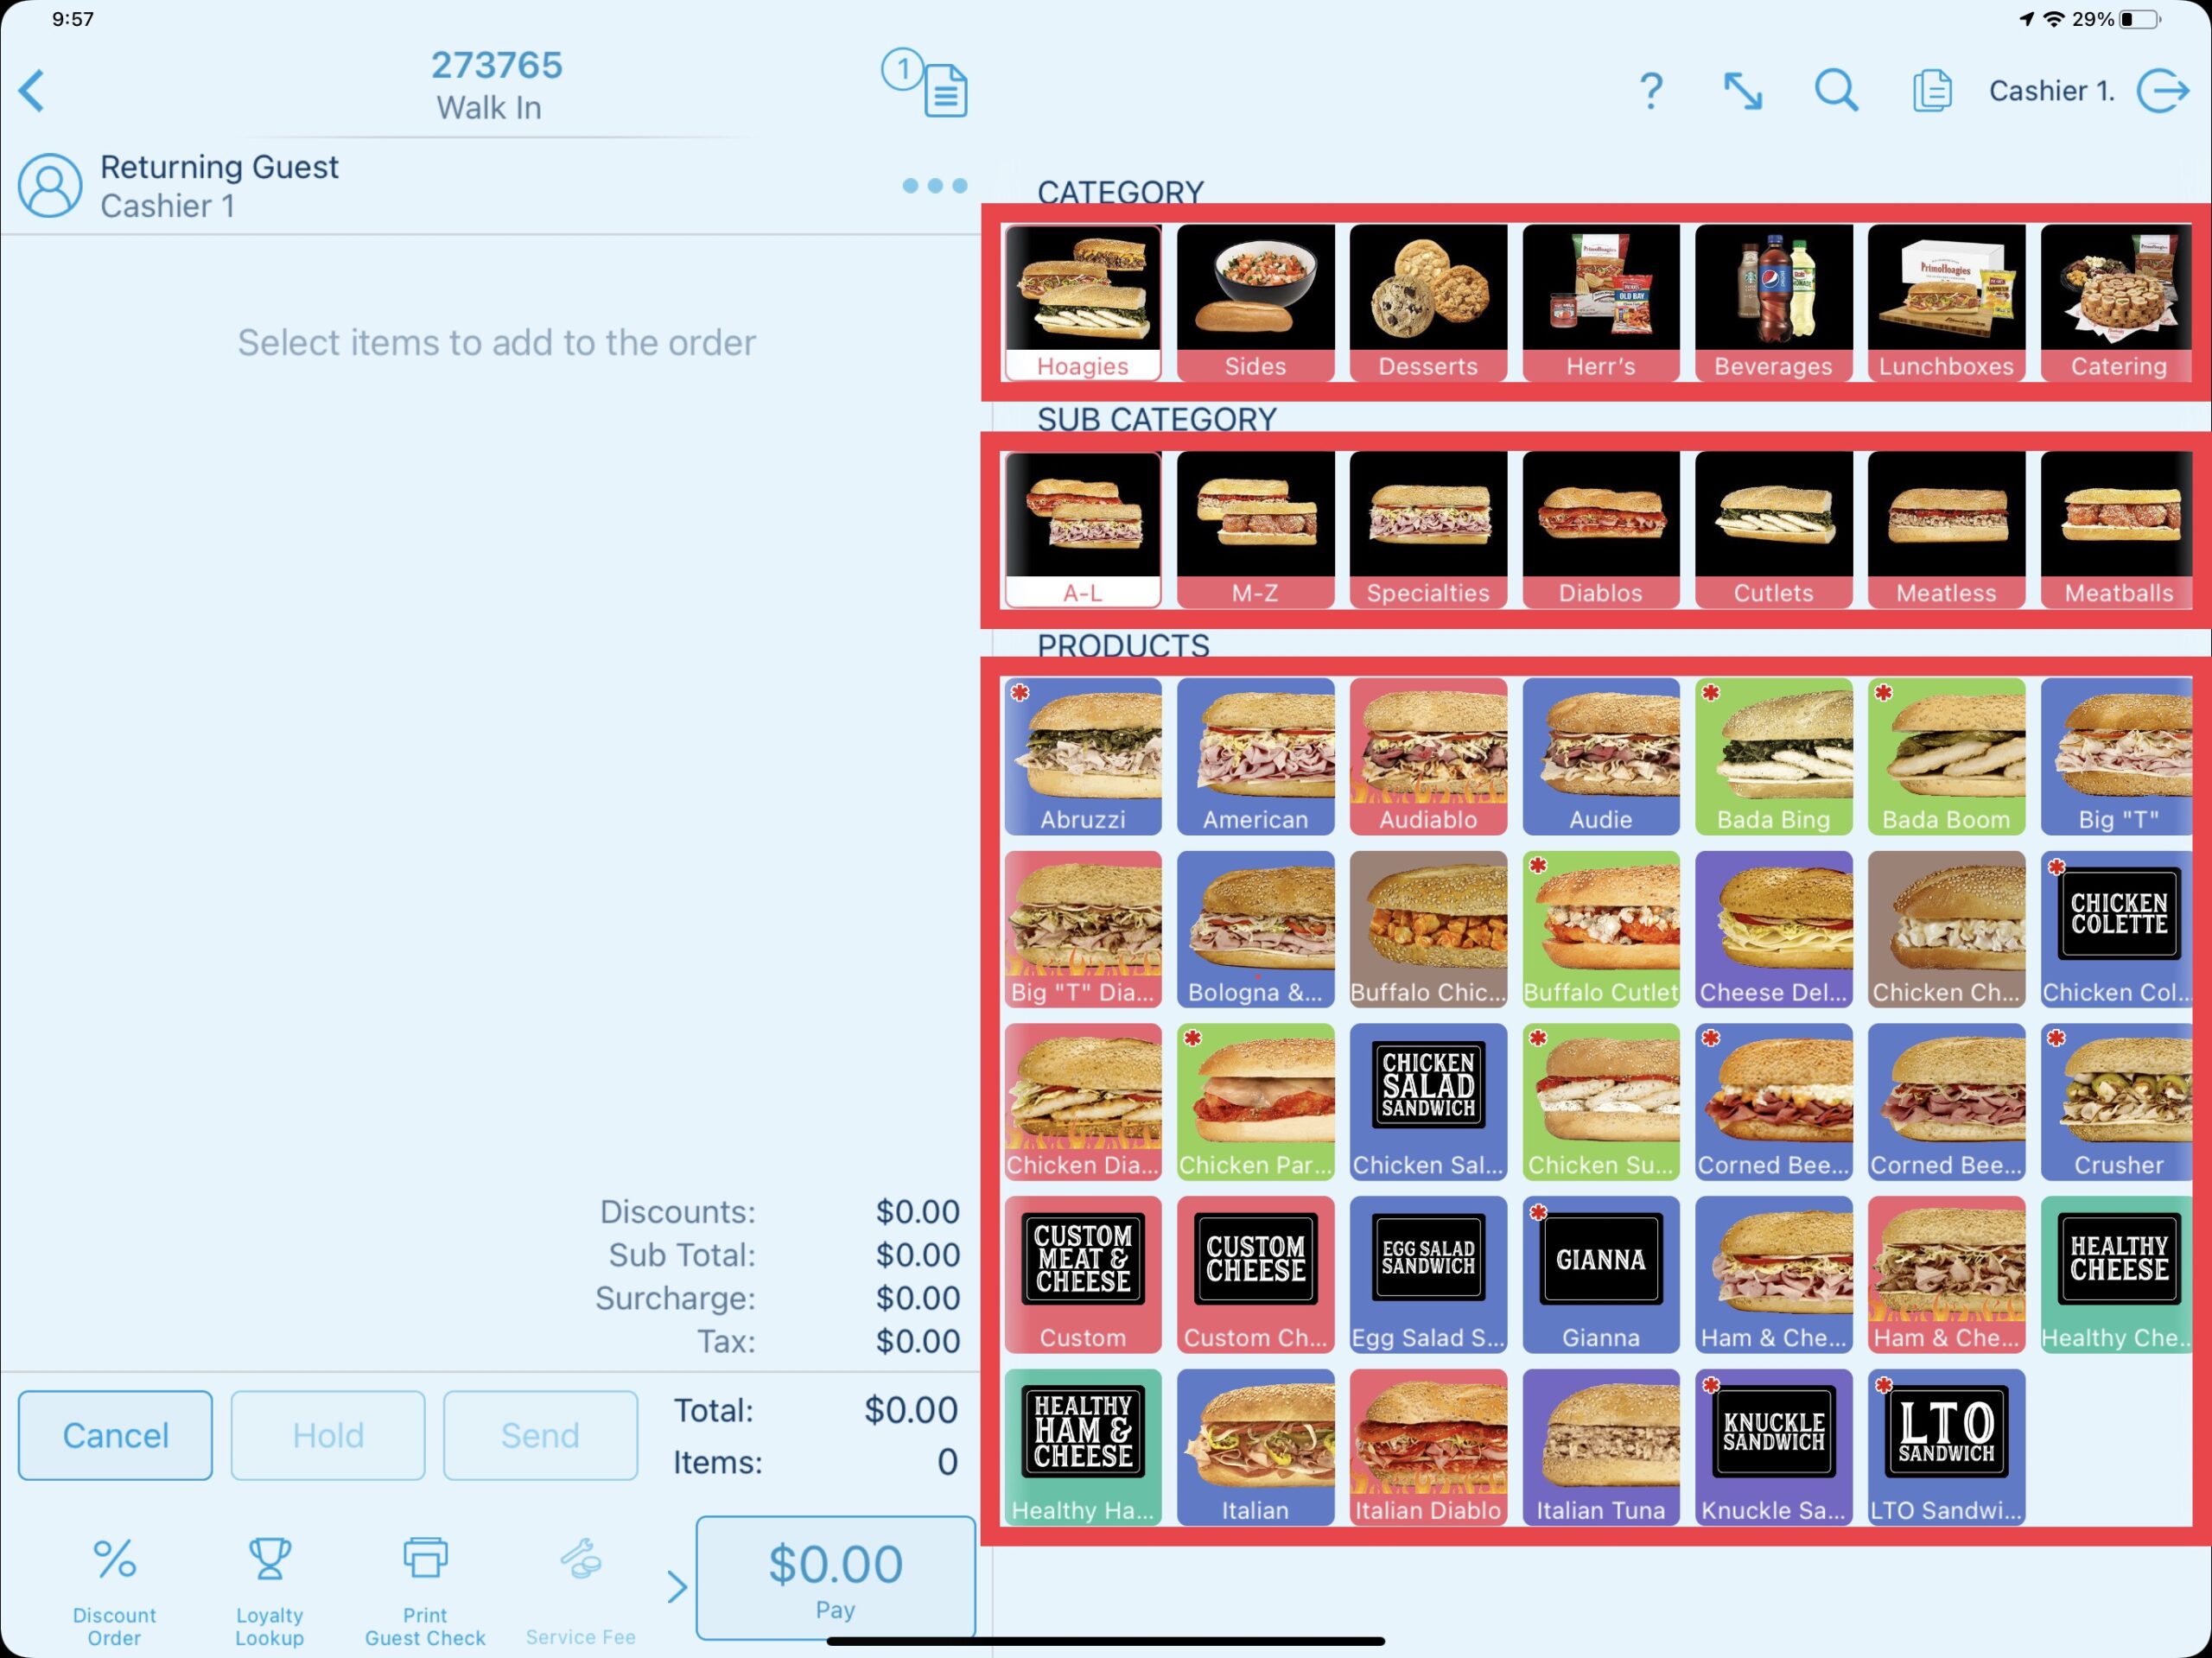
Product Attributes, Weights & Sizes
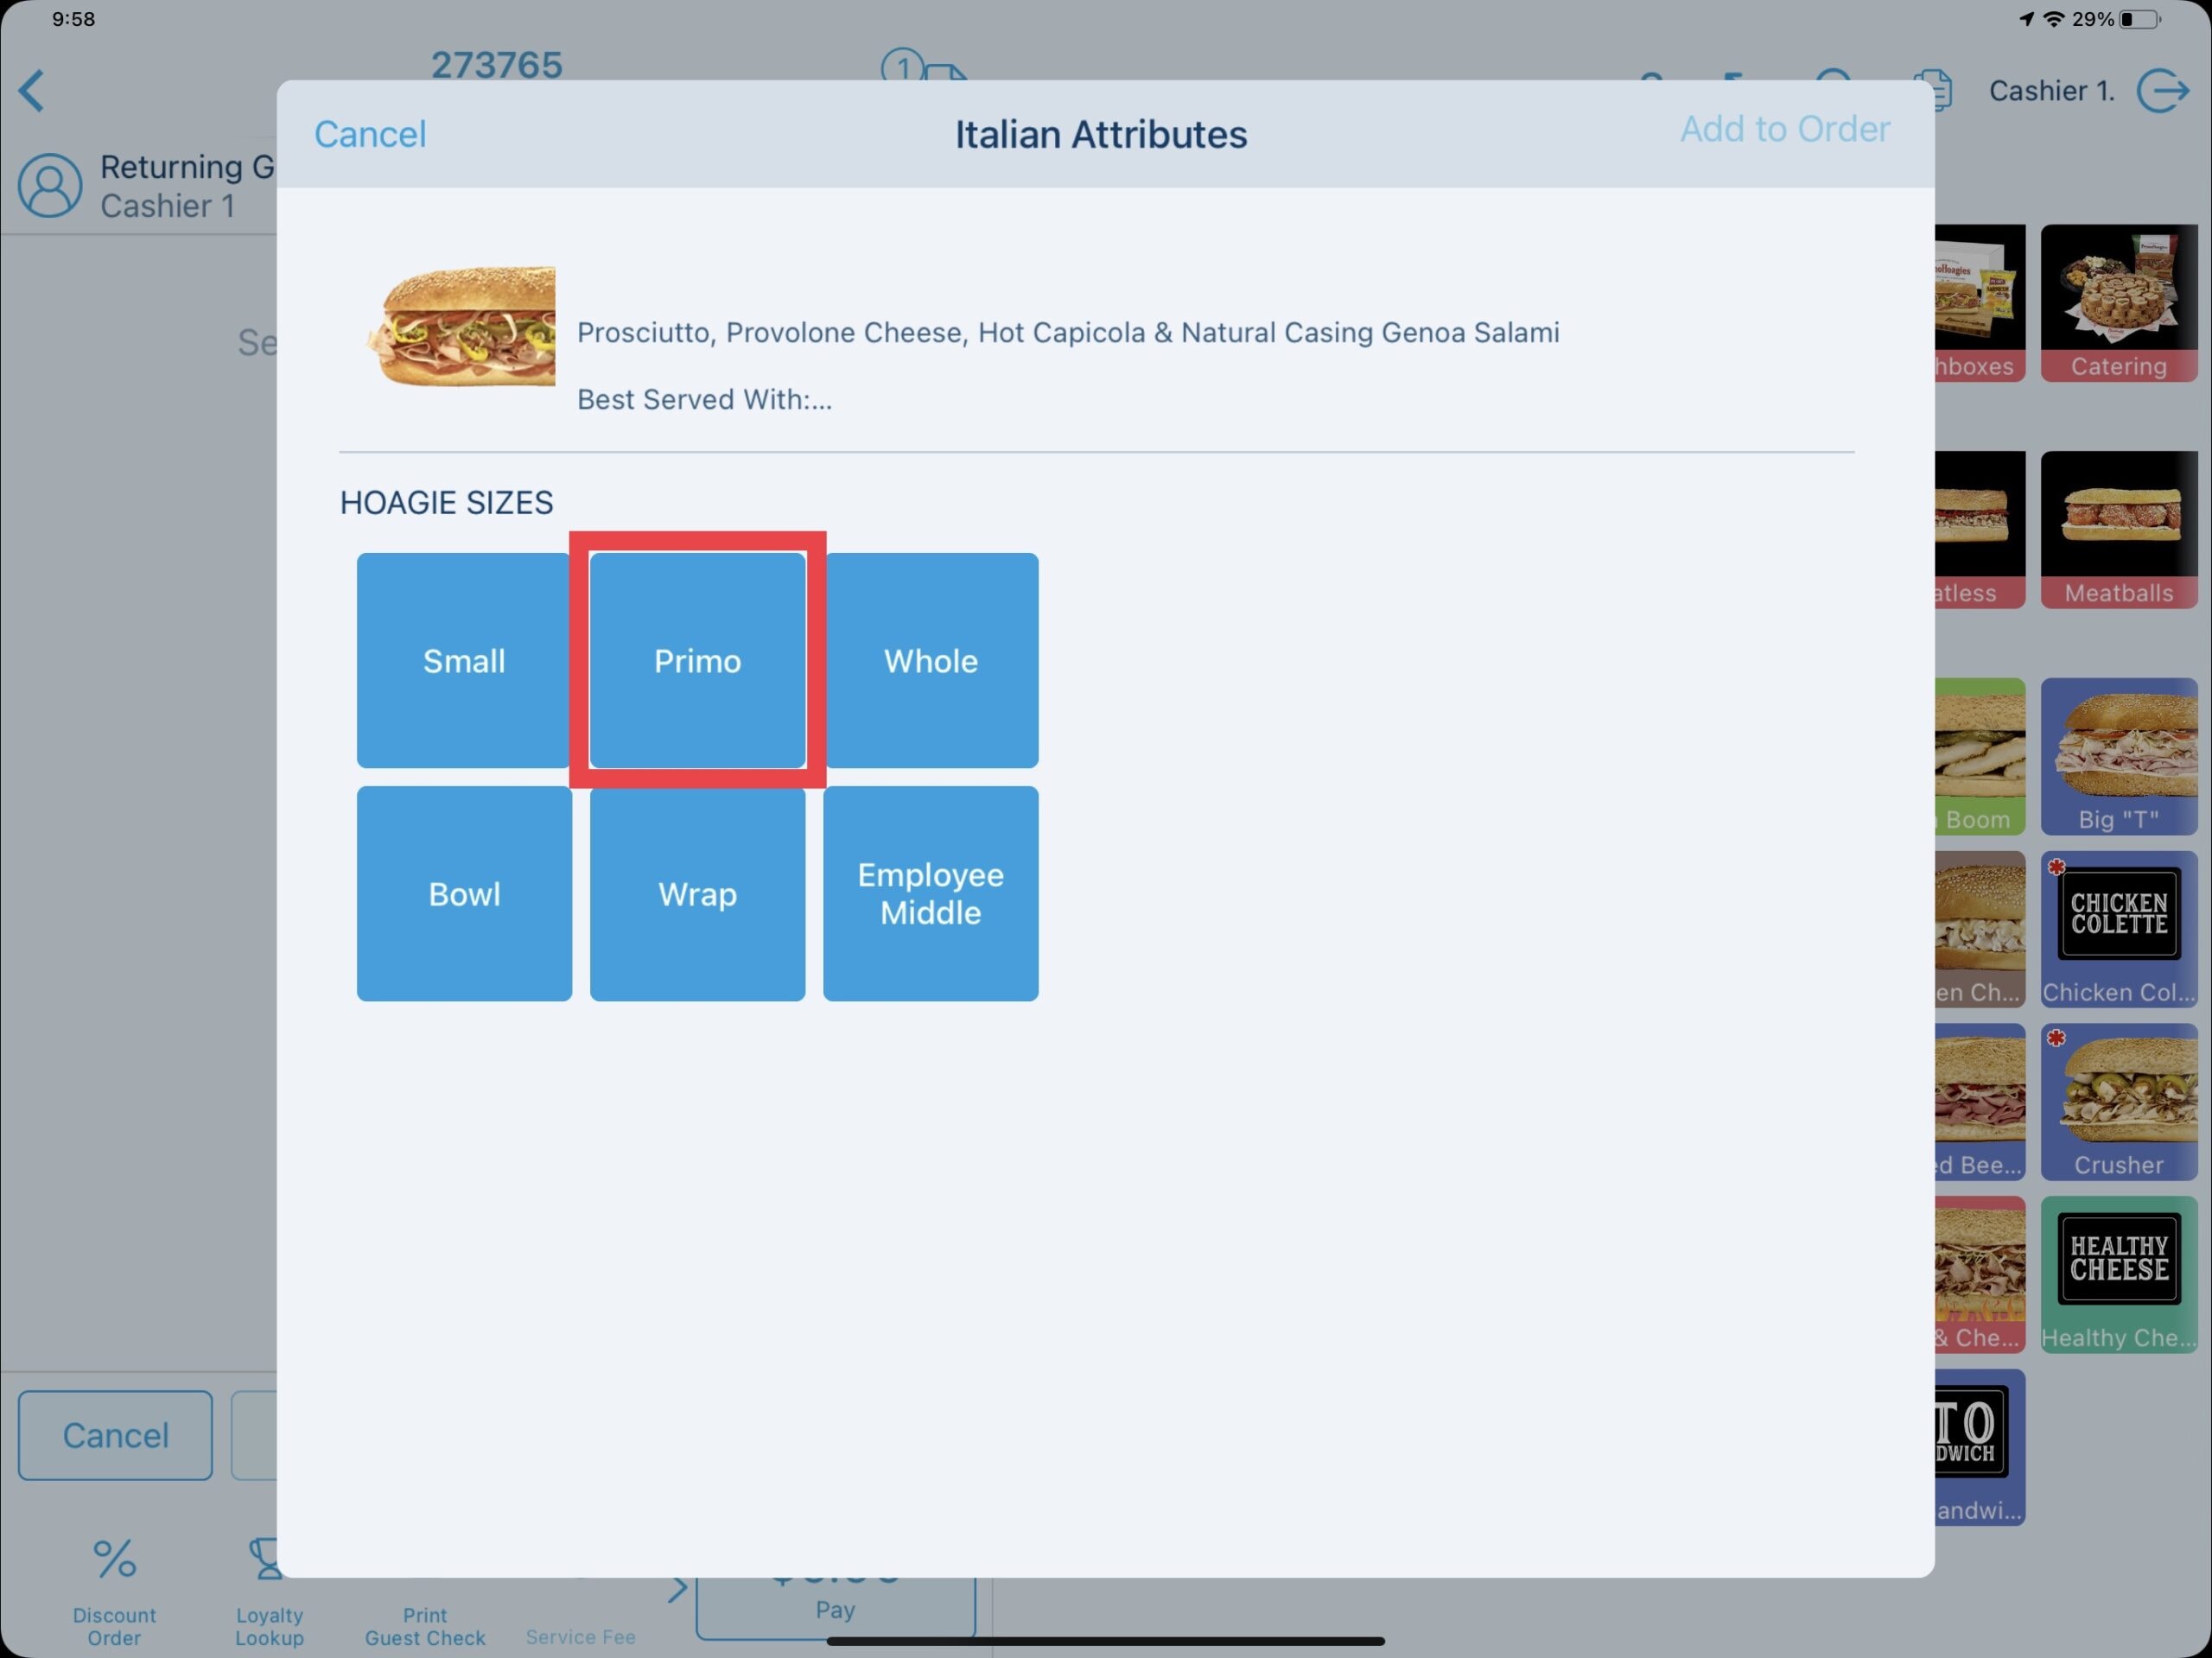
When selecting a Parent Product, a window may appear showing the available sizes of that product. These sizes, known in Revel Systems as attributes, creates a Child Product which is the actual priced product to be ordered. Other Parent Products may prompt for a weight instead of a size such as a container of potato salad, or a quantity such as a quantity of whole pickles. While many products are scannable, their corresponding product button is also available for selection when taking a phone order for example.
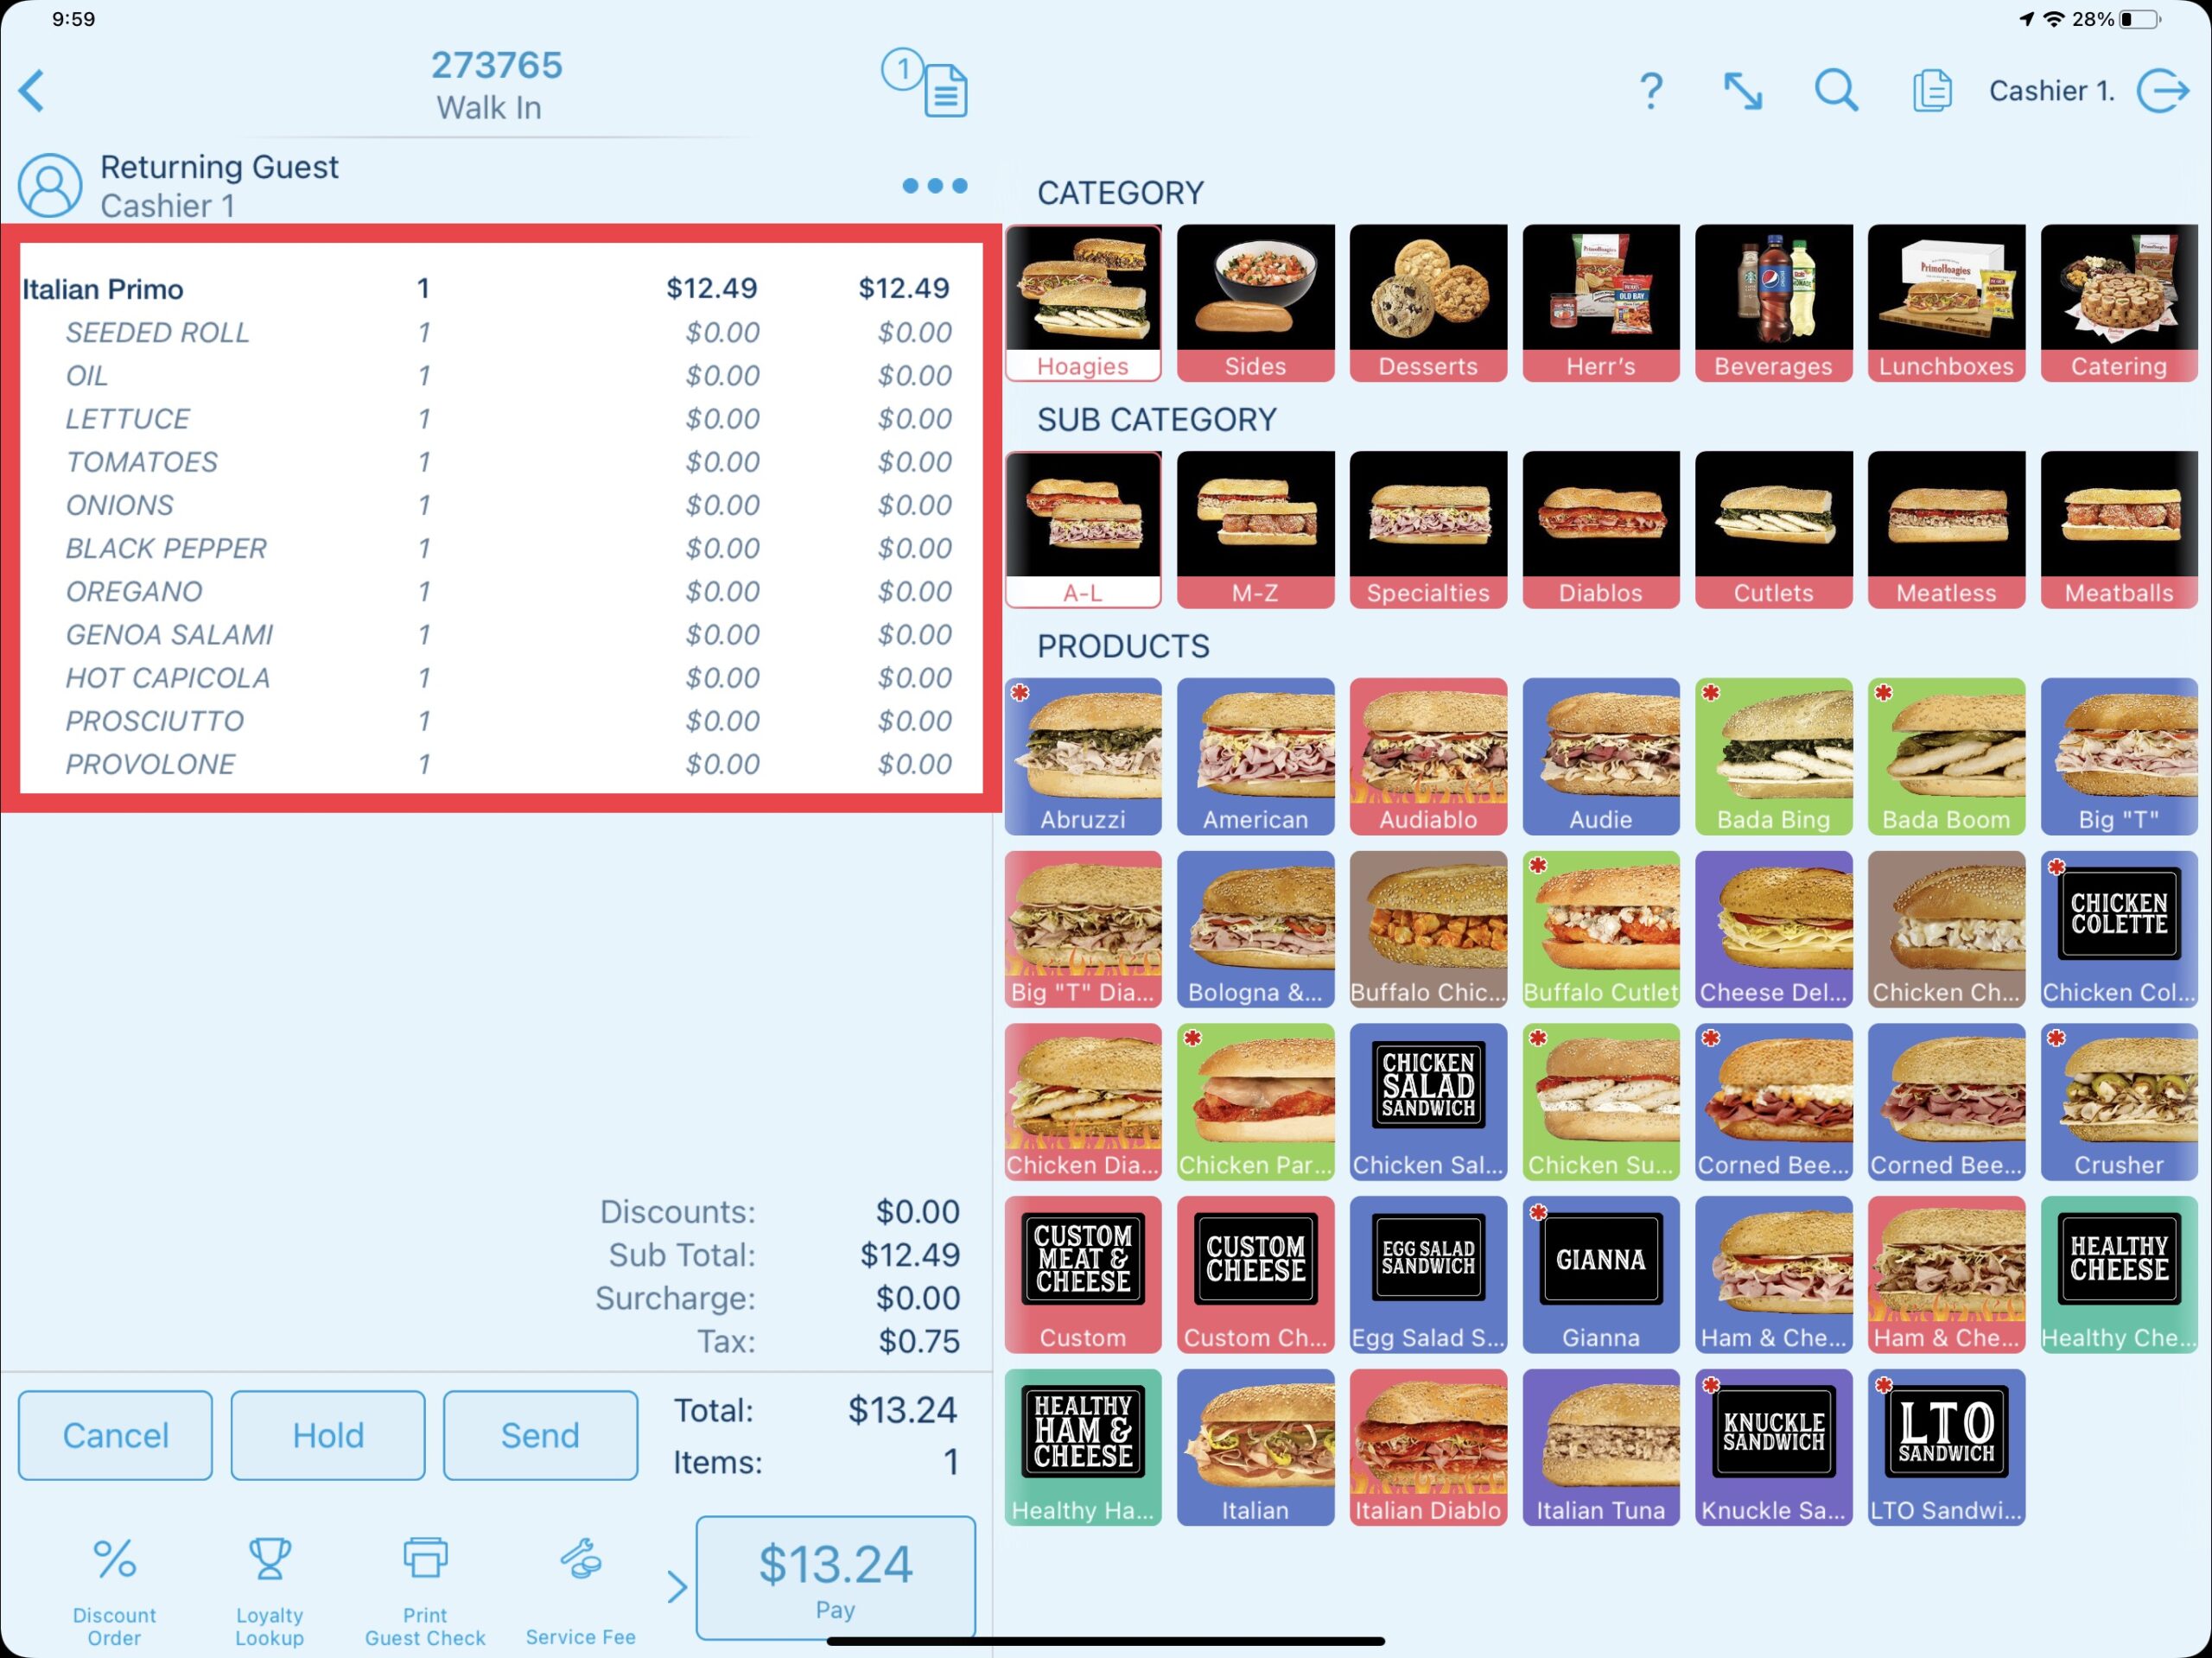
The example below shows the Italian Hoagies attributes of Small, Primo, Whole, Bowl, Wrap, & Employee Middle. When selecting the Primo attribute, the Child Product of Italian Primo is ordered followed by any associated modifier prompts.
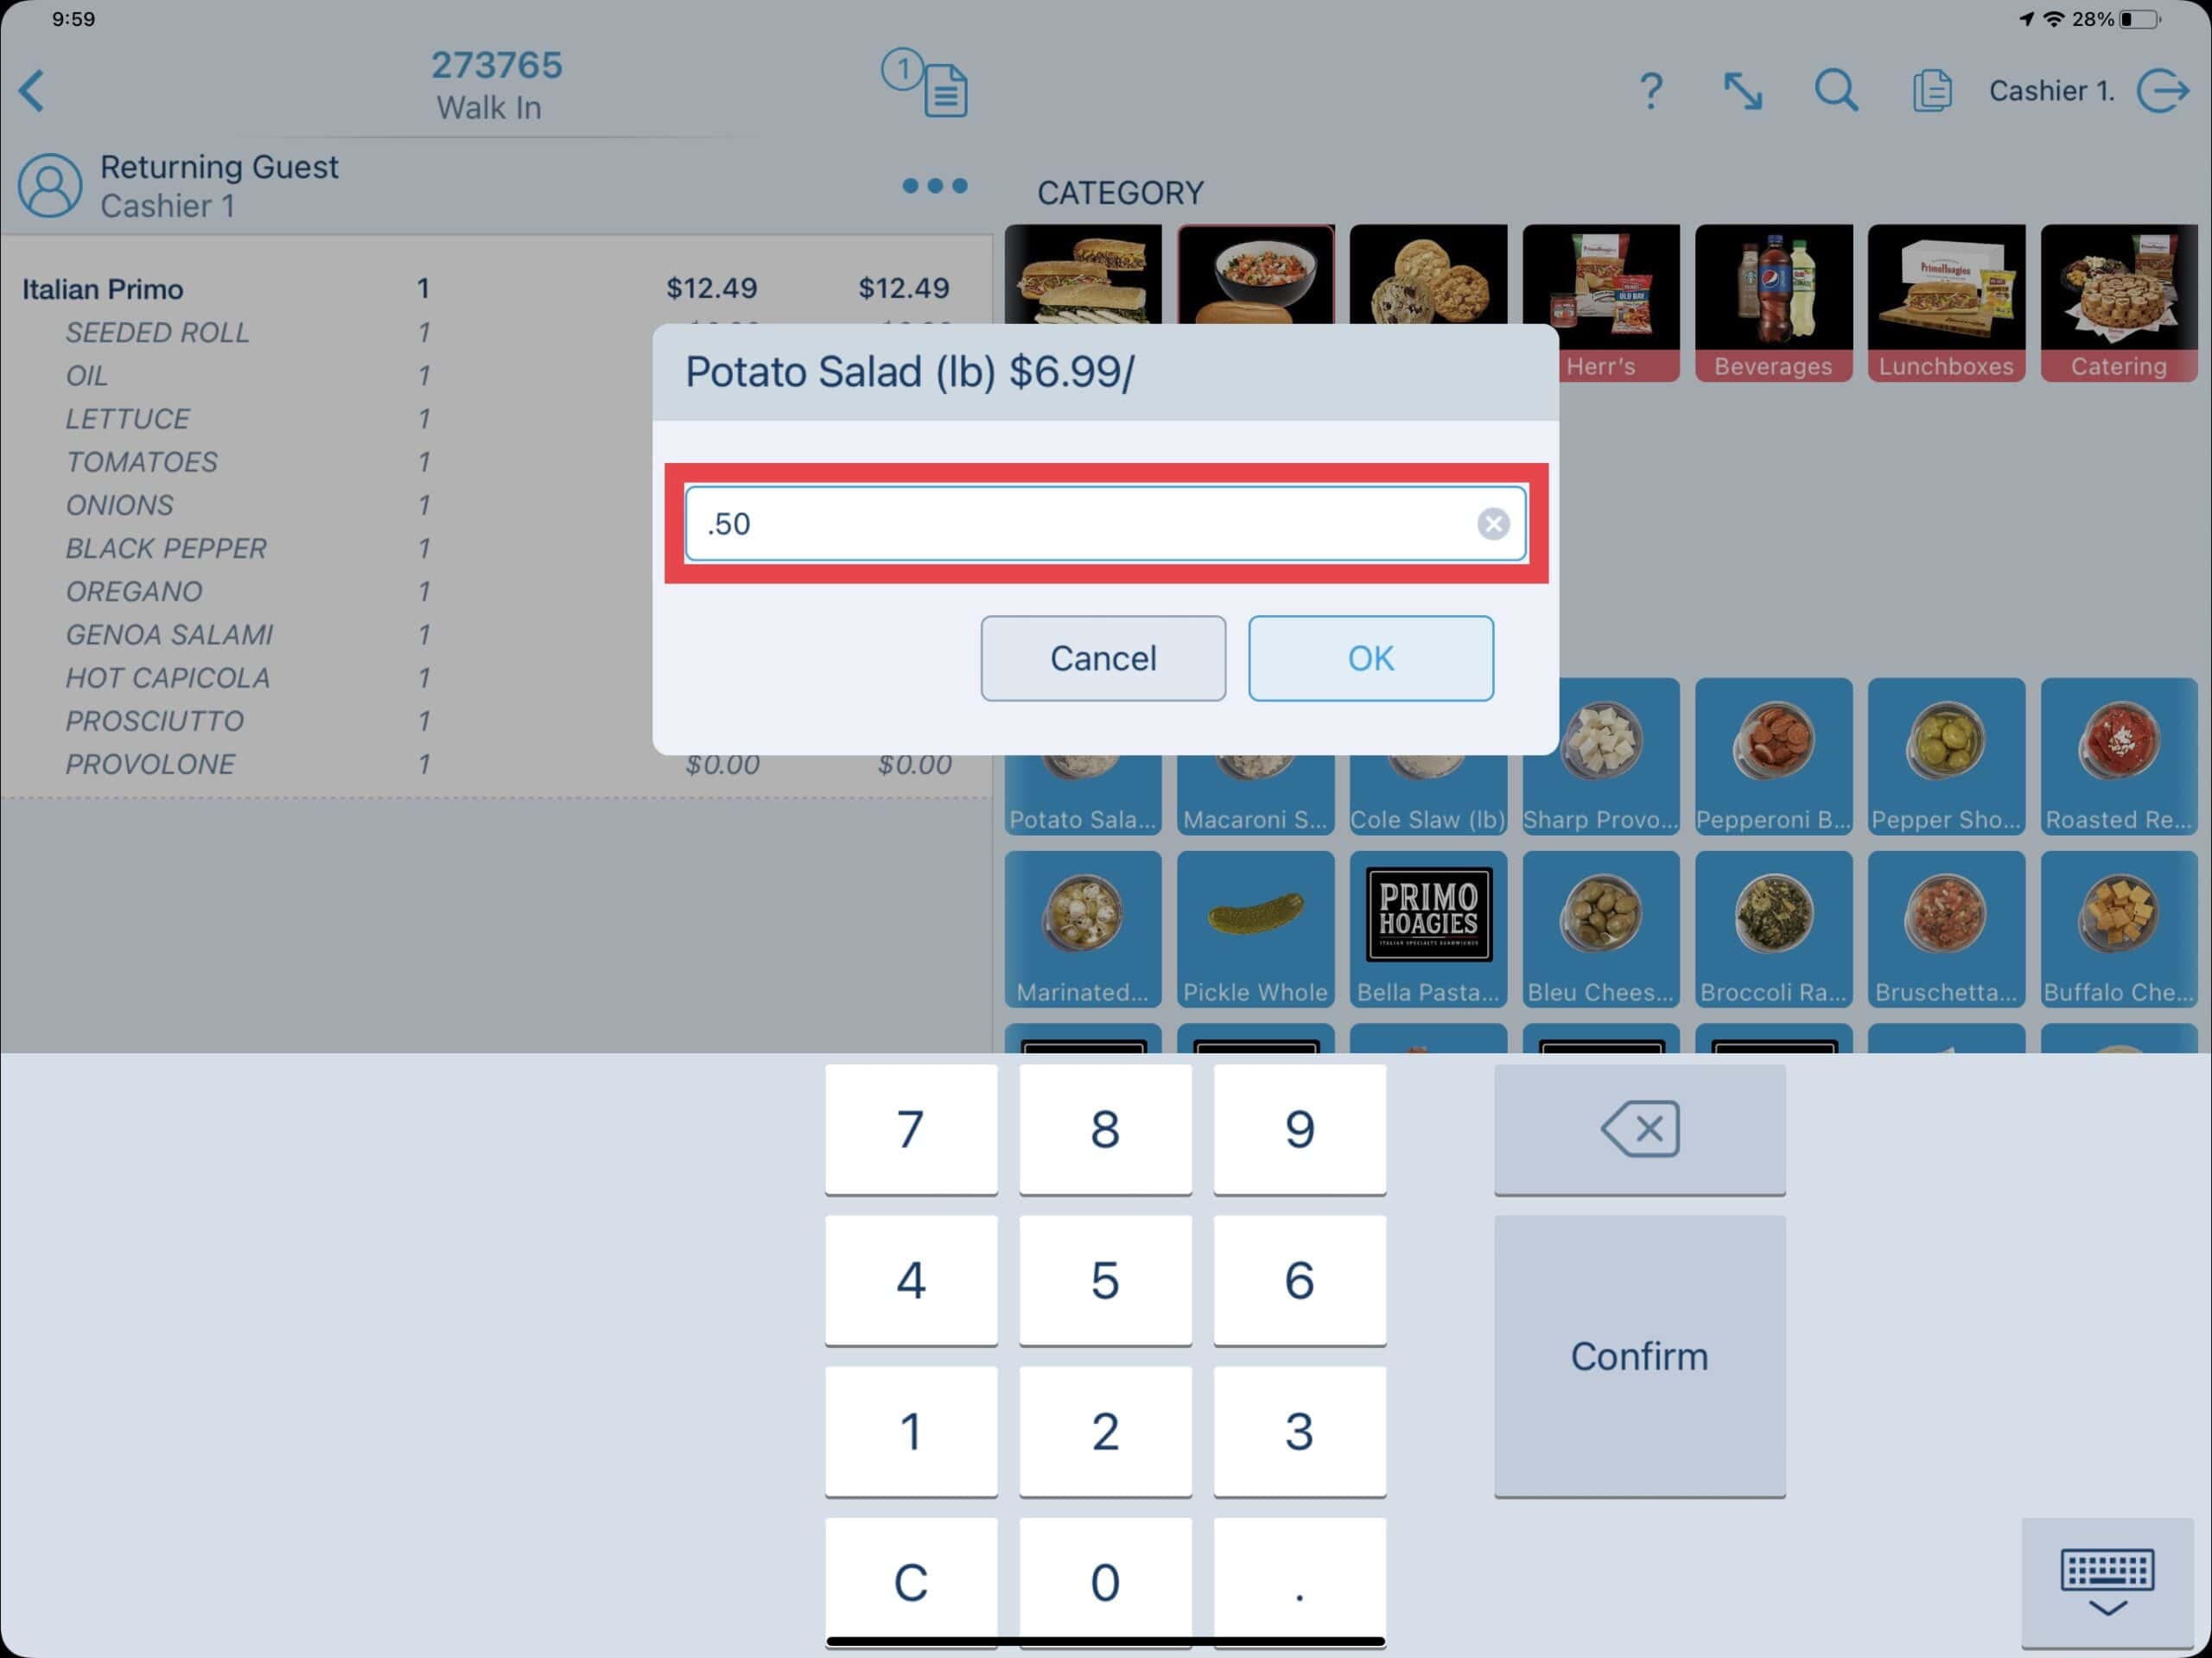
Selecting a weighted product such as the potato salad prompts for a weight input instead if a size attribute.
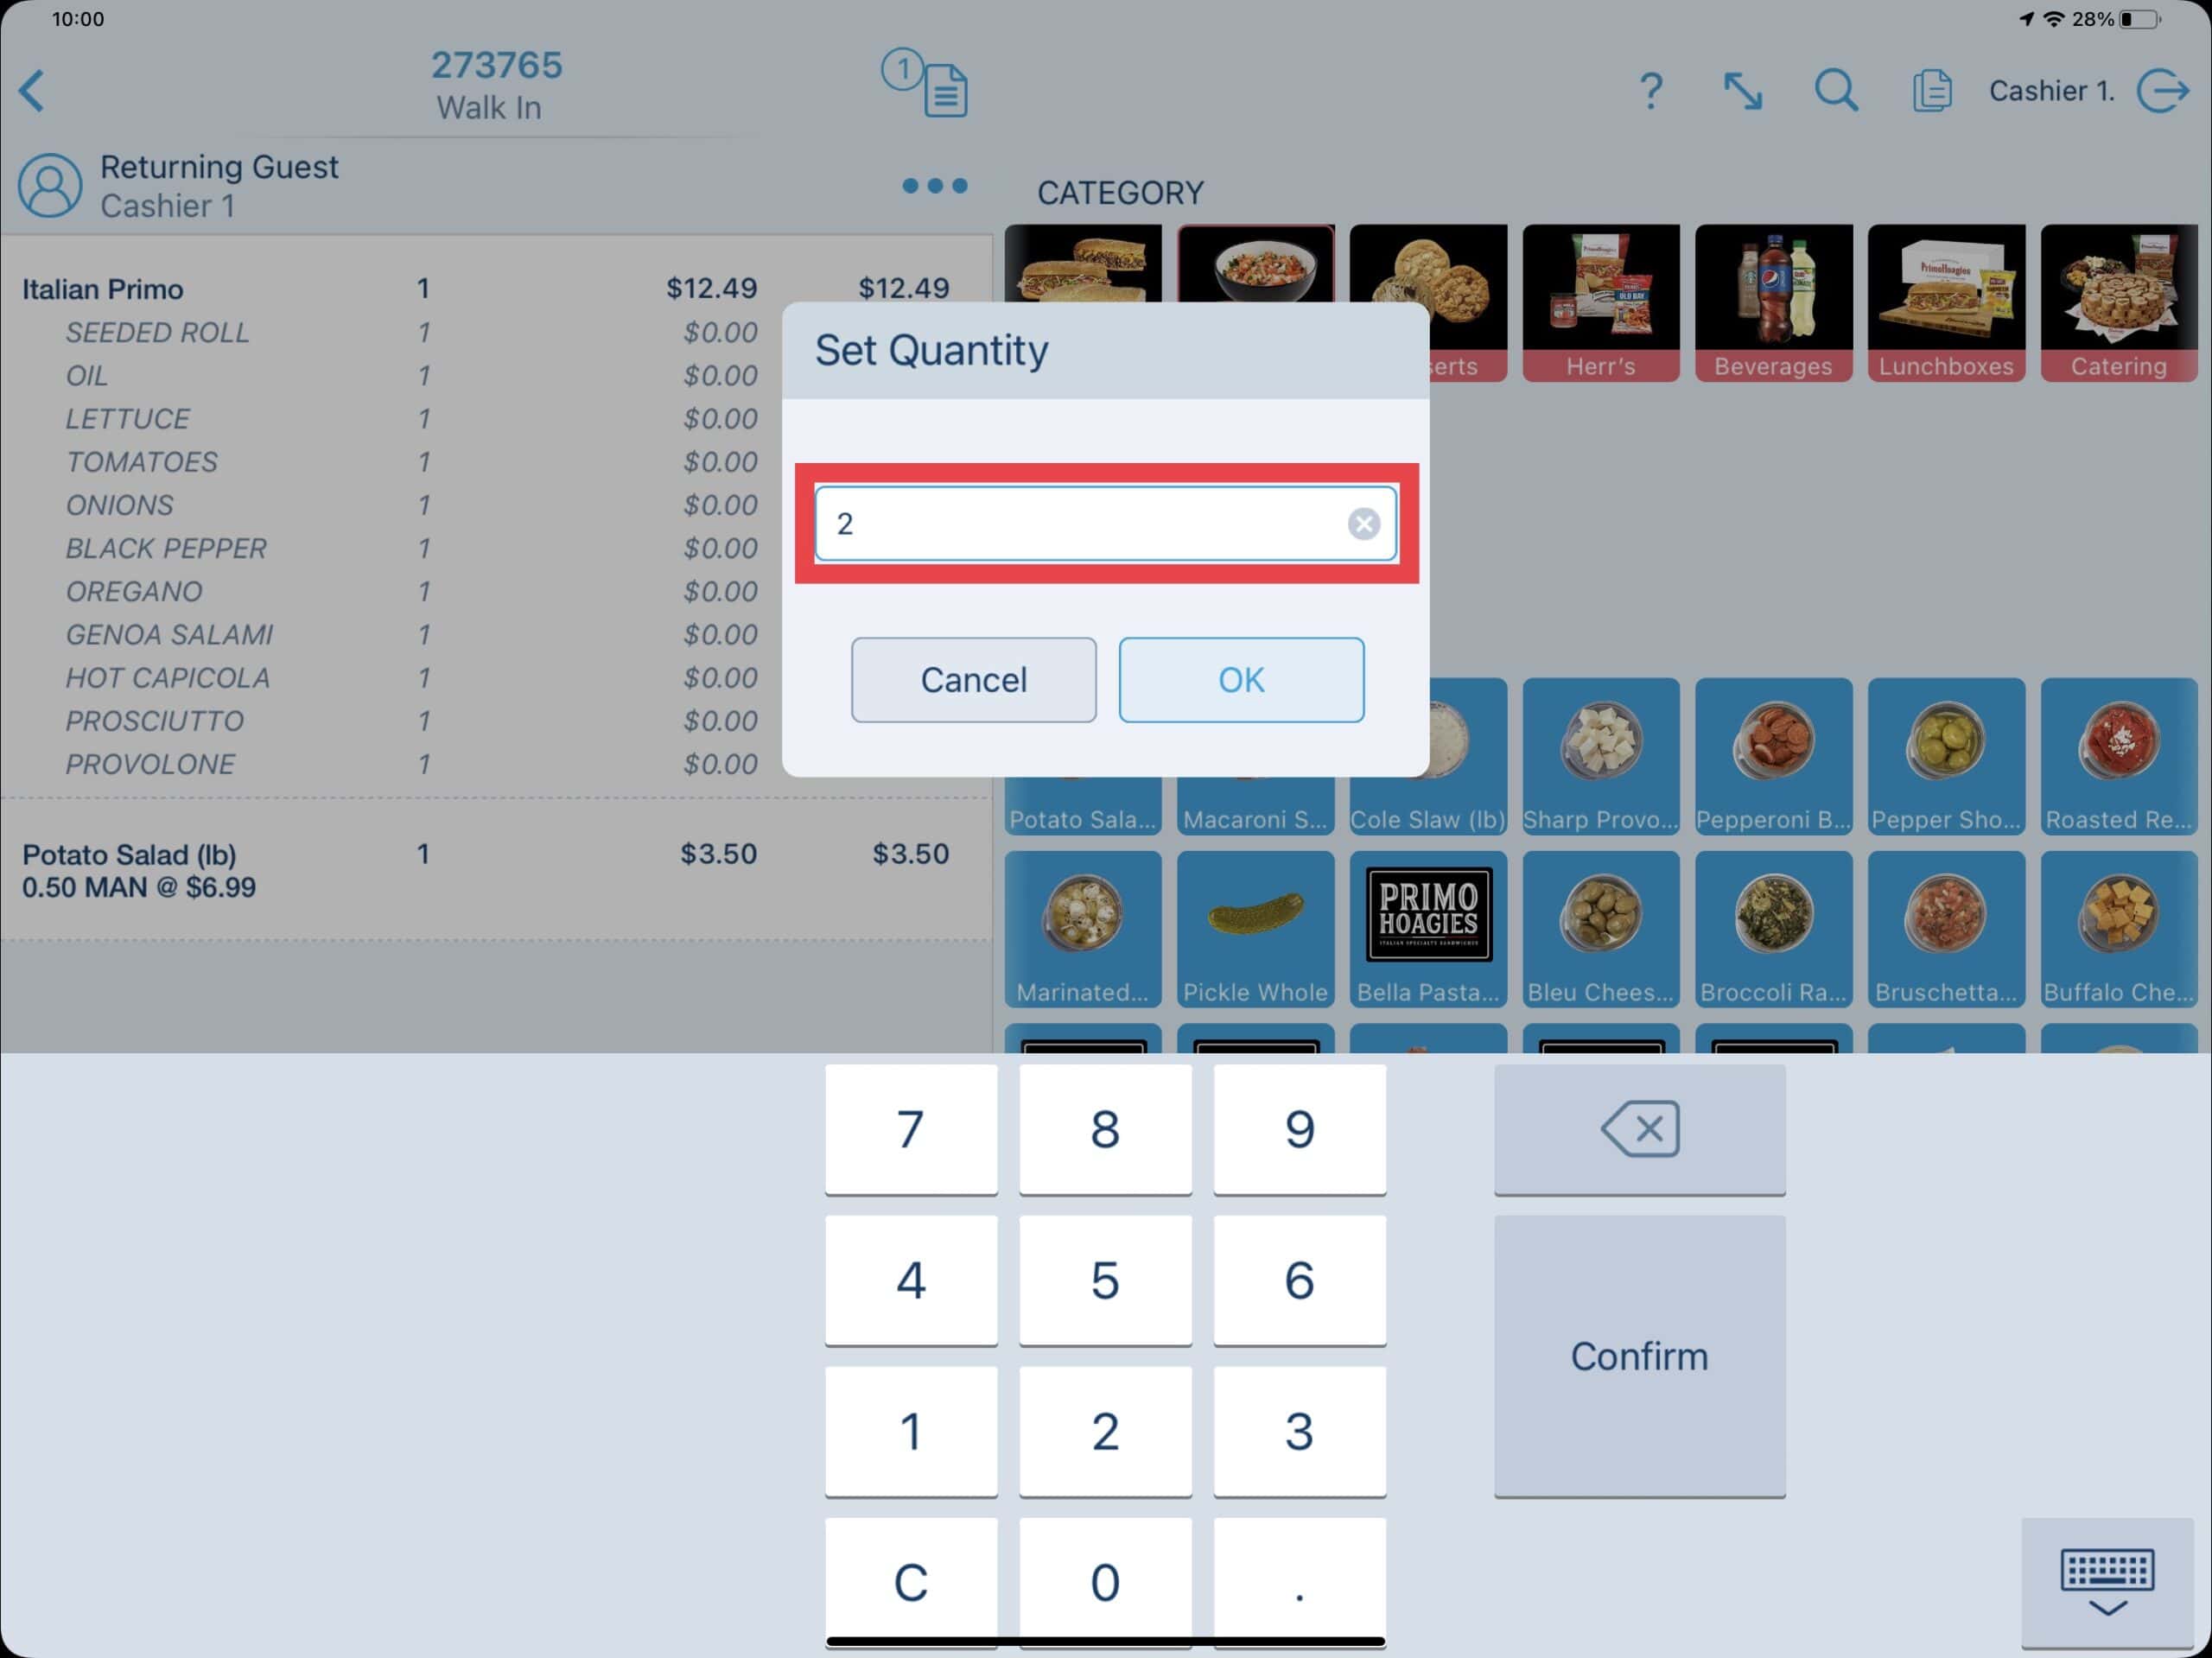
Finally, a product may prompt for the quantity such as the whole pickles.
Herr's & Pepsi Products
Just like a hoagies size attributes that create the orderable Child Product, Herr's & Pepsi products may prompt for a size attribute when manually selecting the product button. For ordering simplicity, the attribute sizes match the printed size on the product label (in previous systems the product price may have been used).
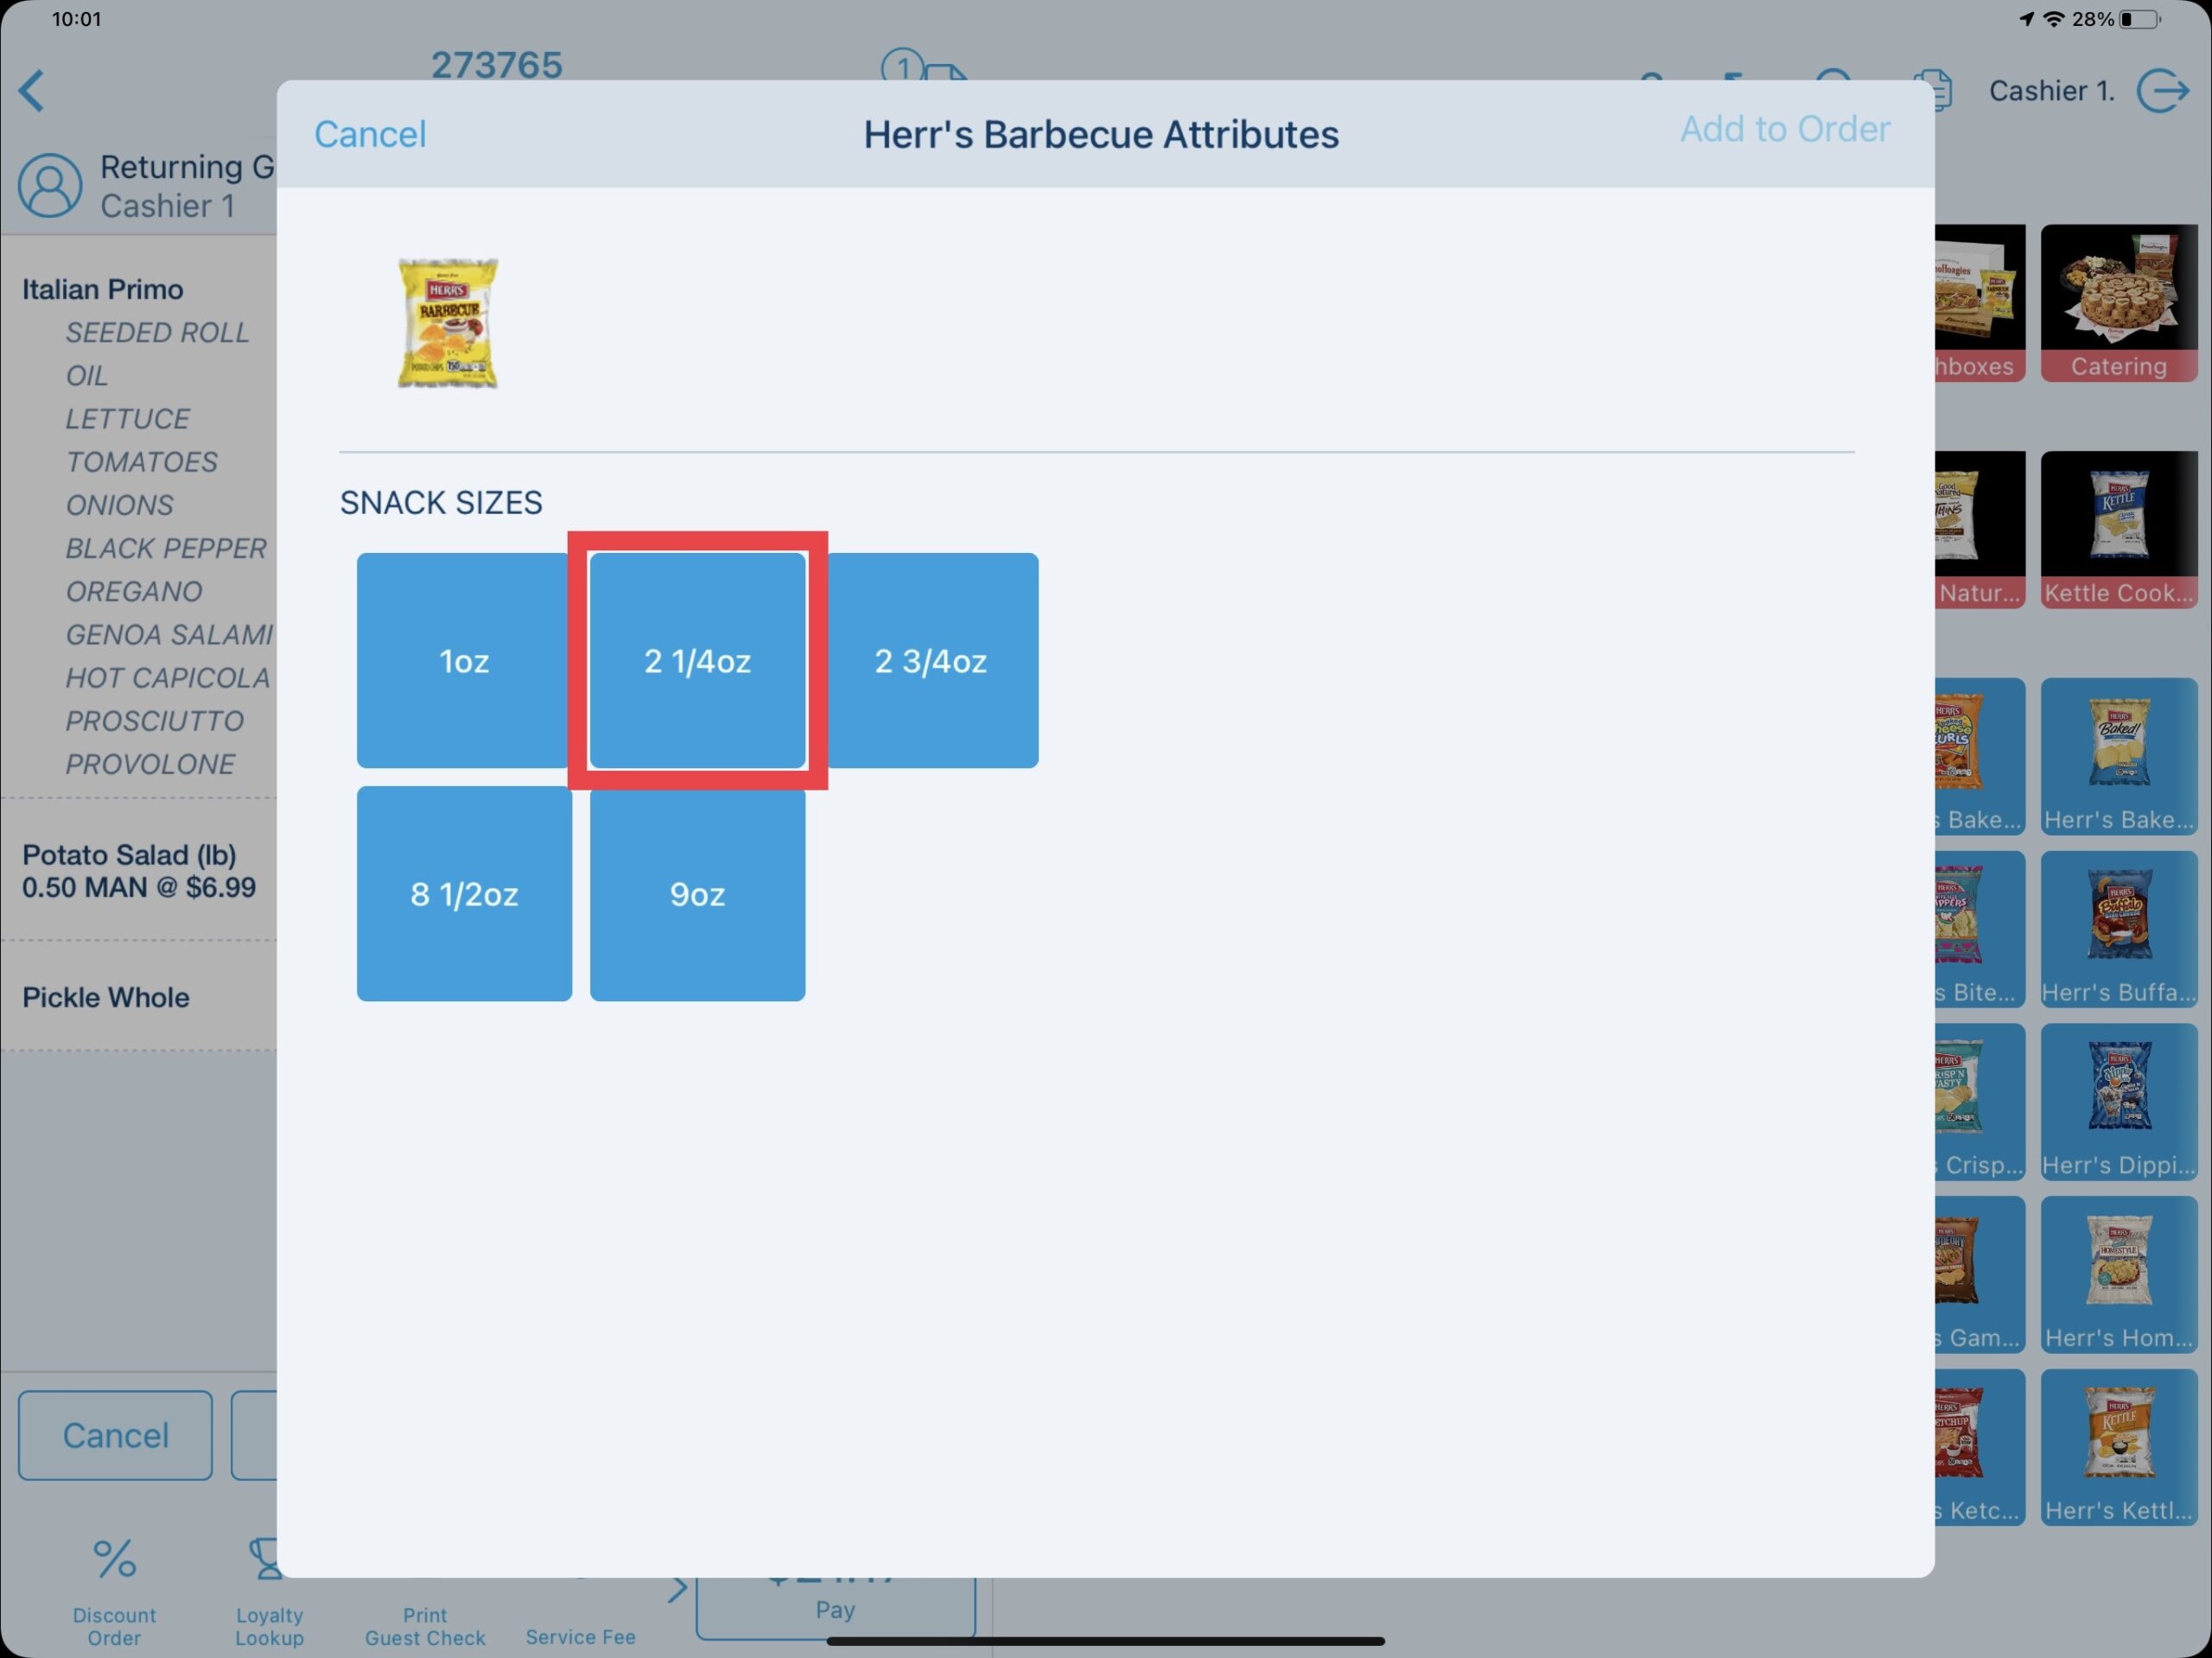
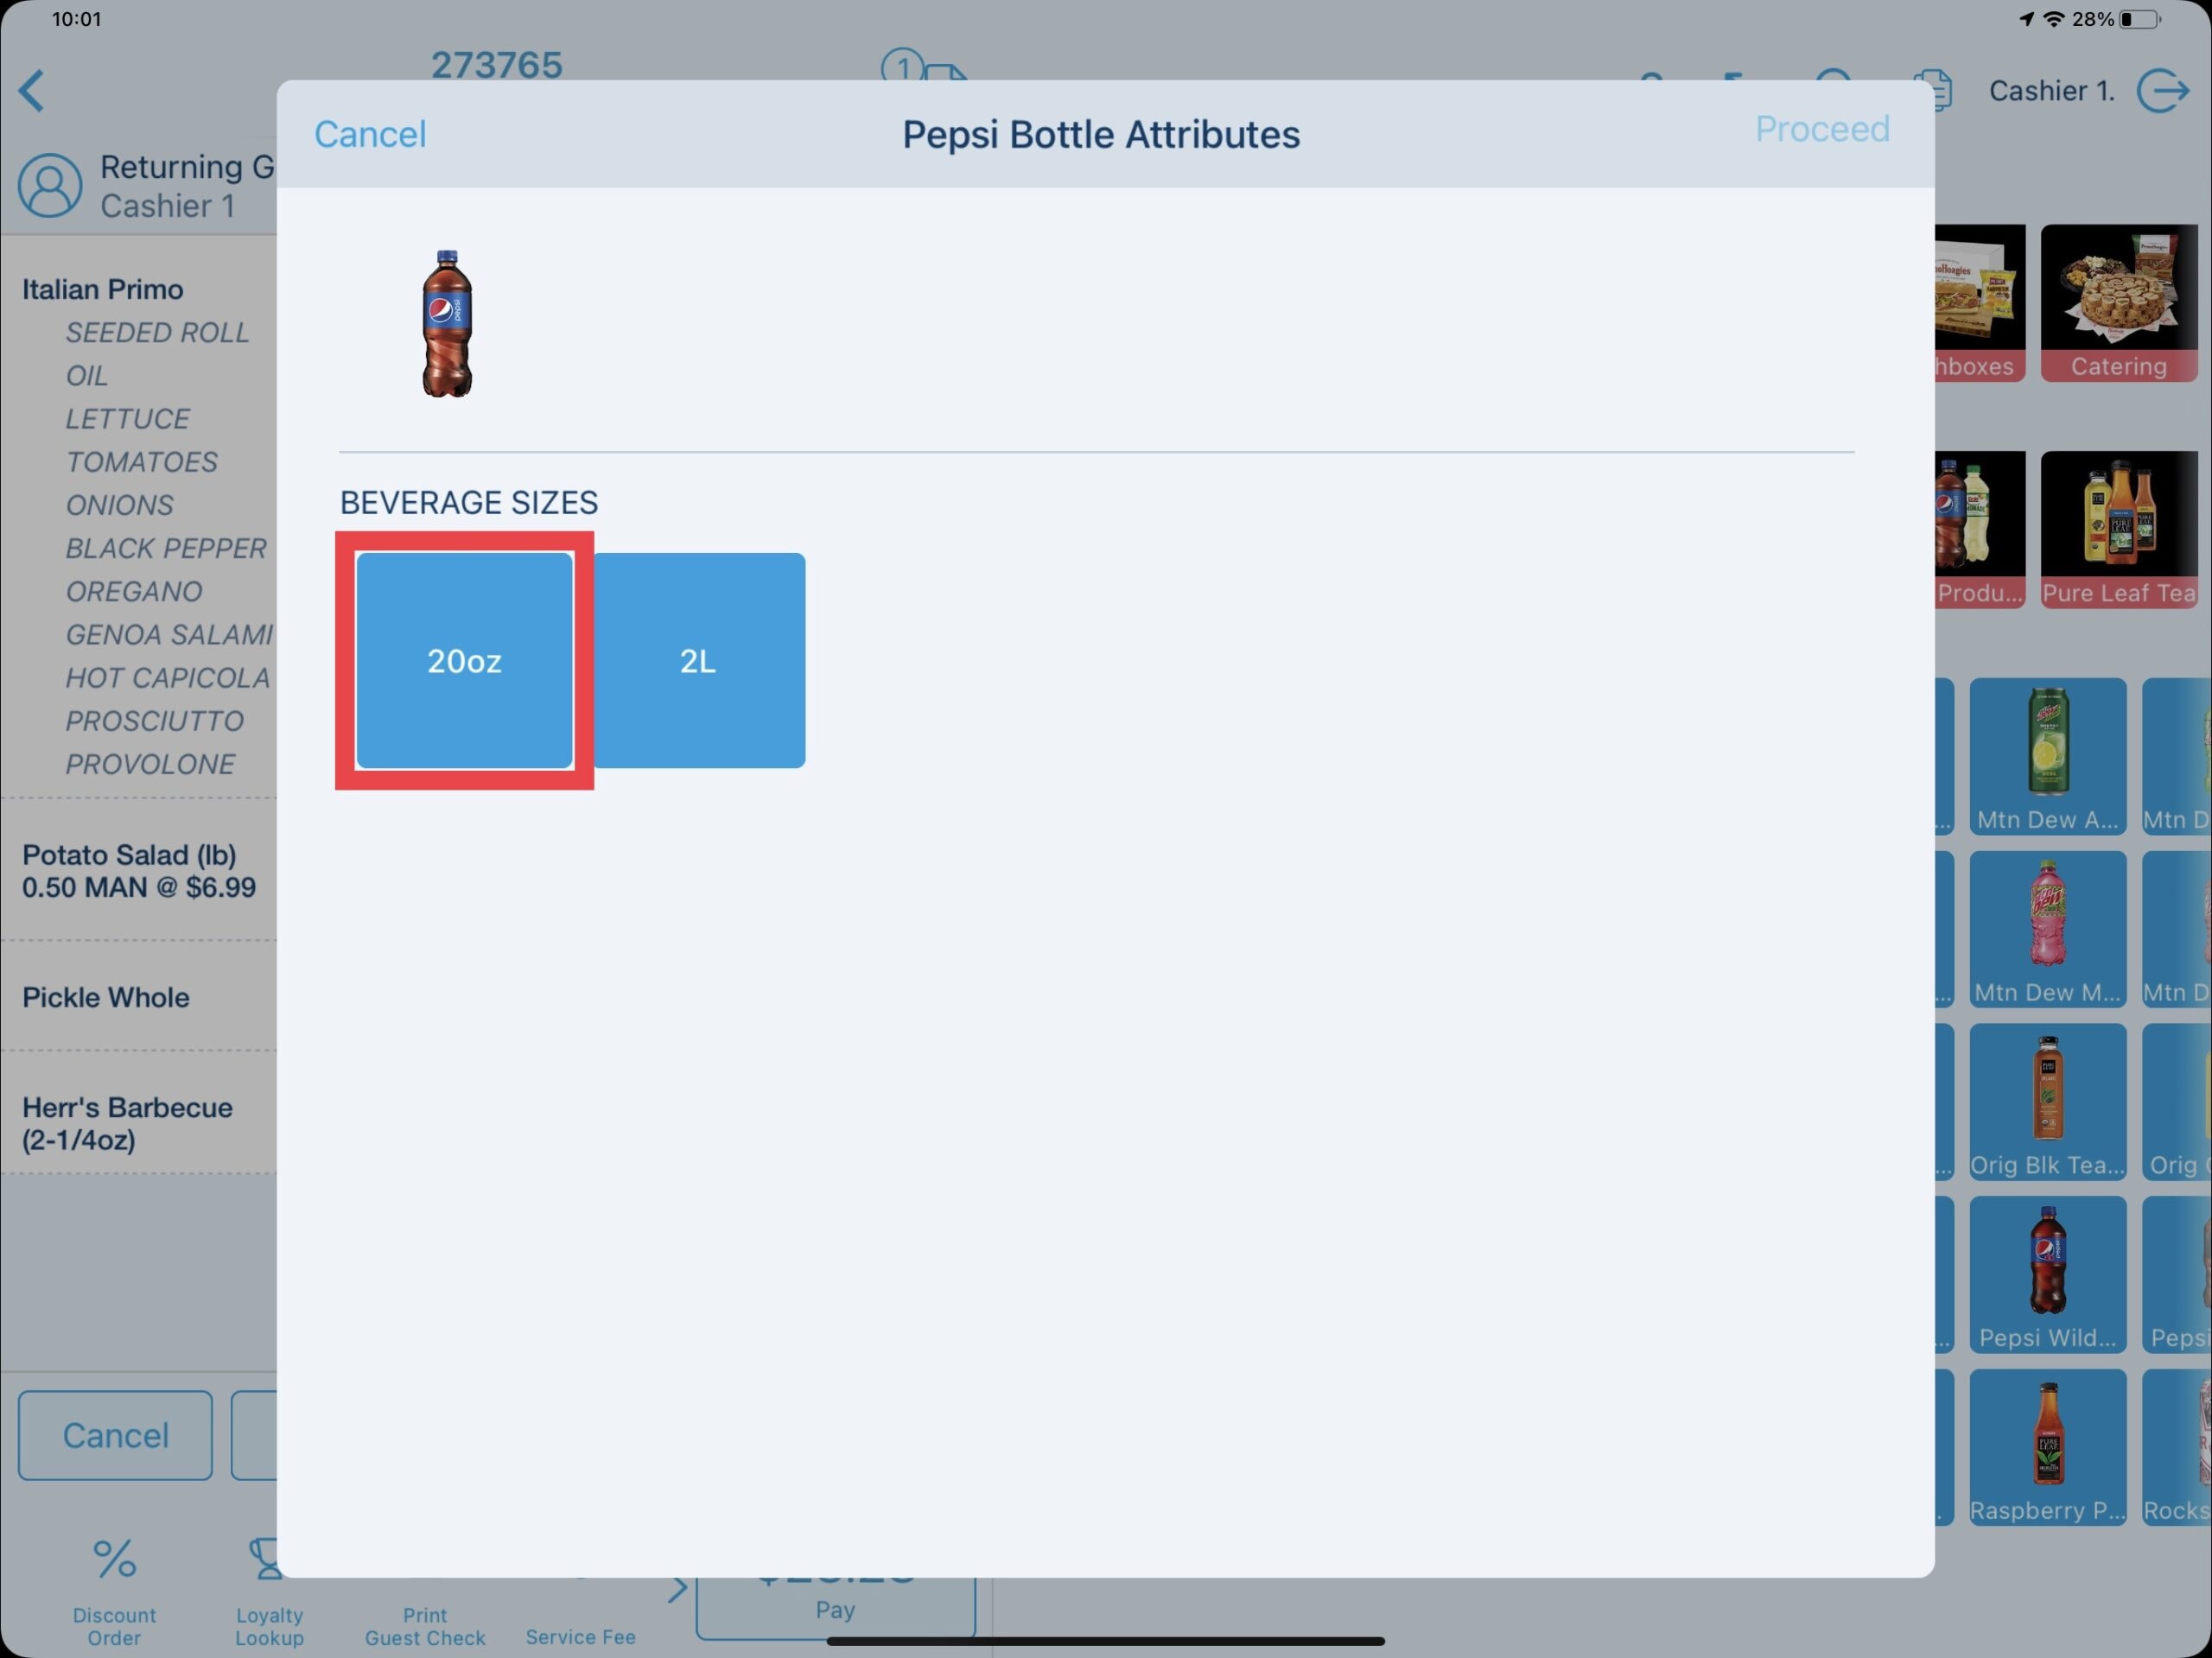
Scanning the same products automatically orders the Child Product and bypasses this attribute prompt.
Updated 06/15/2022

Summary
Ordering modifiers in Revel Systems is designed for flexibility and speed. All modifiers are laid out on one screen allowing for quick navigation. Default modifiers can also be assigned to products reducing the amount of selections the user needs to make during the ordering process. We will look at the modifiers as used by selecting the hoagie products.
Navigating the Screen
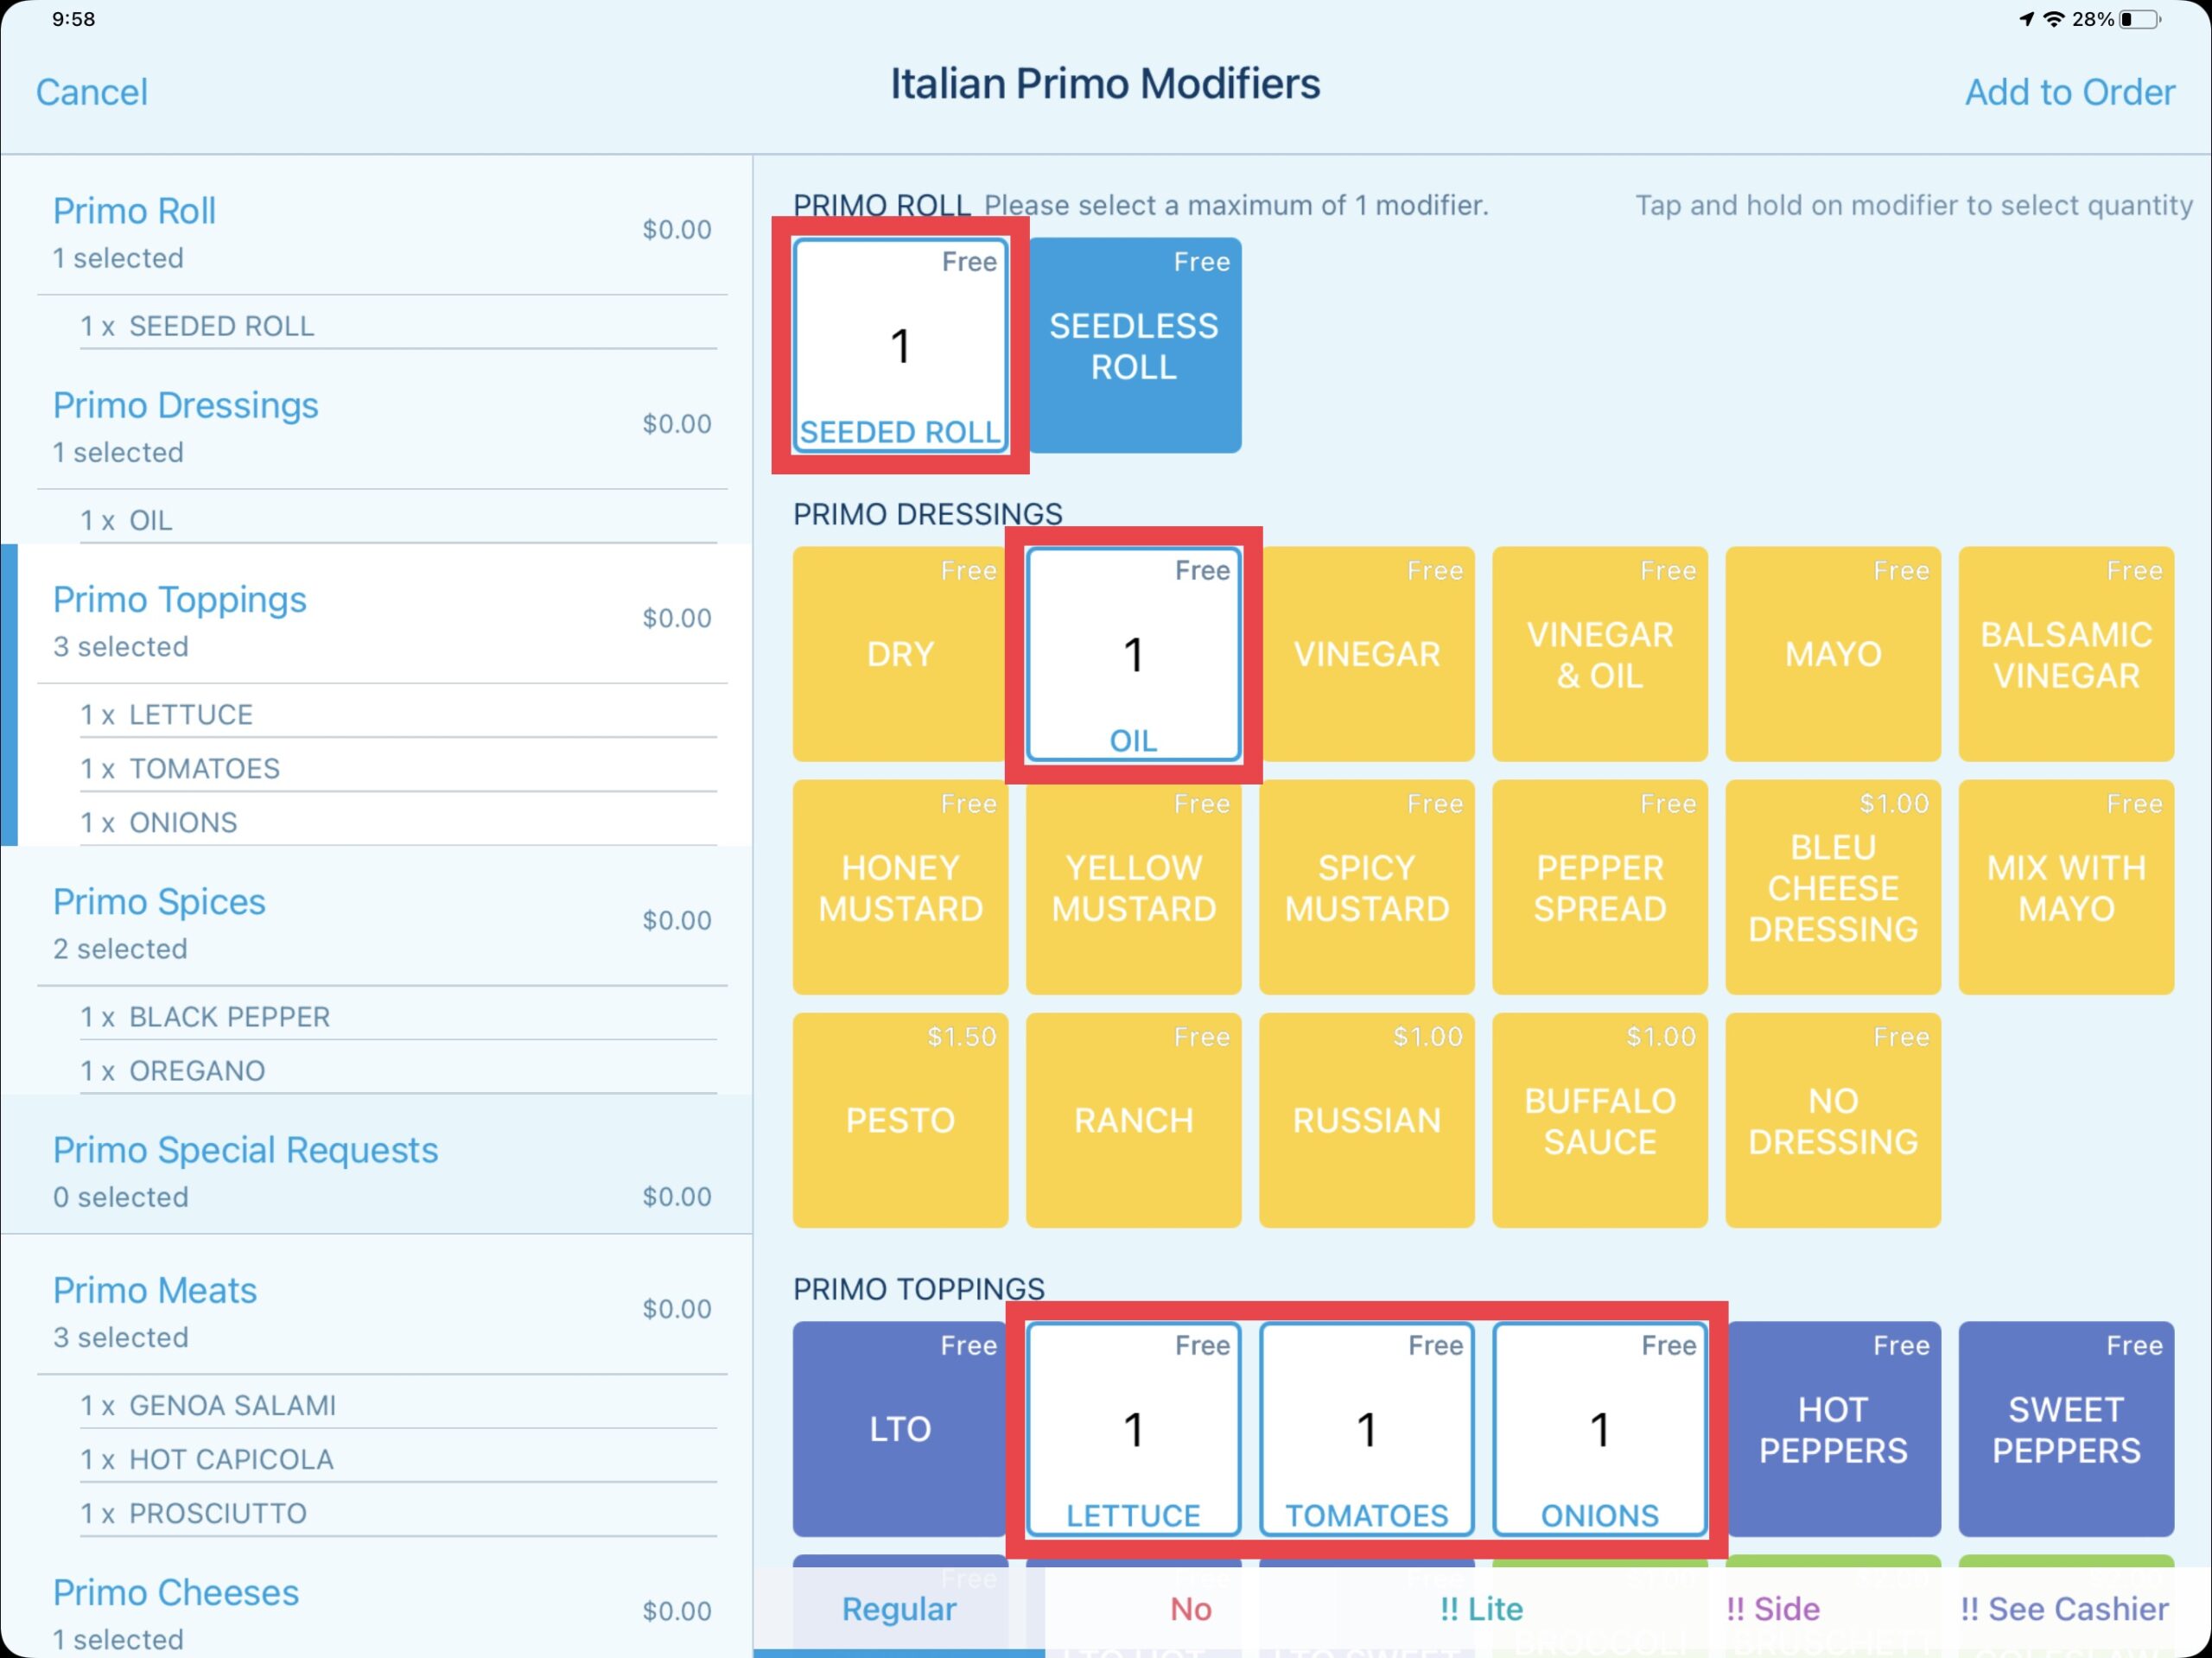
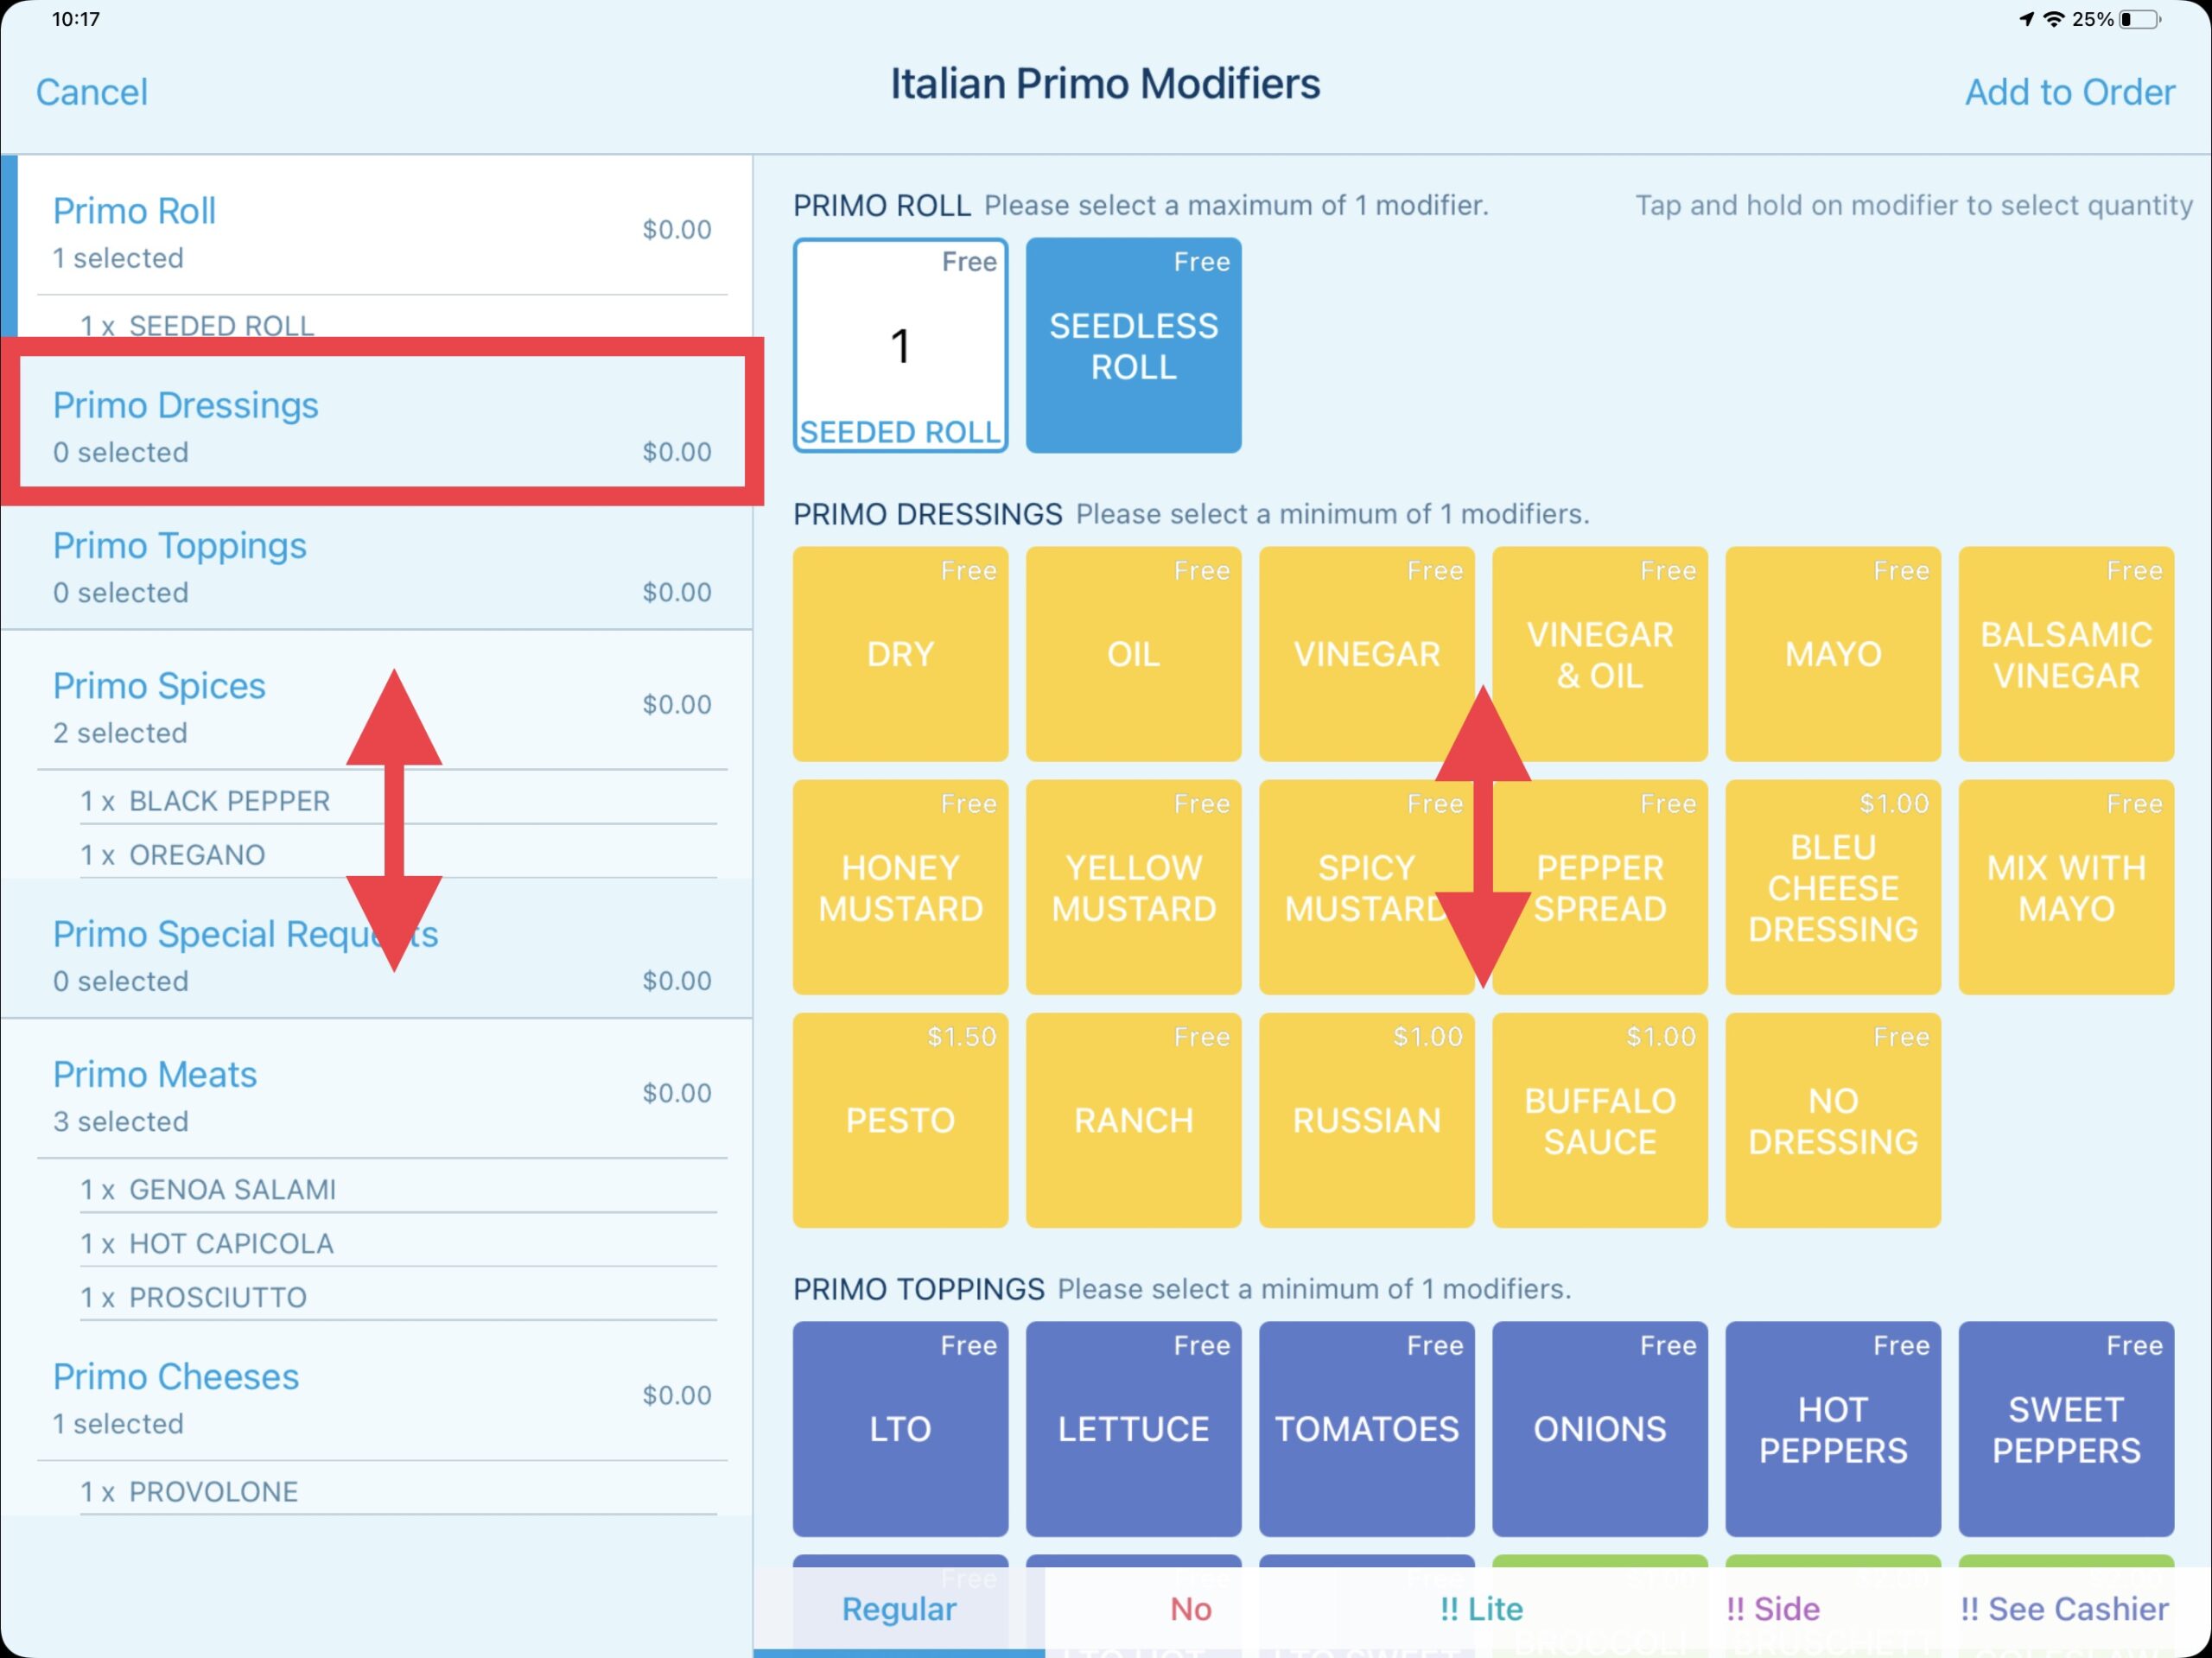
The modifier screen is divided up into two sections, the left modifier display groups and the right modifier selection groups. On each of the section groups, you can scroll up and down to view more of the screen or you can touch on the individual section groups on the left such as “Primo Dressings” to edit the corresponding dressing options. This allows for quick navigation between section groups based on what you are looking to modify.
Descriptions & Defaults
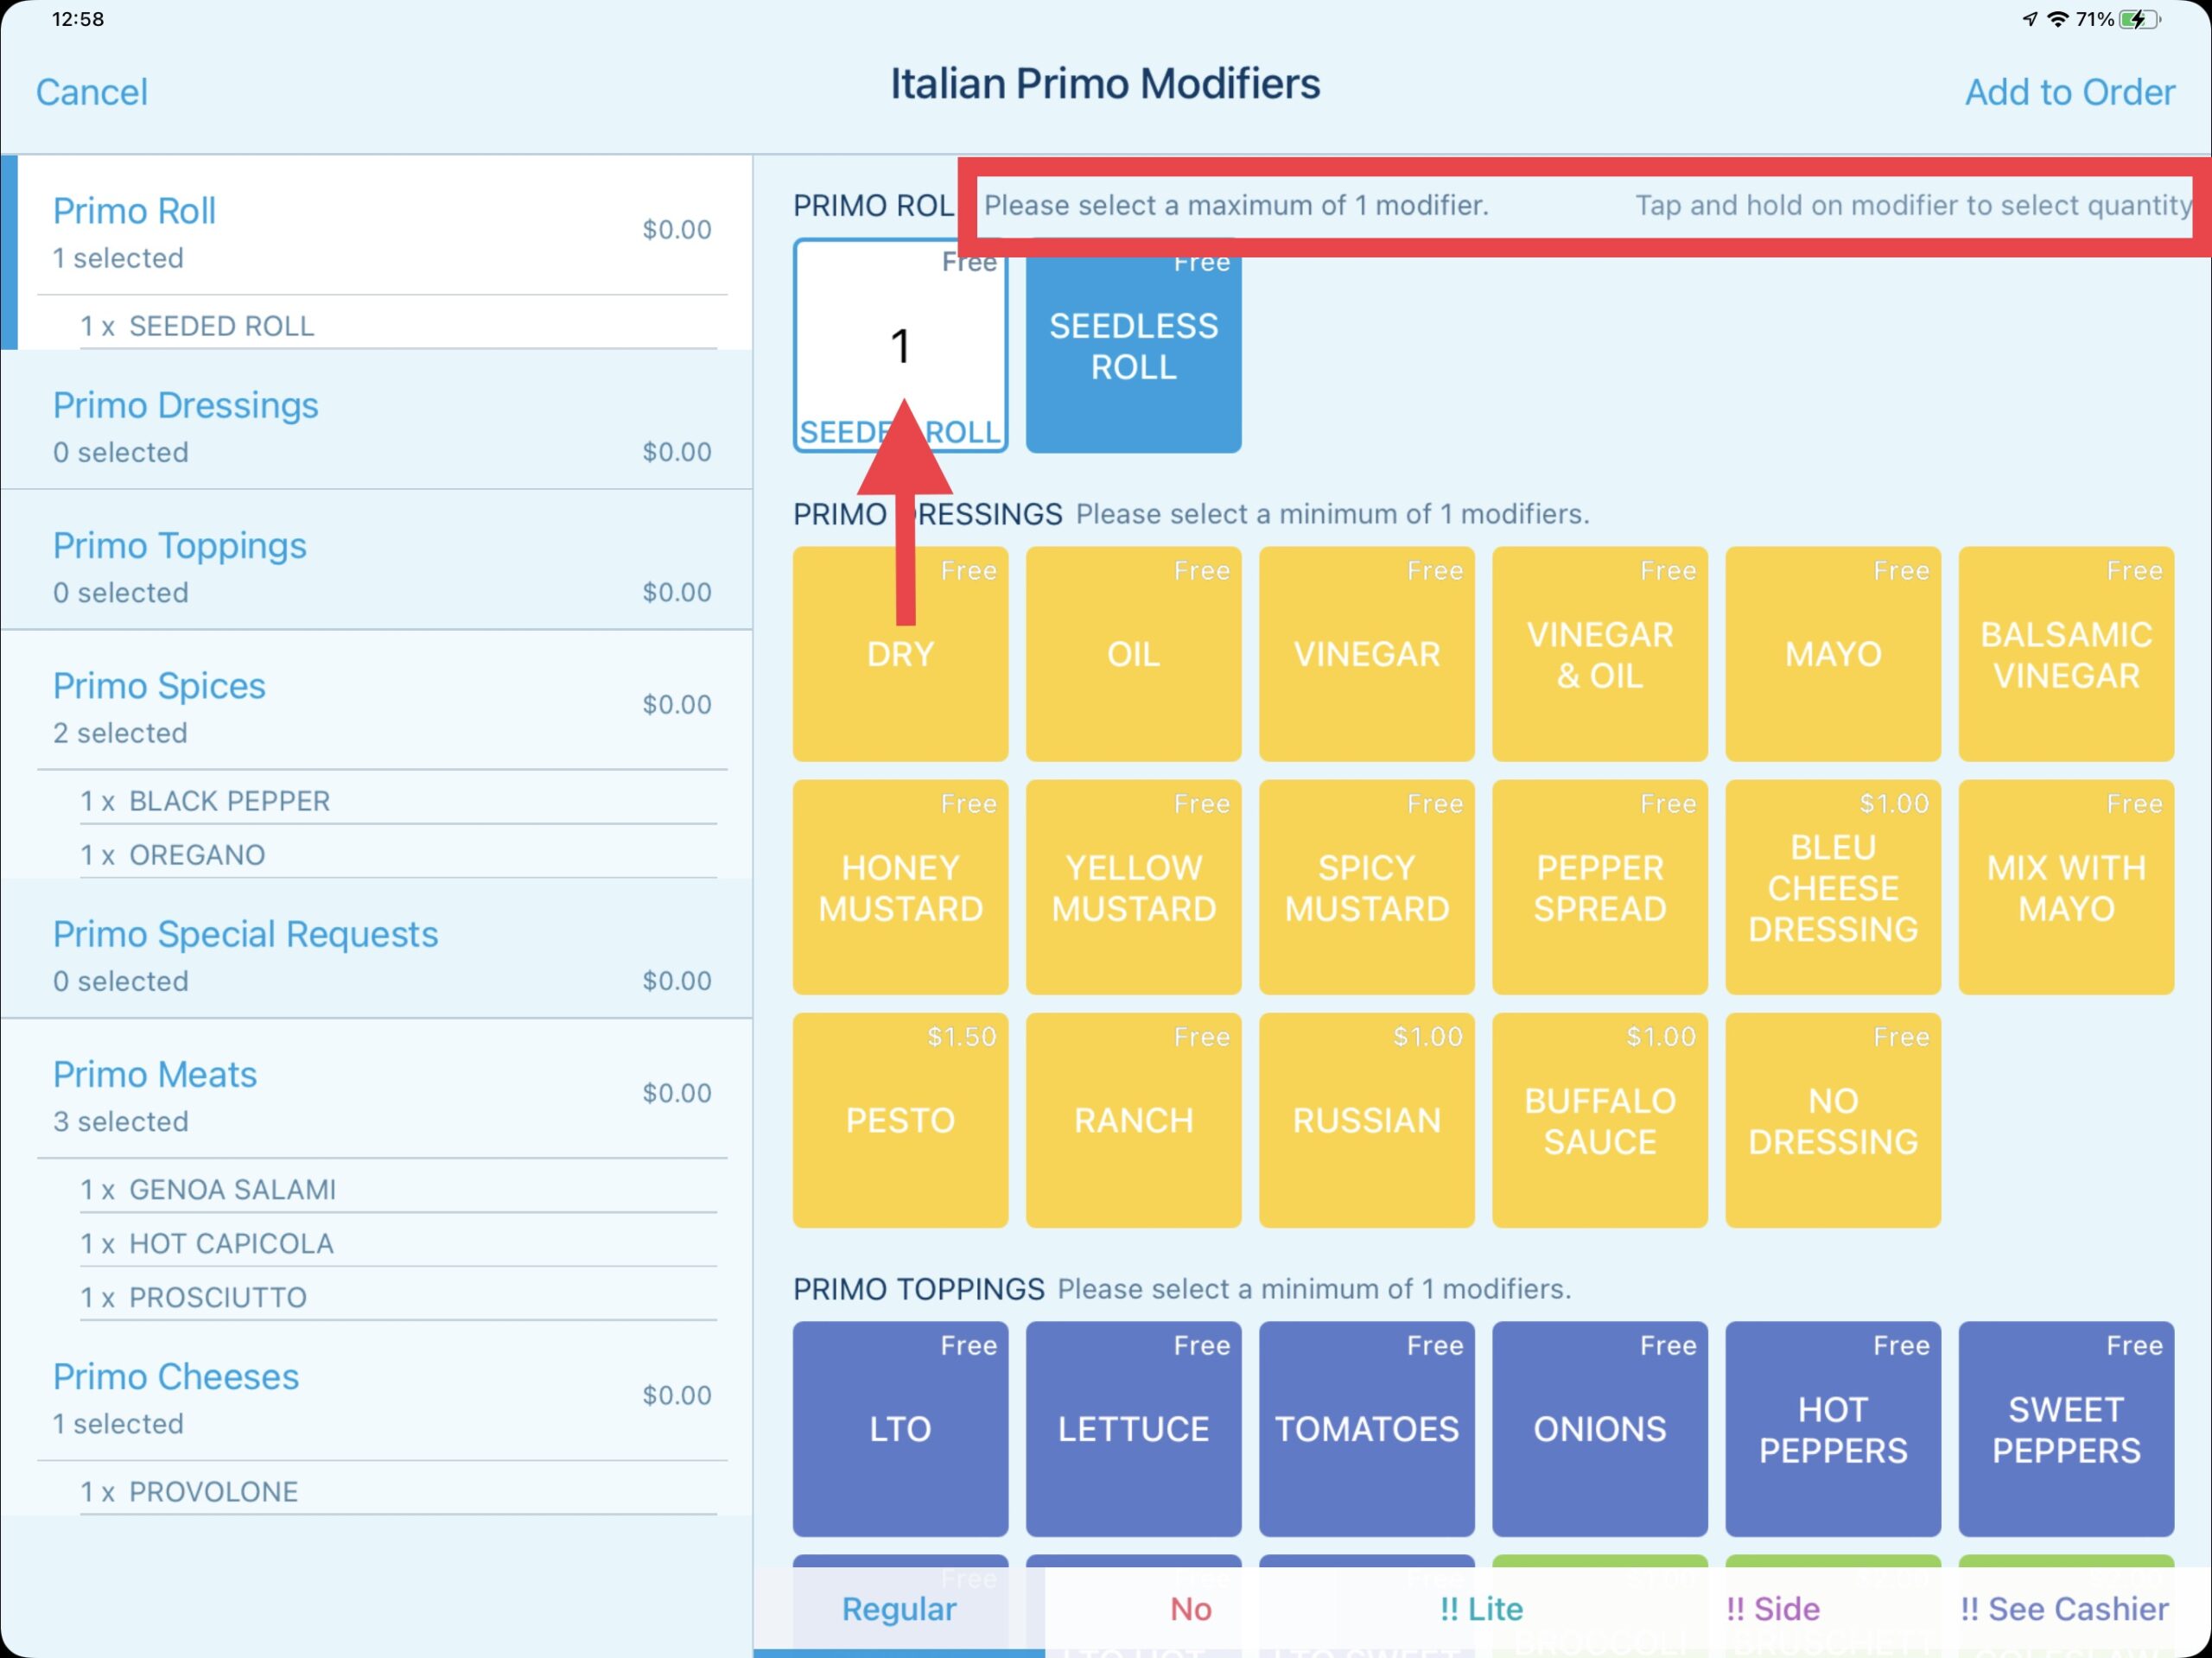
If needed, a description of any requirements is displayed such as in the PRIMO ROLL section group. If a section group requirements has not been filled, you will be warned and required to fulfill the section when trying to Add to Order. Any modifiers set up as defaults will appear in white like the SEEDED ROLL. By design, default modifiers do NOT print to the kitchen prep printer. Only changes such as removing a default will cause it to print (example: NO SEEDED ROLL).
Modifiers & Quantities
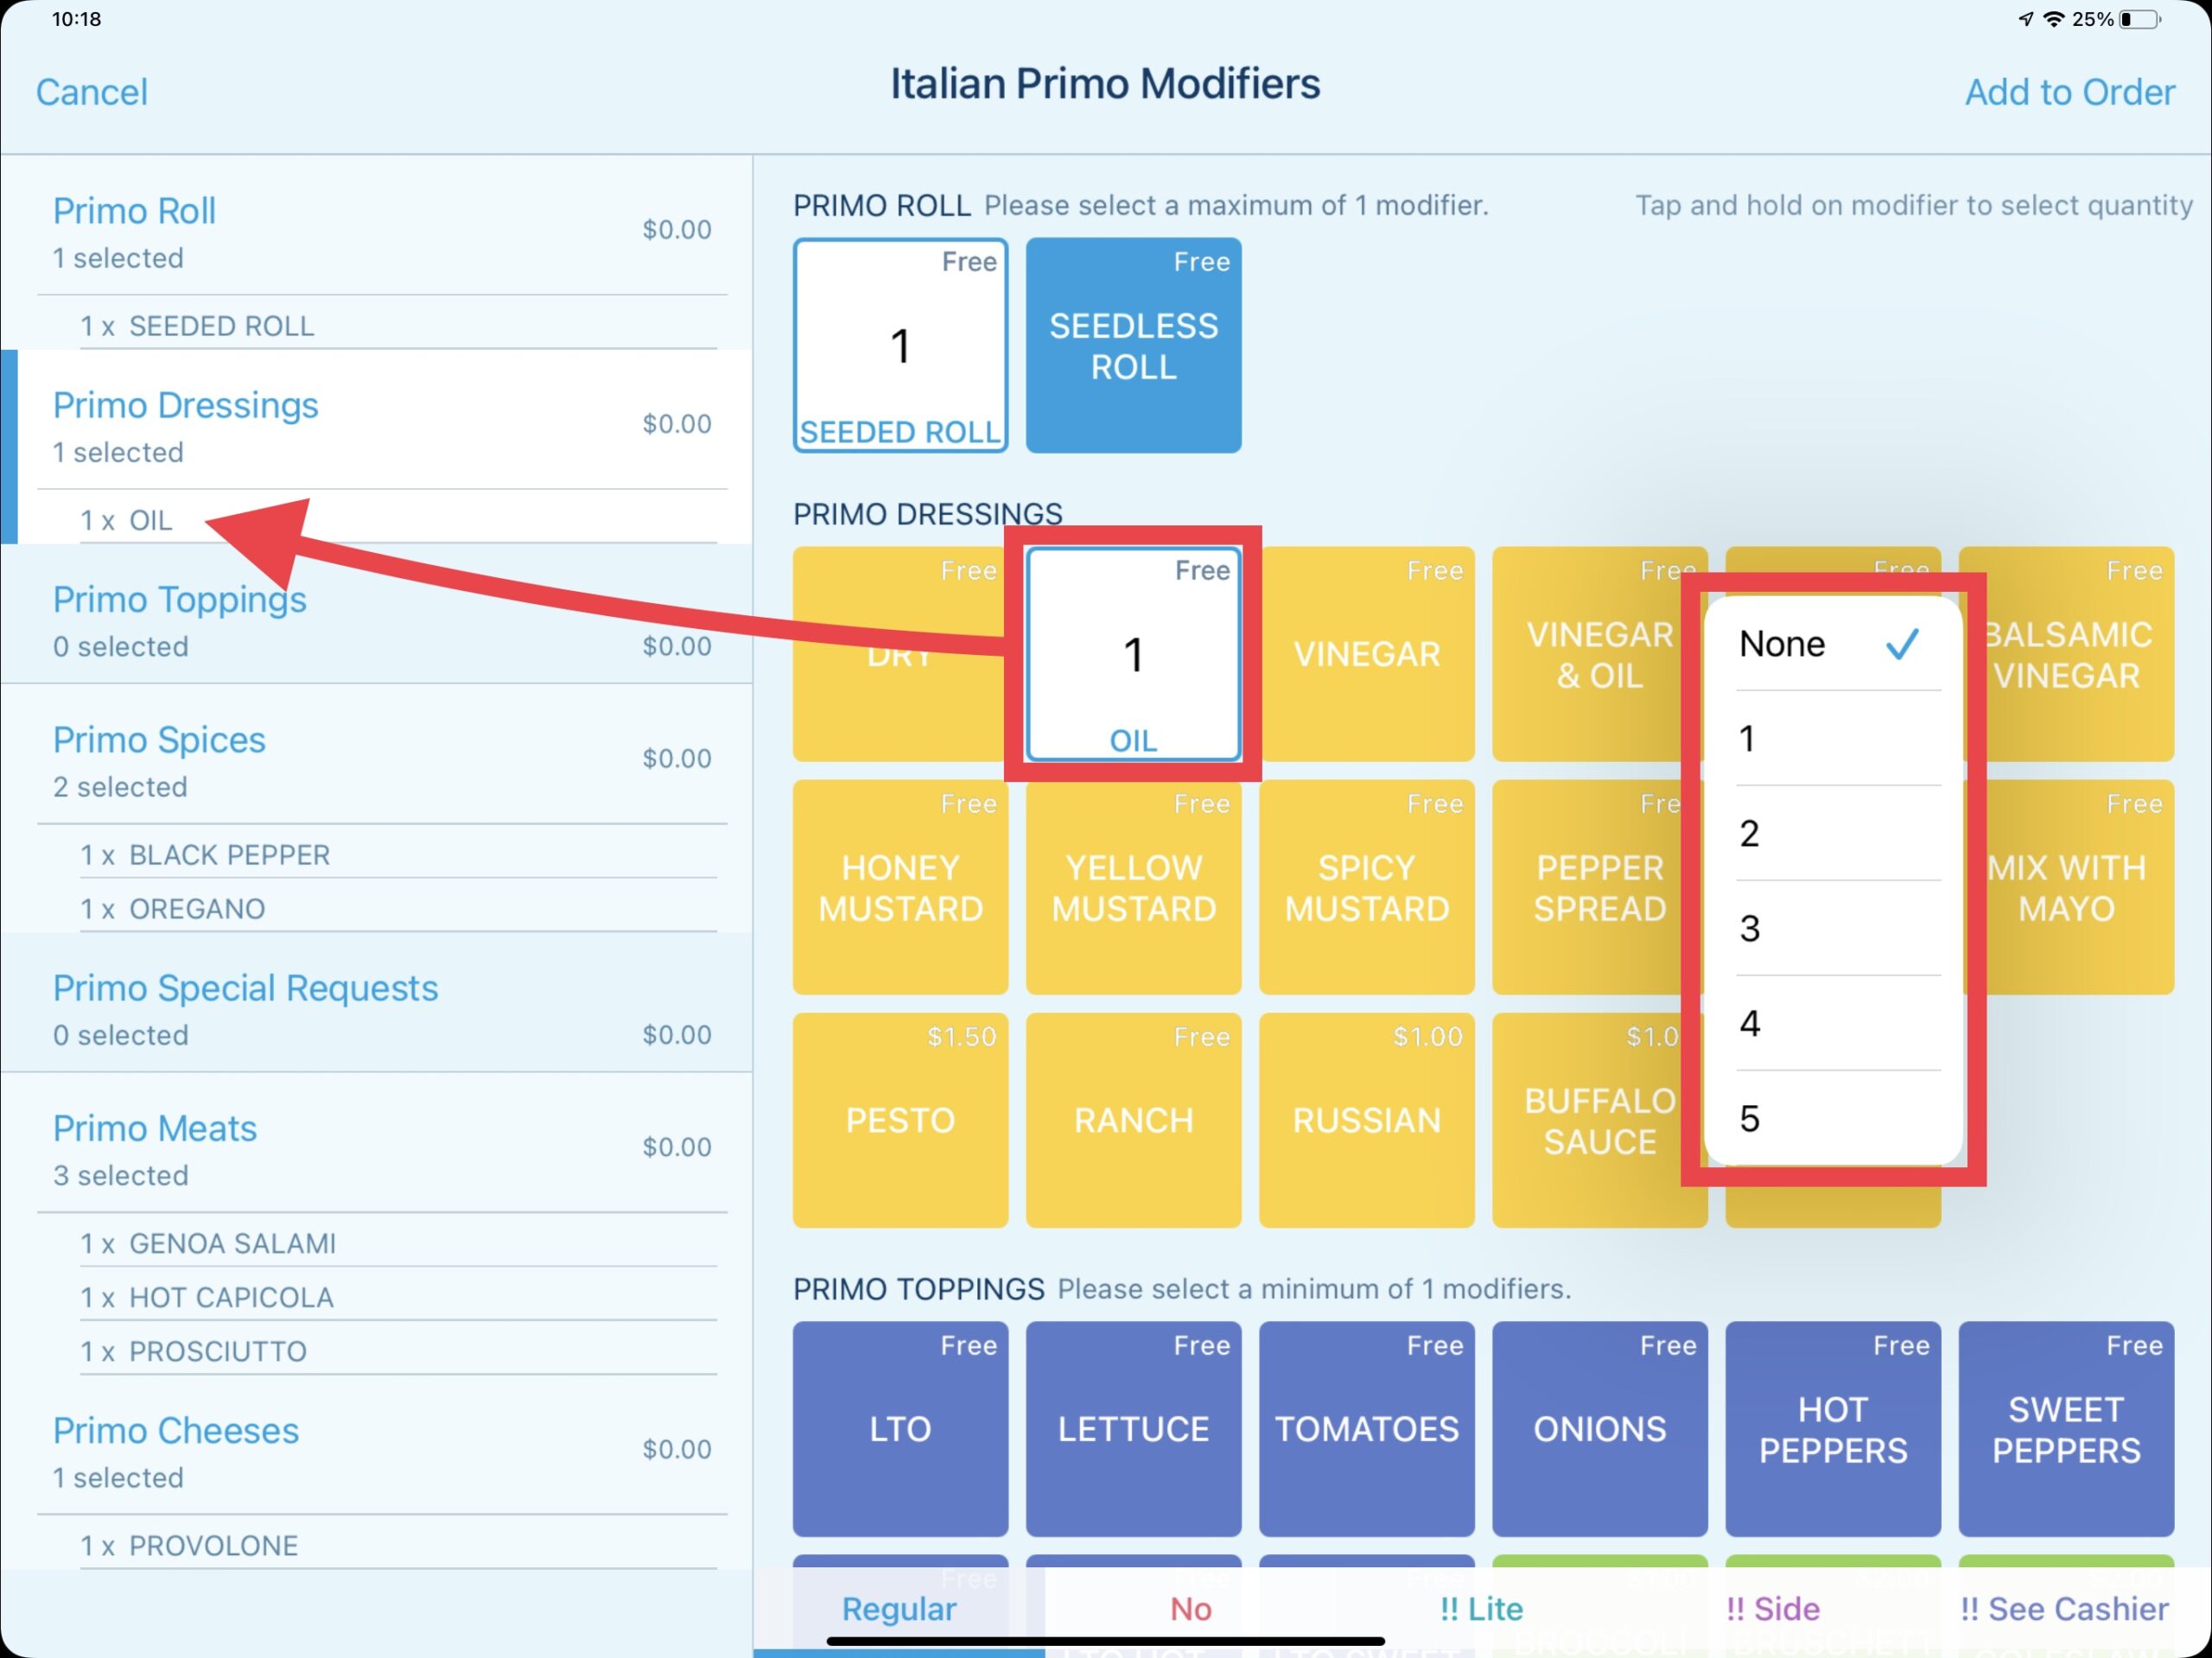
To make a modifier selection, touch on the modifier such as OIL and it will be added on both section groups. To change the quantity of a modifier, hold on the modifier to expand the quantity dropdown and make your selection accordingly.
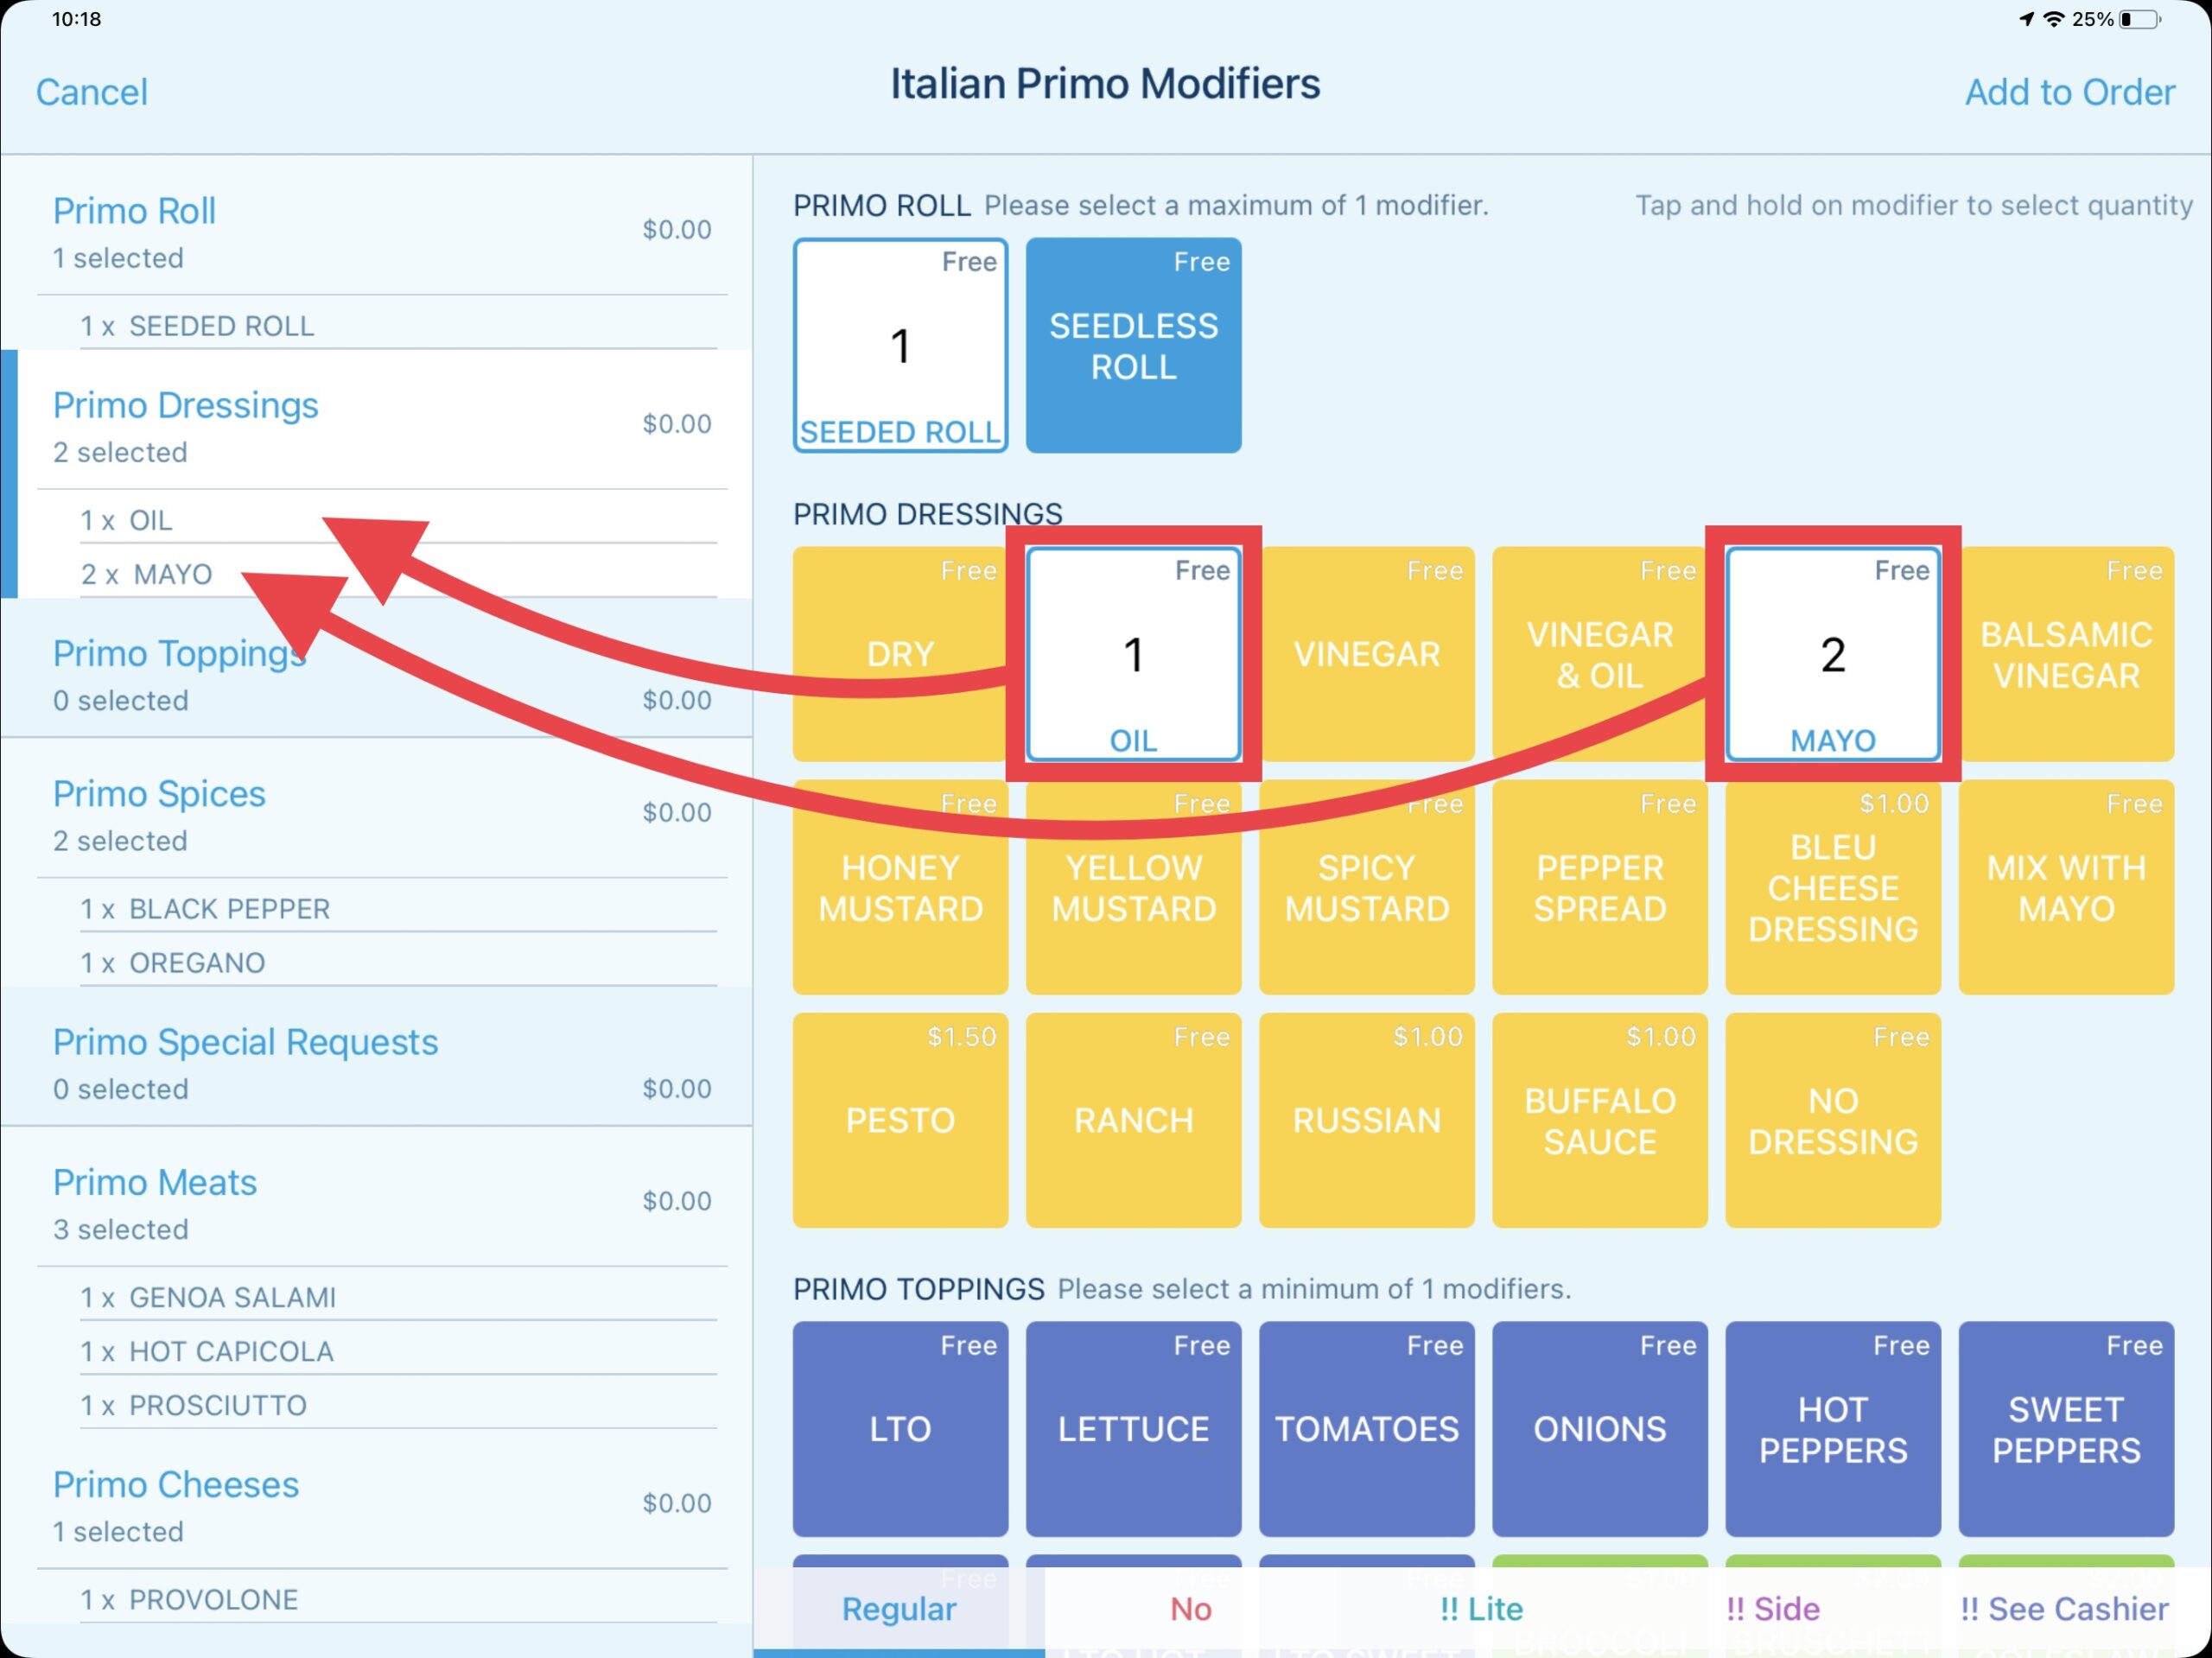
In this example, we are adding one portion of OIL, and two portions (or extra) MAYO.
Special Modifications
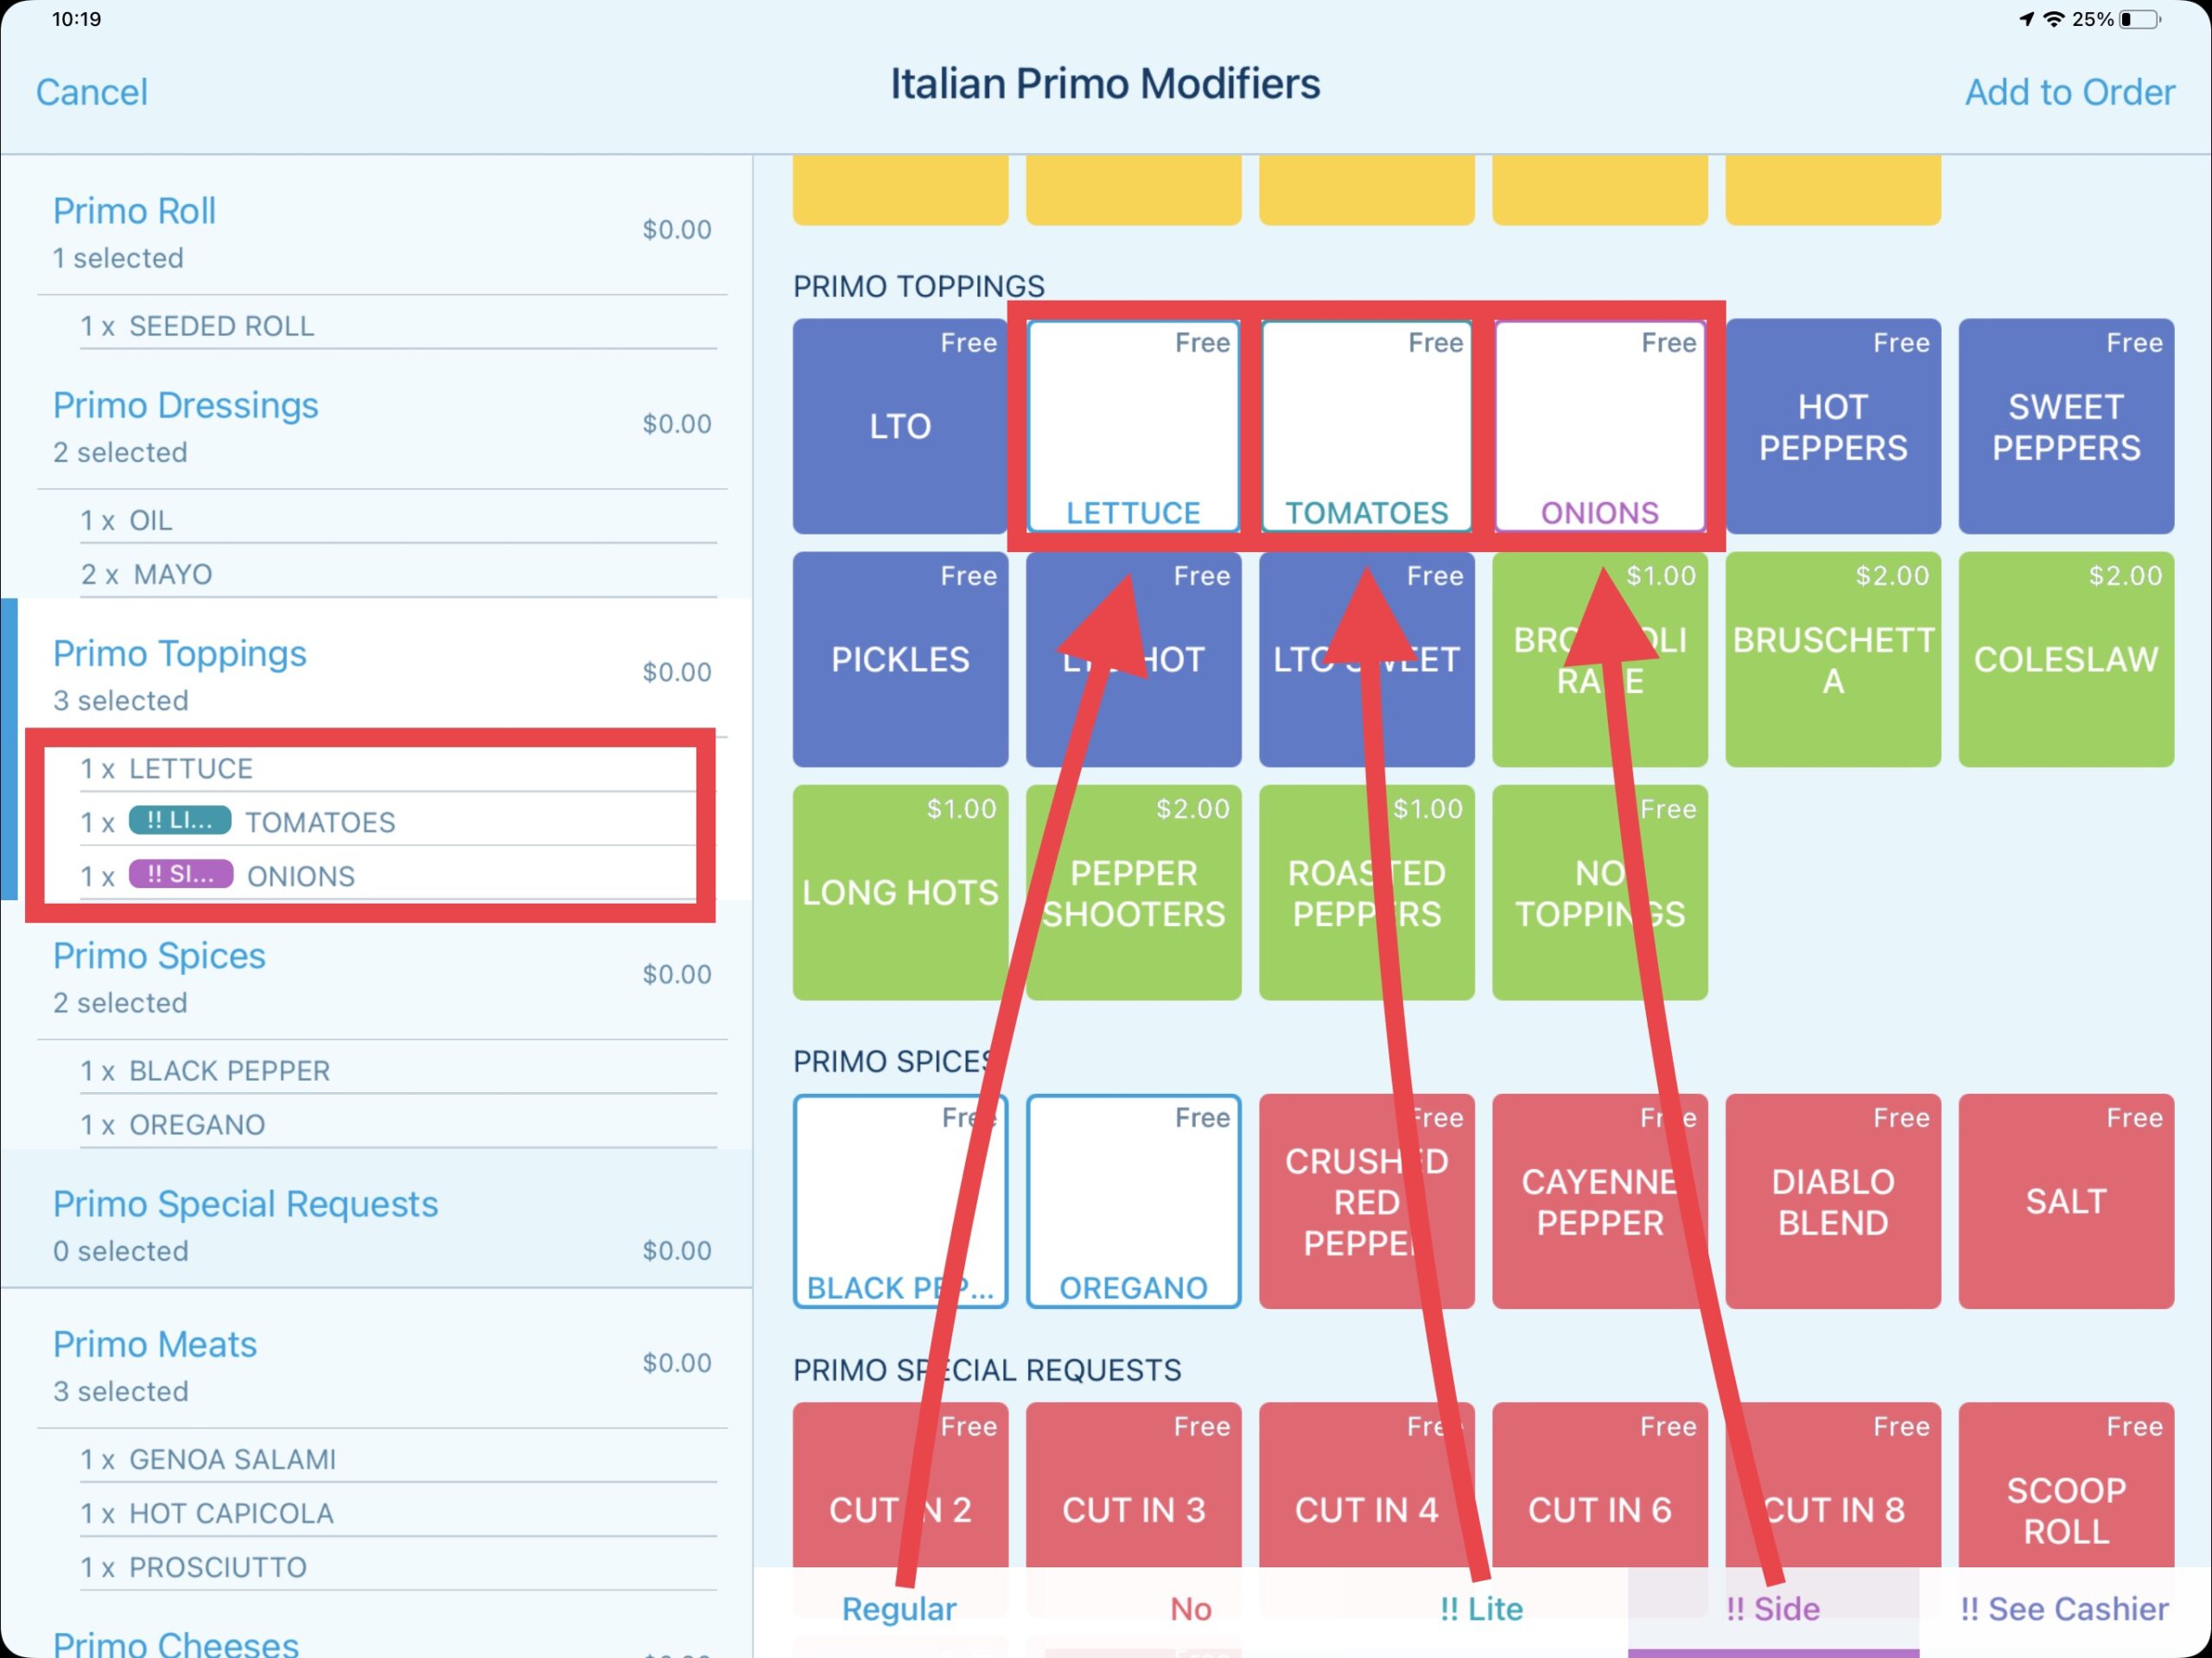
In many cases it may be desired to make an adjustment to the portion of a modifier aside from adding extra. Let's look at the 5 modifier options along the bottom of the right side. By default, the Regular modifier option is selected. Changing between the Regular, No (not needed when using default modifiers), !! Lite, !! Side, !! See Cashier modifier options then selecting the modifier will change the color of the modifier text and display the corresponding modifier option next to the modifier ordered. The modifier option is also indicated on the kitchen prep ticket (example: !! LITE TOMATOES).
Modifier Pricing
Each modifier will have a price associated with it whether it being free or priced. In the database programming we can configure each modifier section group to allow for a default price or quantity to be applied to the section group. Let's look at the PRIMO MEATS section group.
The Italian Primo comes with three meat defaults priced at $2.00 each for a total of $6.00. This section group is configured to allow up to $6.00 in “free” meats. Even though the meat selection button shows $2.00 in the upper right corner, if you look at the PRIMO MEATS section group on the left it shows that there is $0.00 in charges for these default modifiers.
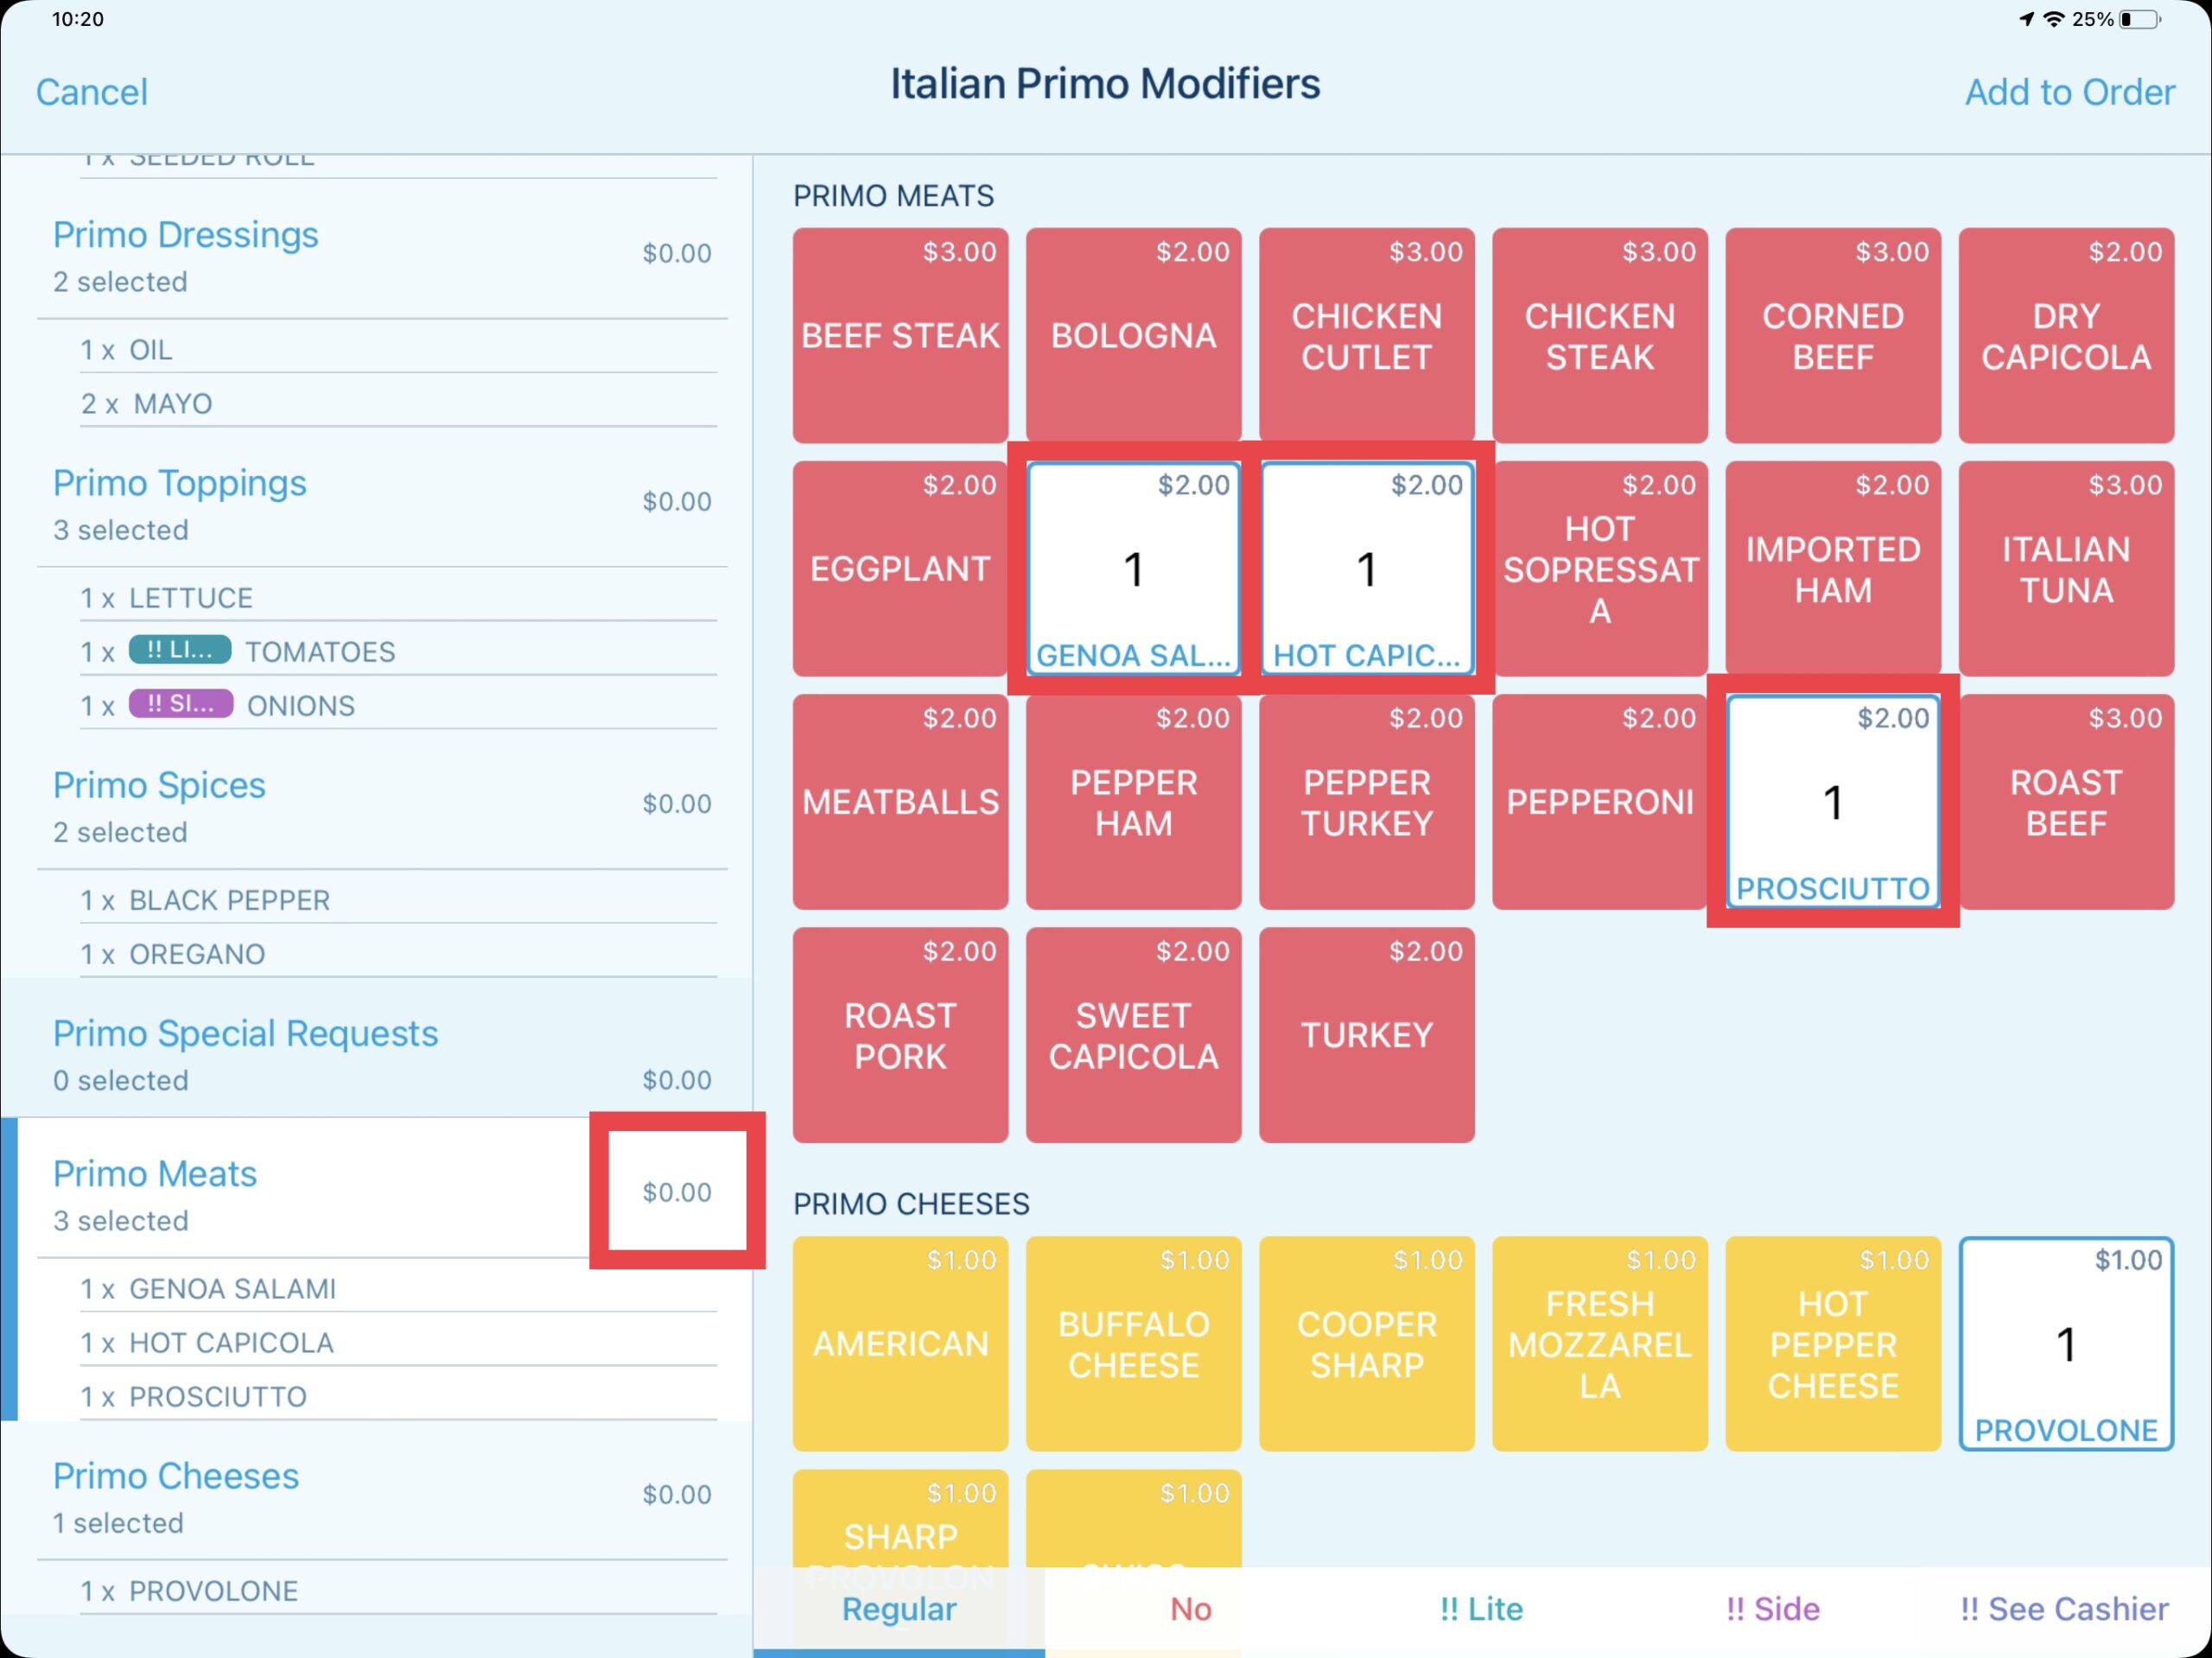
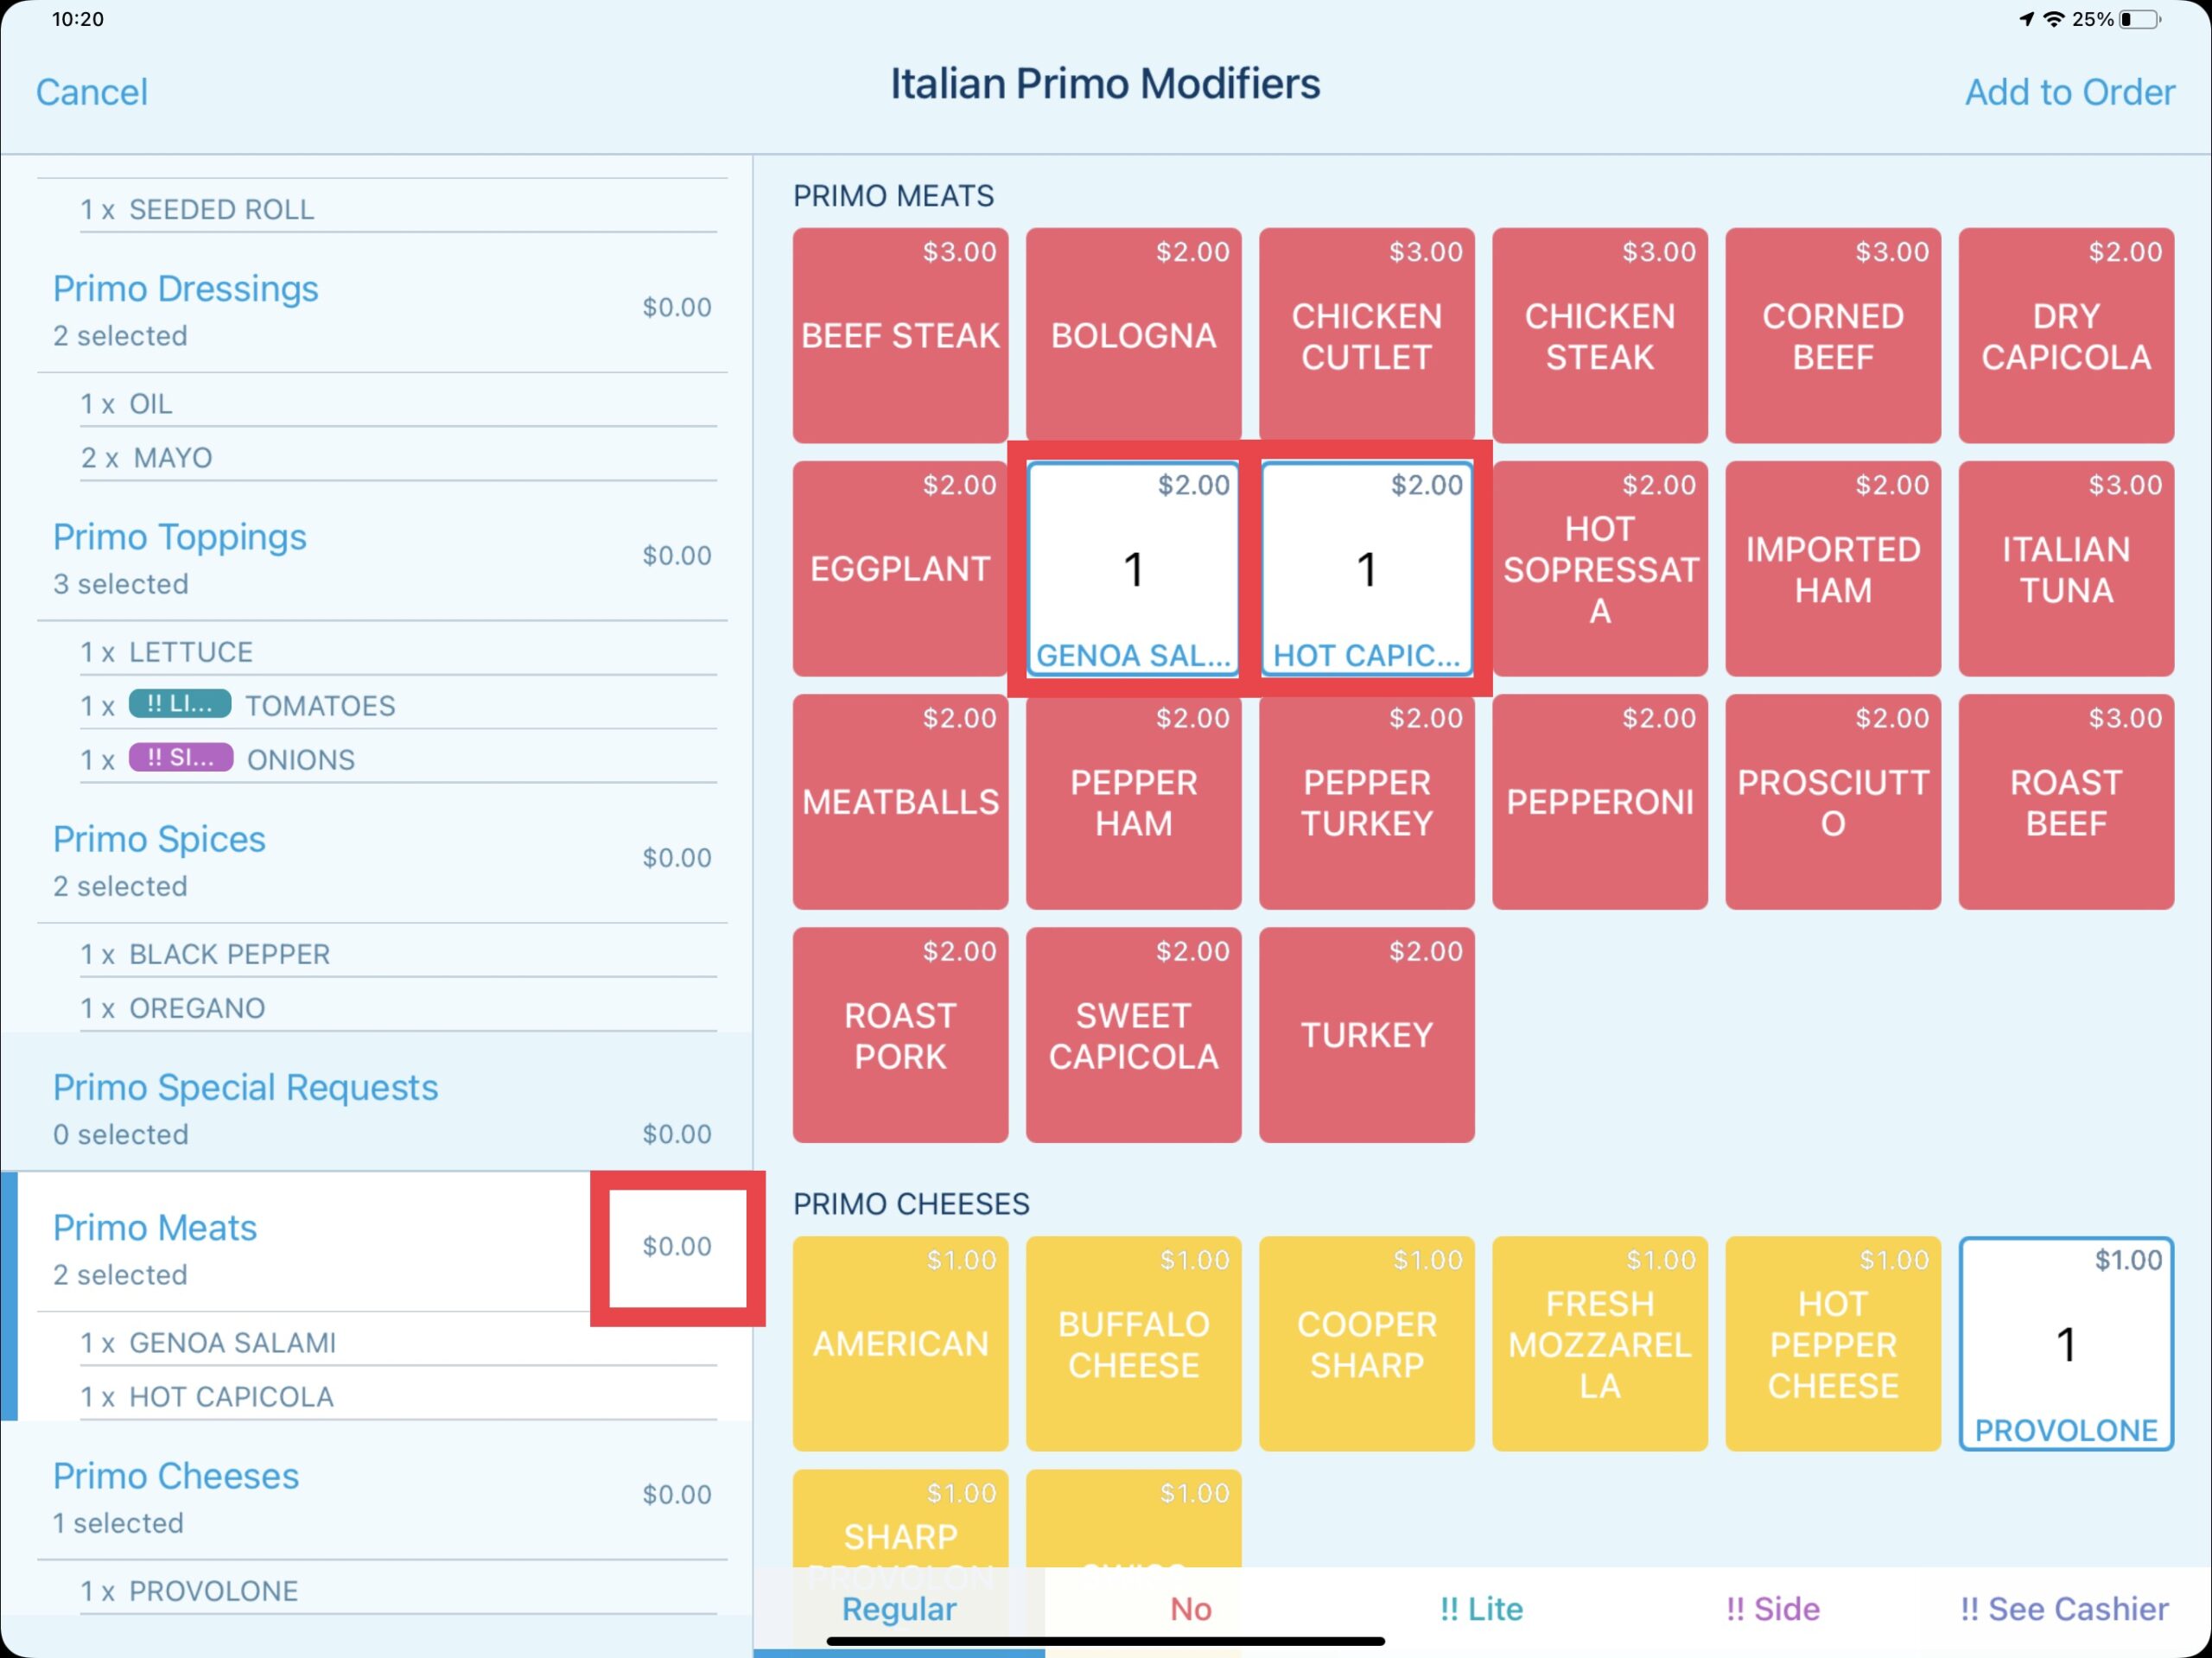
Removing a default modifier such as the PROSCIUTTO does not deduct any price value from the hoagie however it applies a $2.00 “credit” to the PRIMO MEATS section group. This credit can only be applied to this group and no other section group.
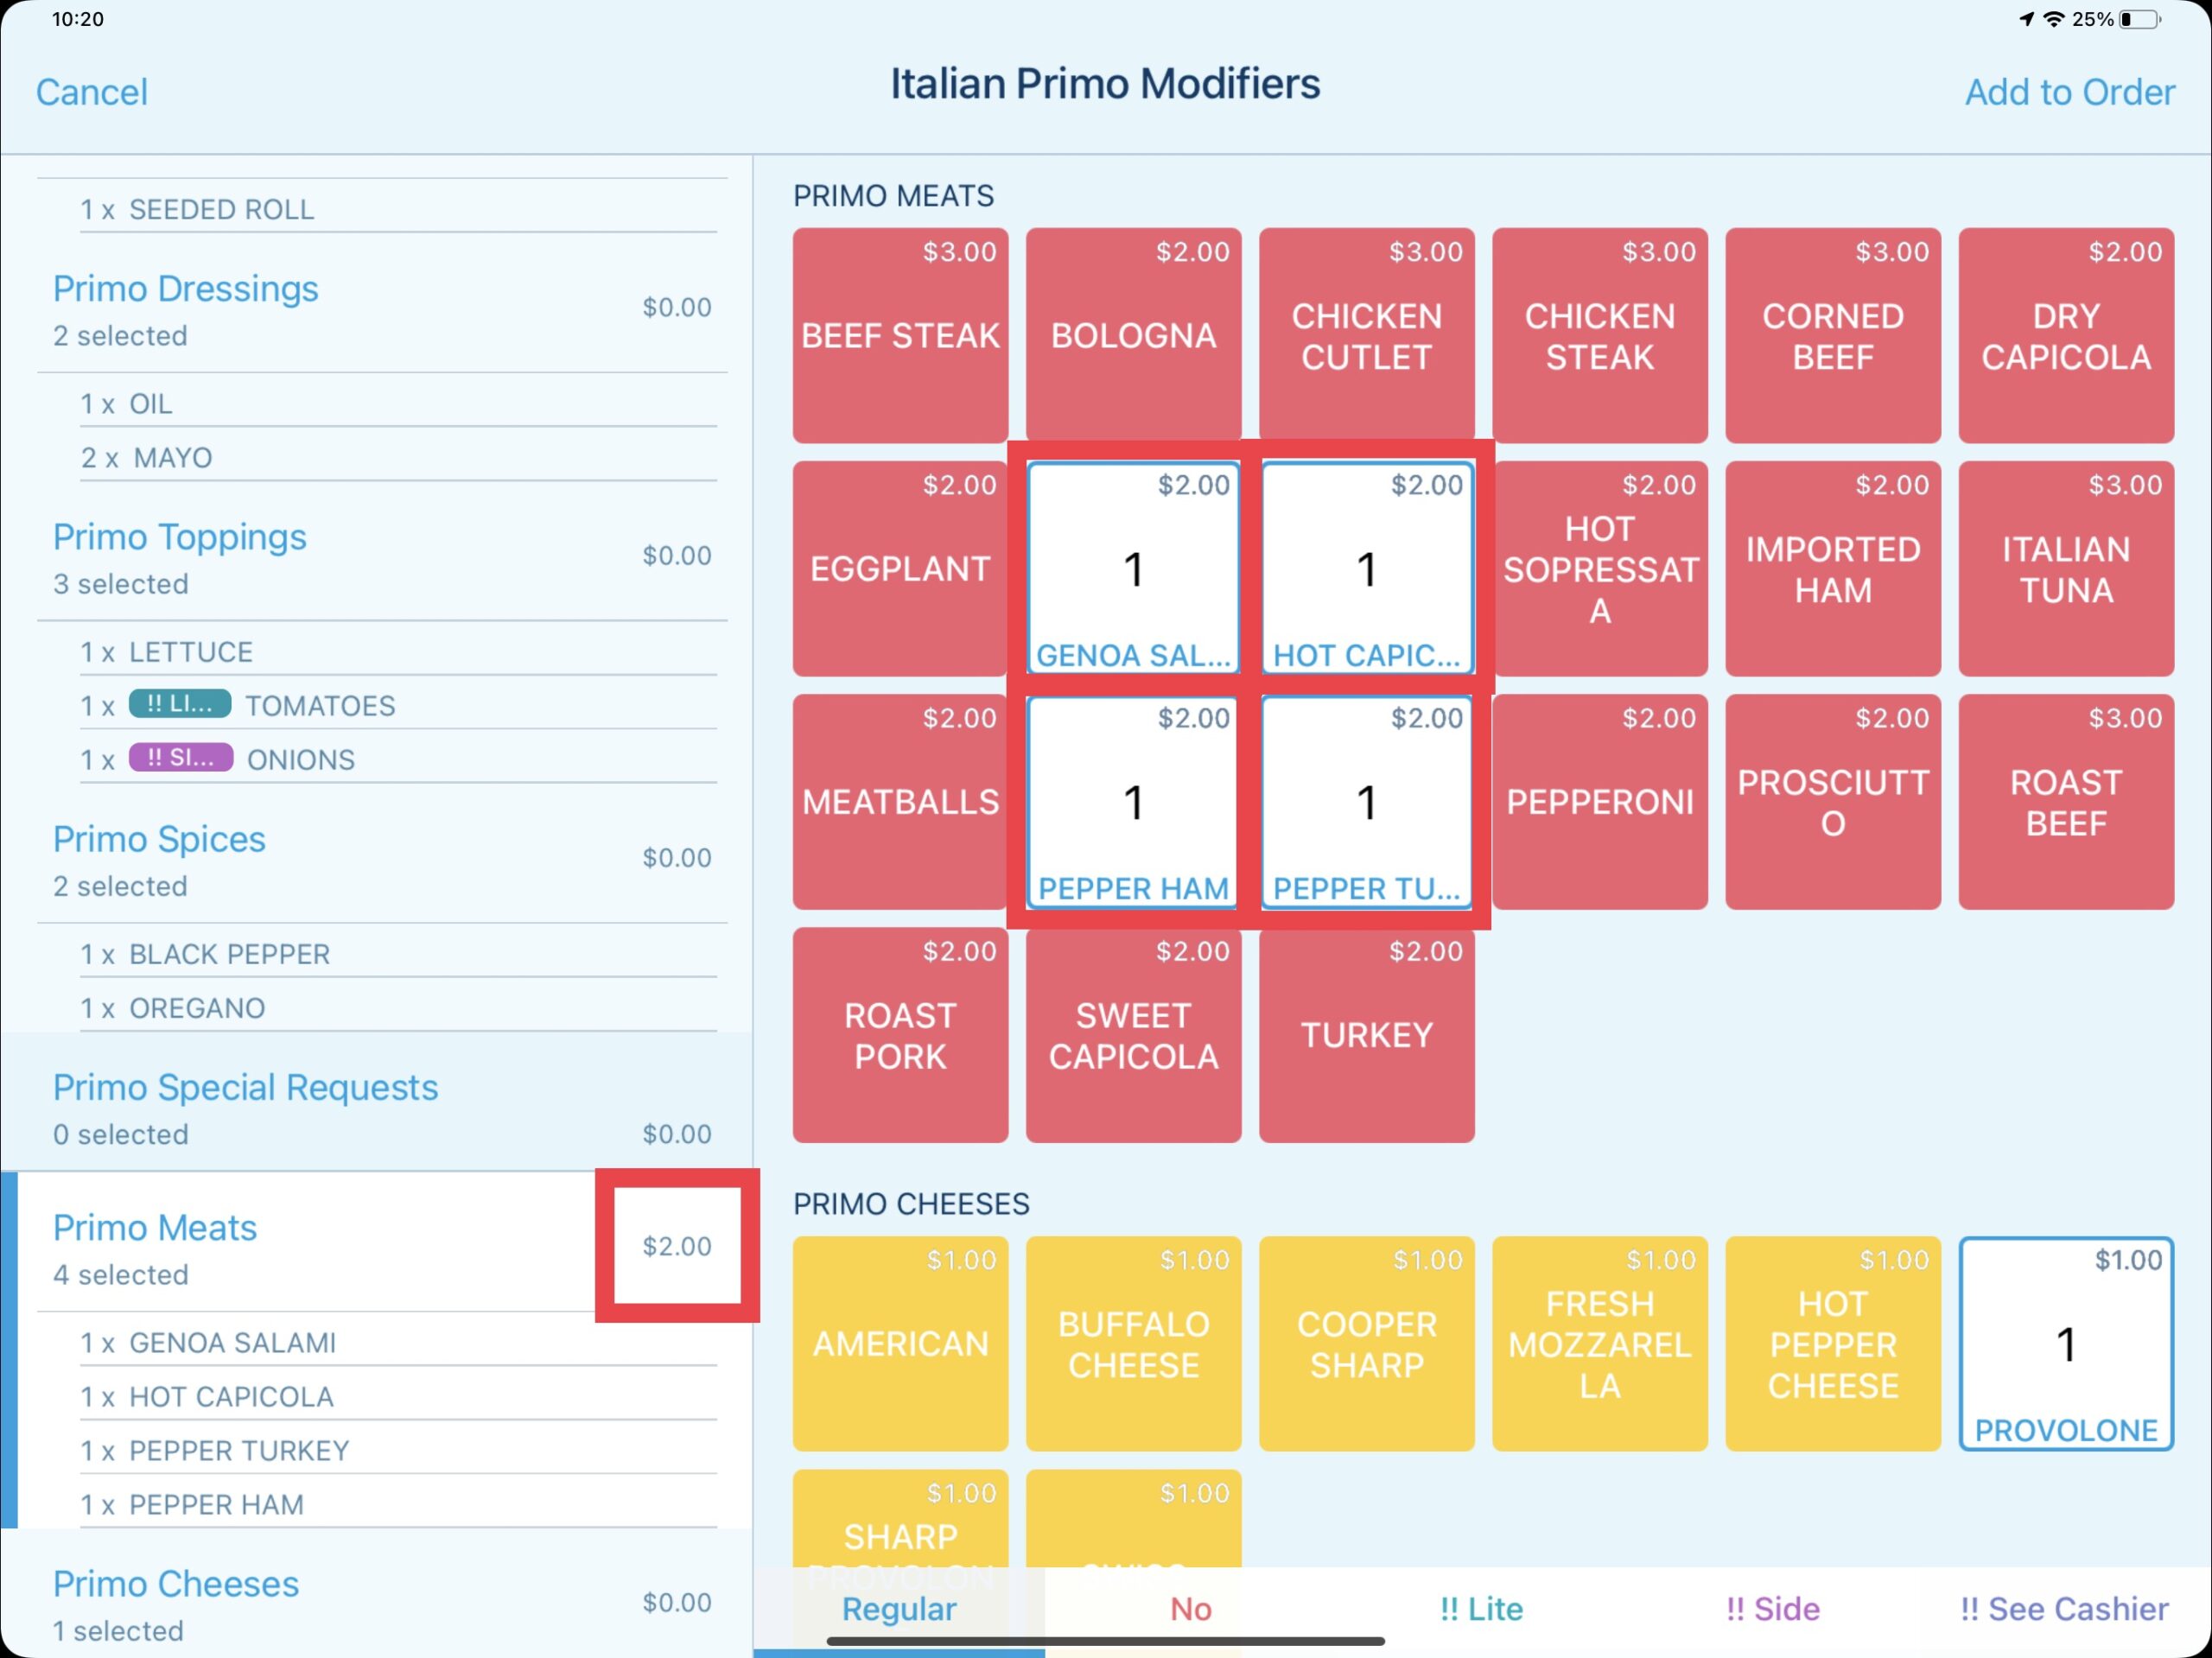
Adding a different meat modifier such as the PEPPER TURKEY for $2.00 does not increase any price value as the section group still has a $2.00 credit prior. Adding the PEPPER HAM for $2.00 however will increase the price value therefore the PRIMO MEATS section group now charges an additional $2.00 as indicated on the left.
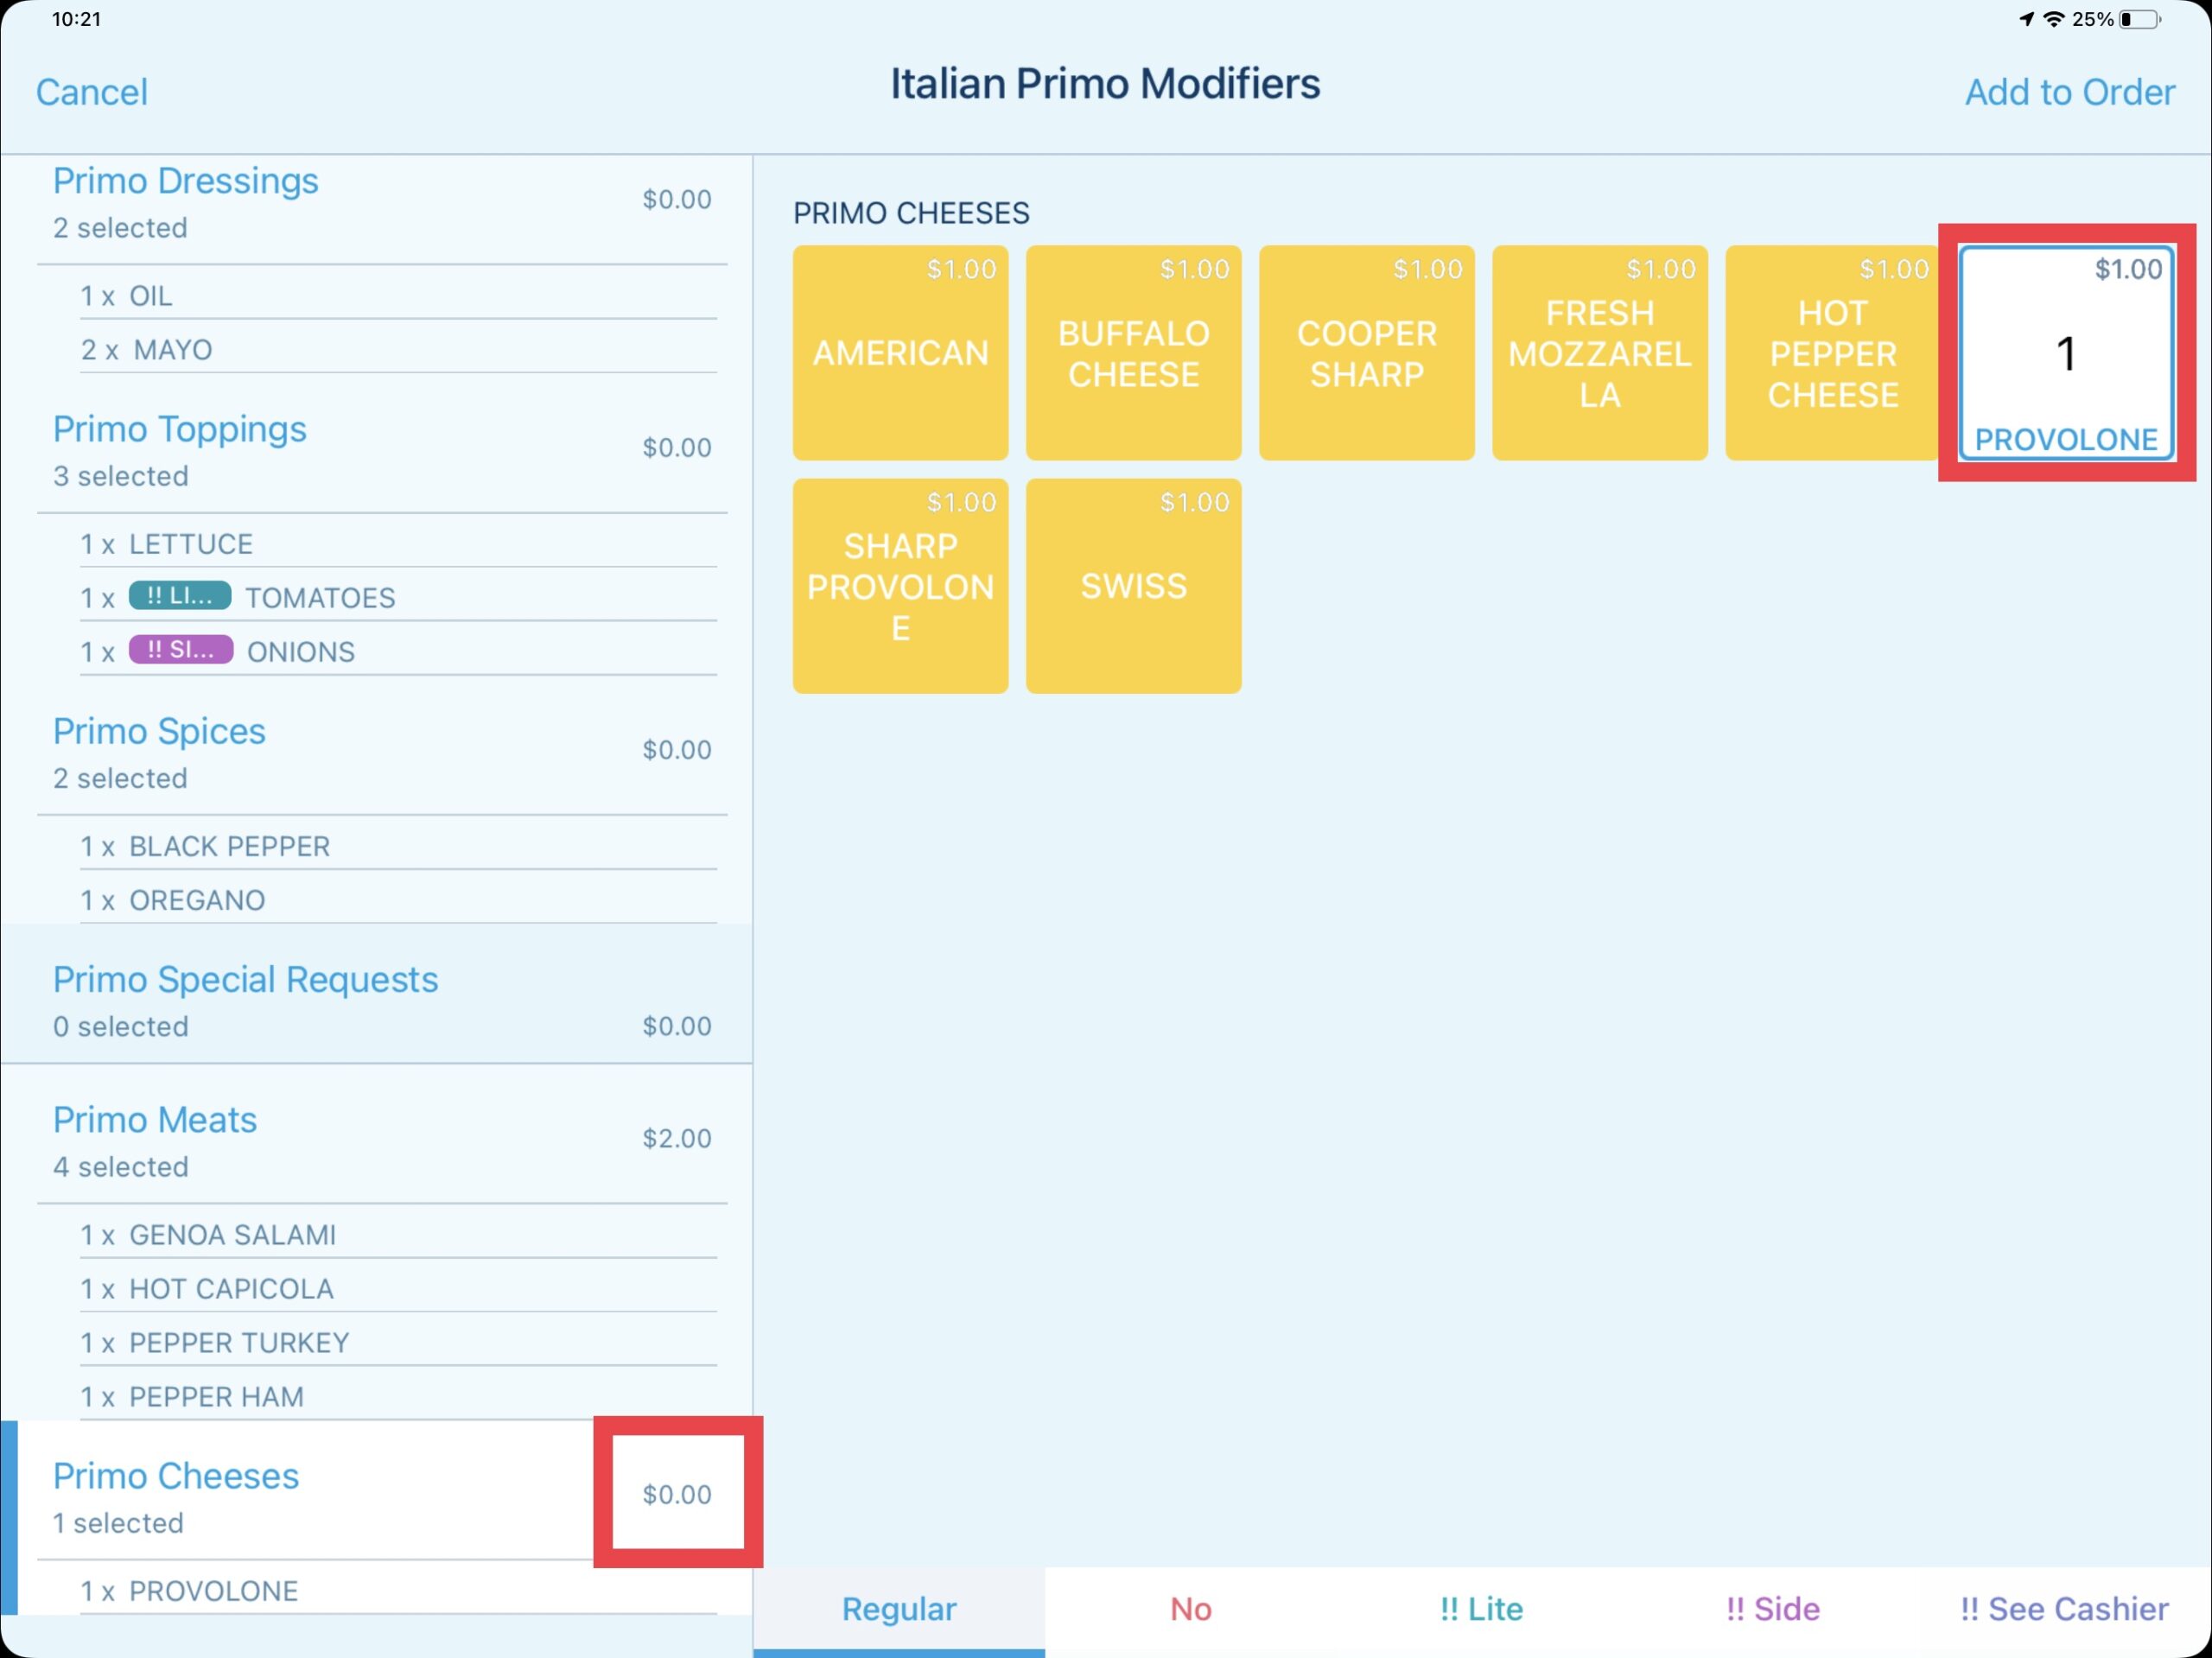
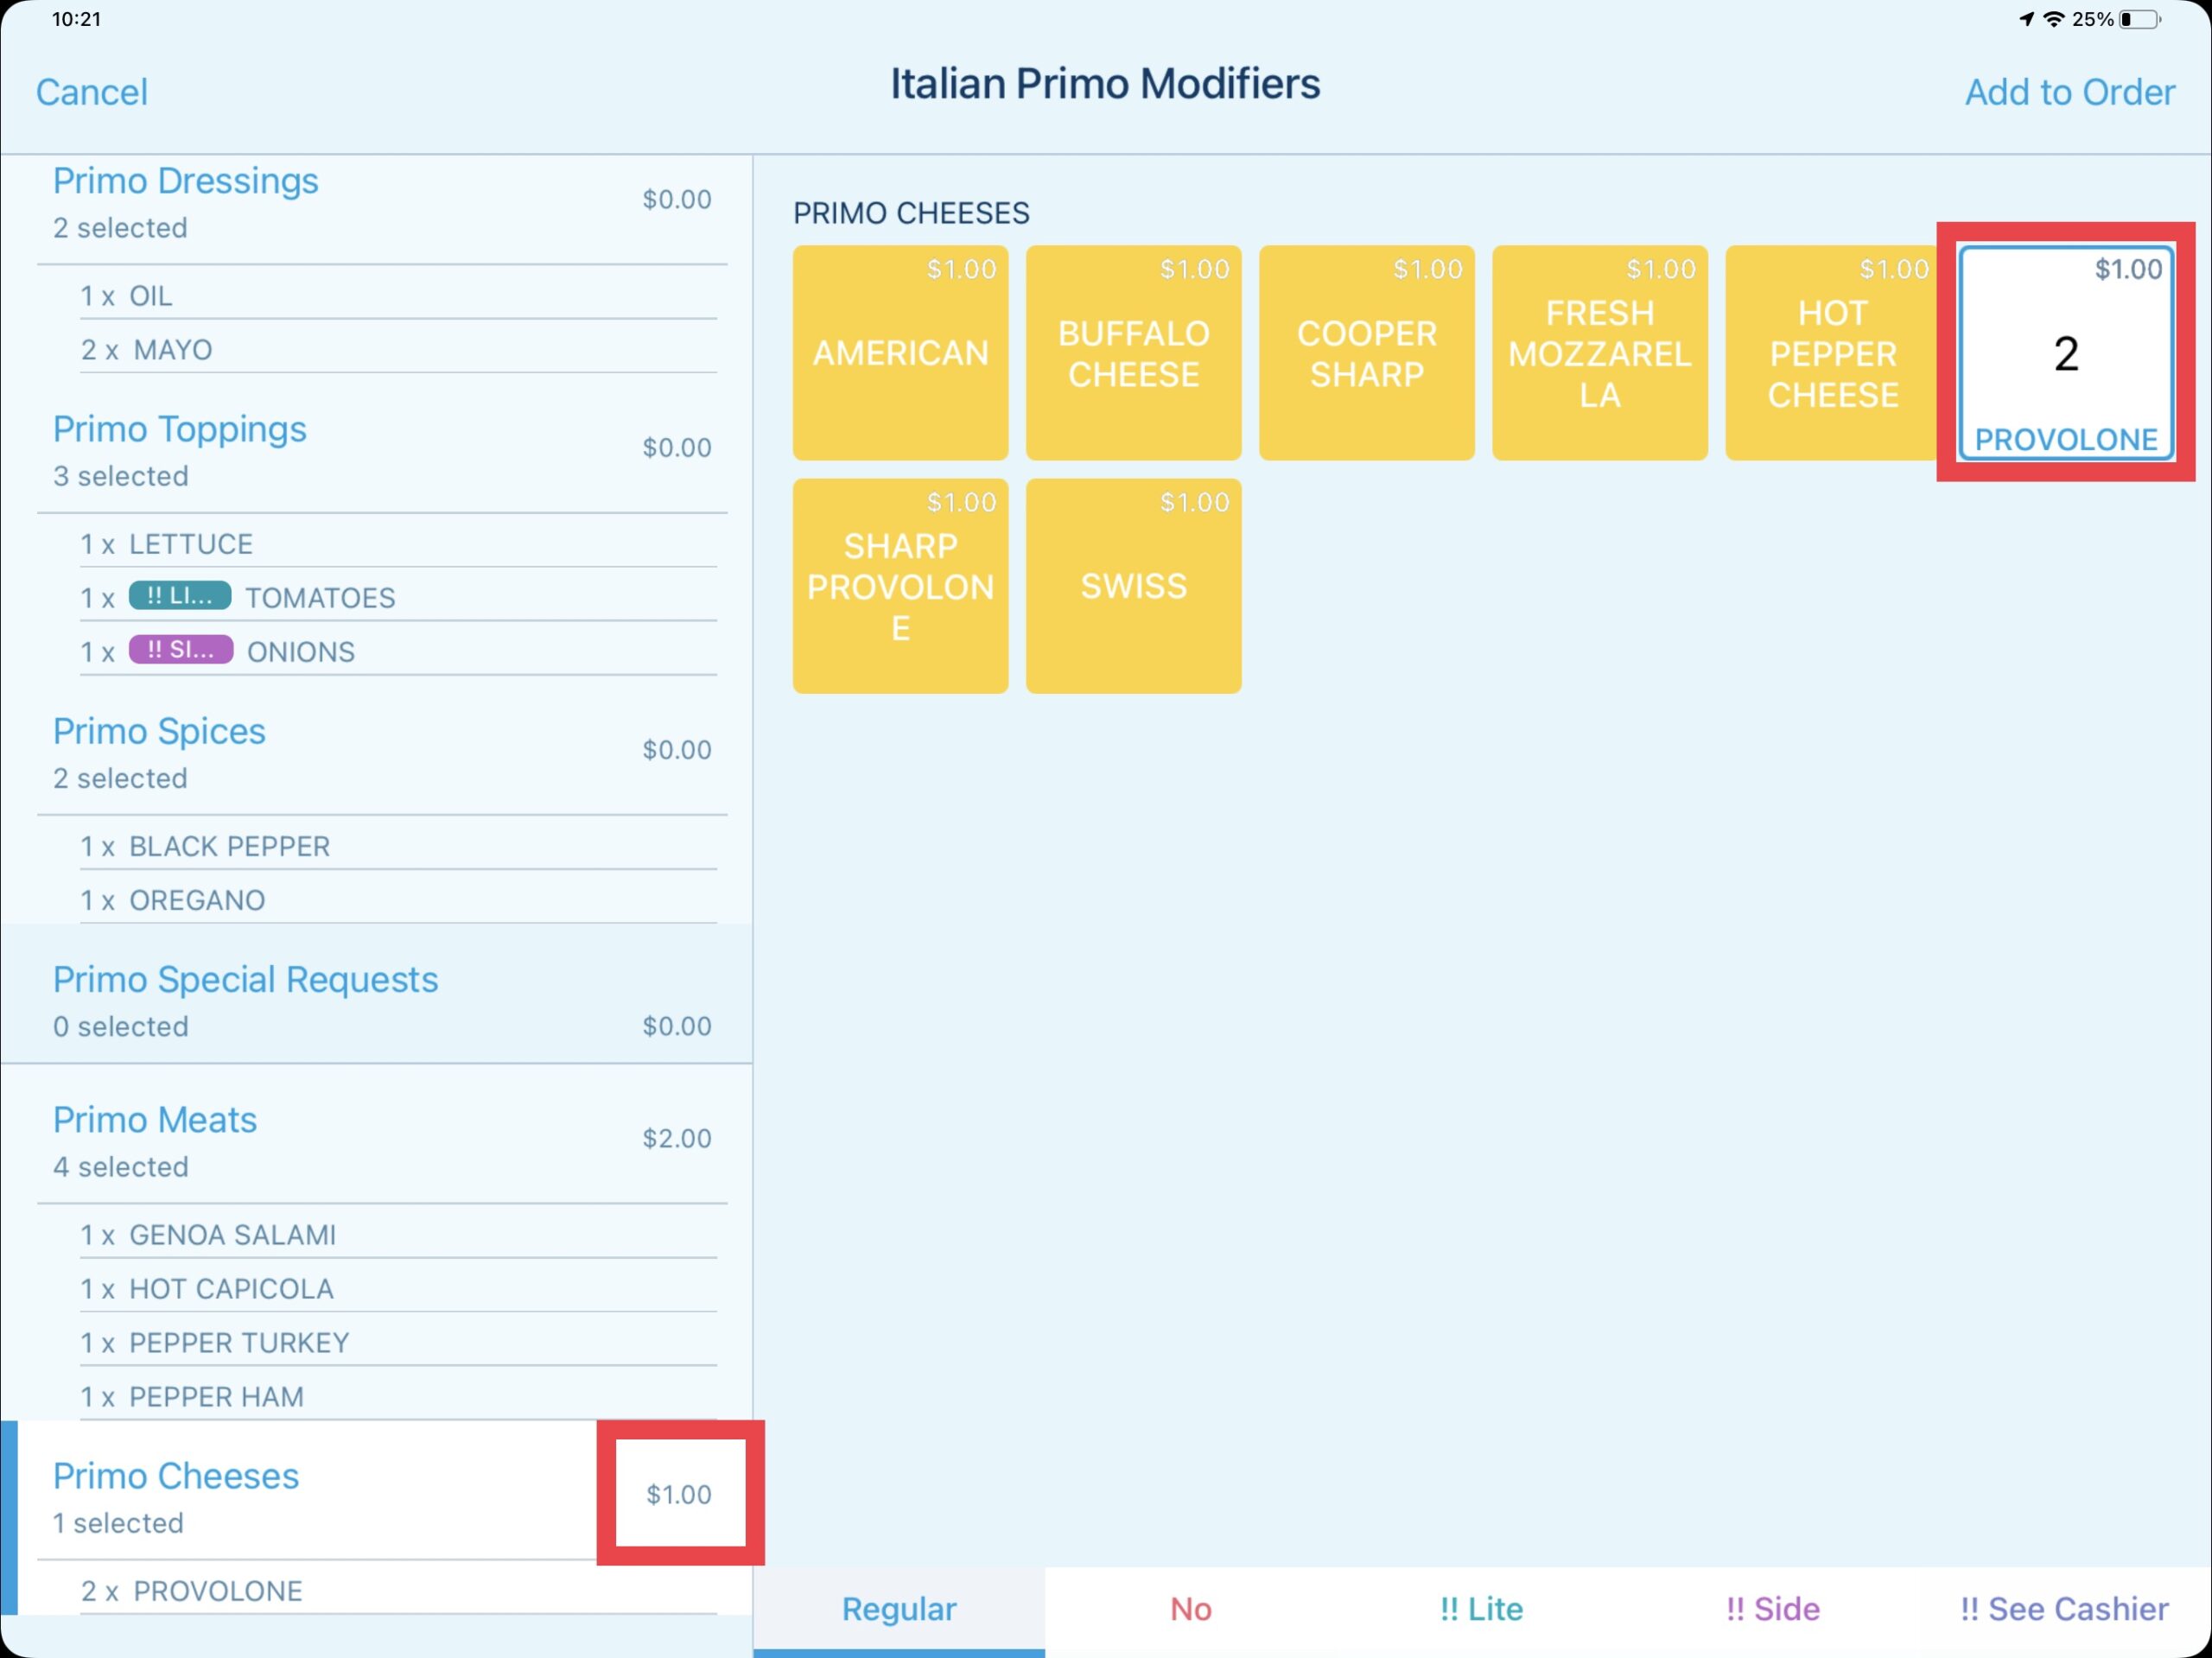
Looking at the PRIMO CHEESES, if the default of PROVOLONE for $1.00 is added at a quantity of 2, Revel Systems will apply a $1.00 additional charge to the section group.
Updated 06/15/2022

Summary
Ordering catering trays in Revel Systems has been redesigned with the Revel Systems 2.76 release. The catering tray system utilizes Group Combos to construct the hoagie whole size components in an easy column selection view at the POS level. This column view also includes the hoagie whole size modifiers.
Navigating the Screen
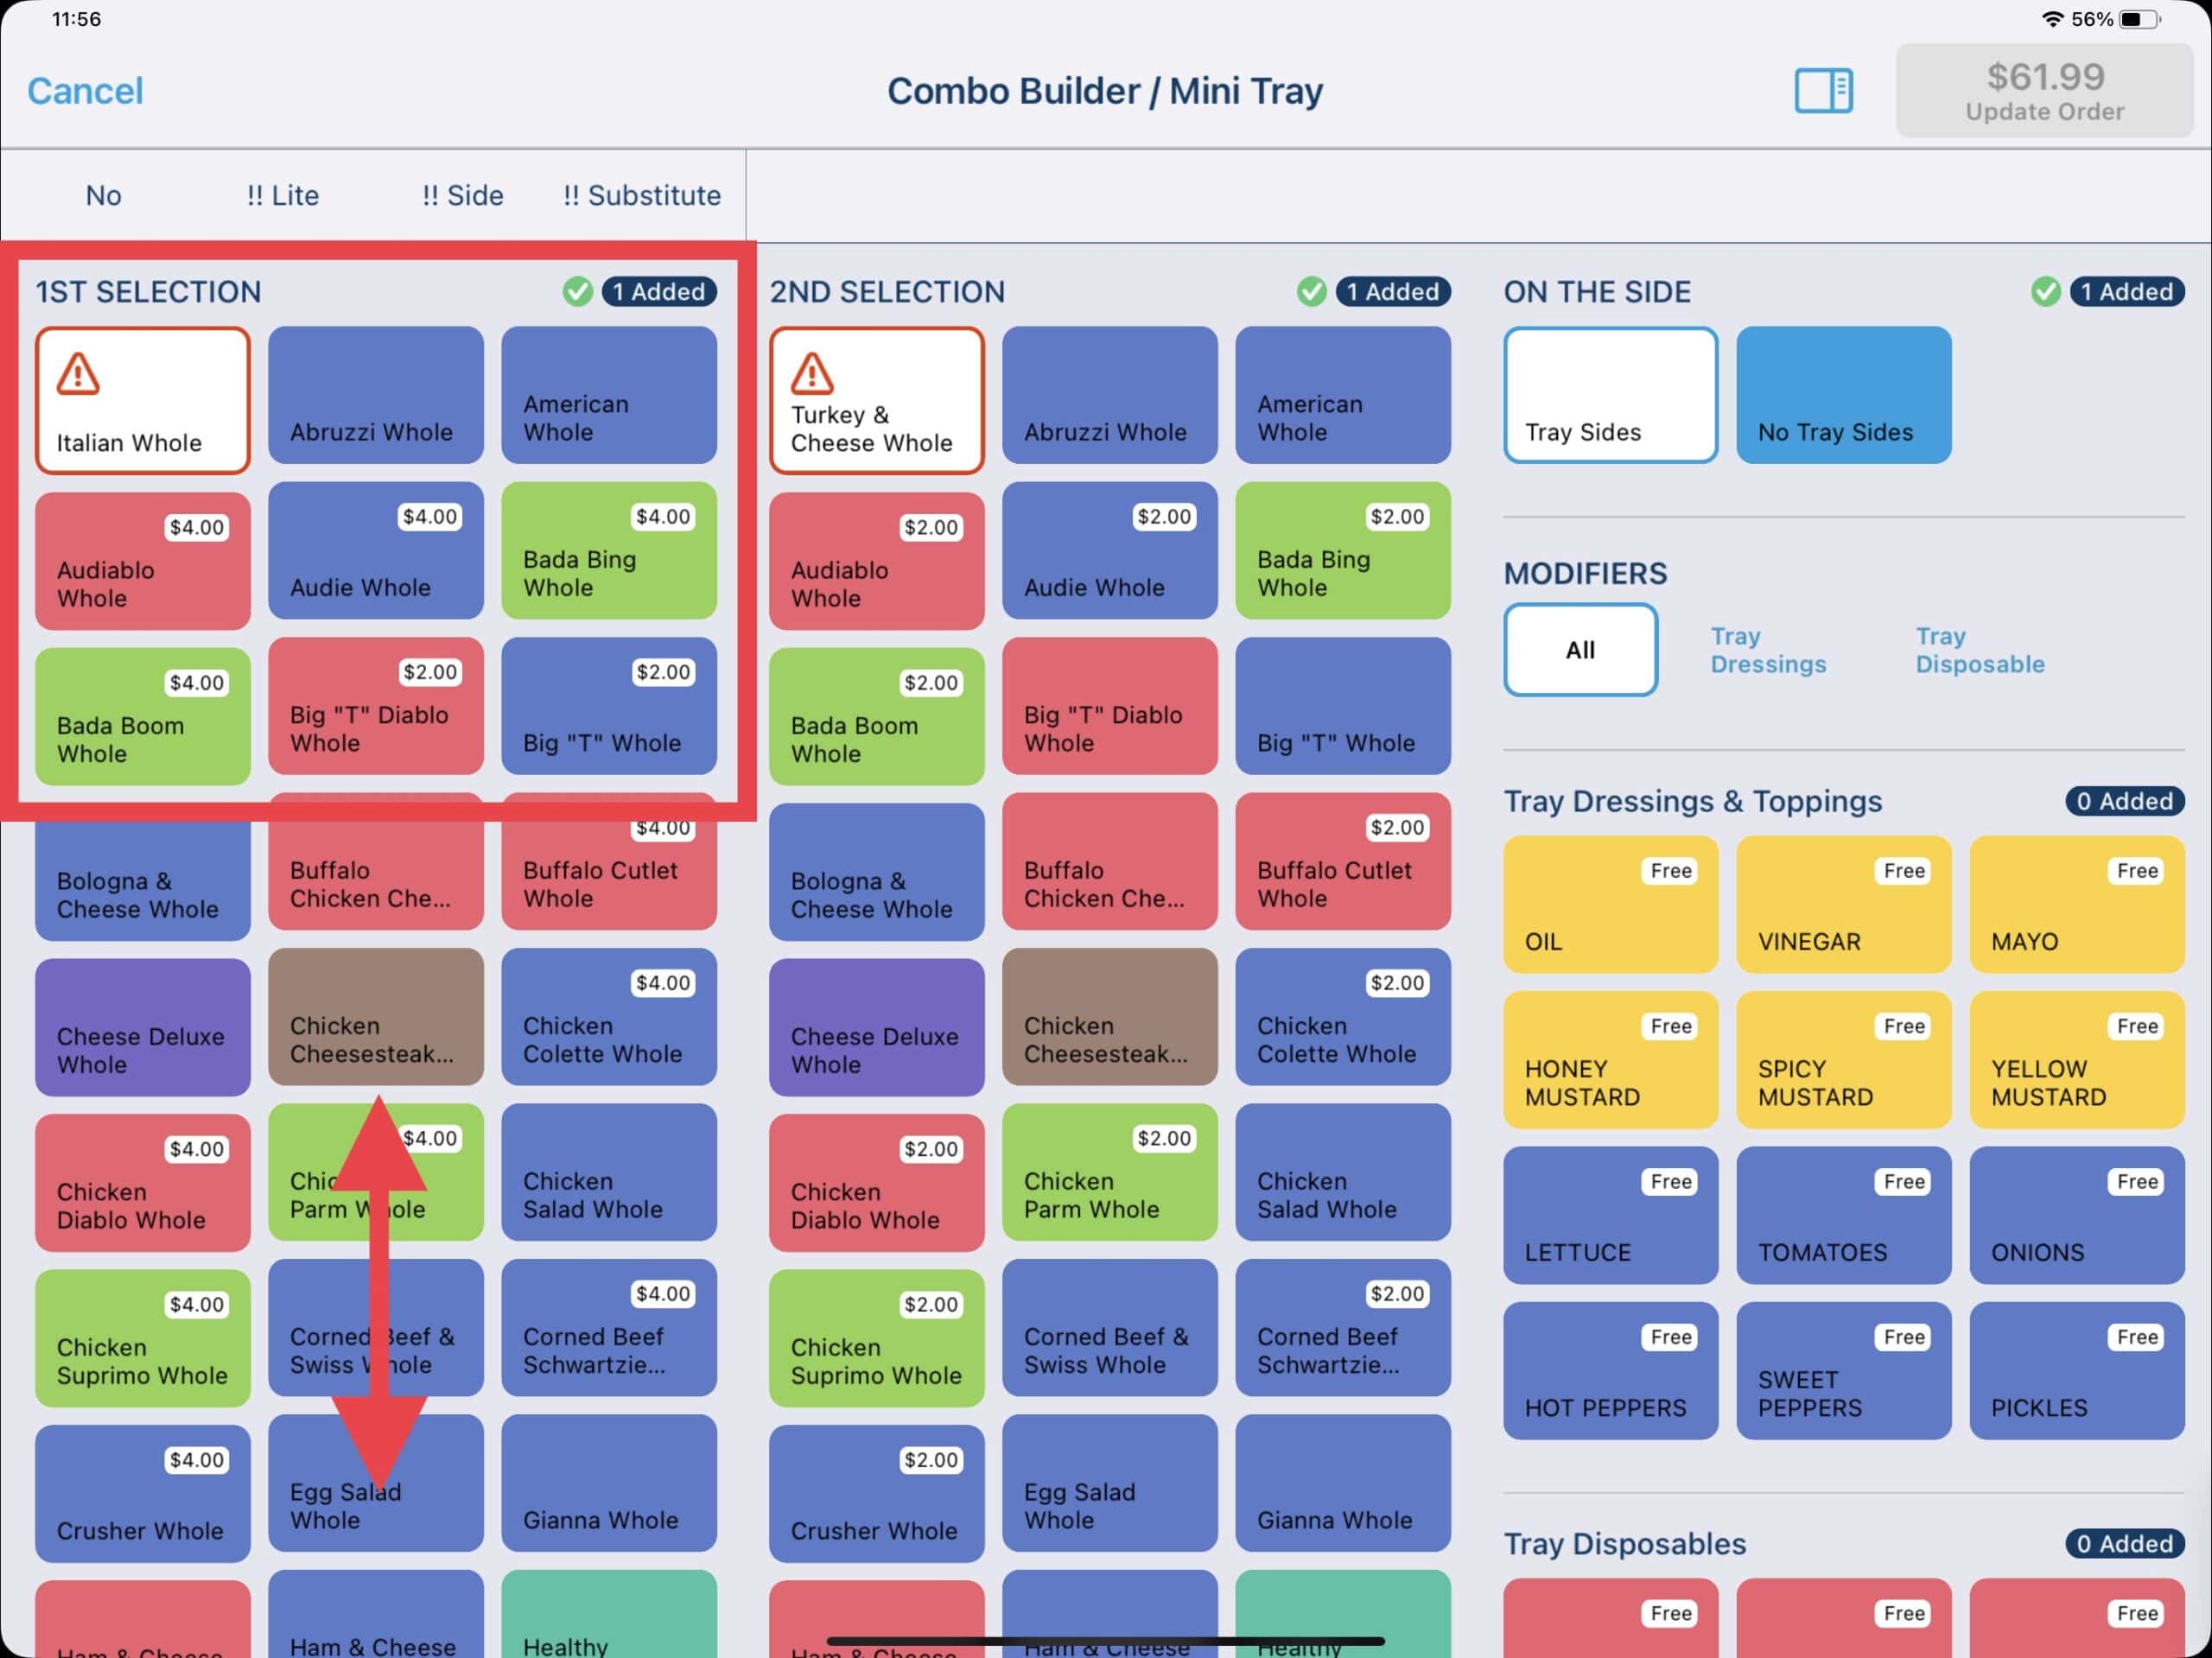
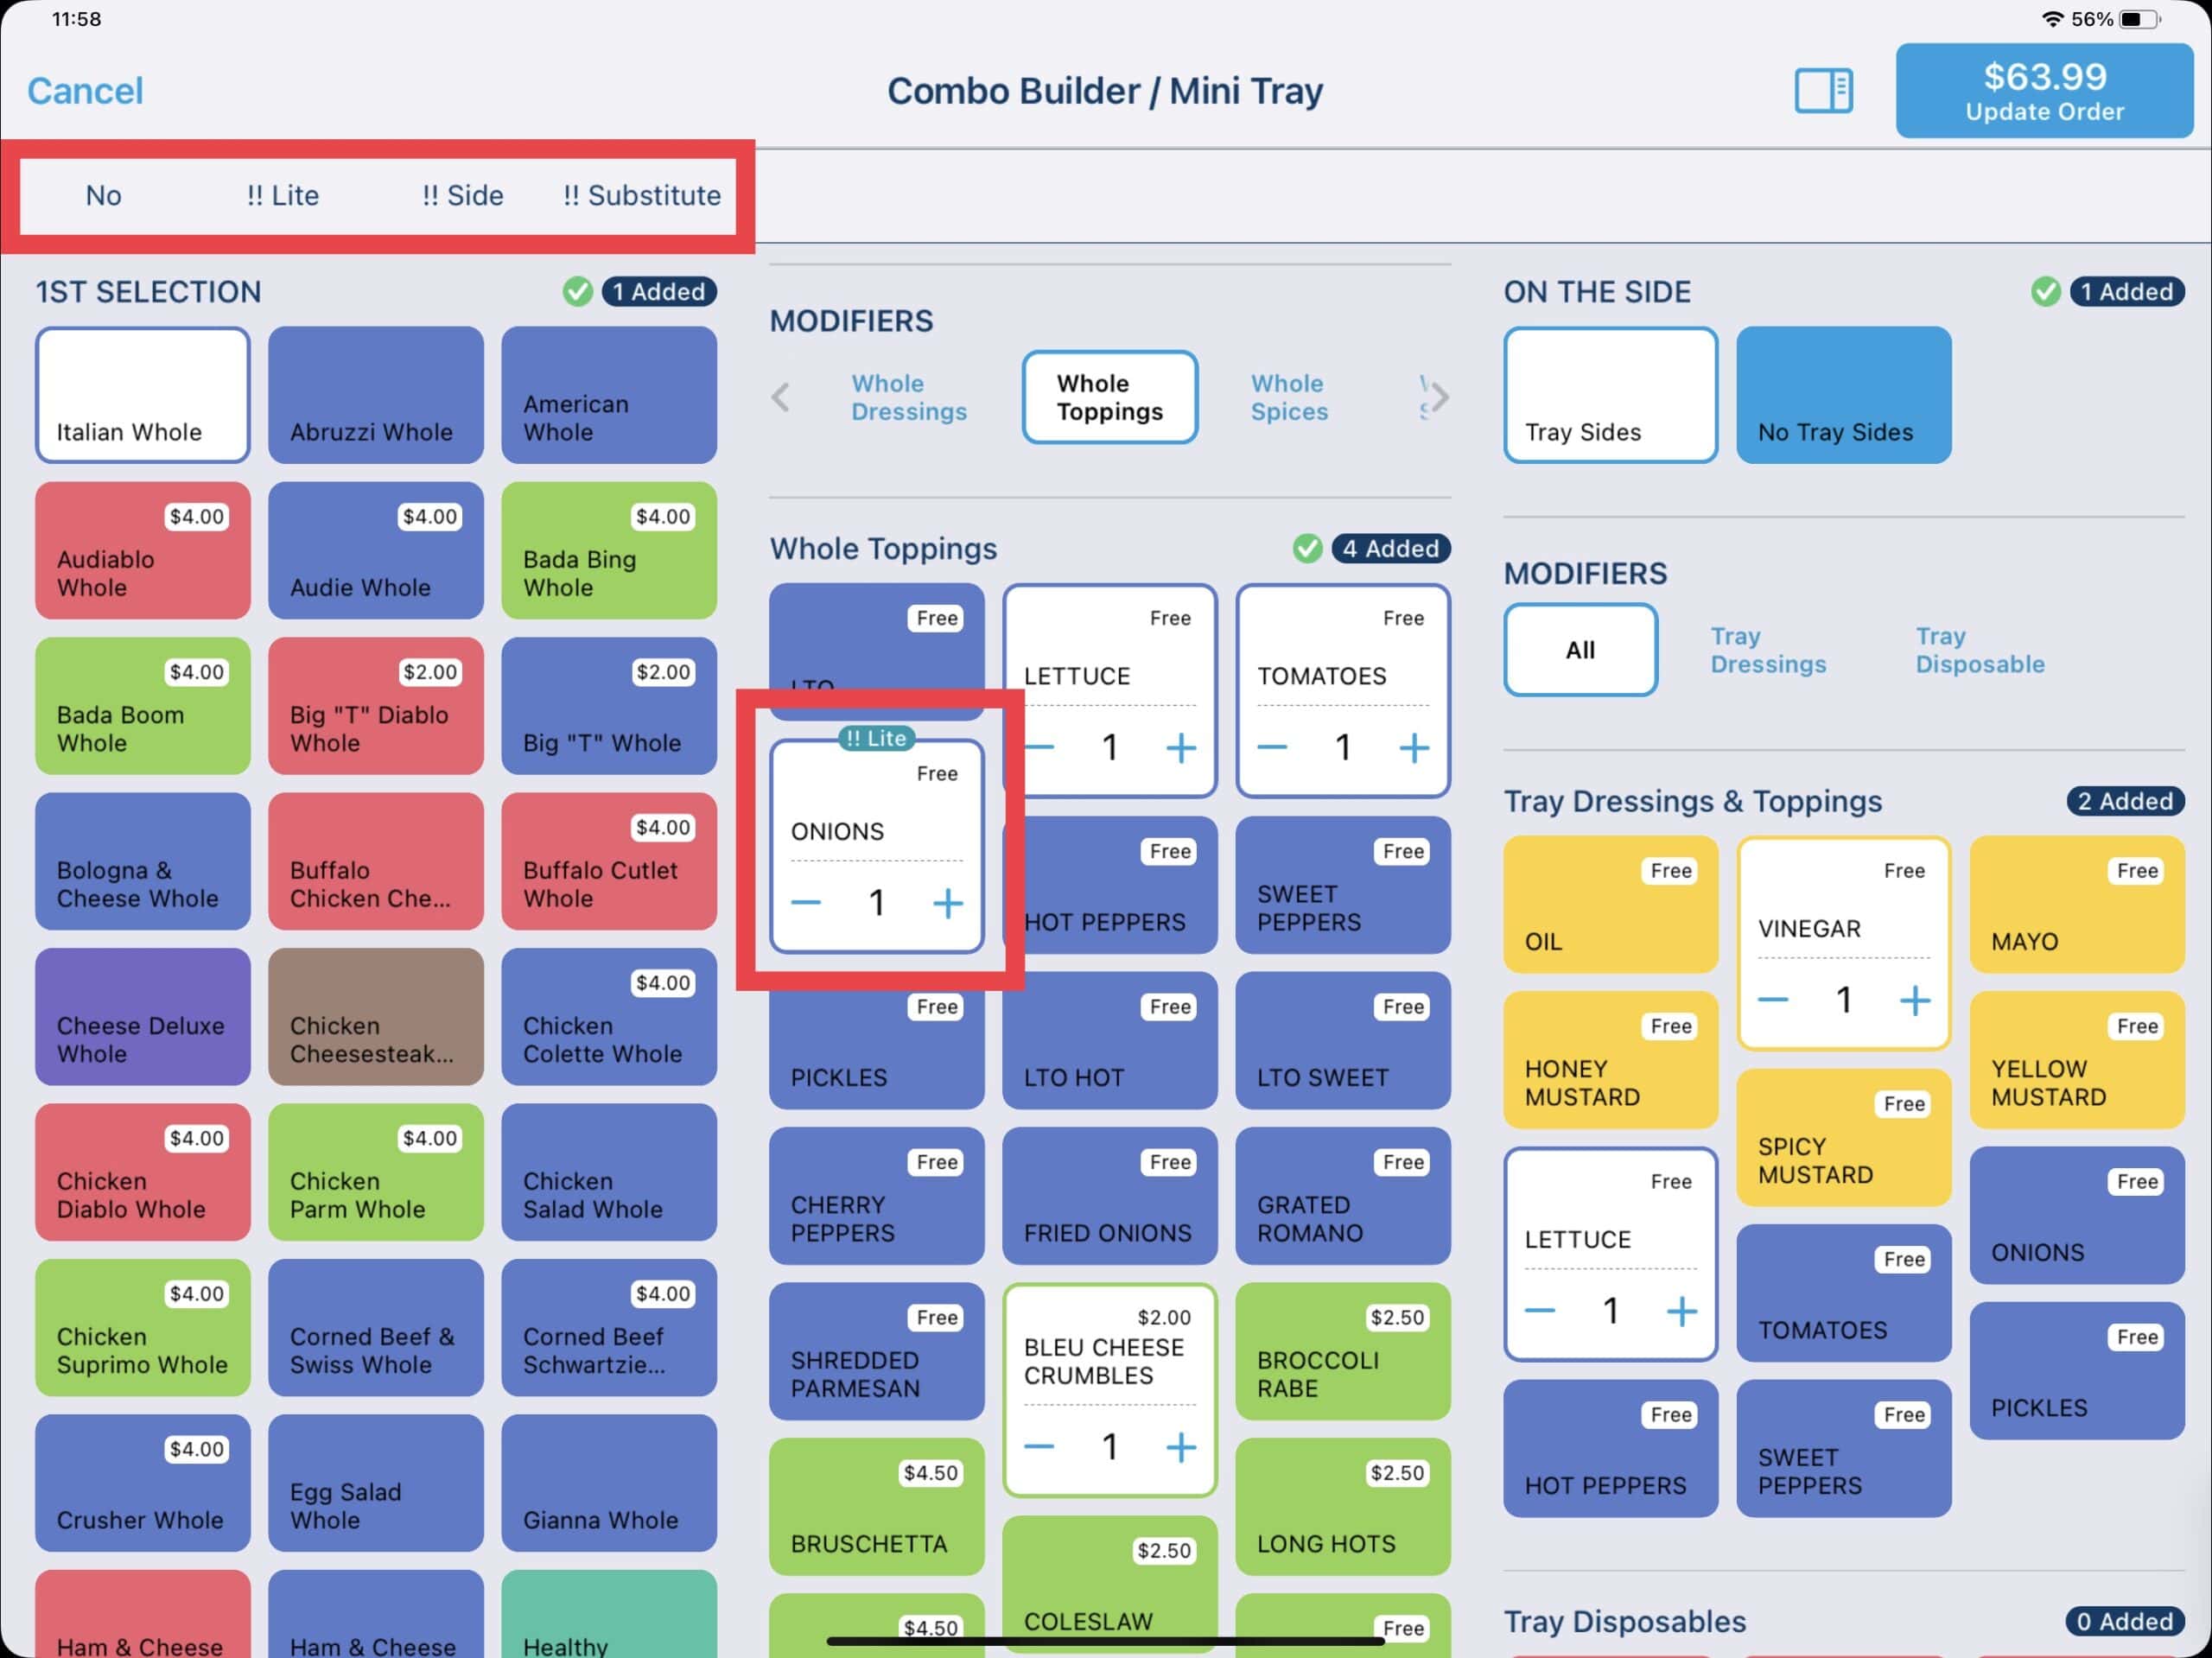
After selecting the desired catering tray from the Catering Category, the tray selections are presented in a column view format. The selected tray will determine the number of columns plus the Tray Sides column. For larger trays, swiping right or left will bring any additional columns into view. By default, the first whole hoagie in each column is highlighted. If modifier selections are required, a red ! will be indicated in the top left of the whole hoagie button. Scroll down to view the modifier selections.
Navigating the Modifiers
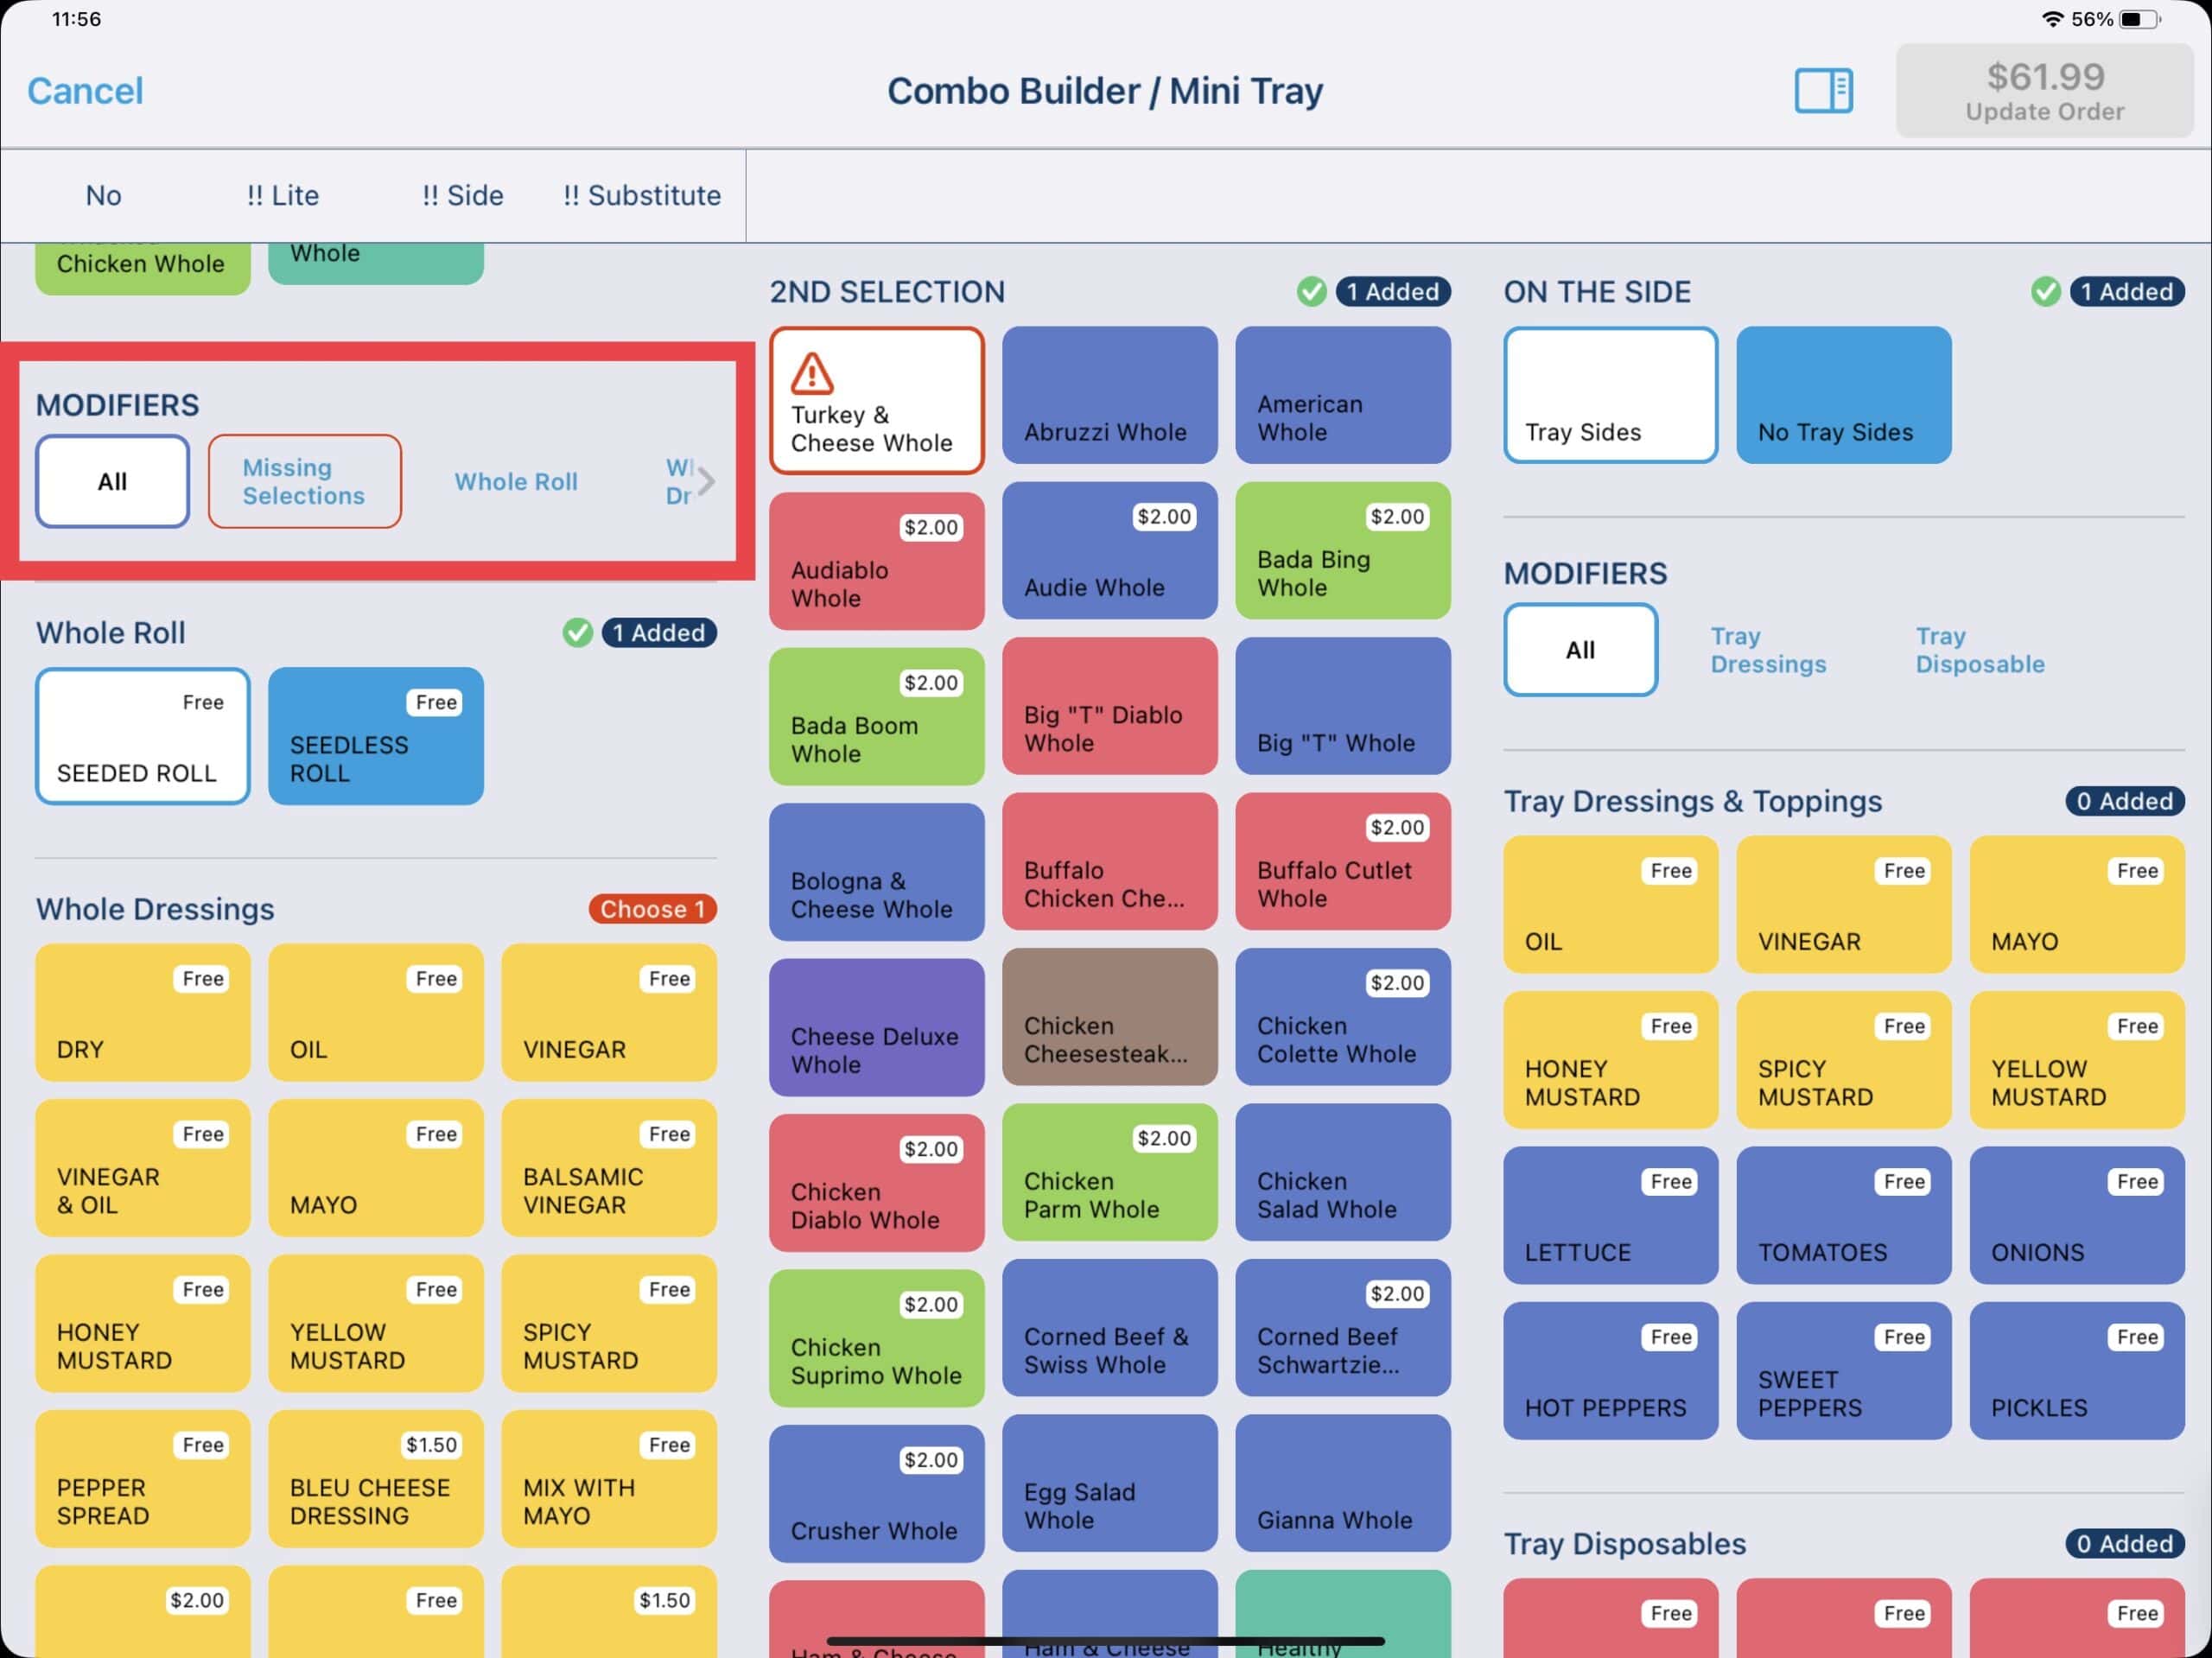
The Modifiers section shows All modifiers by default, however you can swipe right or left to view just the Missing Selections or individual modifier types (ex: Whole Dressings, Whole Toppings, Whole Spices).
Modifiers & Quantities
Select any modifiers needed to fulfill all requirements. Use the top left modifier pre-fixes as needed and/or adjust quantities on each individual modifier selection.
Viewing & Updating the Selections
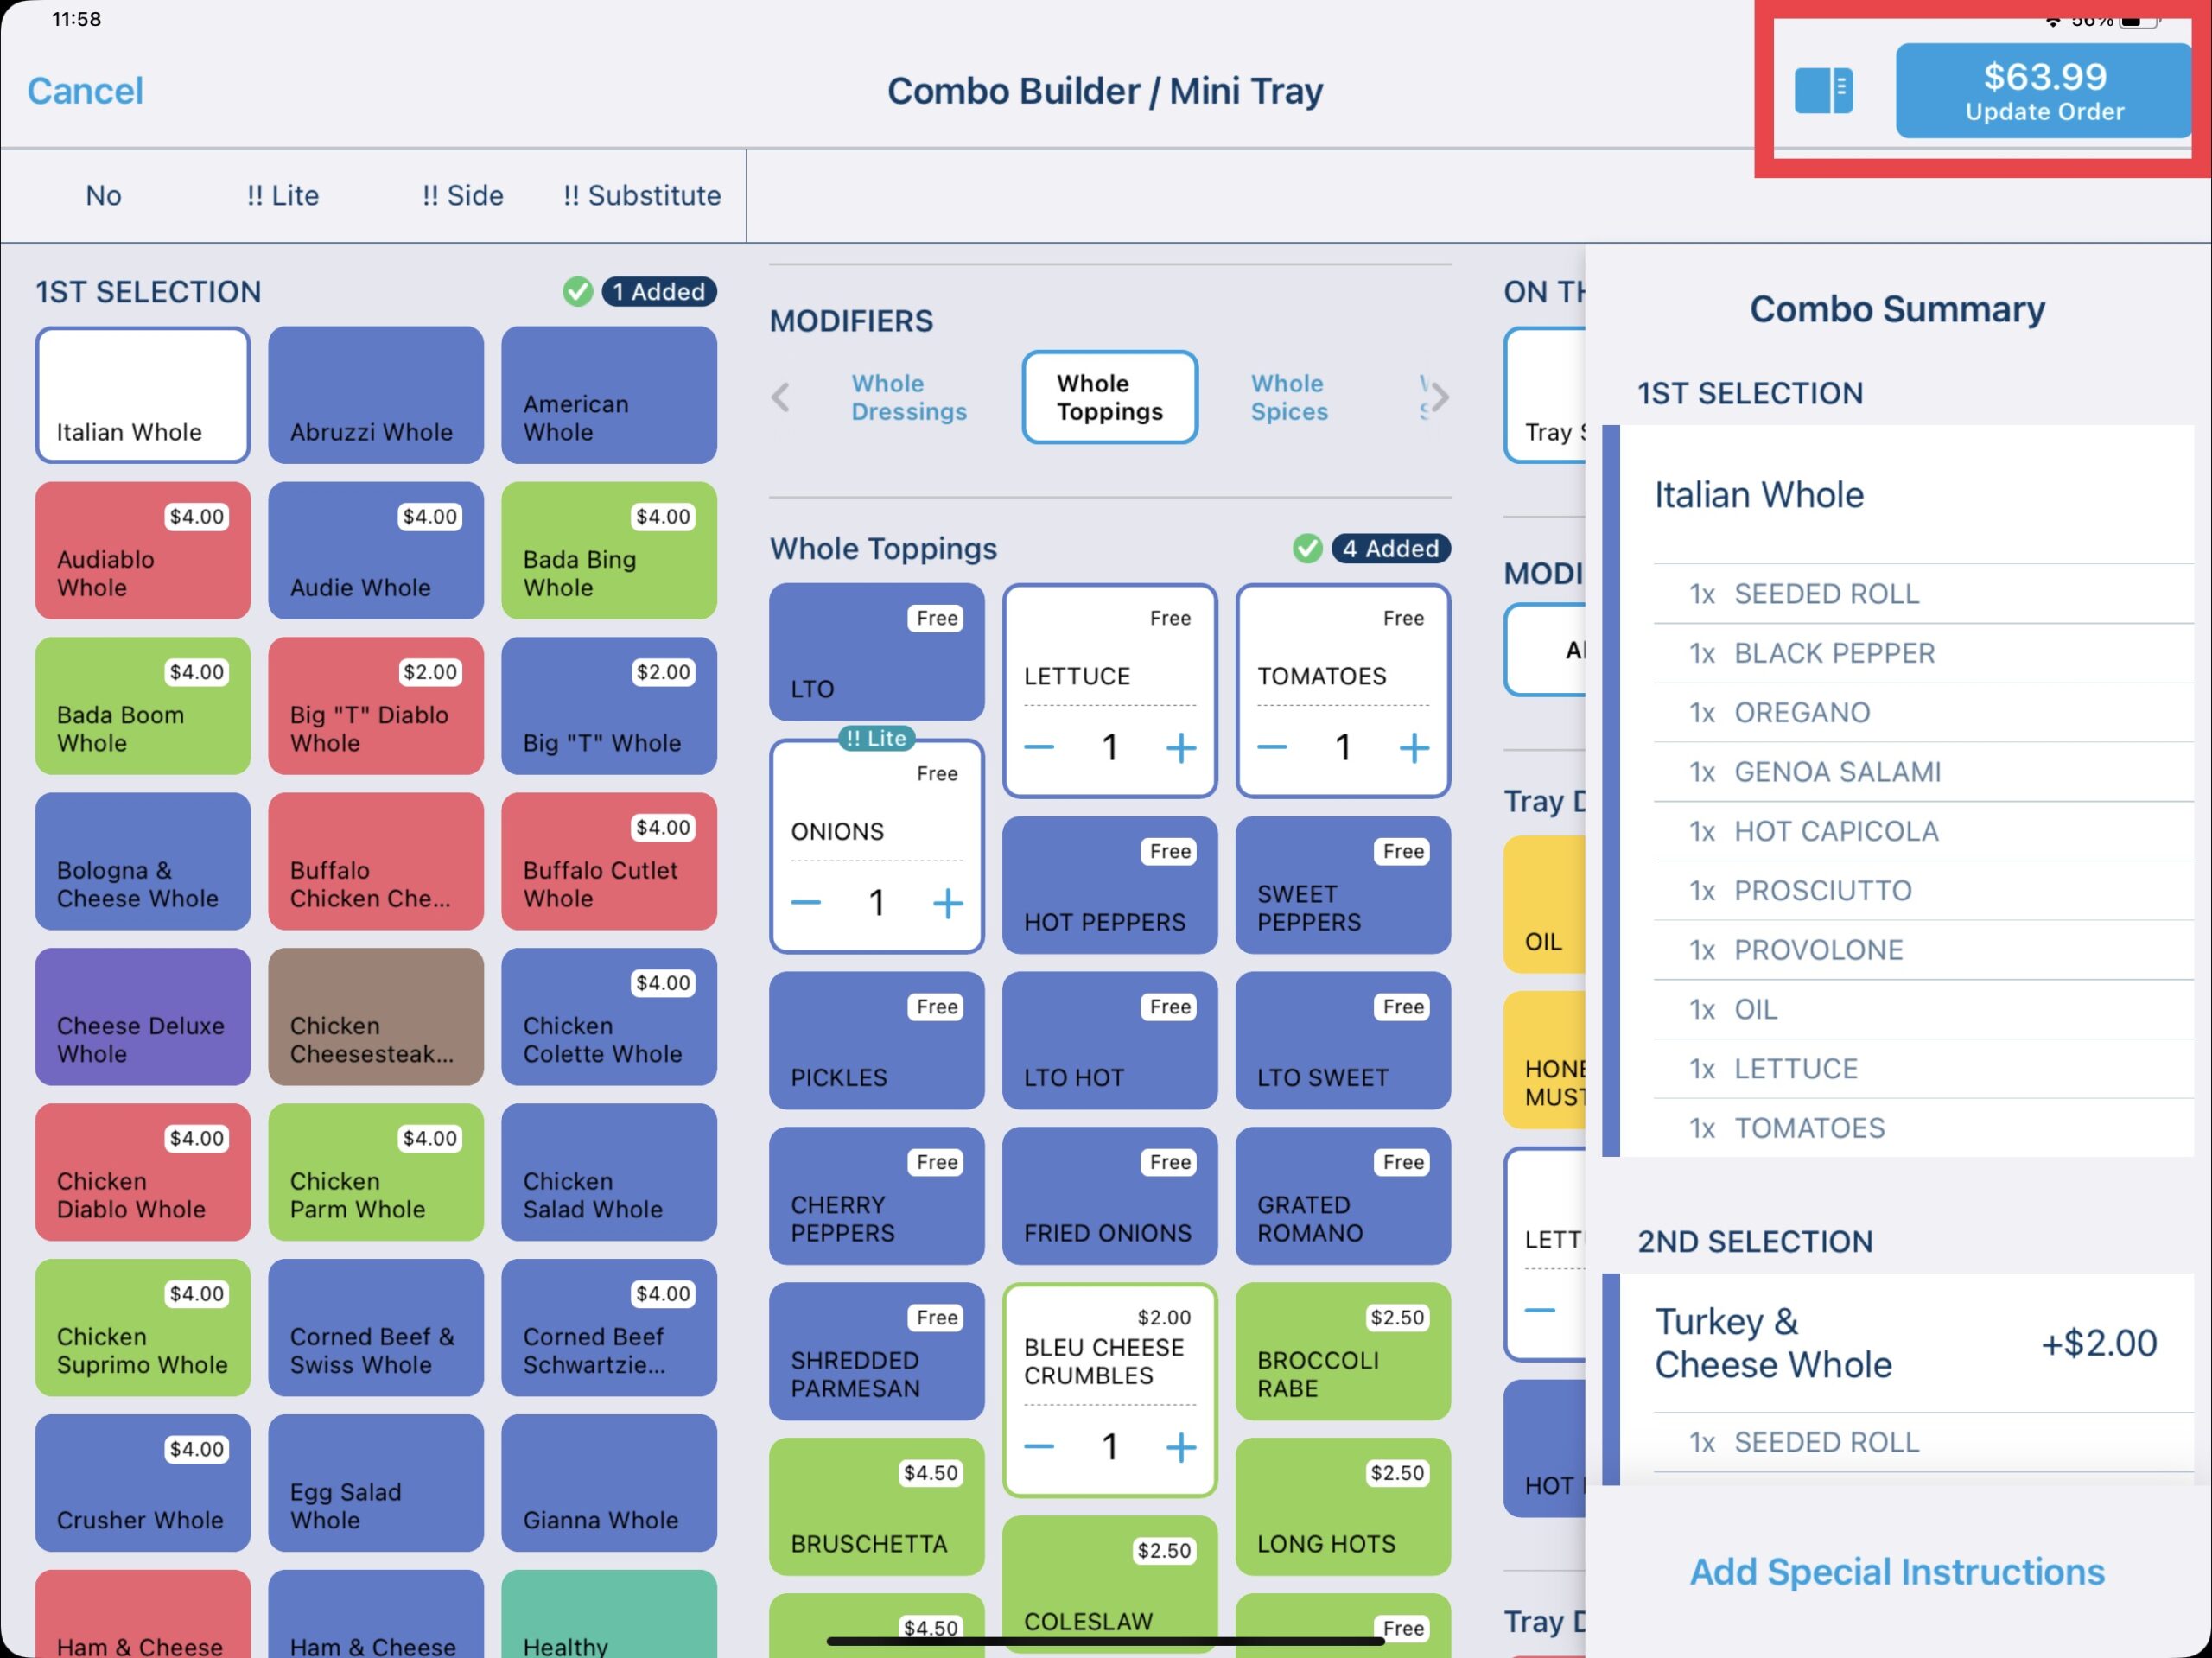
To view a summary of the combo, select the View button at the top right to expand the view. Special Requests can also be added in this view. Finally, update the order with the priced Update Order button on the top right to complete the tray build.
Updated 04/26/2023

Summary
Gift cards can be sold and redeemed from the point of sale. There are two main areas to familiarize yourself with in regards to gift cards. Gift card balance inquiries from the POS Dashboard, and gift card sales and redemption from the ordering screen. We will explore both options.
For additional information regarding holiday bonus cards, refer to the Holiday Bonus Cards guide.
Gift Card Balance Inquiries
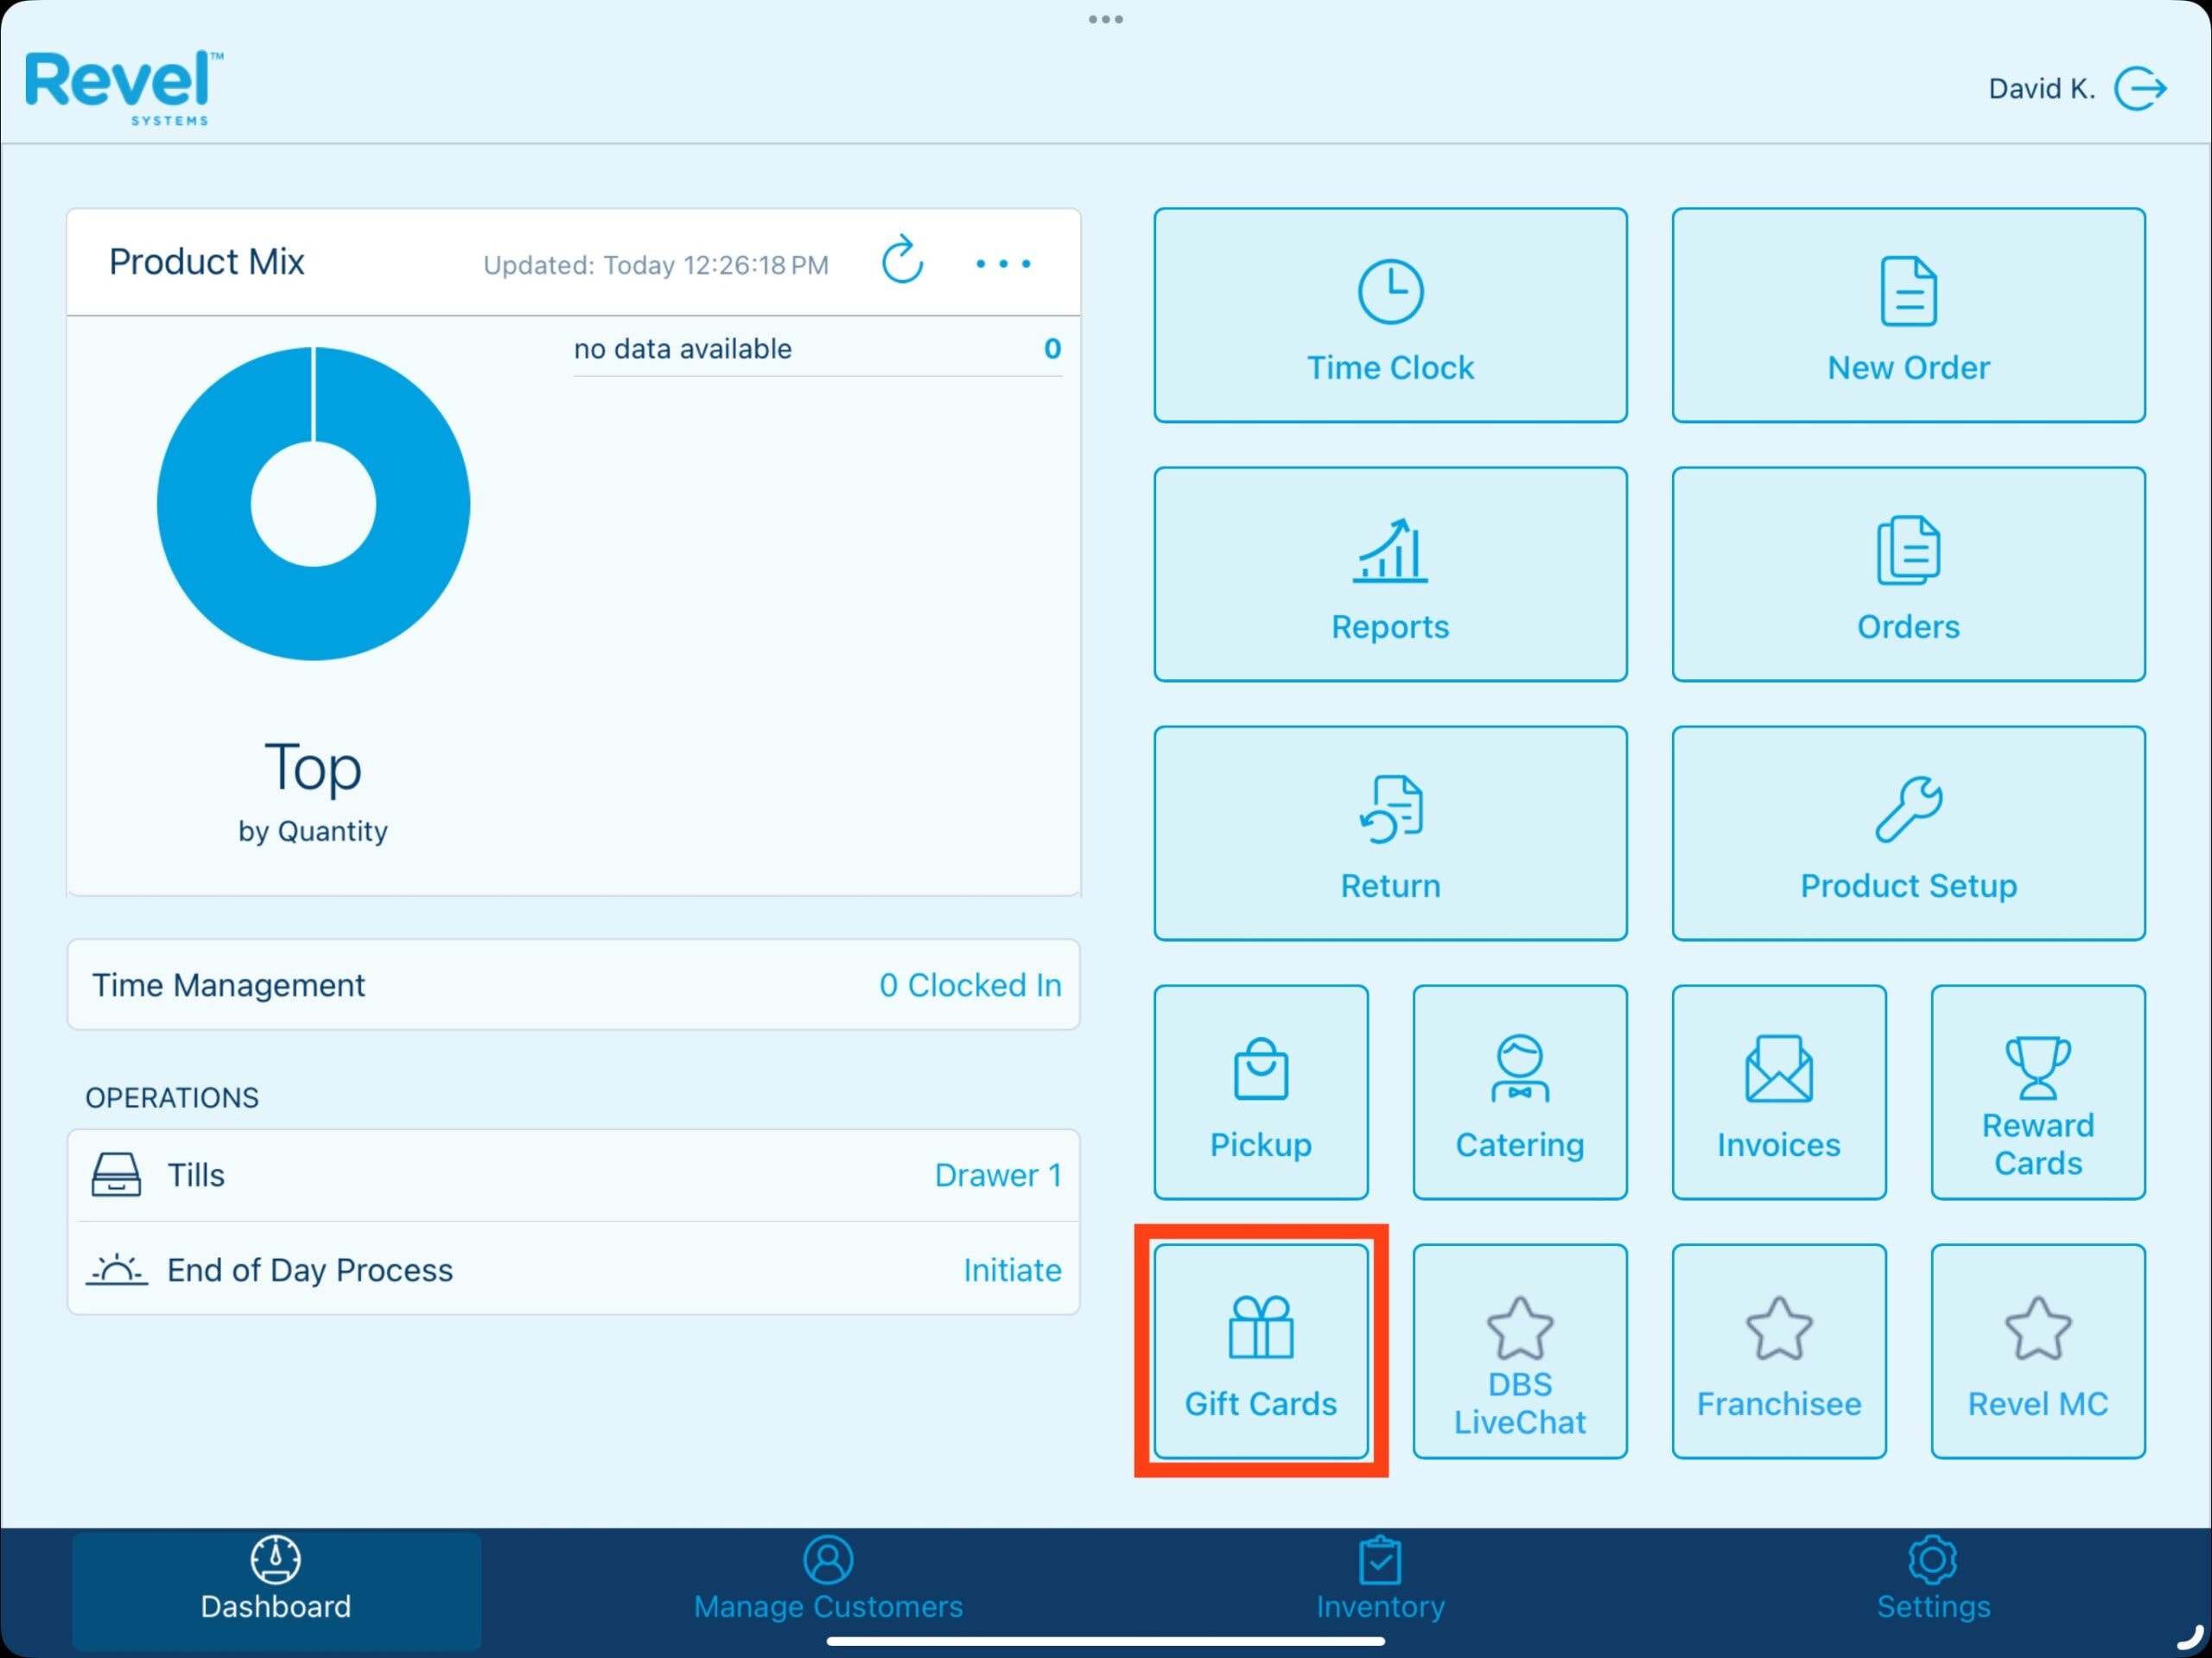
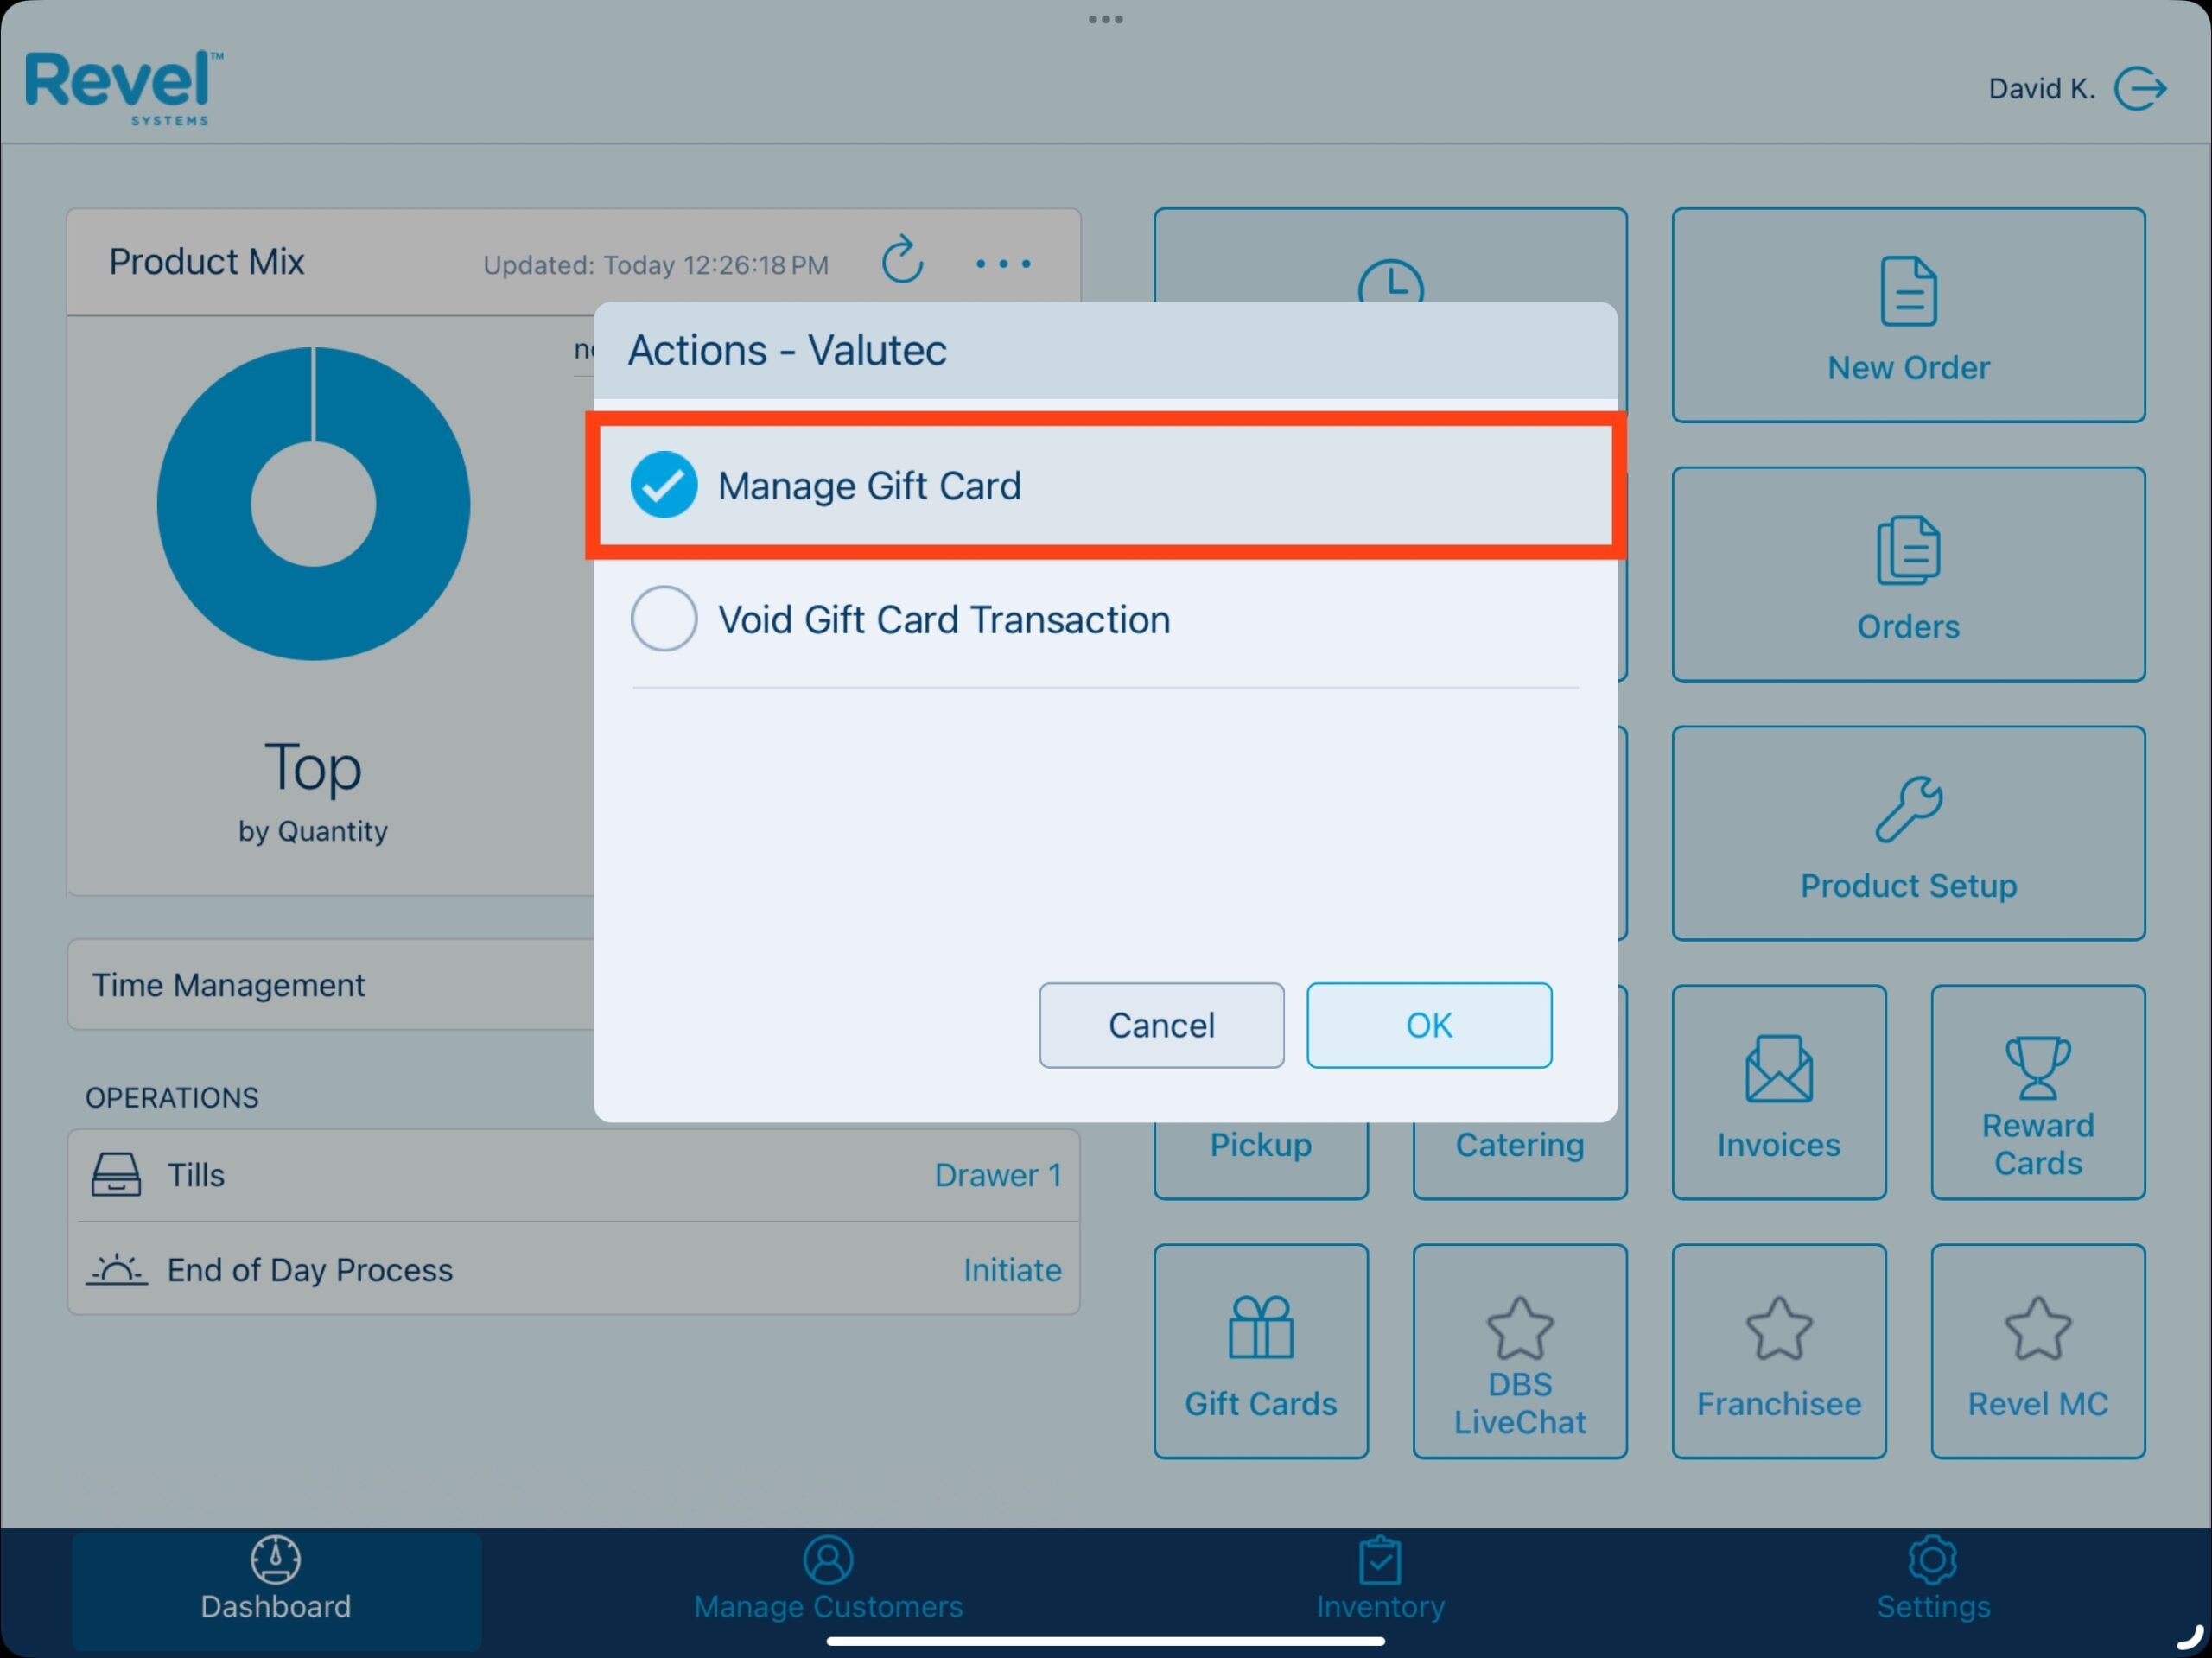
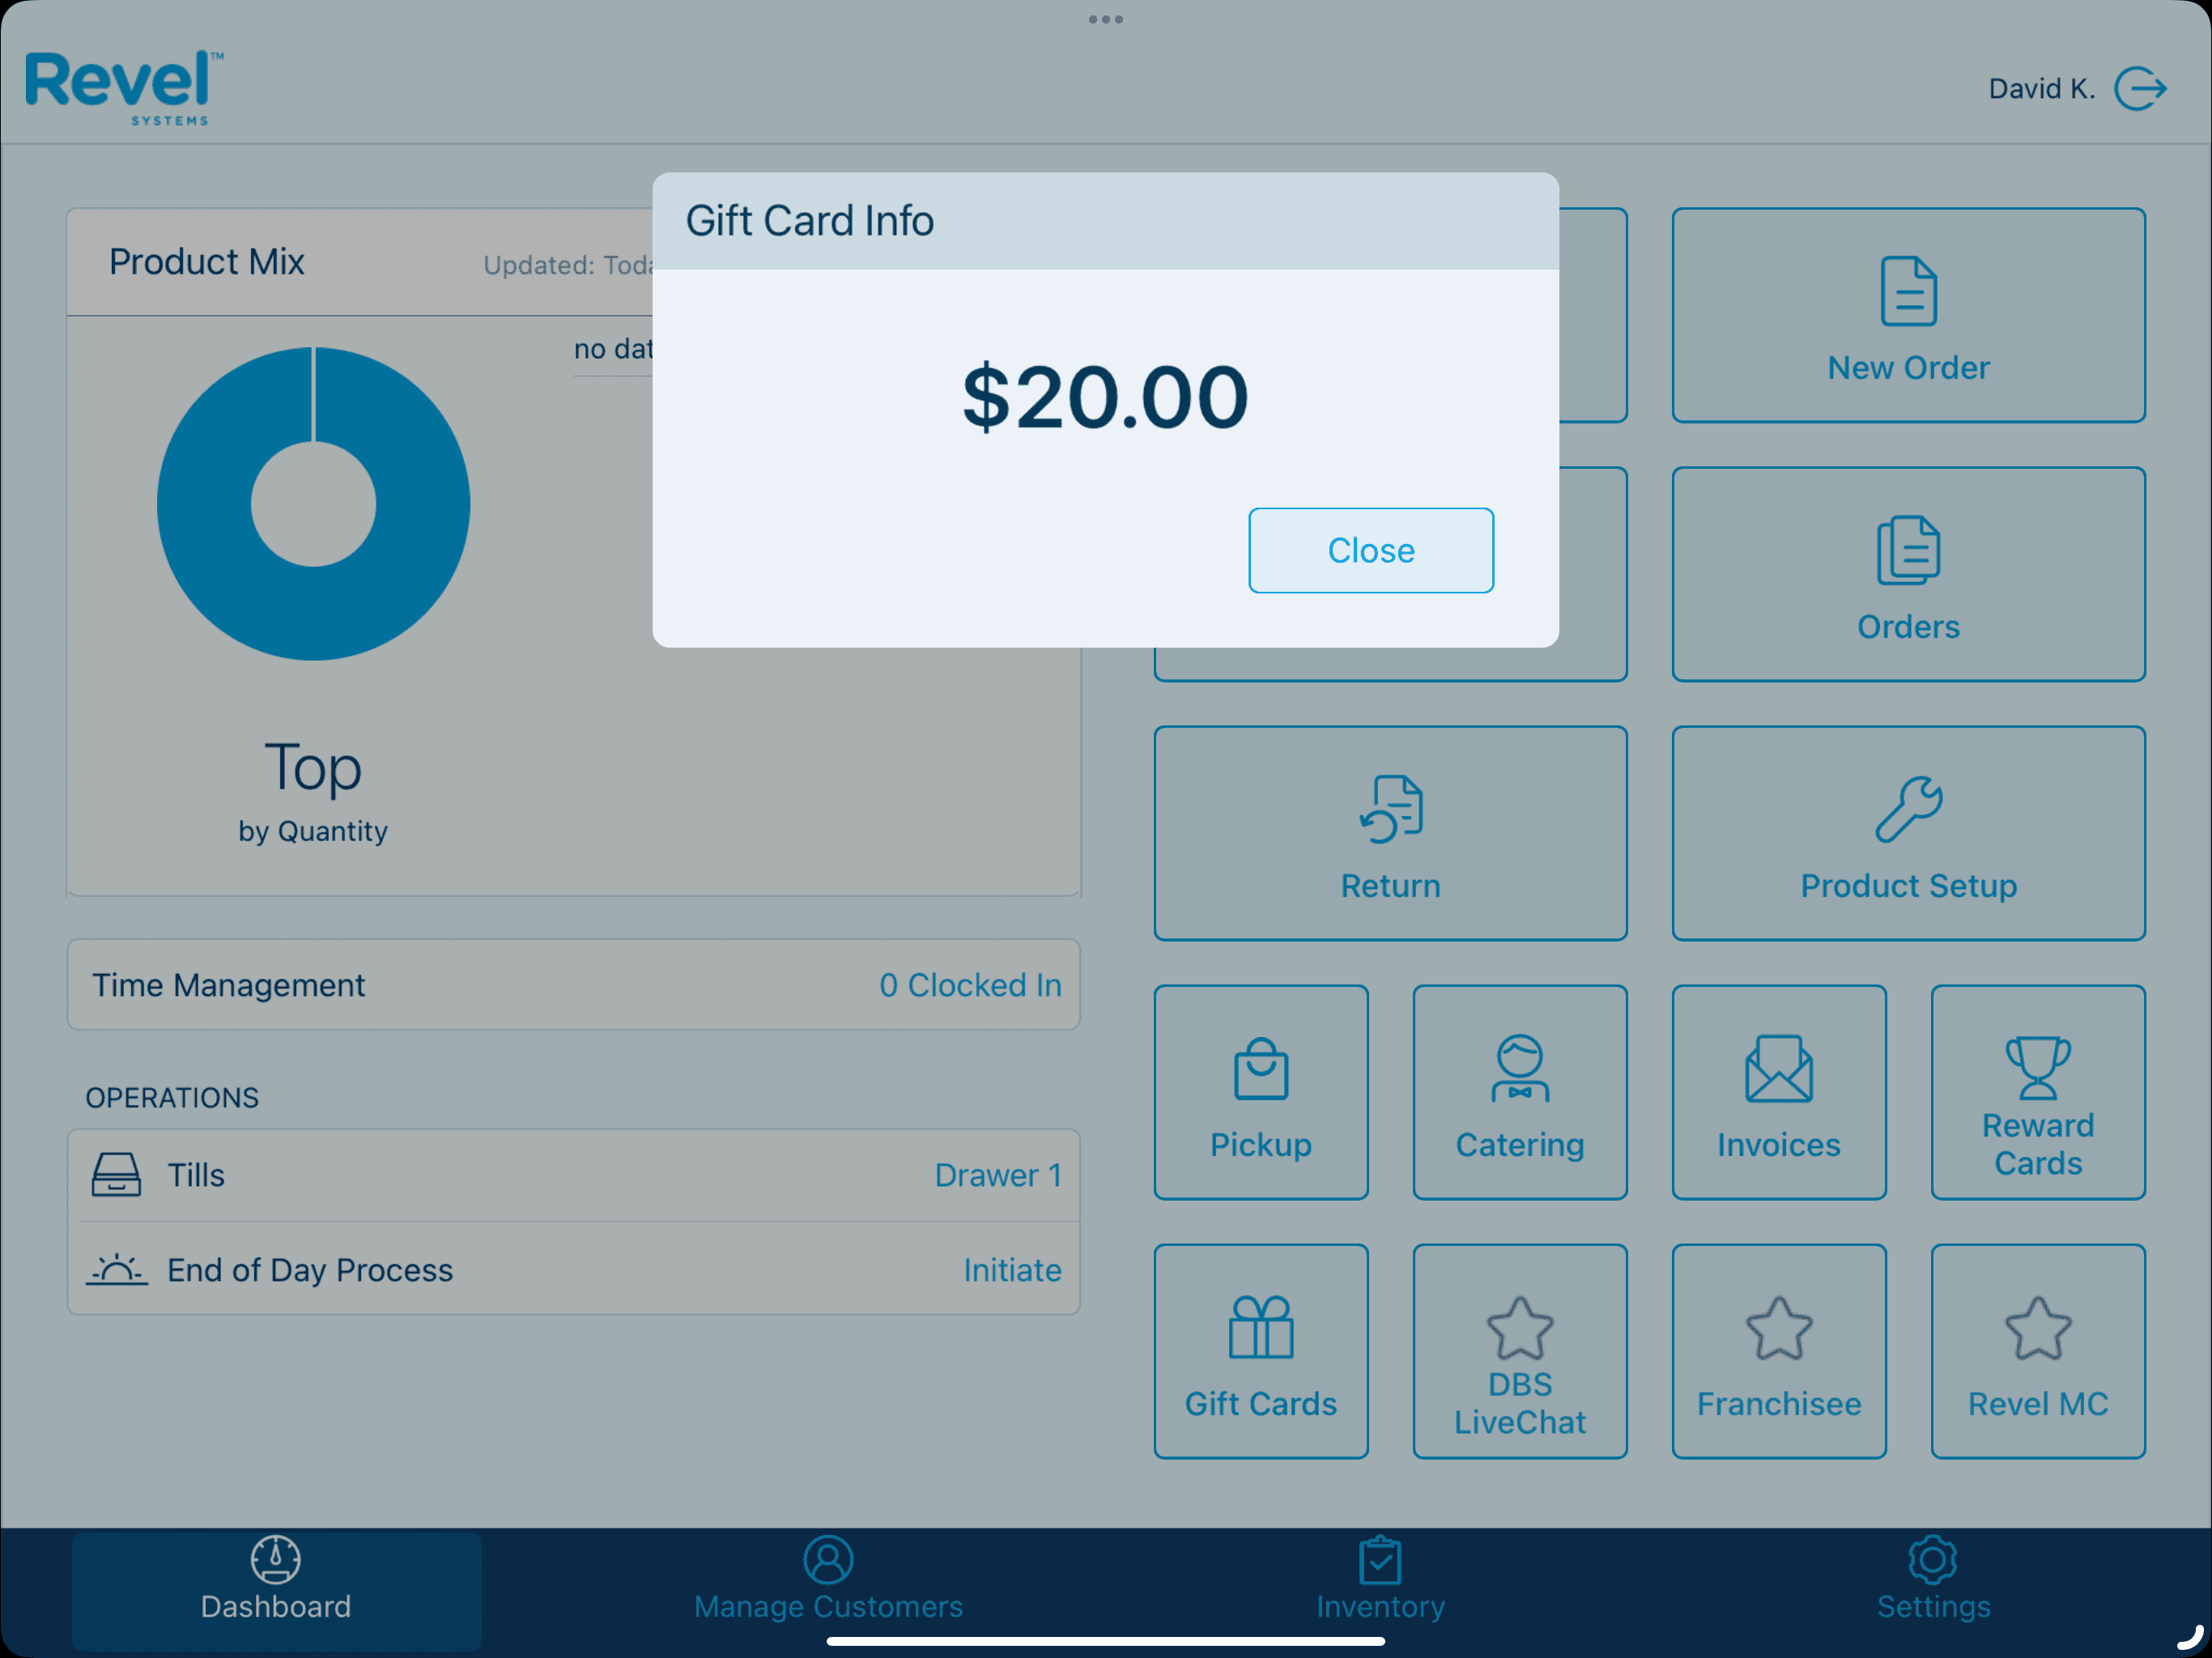
To check the balance of a gift card, from the POS Dashboard, select the Gift Cards button, then Manage Gift Card (Void Gift Card Transaction is not allowed at this time as you cannot Add Value to or Cash Out a gift card per PrimoHoagies requirement).
Lookup Methods
There are 3 methods to entering a gift card number into the point of sale.
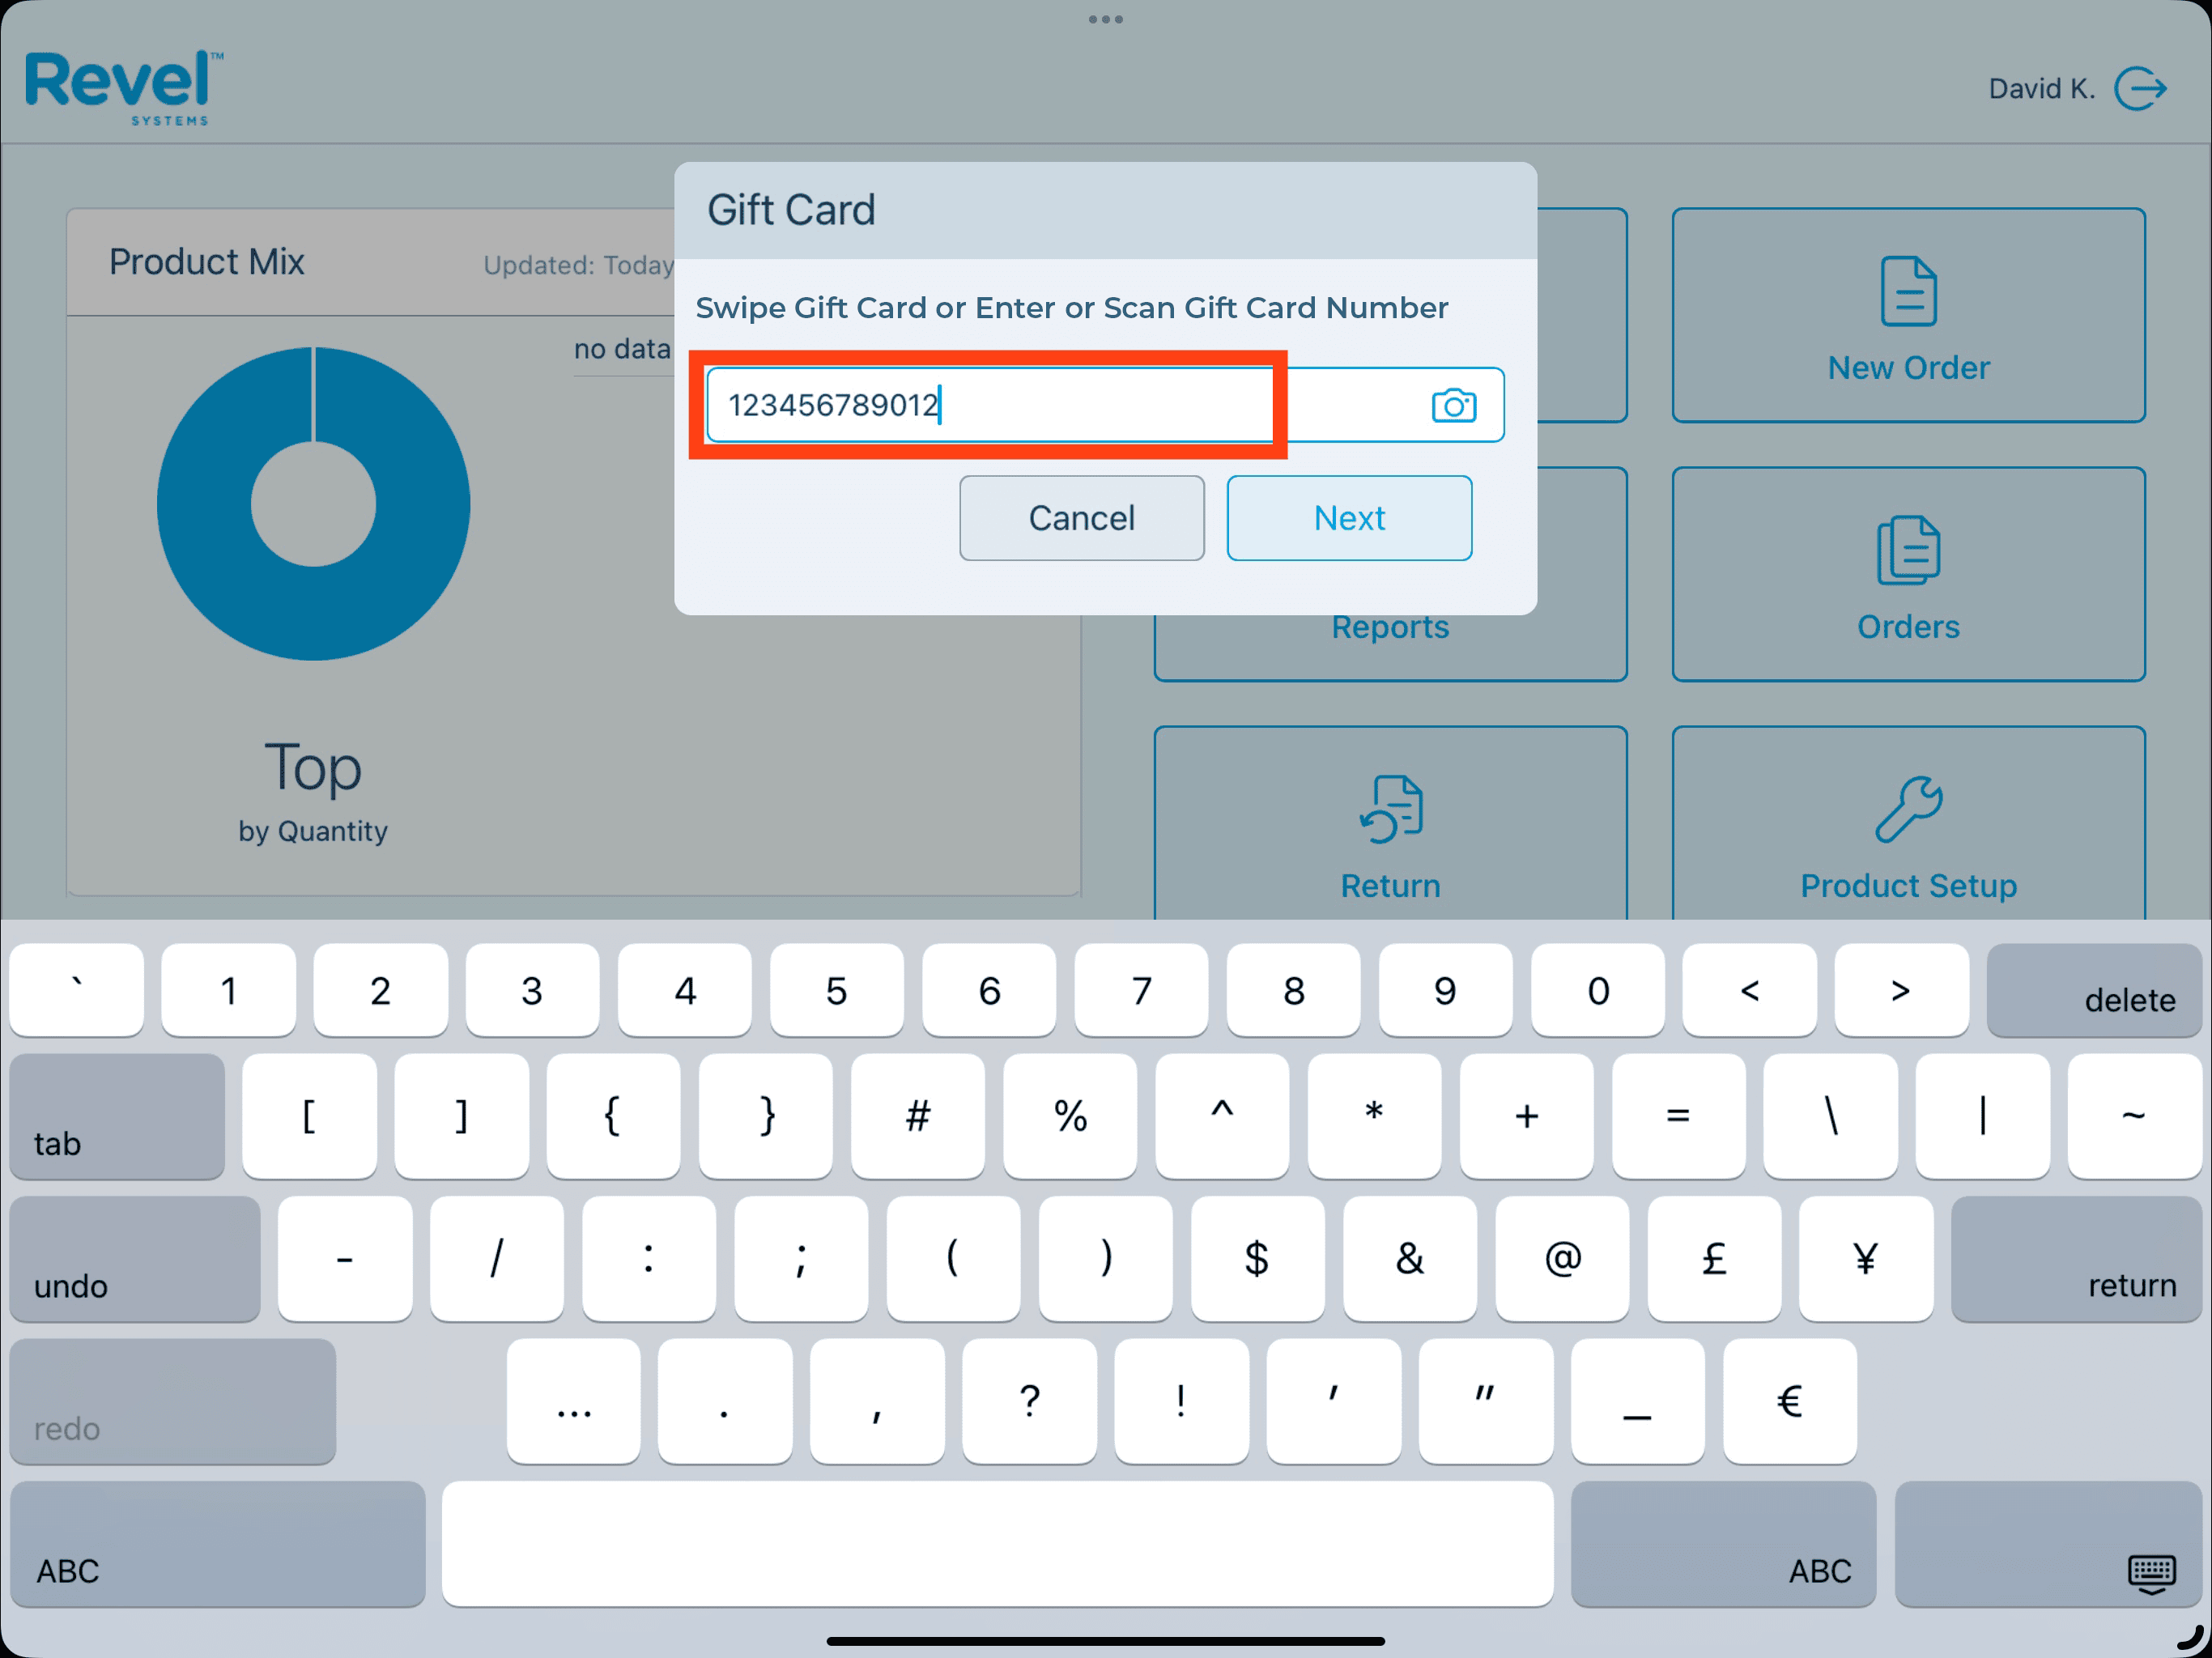
1 – Enter Gift Card Number Manually: For this method, the user is required to type in the full gift card number (excluding any expiration date or PIN/CVV. You can also use the scanner to scan the gift card QR Code/Barcode into the field at this point.
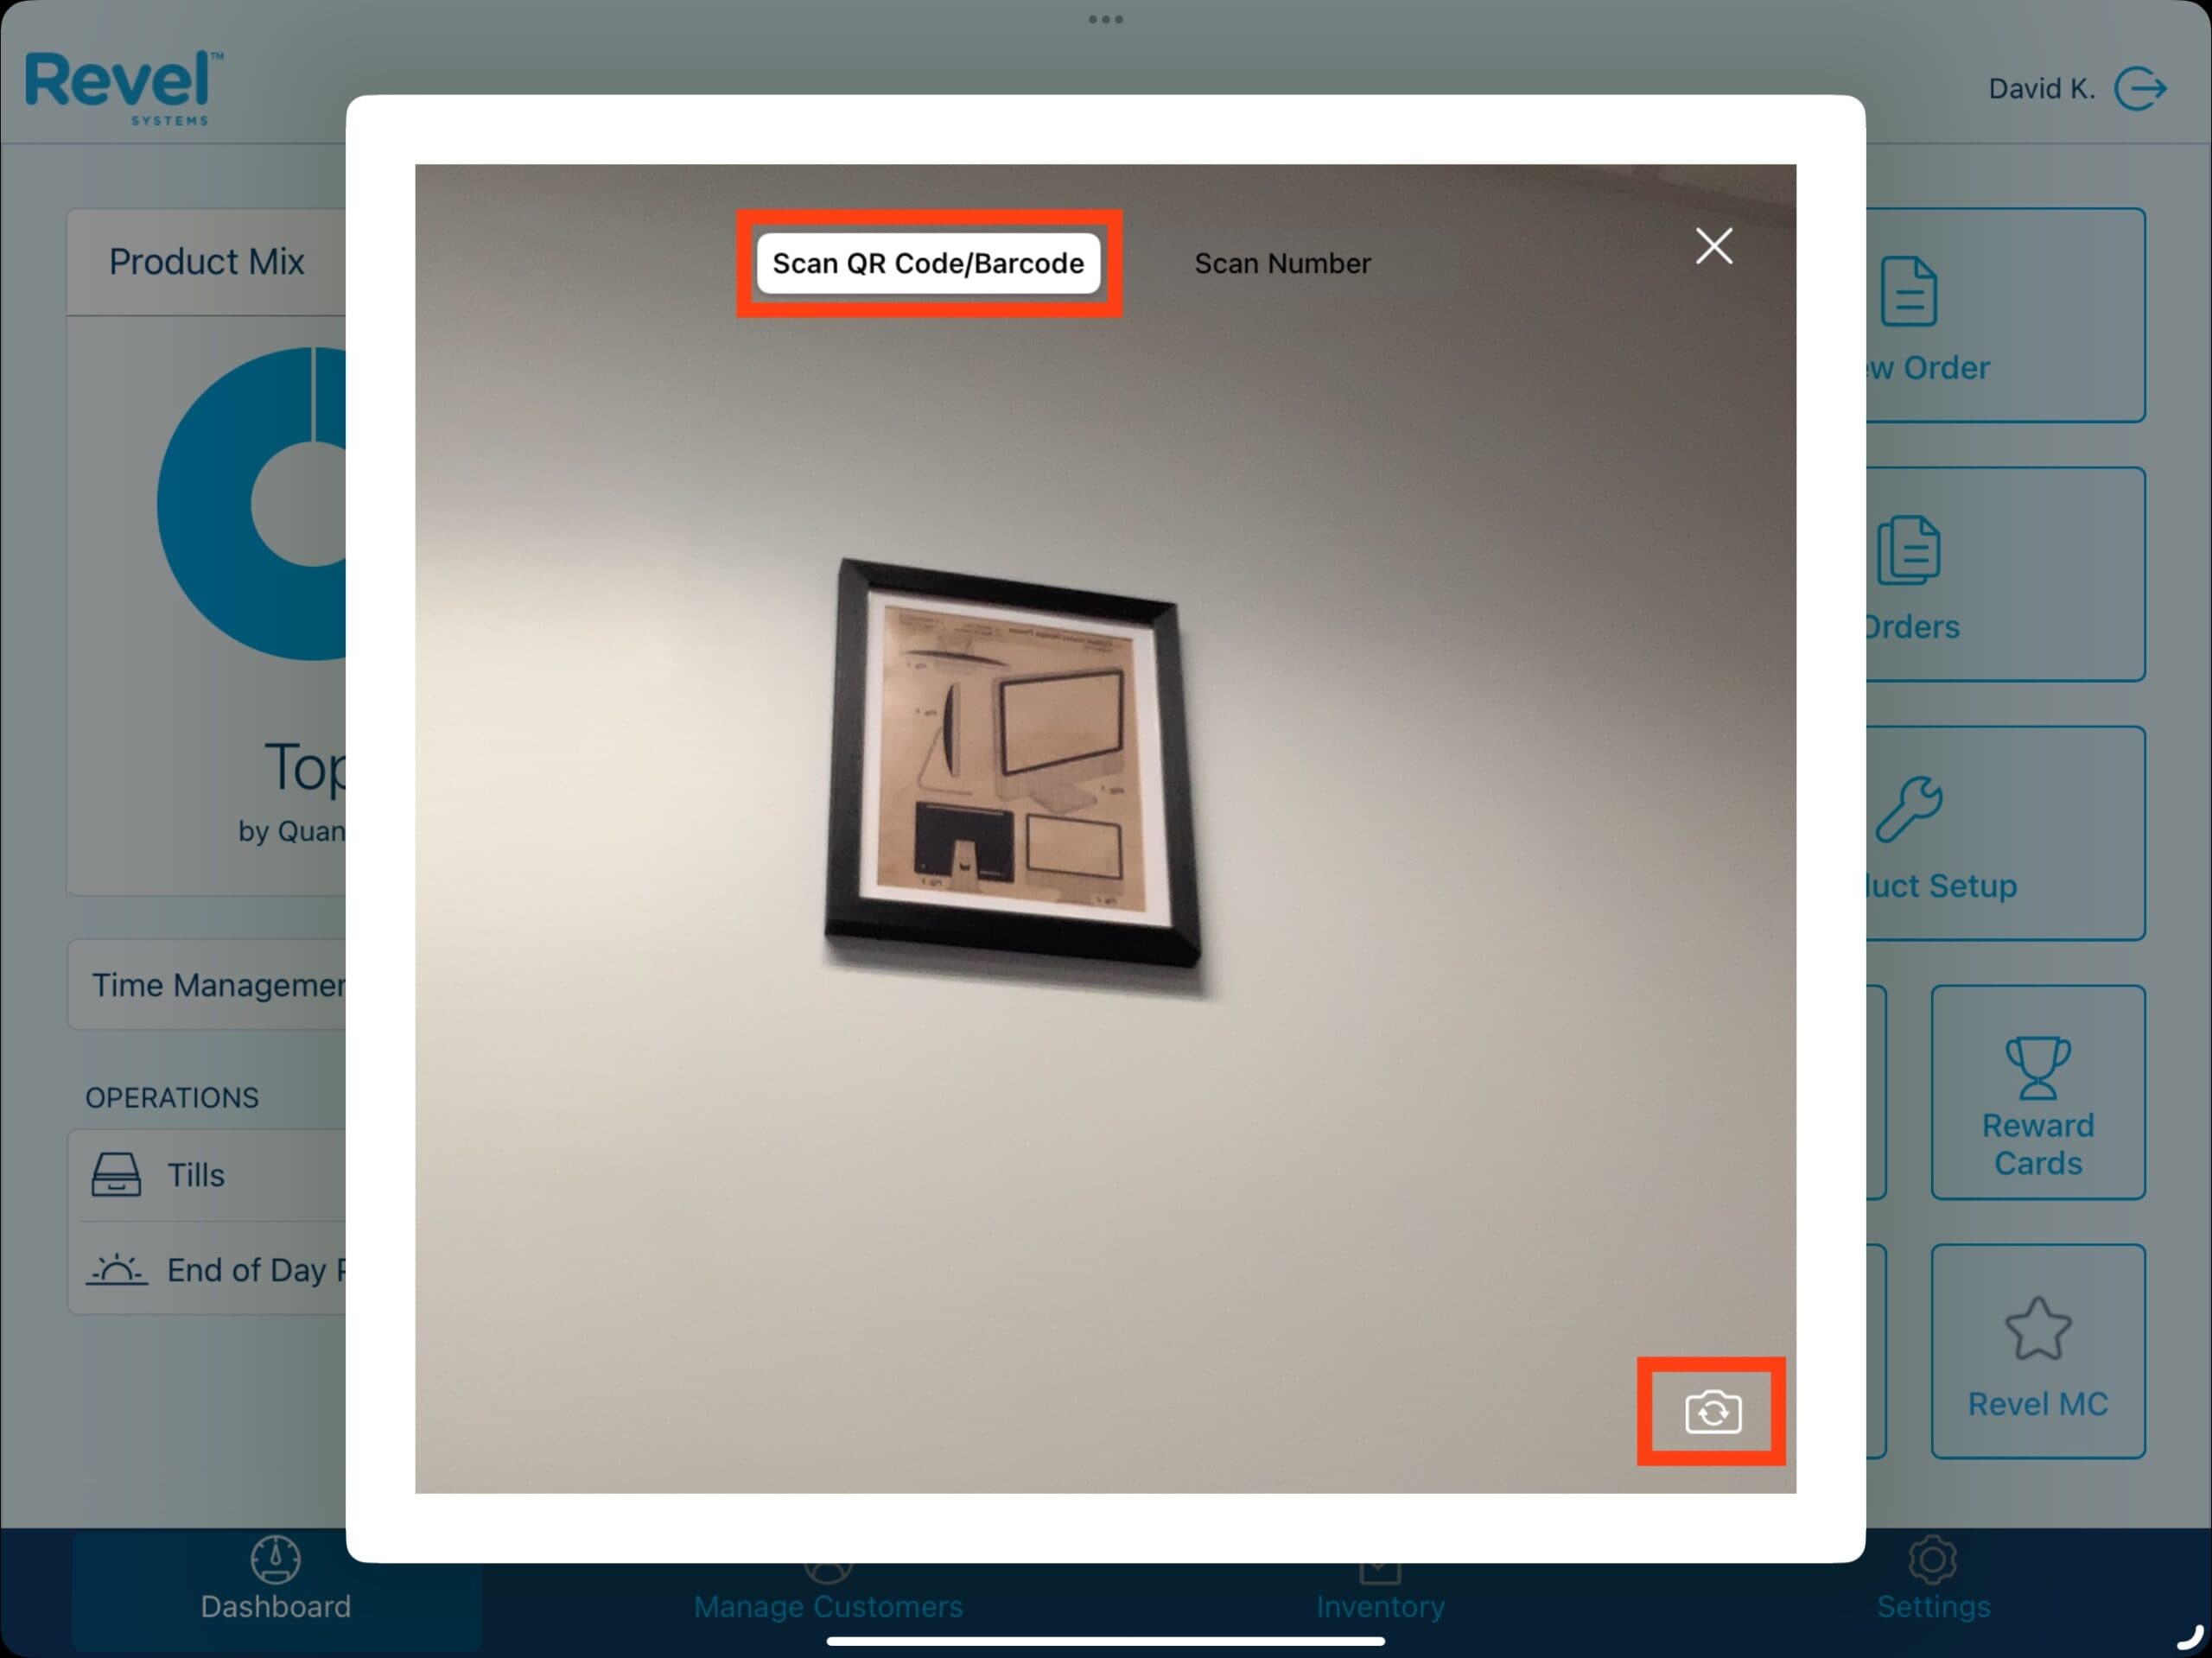
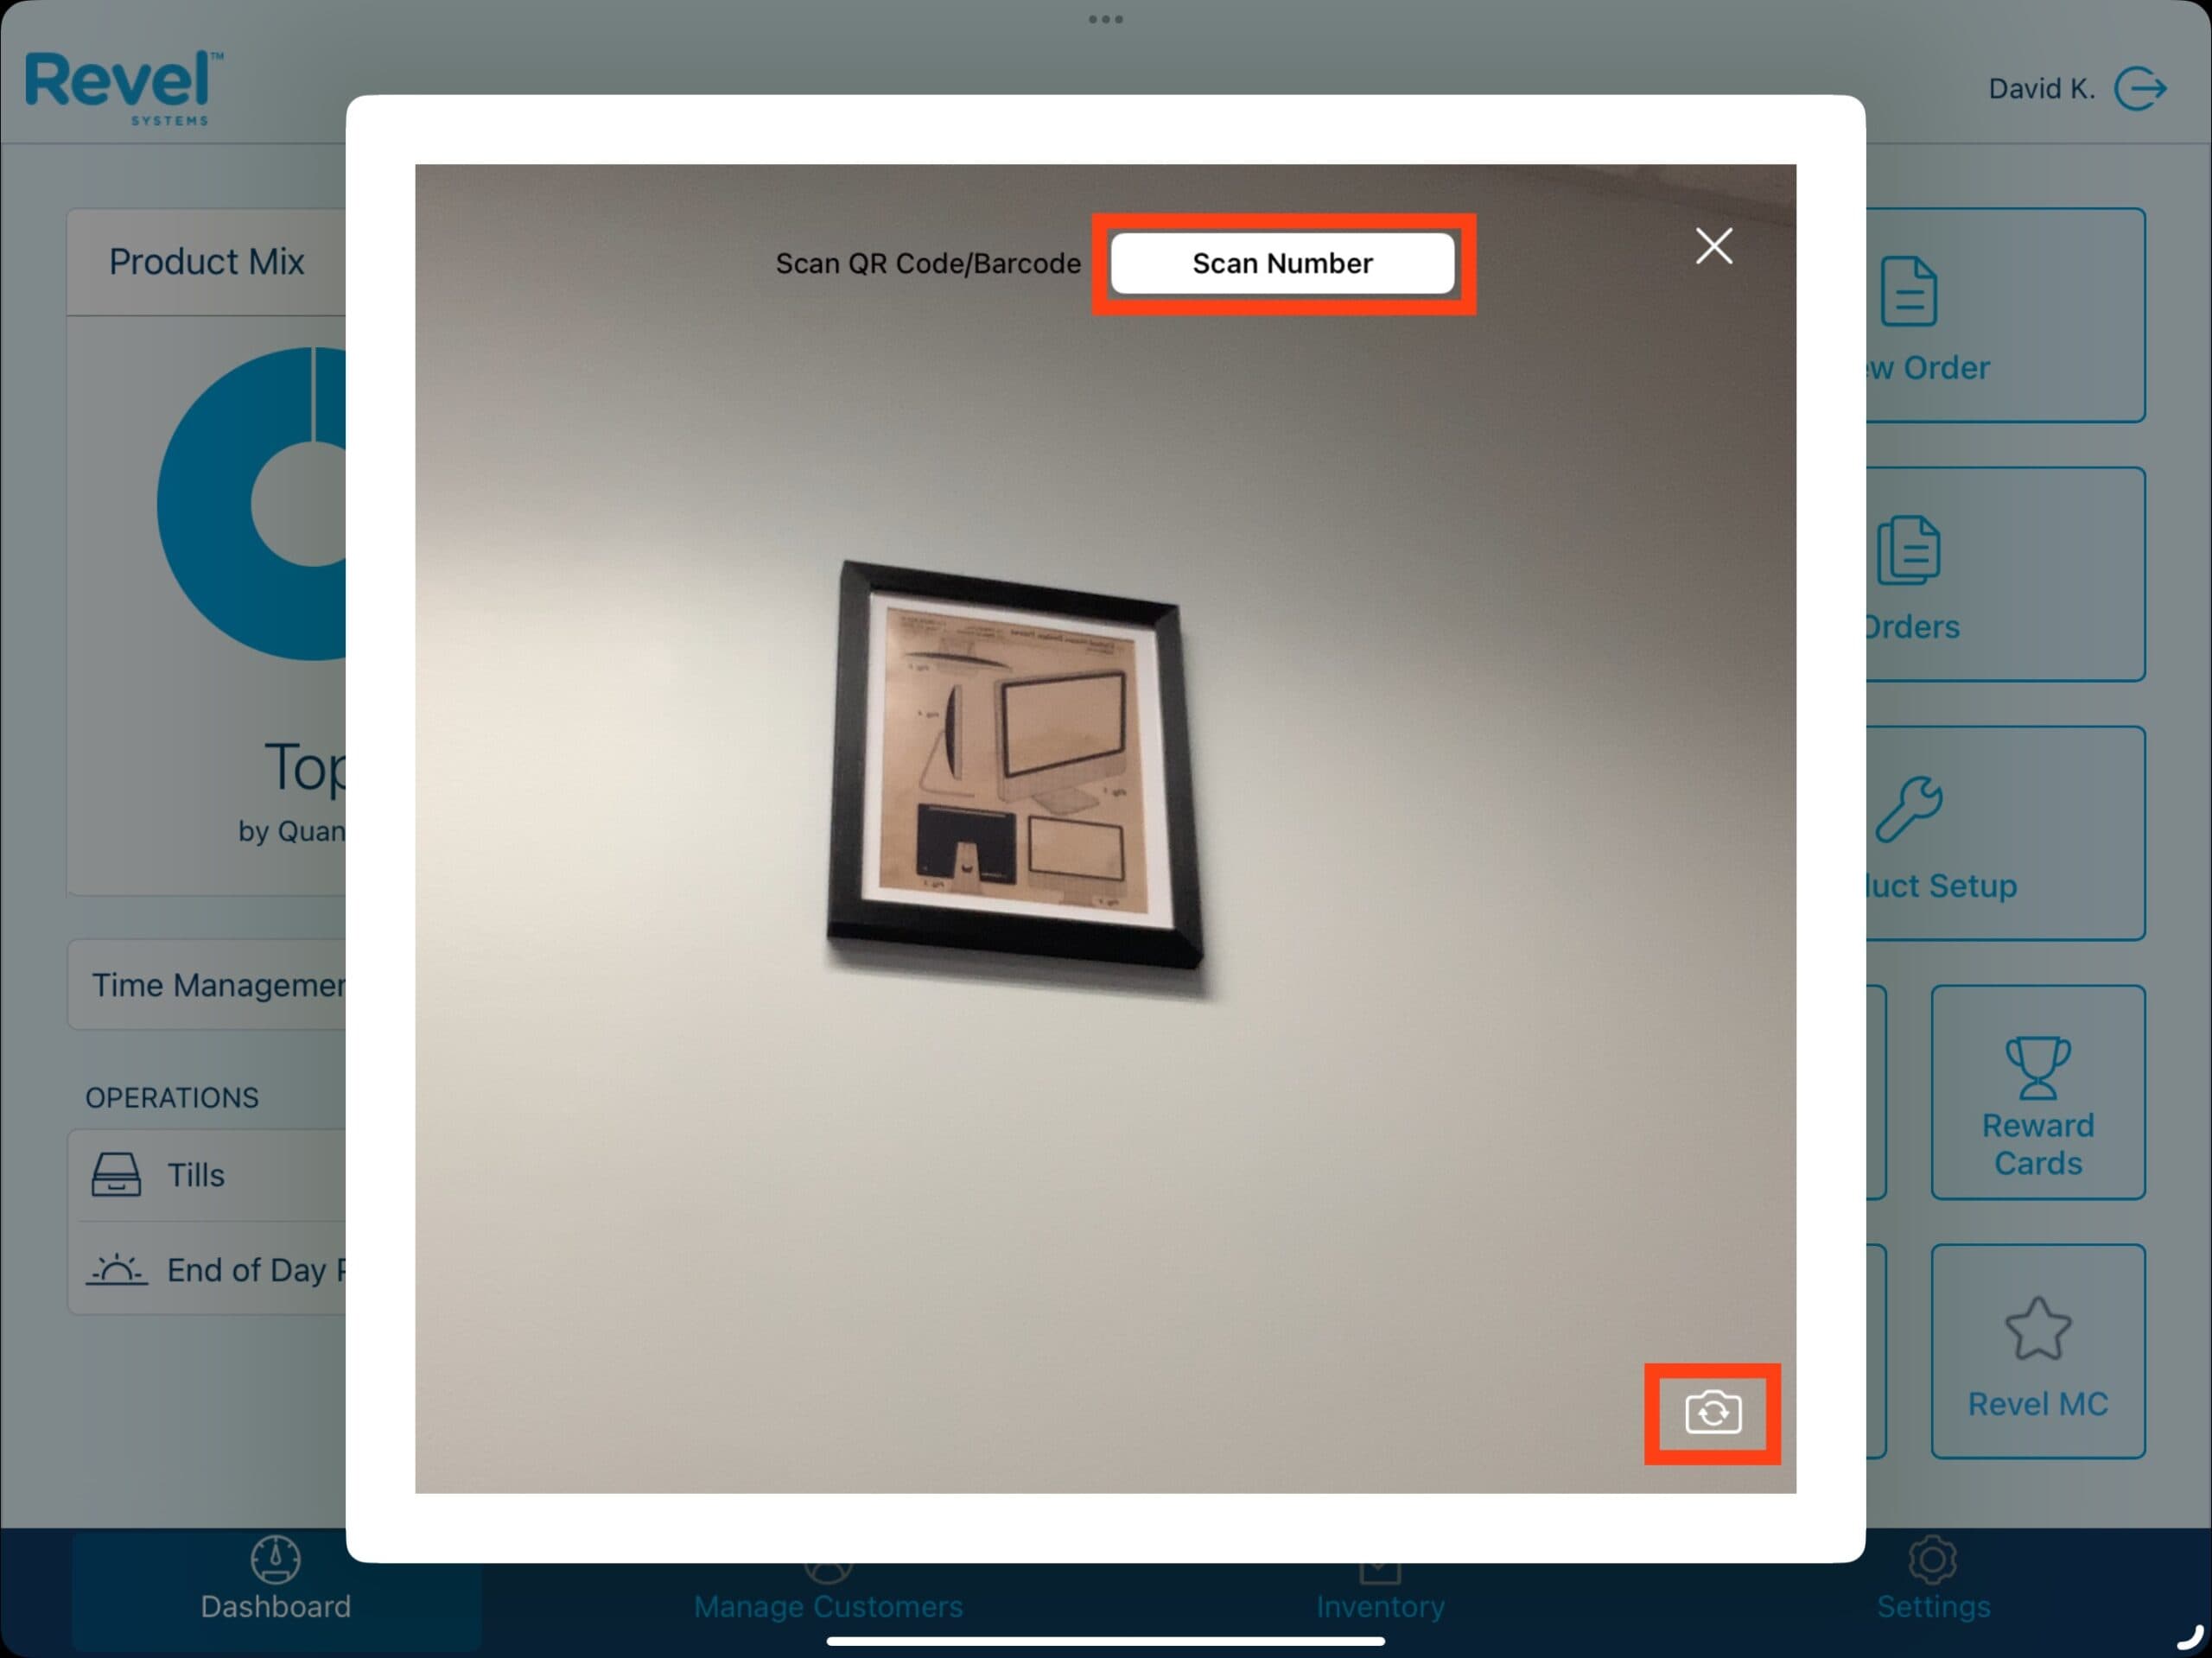
2- Scan QR Code/Barcode: If the gift card has a QR Code or Barcode available, select the camera icon on the Gift Card input window. By default, the camera will face the customer and need to be flipped to the cashier facing side. To do this, select the camera icon on the bottom right of the camera window. With the Scan QR Code/Barcode toggled on, hold the gift card QR Code or Barcode in front of the camera to complete the transaction.
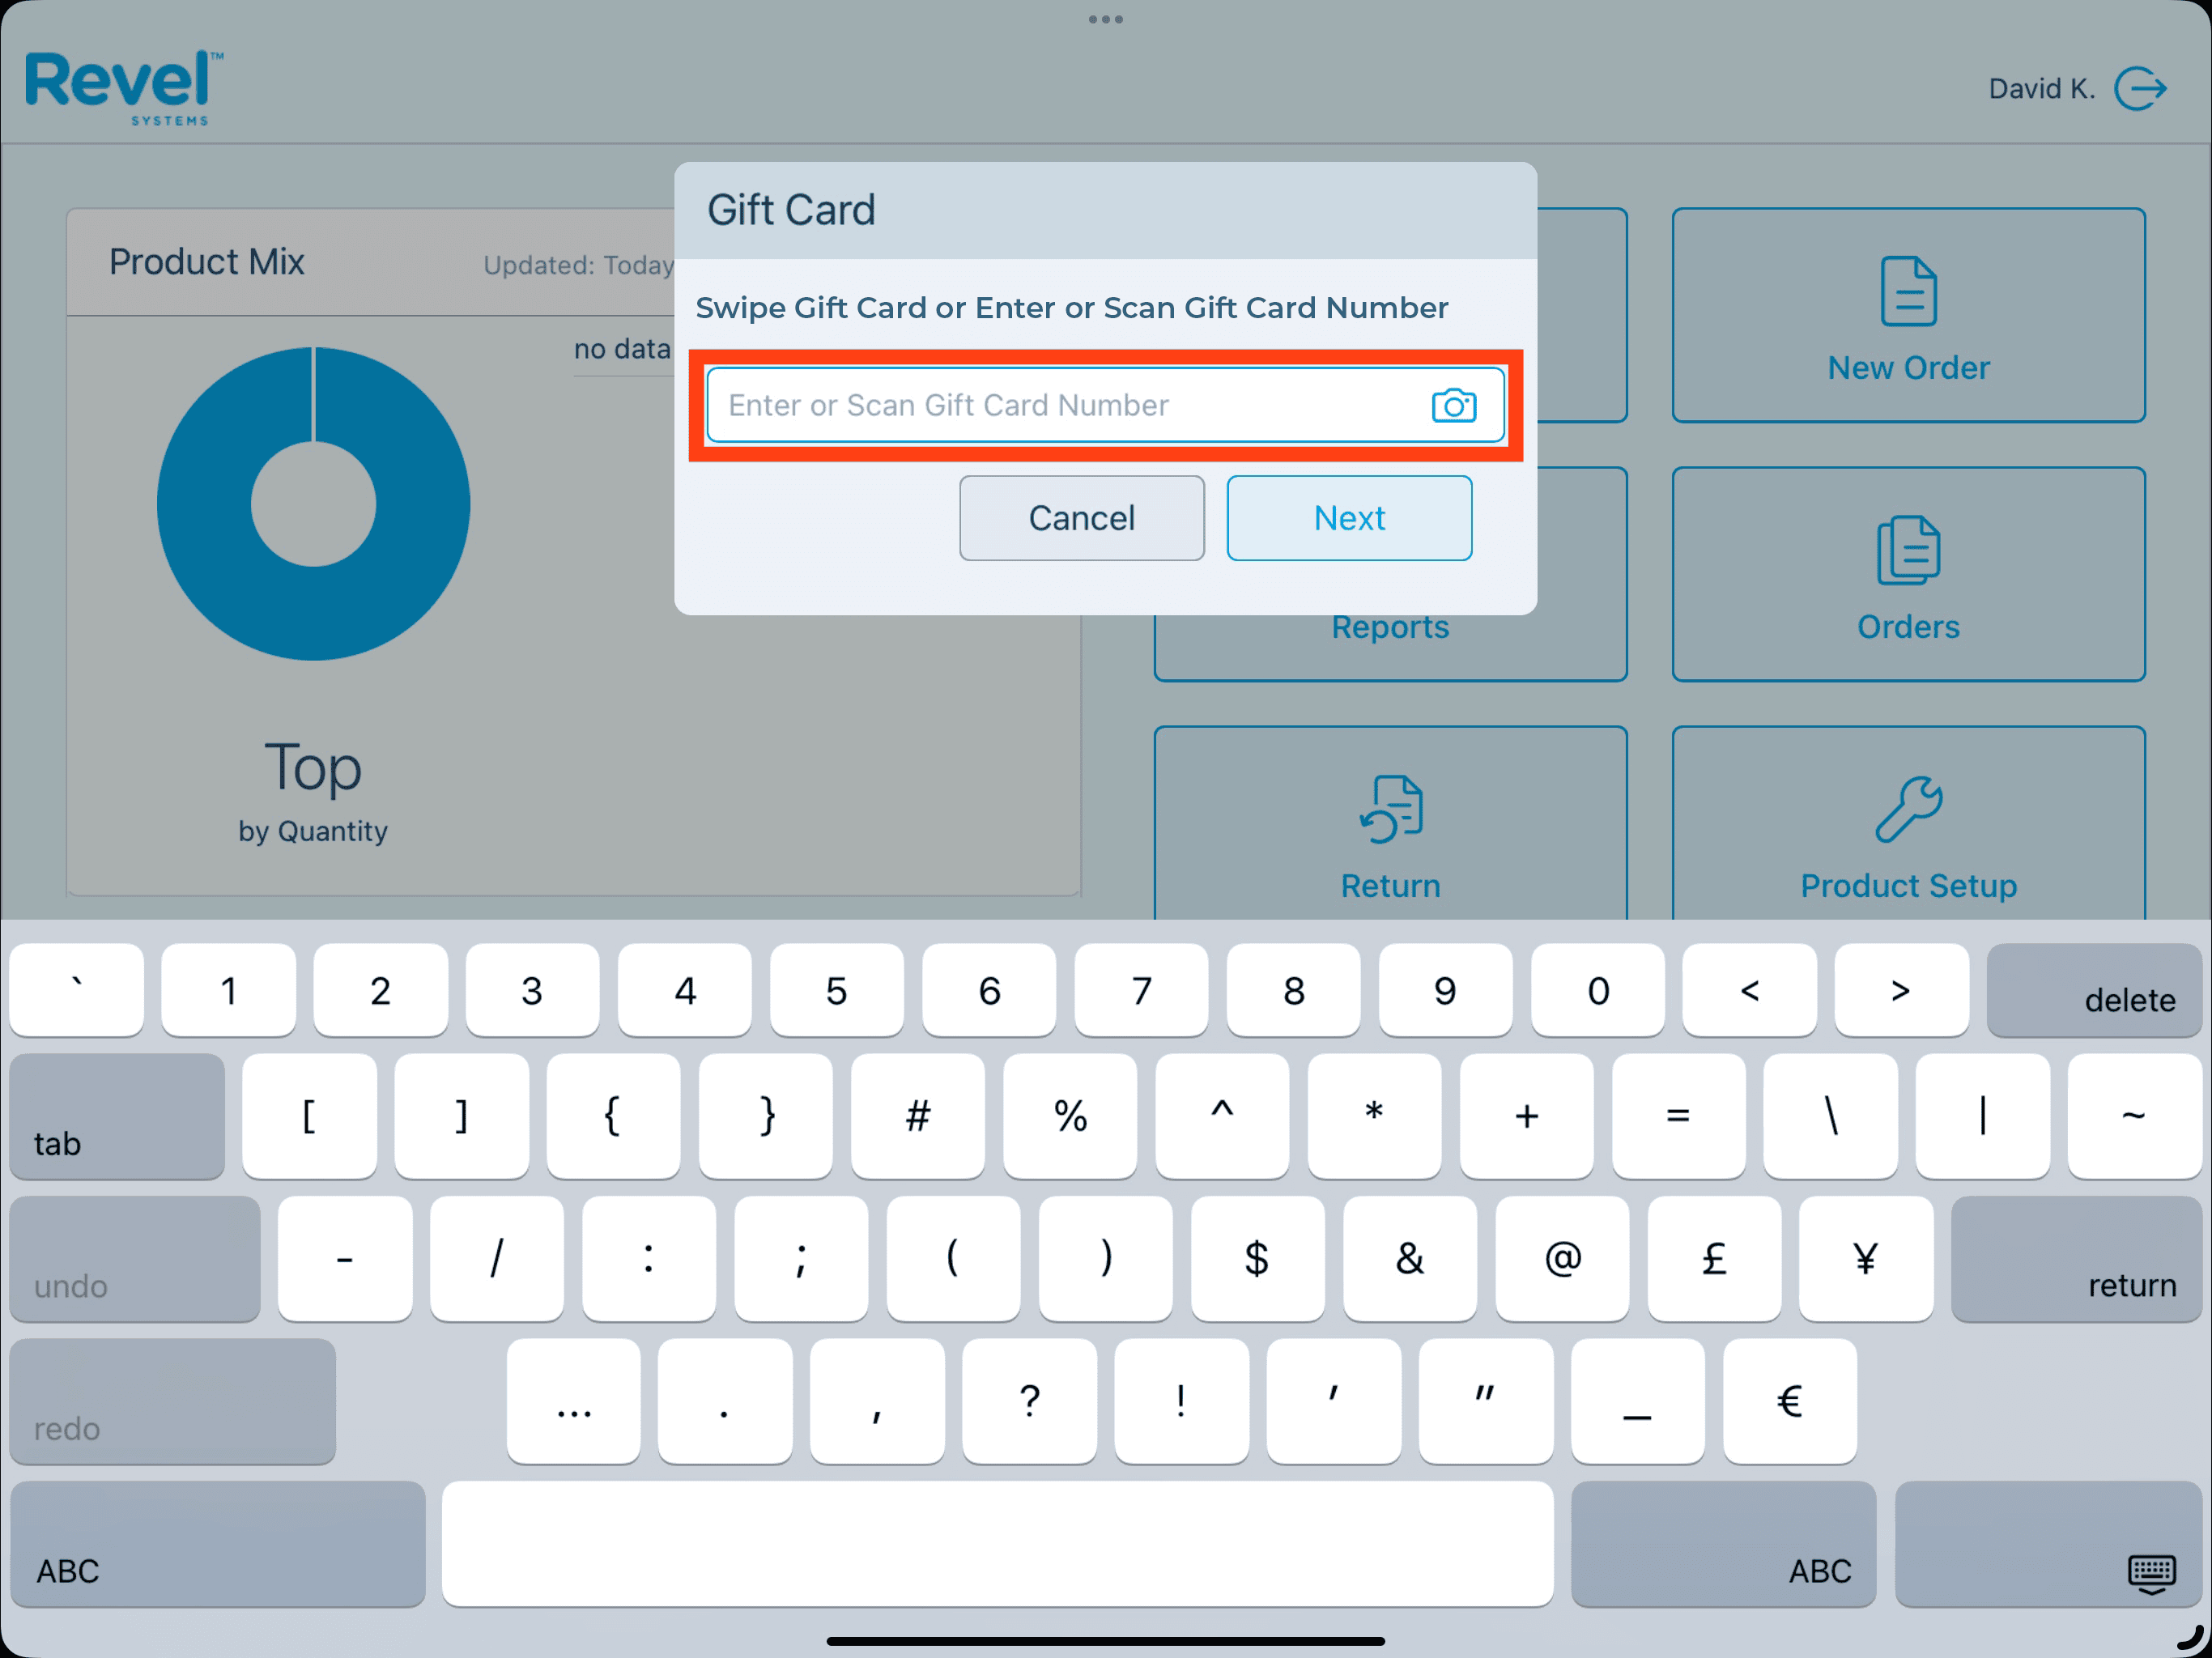


3 – Scan Number: To scan the gift card number, select the camera icon on the Gift Card input window. By default, the camera will face the customer and need to be flipped to the cashier facing side. To do this, select the camera icon on the bottom right of the camera window. With the Scan Number toggle on, hold the gift card number in front of the camera to complete the transaction.



Selling A Gift Card
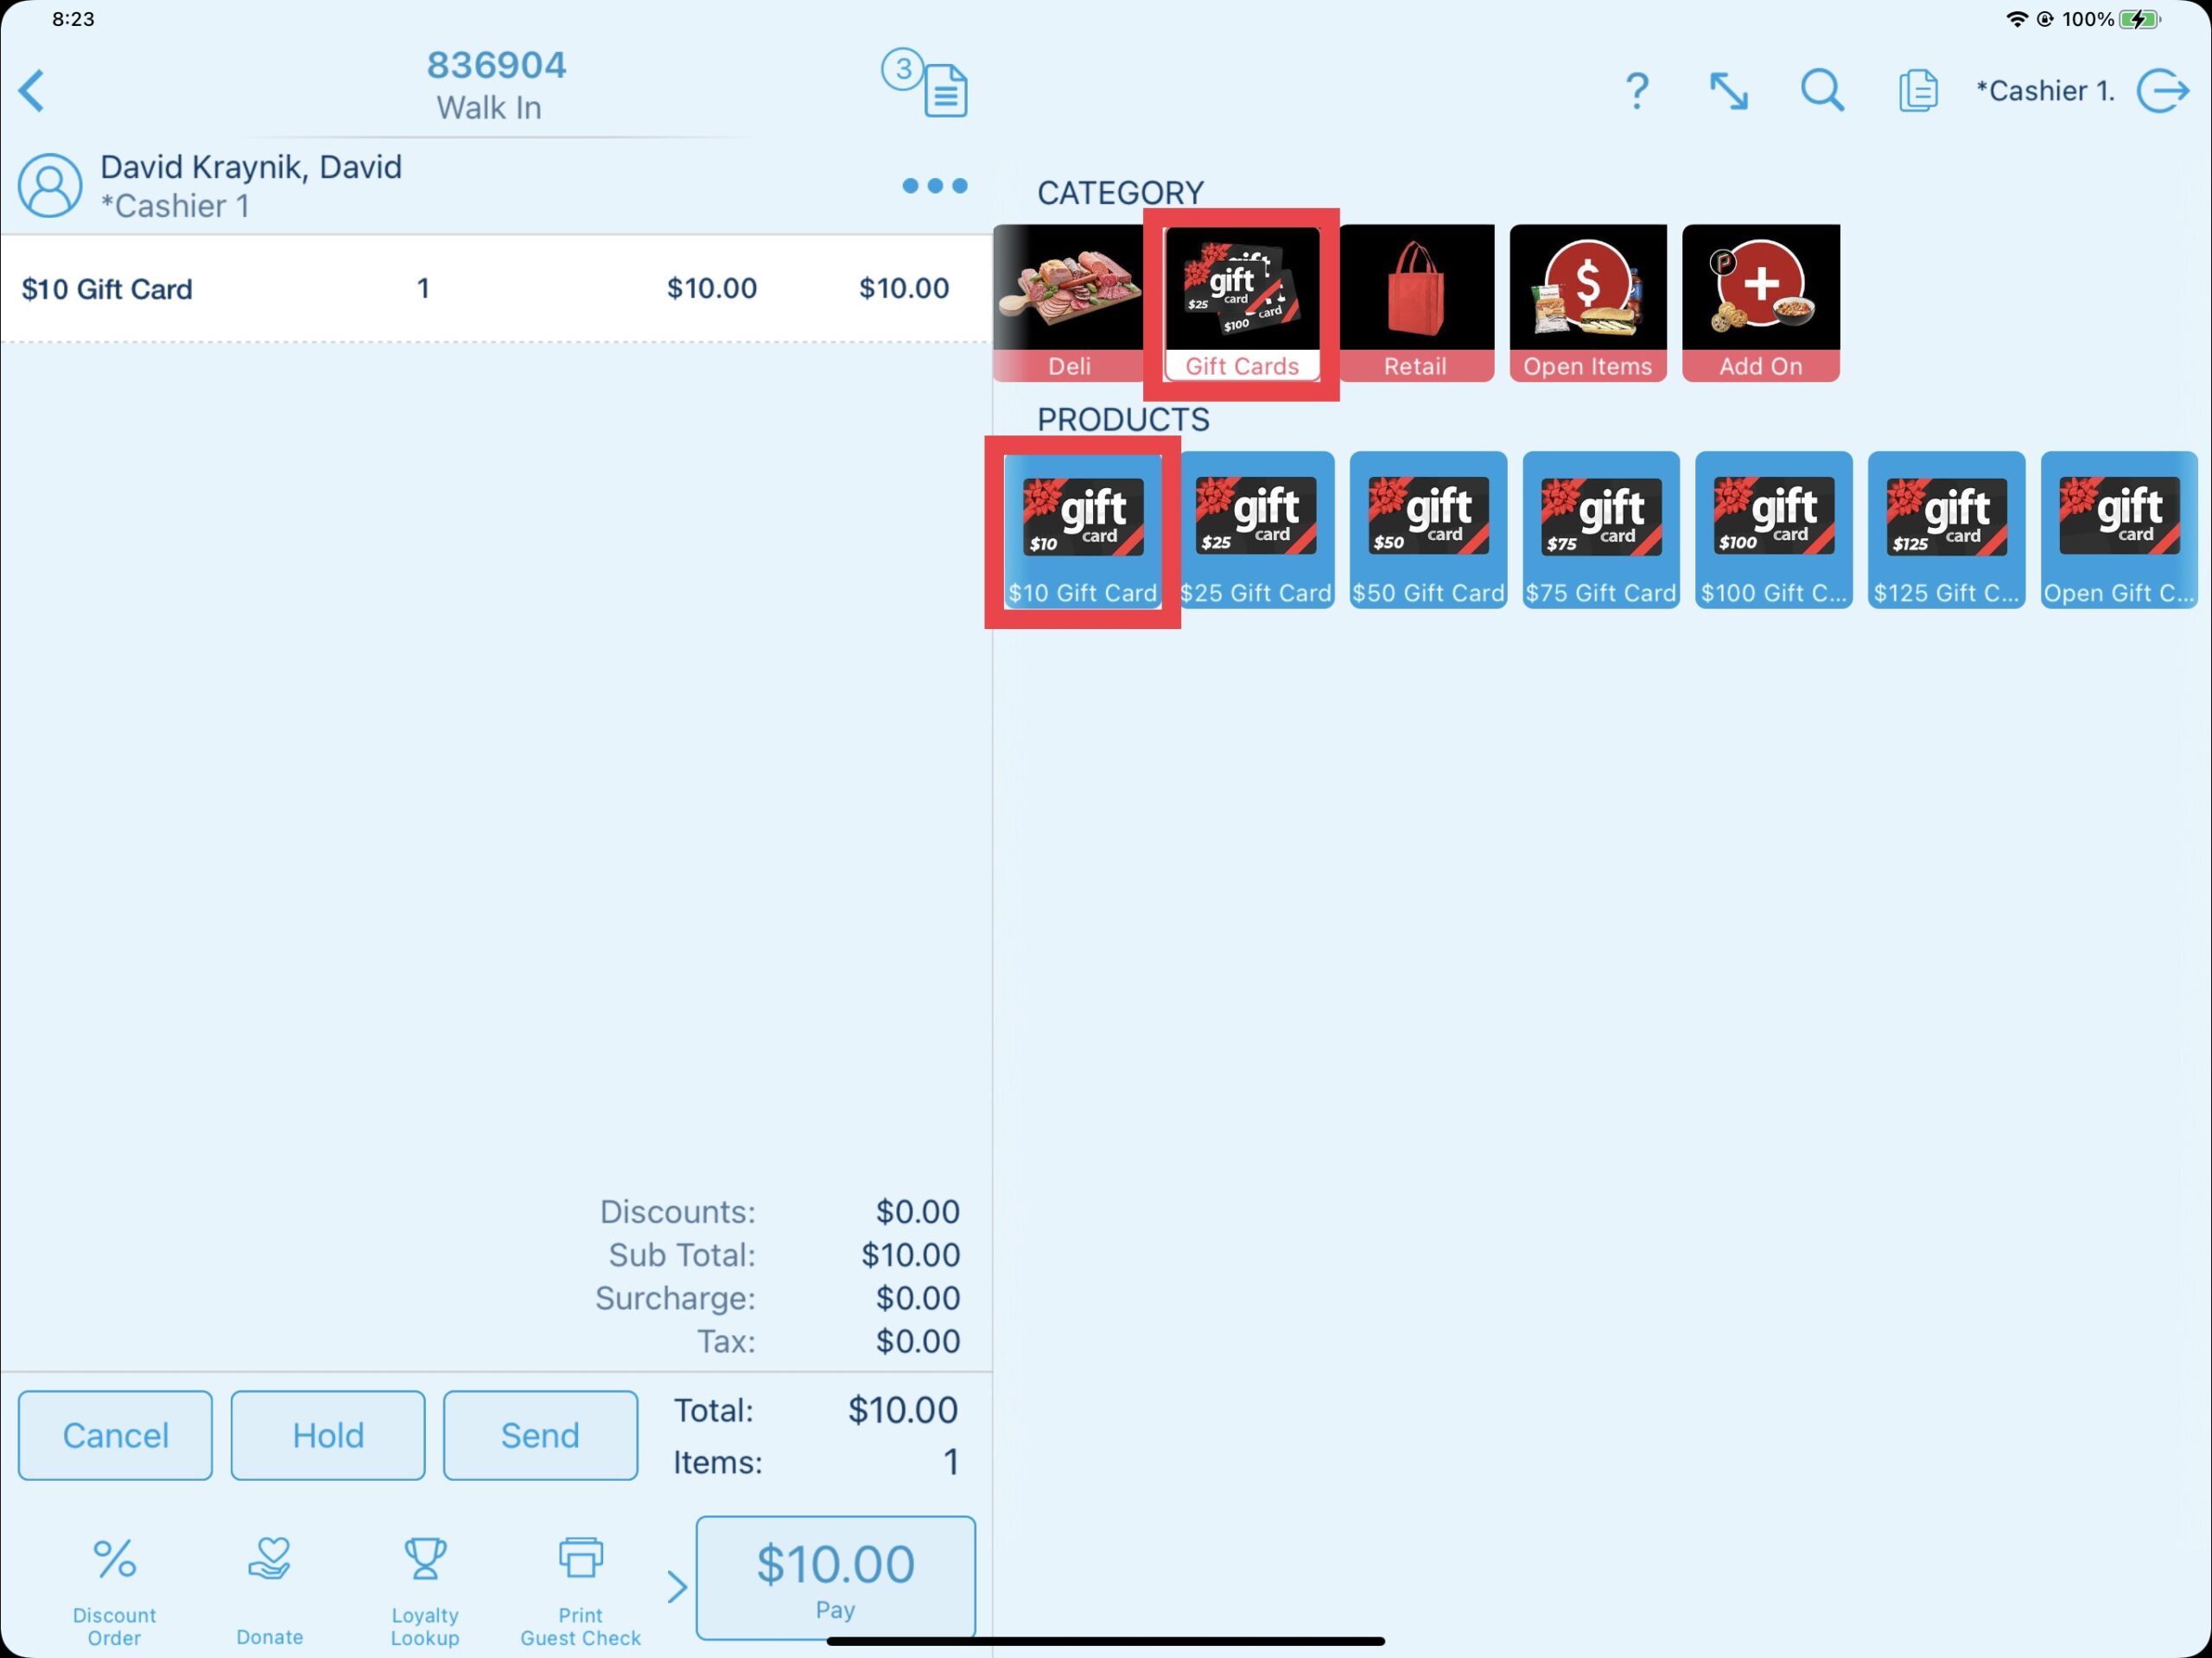
To sell a gift card to a customer (and take payment for the gift card), start an order and select the appropriate gift card from the Gift Cards category and add it to the order. You may sell multiple gift cards on the same order as well as sell gift cards to an order with products such as hoagies. Gift cards that have previously been activated (regardless if having a current balance or not), cannot be reloaded per PrimoHoagies requirement.
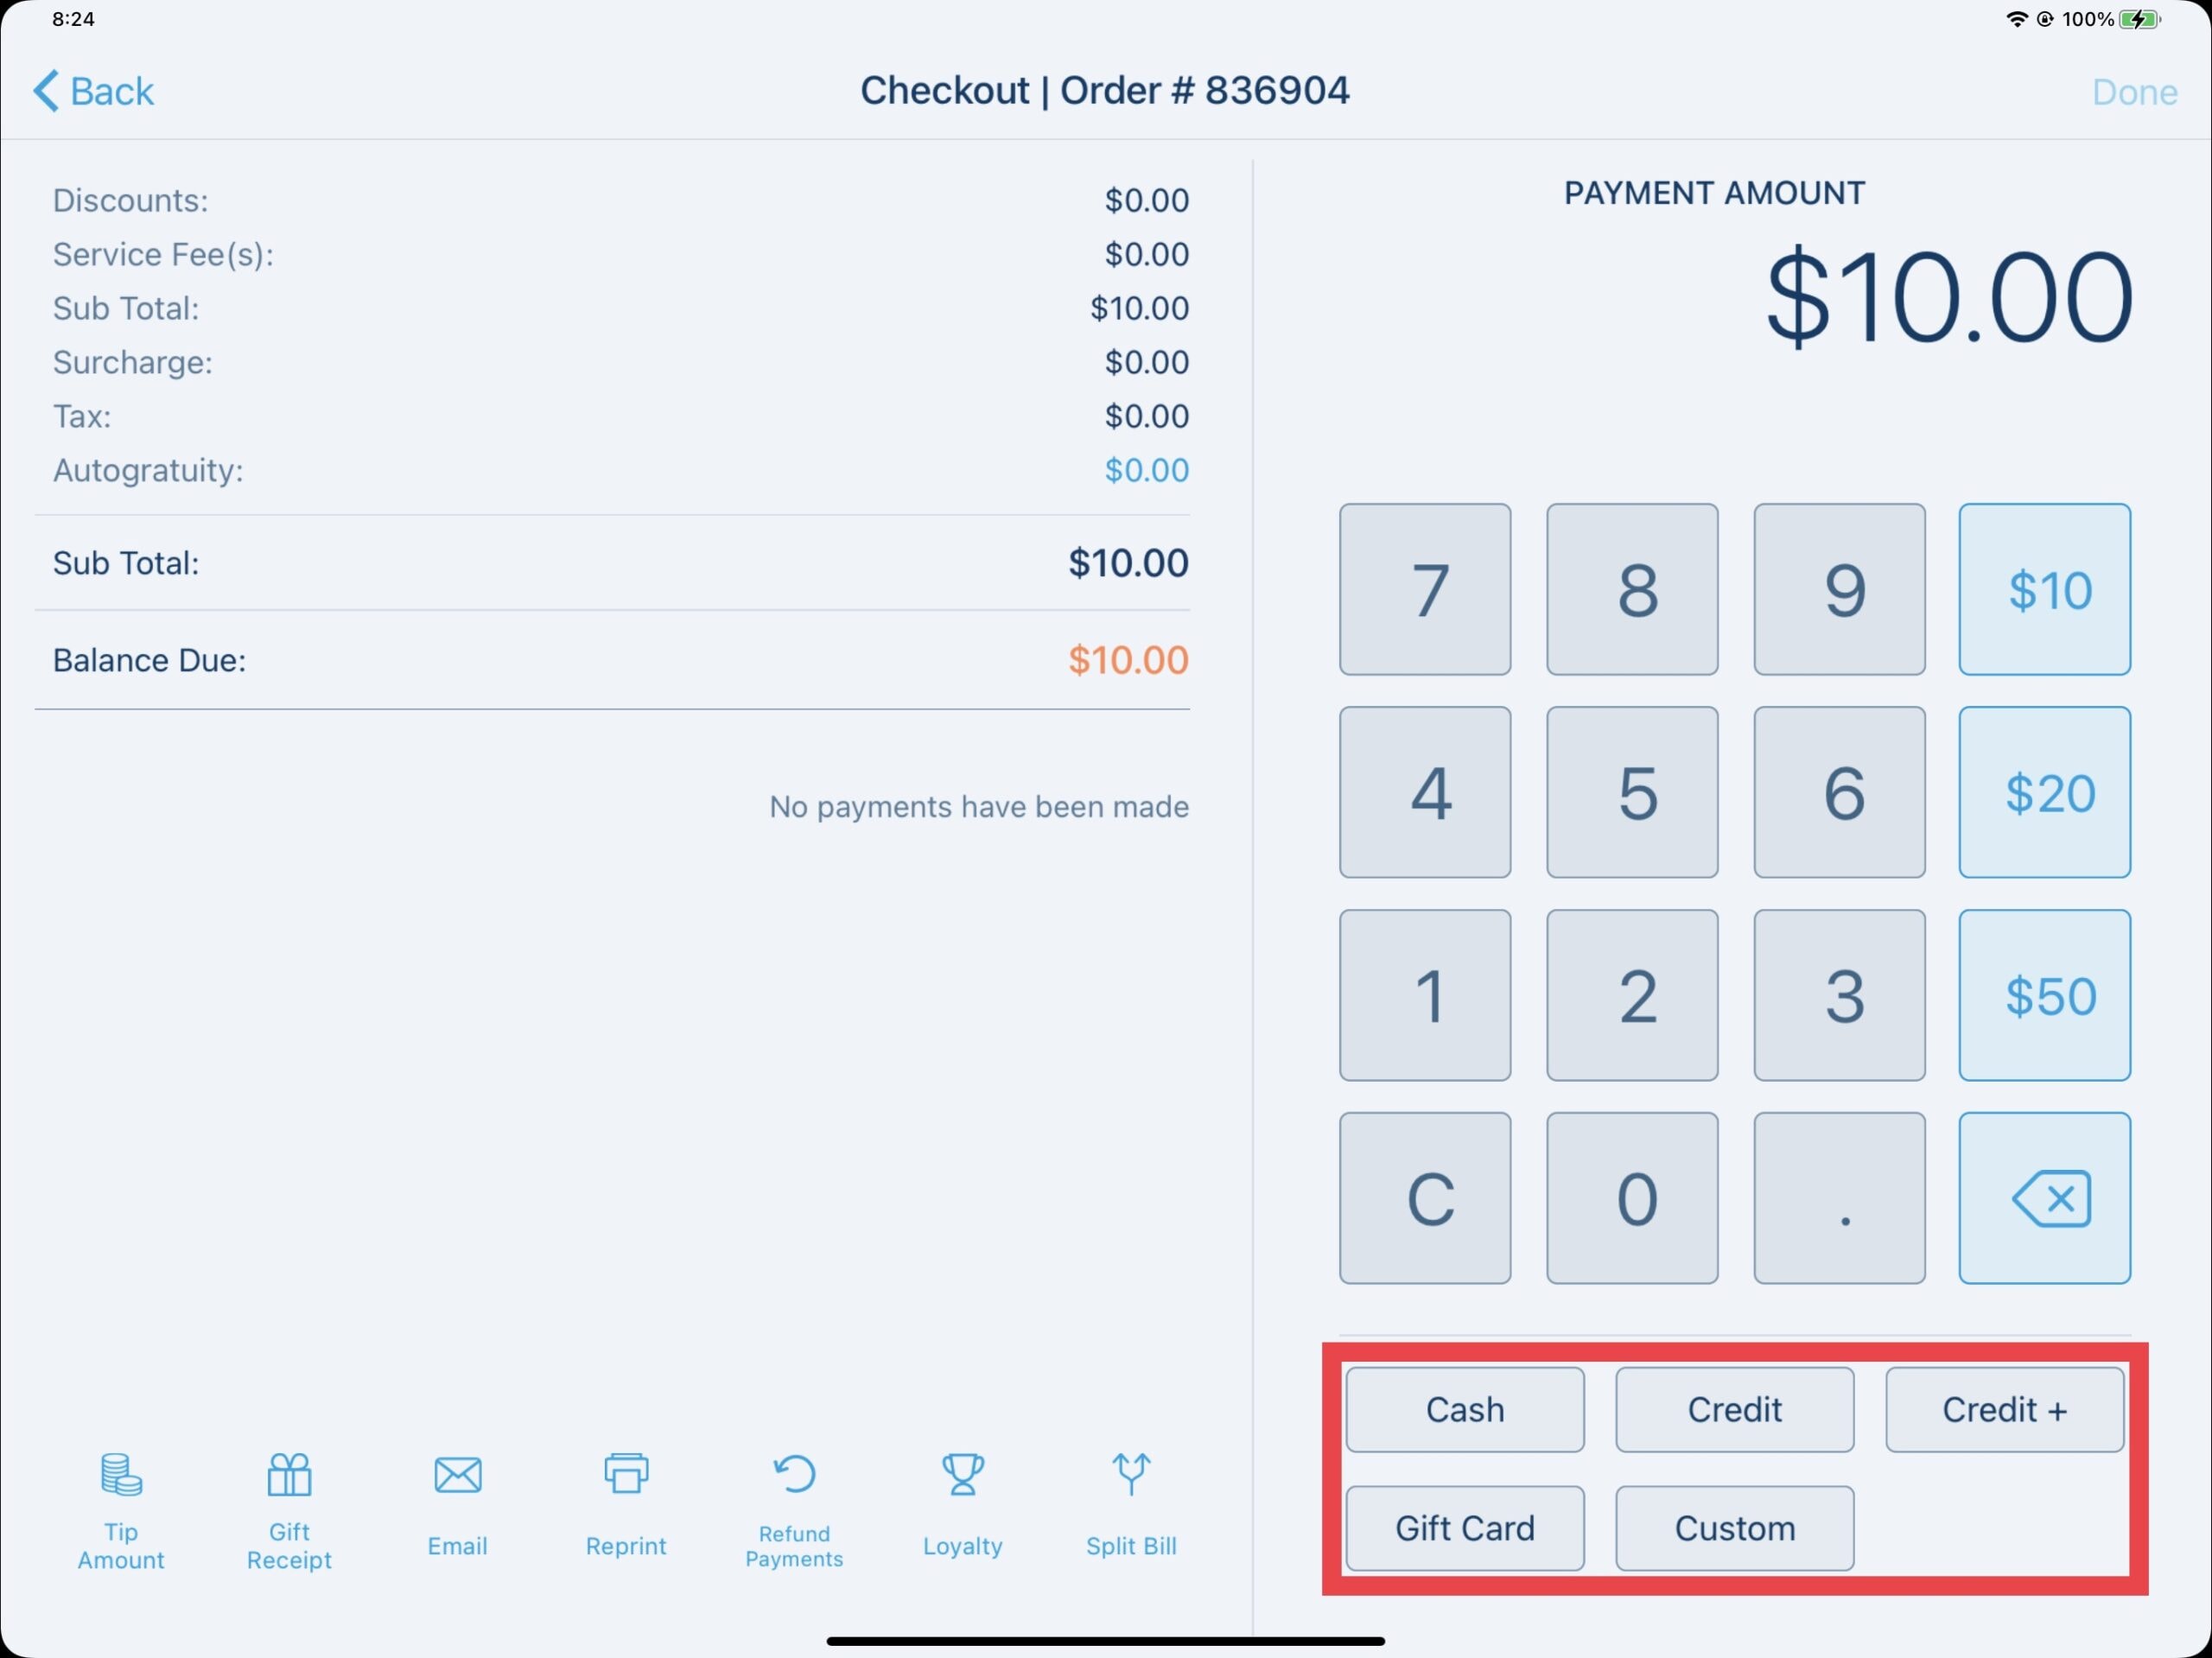
Next, from the payment screen, pay the order to the desired payment type.
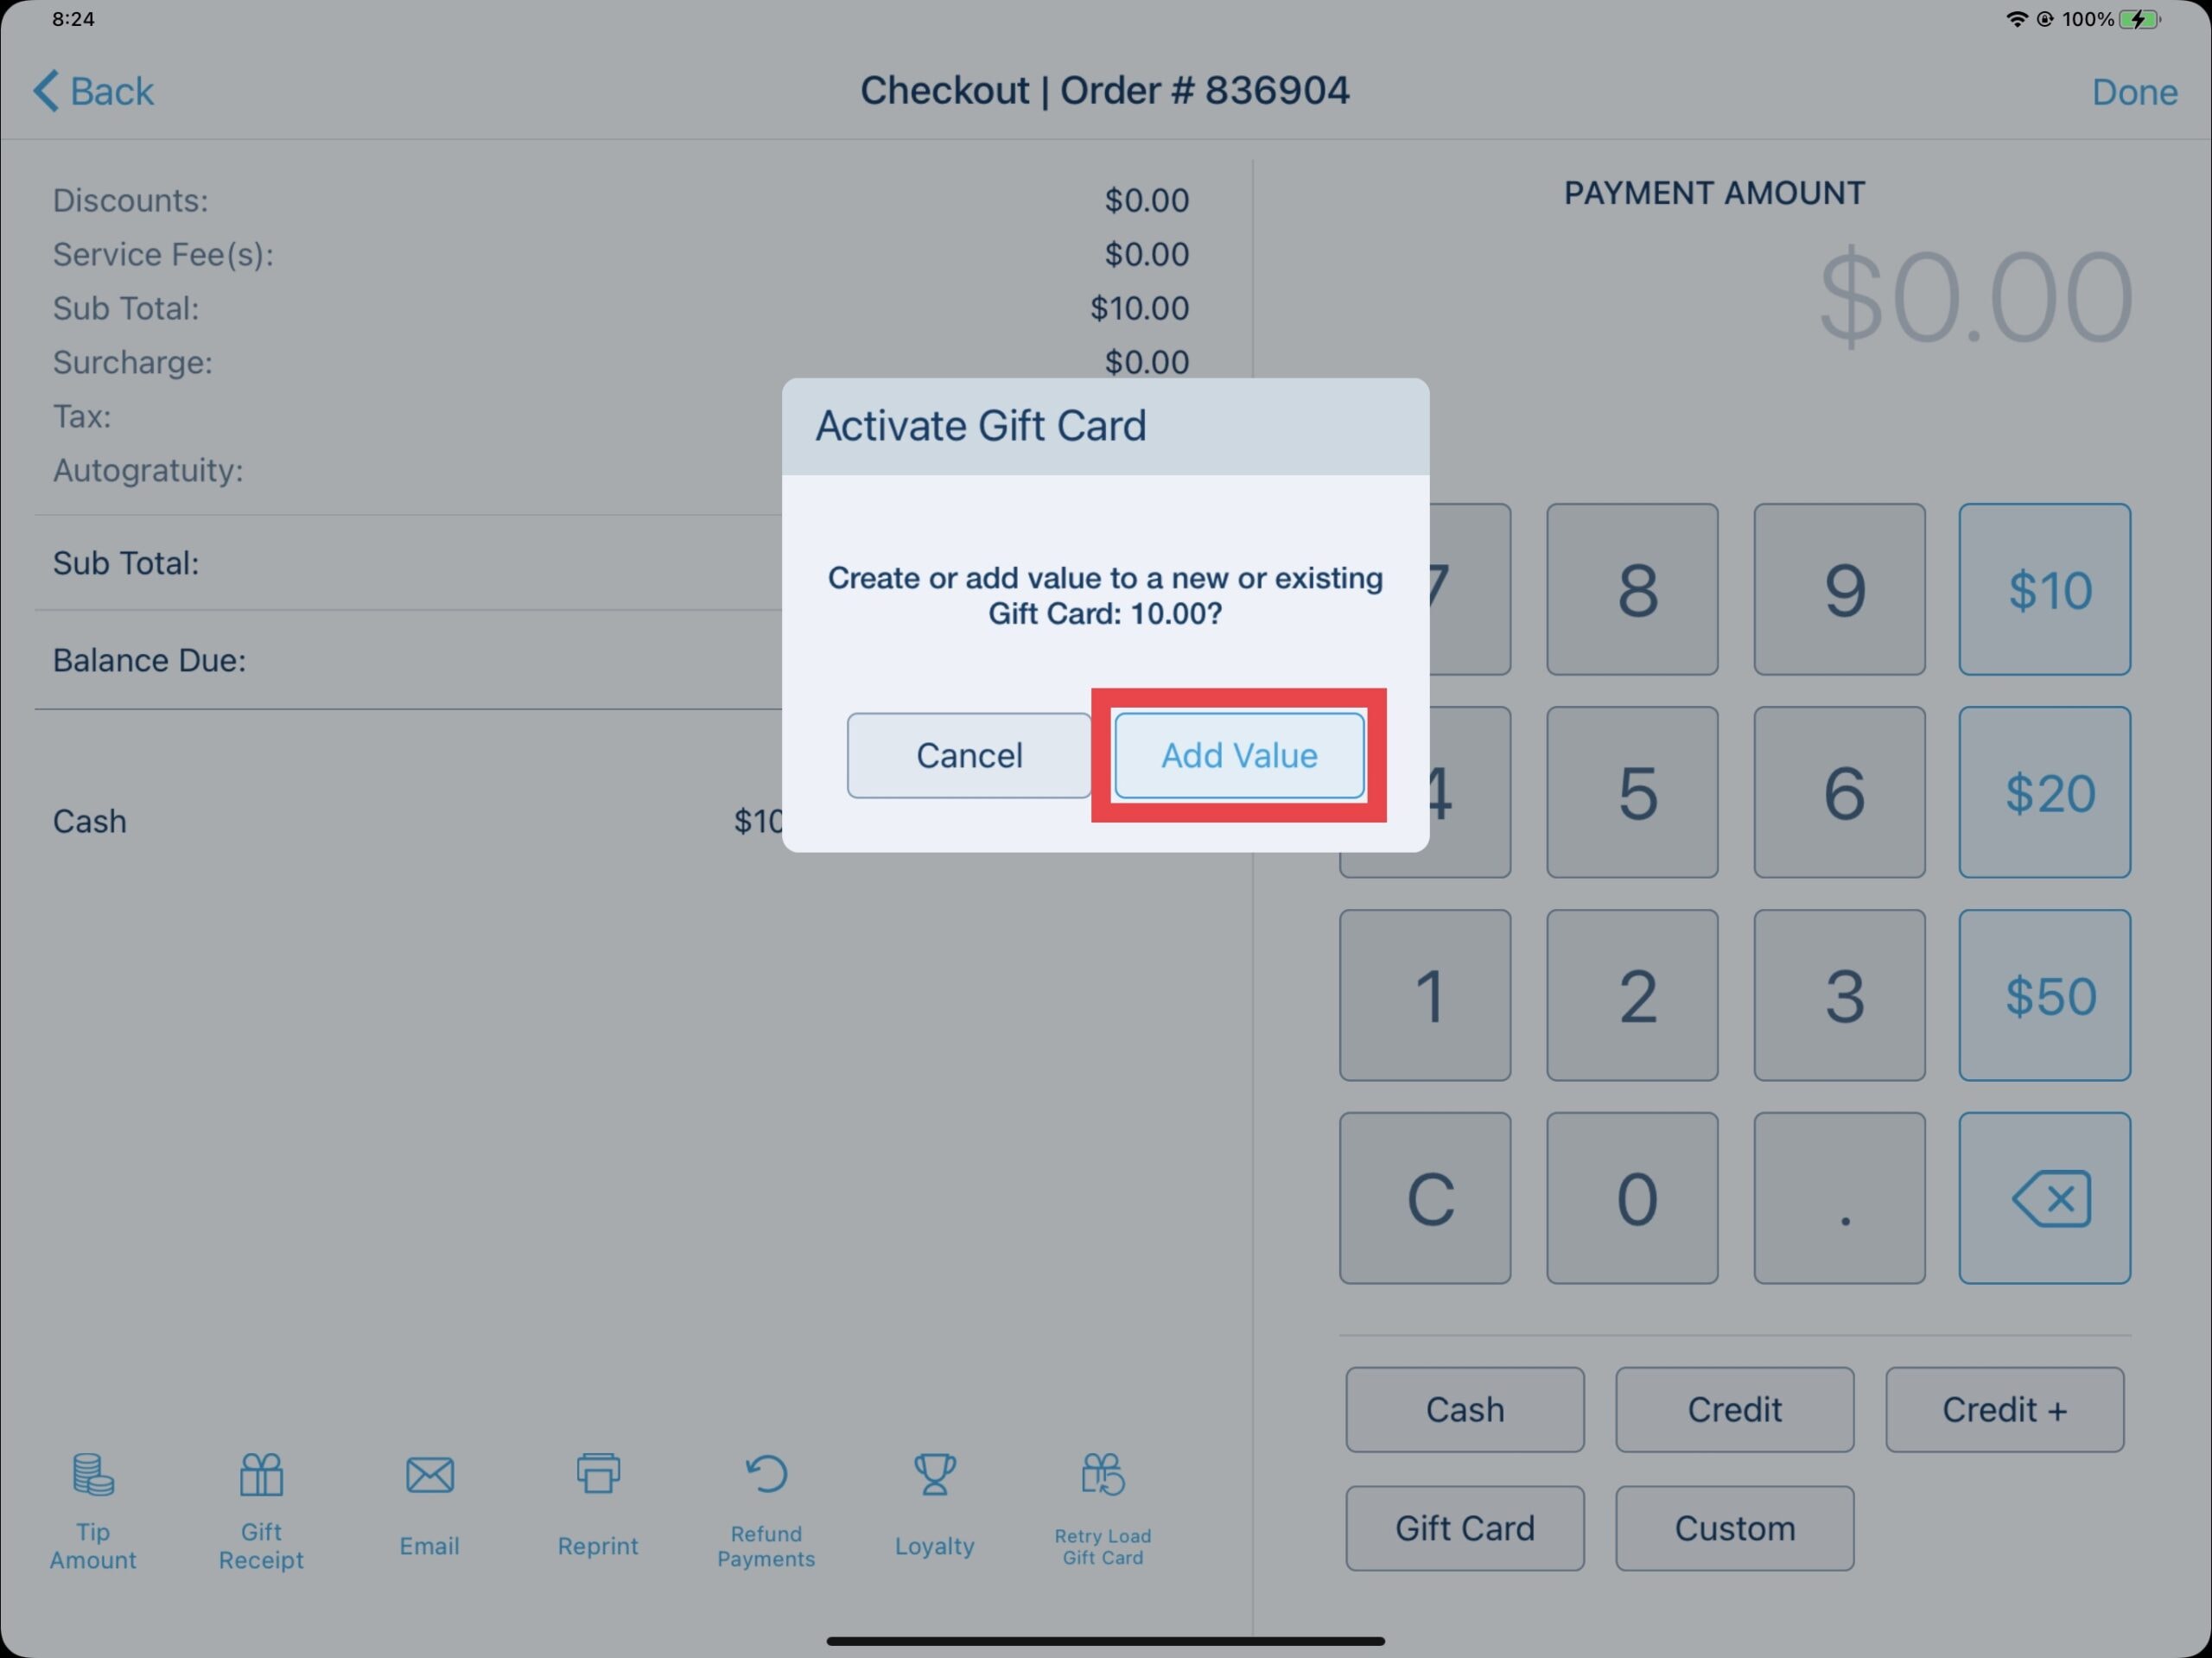
Once the order has been paid in full, a prompt will ask you to activate the gift card. Select Add Value.
At this time the screen will prompt you to enter or scan the gift card as previously shown to program the card value and complete the order.
Redeeming A Gift Card
To redeem a gift card, add the products to and order and select Pay.
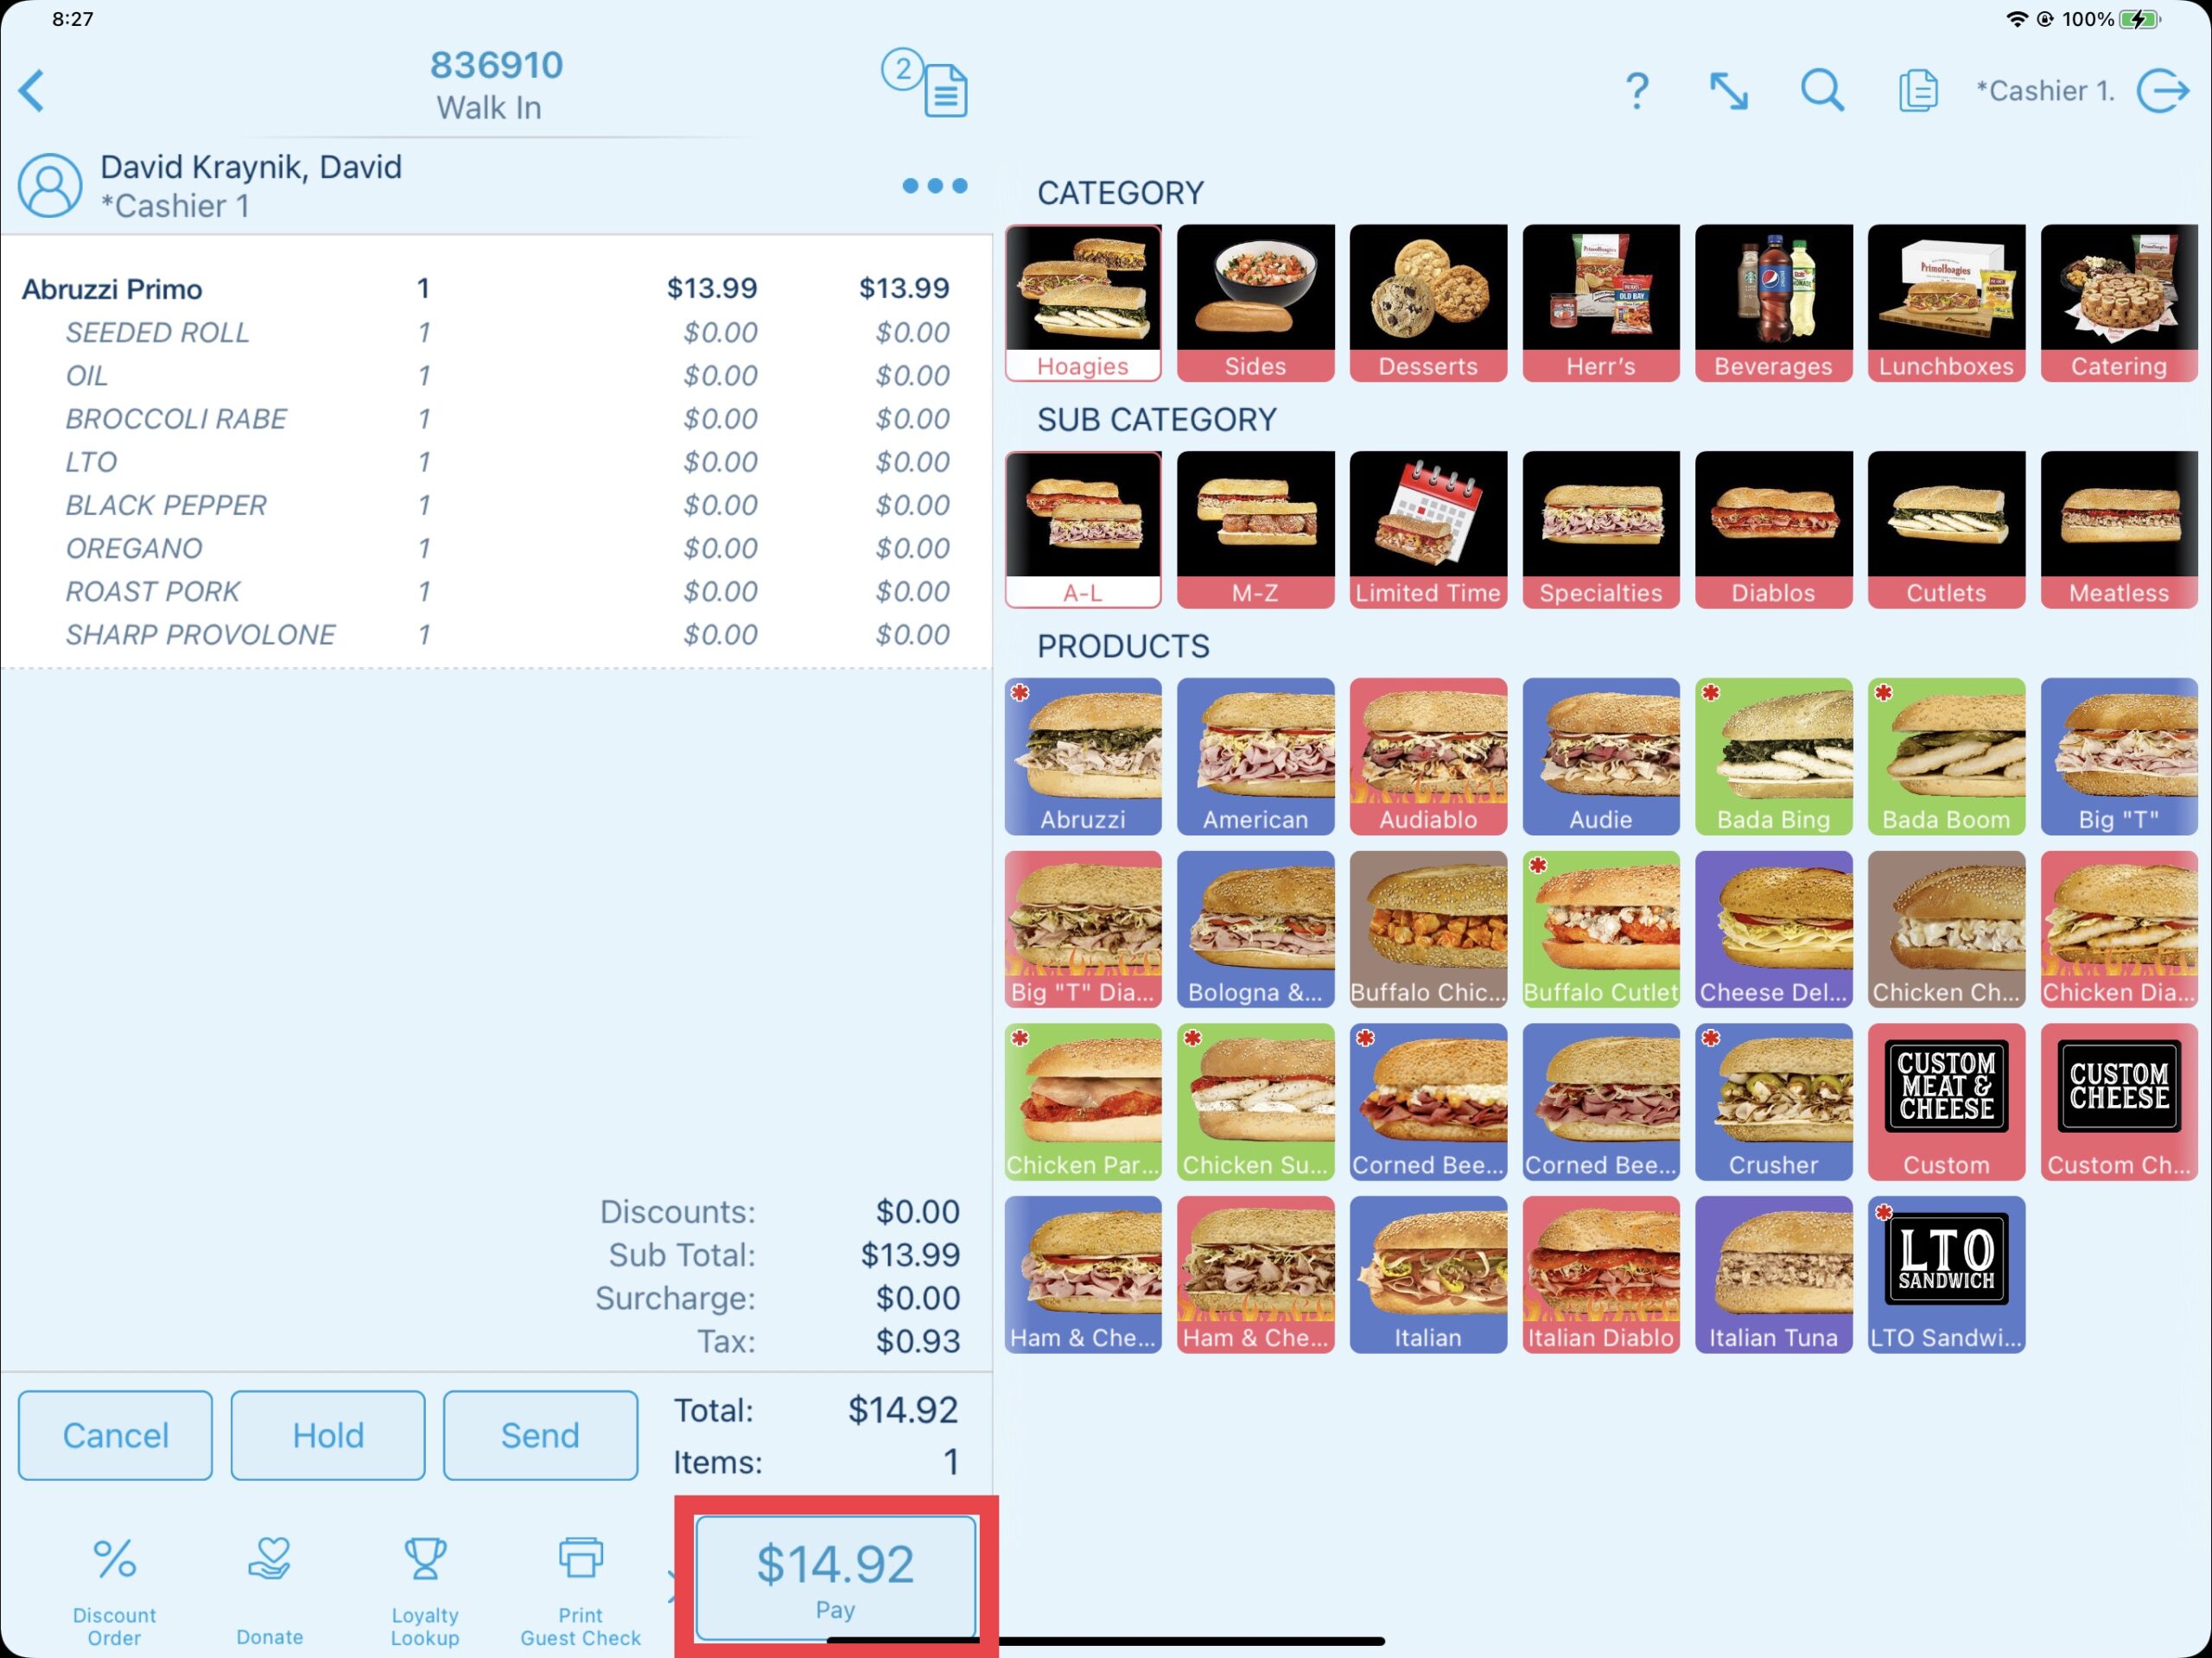
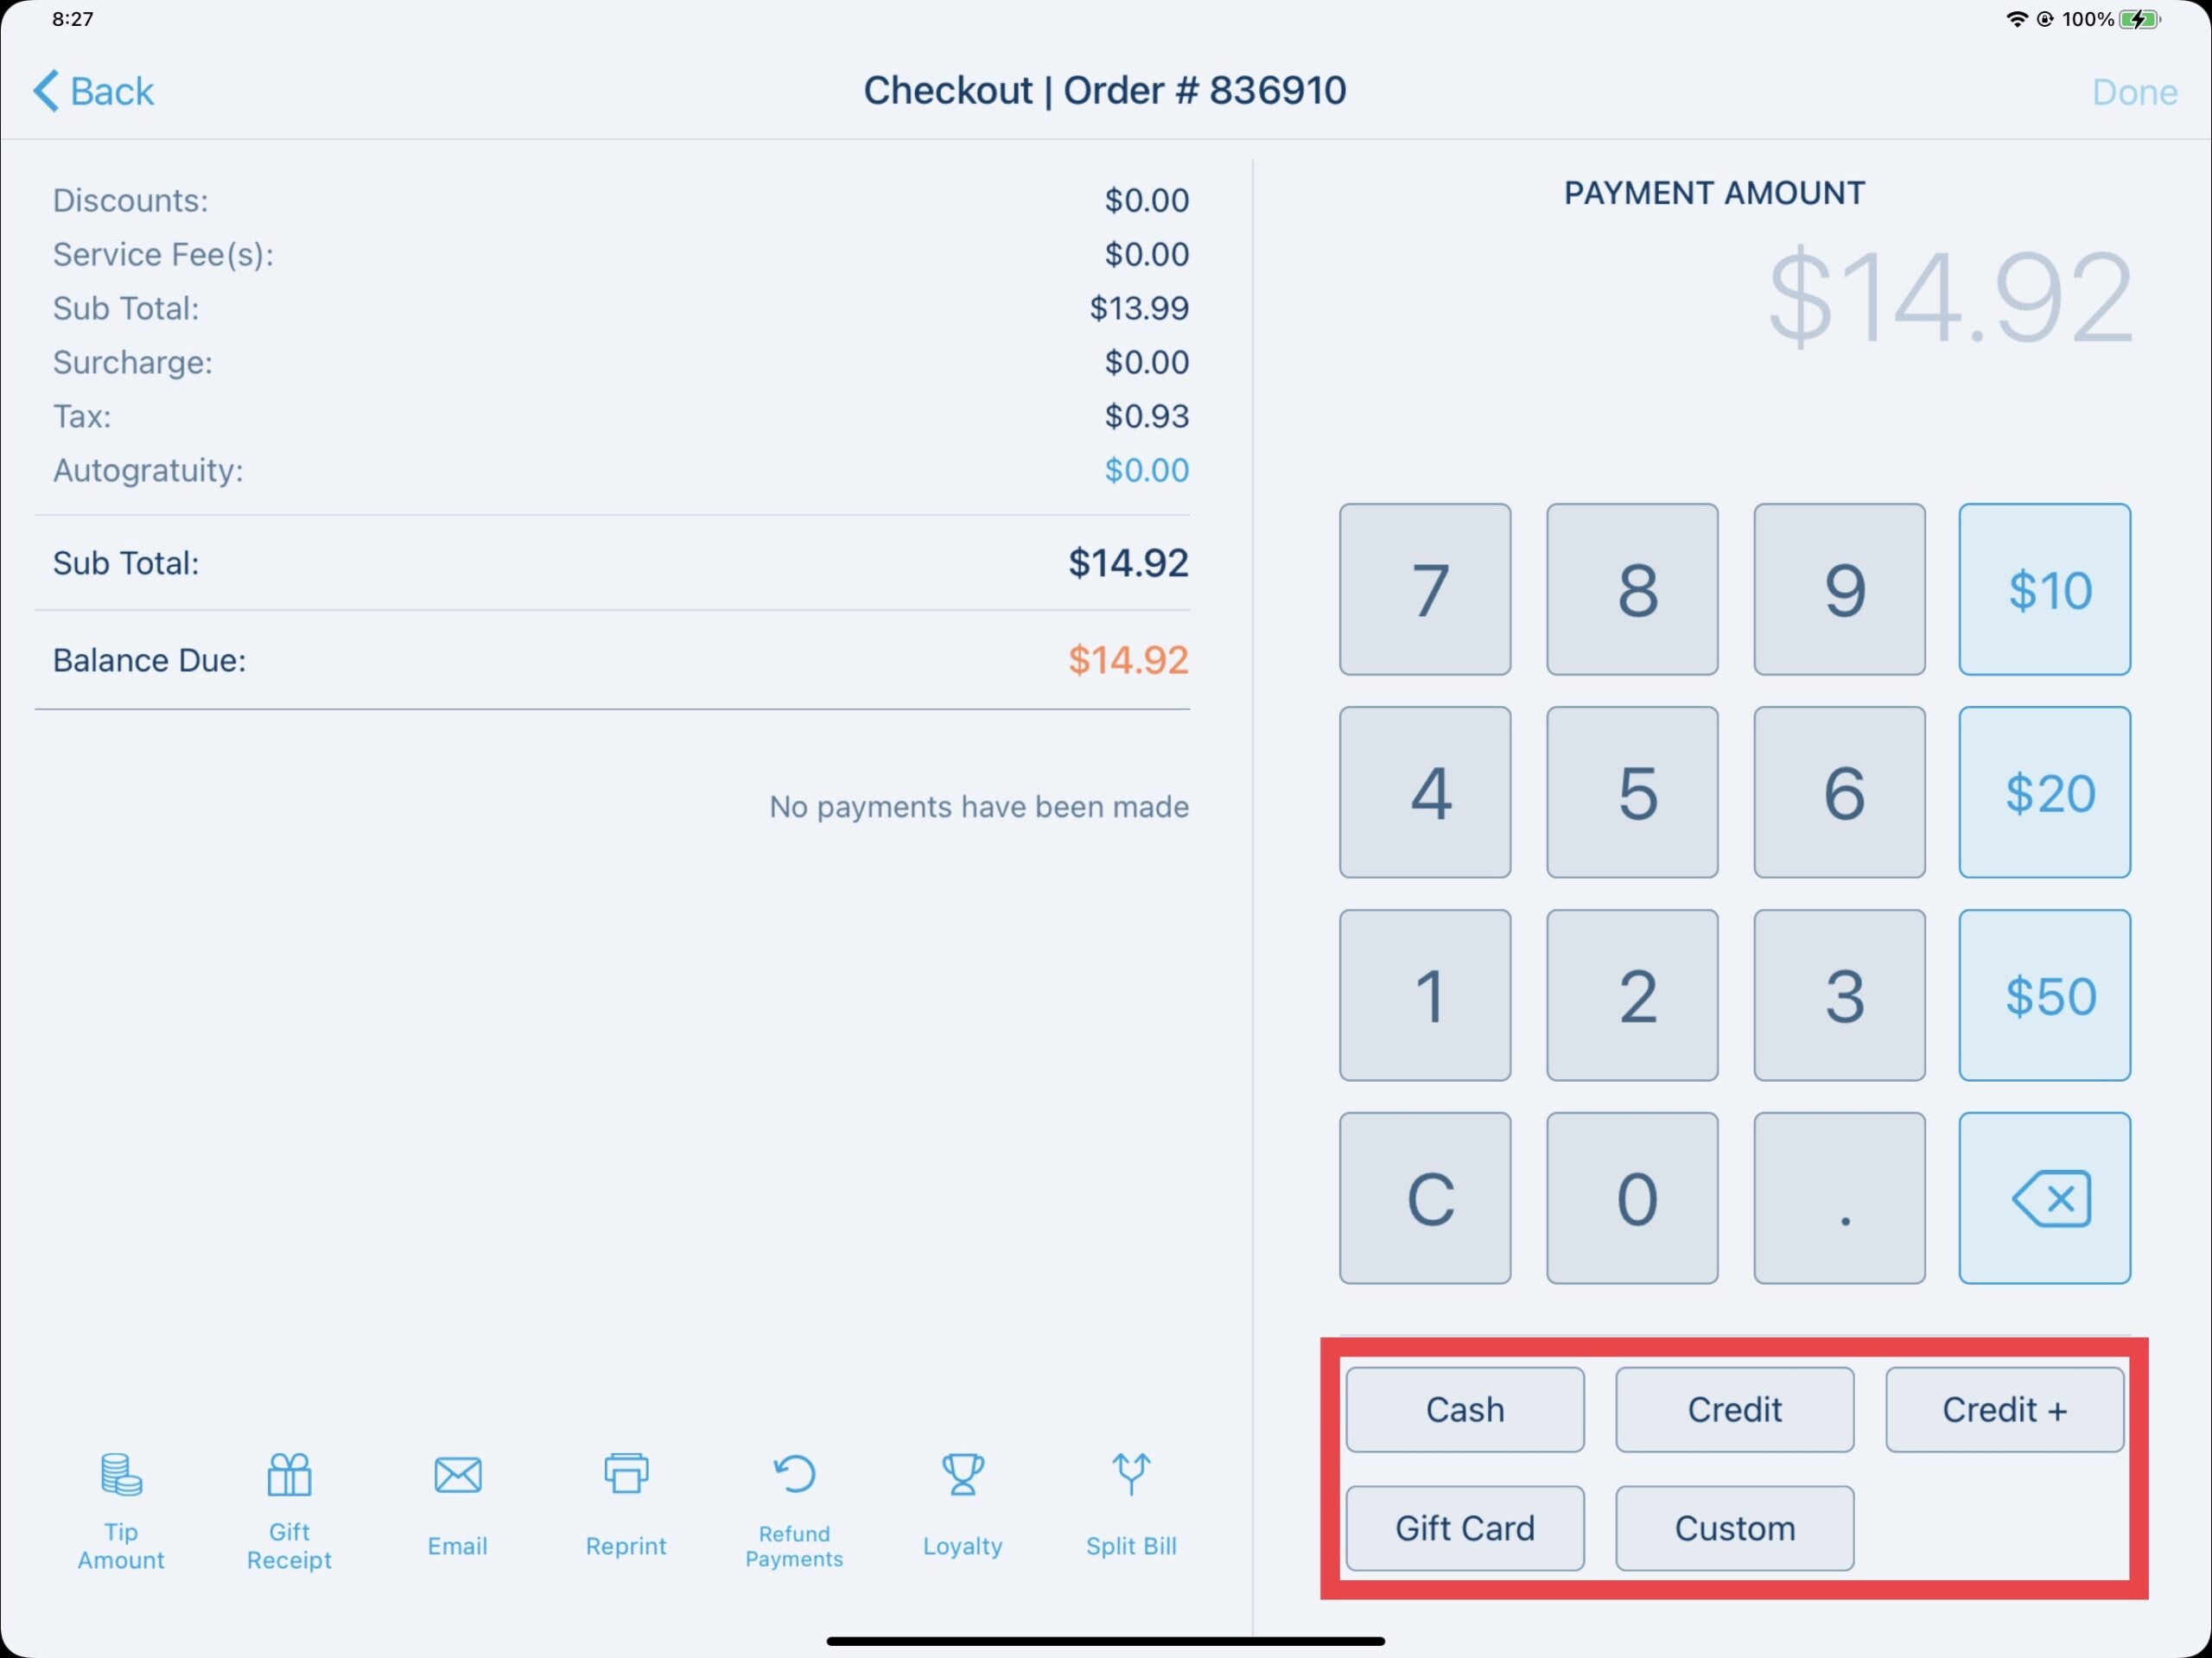
Next, from the payment screen, pay the order to the desired payment type. When selecting the Gift Card payment type, you will be prompted on the screen to enter or scan the gift card as previously shown. You may need to select Gift after swiping to confirm the card is a gift card.
If there is an insufficient balance on the card, the available balance will be removed and a warning message will be displayed indicating an additional payment is needed.
Updated 07/31/2024

Summary
Holiday bonus cards can be issued from the point of sale. Each holiday season, $5 and $25 holiday bonus cards are pre-programmed with their respective values before being shipped out to the establishments. The holiday bonus cards are valid for redemption from January 1st to February 29th.
When a customer purchases a regular $25 gift card, they will receive a complimentary $5 holiday bonus card. When $100 in regular gift cards are purchased, they will receive a $25 holiday bonus card.
At the end of the holiday season, the establishment will be required to return any holiday bonus cards that have not been distributed back to PrimoHoagies Corporate. To track the holiday bonus cards that are distributed, refer to the Holiday Bonus Cards Report.
Adding Gift Cards & Holiday Bonus Cards to Orders
After starting an order, select the Gift Cards category. Add the gift cards to the order using the pre-defined amounts or the open amount. The gift cards will be added to the order and activated after payment for the order has been accepted. You can also add gift cards and holiday bonus cards to orders with products.
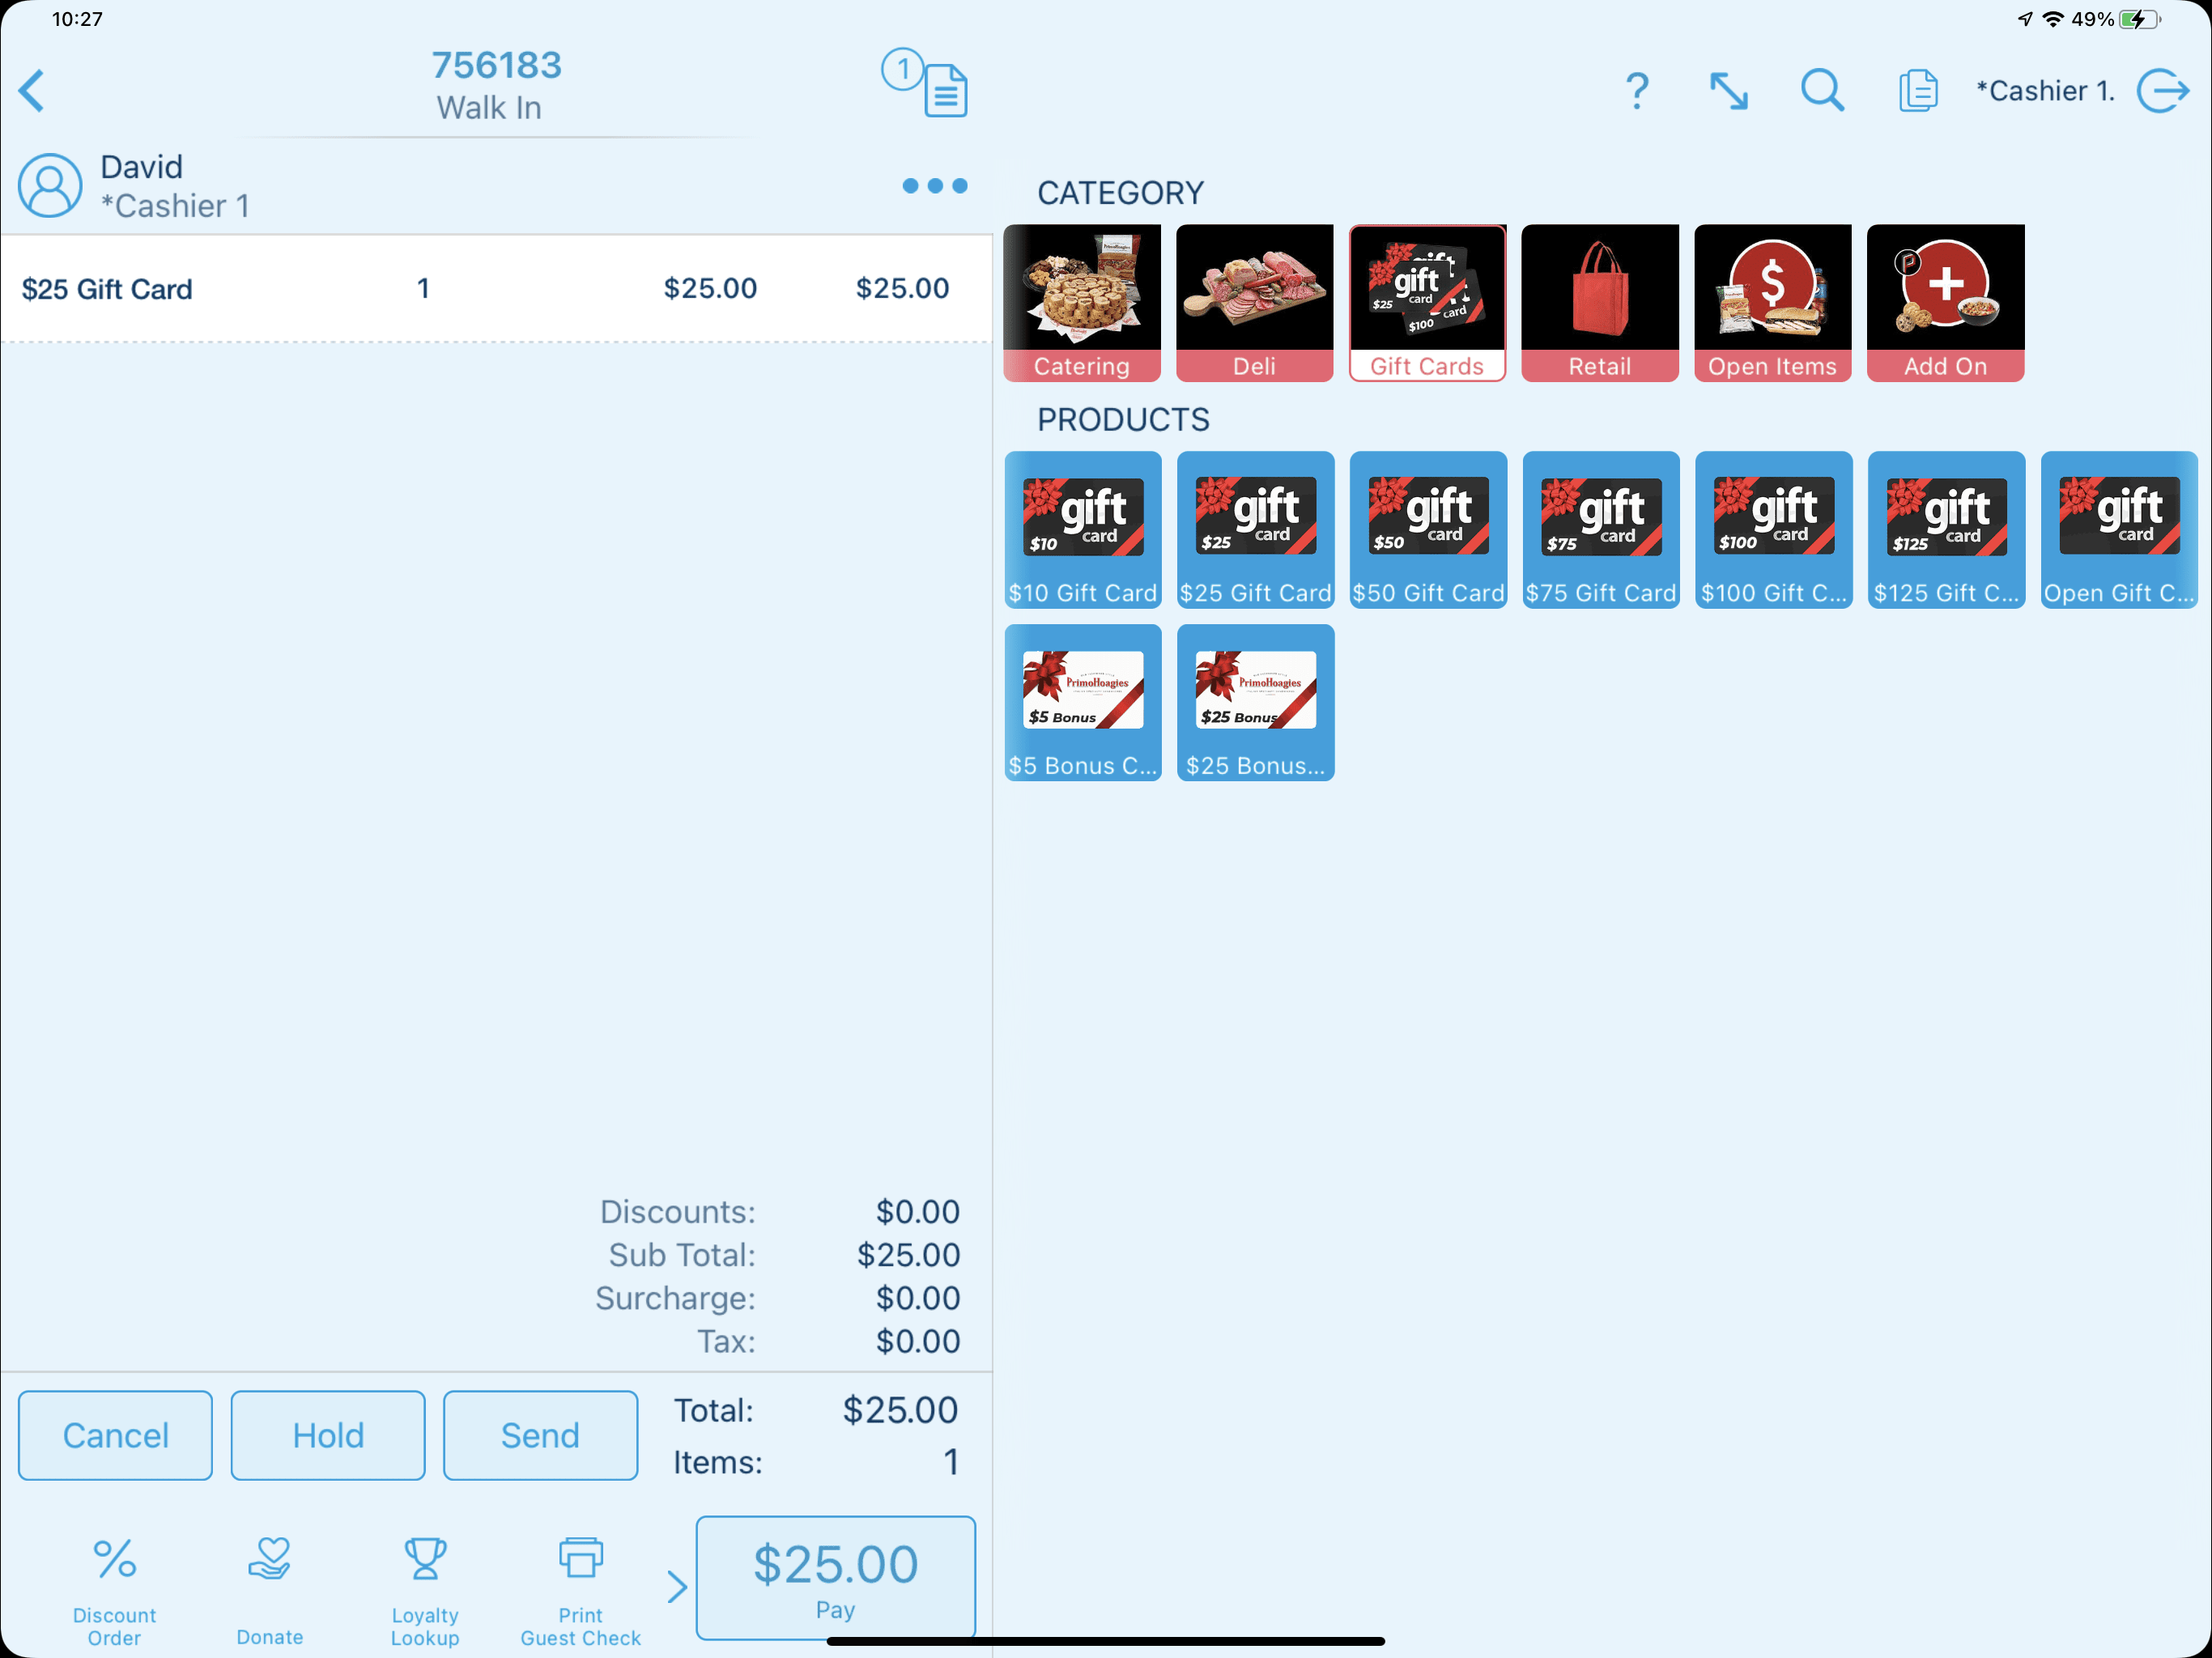
Next, add the desired holiday bonus cards. The holiday bonus card value is determined by the total amount of gift cards being purchased. For example, if a customer purchases two $25 gift cards for a total value of $50, the customer should receive two $5 holiday bonus cards.
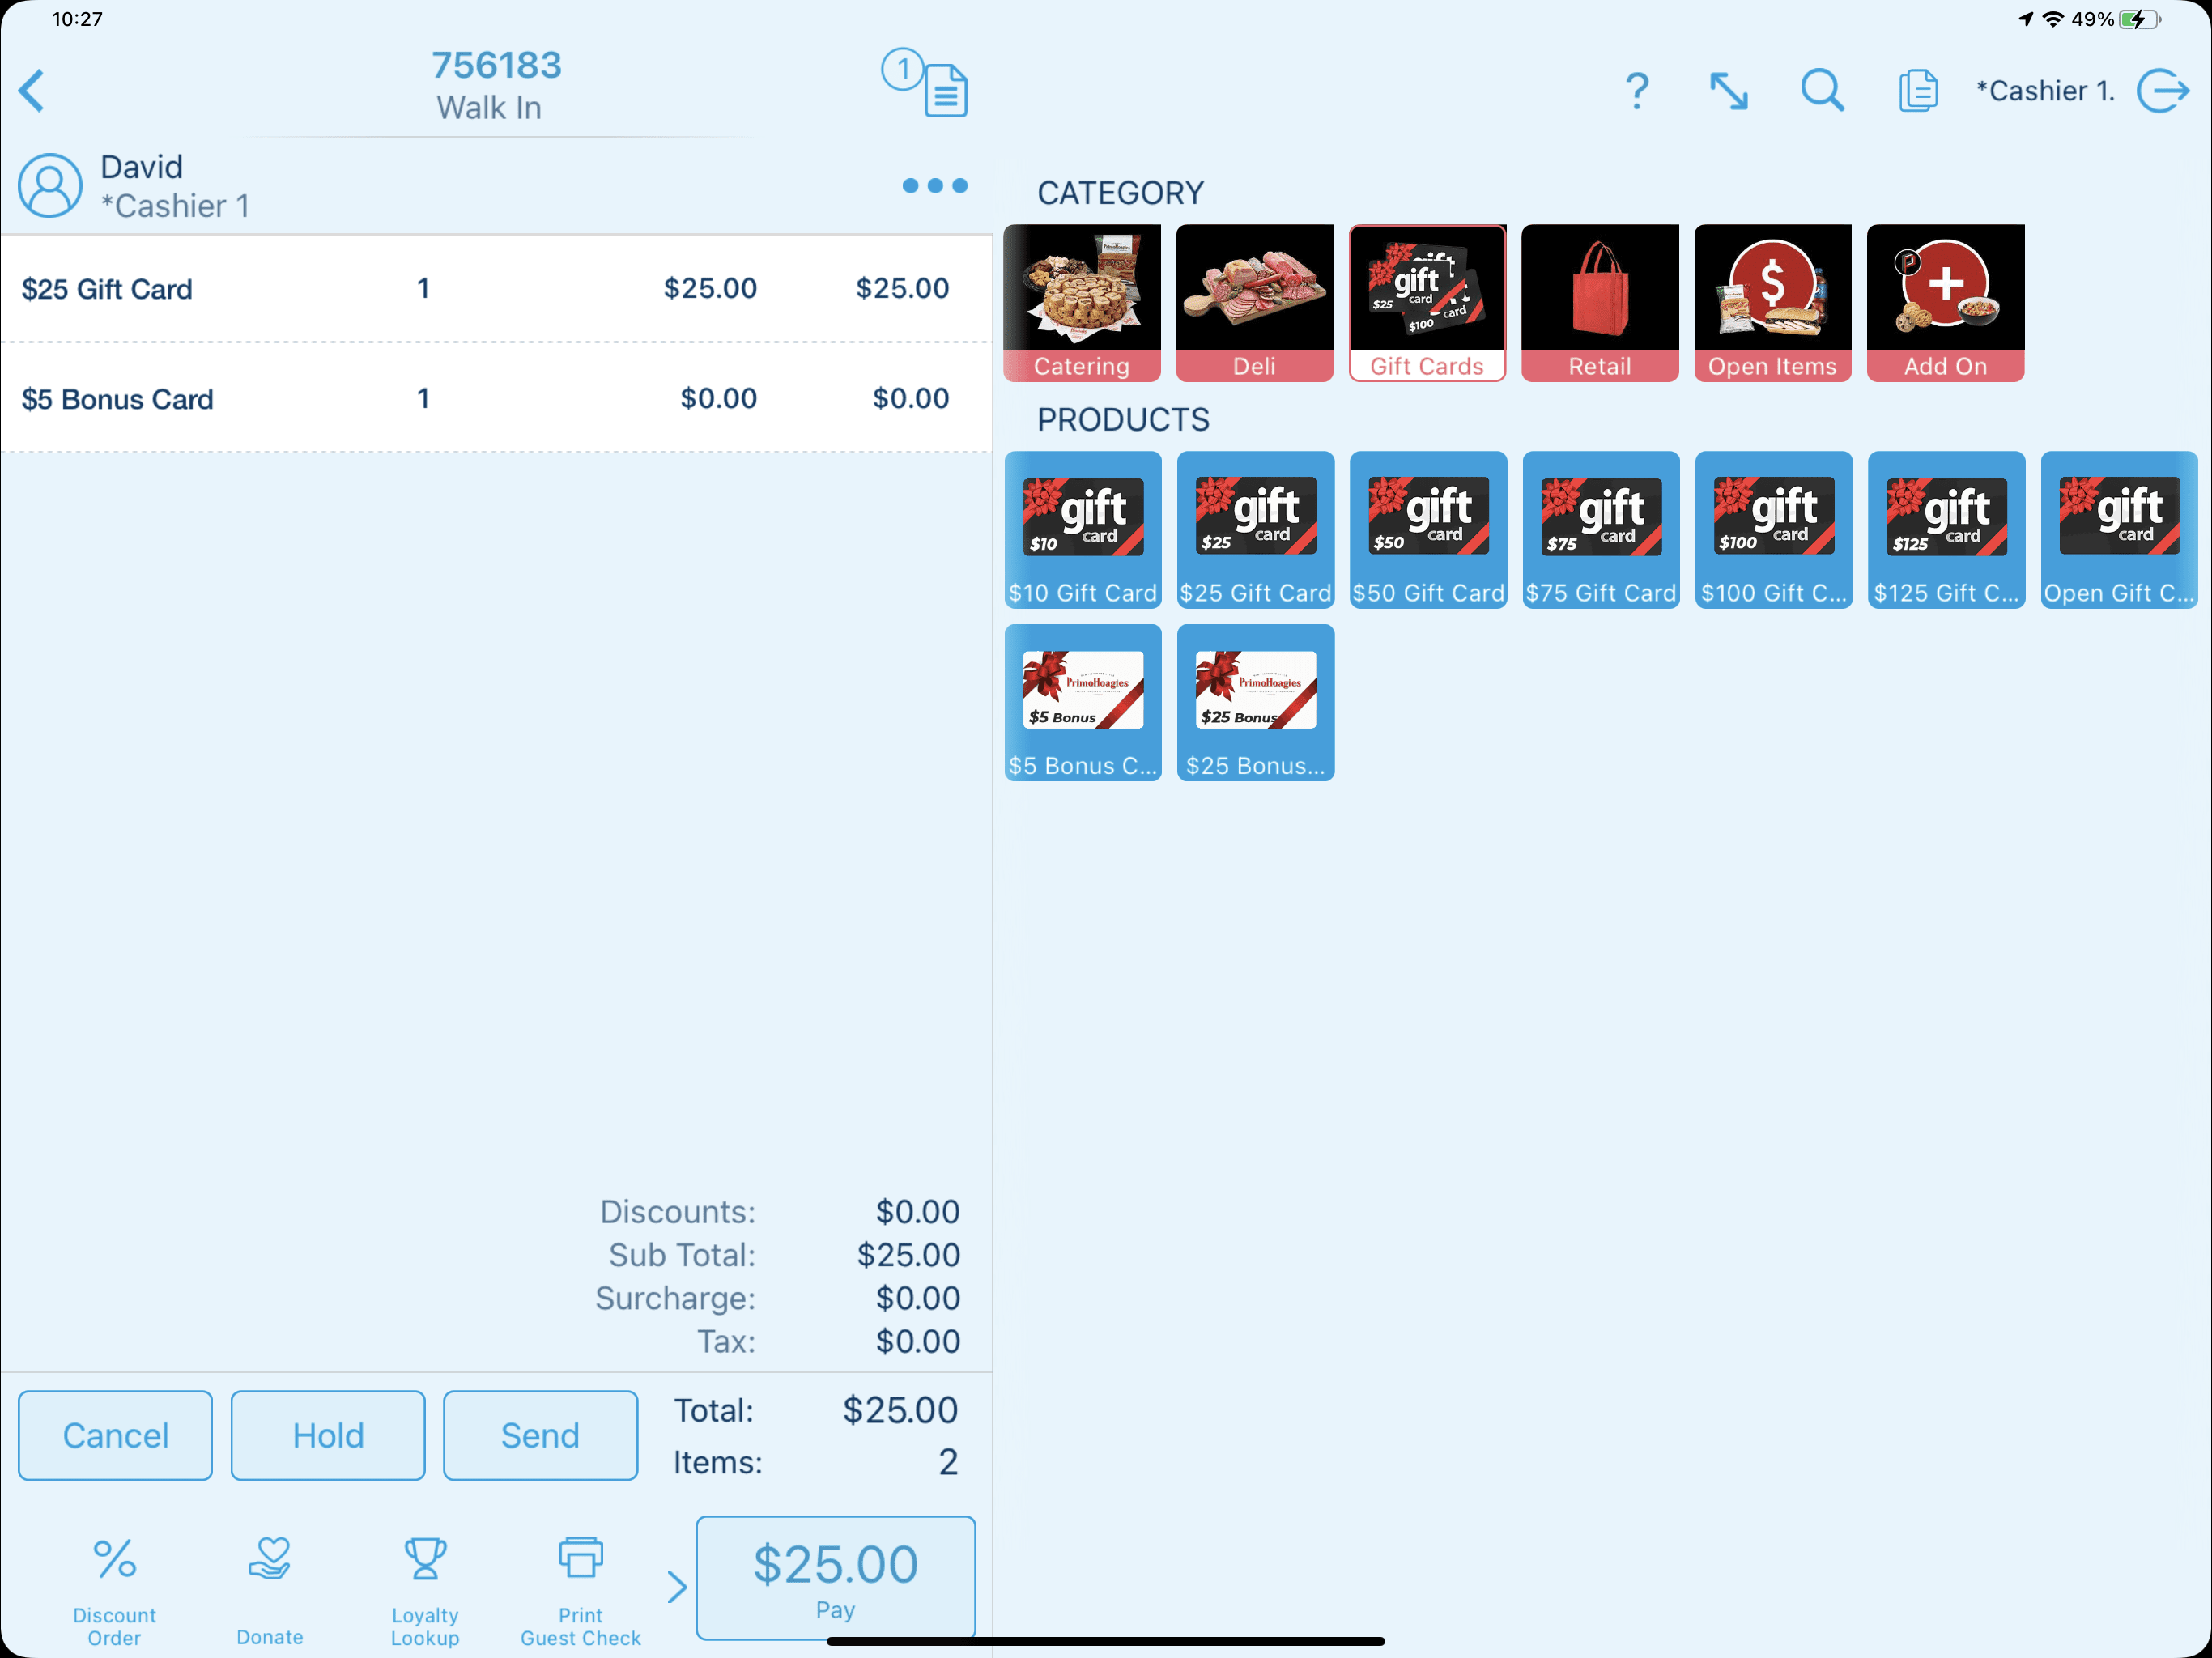
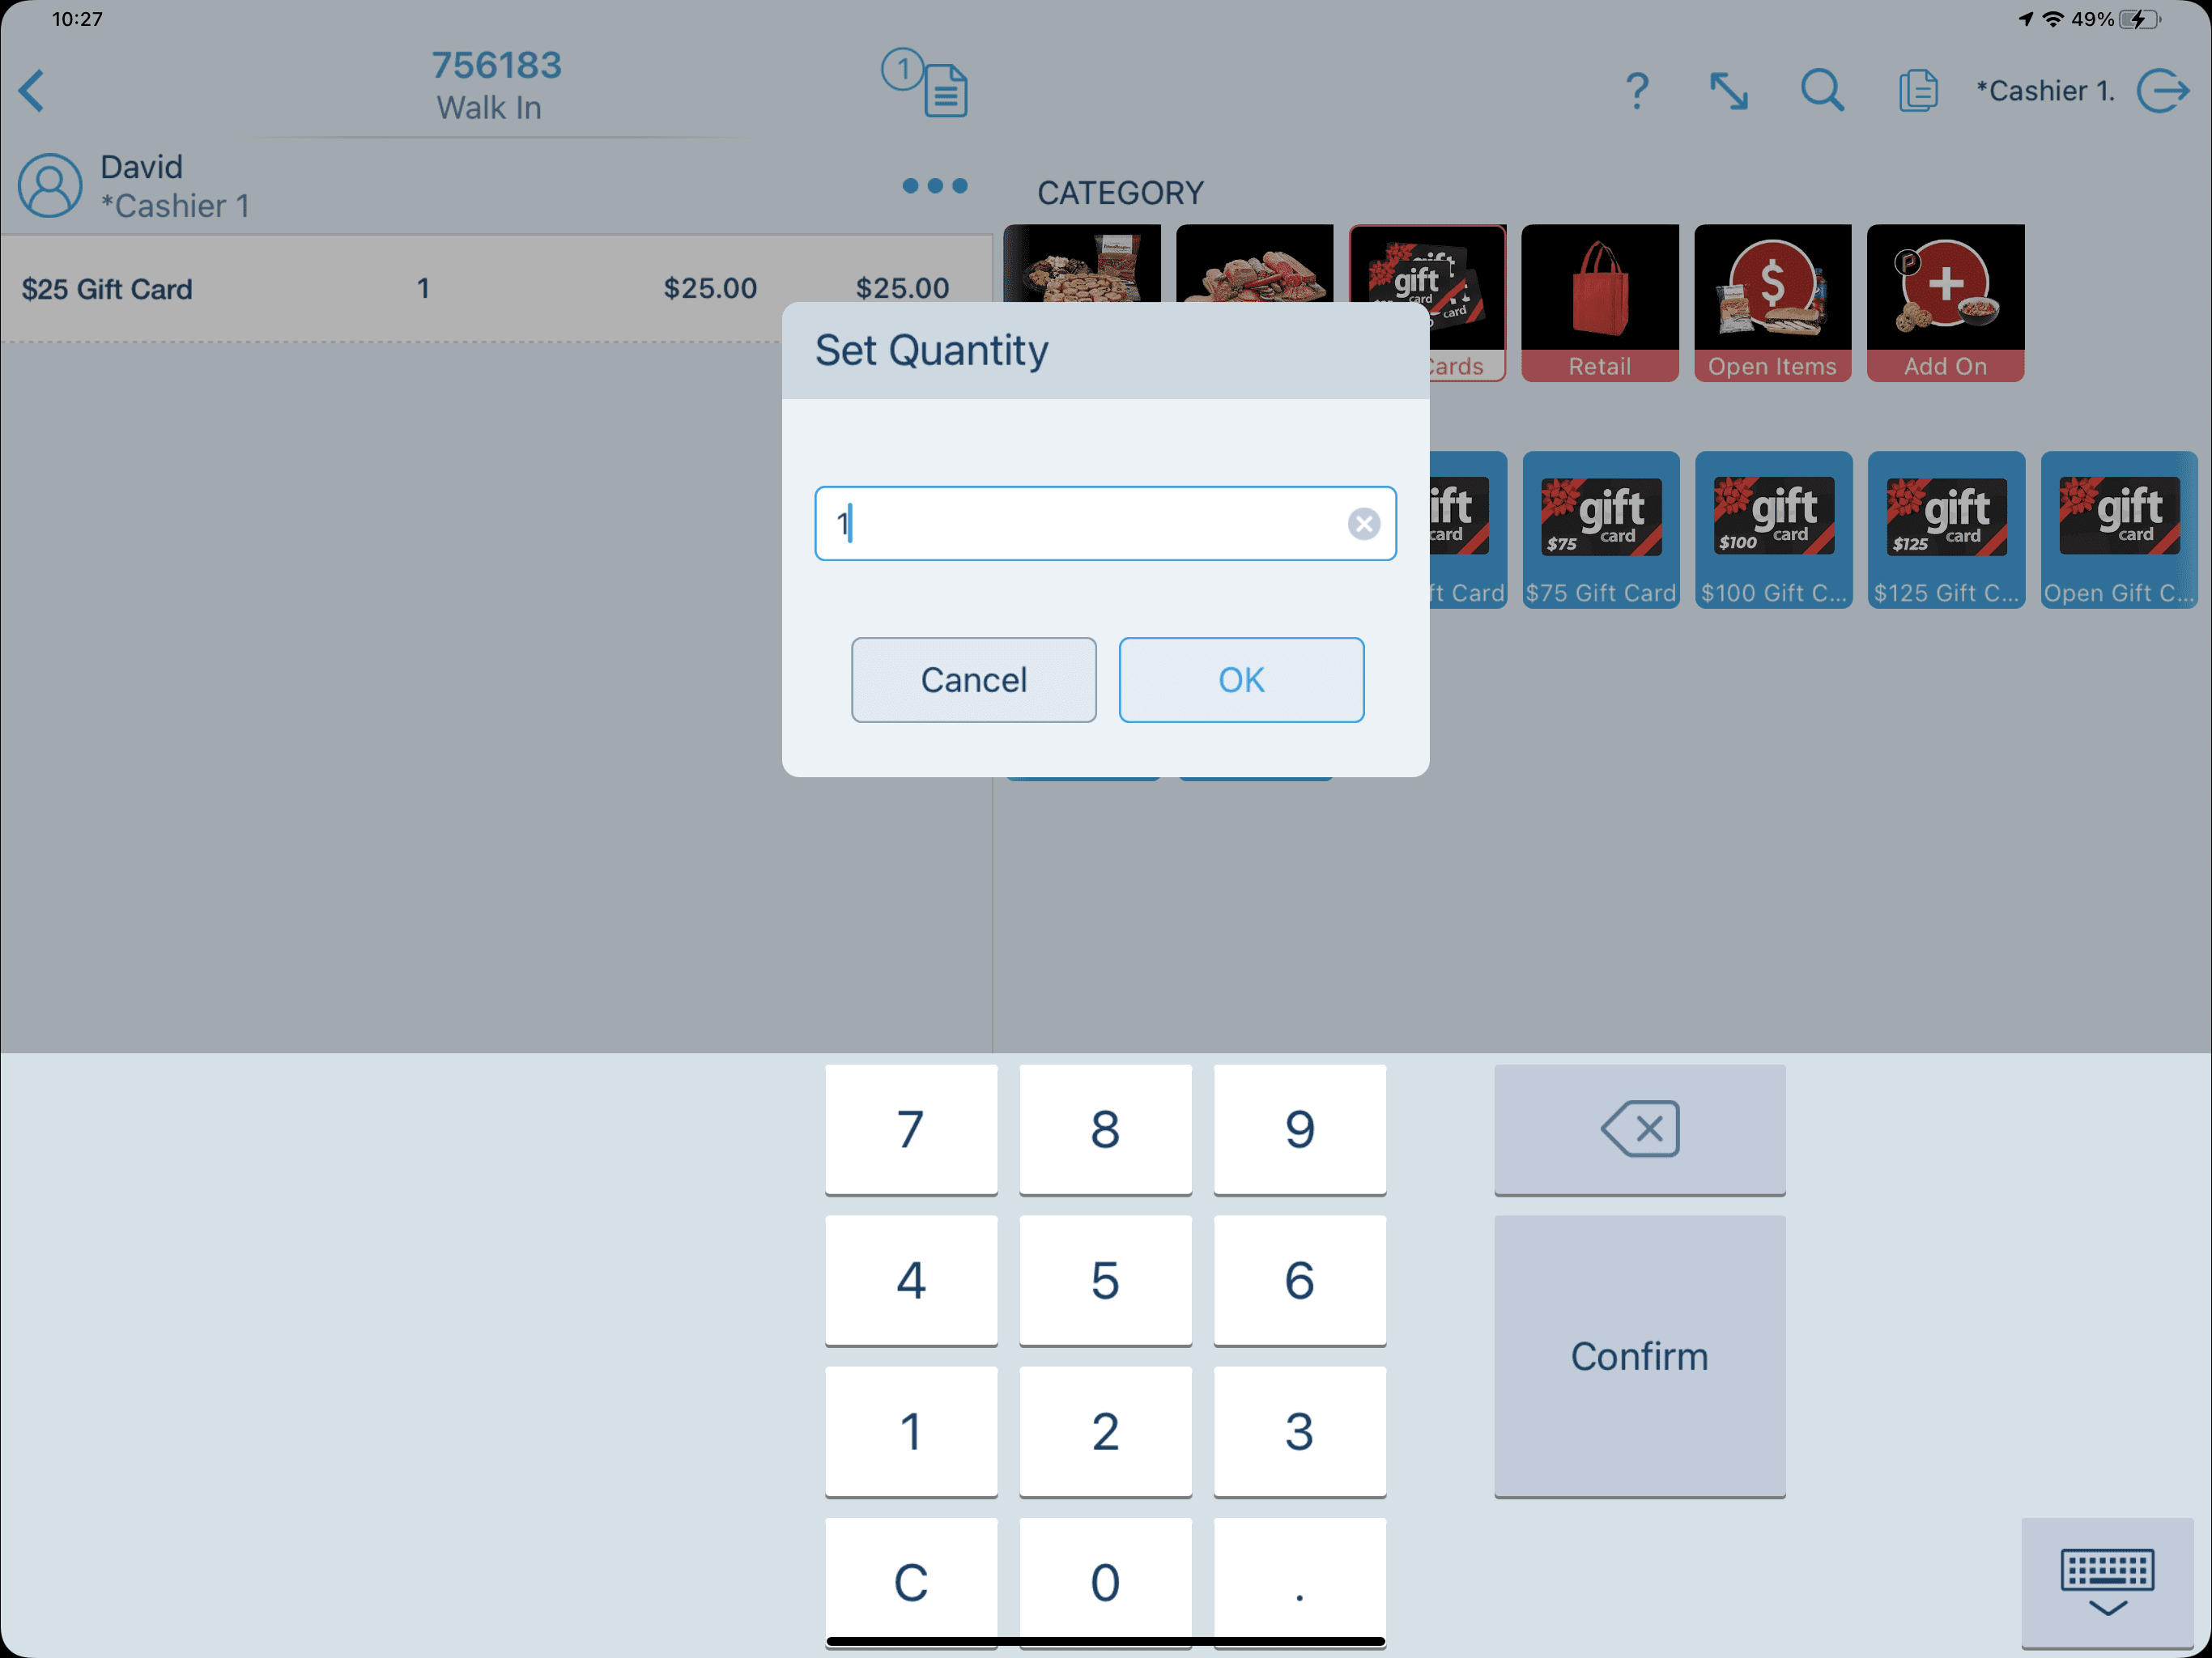
When adding the holiday bonus cards, you will be prompted to enter the quantity for the respective card.
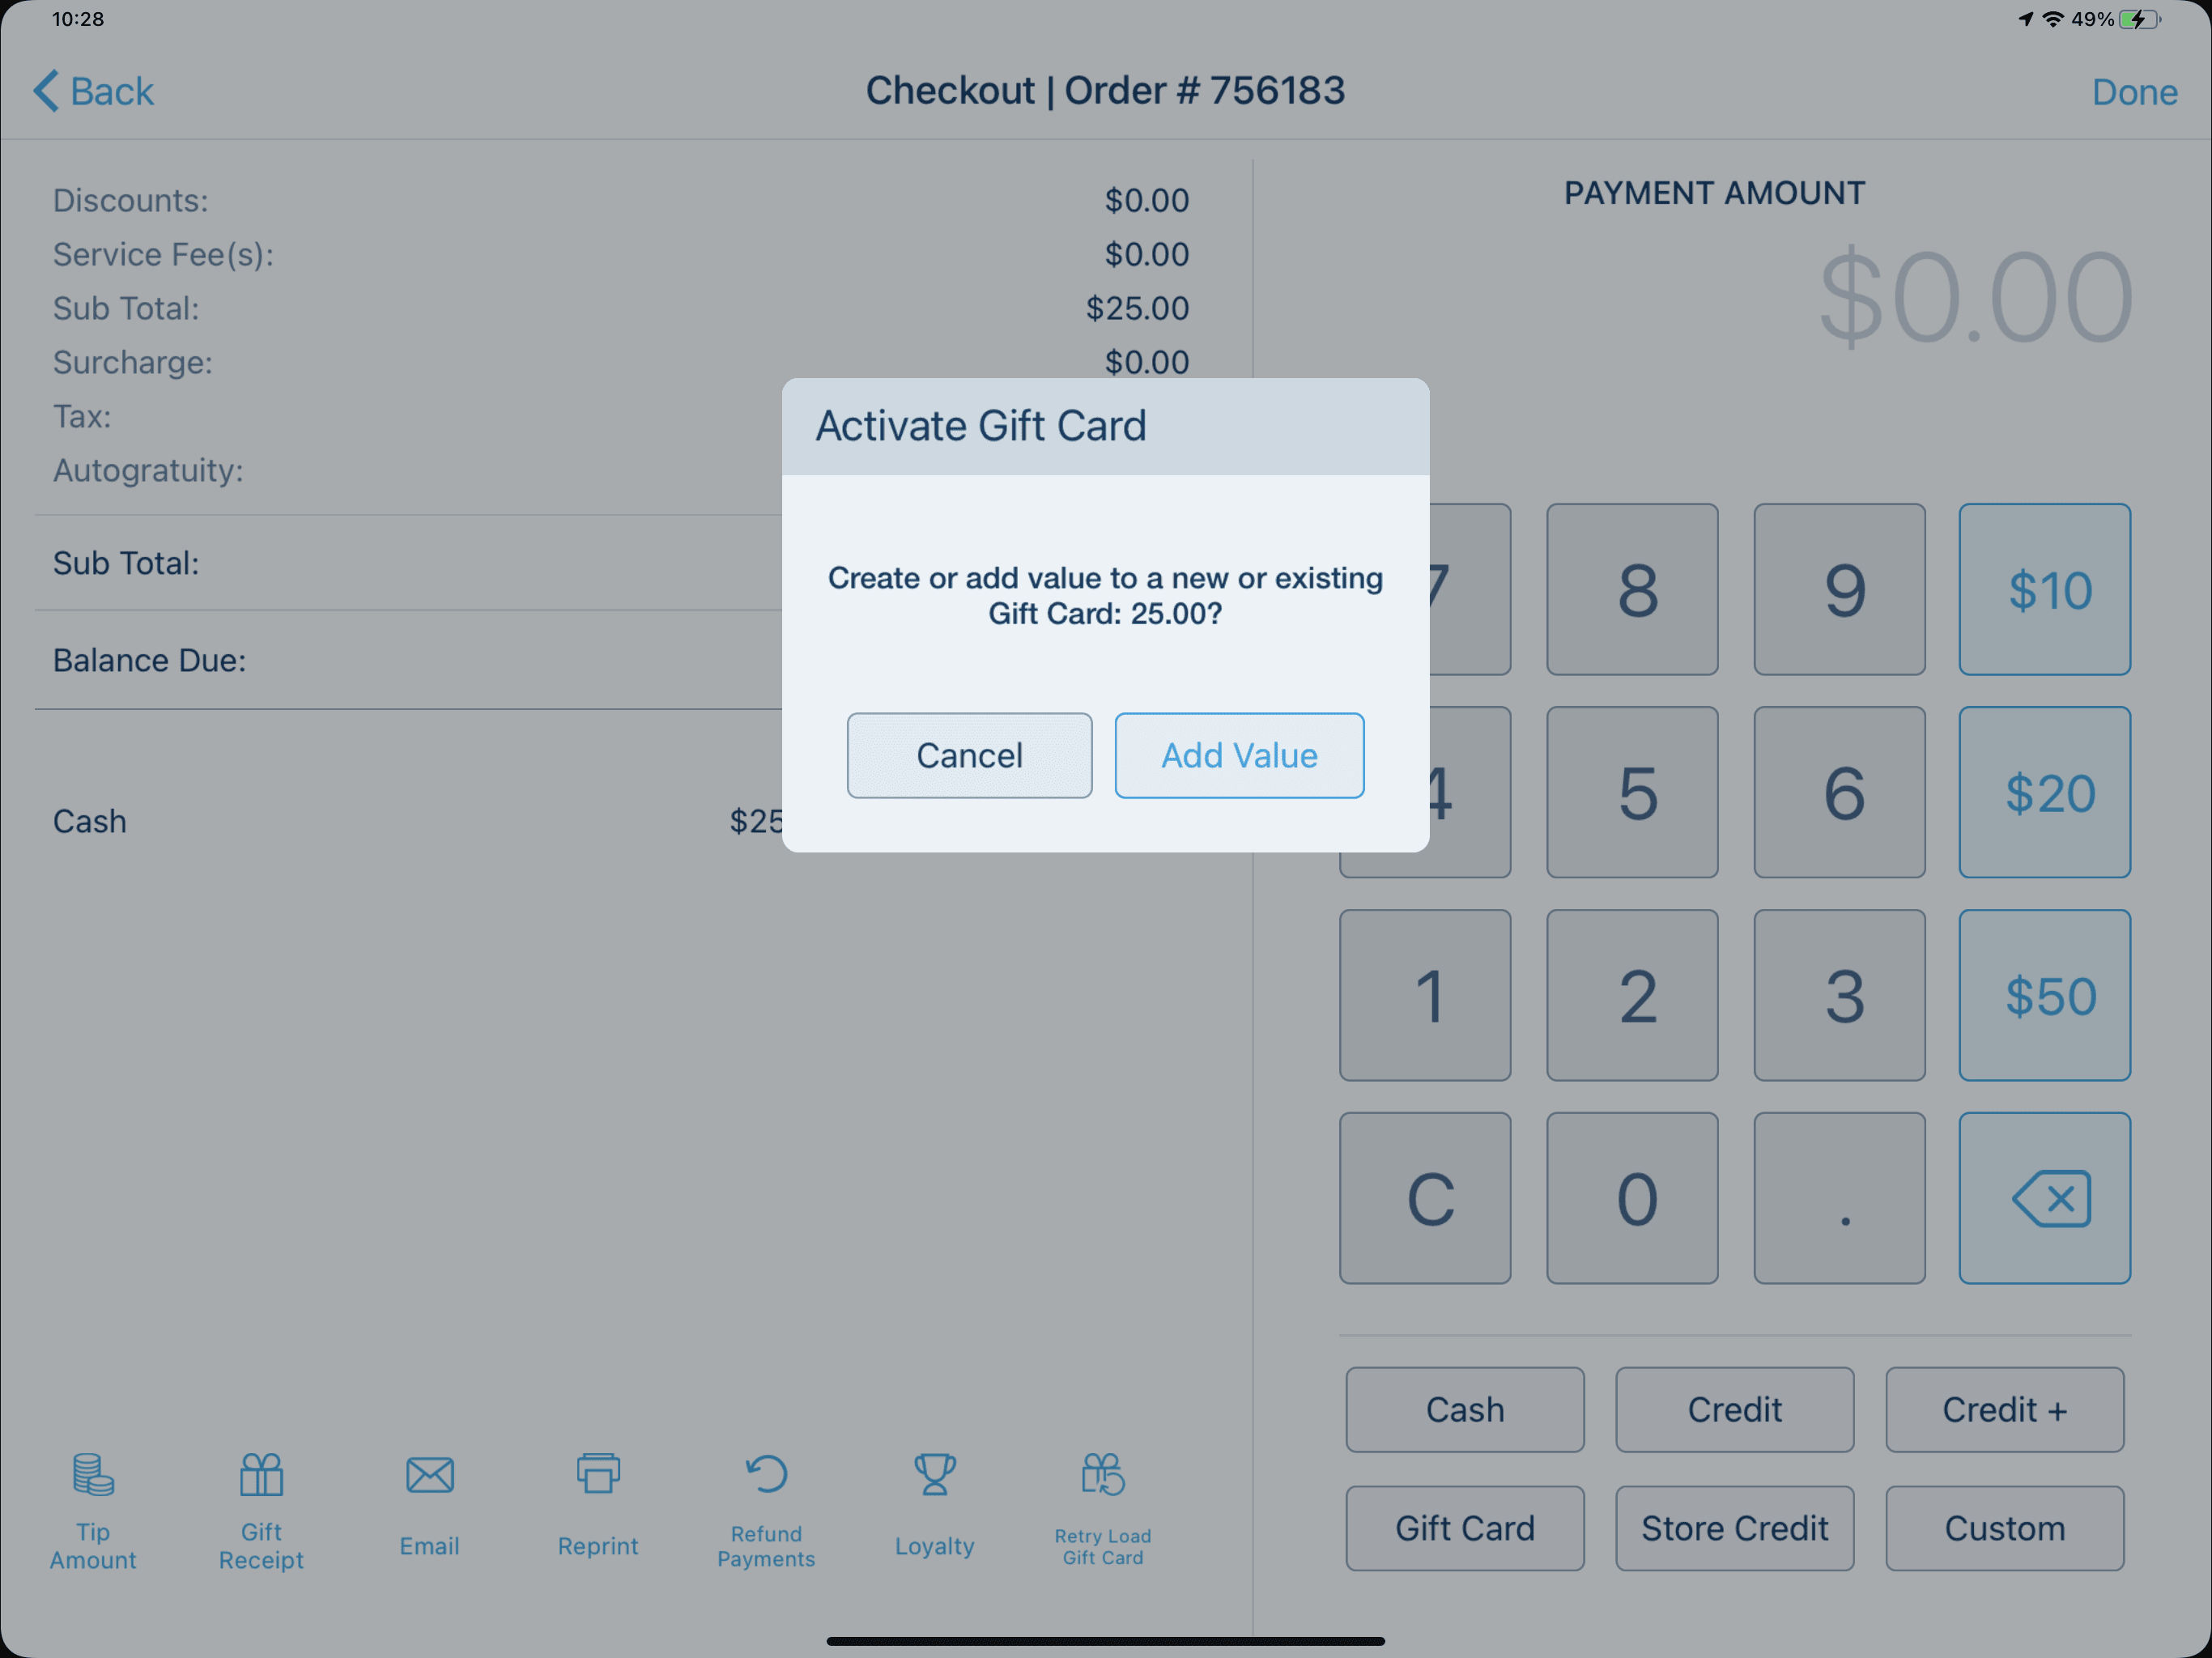
After receiving payment for the order, you will be prompted to create the regular gift cards being purchased (you cannot program a previously activated gift card). Select Add Value.
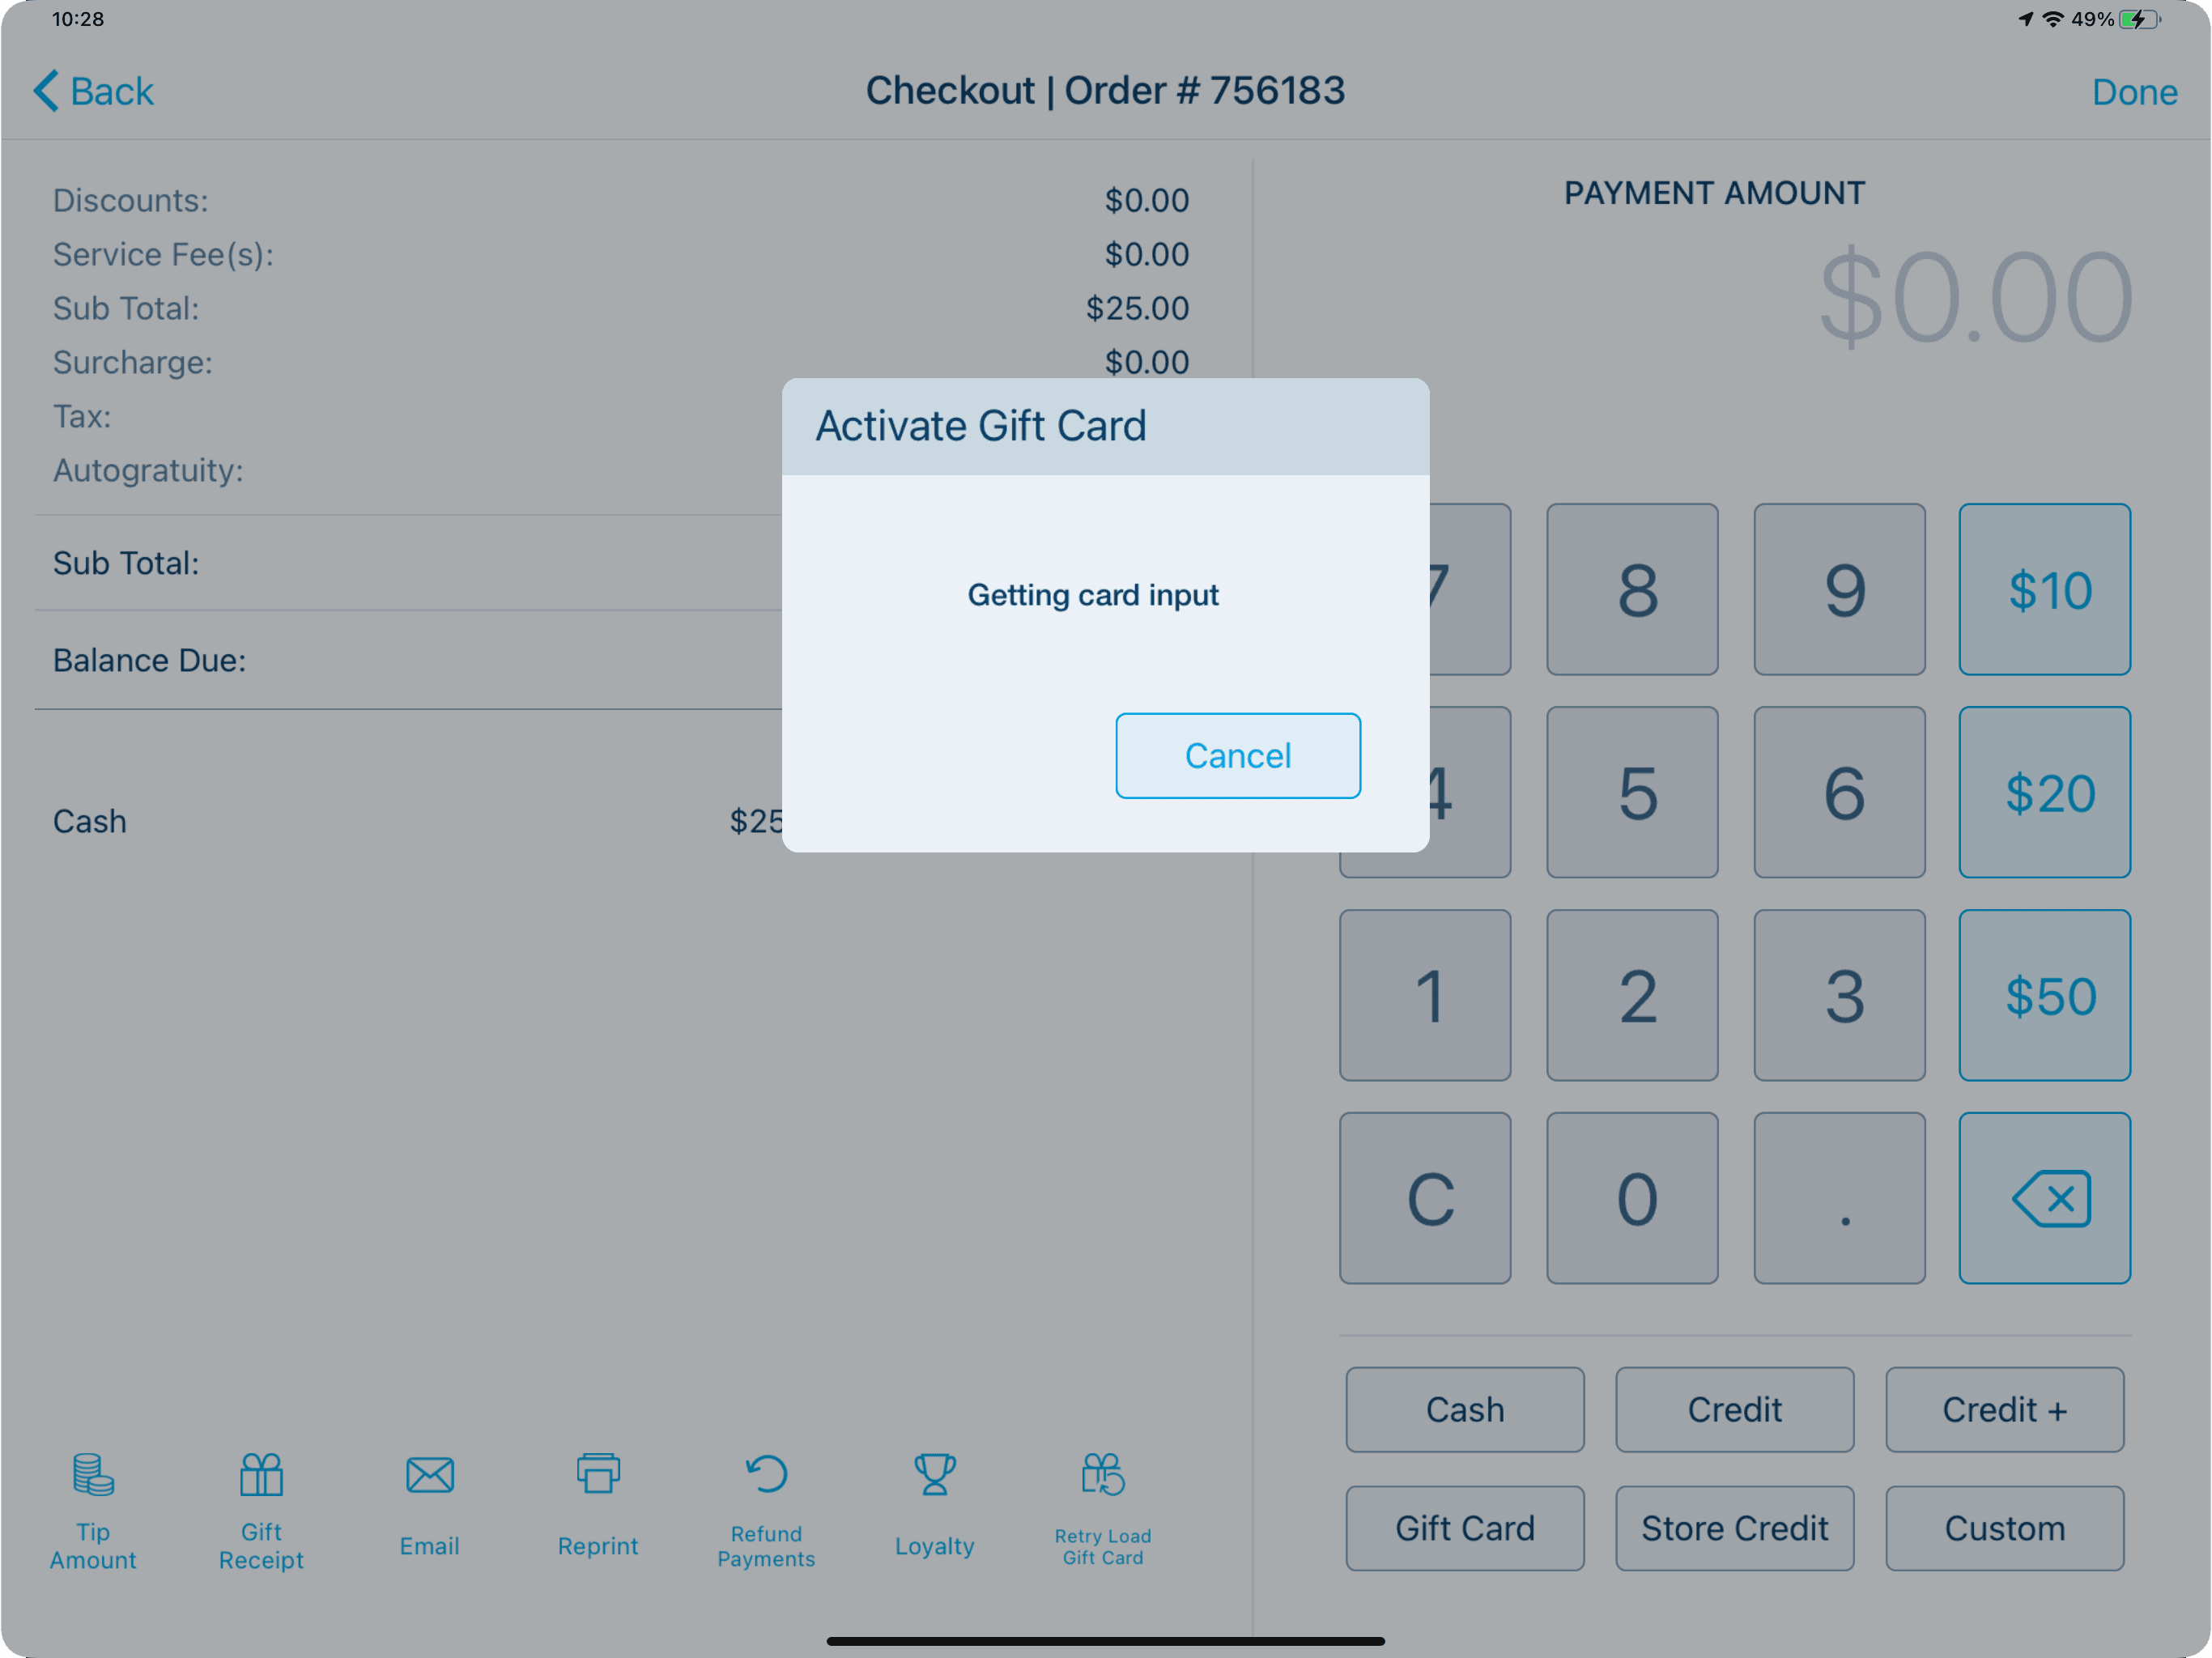
You will be prompted to program the dollar values.
Do not program the holiday bonus cards through the point of sale. The values are already added onto the holiday bonus cards. Simply hand the cards to the customer with their purchased regular gift cards.
Updated 11/15/2024

Summary
Discounts at the point of sale level are classified into two types: Order Discounts and Item Discounts. Both discount types may or may not have manager passwords or auto-apply based on pre-defined parameters.
Order Discounts: These are most commonly used when configuring discounts in Revel Systems. Order Discounts allow you to apply the discount to the order overall order yet still may target specific products. Order Discounts are found by accessing the Discount Order action button.
Item Discounts: These can be used to target a specific product or set of products to discount however this option is less commonly configured in the database. Item Discounts are found by accessing the blue elipsis icon above the order or by selecting the product to discount.
Applying Order Discounts
After adding products to an order, select the Discount Order action button on the bottom left of the point of sale.
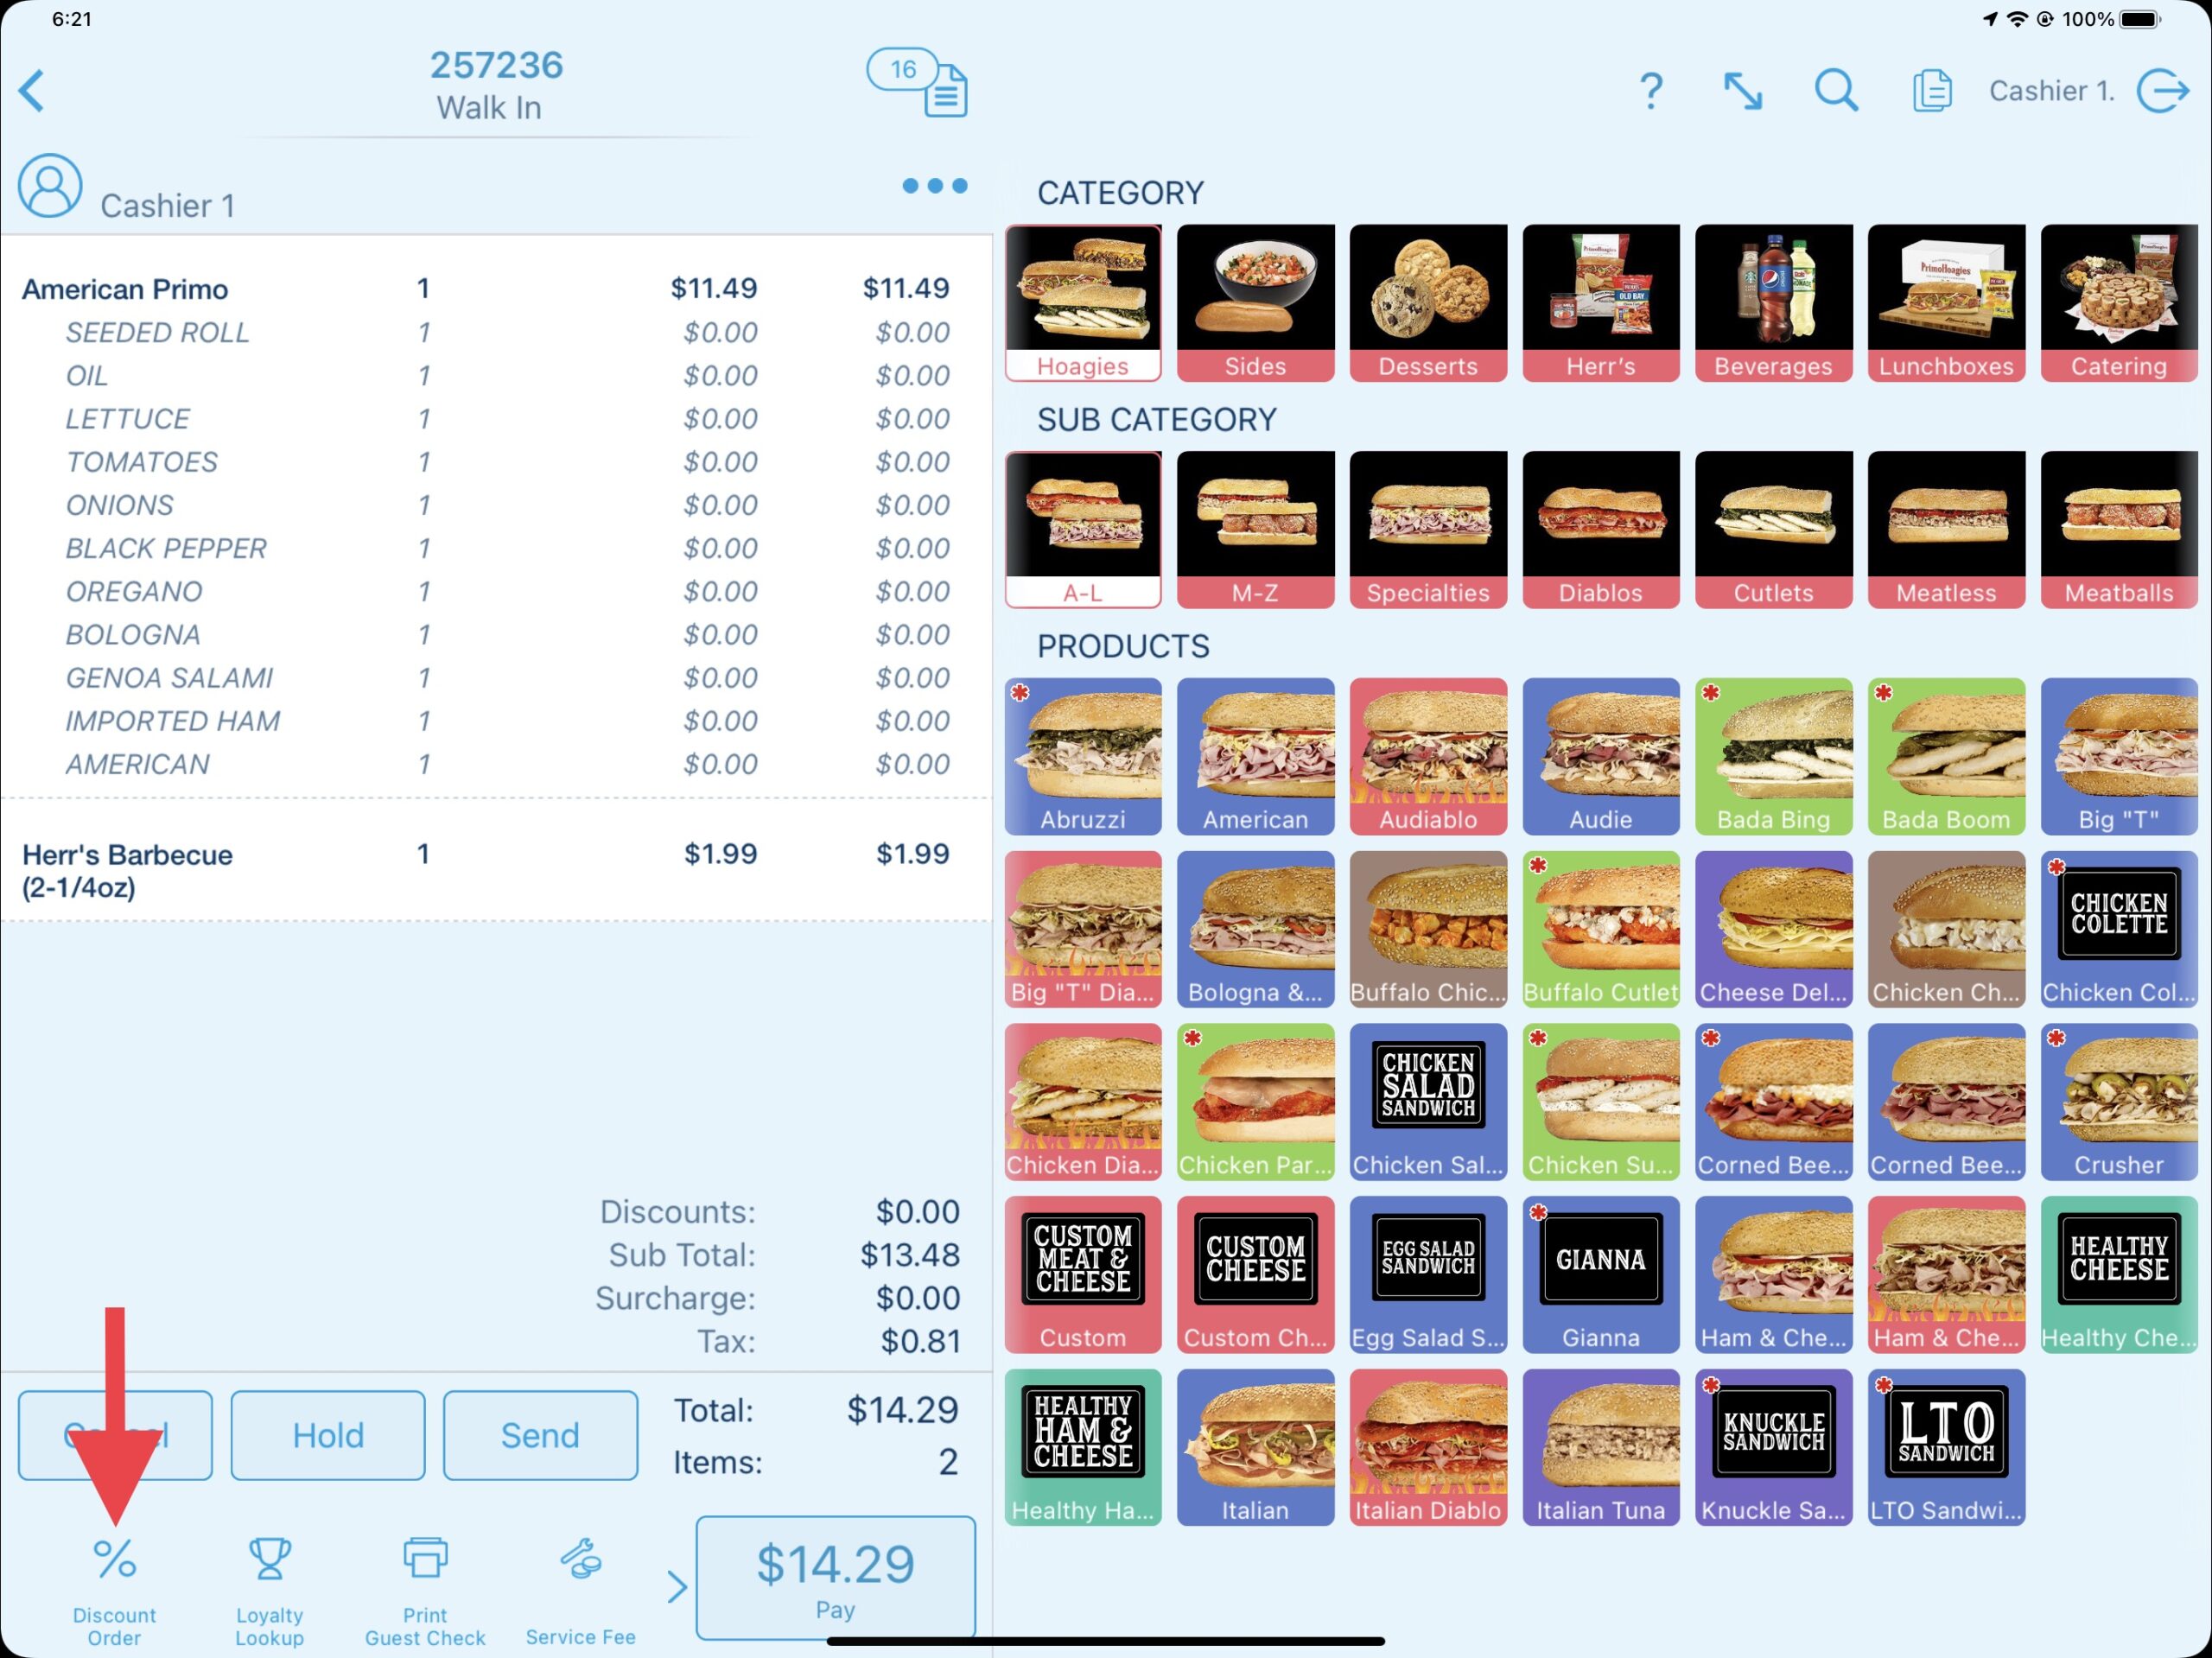
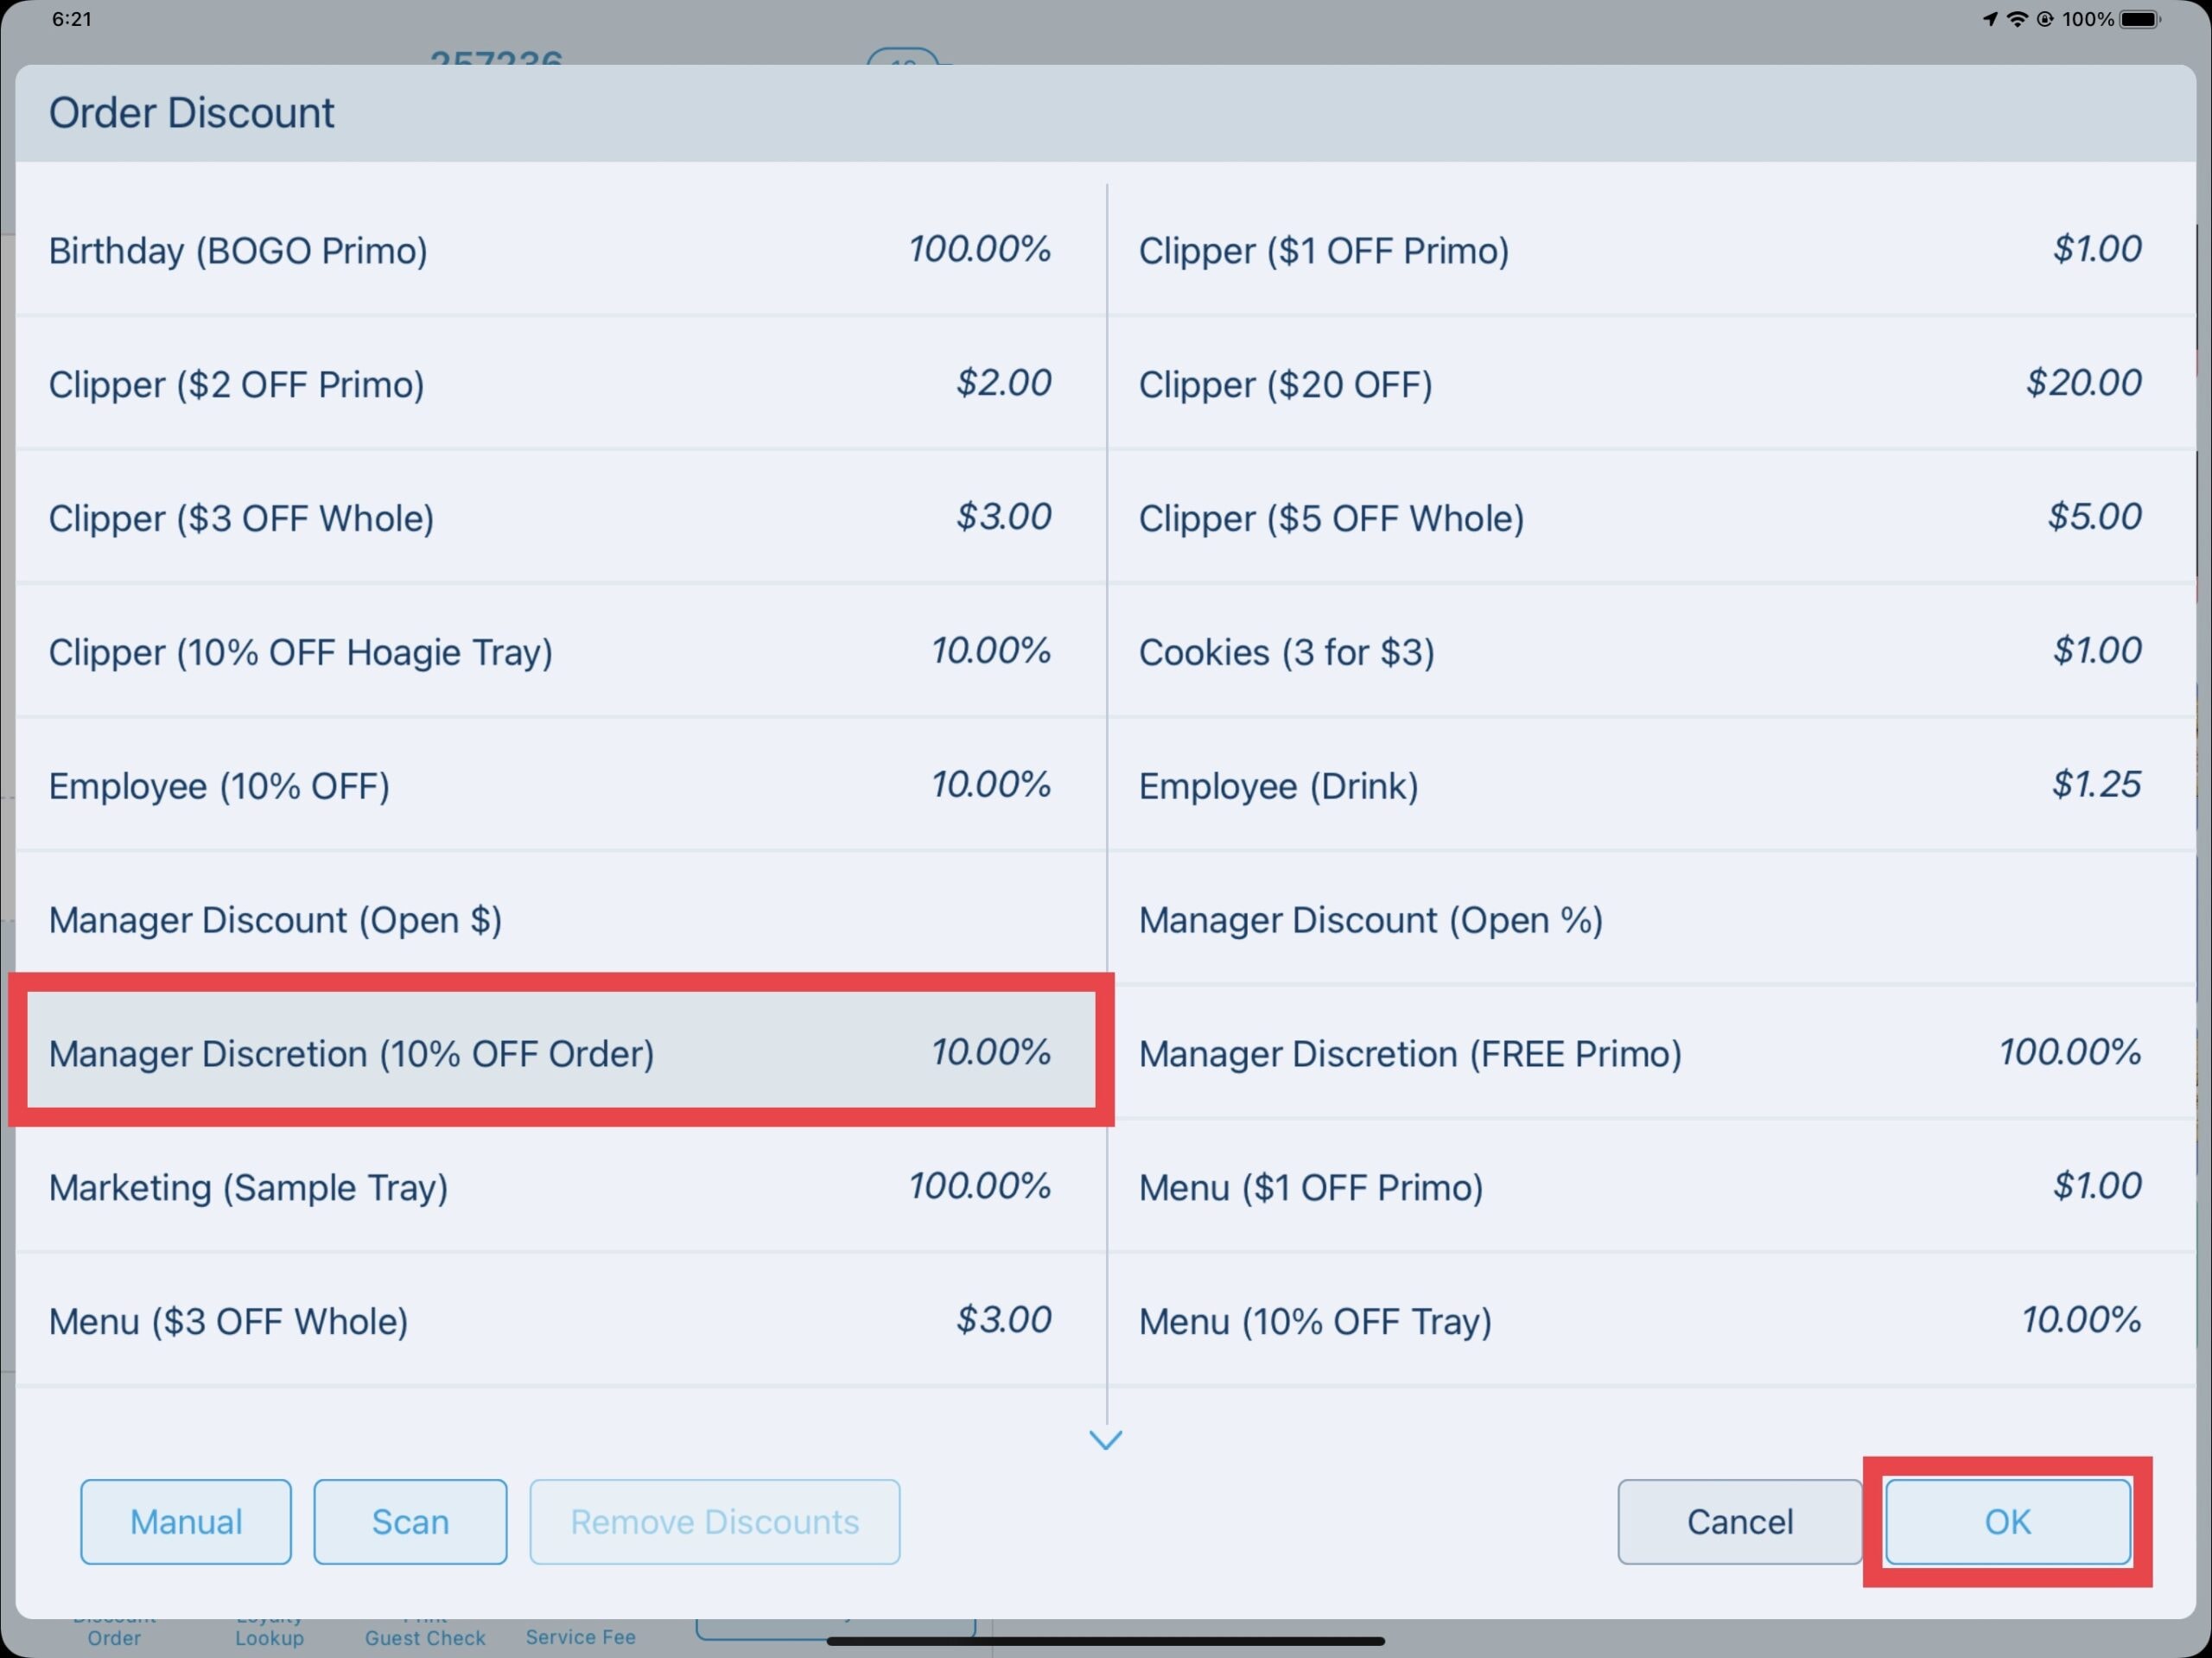
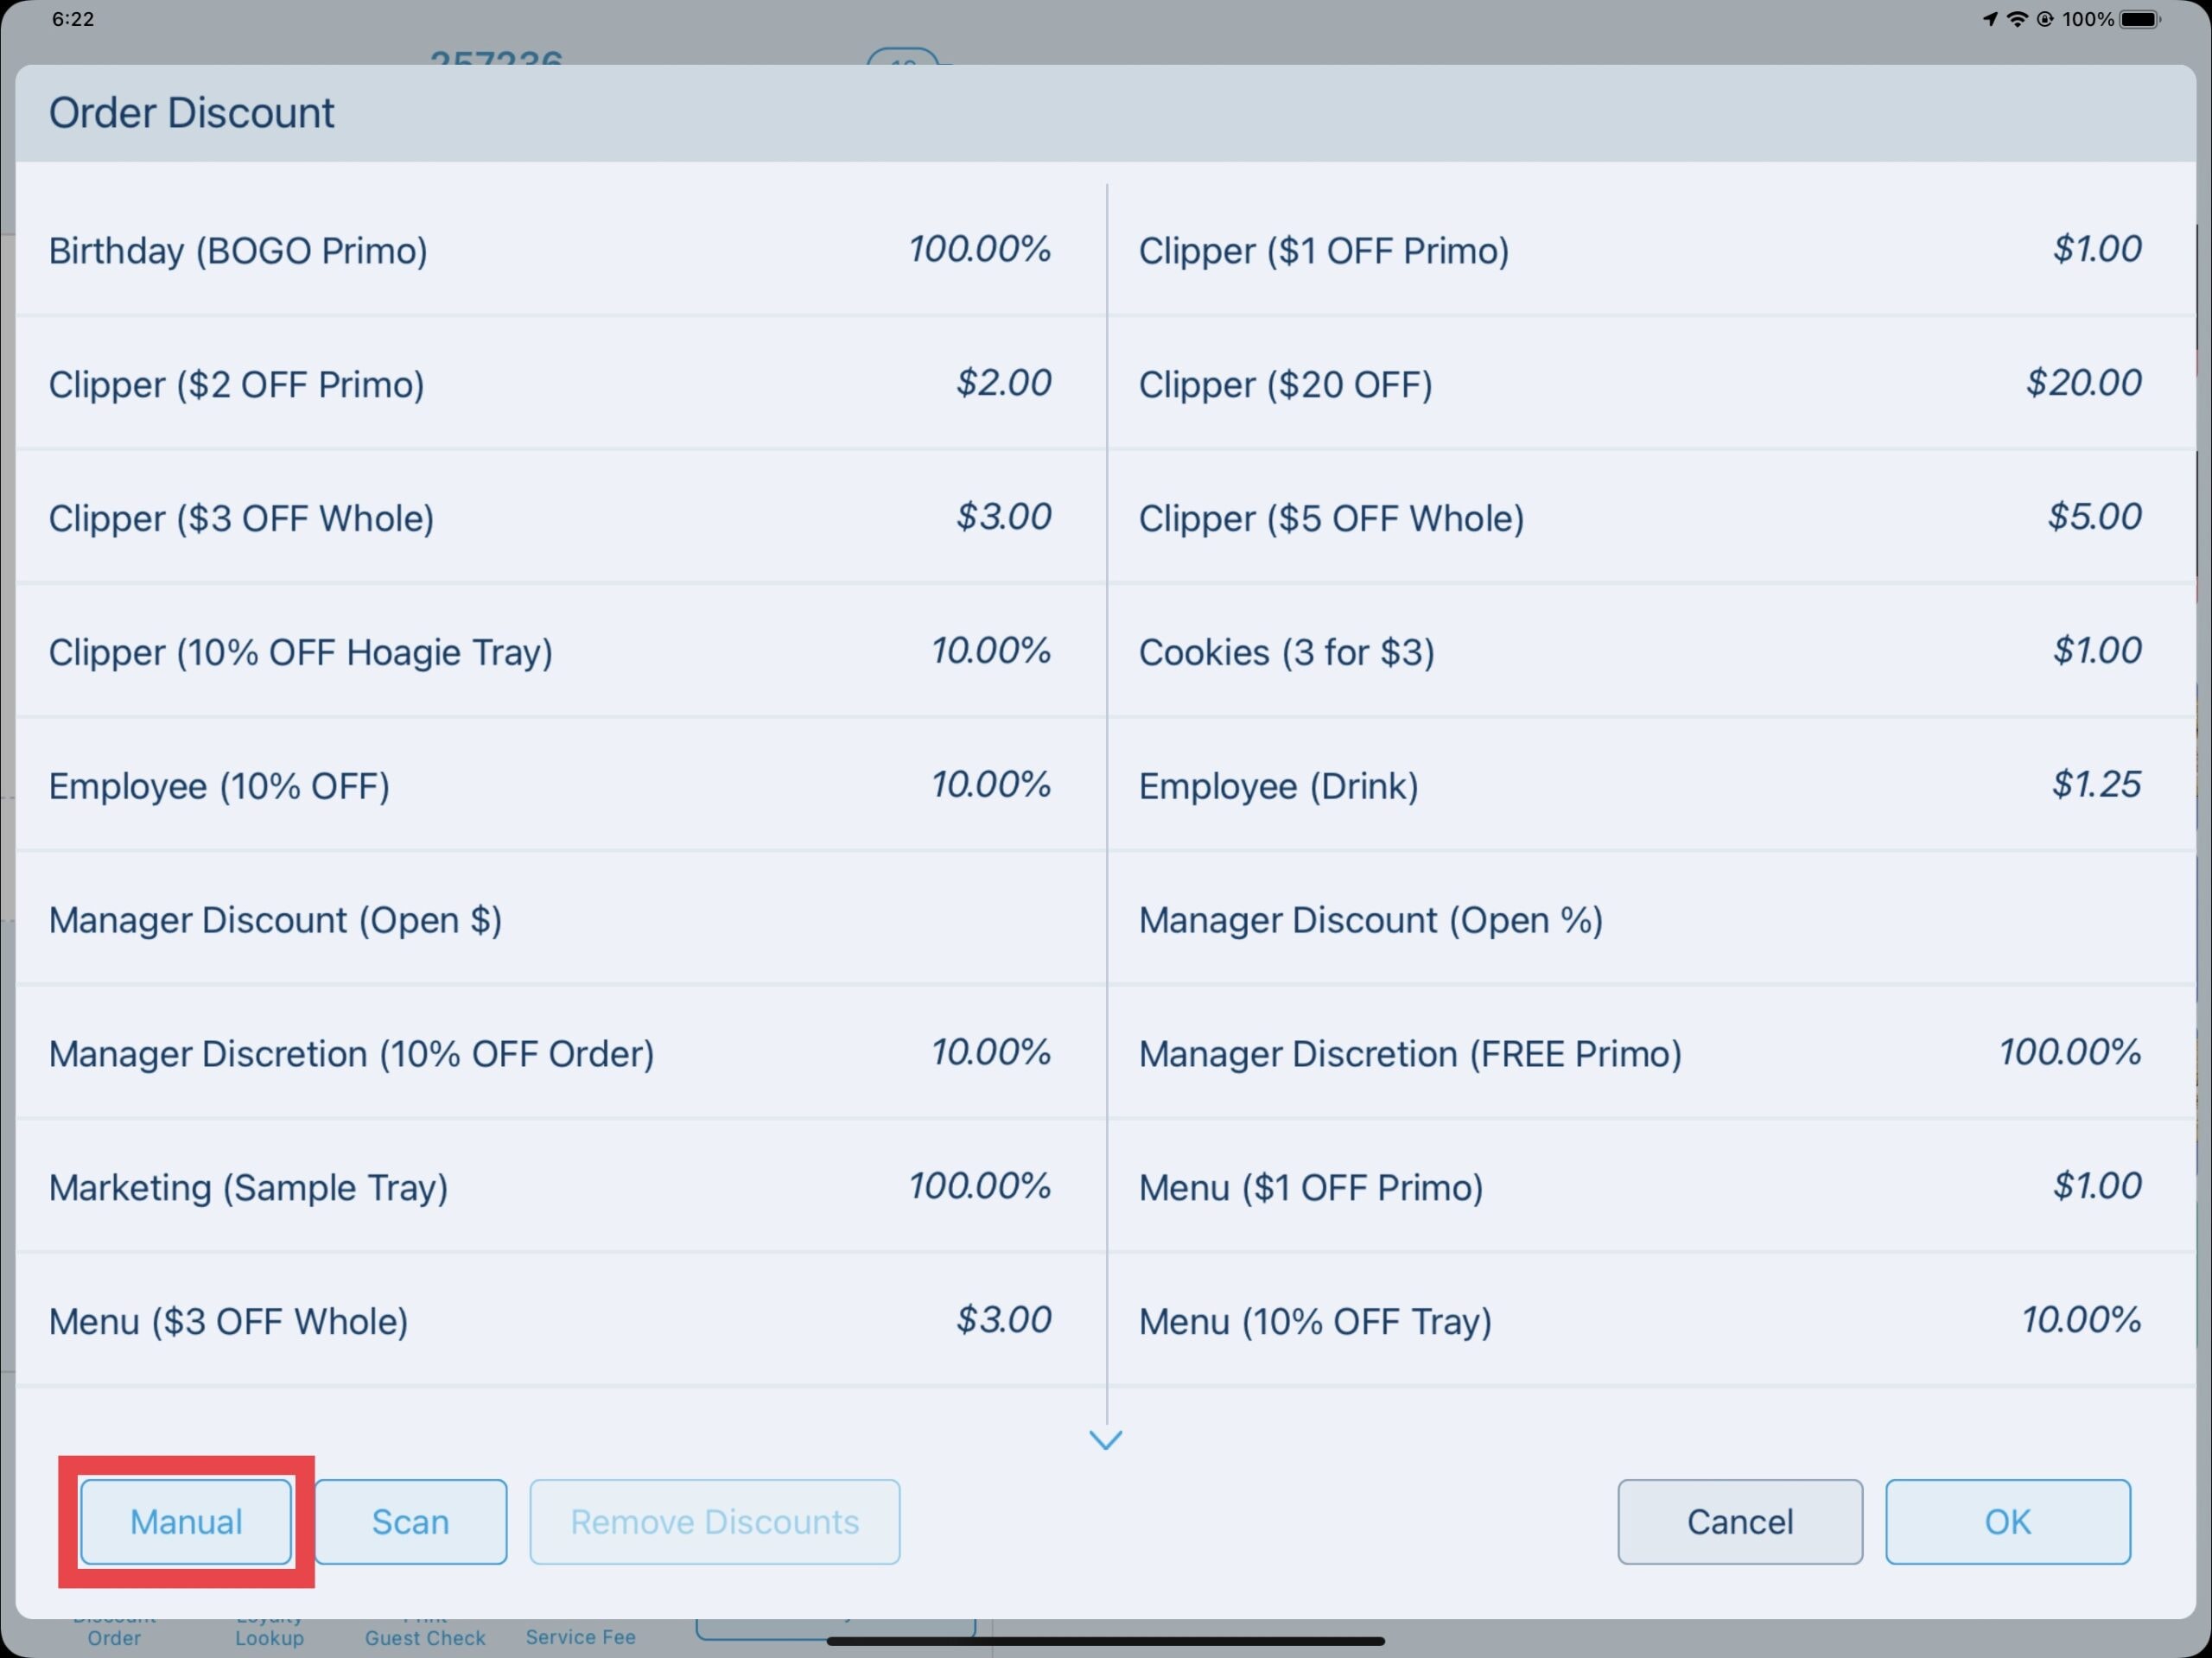
This opens up the Order Discount window. This window will contain all available discounts. Select the appropriate discount then select OK.
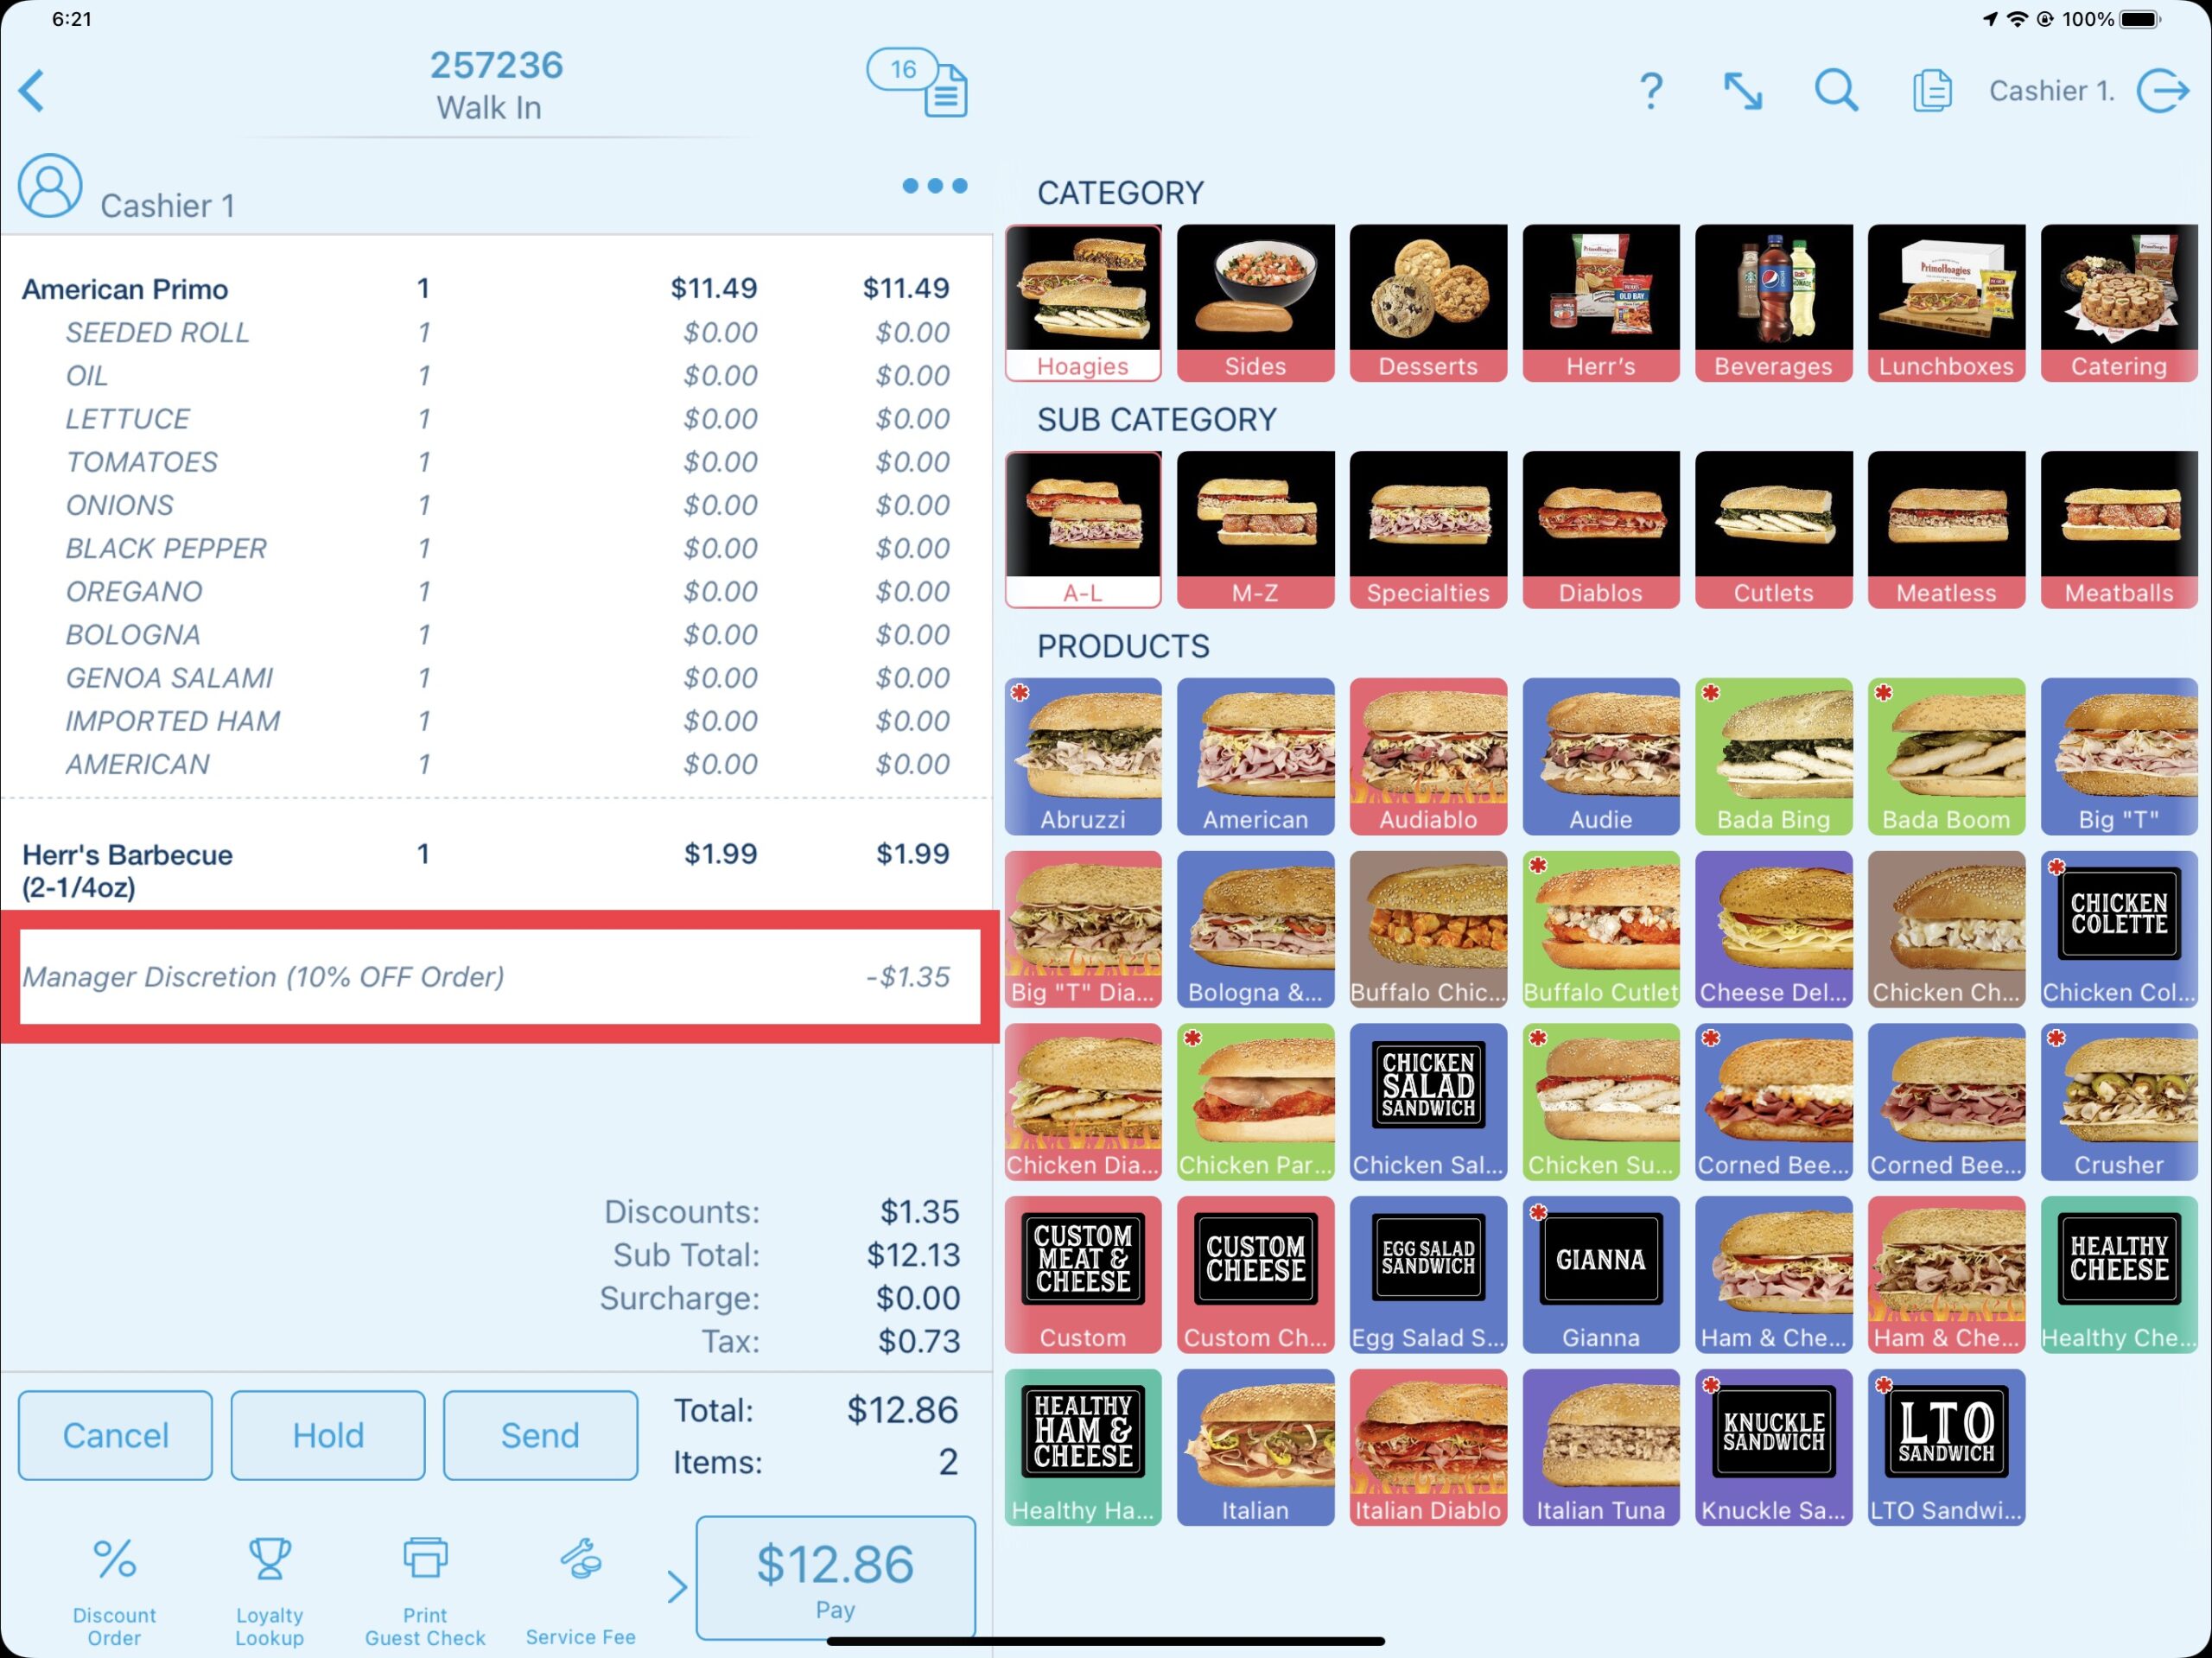
If the selected discount is applicable, it will be applied to the order as a separate line item however it may also display under any pre-targeted products.
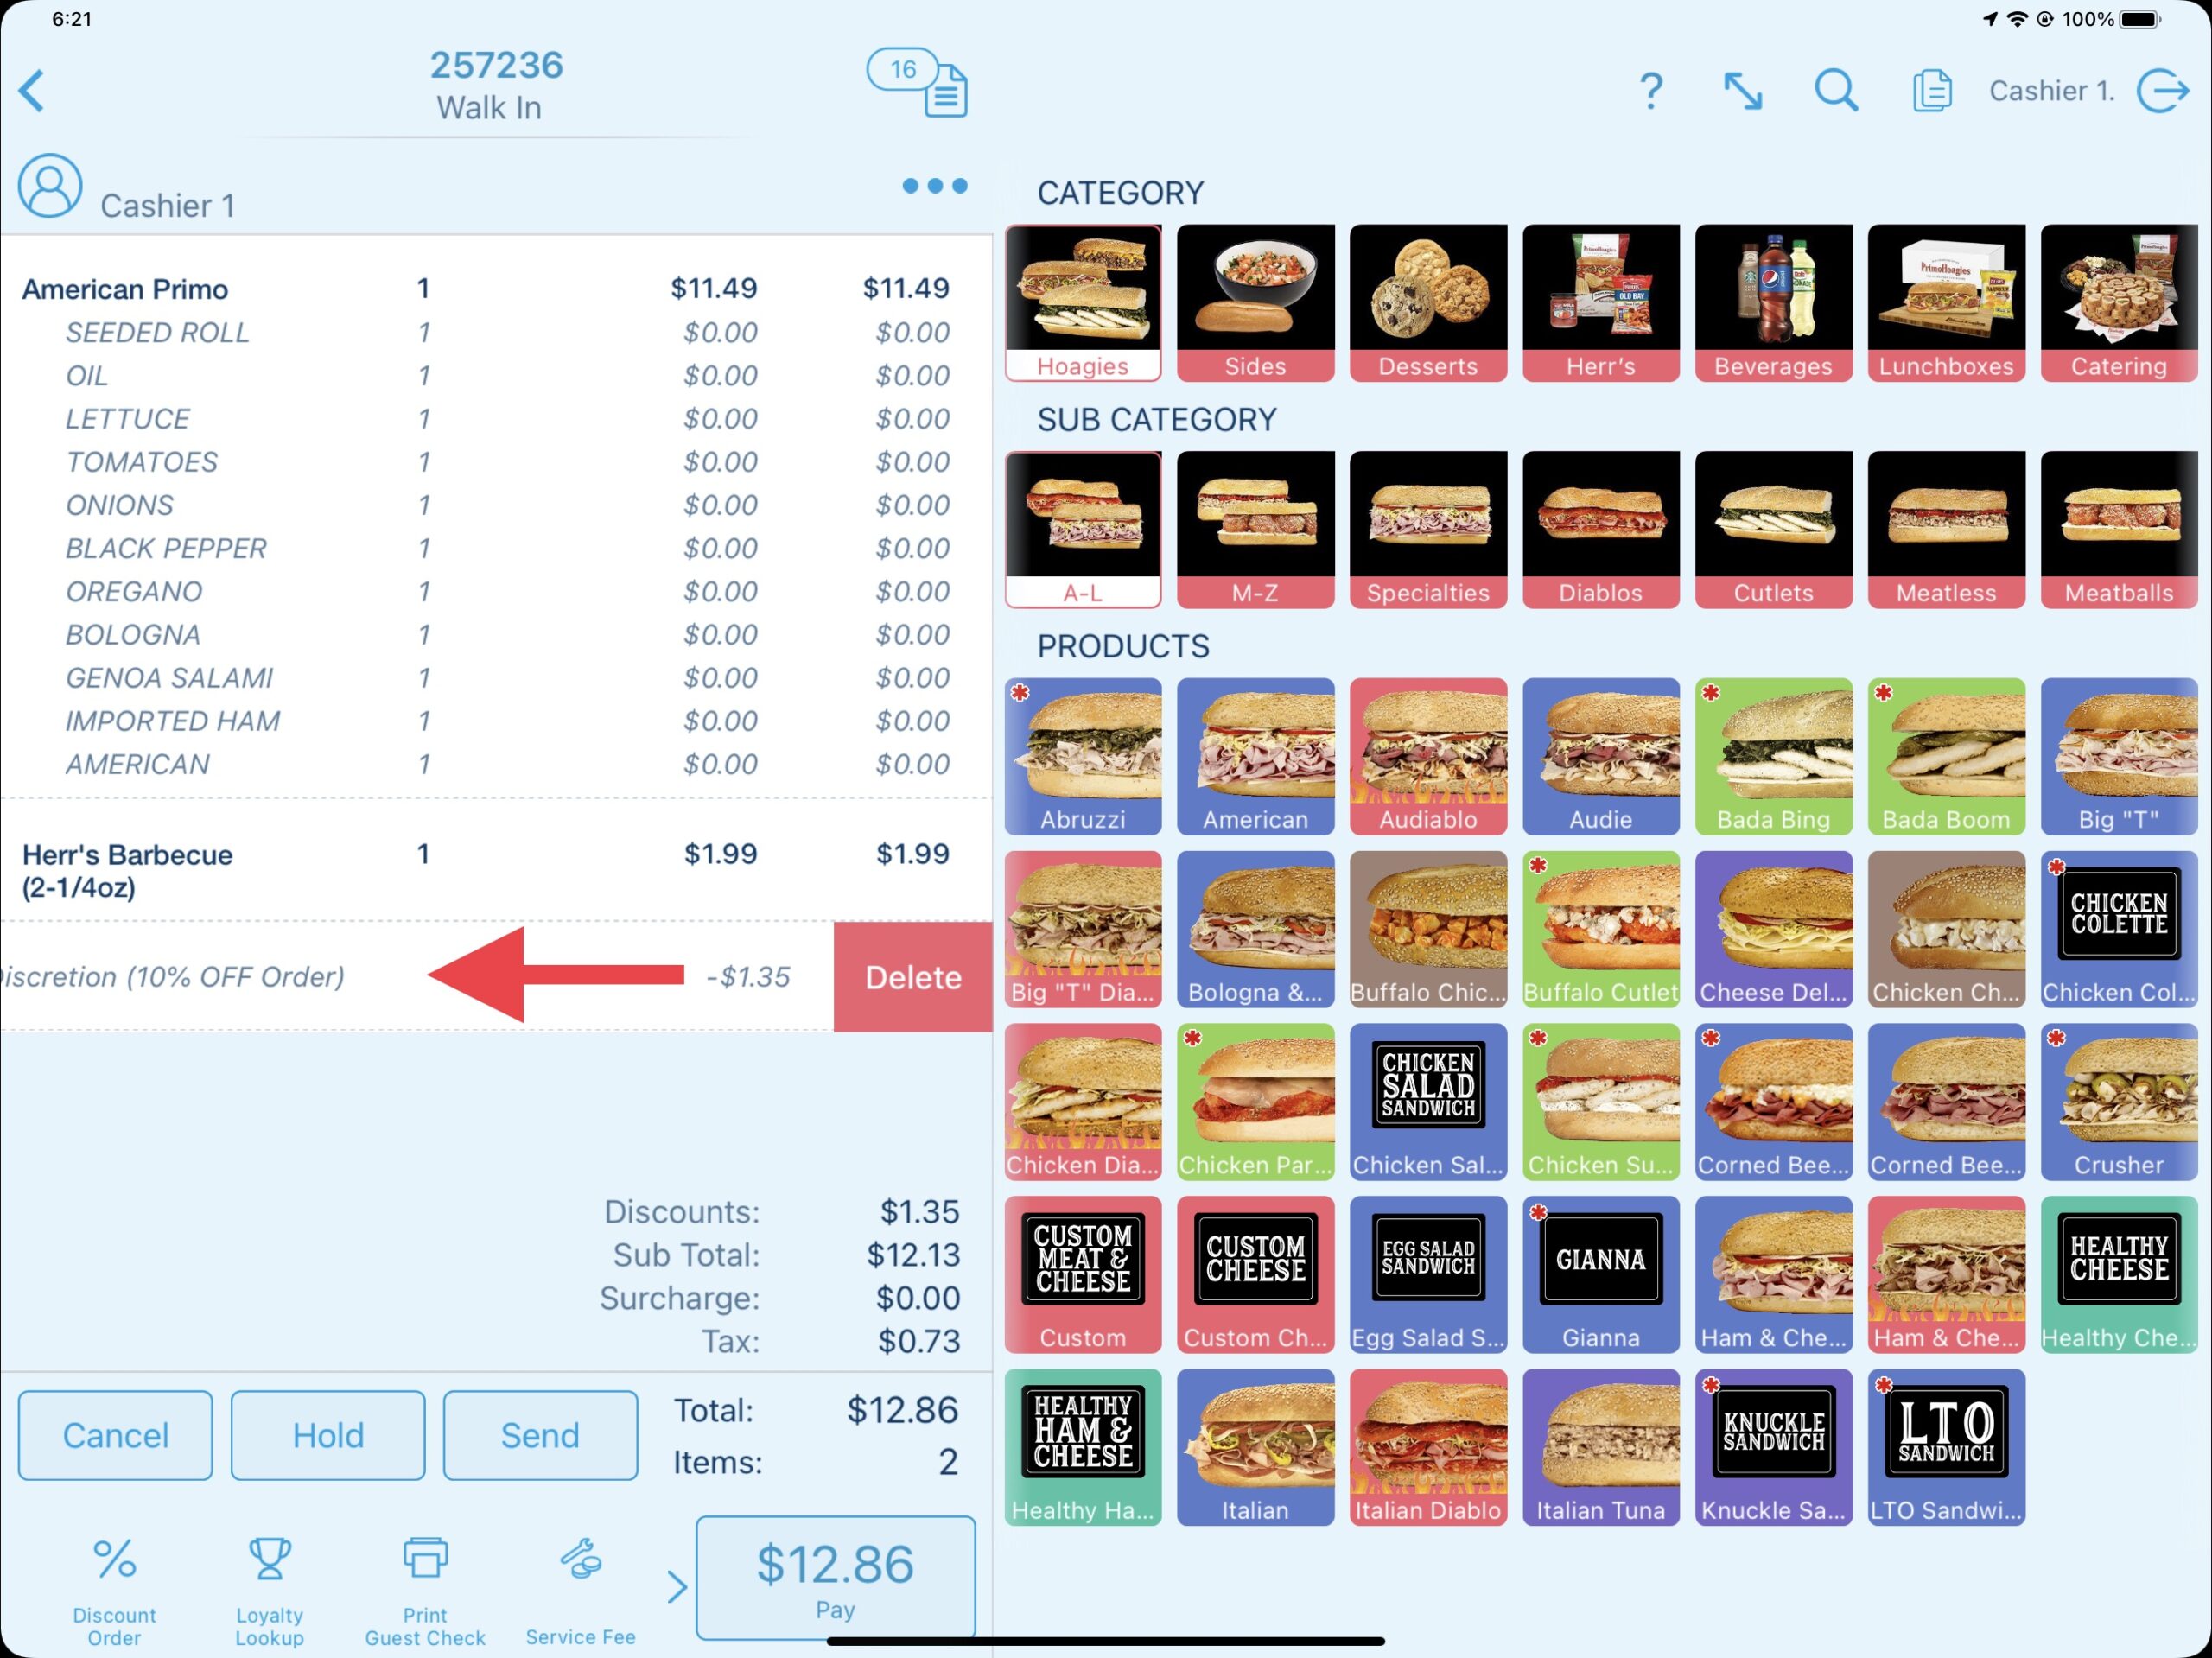
To remove a discount that has been applied as a separate line item, swipe left and select Delete.
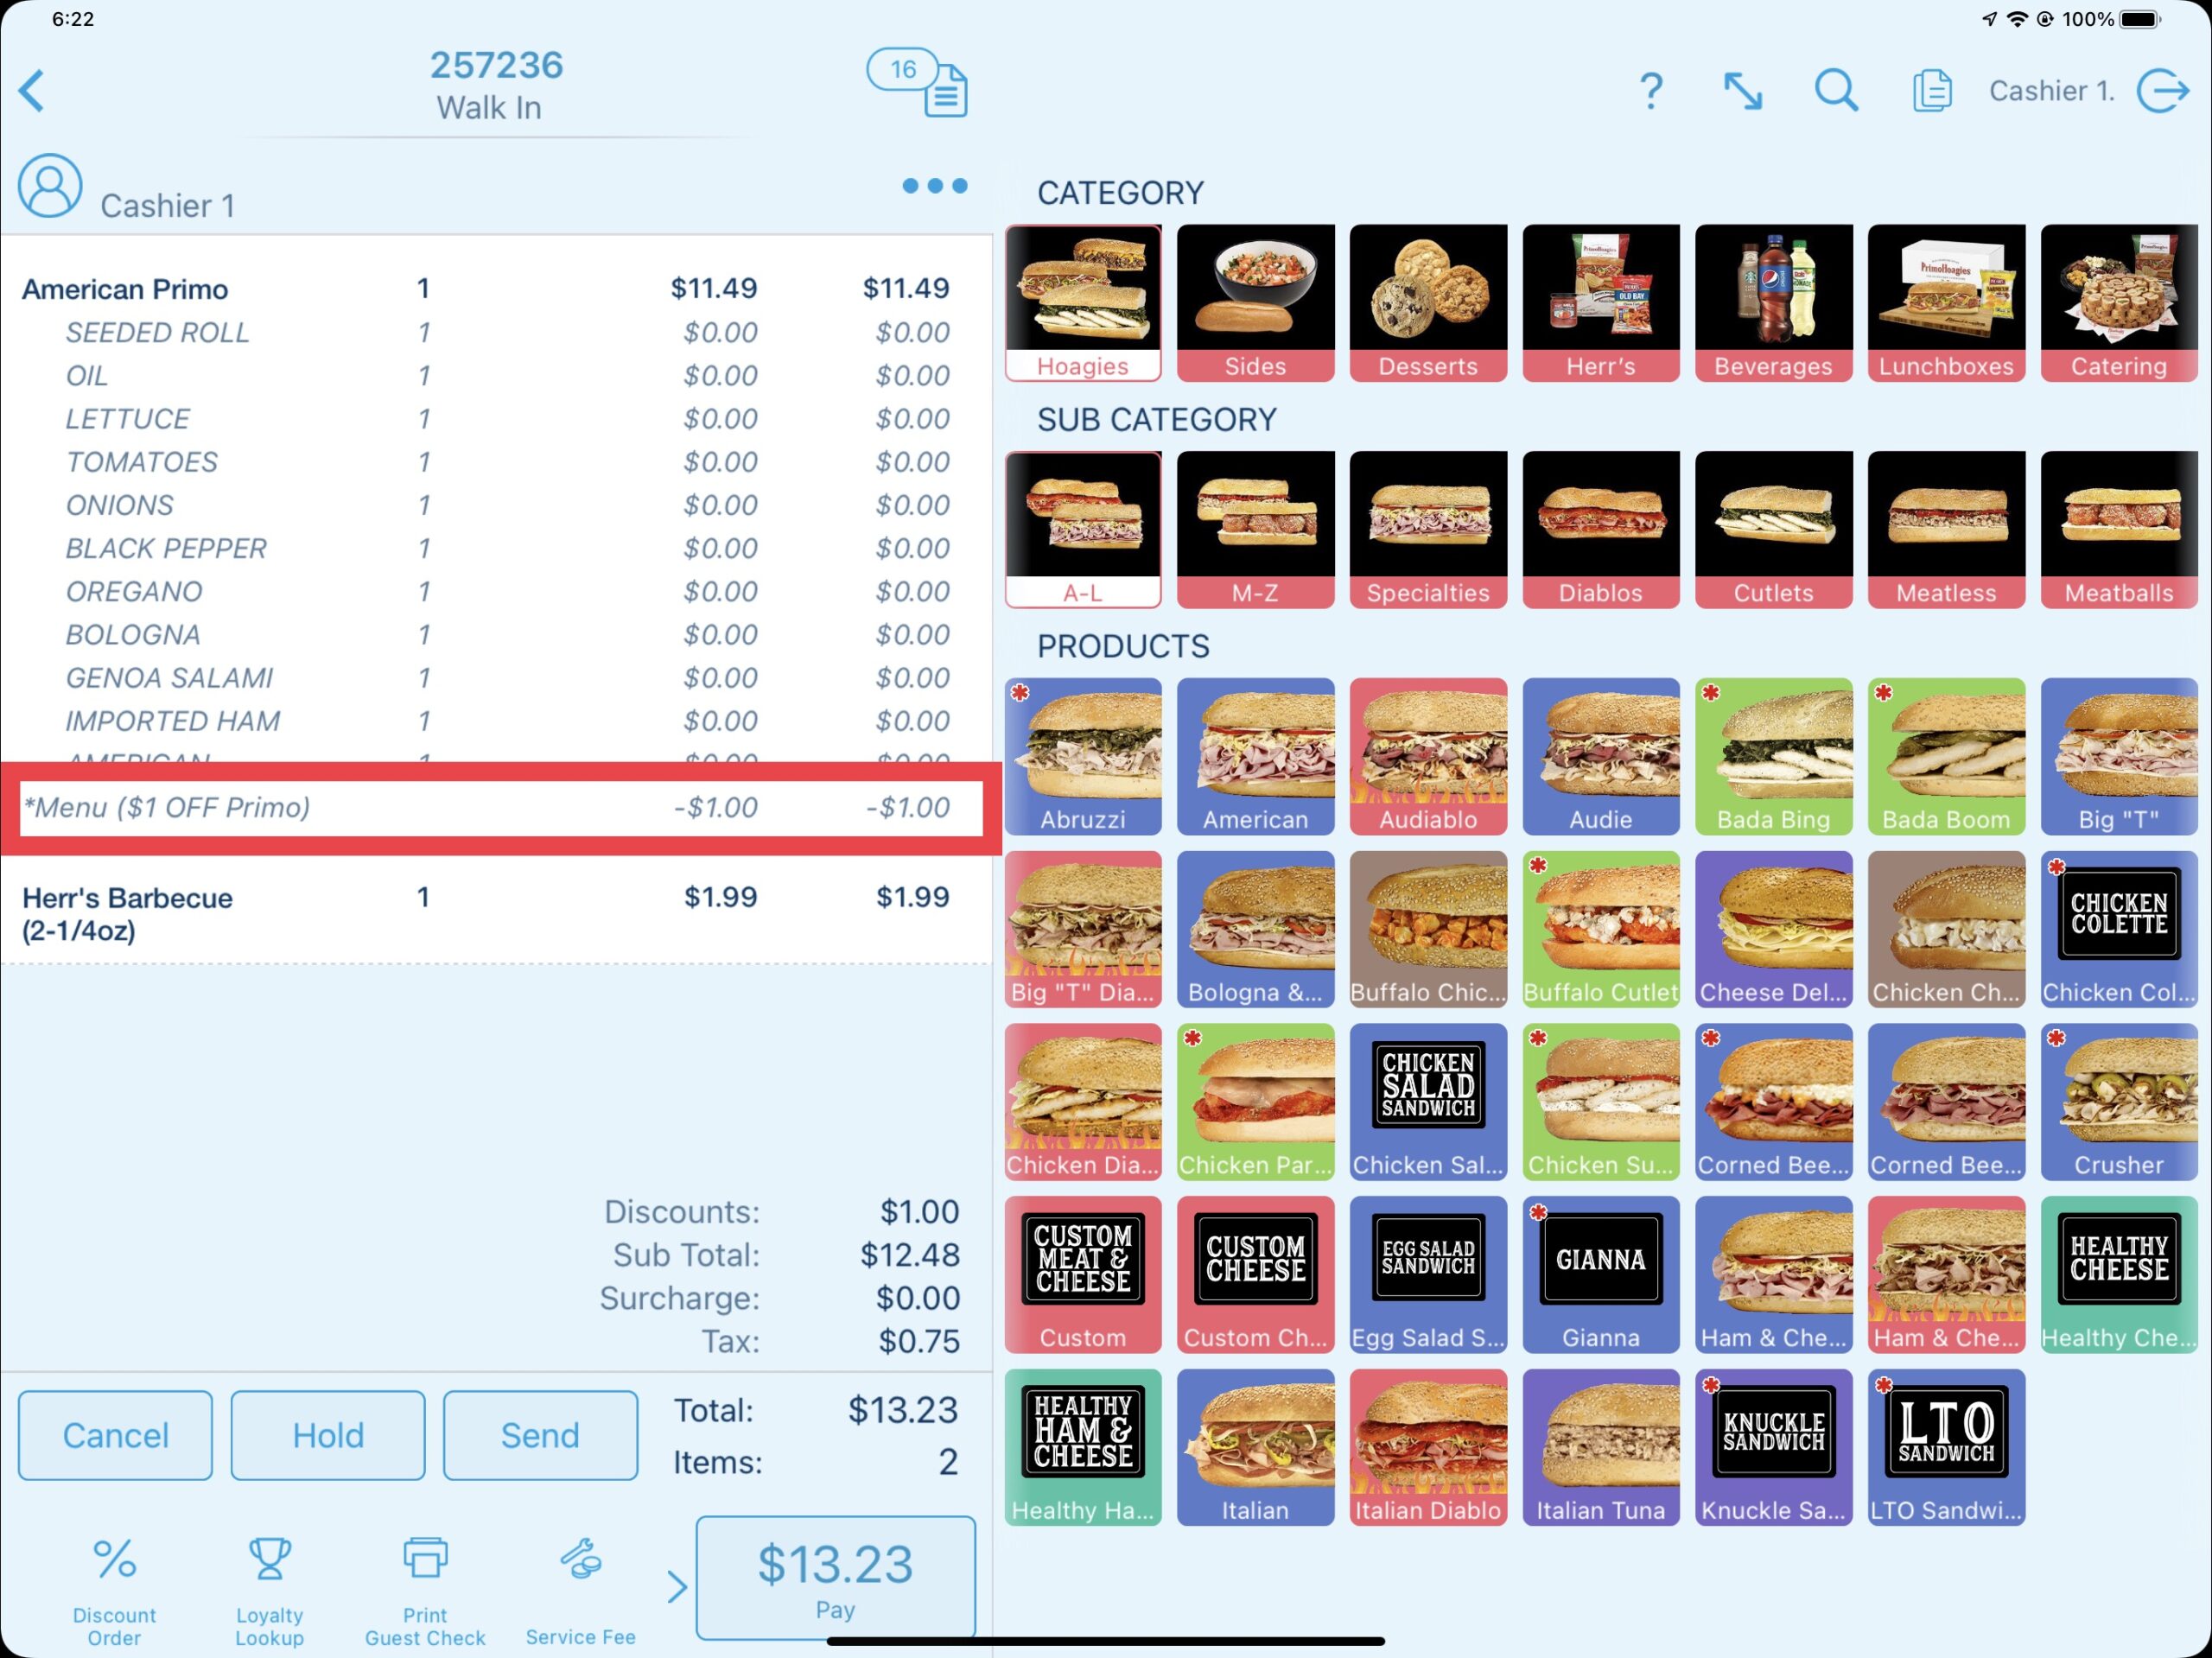
Alternatively, discounts applied to a certain product(s) will appear underneath where they are being applied.
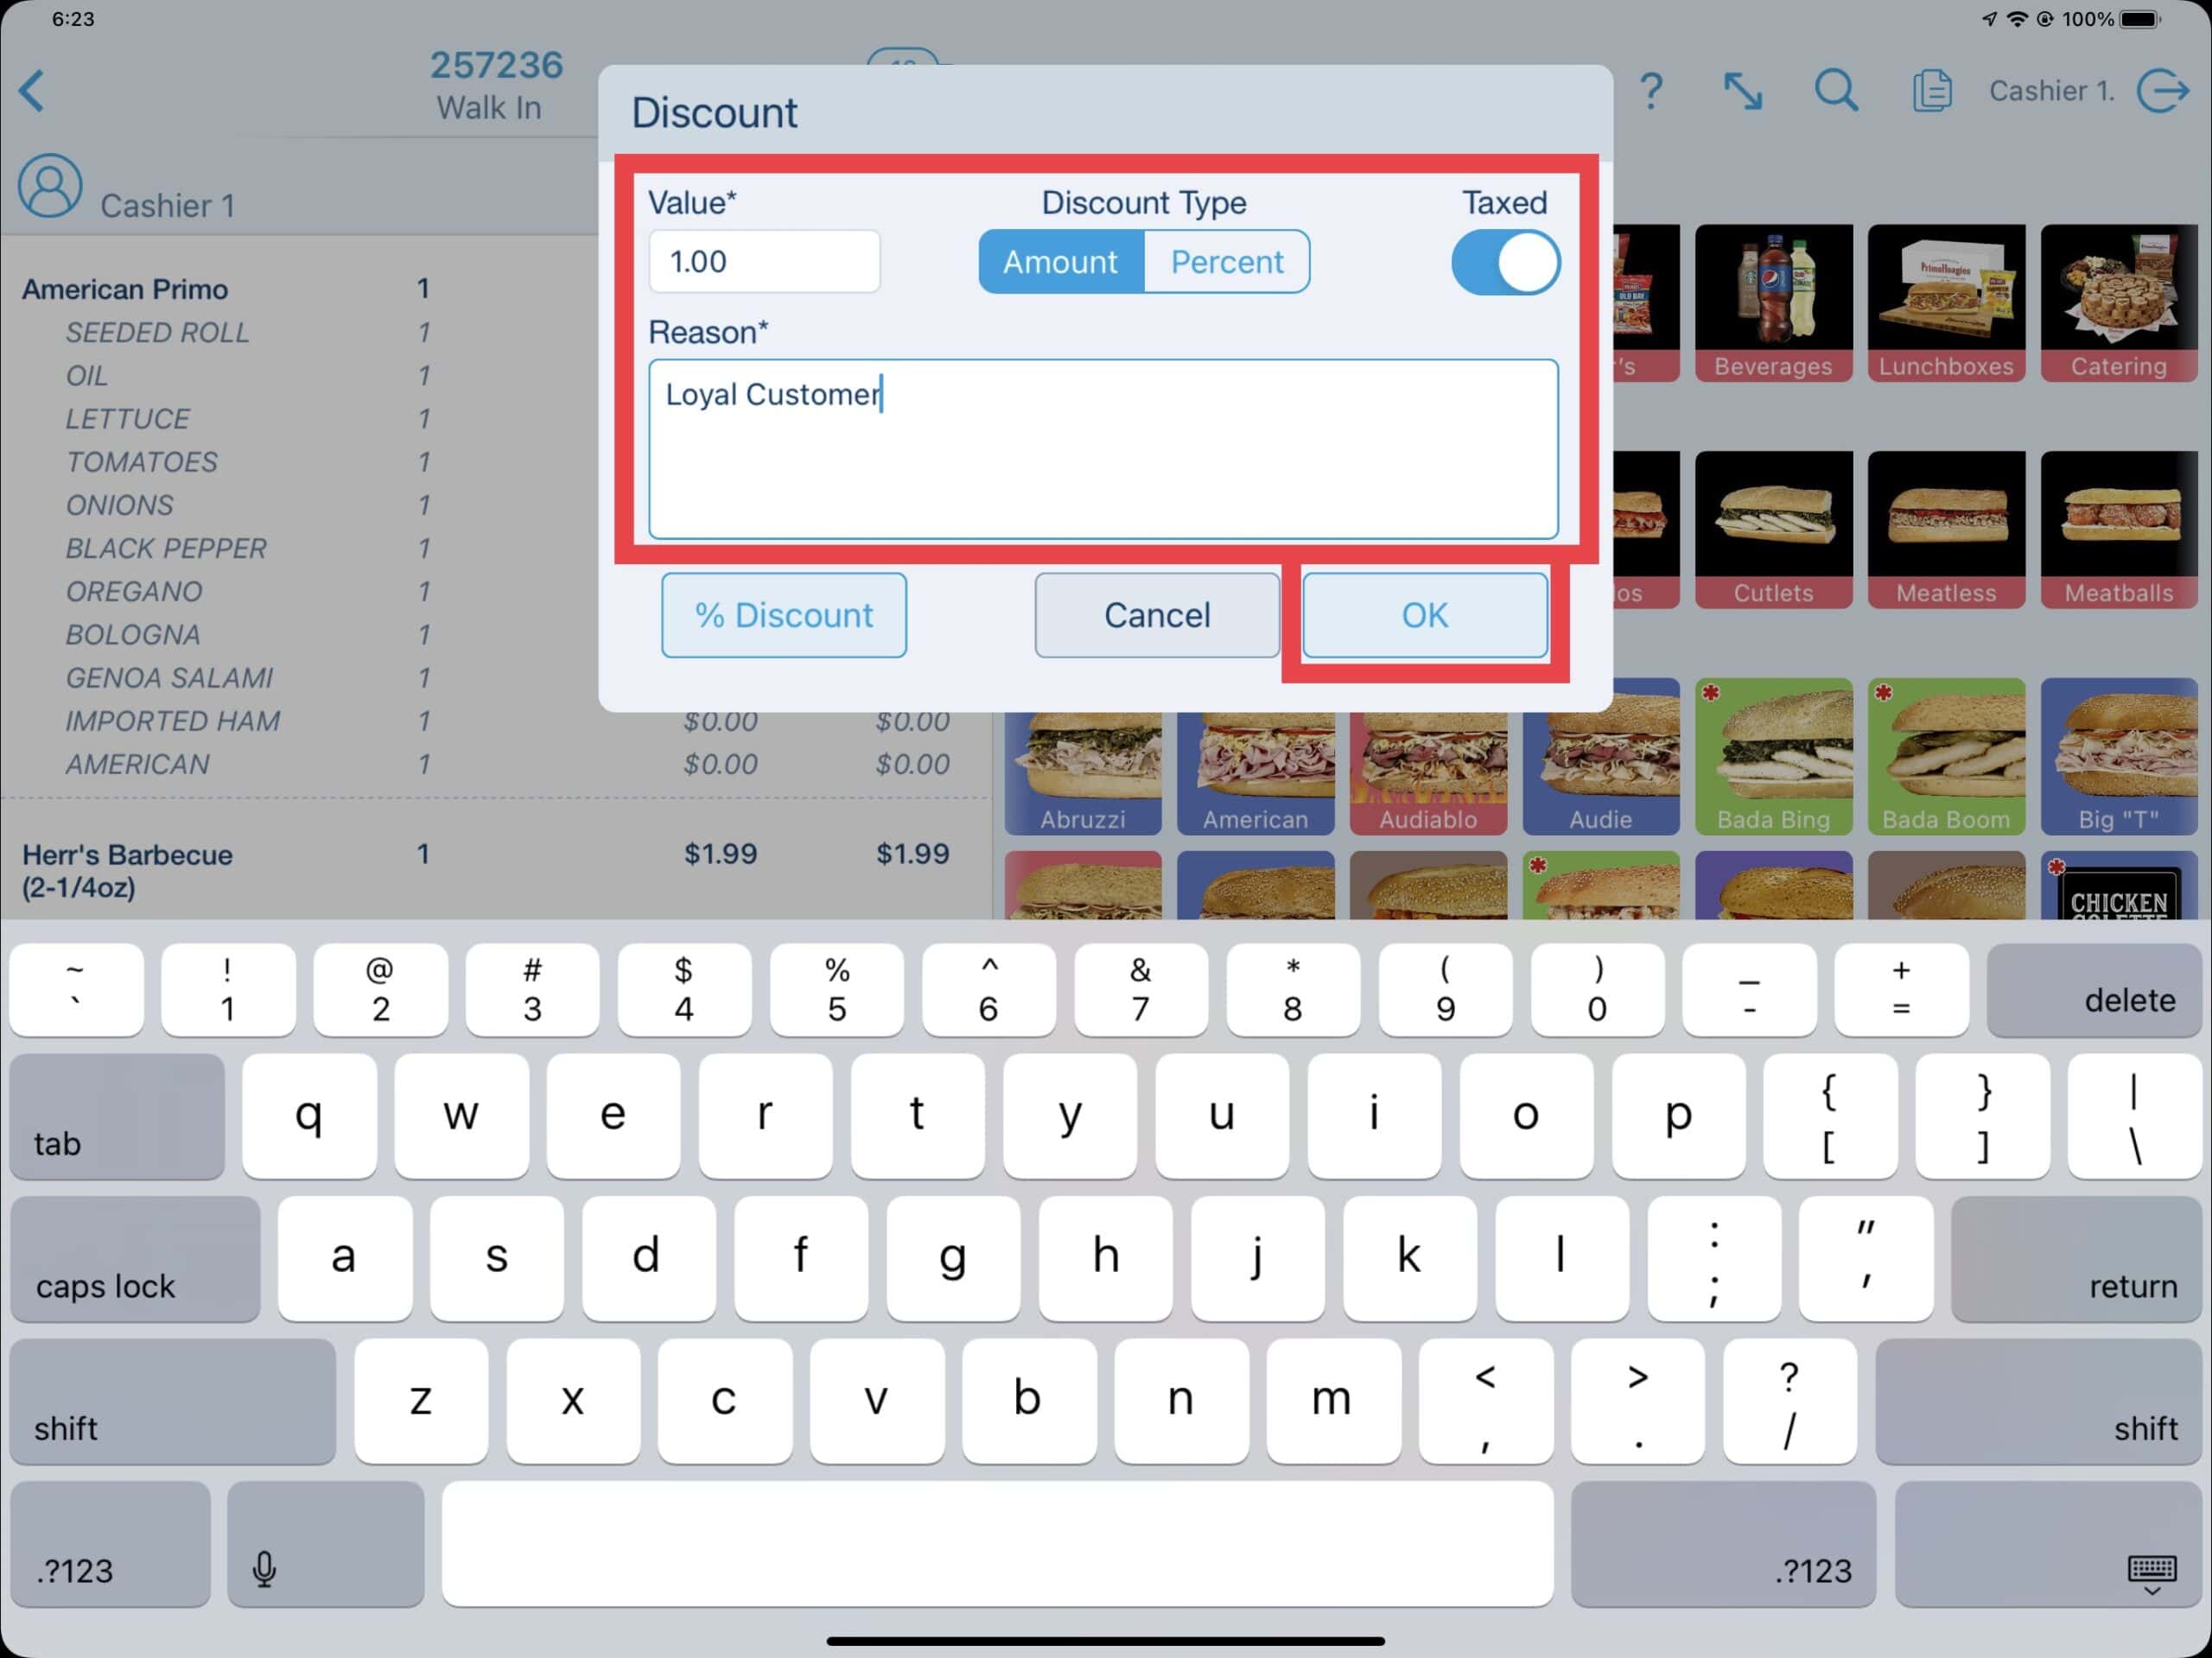
If you need to add a manual discount, selecting the Manual button on the Order Discount window calls the corresponding discount details window.
Define the discount by amount or percent as needed and provide a reason for the discount. Manual discount reasons will not be displayed on a printed customer check or receipt.
Applying Item Discounts
There are a few options to apply an Item Discount. One method is to select the product to apply the discount to. This opens the product modification window. Select Discount Item from the options.
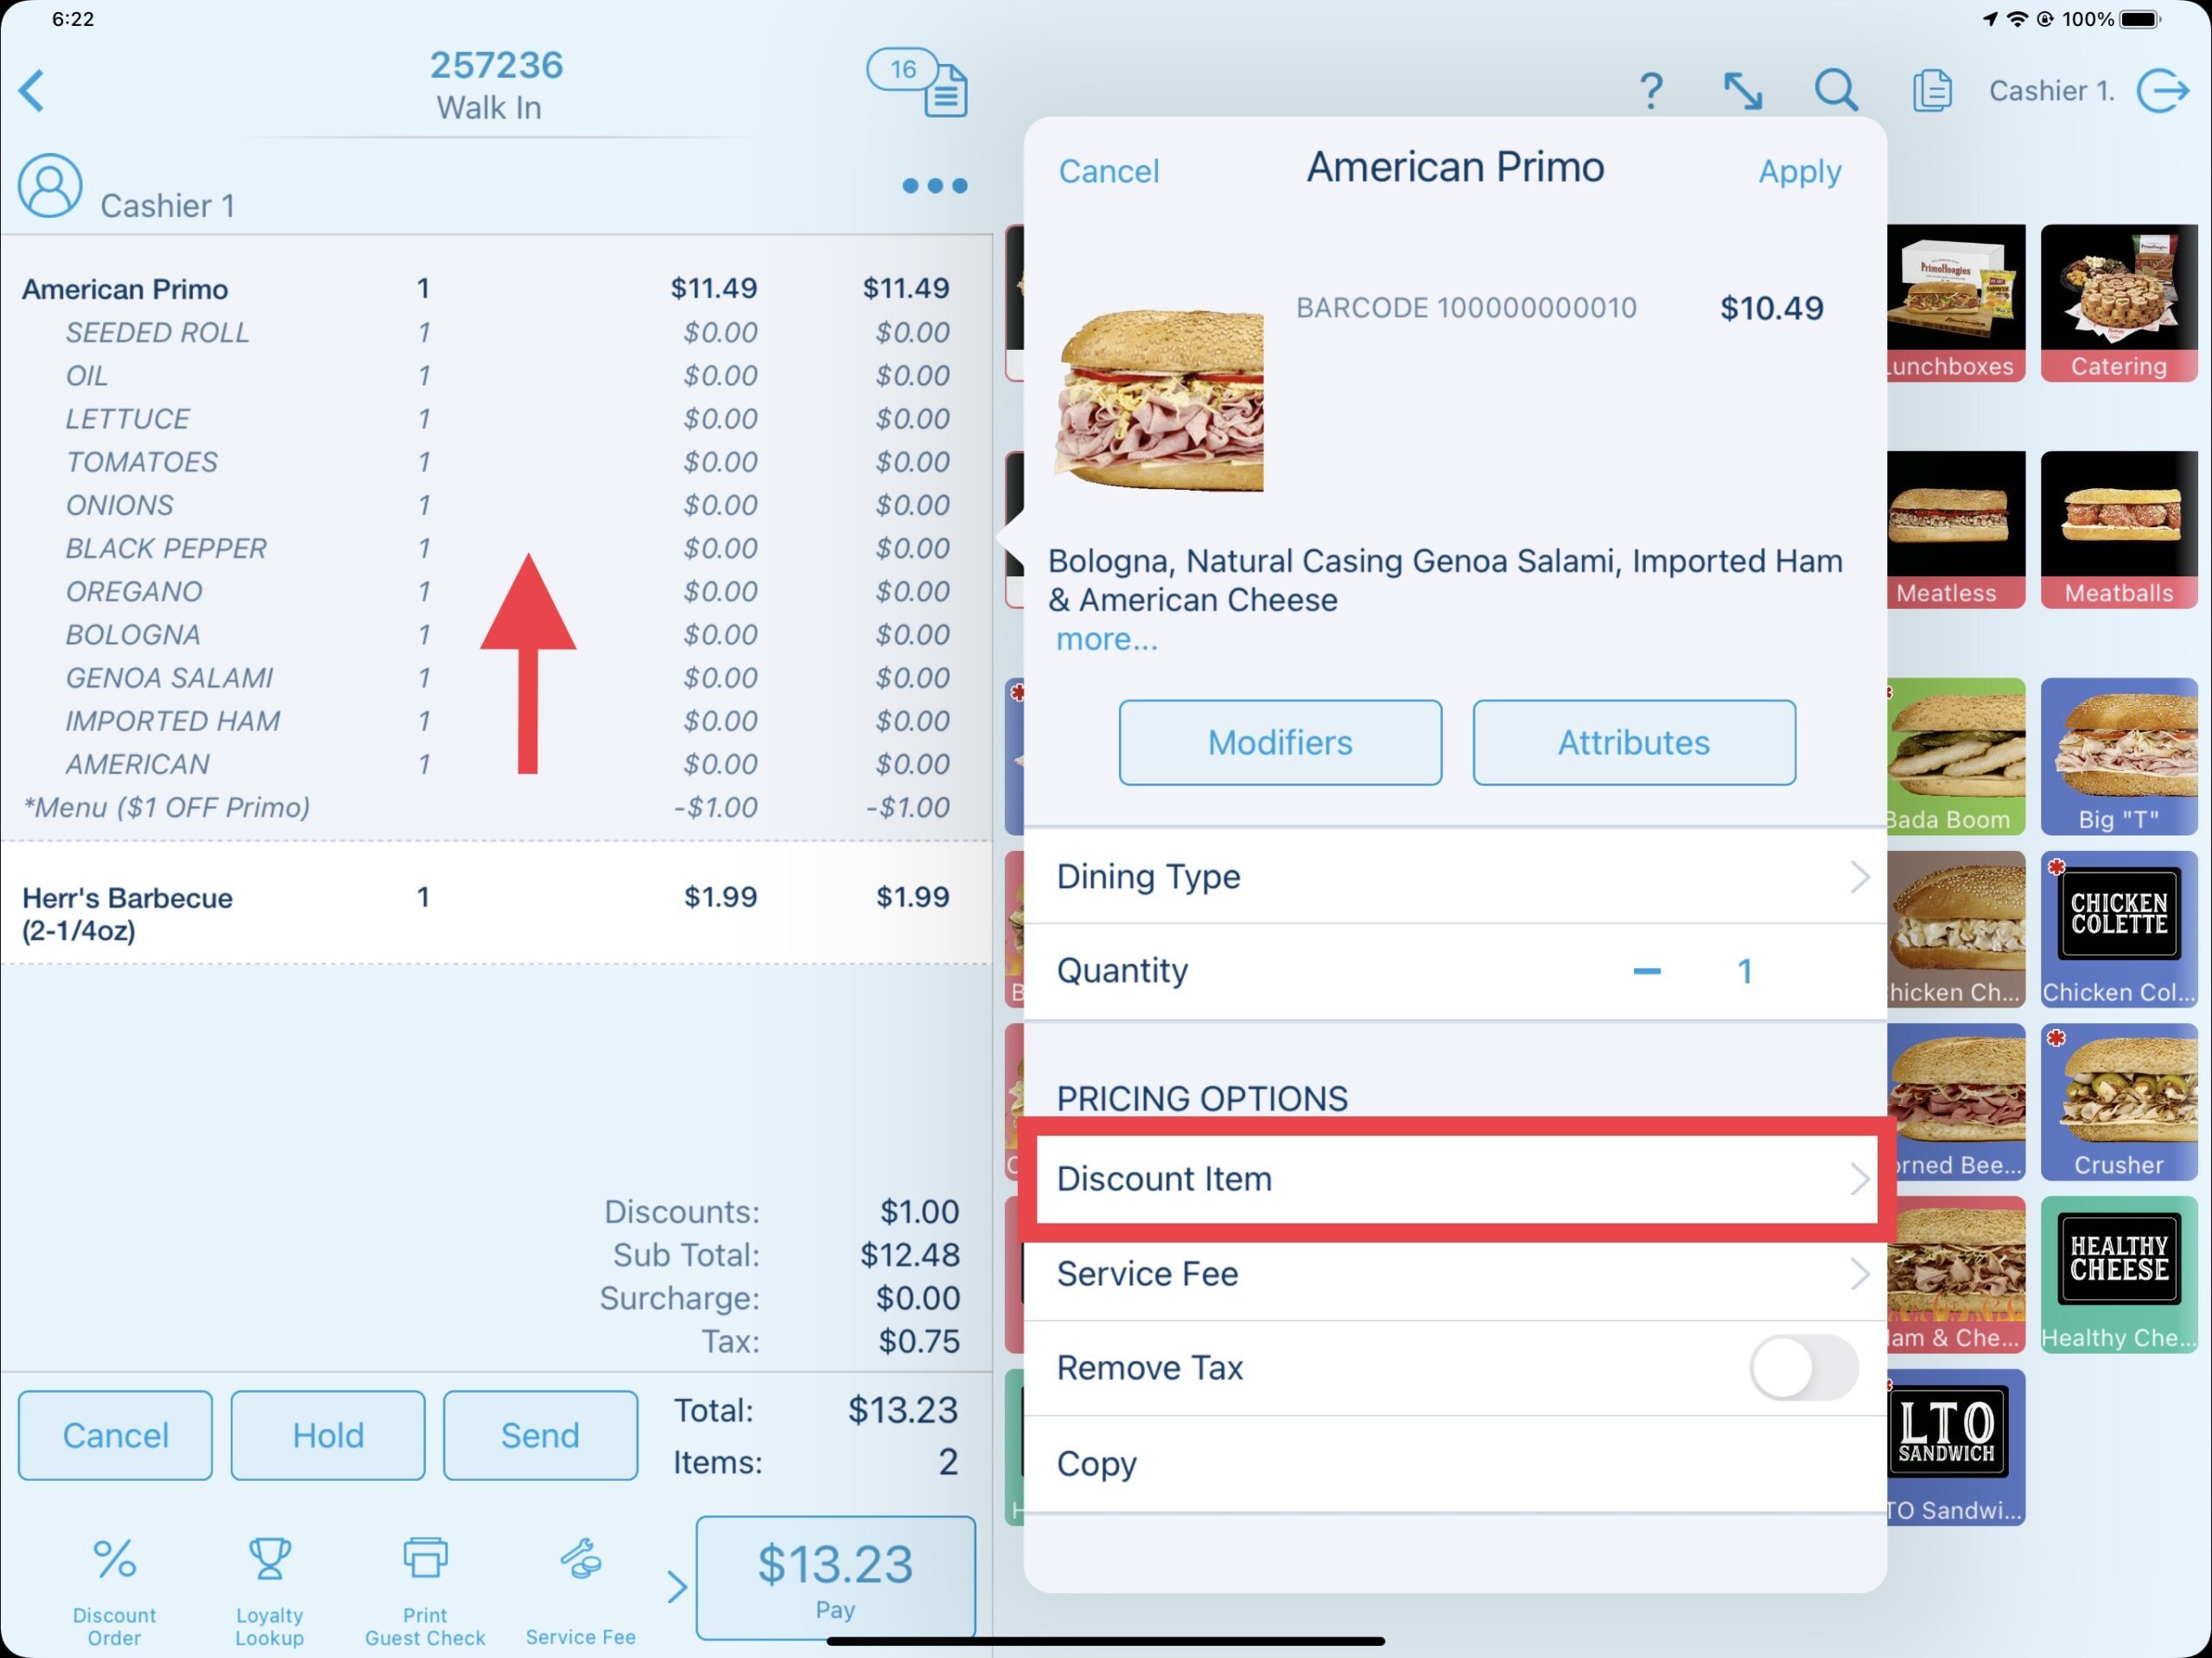
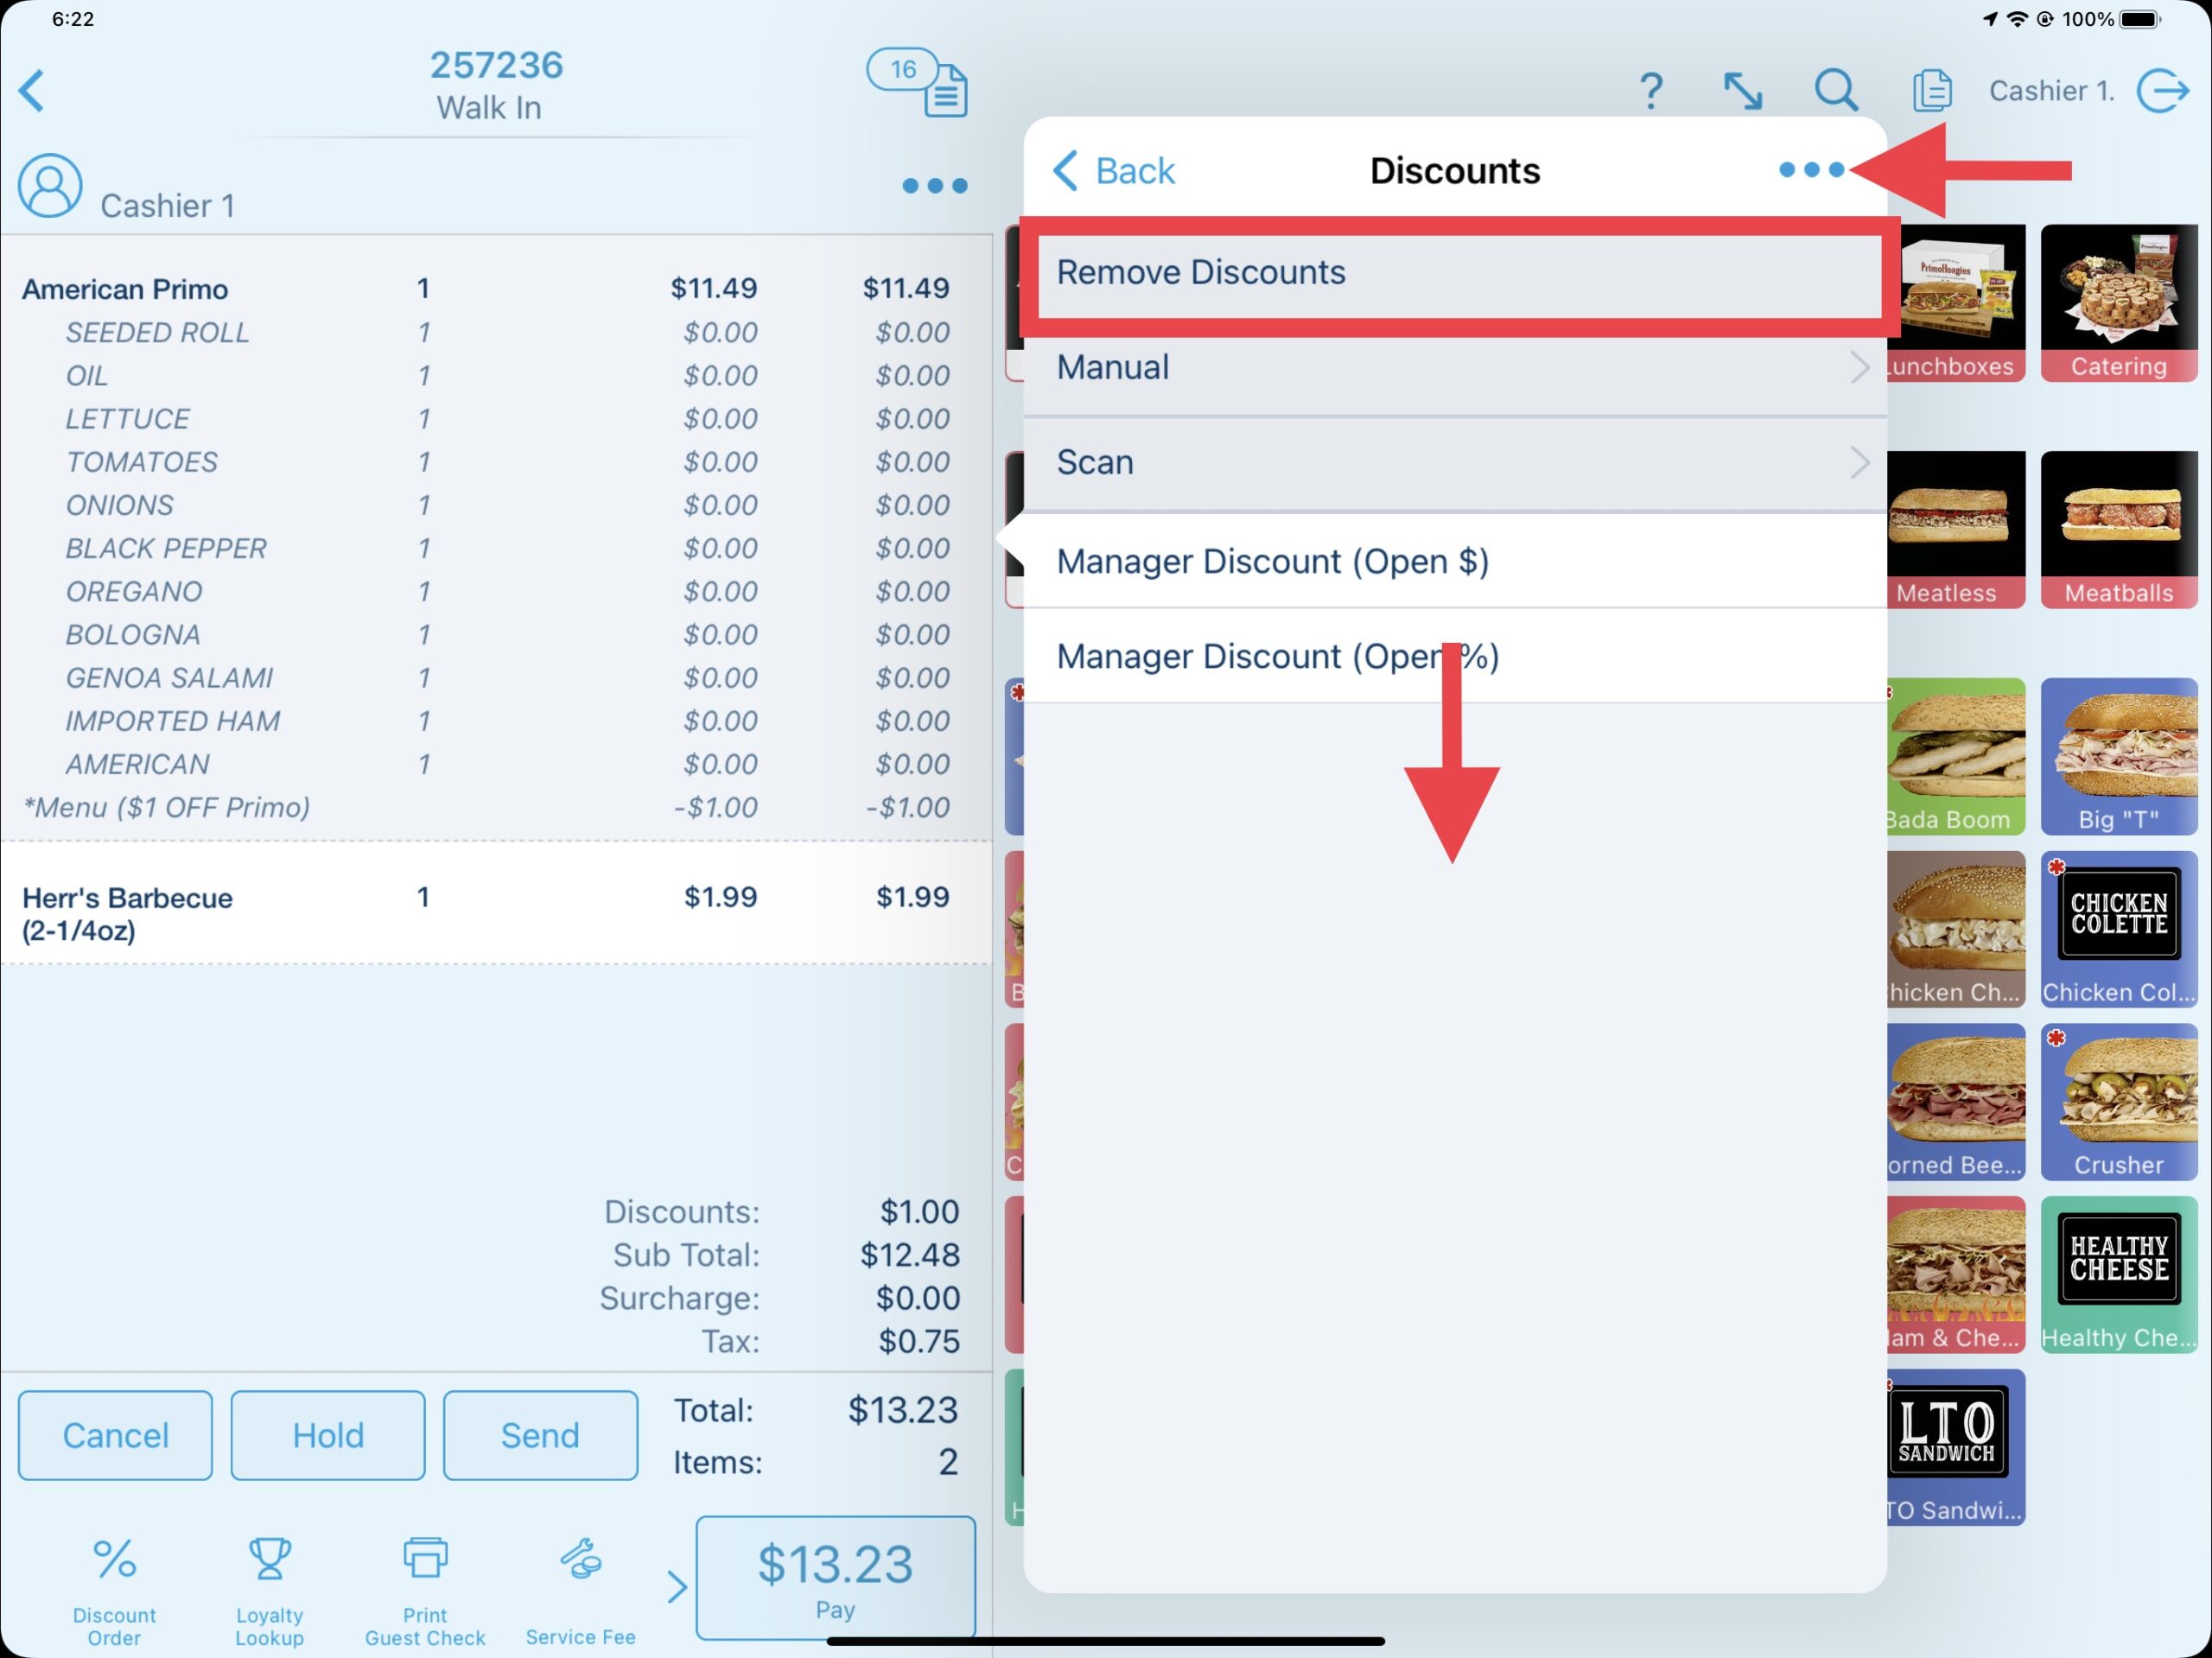
Any available Item Discounts designed for a particular product will be listed in addition to the standard Manager Discounts. Select the discount as needed. You can also remove an applied discount on a product by either swiping down or by selecting the blue elipsis icon, then selecting Remove Discounts. The manual discount option is also found here as well.
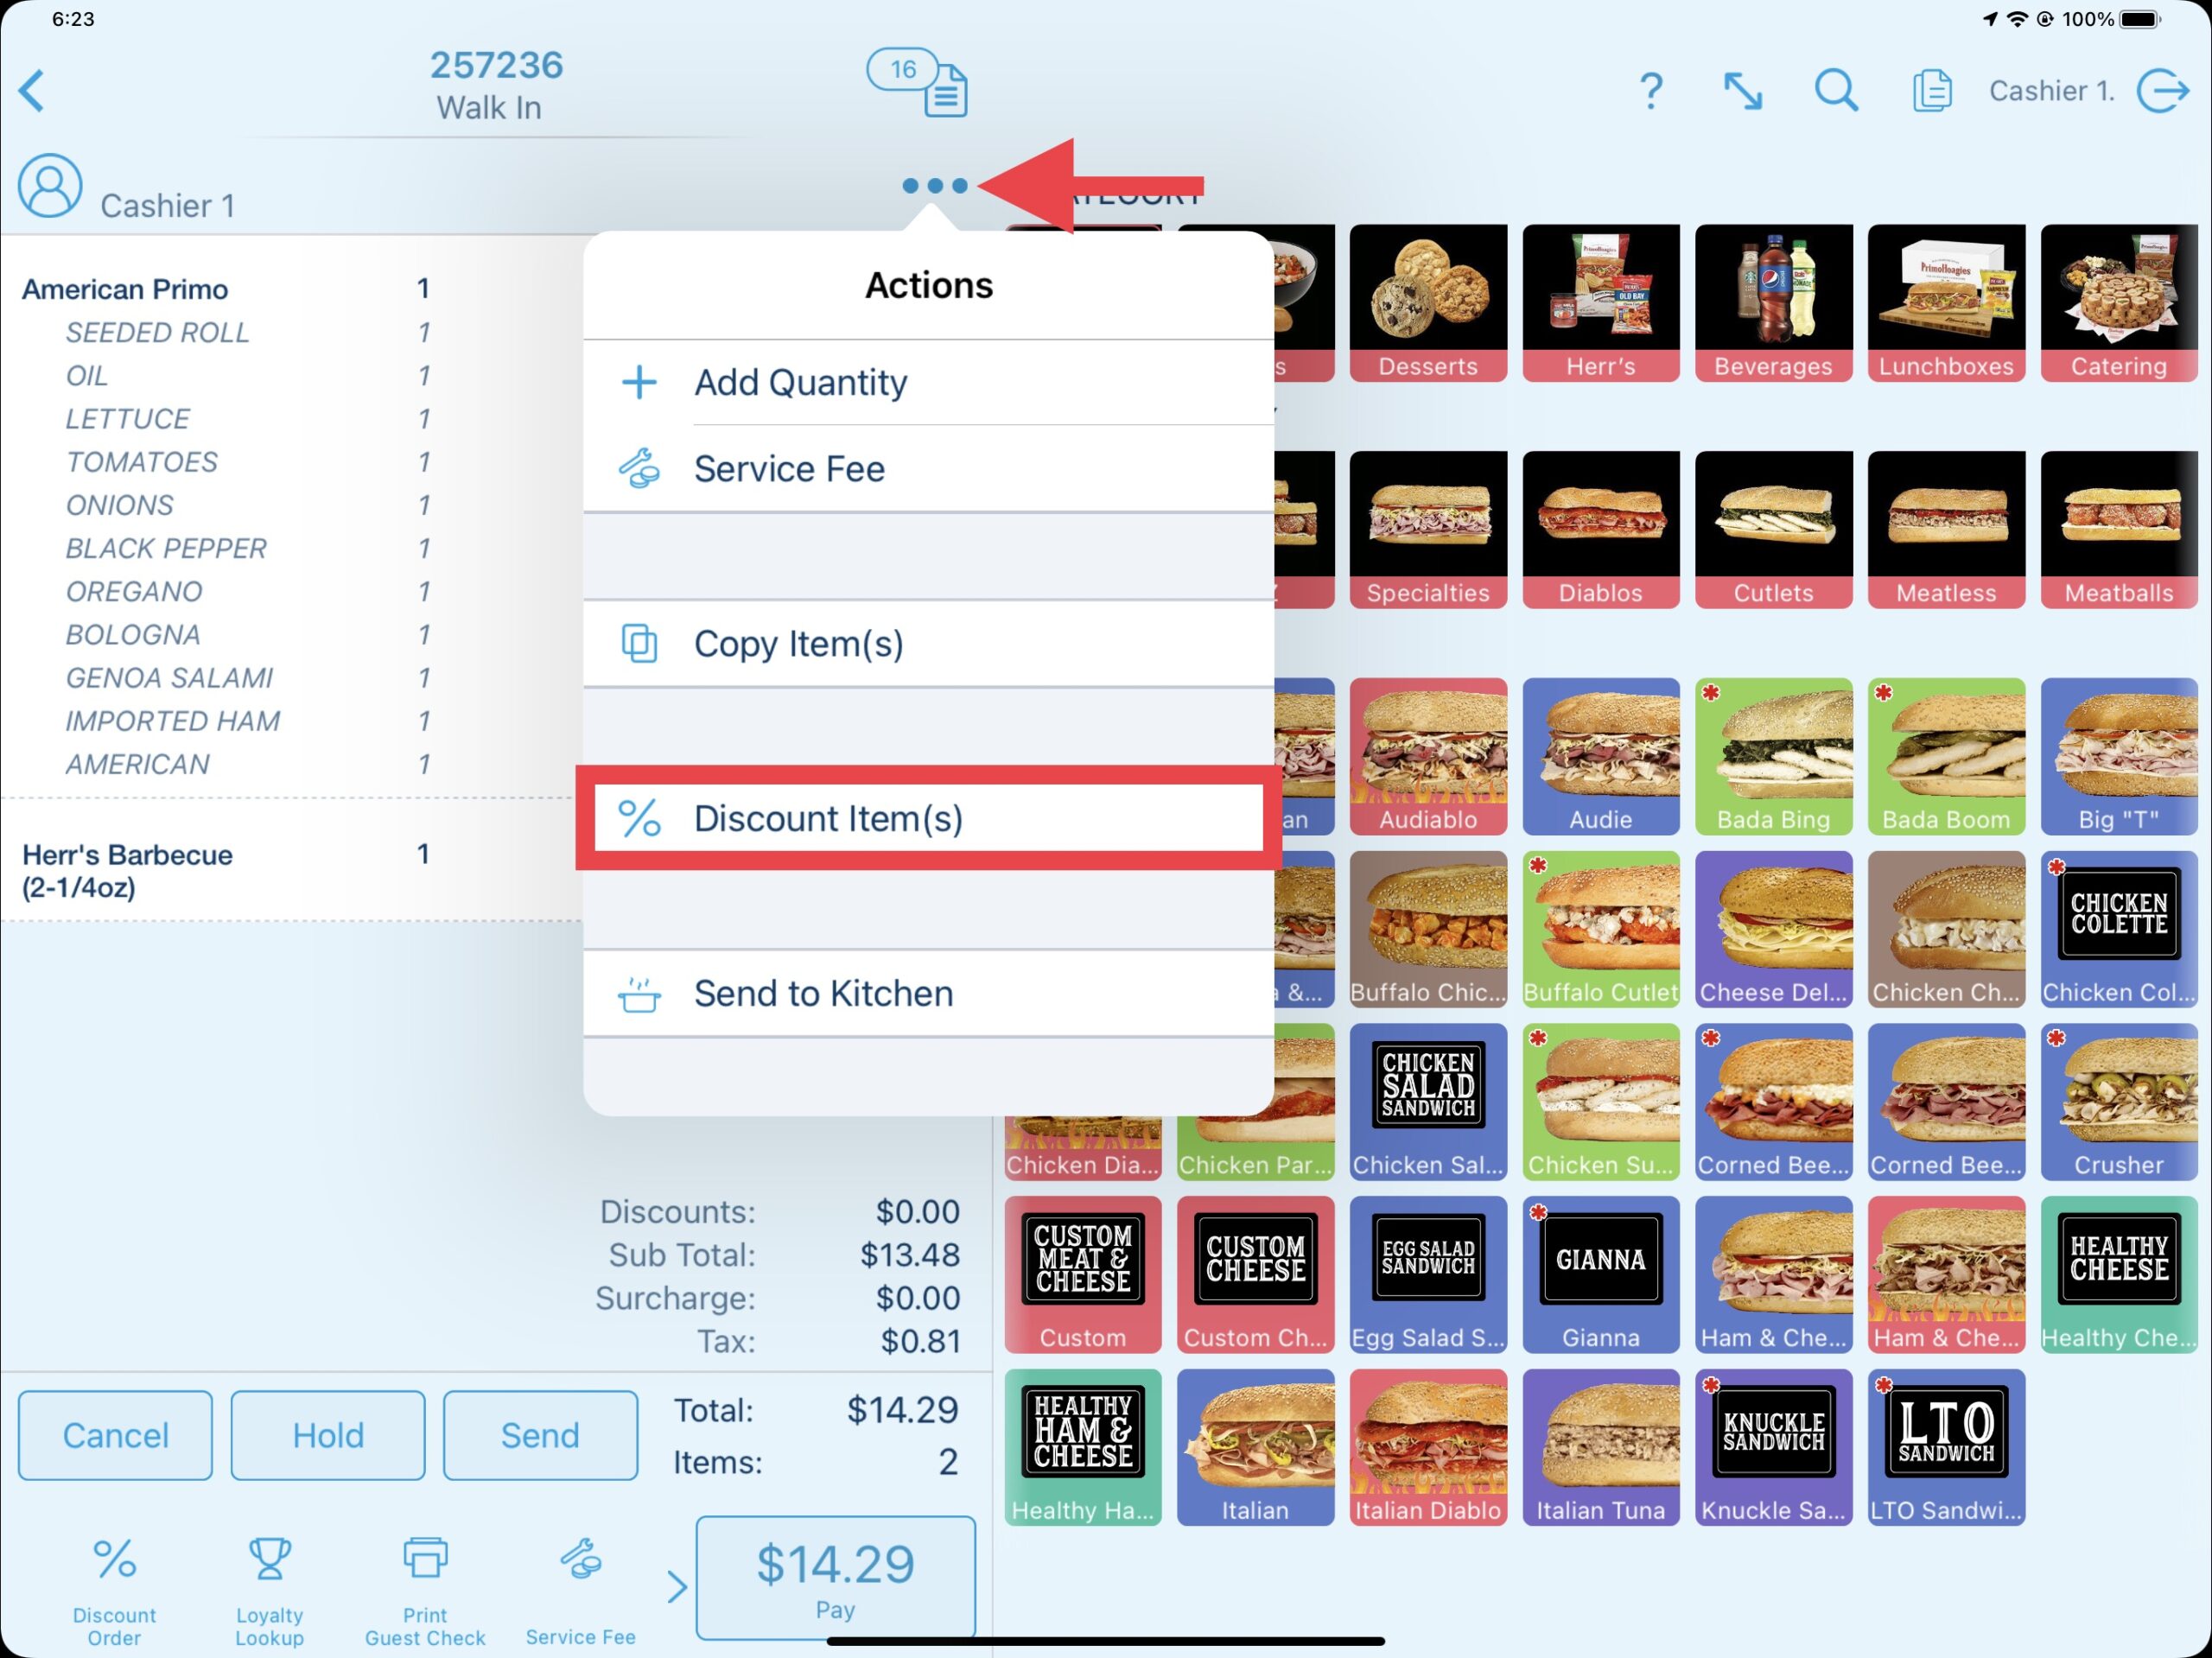
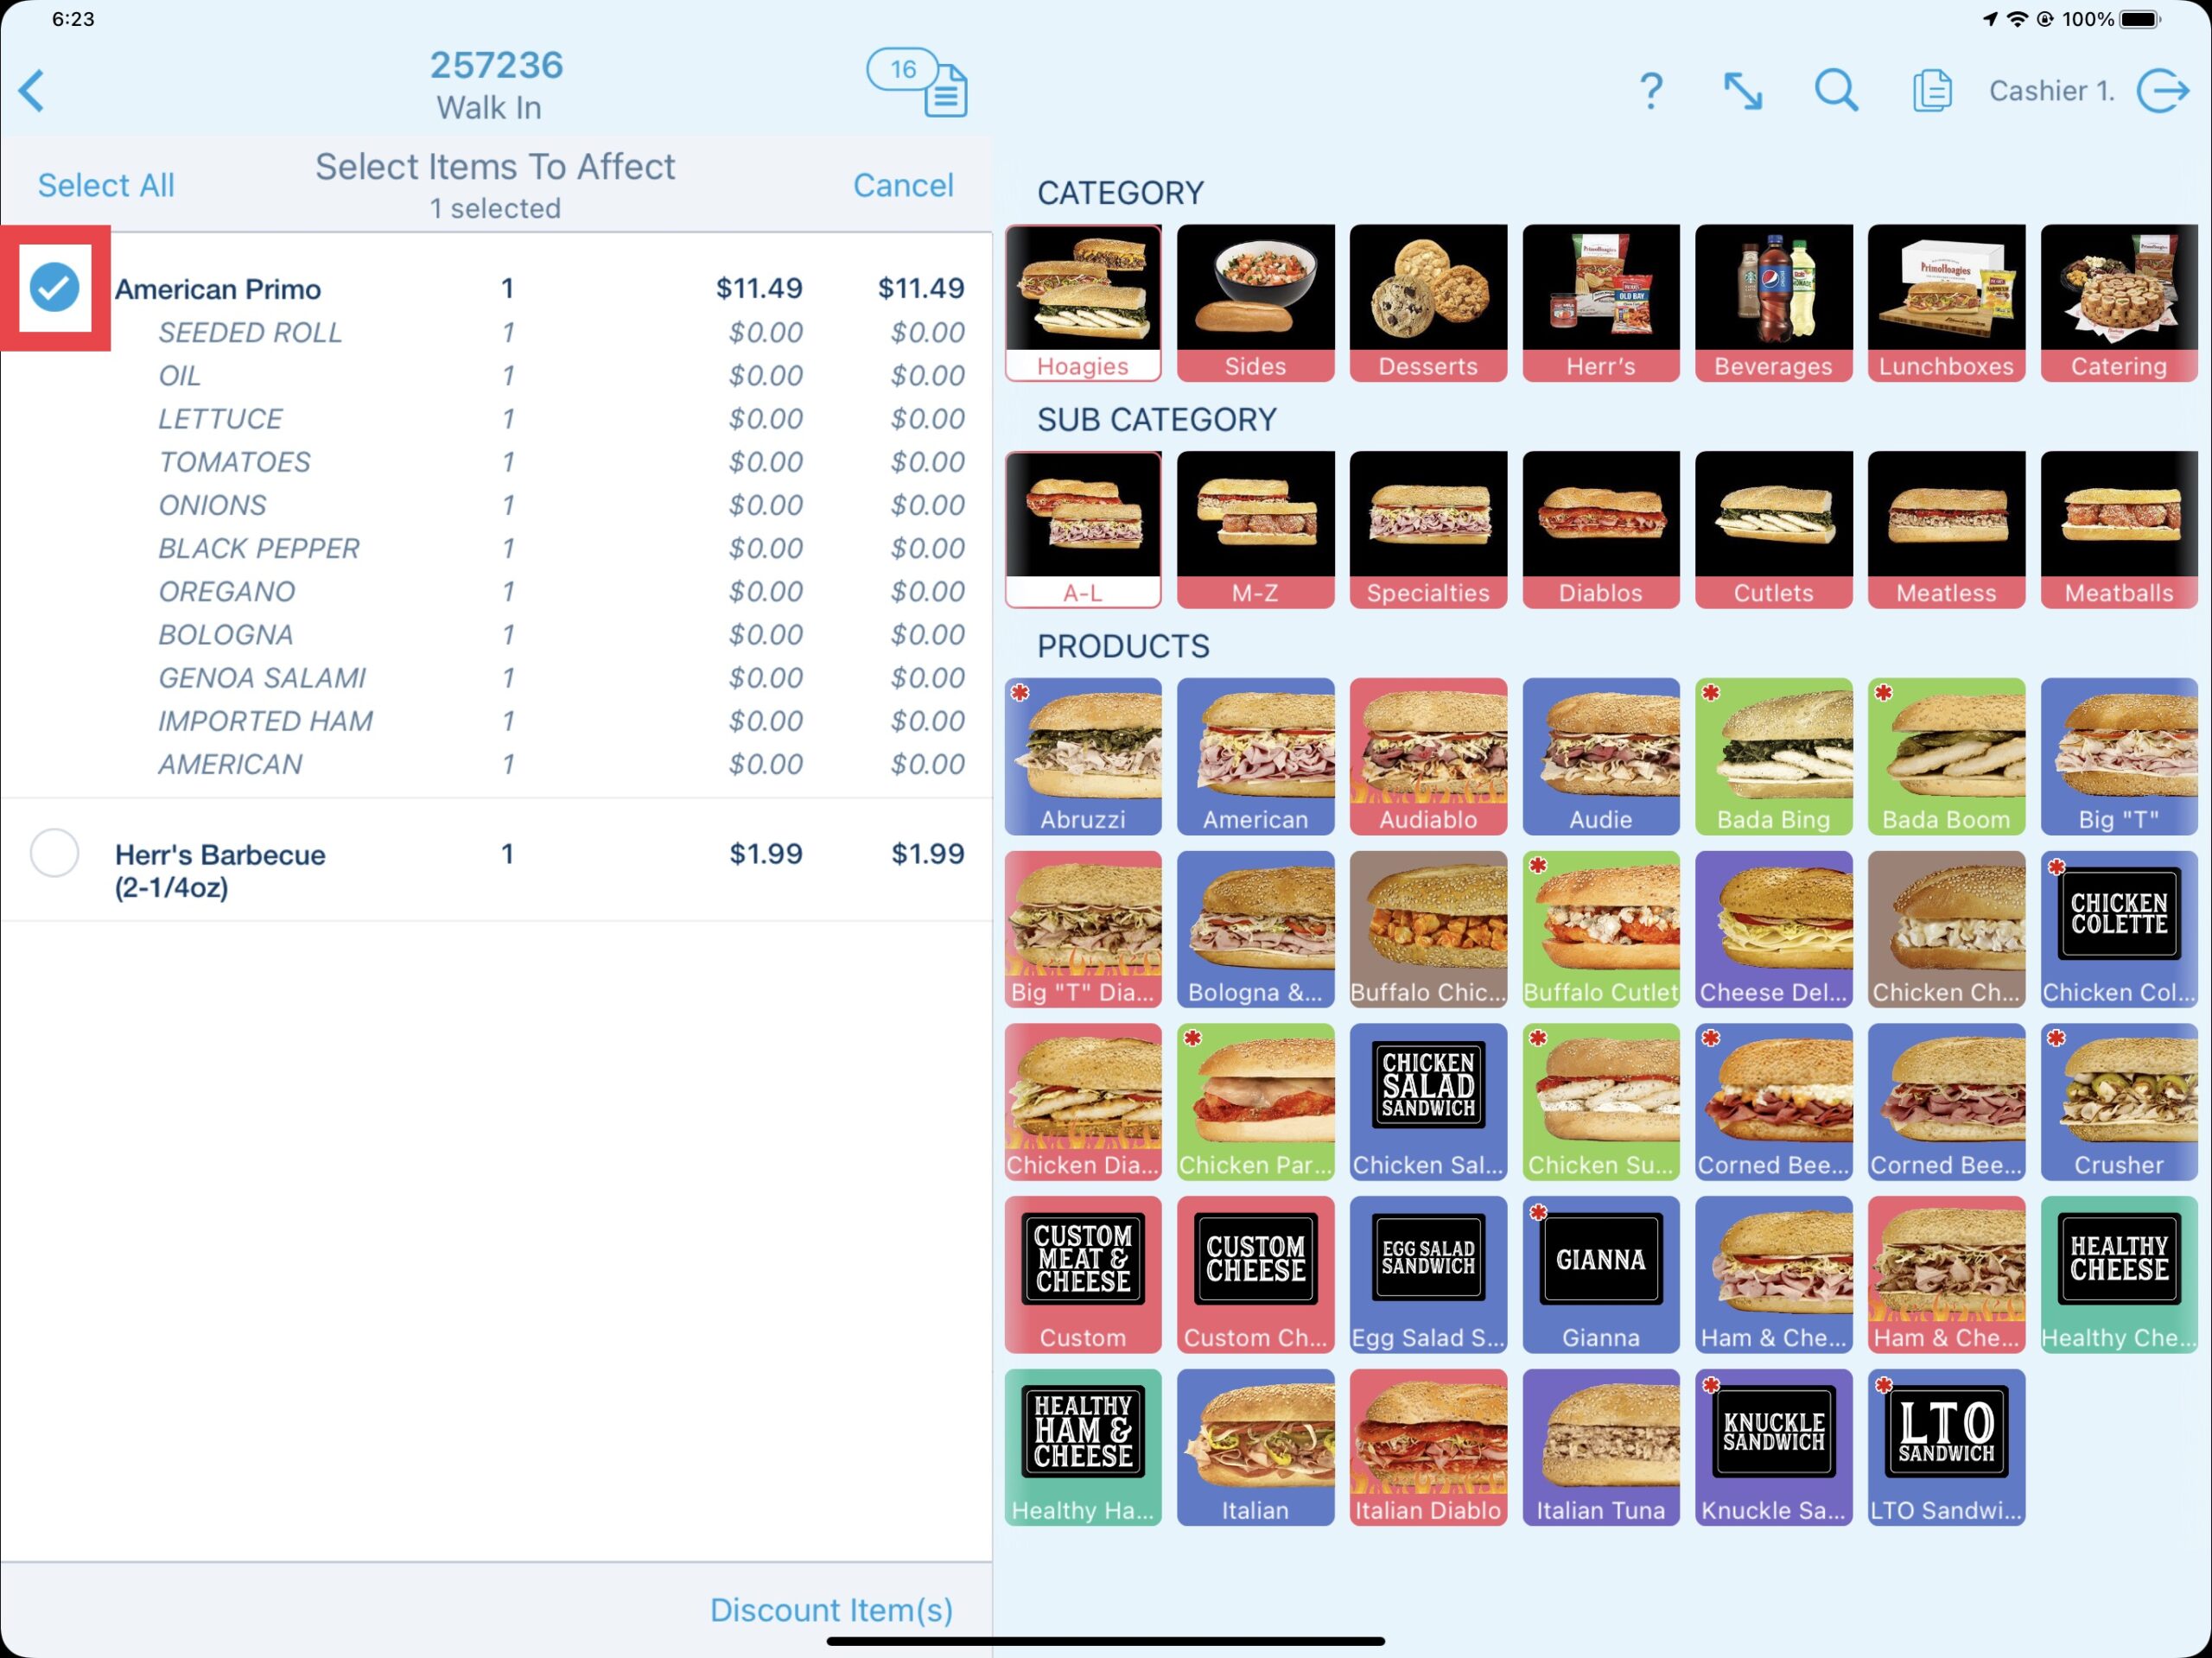
Another method to apply a discount to a specific product(s) can be done by selecting the blue elipsis icon above the order. Selecting the Discount Item(s) option allows you to select individual products to apply a discount against.
Select the product(s) or use the Select All option before choosing Discount Item(s) at the bottom.
Updated 06/15/2022

Summary
Loyalty customers can be added to an order in four different ways. A phone number is required to associate a loyalty customer to the order. Alternatively, new loyalty customers can also be created directly from the point of sale.
Loyalty Prompt on Pay: This is the most commonly used way to attach a loyalty customer to an order or create a new loyalty customer. When selecting the payment button, if a loyalty customer has not previously been attached to the order, a prompt will display asking if you would like to add rewards.
Loyalty Lookup Action Button: During the order, the Loyalty Lookup action button can be used to display the Loyalty User Lookup window. All steps in the Loyalty Prompt on Pay section above will apply.
Loyalty Action Button (Payment Screen): If a loyalty customer has not been attached to the order or a change to an attached customer needs to be made, the Loyalty action button on the bottom left of the payment screen may be used. All steps in the Loyalty Prompt on Pay section above will apply.
Customer Display System: The last method to attach a loyalty customer is done by the customer on the customer display system (CDS) using the Earn Rewards button. New loyalty customer creation currently is not available on the CDS.
Attaching Loyalty Customers to Orders
To add a loyalty customer to an order or create a new loyalty customer, select the Pay button (most common). Alternatively, the Loyalty Lookup action button can also be used.
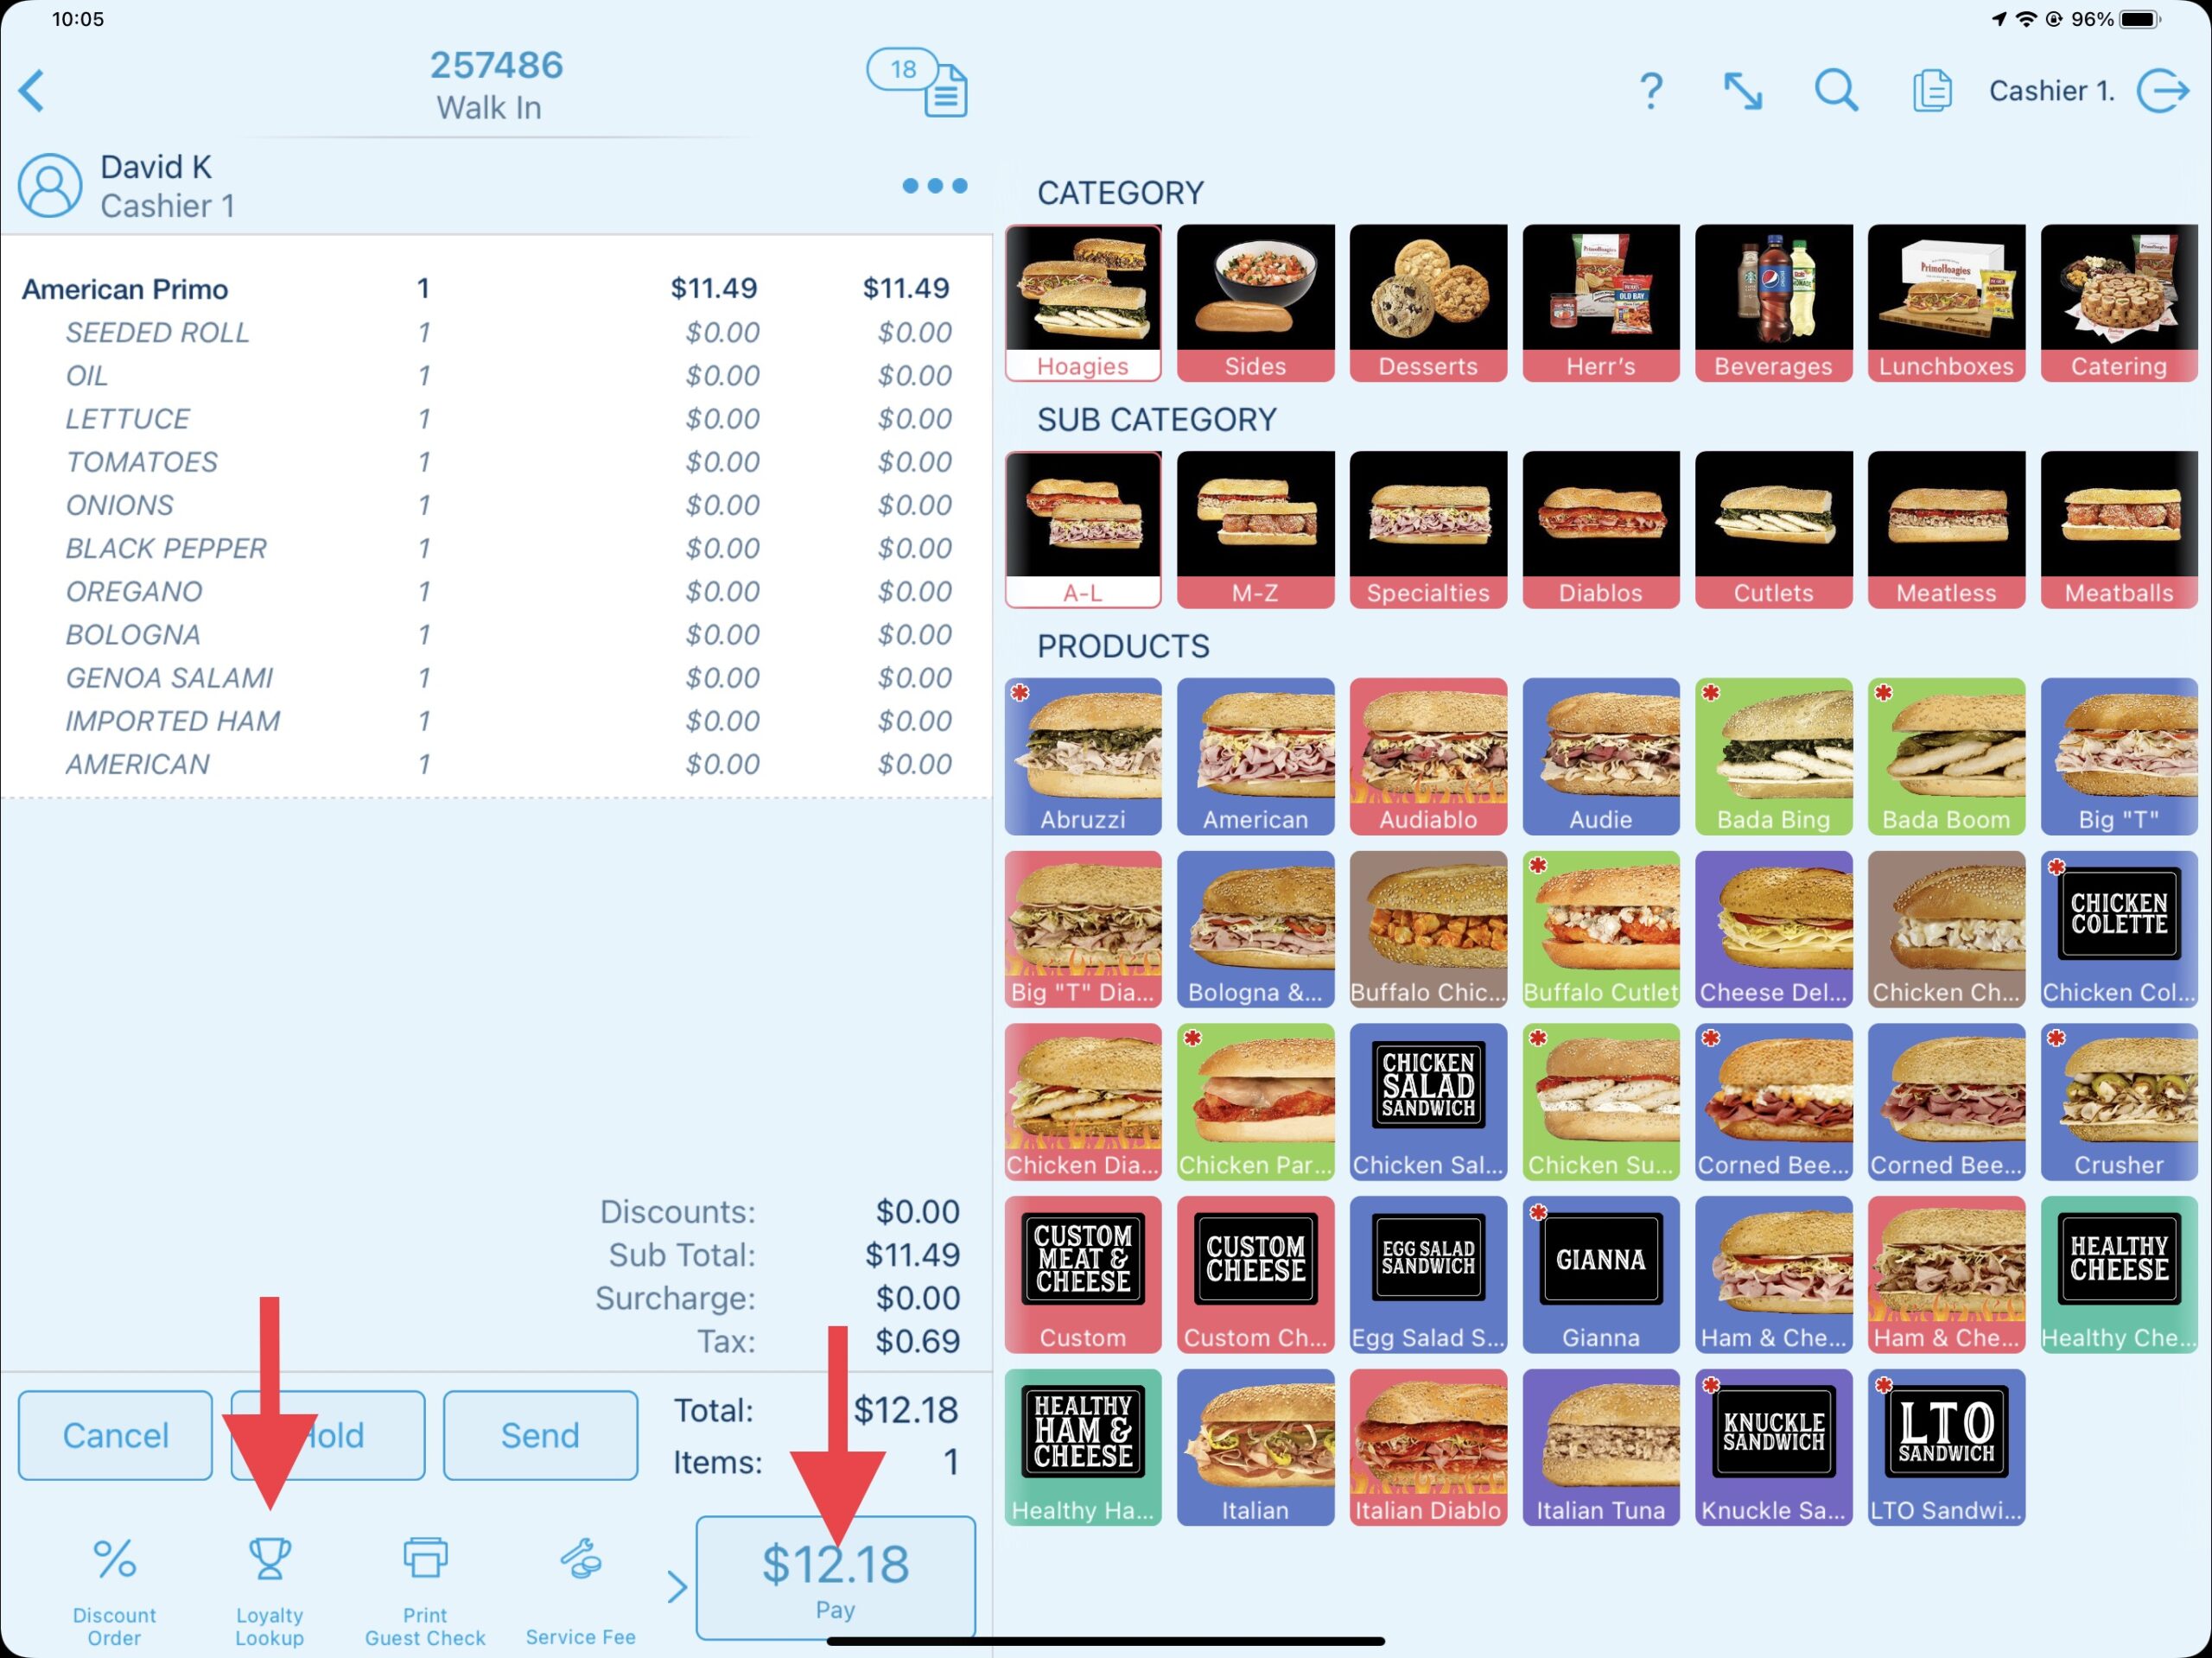
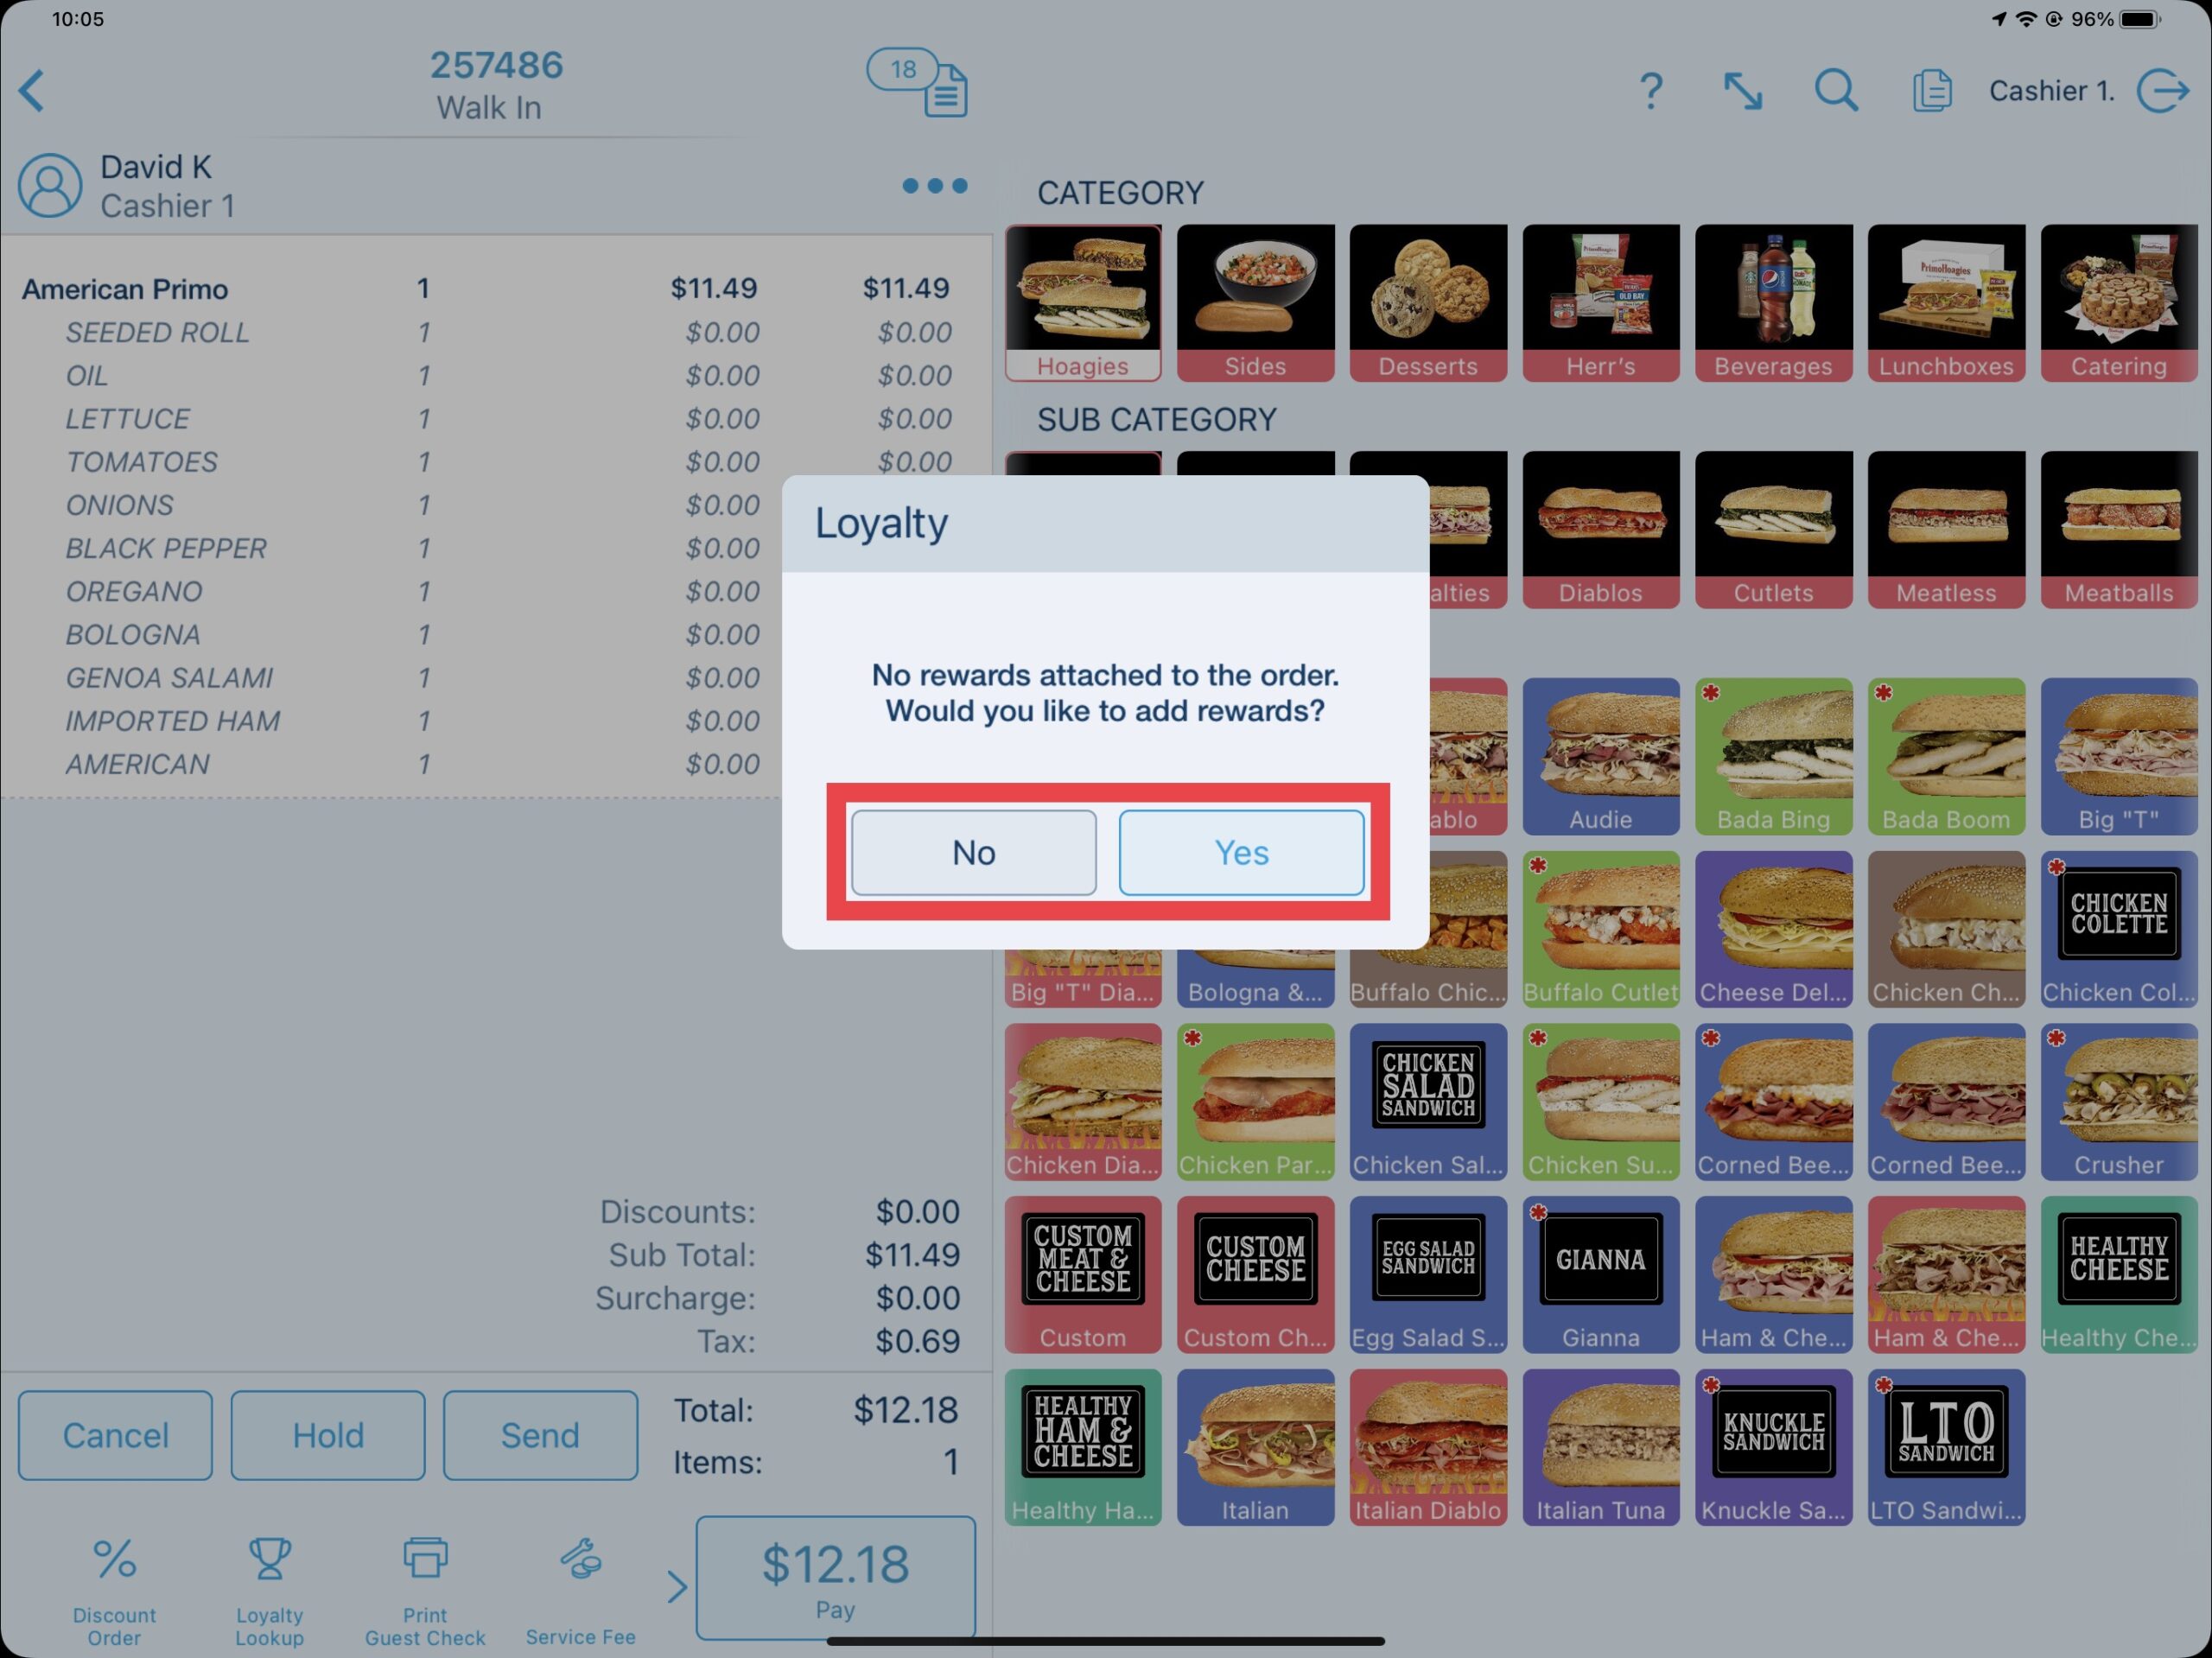
If using the pay button method, you will be prompted to attach a loyalty customer. Selecting No will bypass the loyalty system while selecting Yes will call the Loyalty User Lookup window.
After selecting Yes, enter the loyalty customers phone number then choose next.
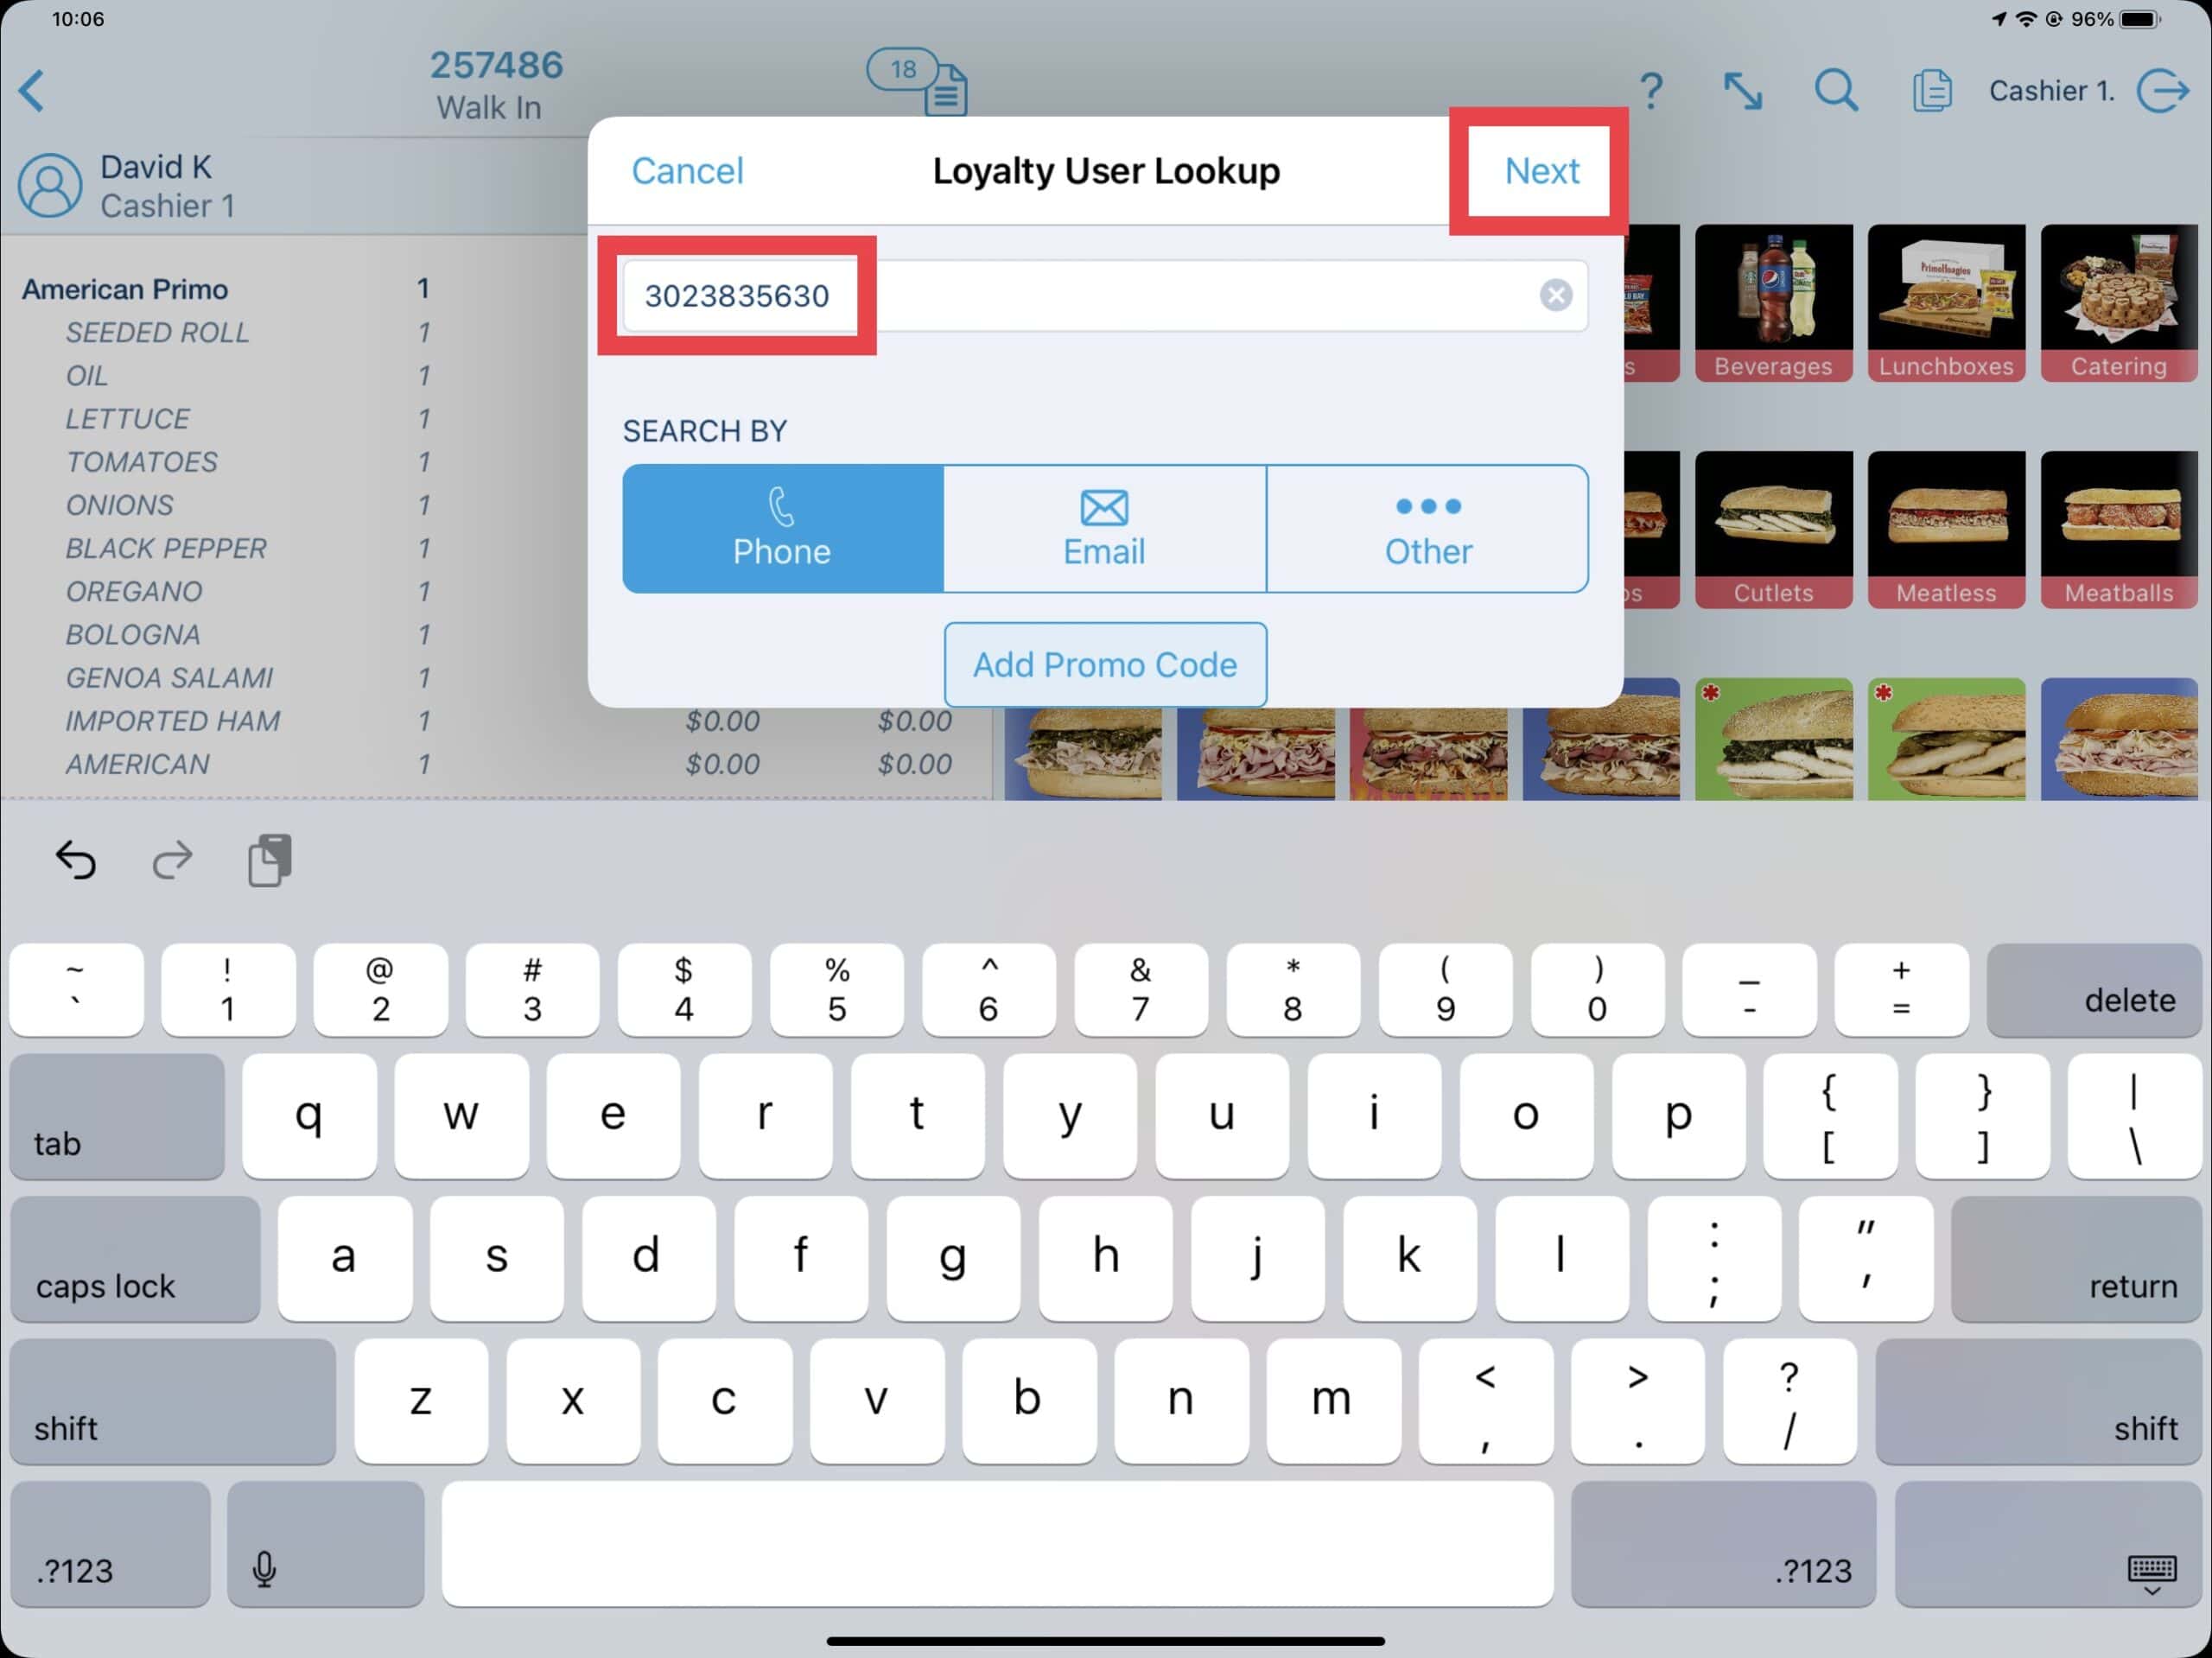
If the phone number is associated with an existing loyalty customer account, the Loyalty User Details window will appear showing account details and available rewards. Applicable rewards may be auto-applied or manually selected depending on pre-defined loyalty discount setups. Auto-applied discounts cannot be removed and multiple discounts may be applied. After selecting an appropriate discount, choose Attach to attach the loyalty customer to the order.
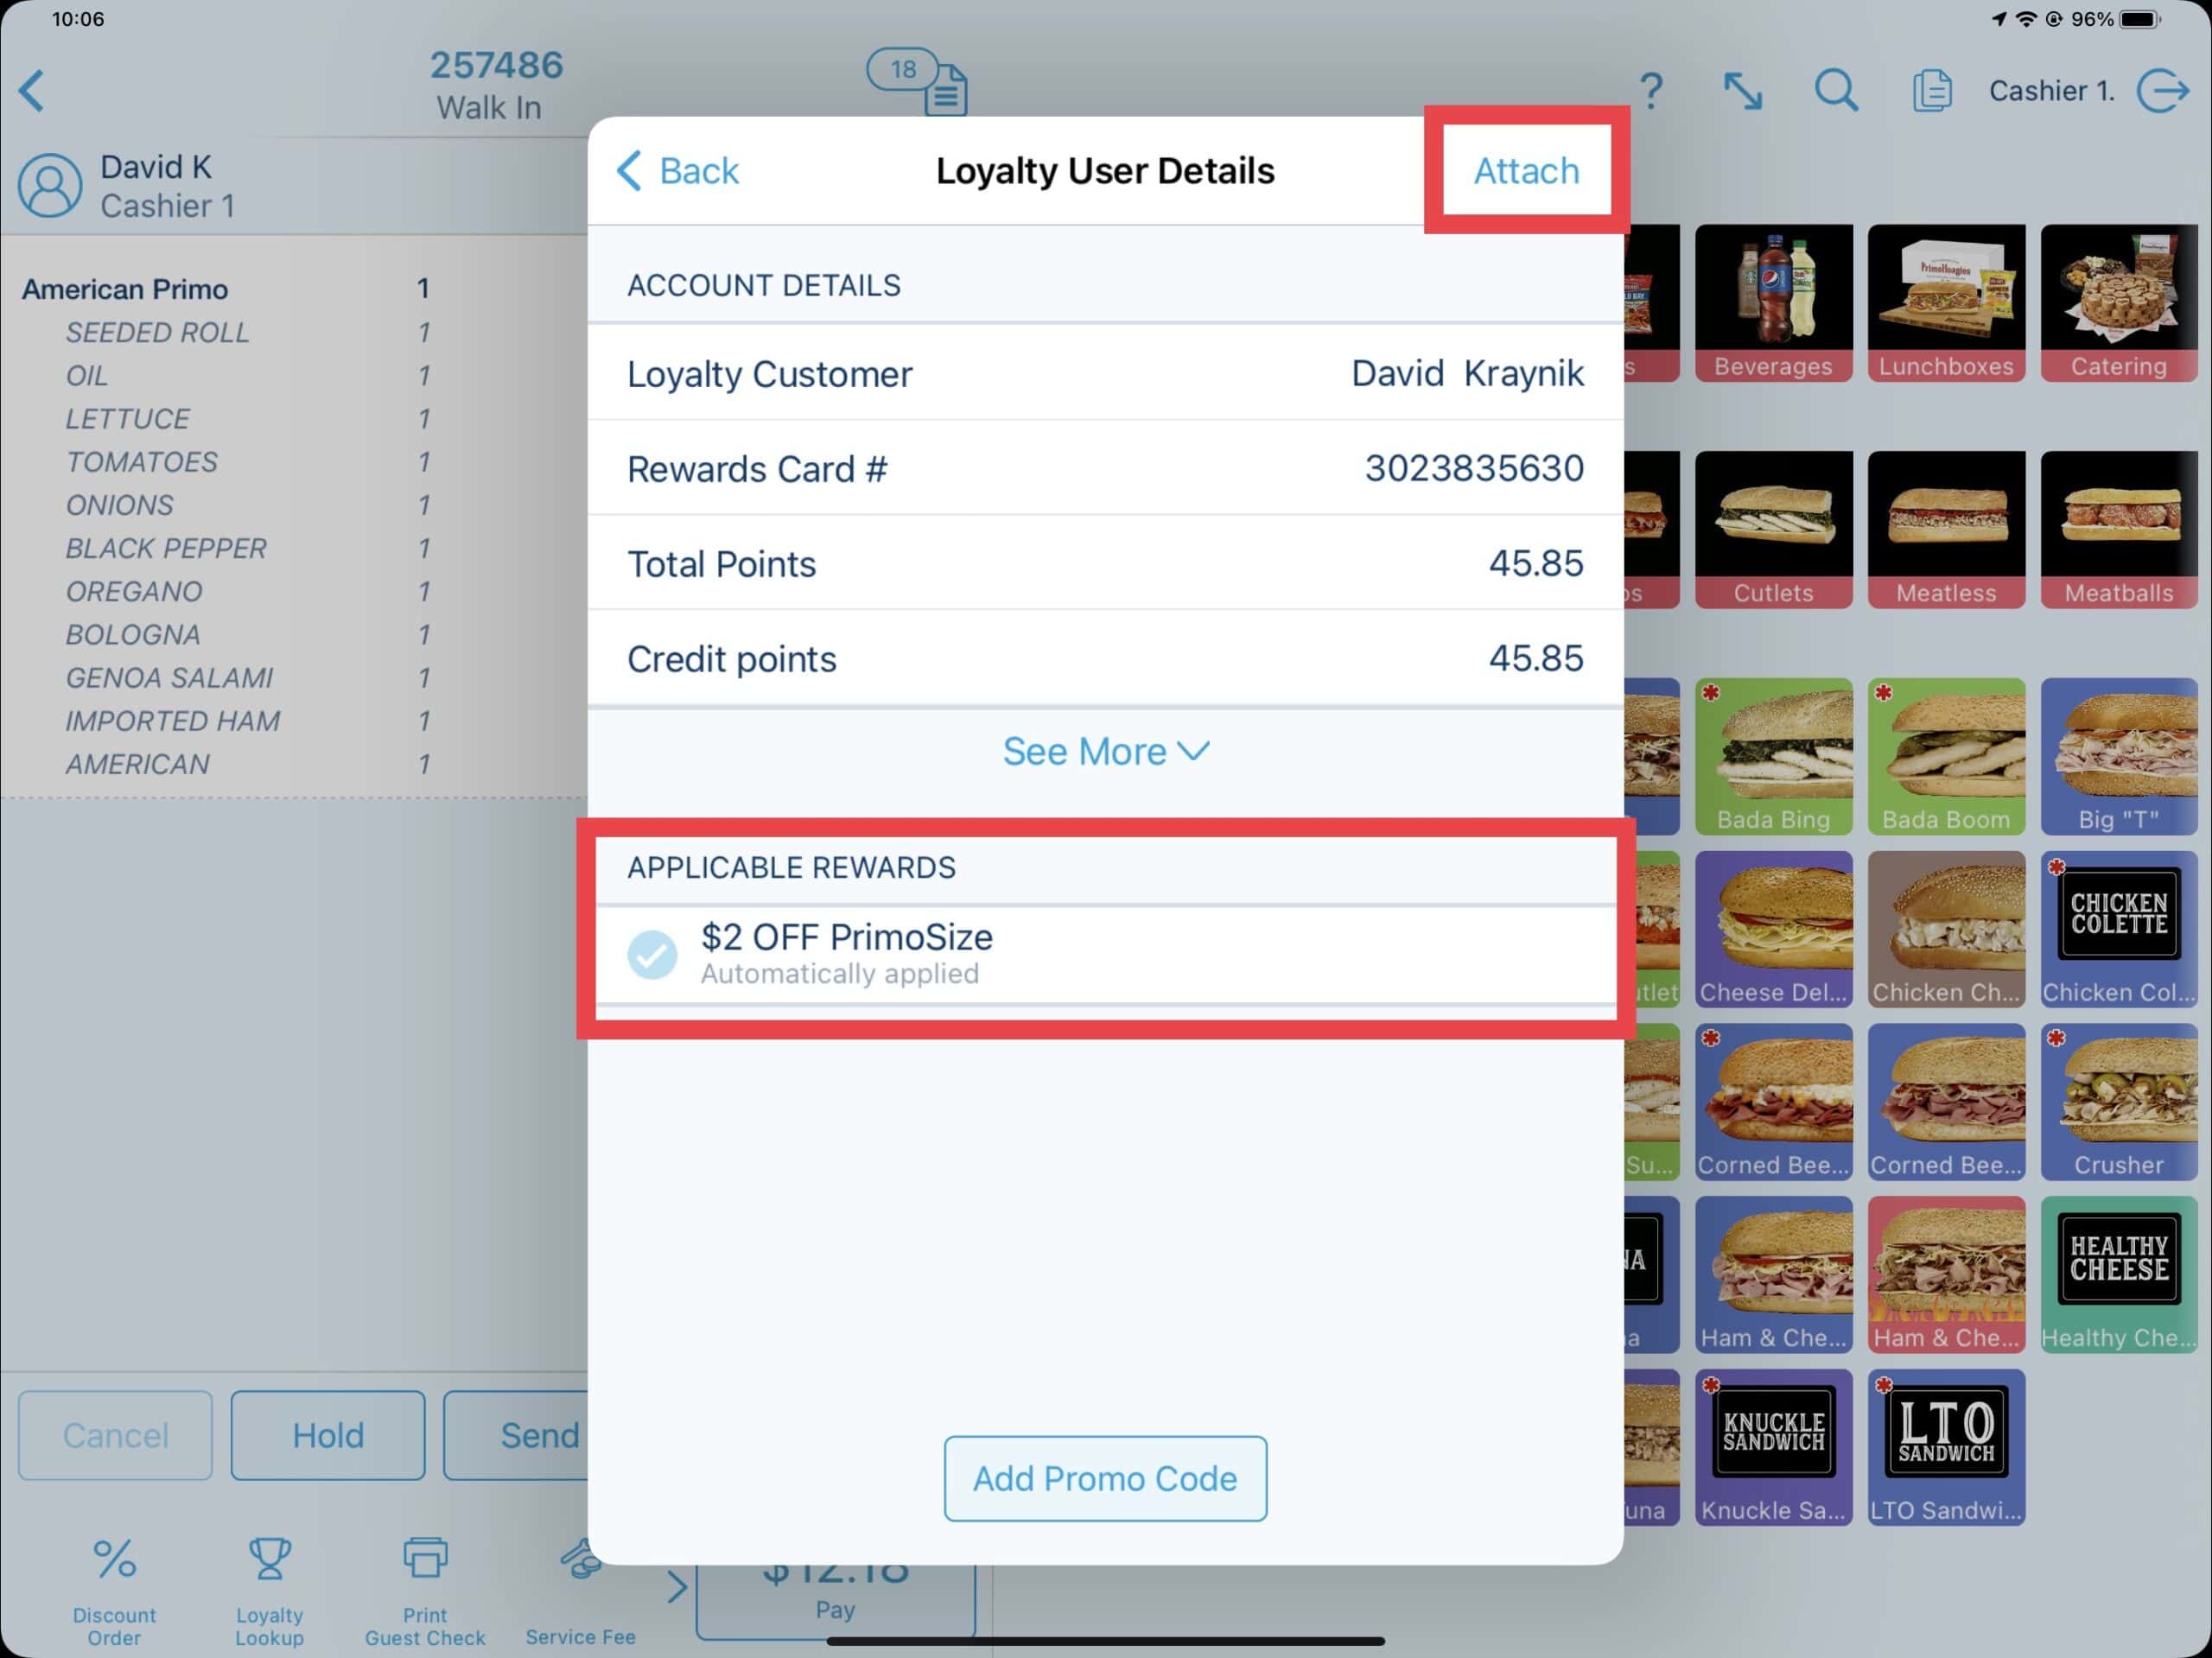
Customers also have the ability to attach their loyalty account to an order at any time during the sale by selecting the Earn Rewards button.
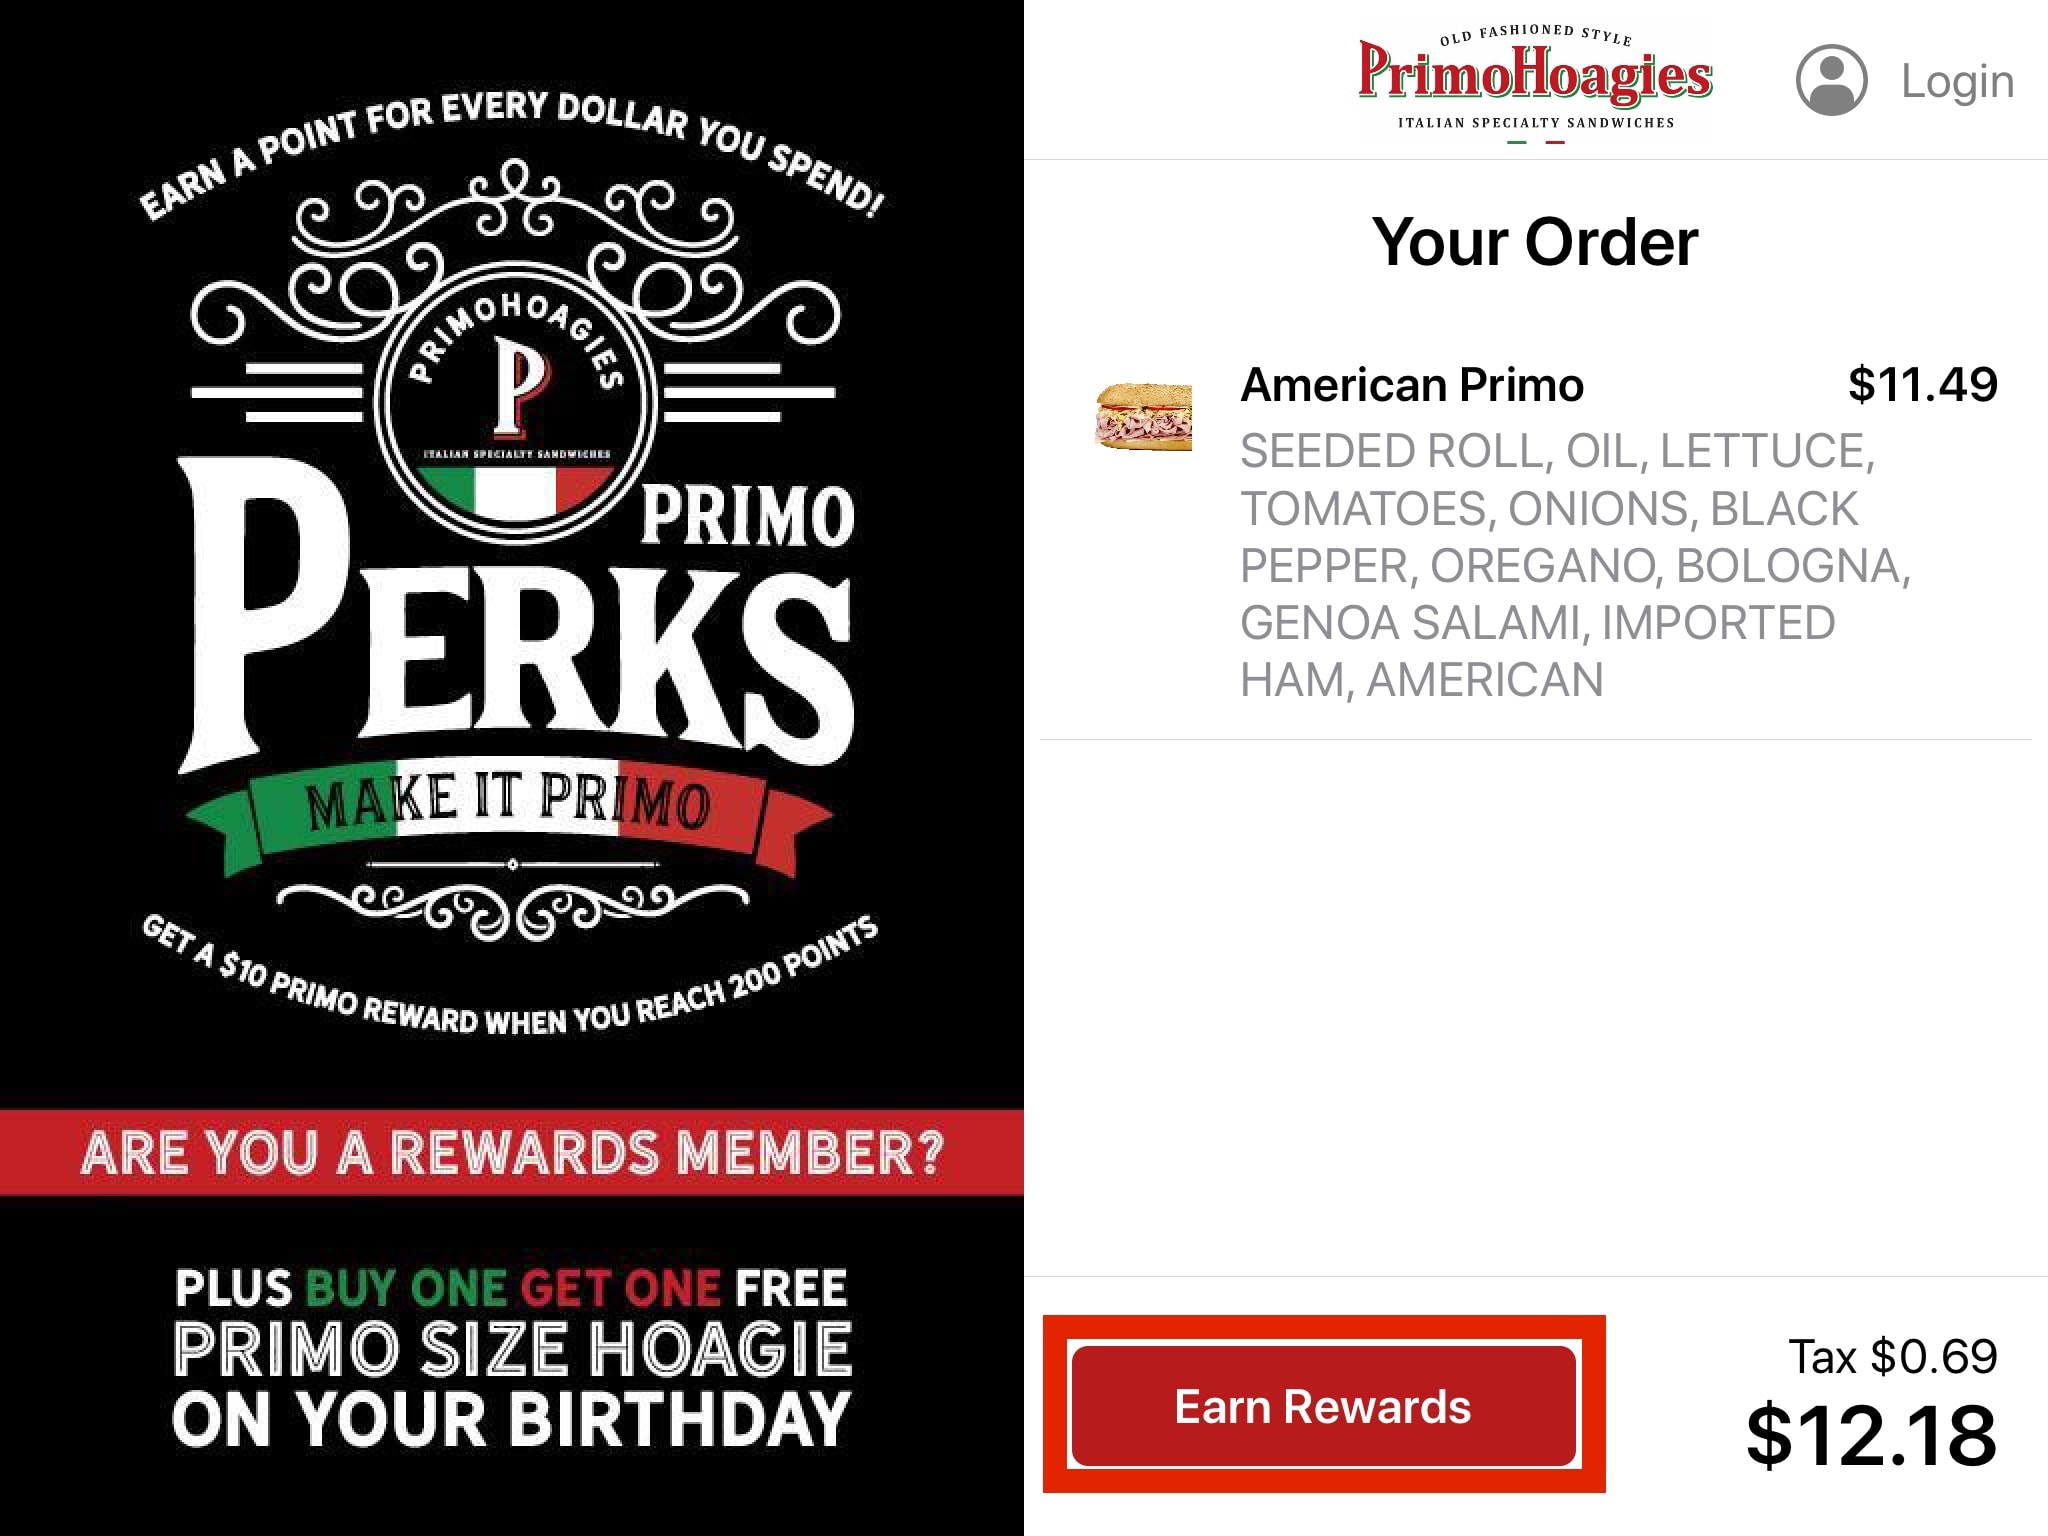
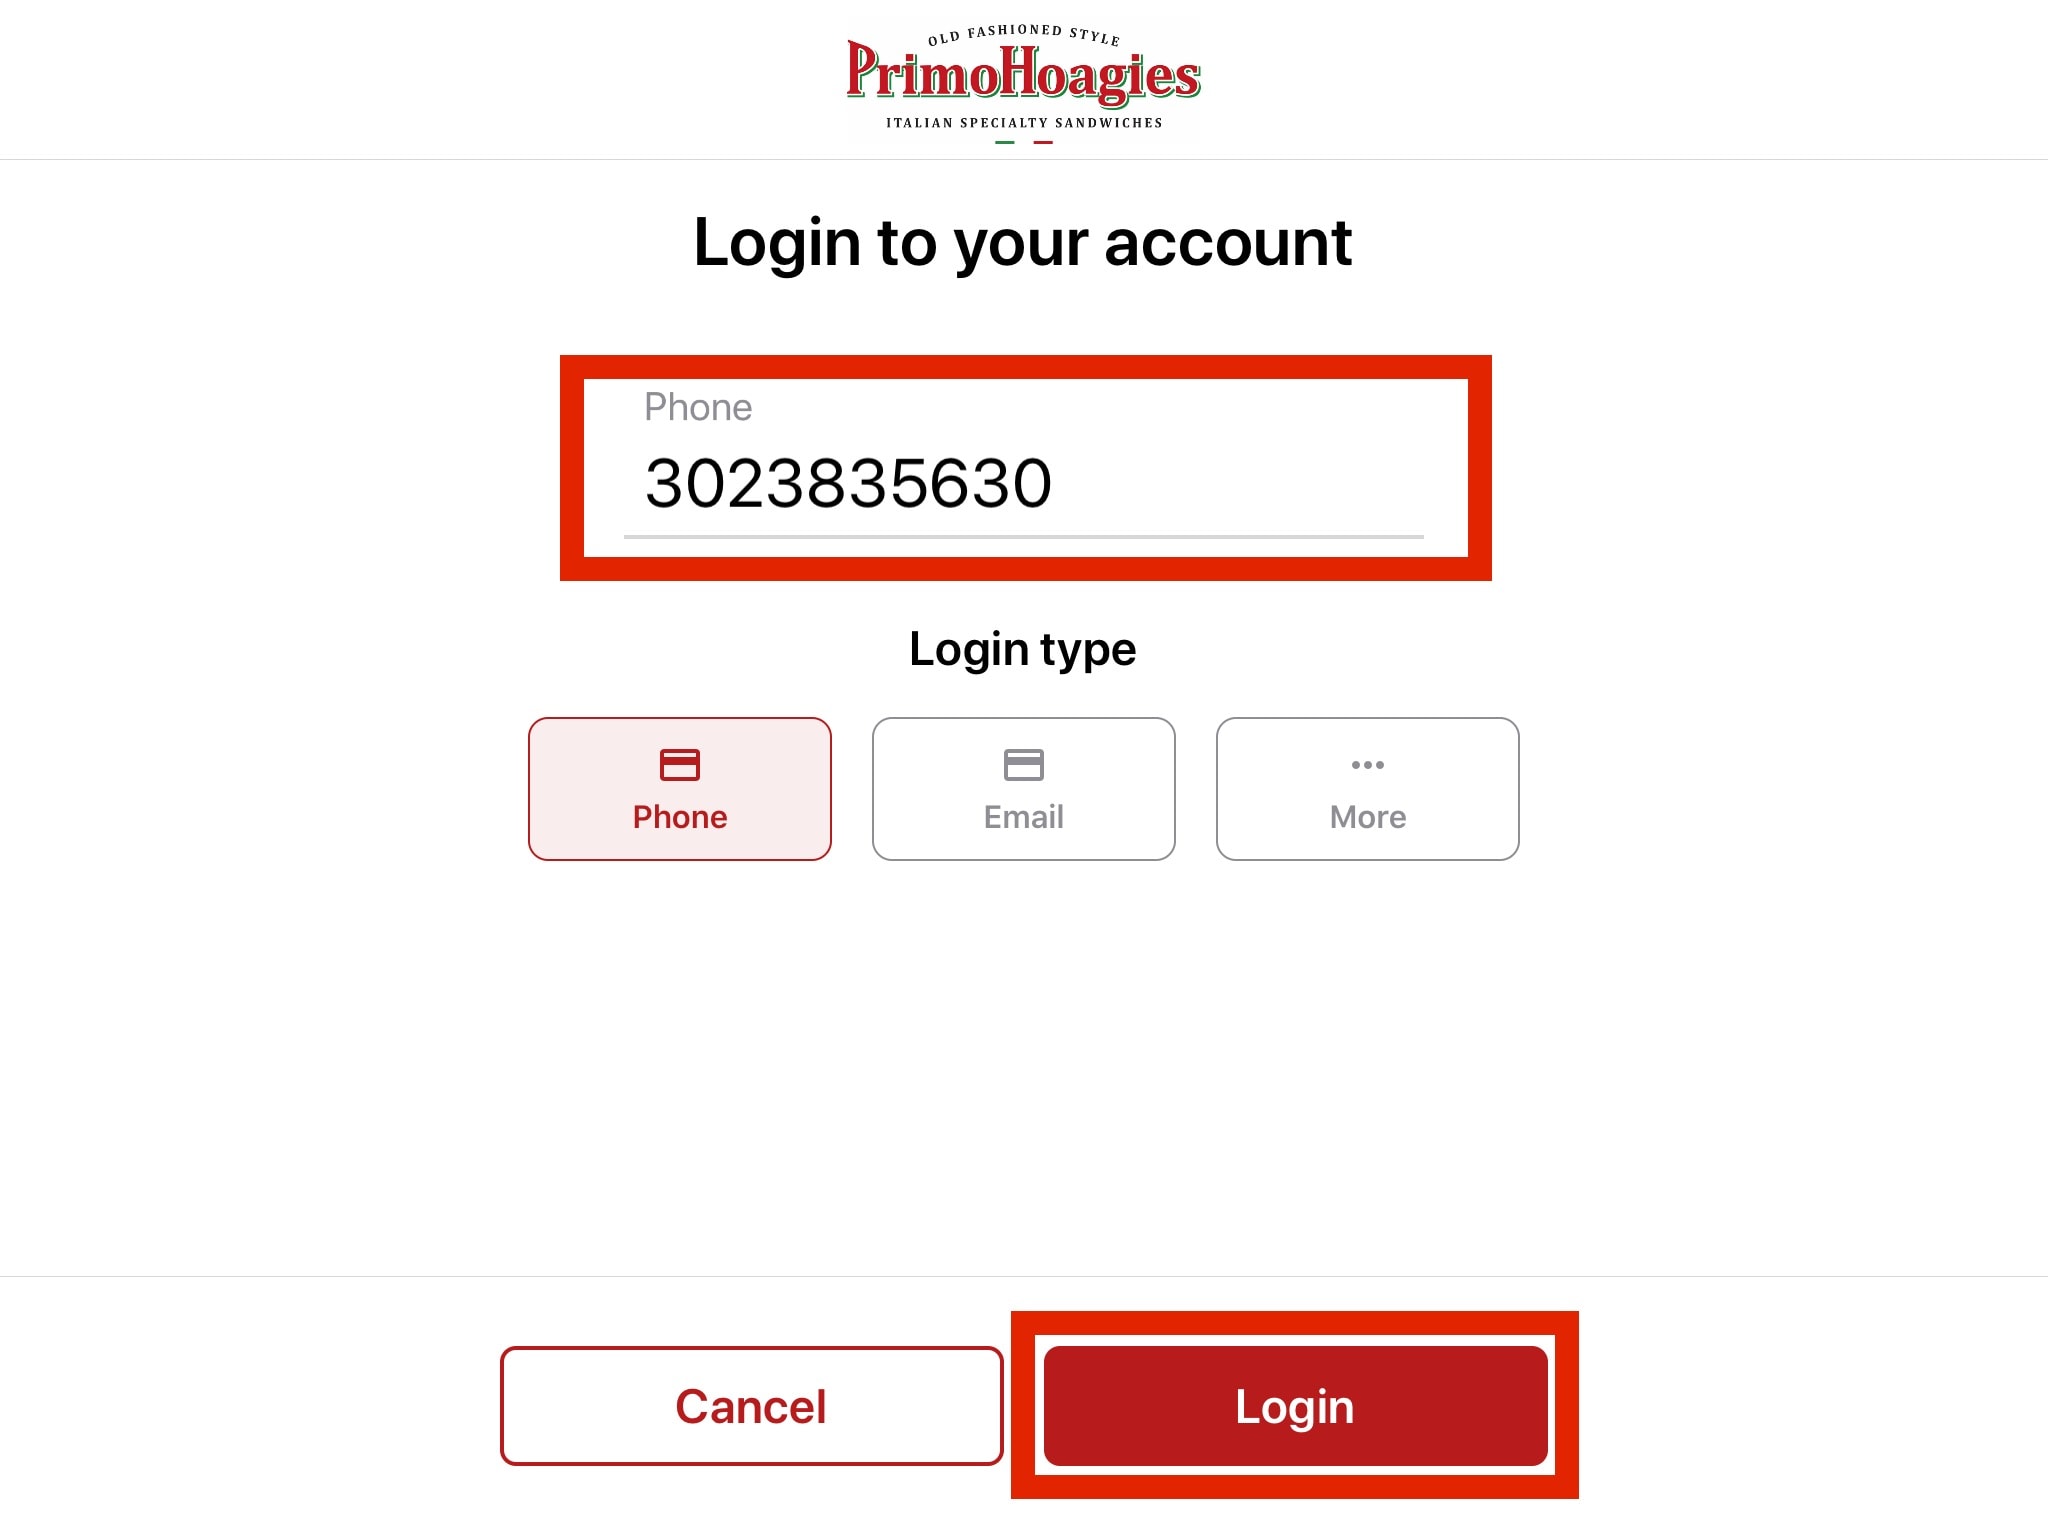
After choosing to earn rewards, customers can log into their account using their phone number. It is not possible at this time for customers to create an account from the CDS.
If successful, the customer will be notified that their account has been associated to the order. The cashier will also receive a notification bubble that the account has been associated from the CDS.
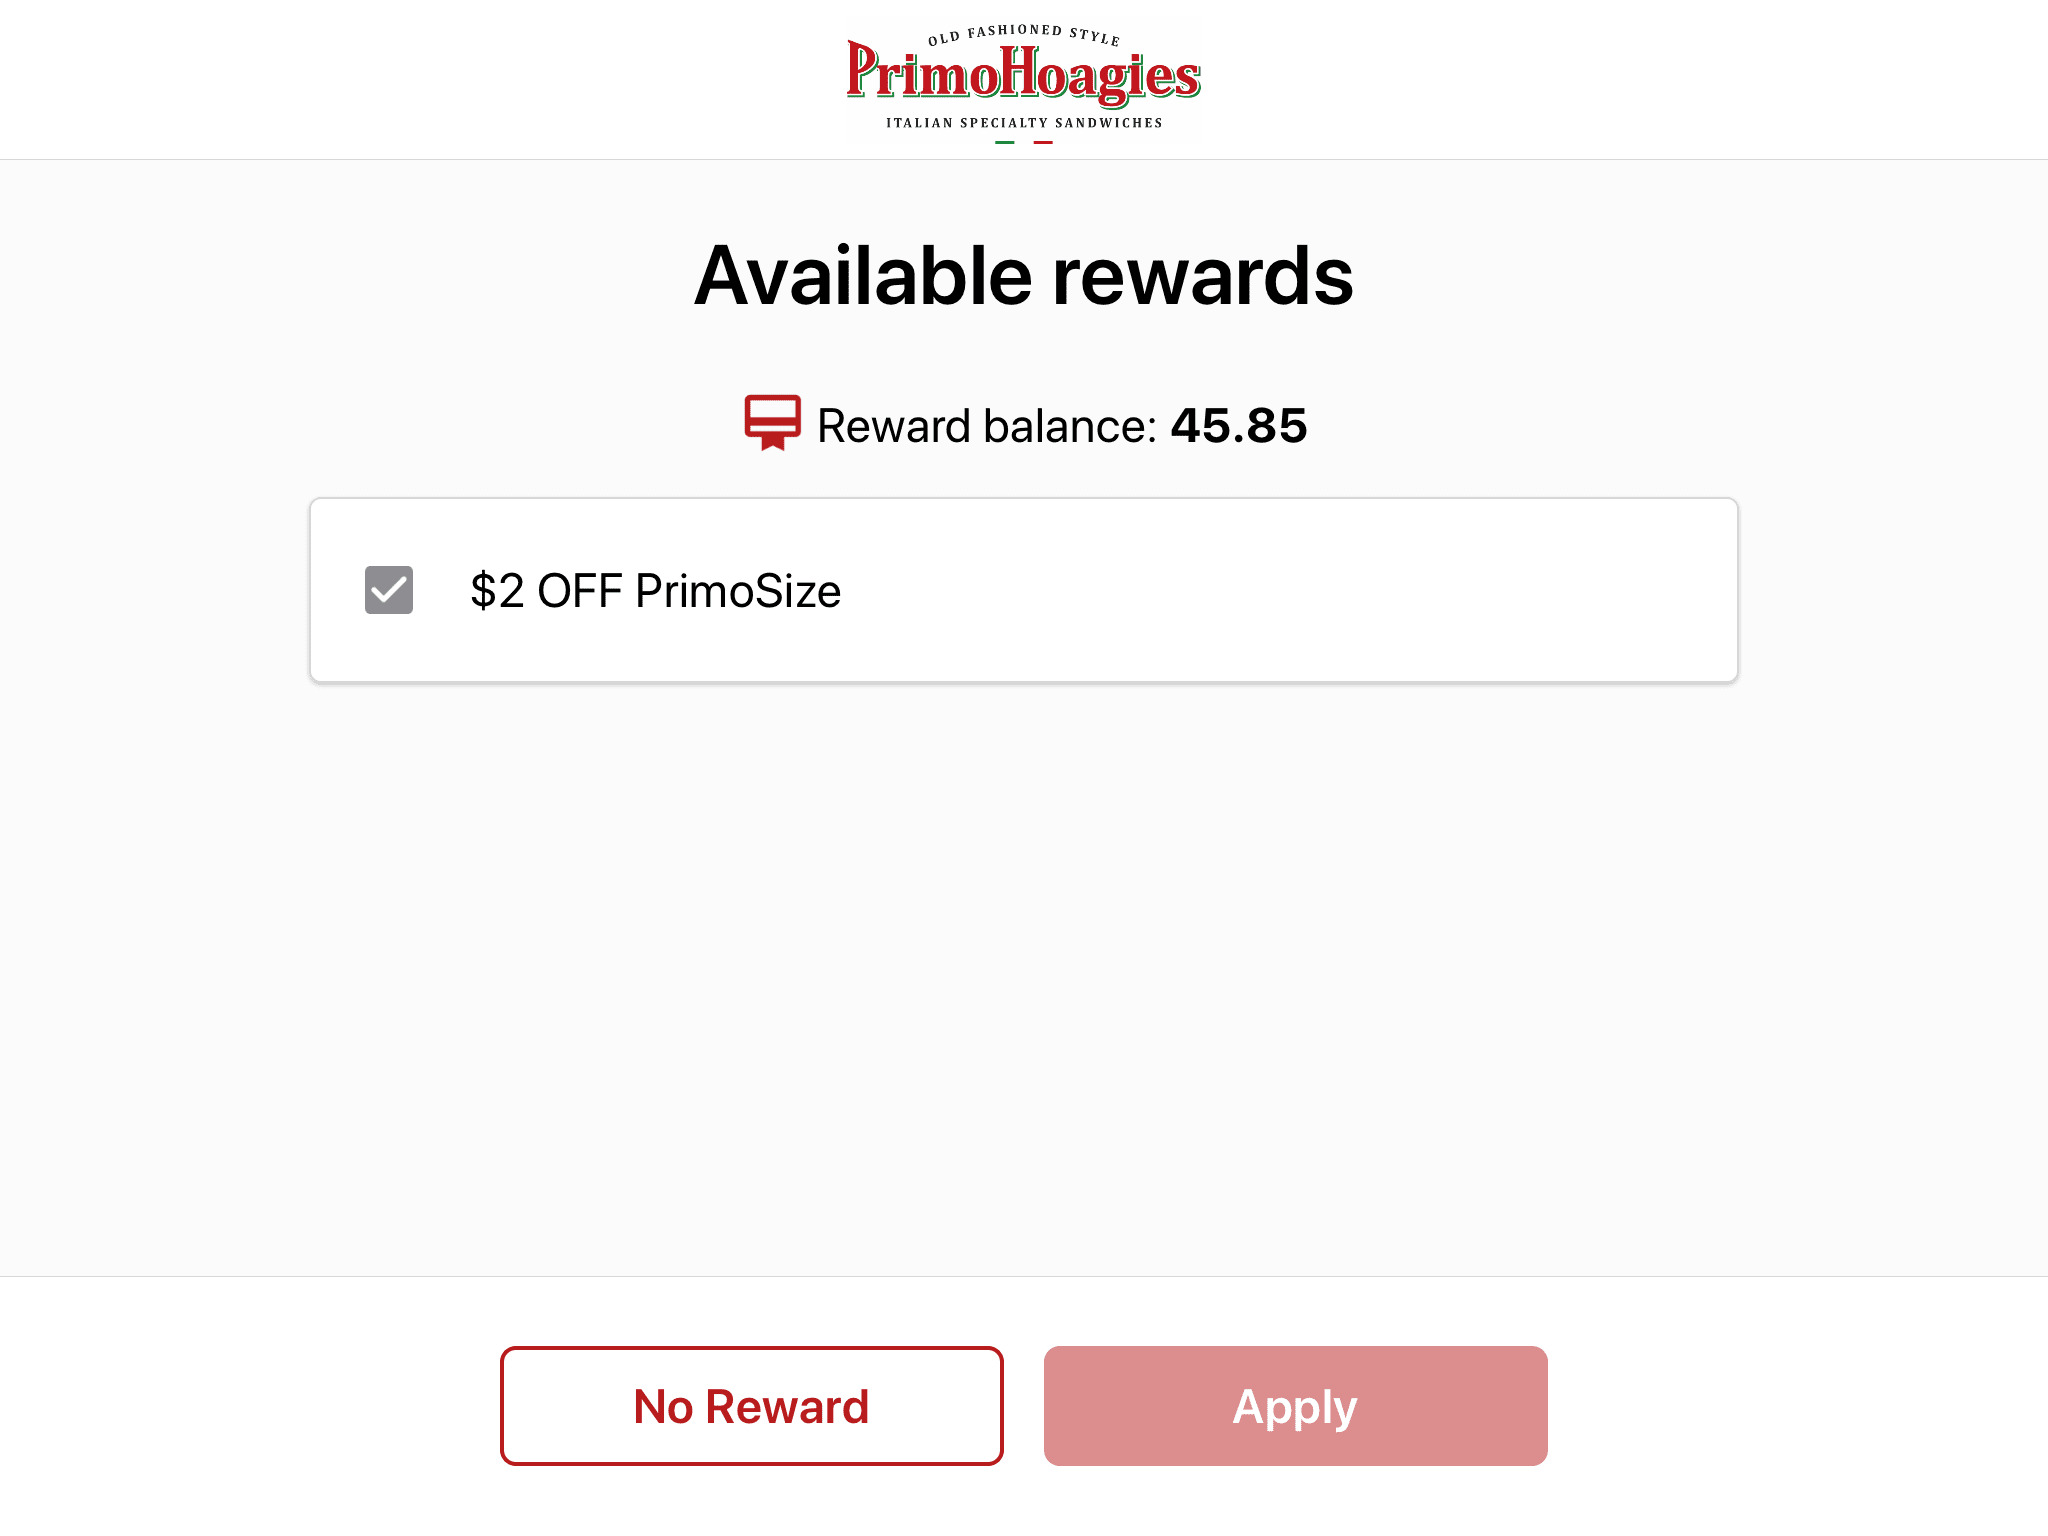
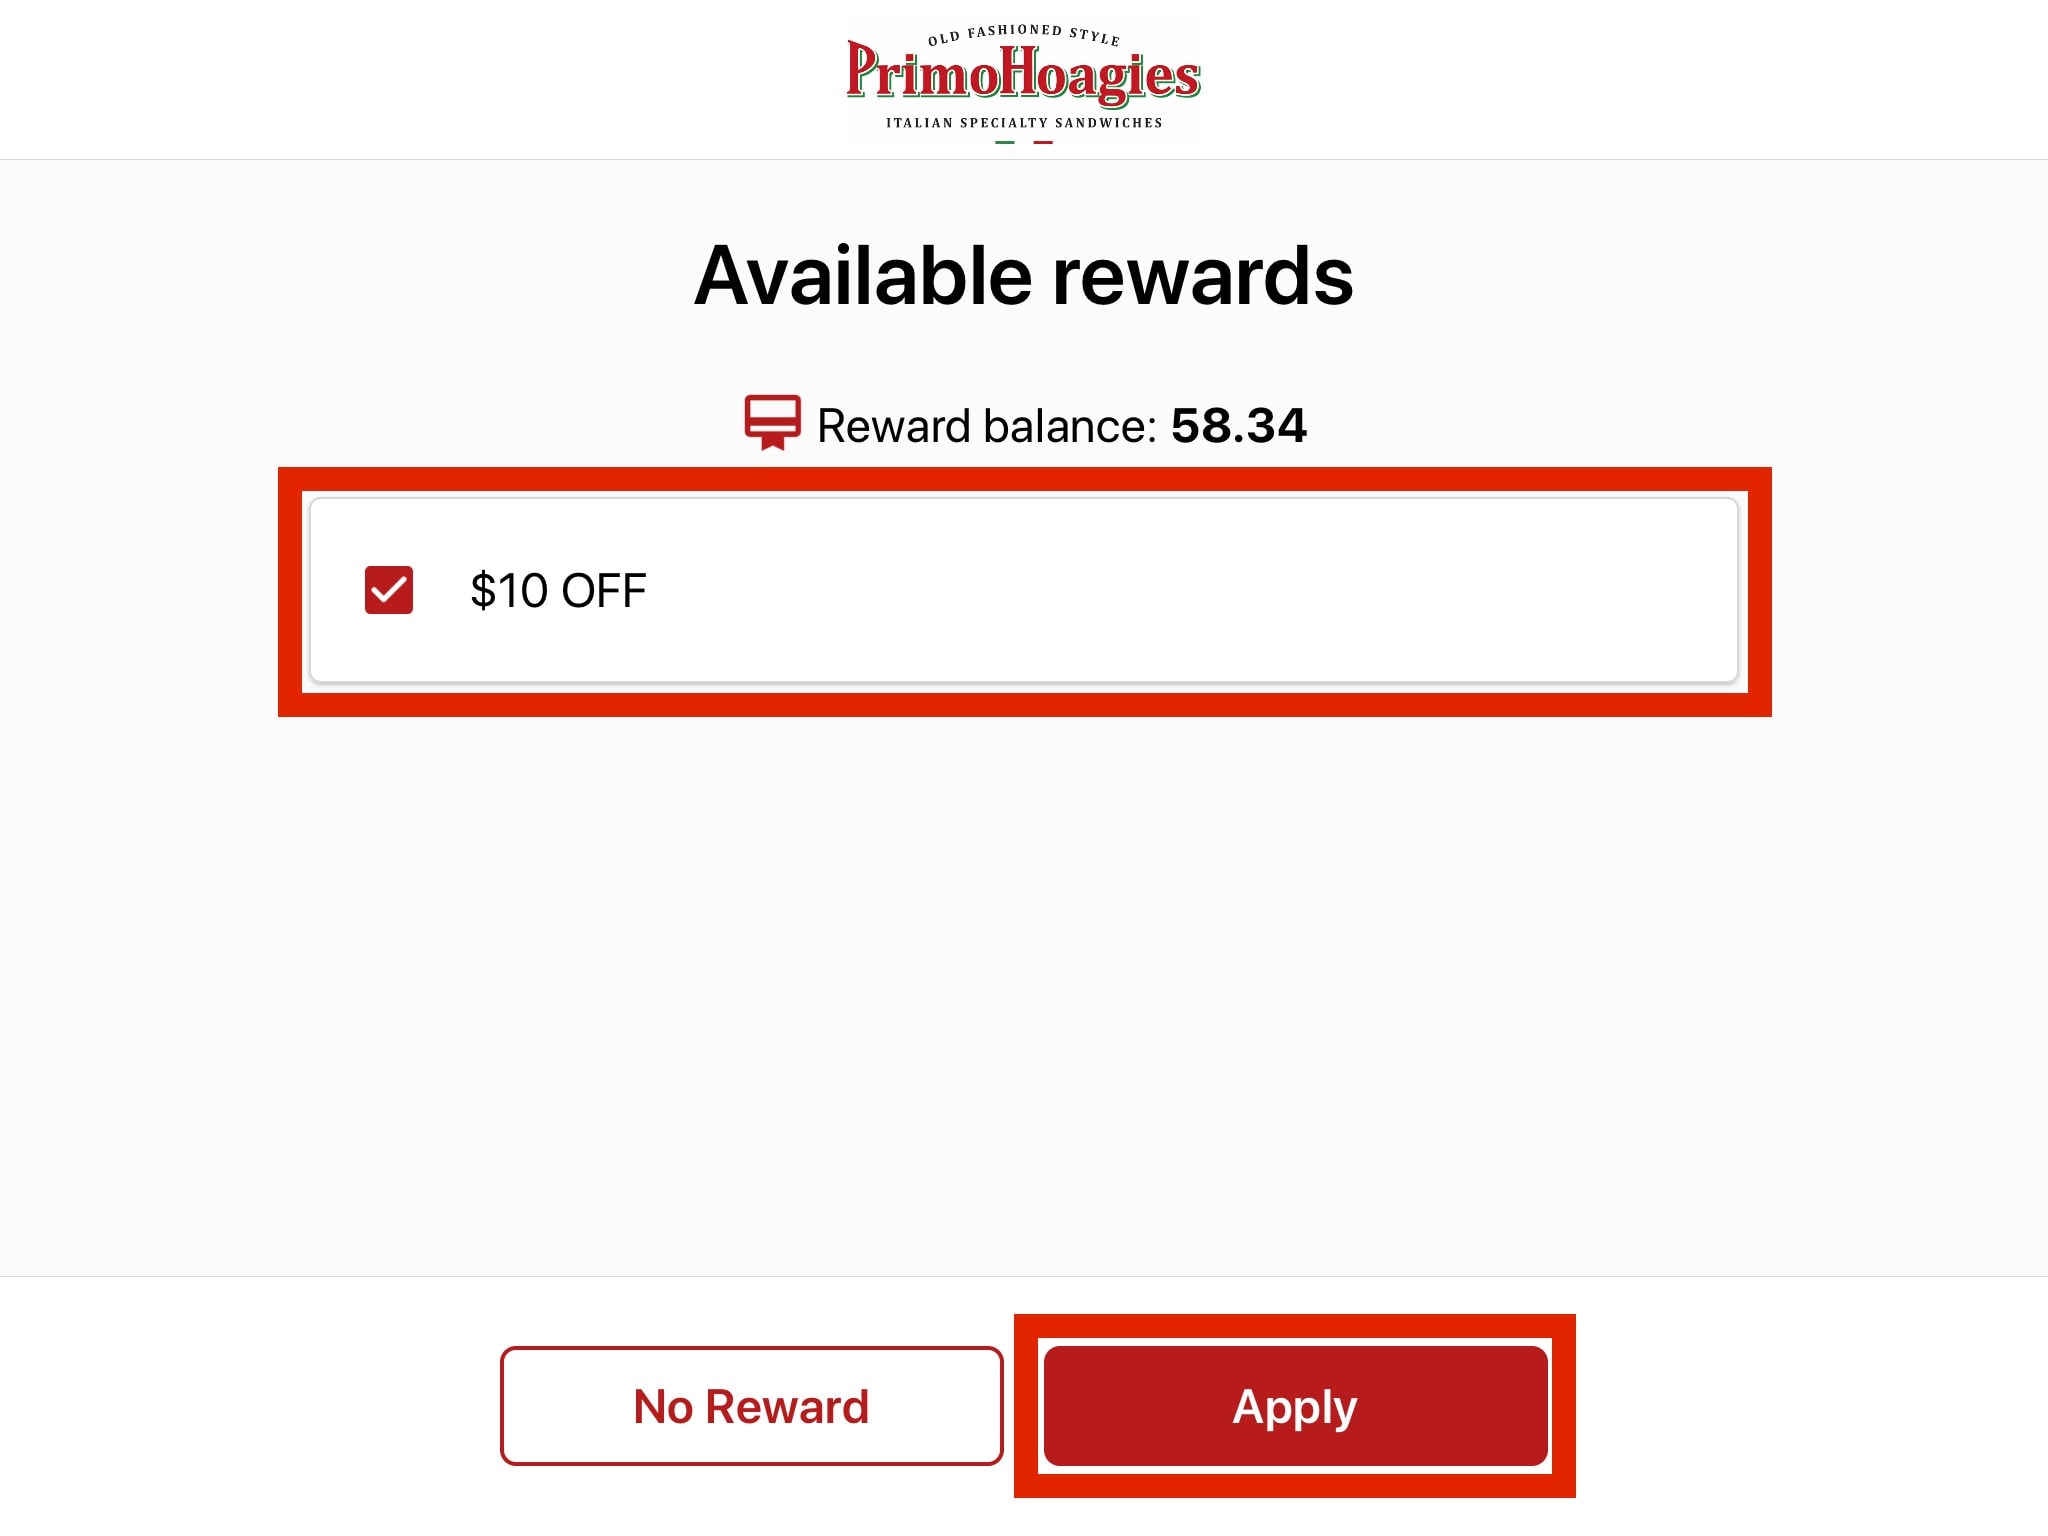
Any available rewards are displayed. Auto-applied rewards cannot be removed however optional rewards can be selected by the customer and applied.
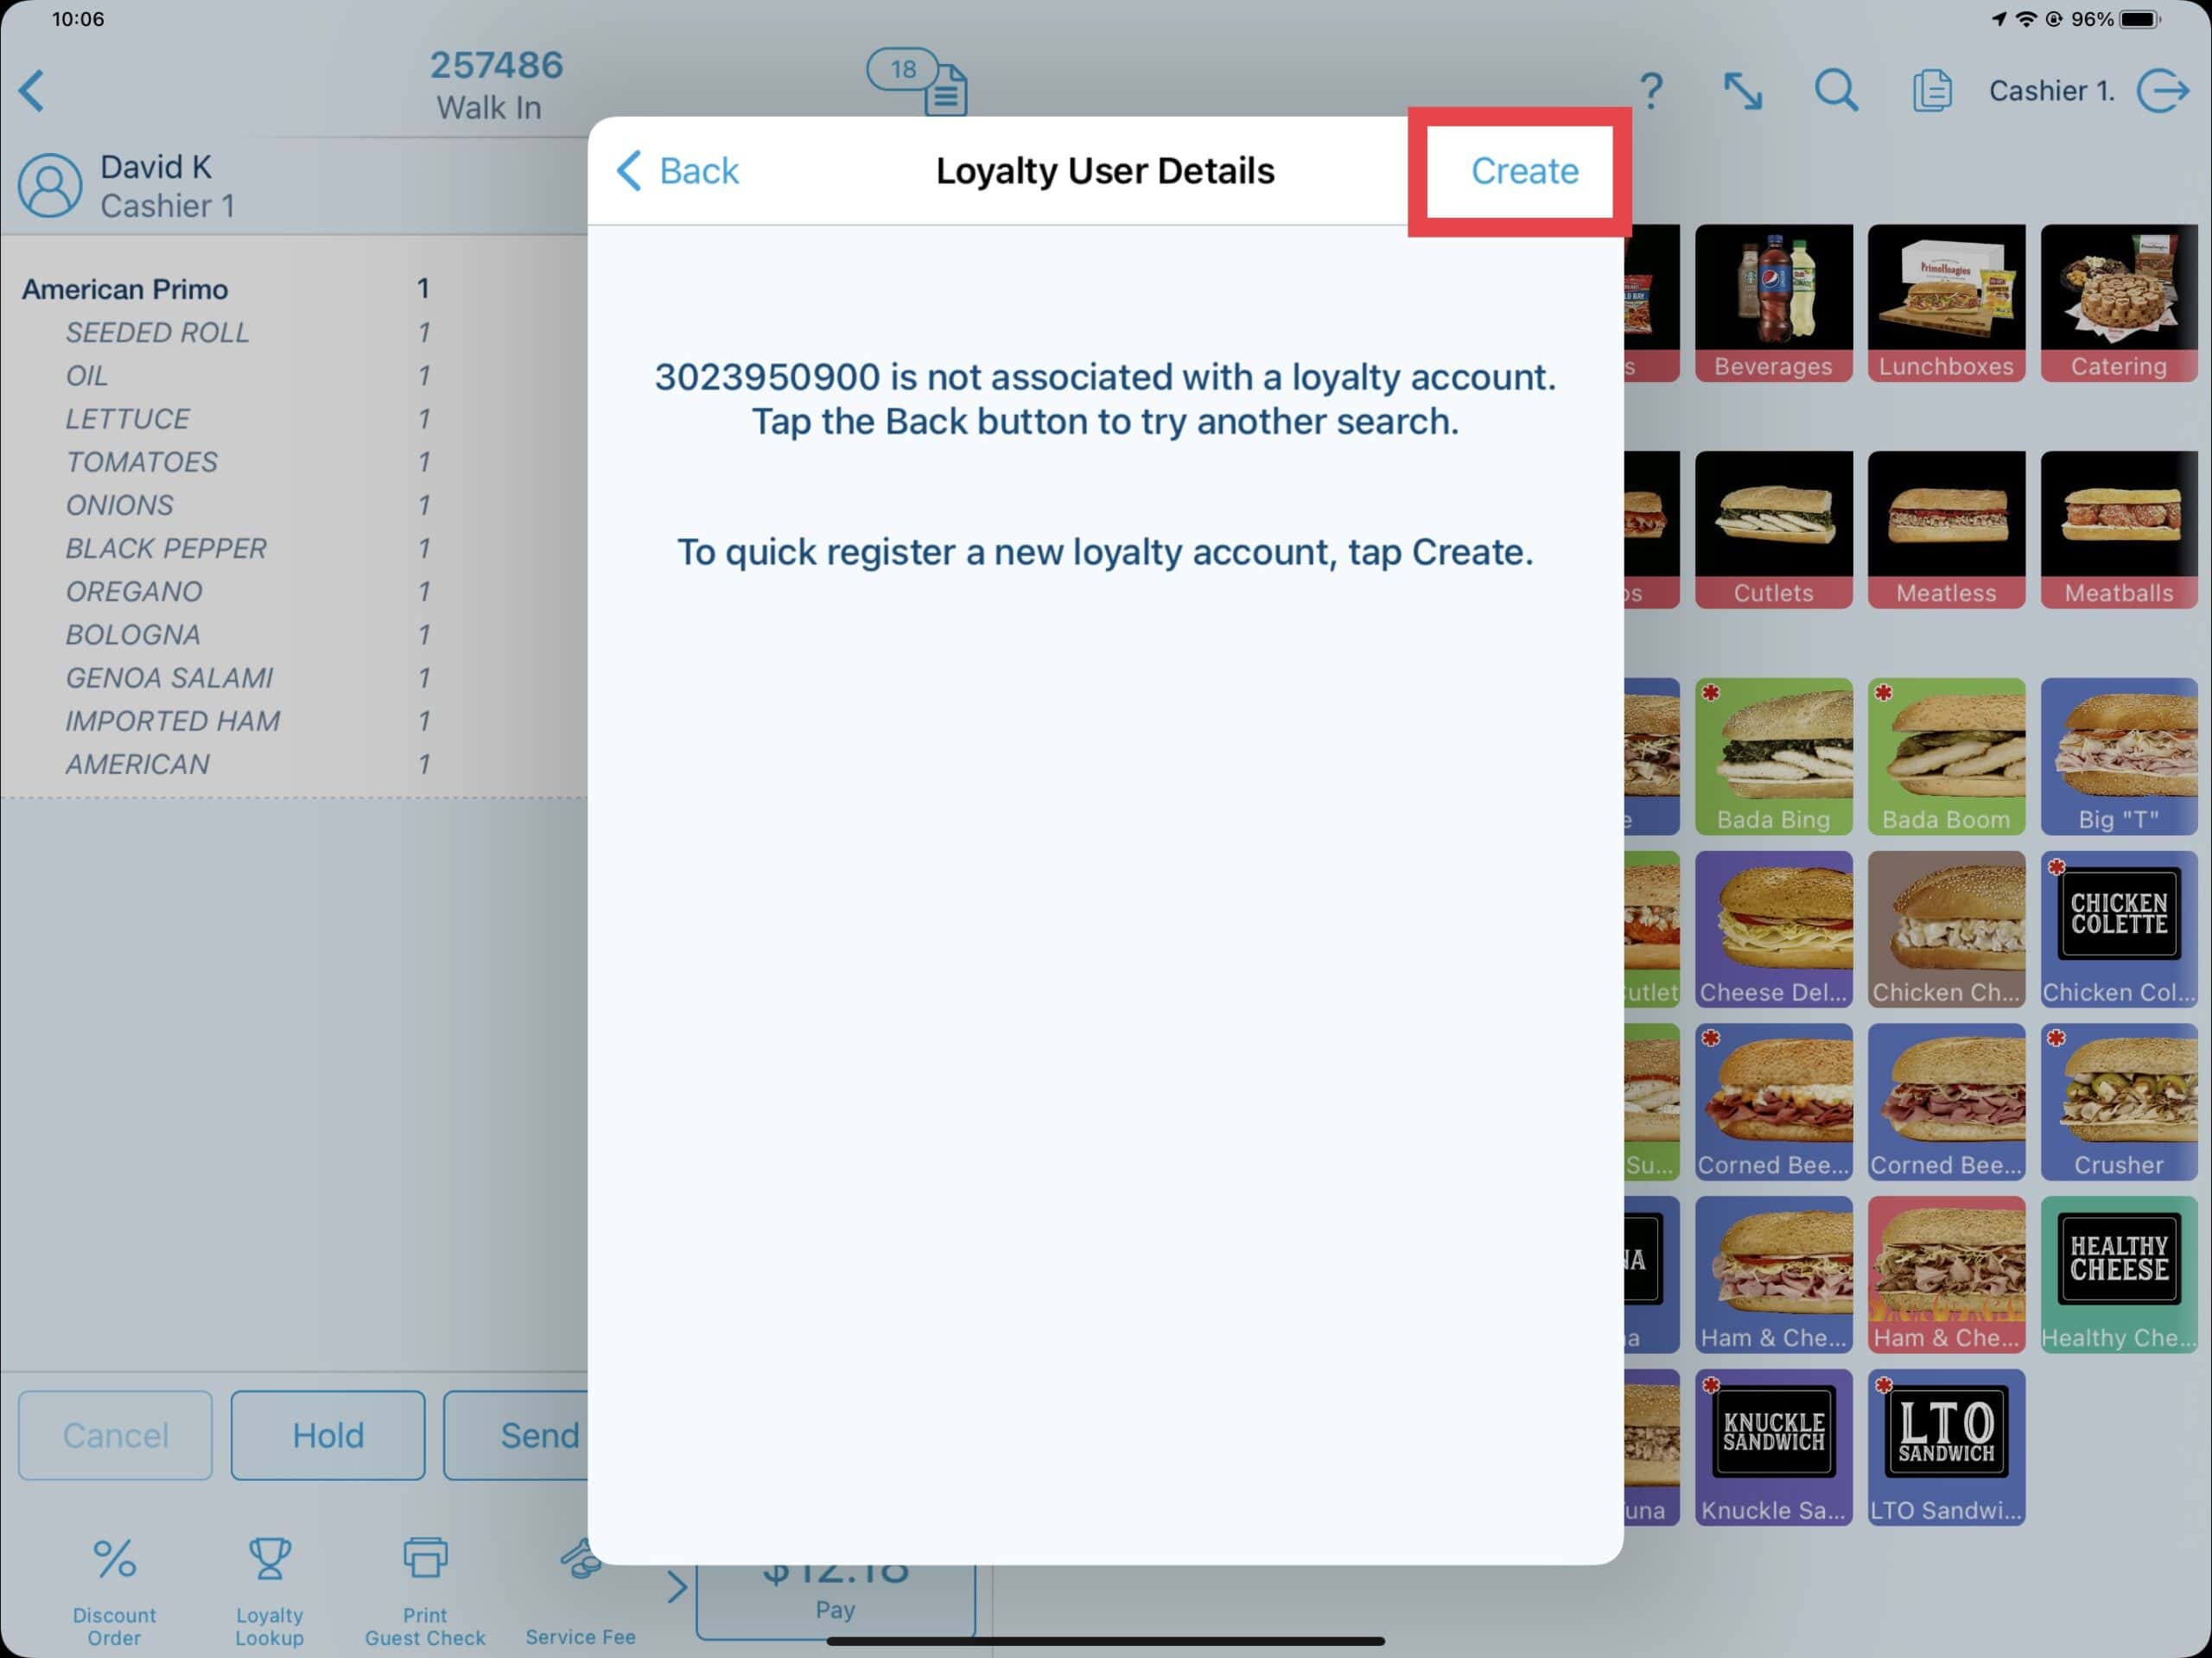
Creating New Loyalty Customers
If a phone number is not associated with a loyalty customer while completing the above process, you will be asked to create the new account. Select Create on the top right of the window.
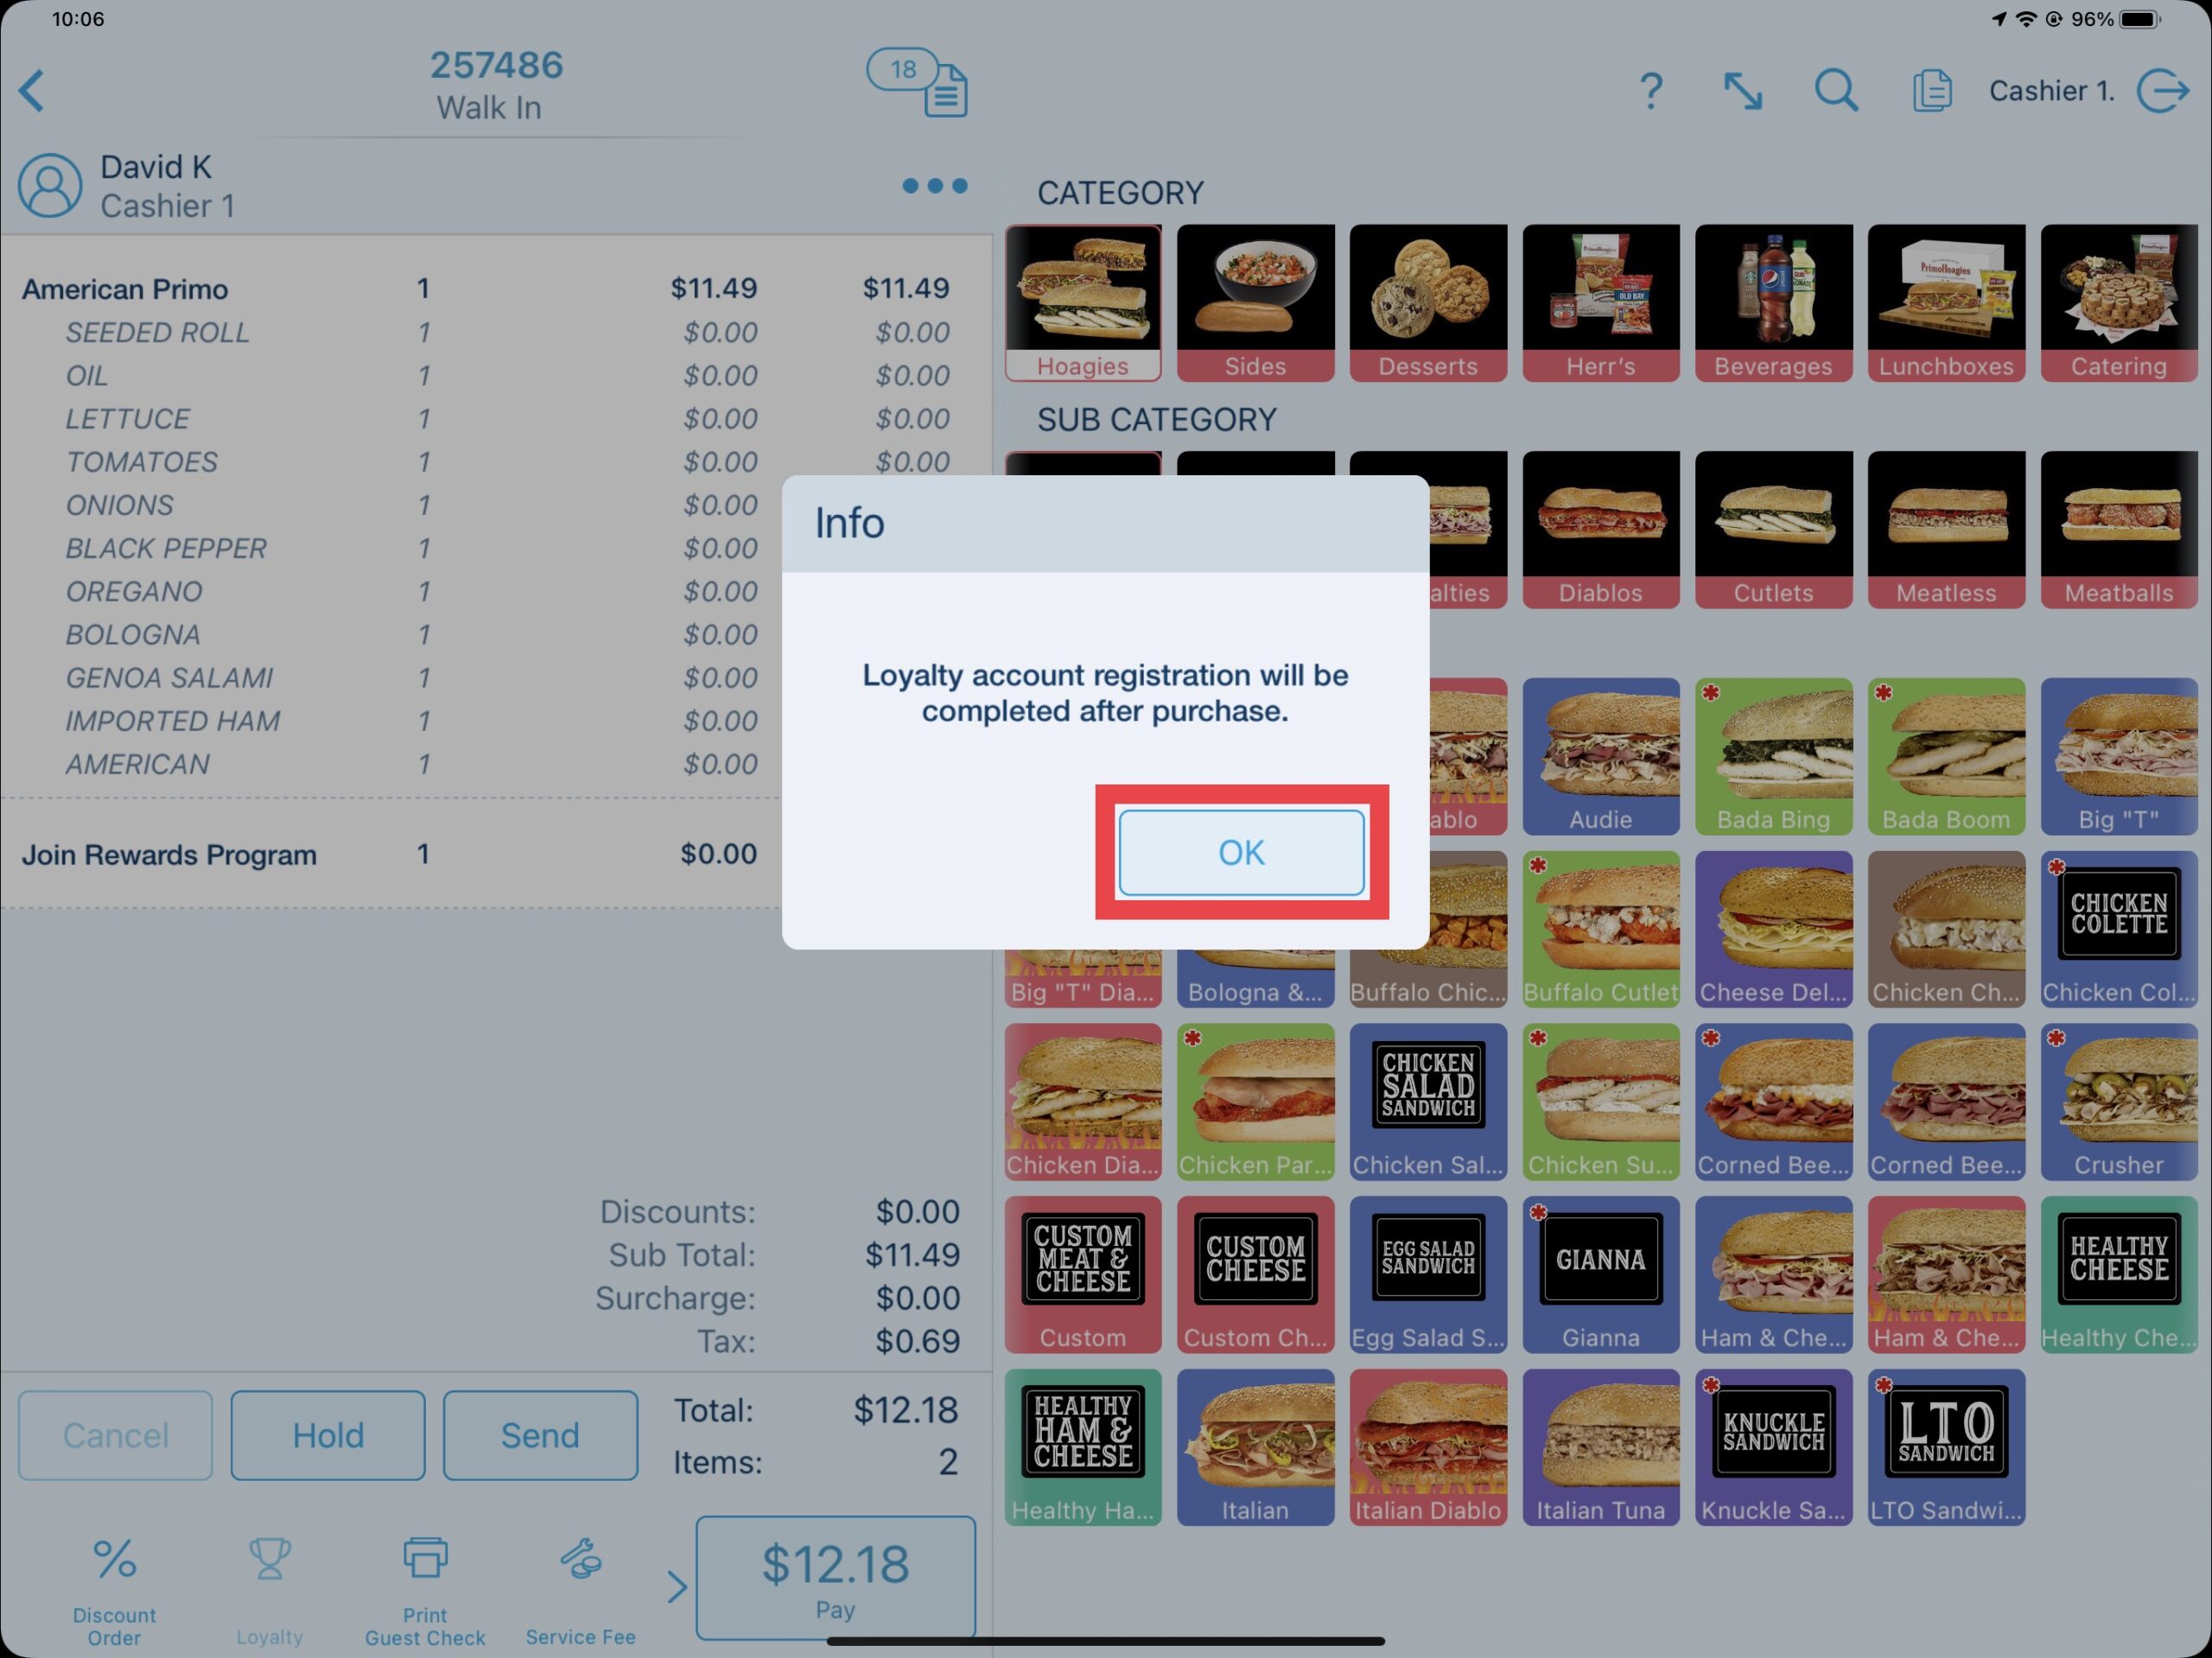
A final notification prompt will warn that the account will be created after the current purchase. Any points for the current transaction will be accrued to the account however no reward offers will be available until the next purchase or after.
Updated 06/15/2022

Summary
The PrimoCares Donation program runs throughout the holidays starting in early October. Customers can choose to donate or round up their change at the time of payment and that dollar amount will be donated to a PrimoHoagies charity.
Adding Donations
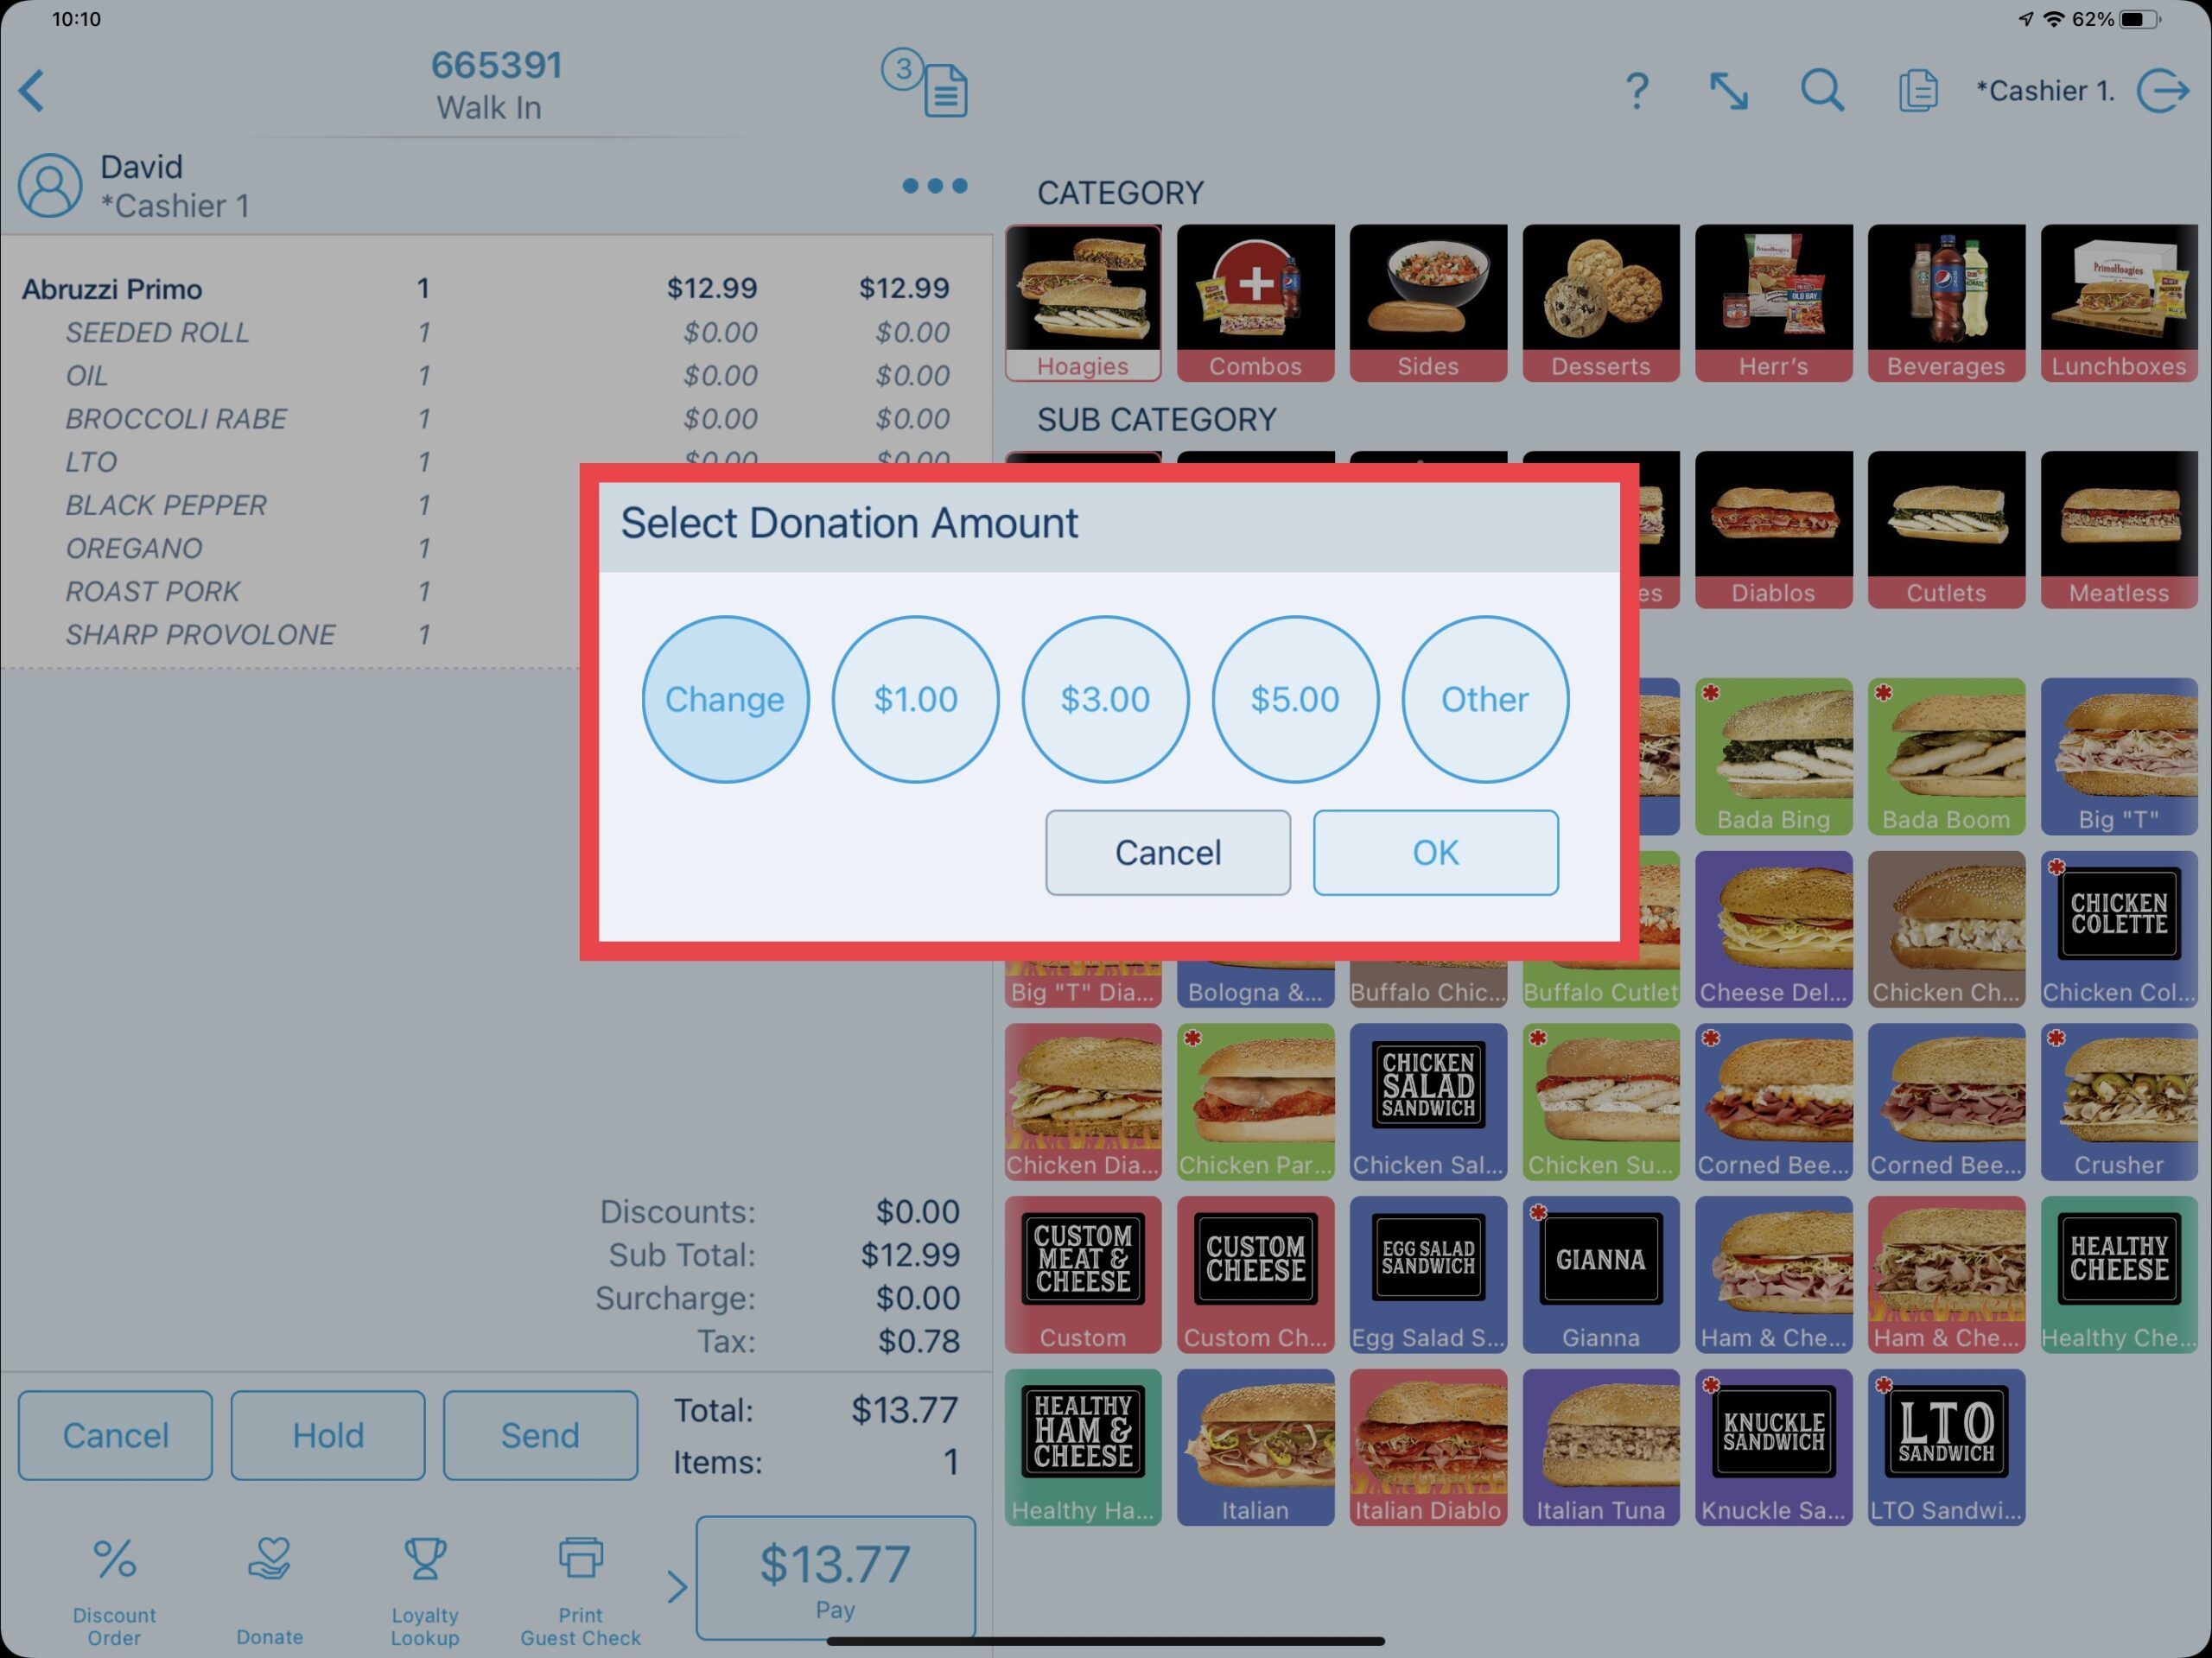
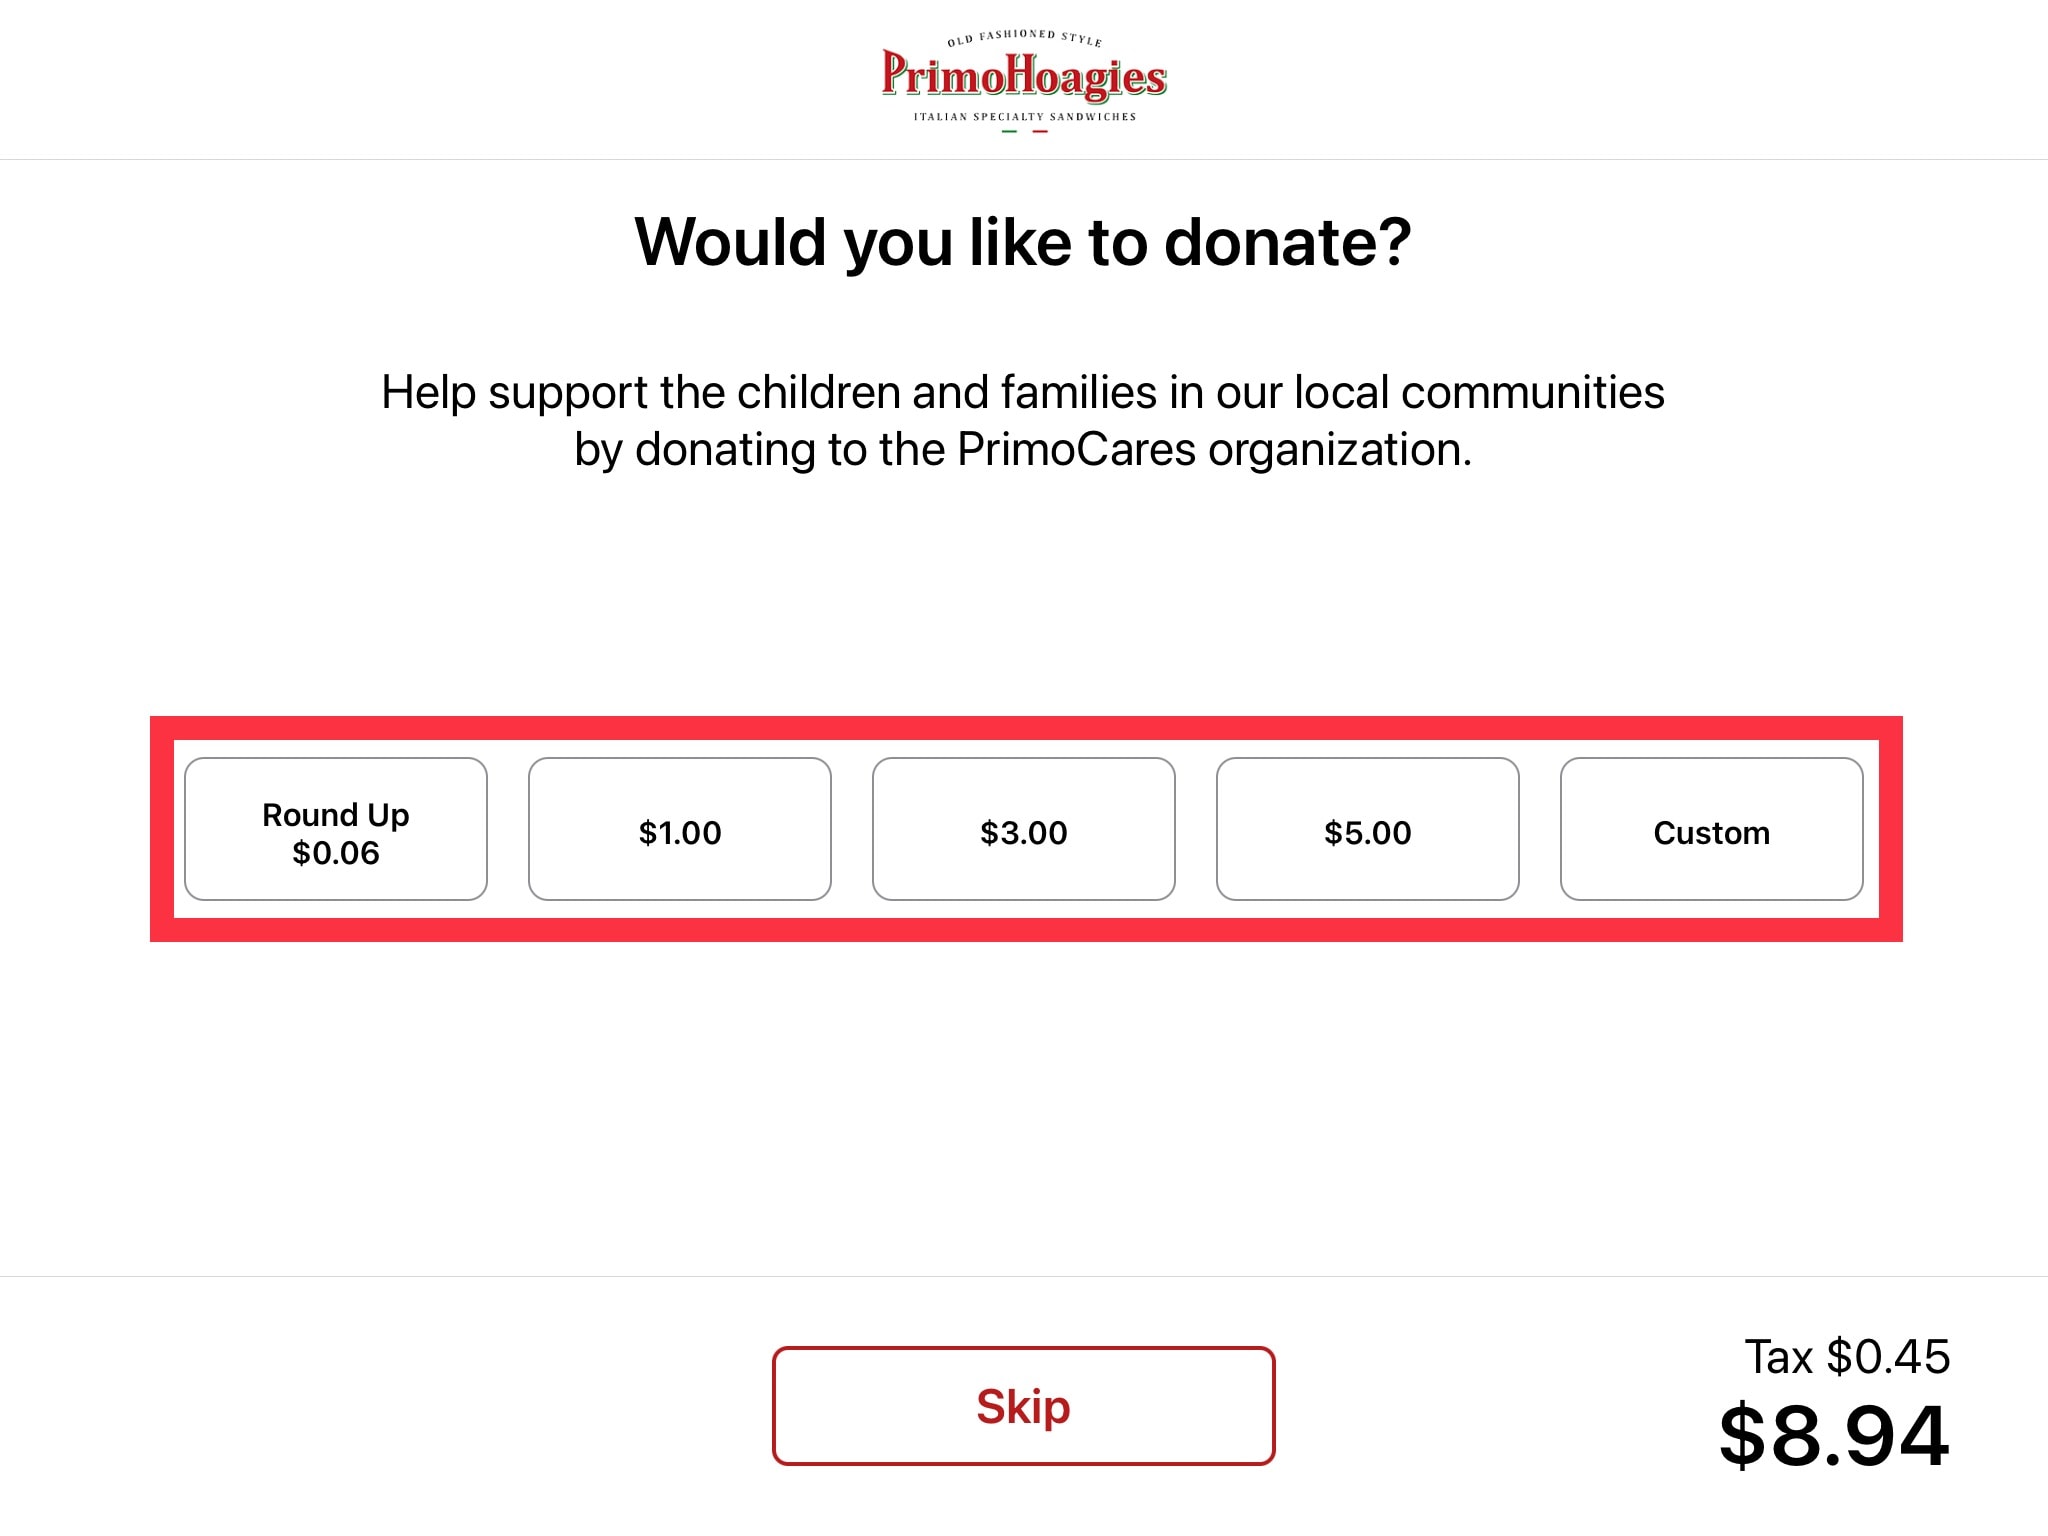
Adding a donation should be the final step of the ordering process before going to the payments screen. After adding products, discounts, etc. to the order as needed, select Pay. If a customer/call name and loyalty member has not been associated to the order, the cashier will receive the respective prompts. Once the previous requirements have been completed, the donation prompt will display containing the various donation options. Both the cashier iPad and the customer display iPad will prompt for the donation. Either party can select from Change, $1.00, $3.00, $5.00 or Other then select OK. If Other is selected, you will be prompted to enter the open dollar donation amount. To skip adding a donation, select Cancel.
Cashier iPad View
Customer Display iPad View
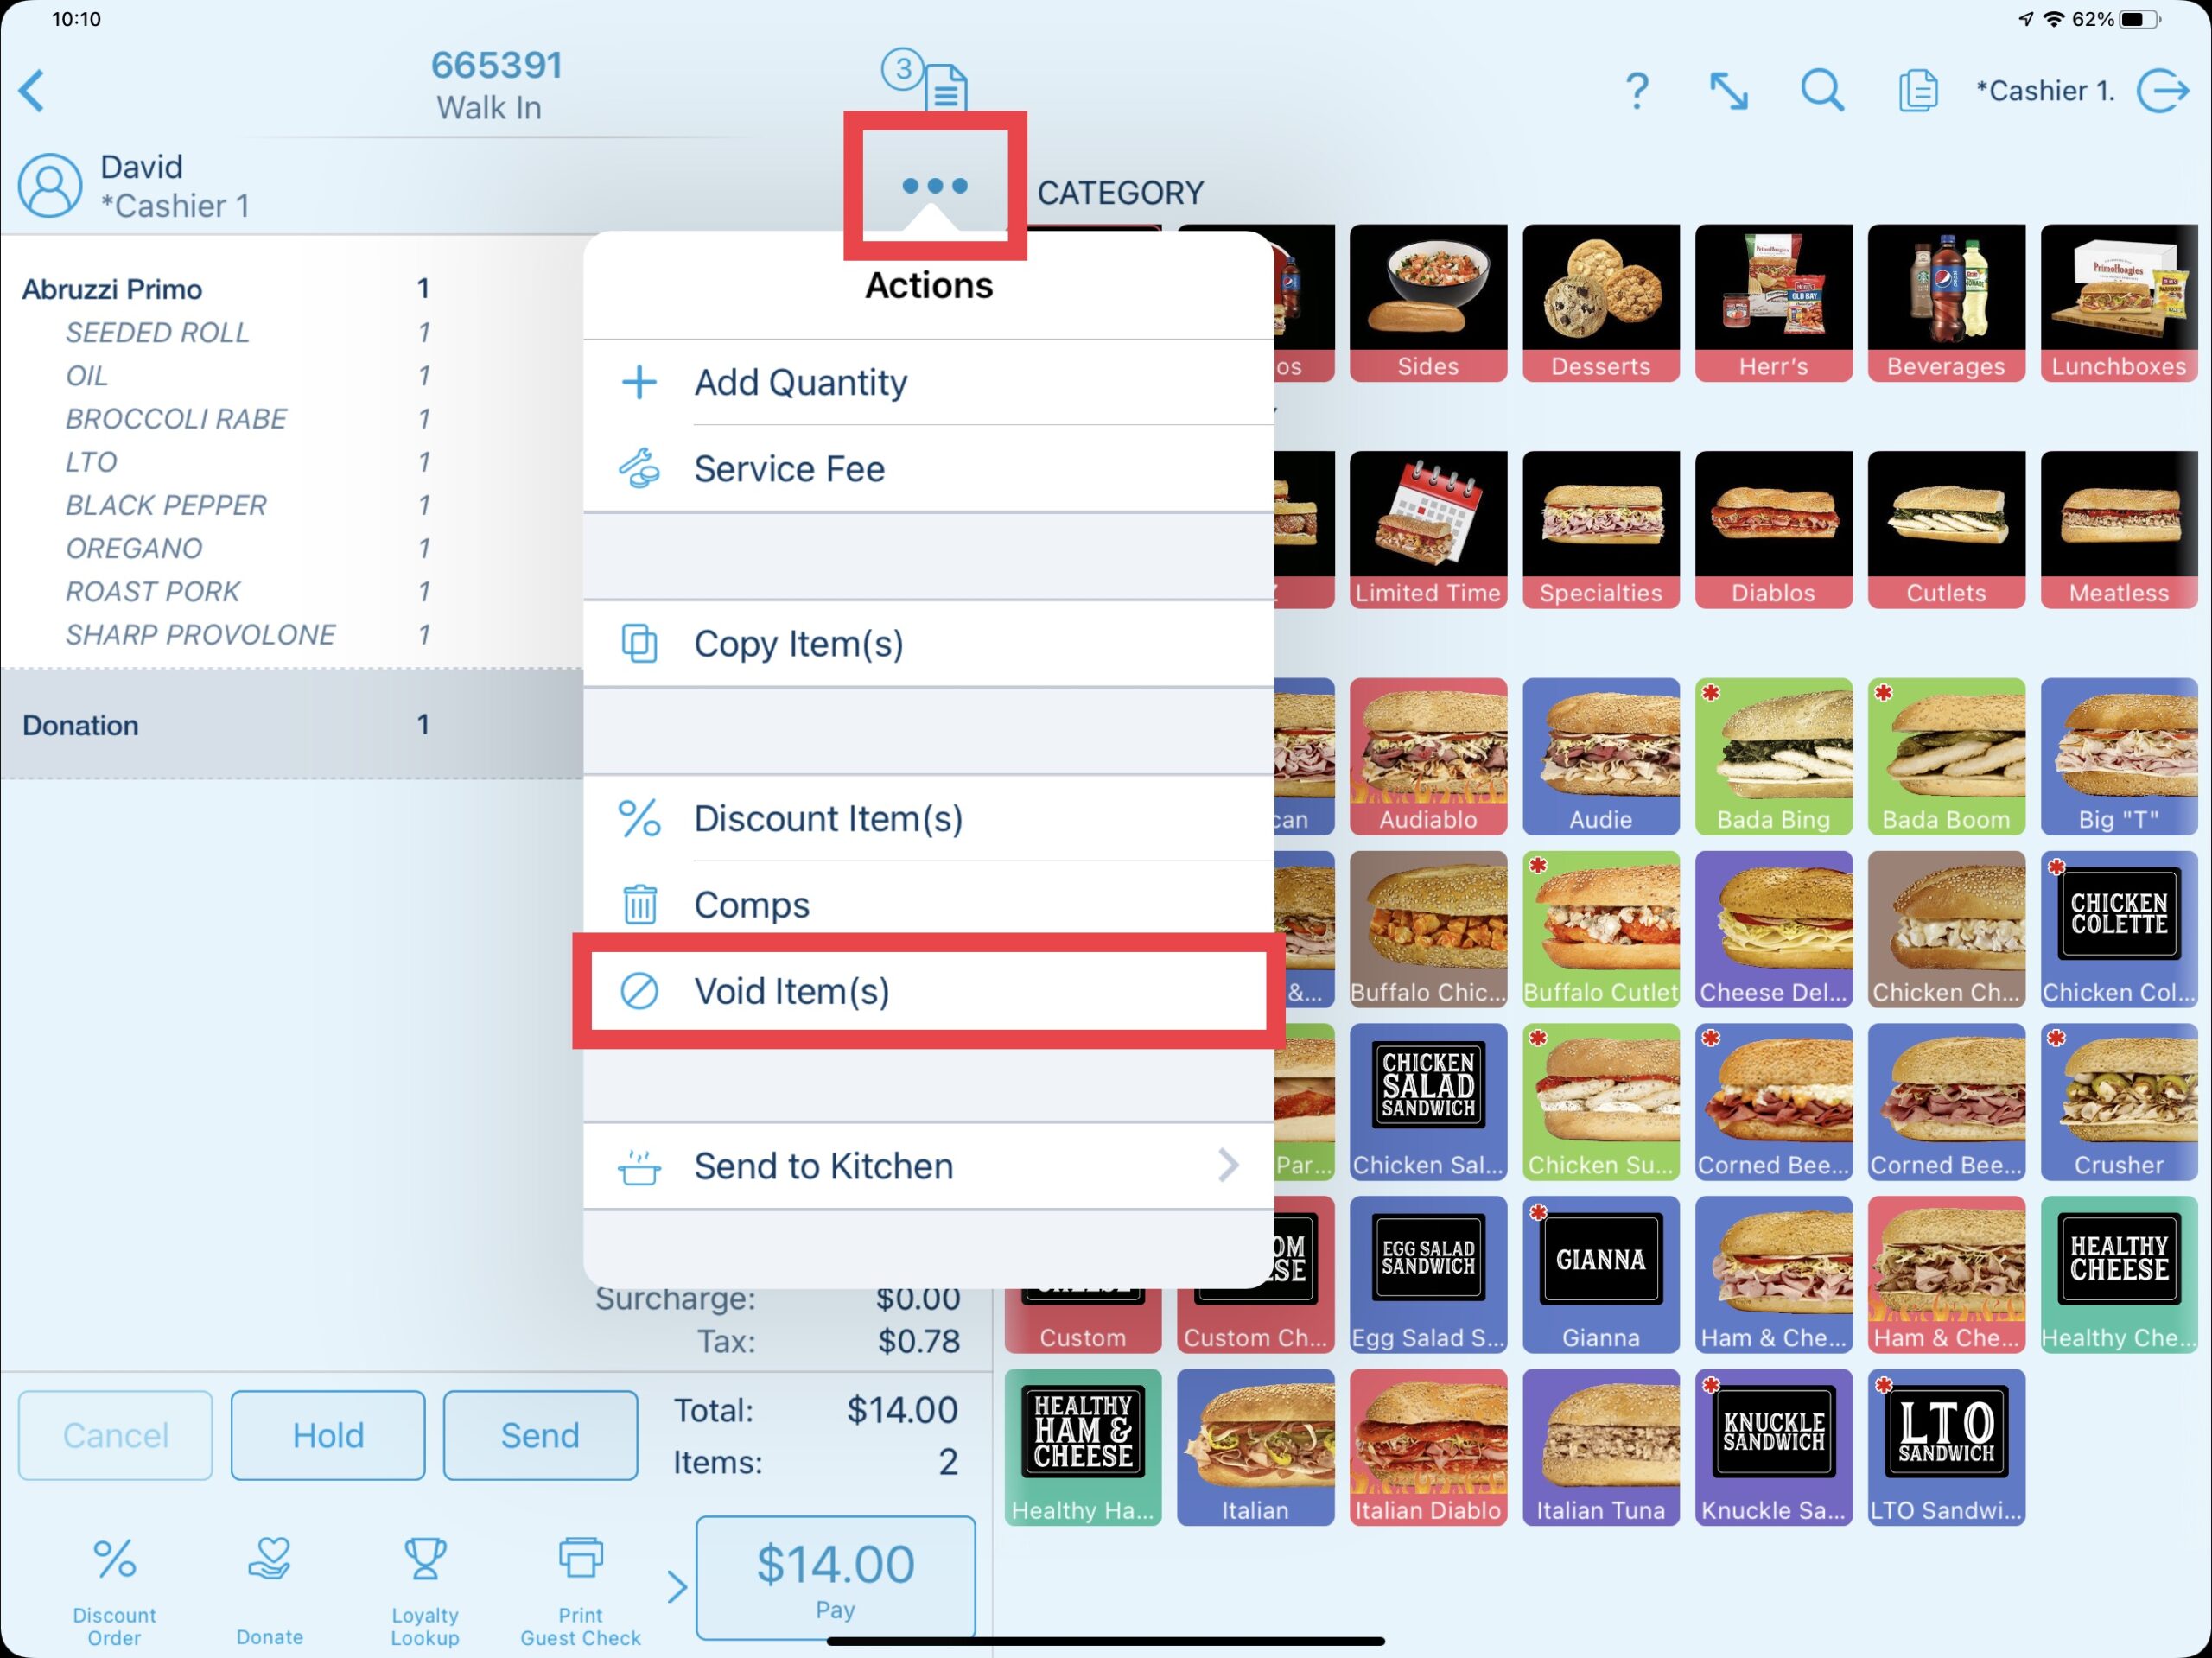
If an order adjustment needs to be made after the donation is applied, navigate back to the ordering screen and select the blue elipsis icon at the top of the order and void the donation. Make any order adjustments as needed then proceed to the Pay button to recall the donation prompt.
Updated 11/06/2023

Summary
The interactive Customer Display System (CDS) ensures your customers are engaged in the ordering process. In addition to showing custom advertisements geared towards promoting your brand, a CDS allows customers to view products and order totals, log into their own customer loyalty account, add tips for employees, sign for credit card transactions, & choose receipt options.
Customer Display System Features
As the cashier adds products to an order, the customer facing display (iPad Mini) allows the customer to view all order information on the right side of the display. The left side simultaneously rotates various branded advertisements throughout the order.
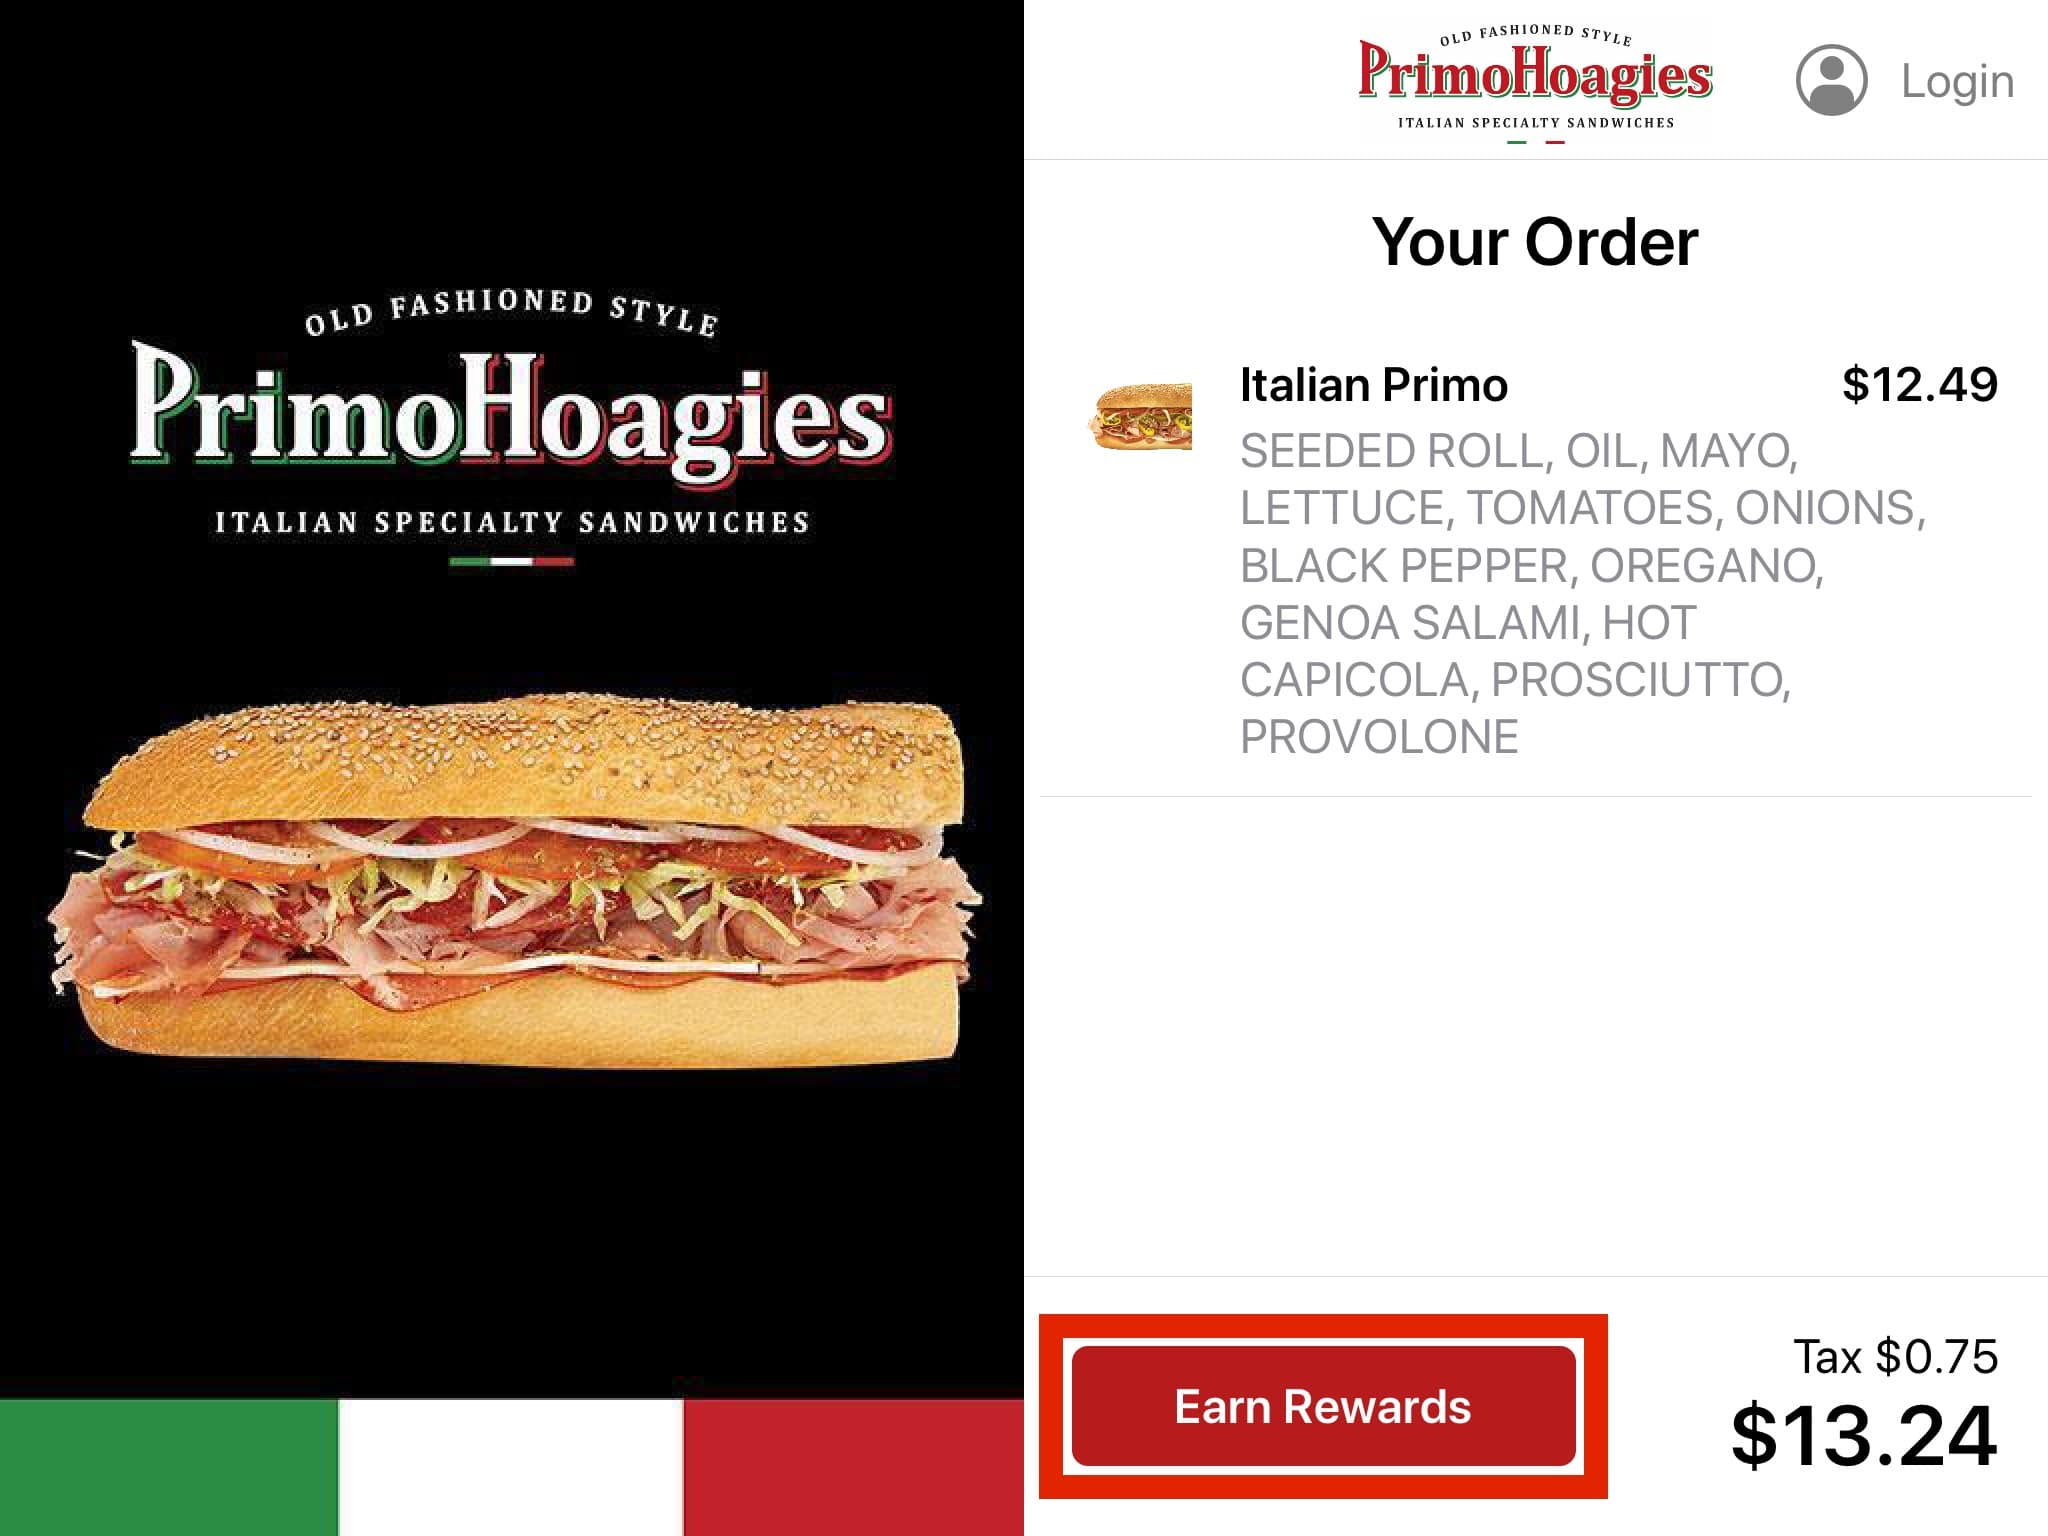
At any point during the order, the customer may choose to select the Earn Rewards button. This will allow them to associate their customer loyalty phone number to the order. The cashier will be notified on the cashier screen with a popup bubble if the customer loyalty has been linked.
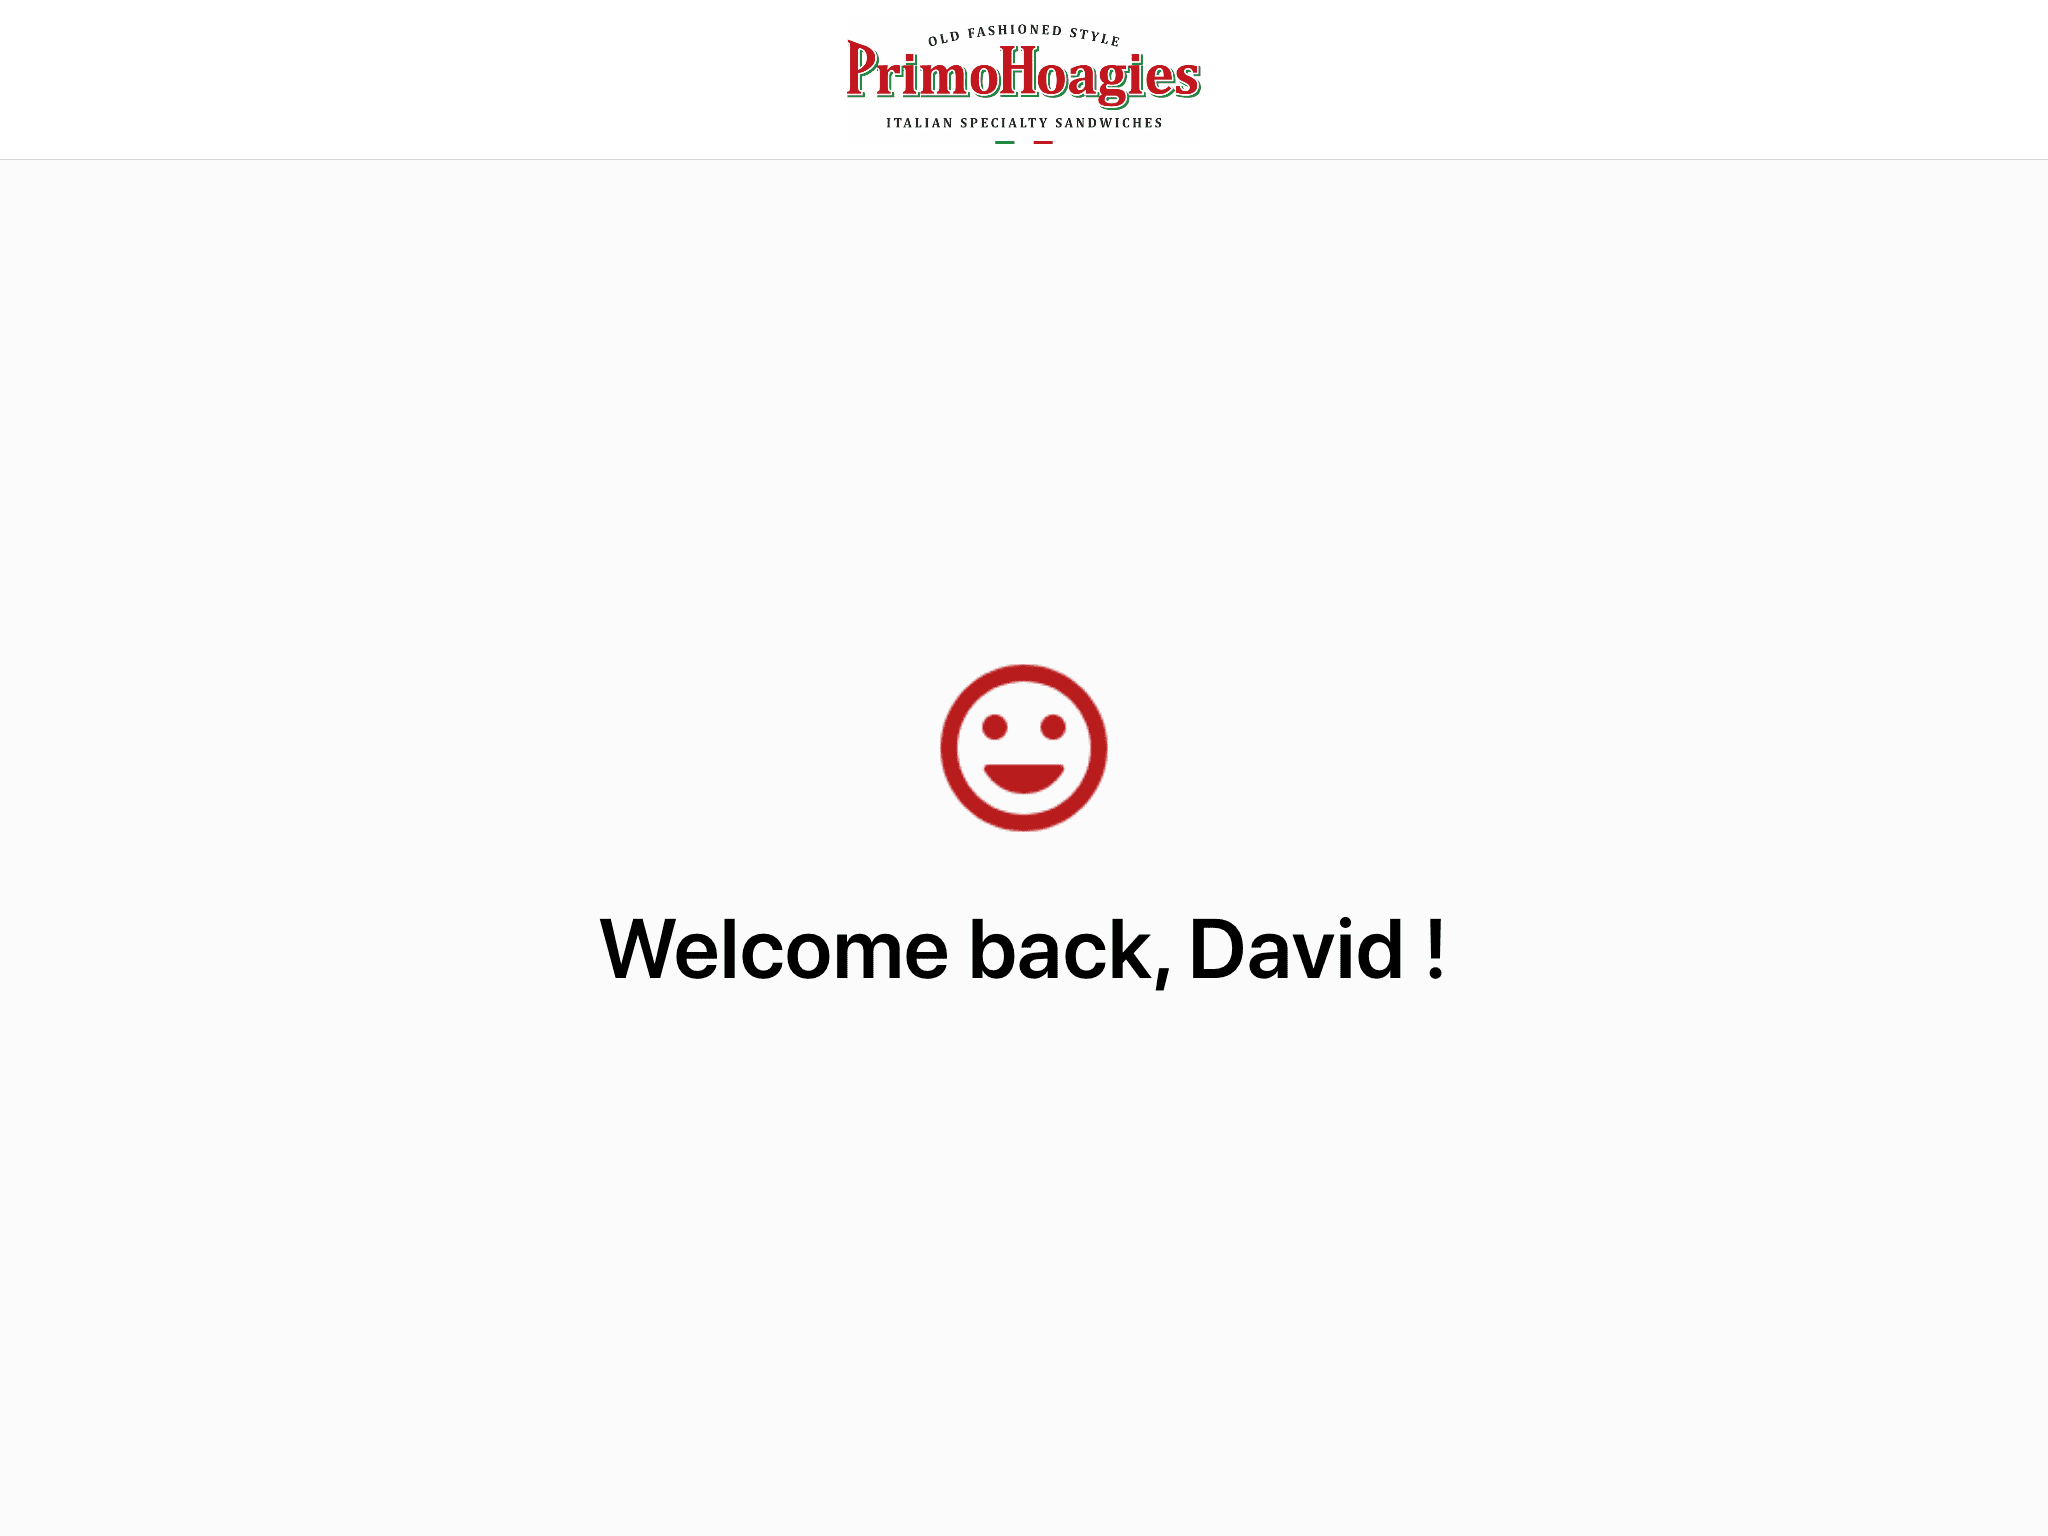
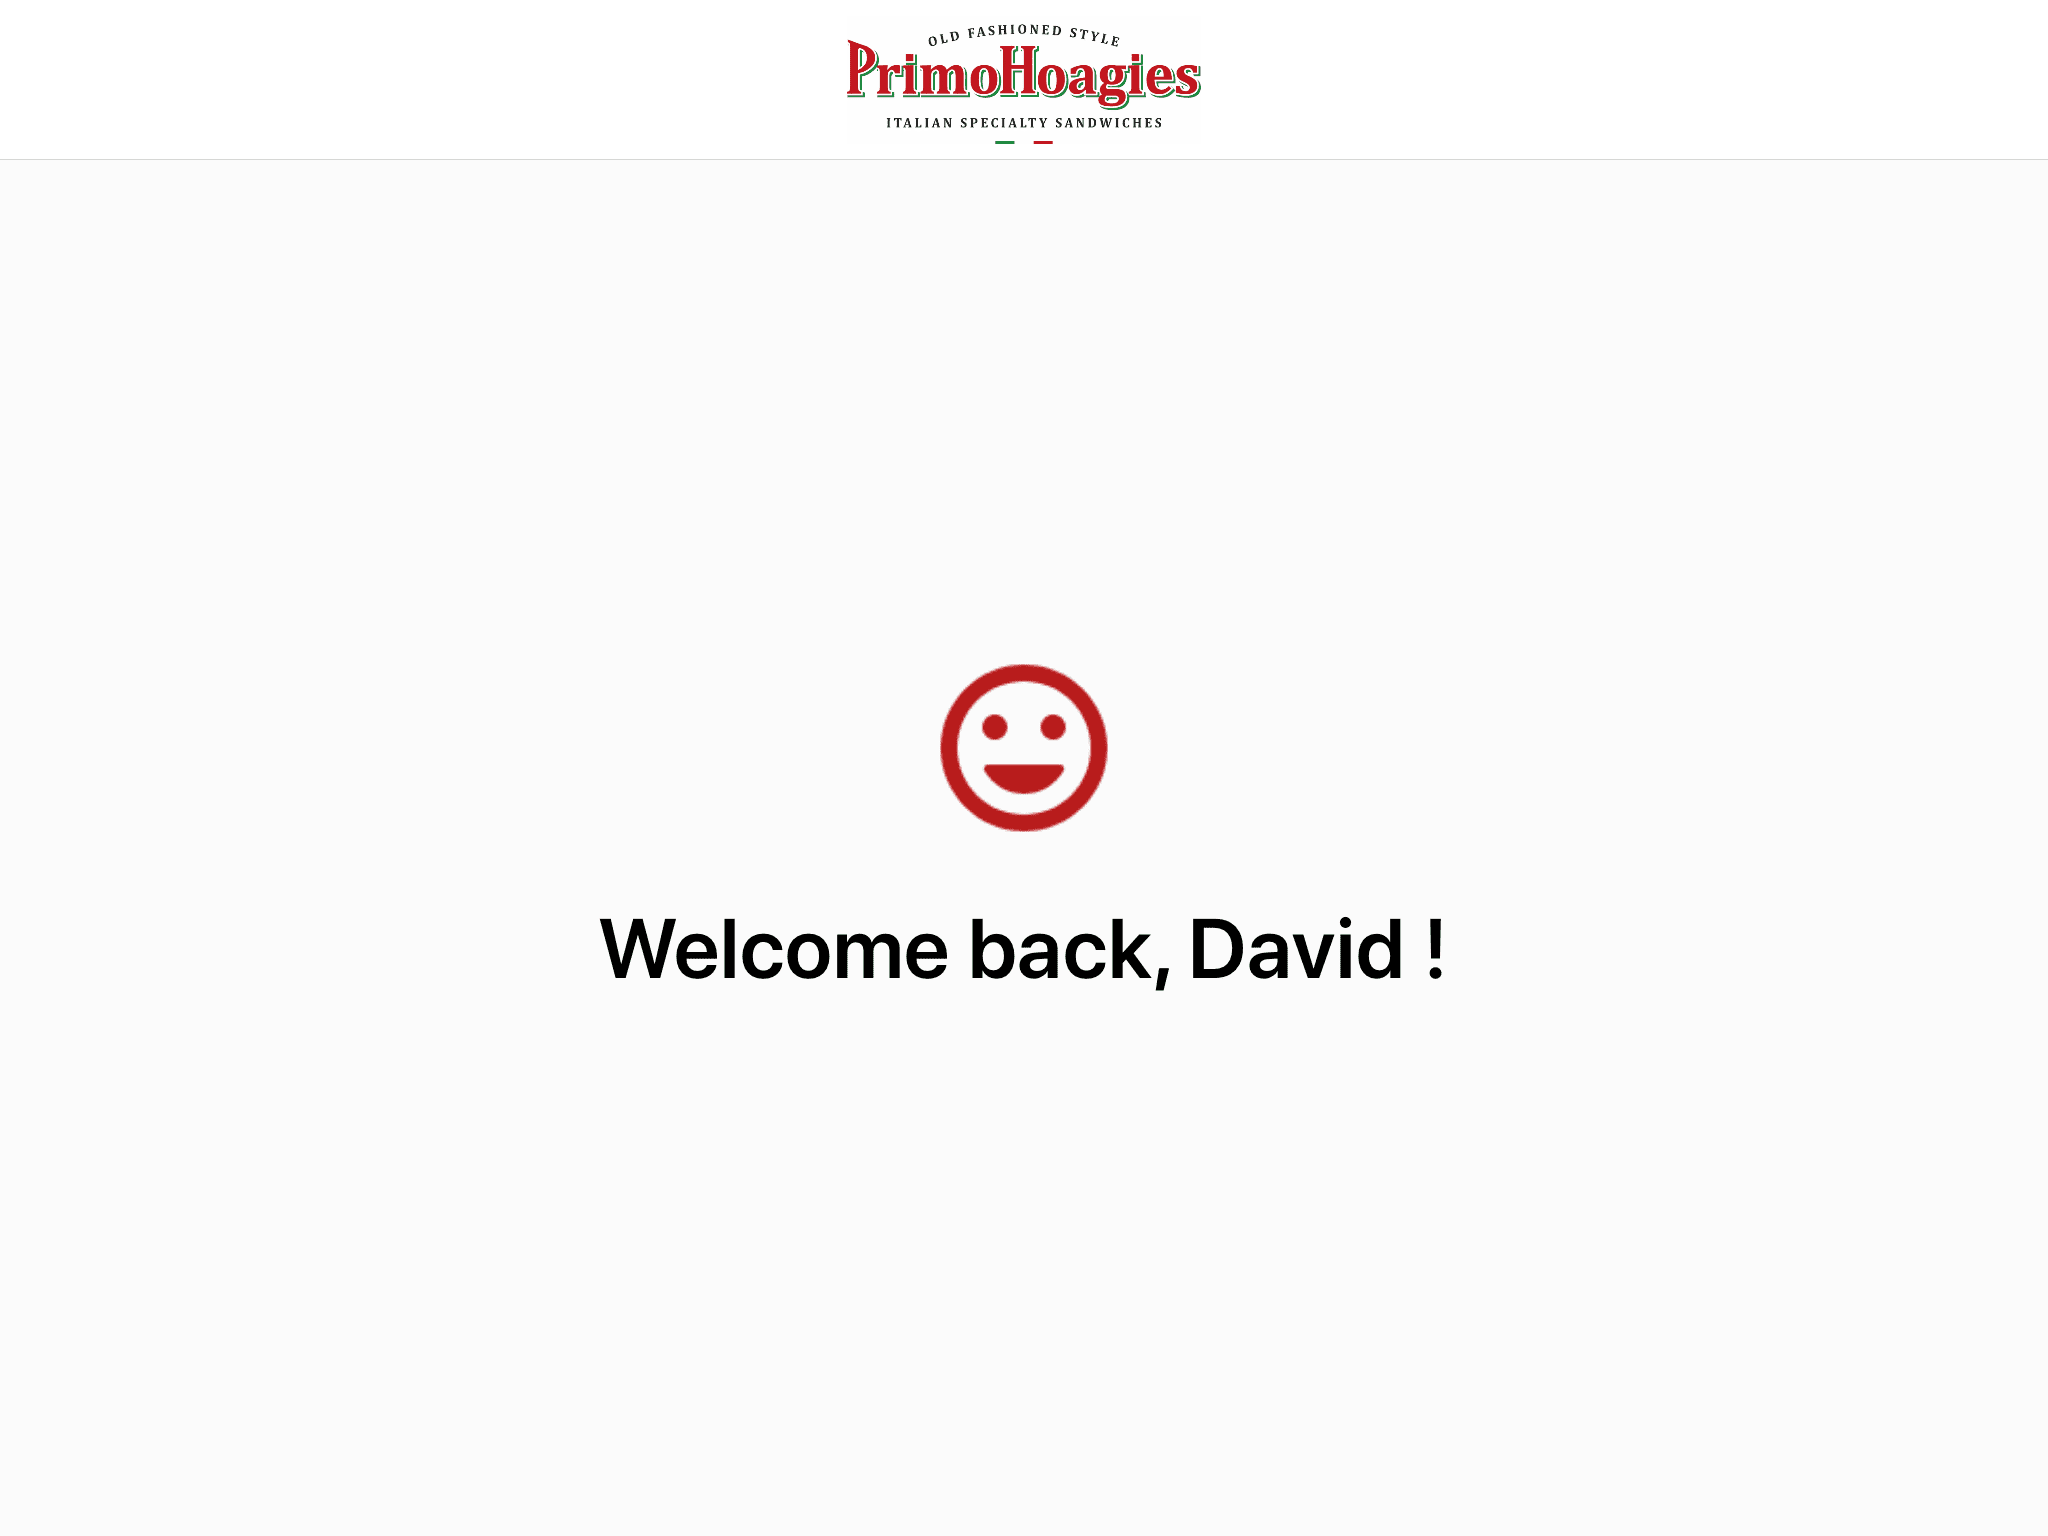
A “Welcome Back” message greets the returning loyalty customer.
Once the cashier goes to the payment screen, the customer can view and select reward offers. Automatic rewards such as the PrimoHoagies $2 OFF Primo Size Hoagies on Wednesday will be automatically applied (if applicable to the order) and cannot removed. Also see the Attaching Loyalty Customers guide.
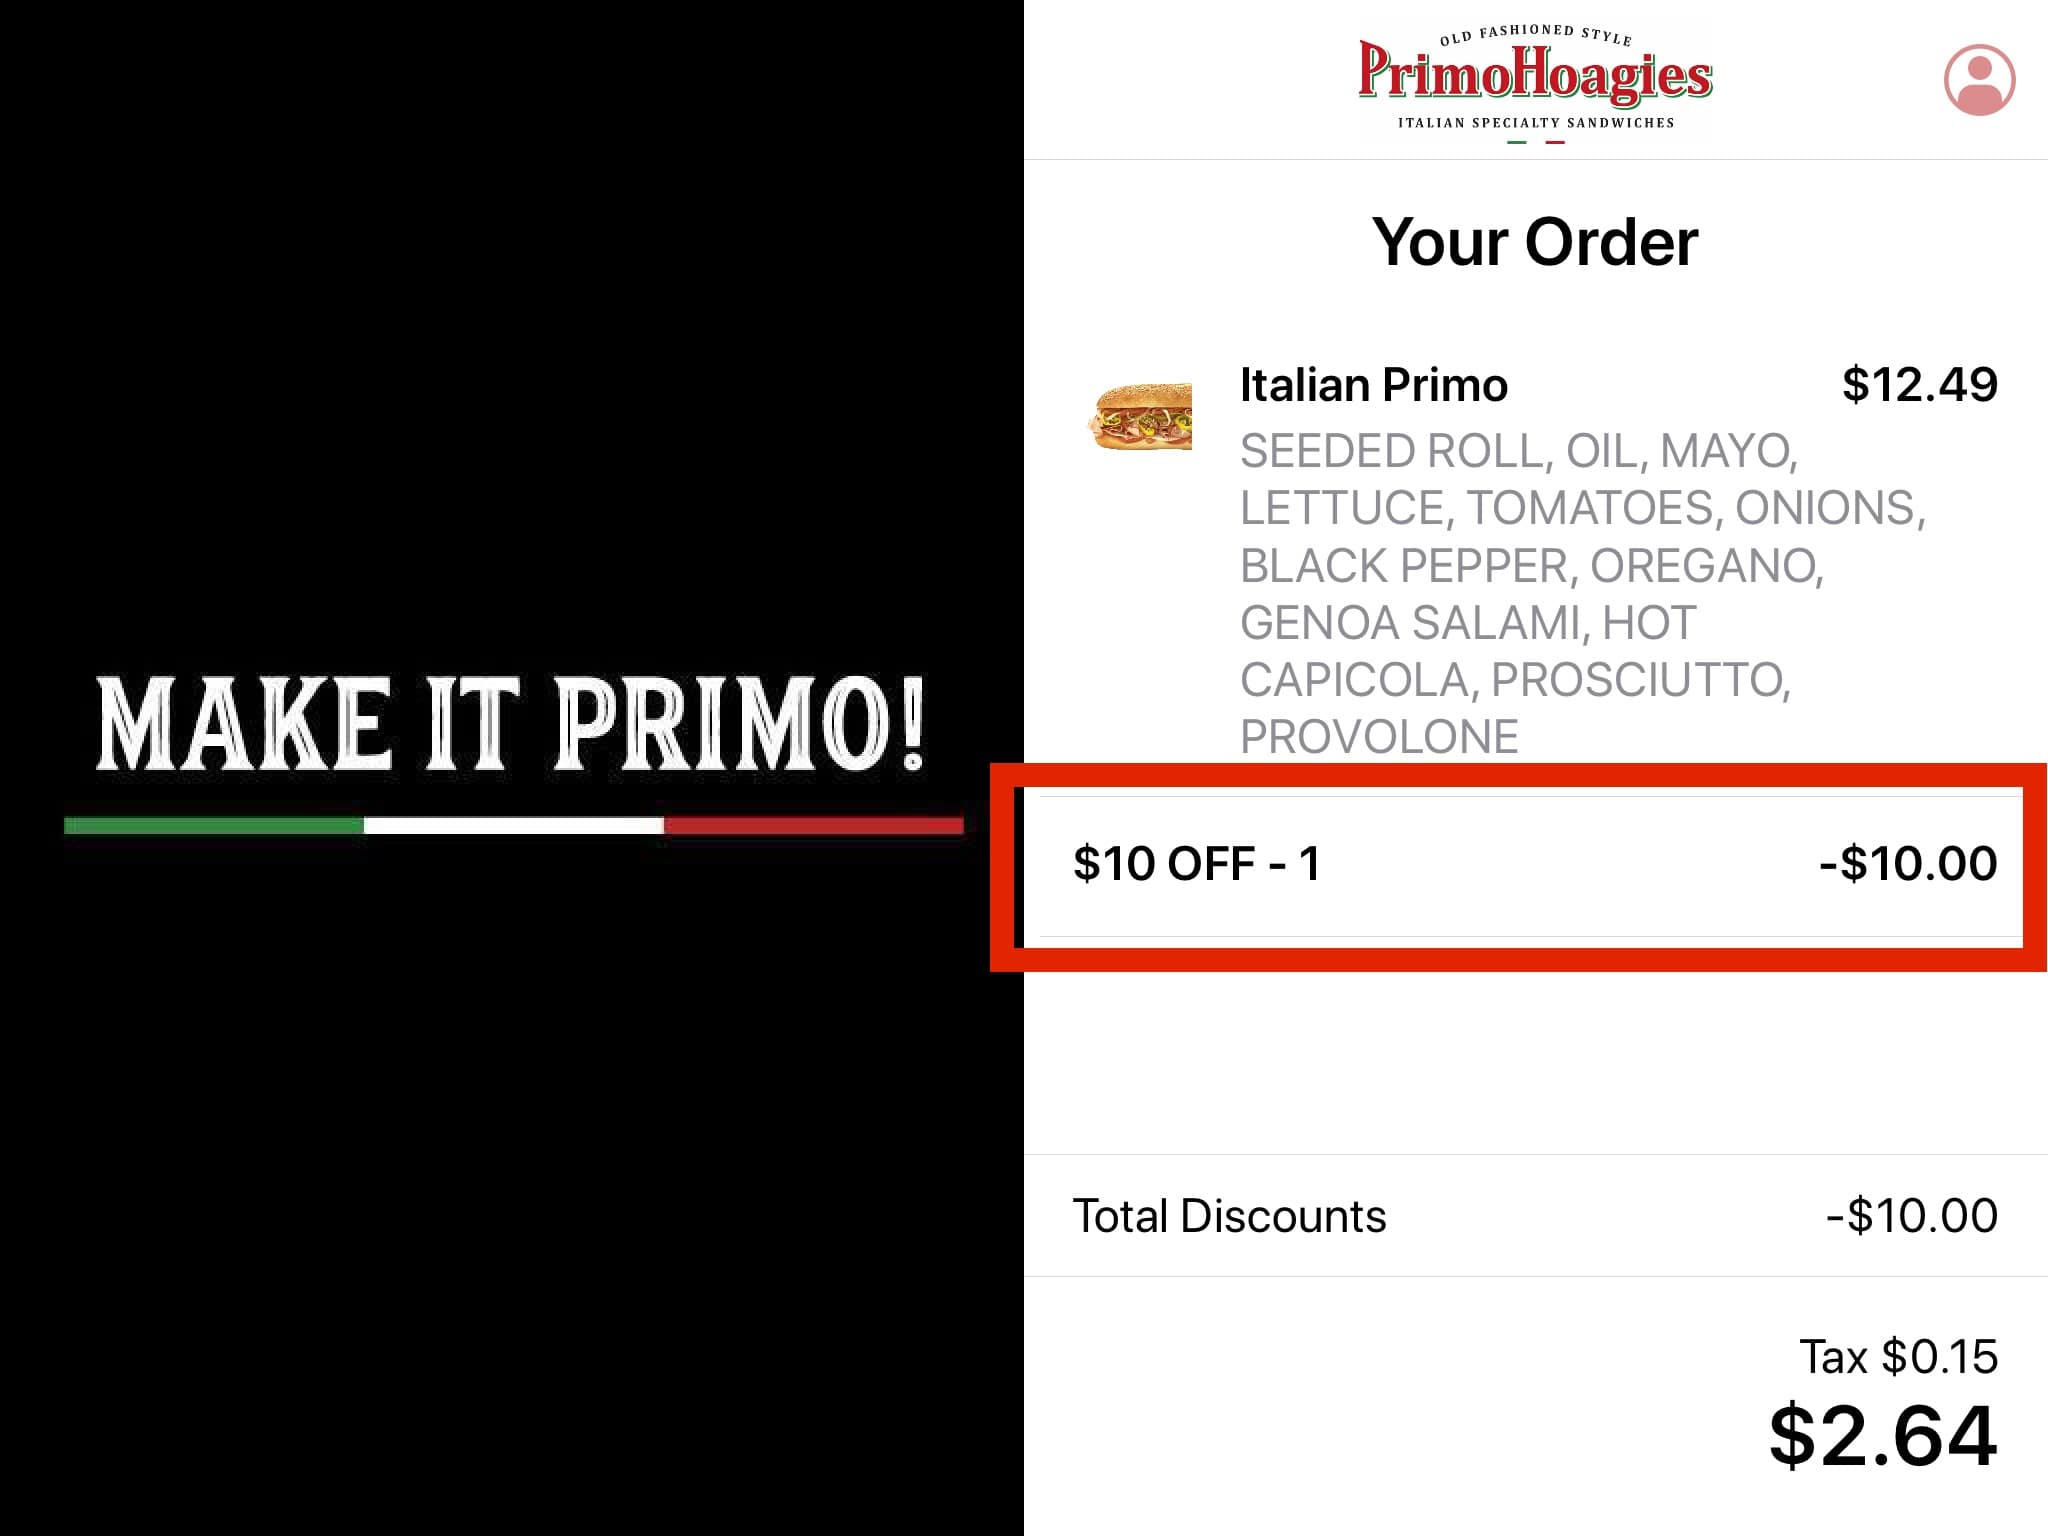
Select Apply to see any applied rewards and updated totals.
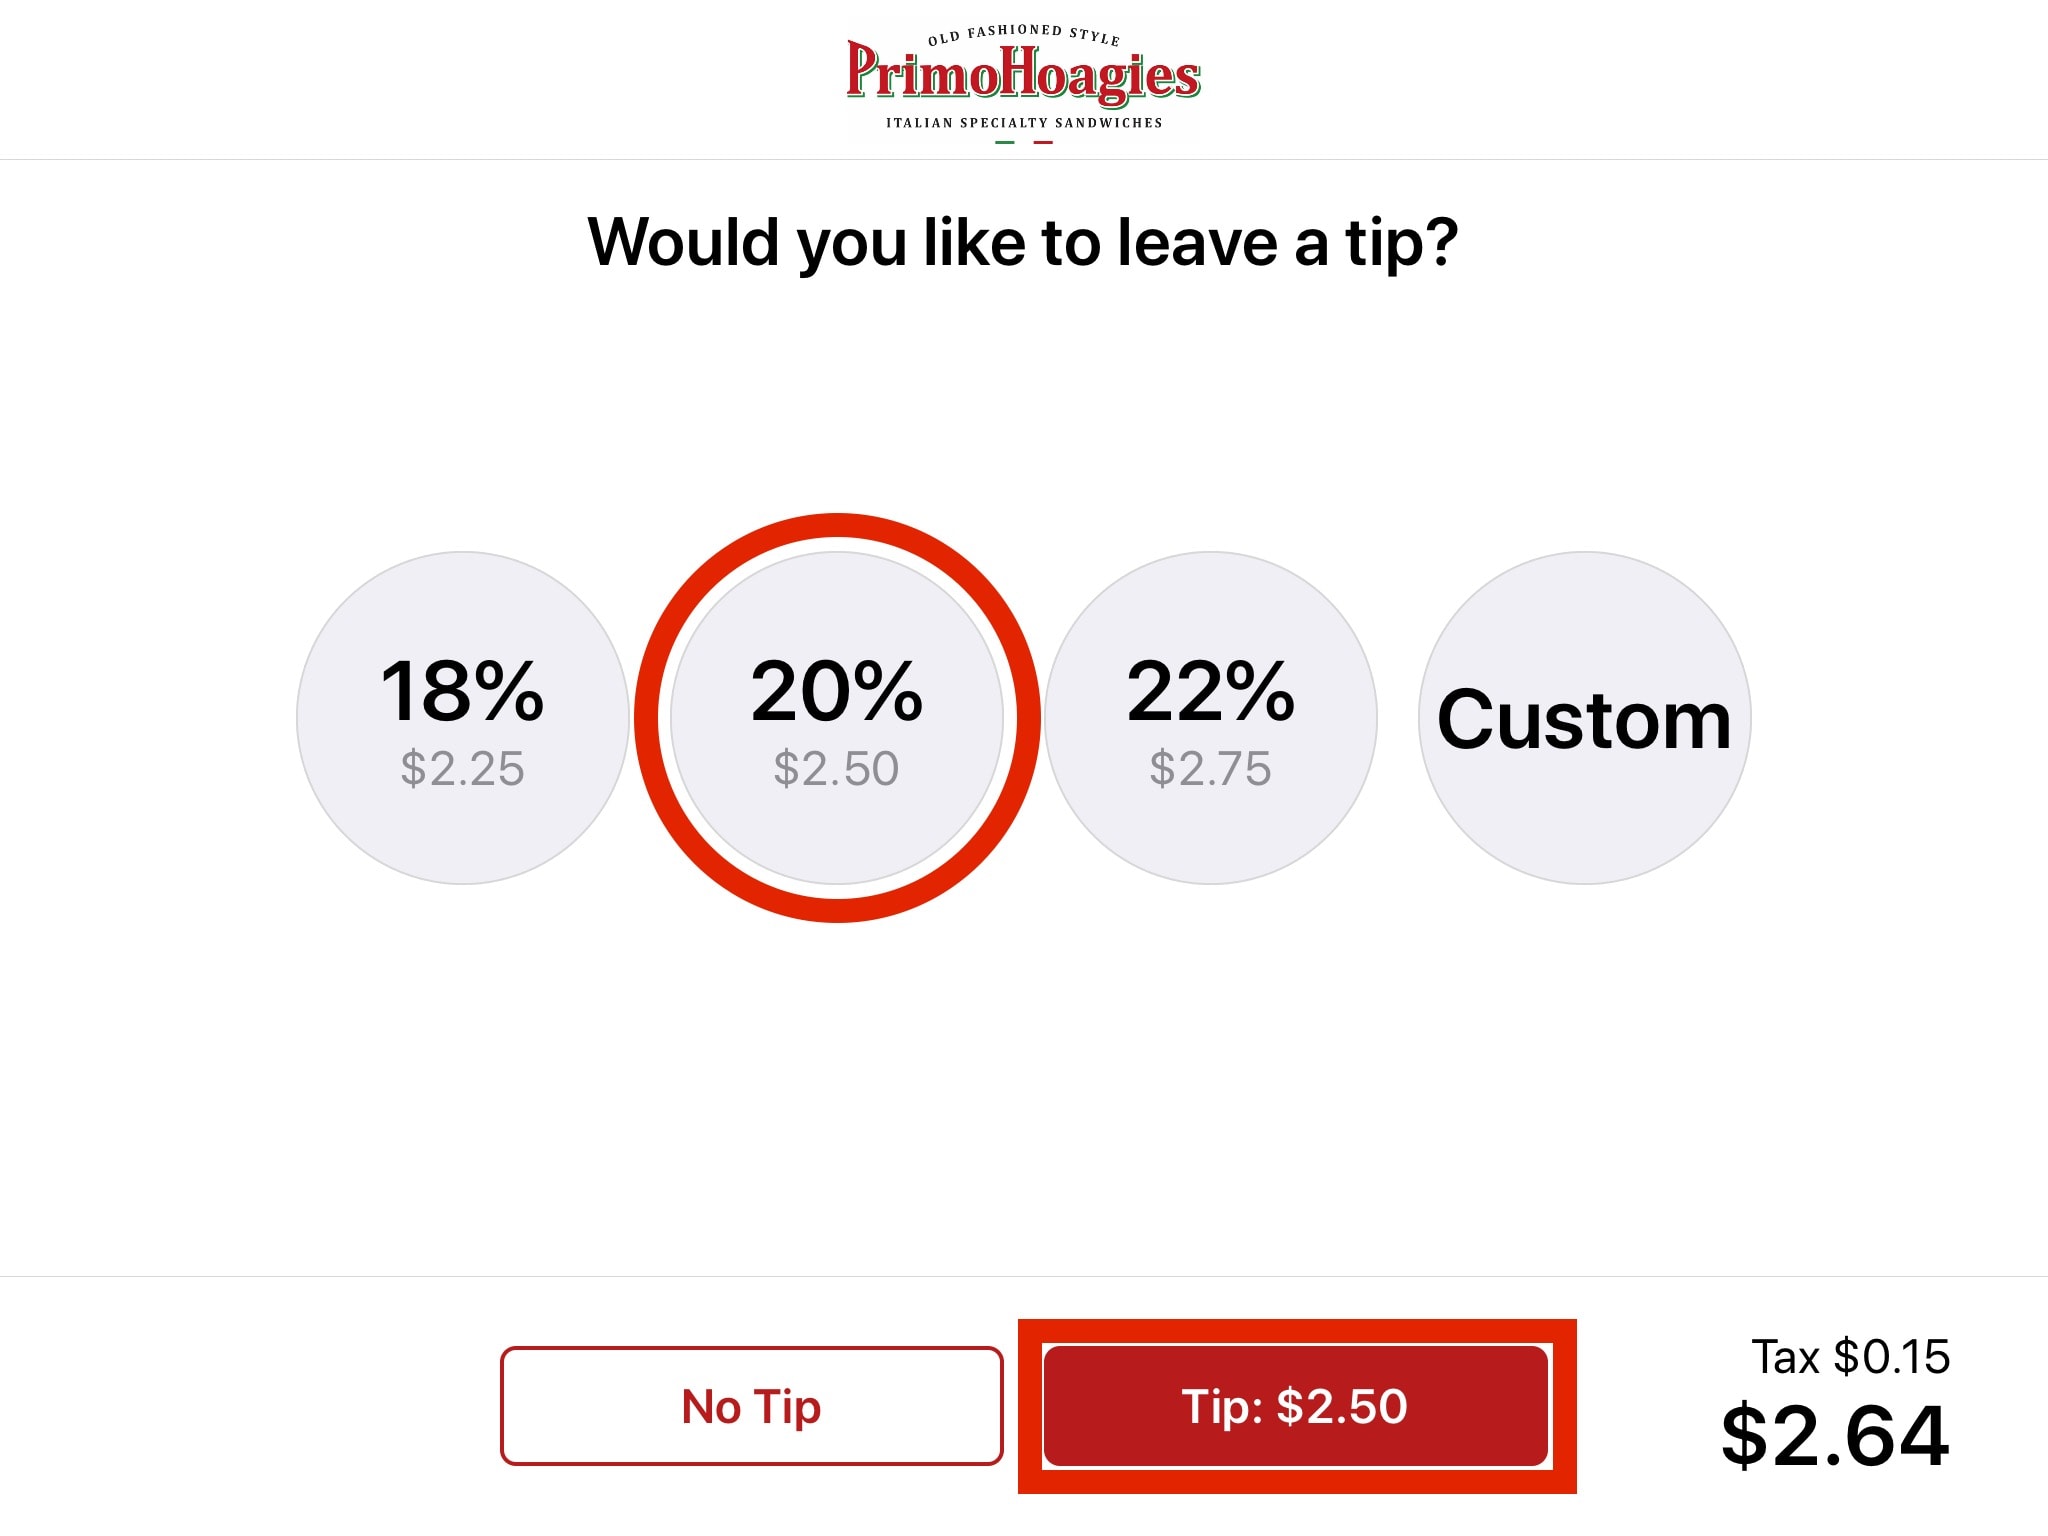
When a credit card payment is required, the customer will follow the prompts on the EMV terminal to complete the transaction. The CDS will prompt the customer to choose a tip option. Tip options include: No Tip, 18%, 20%, 22%, or a Custom Tip amount.
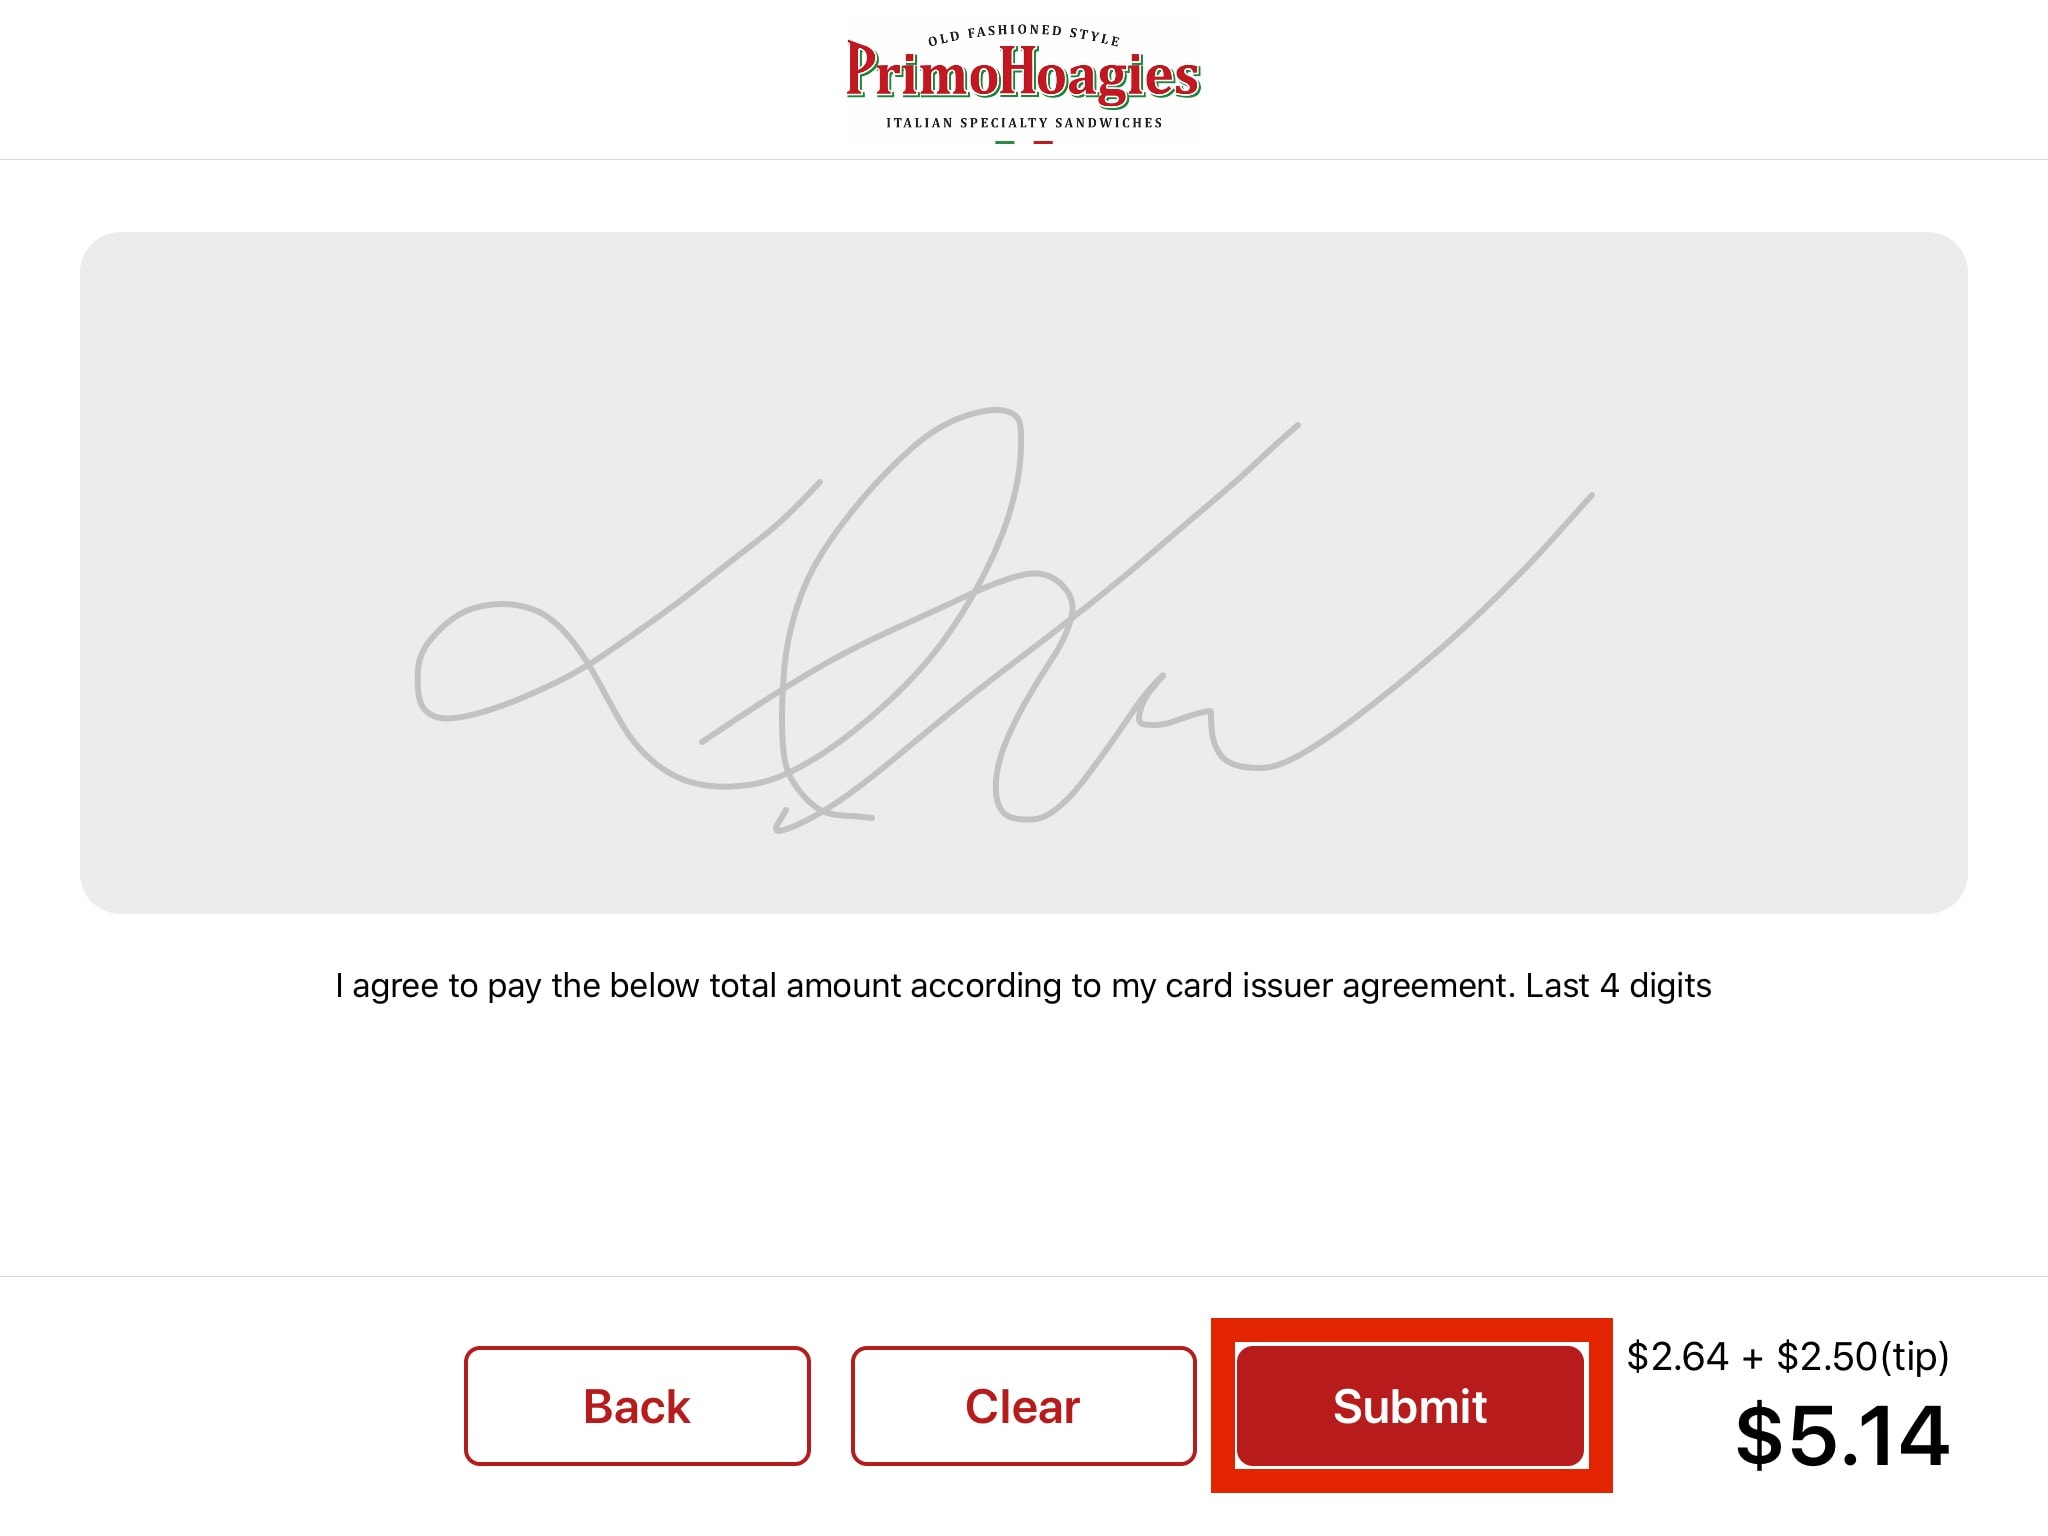
For an added layer of security, customers are required to sign on the CDS. This signature is stored on the Order History report from the Management Console for reference if needed later.
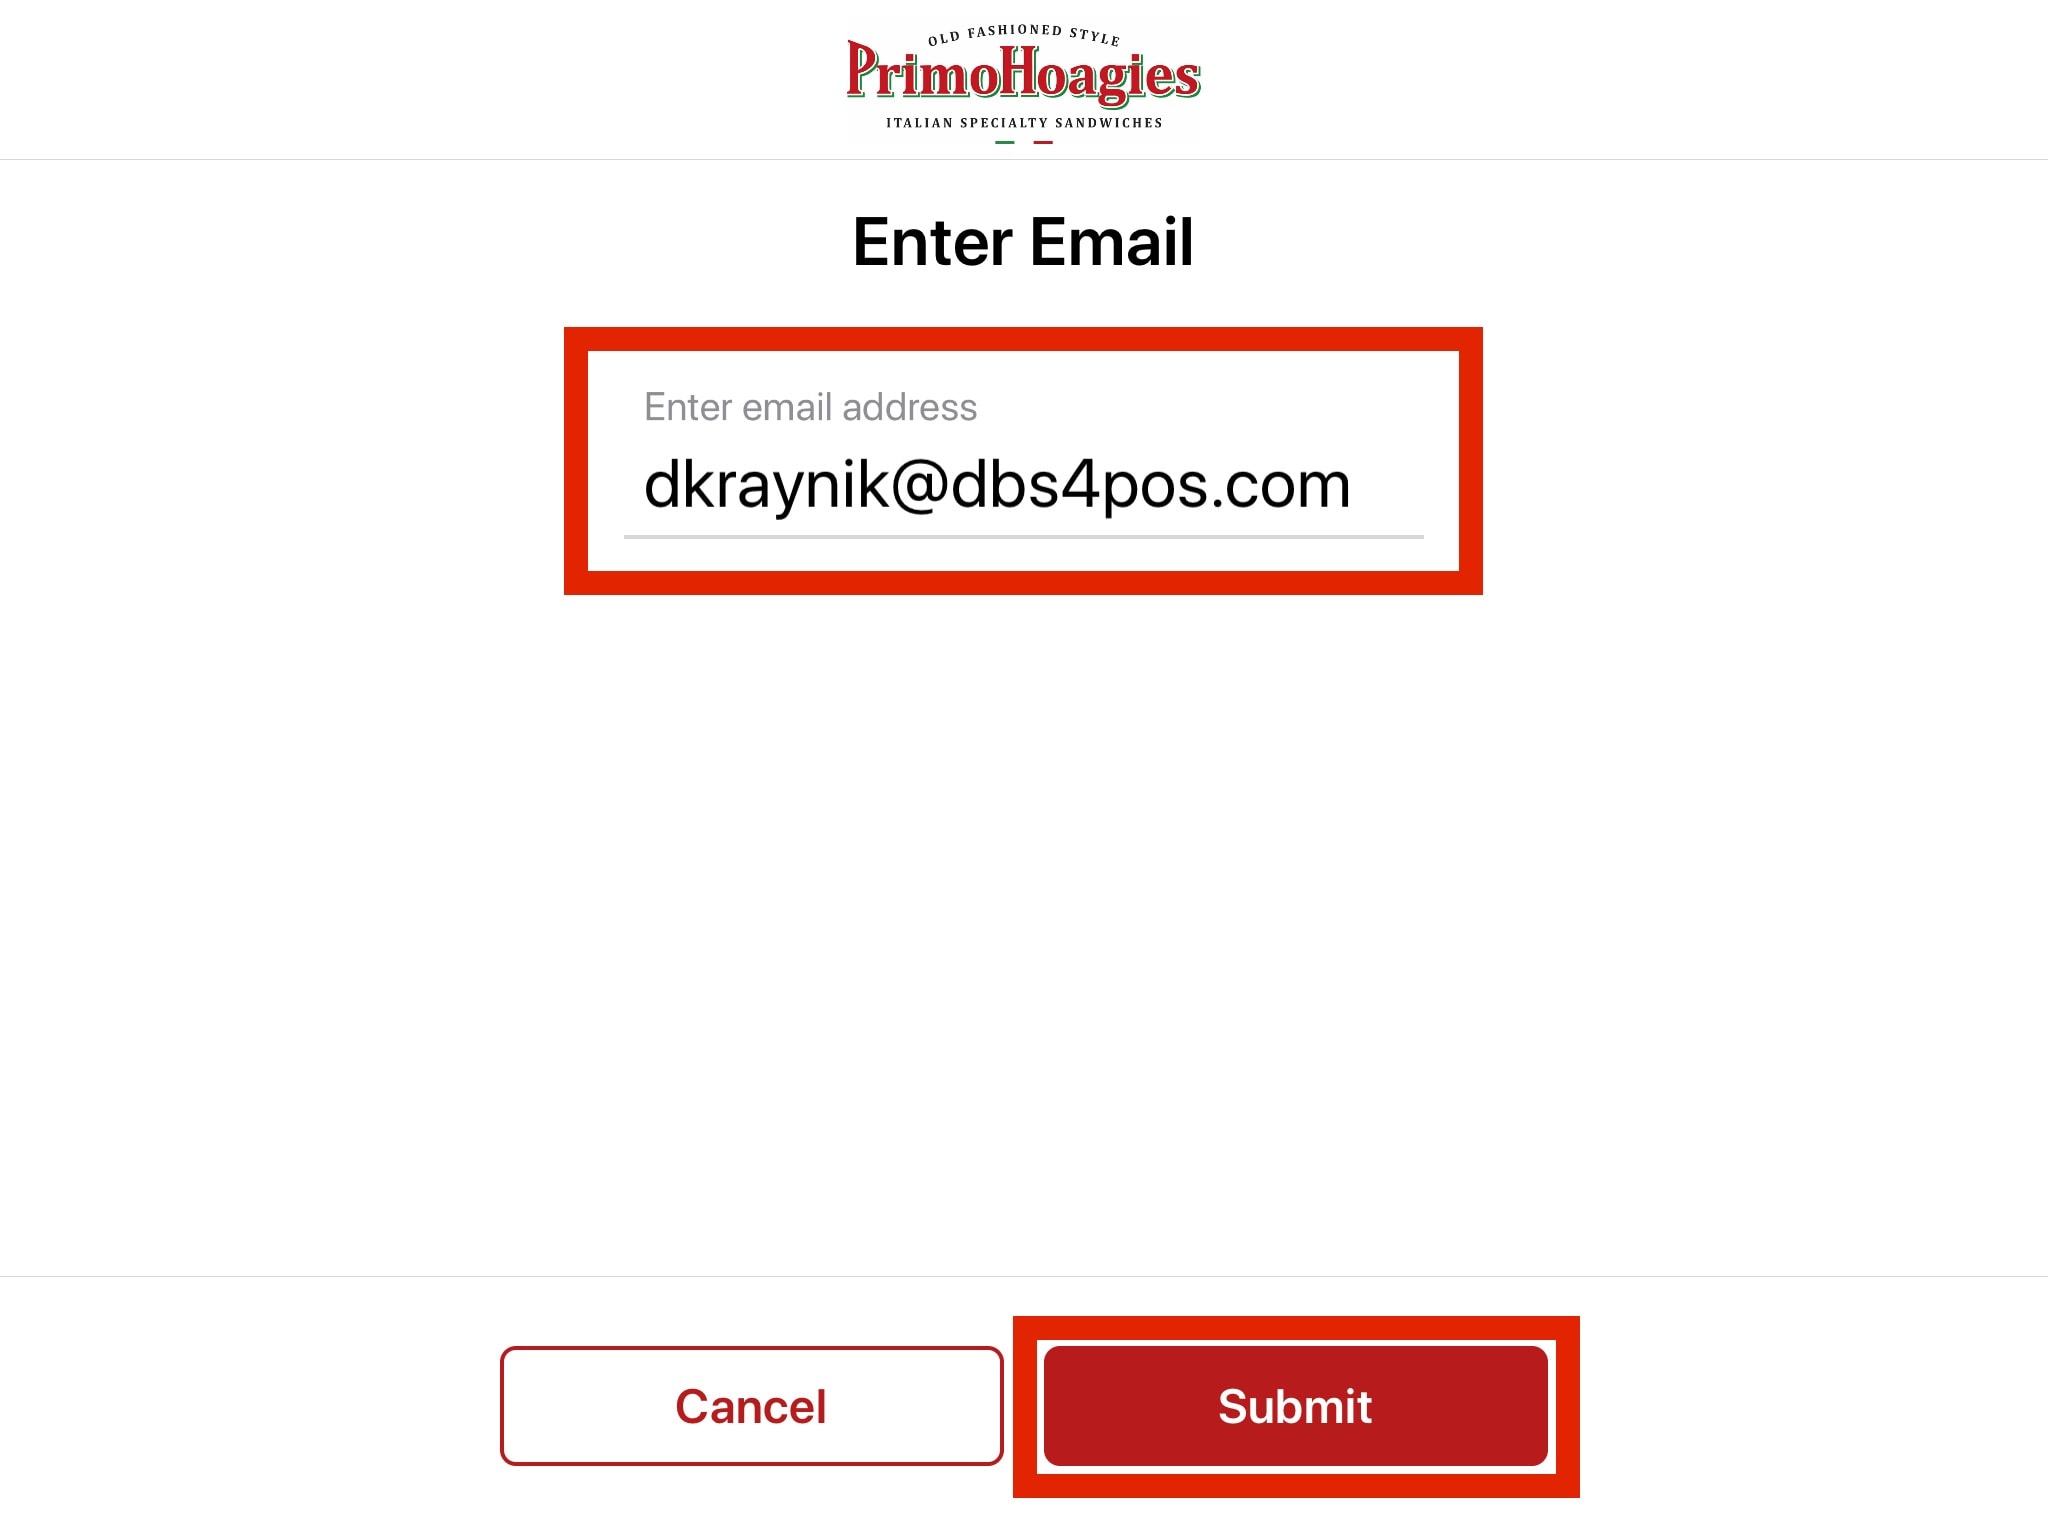
The final customer interaction asks the customer to choose a receipt option. These options include: Printed Receipt, Emailed Receipt, or No Receipt. If an emailed receipt is selected, the customer must input their email address or choose the pre-filled email address if associated with an attached Revel CRM customer. This pre-filled email address can be changed if needed.
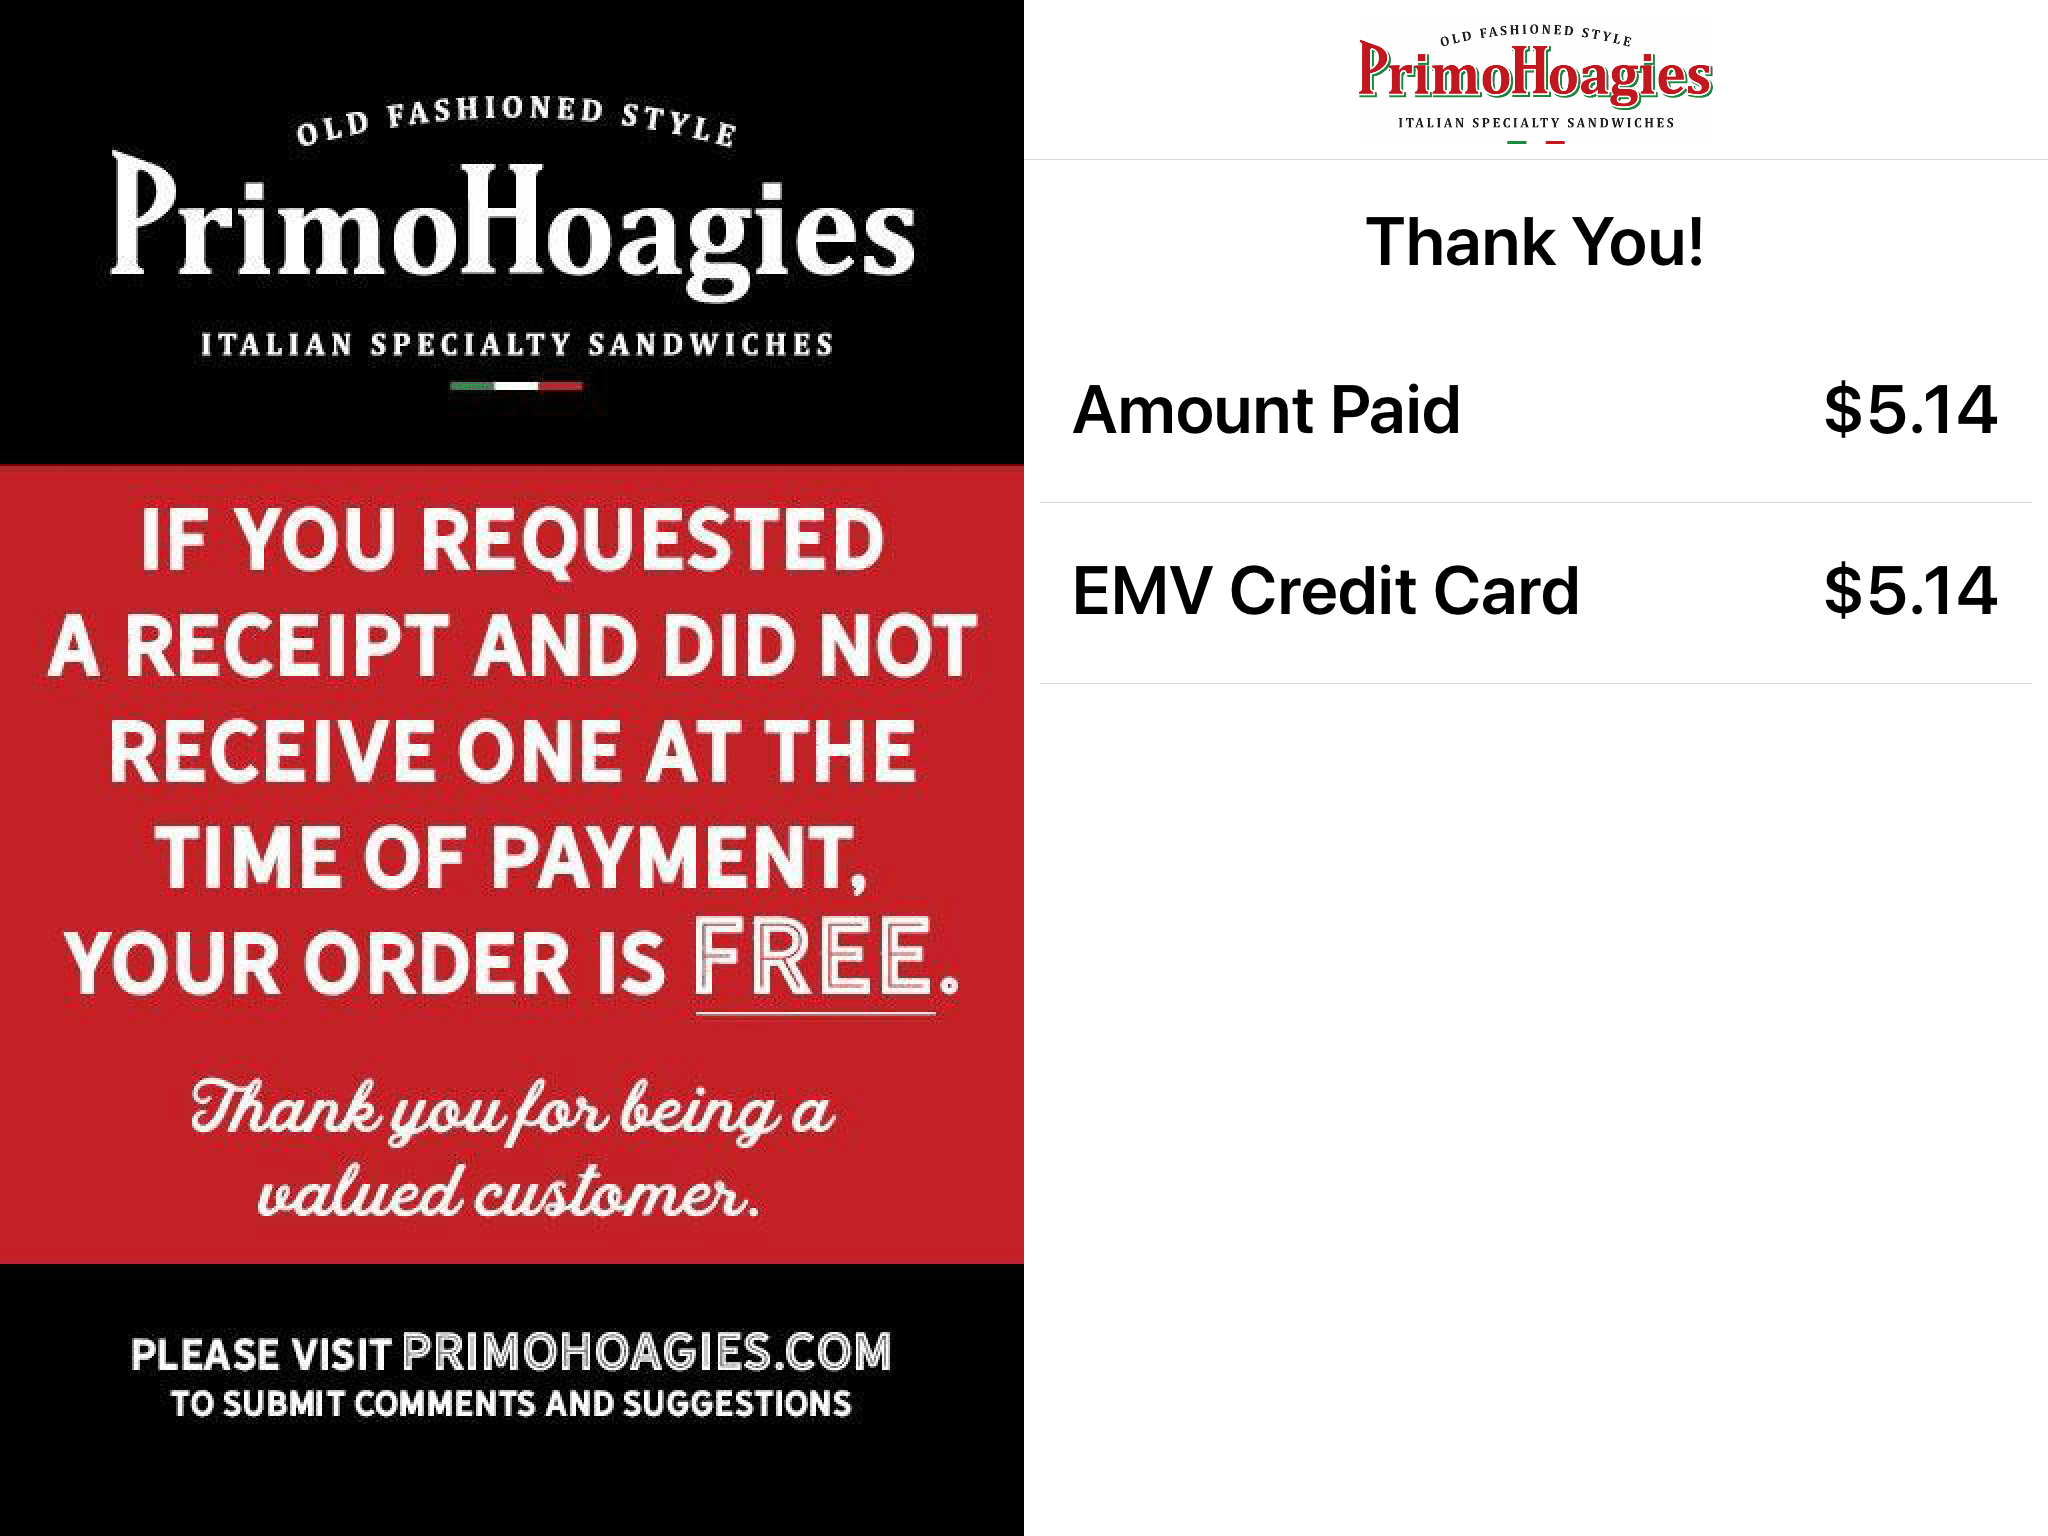
The payment screen then indicates that the transaction has been completed before returning to the main ordering screen.
Updated 06/15/2022

Summary
Currently there is no direct integration with the ezCater platform and Revel Systems. This means your business will need to manually enter the ezCater orders into the point of sale system to ensure they are properly accounted for and print to the kitchen.
Entering ezCater Orders
To enter an ezCater order into the point of sale, an ezCater dining option has been created. This dining option is exempt from applying taxes (for tax reporting practices please refer to your PrimoHoagies Corporate Representative).
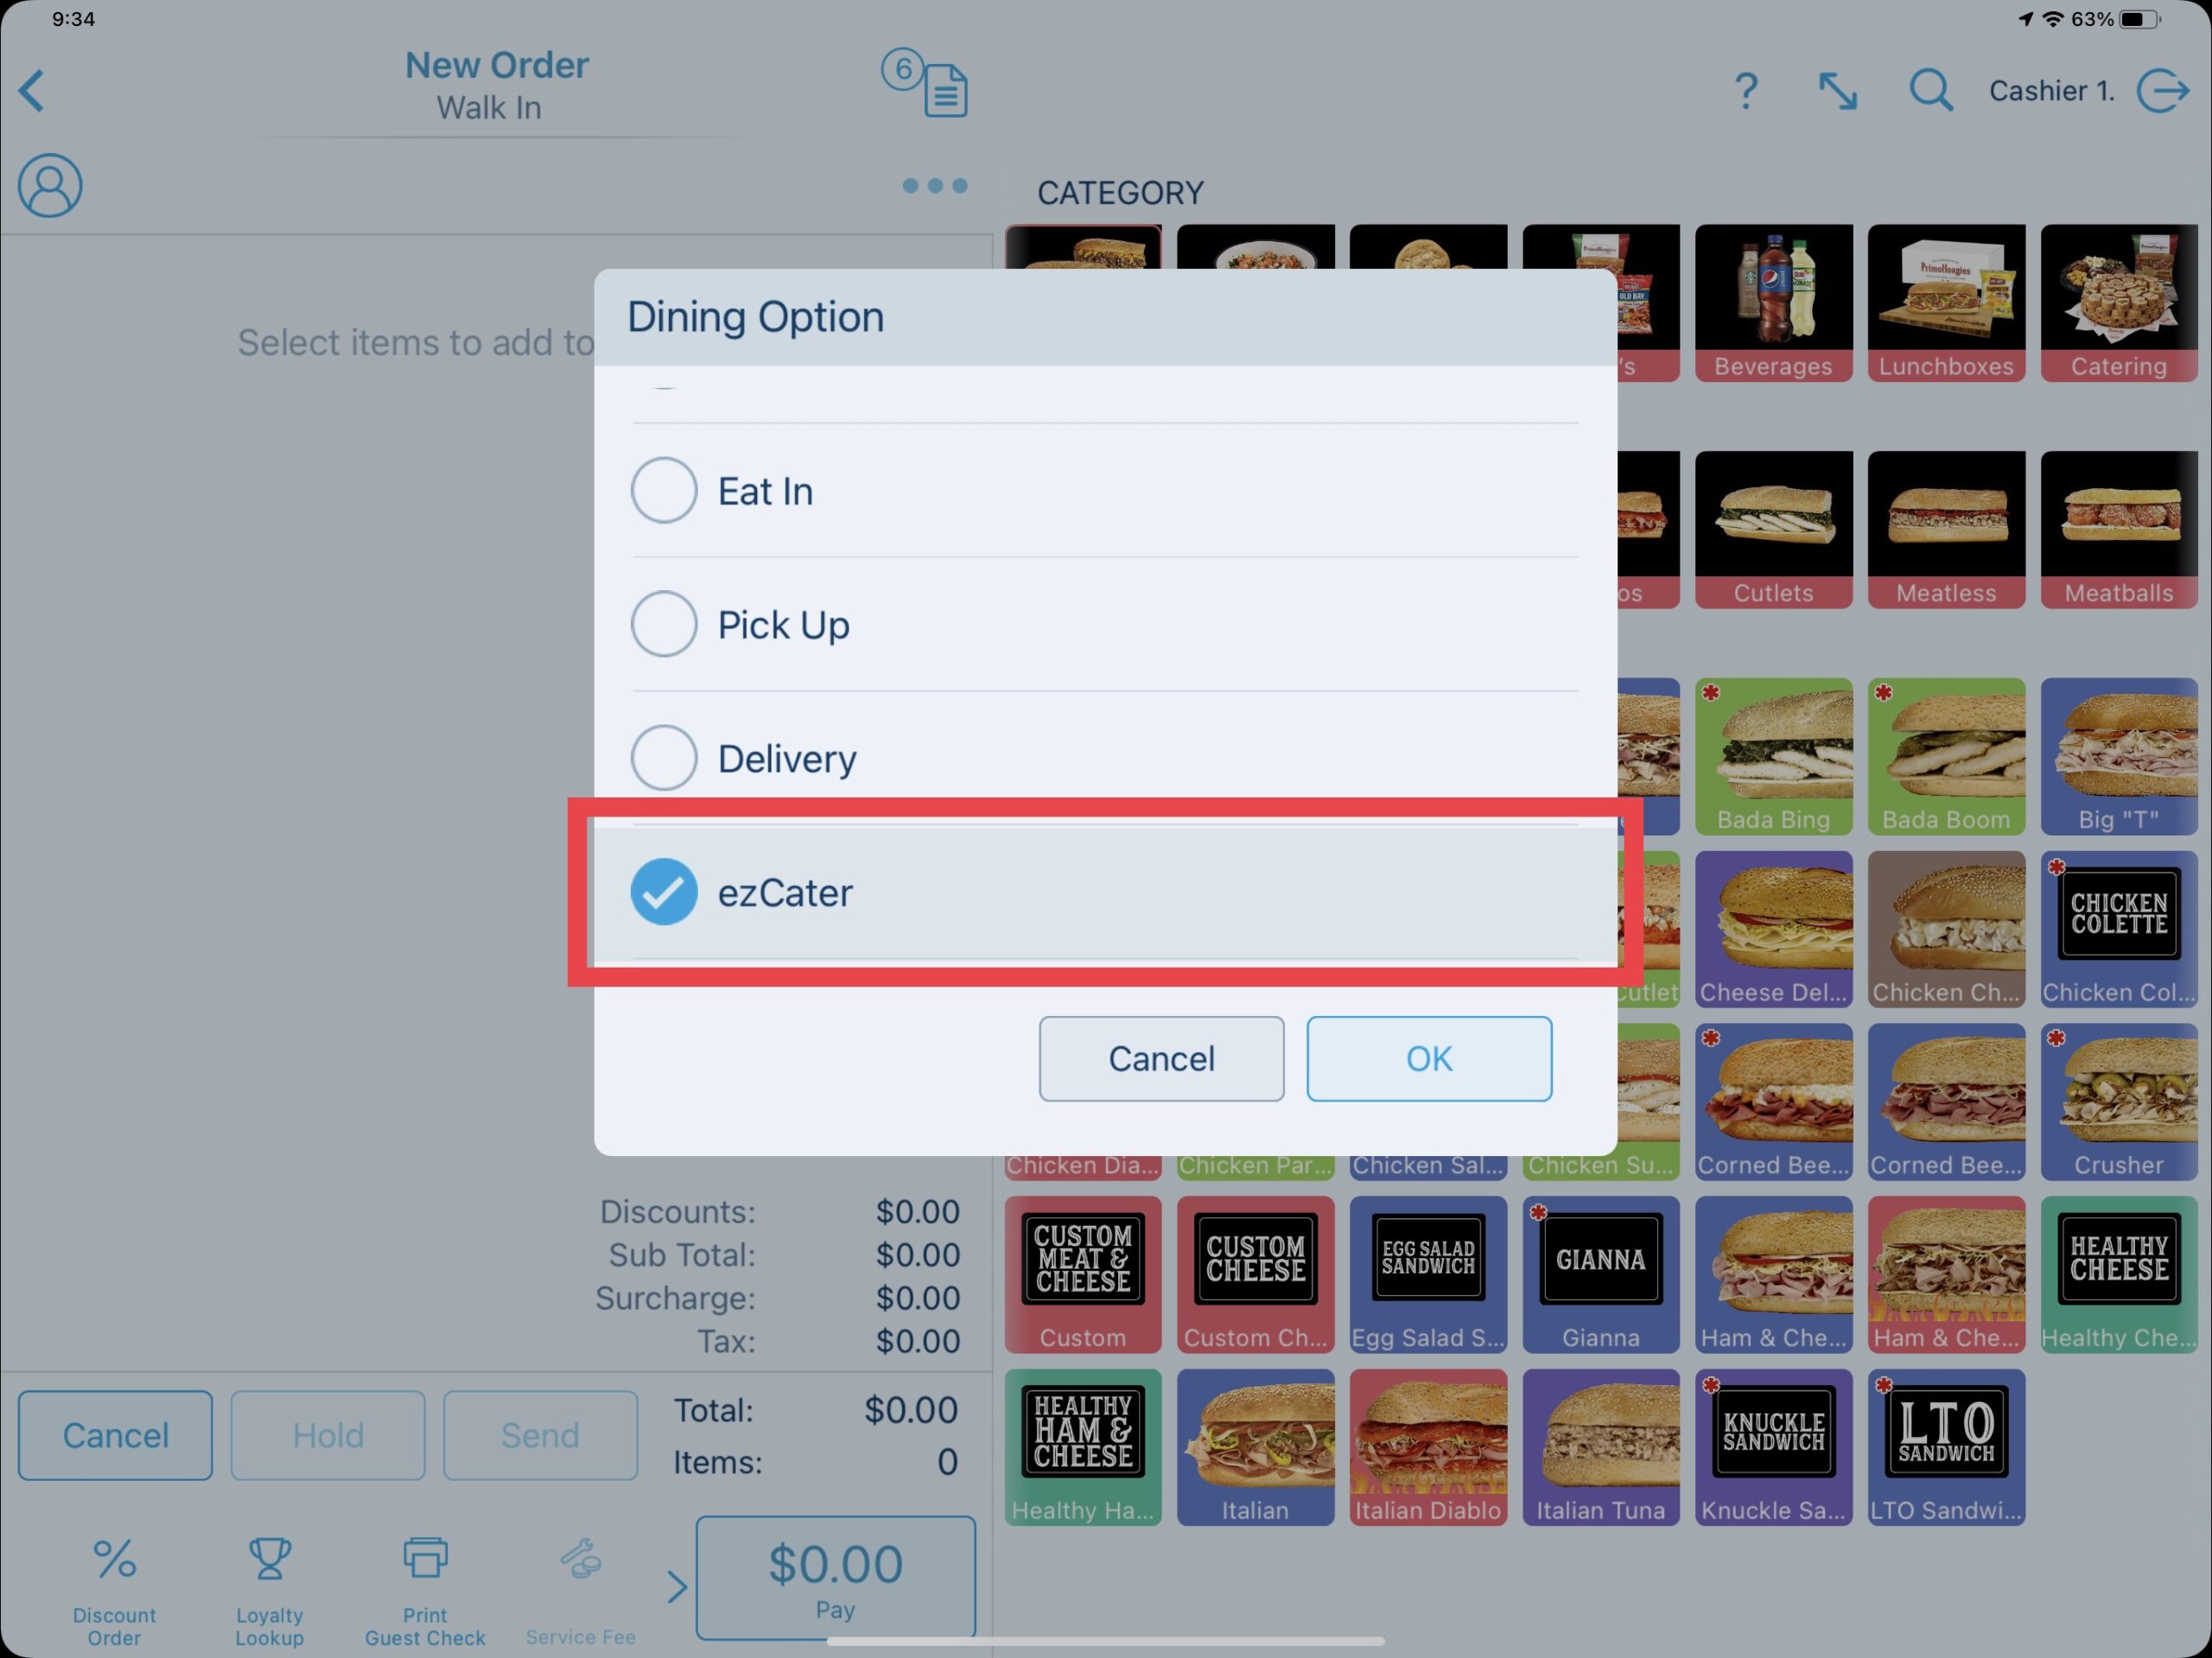
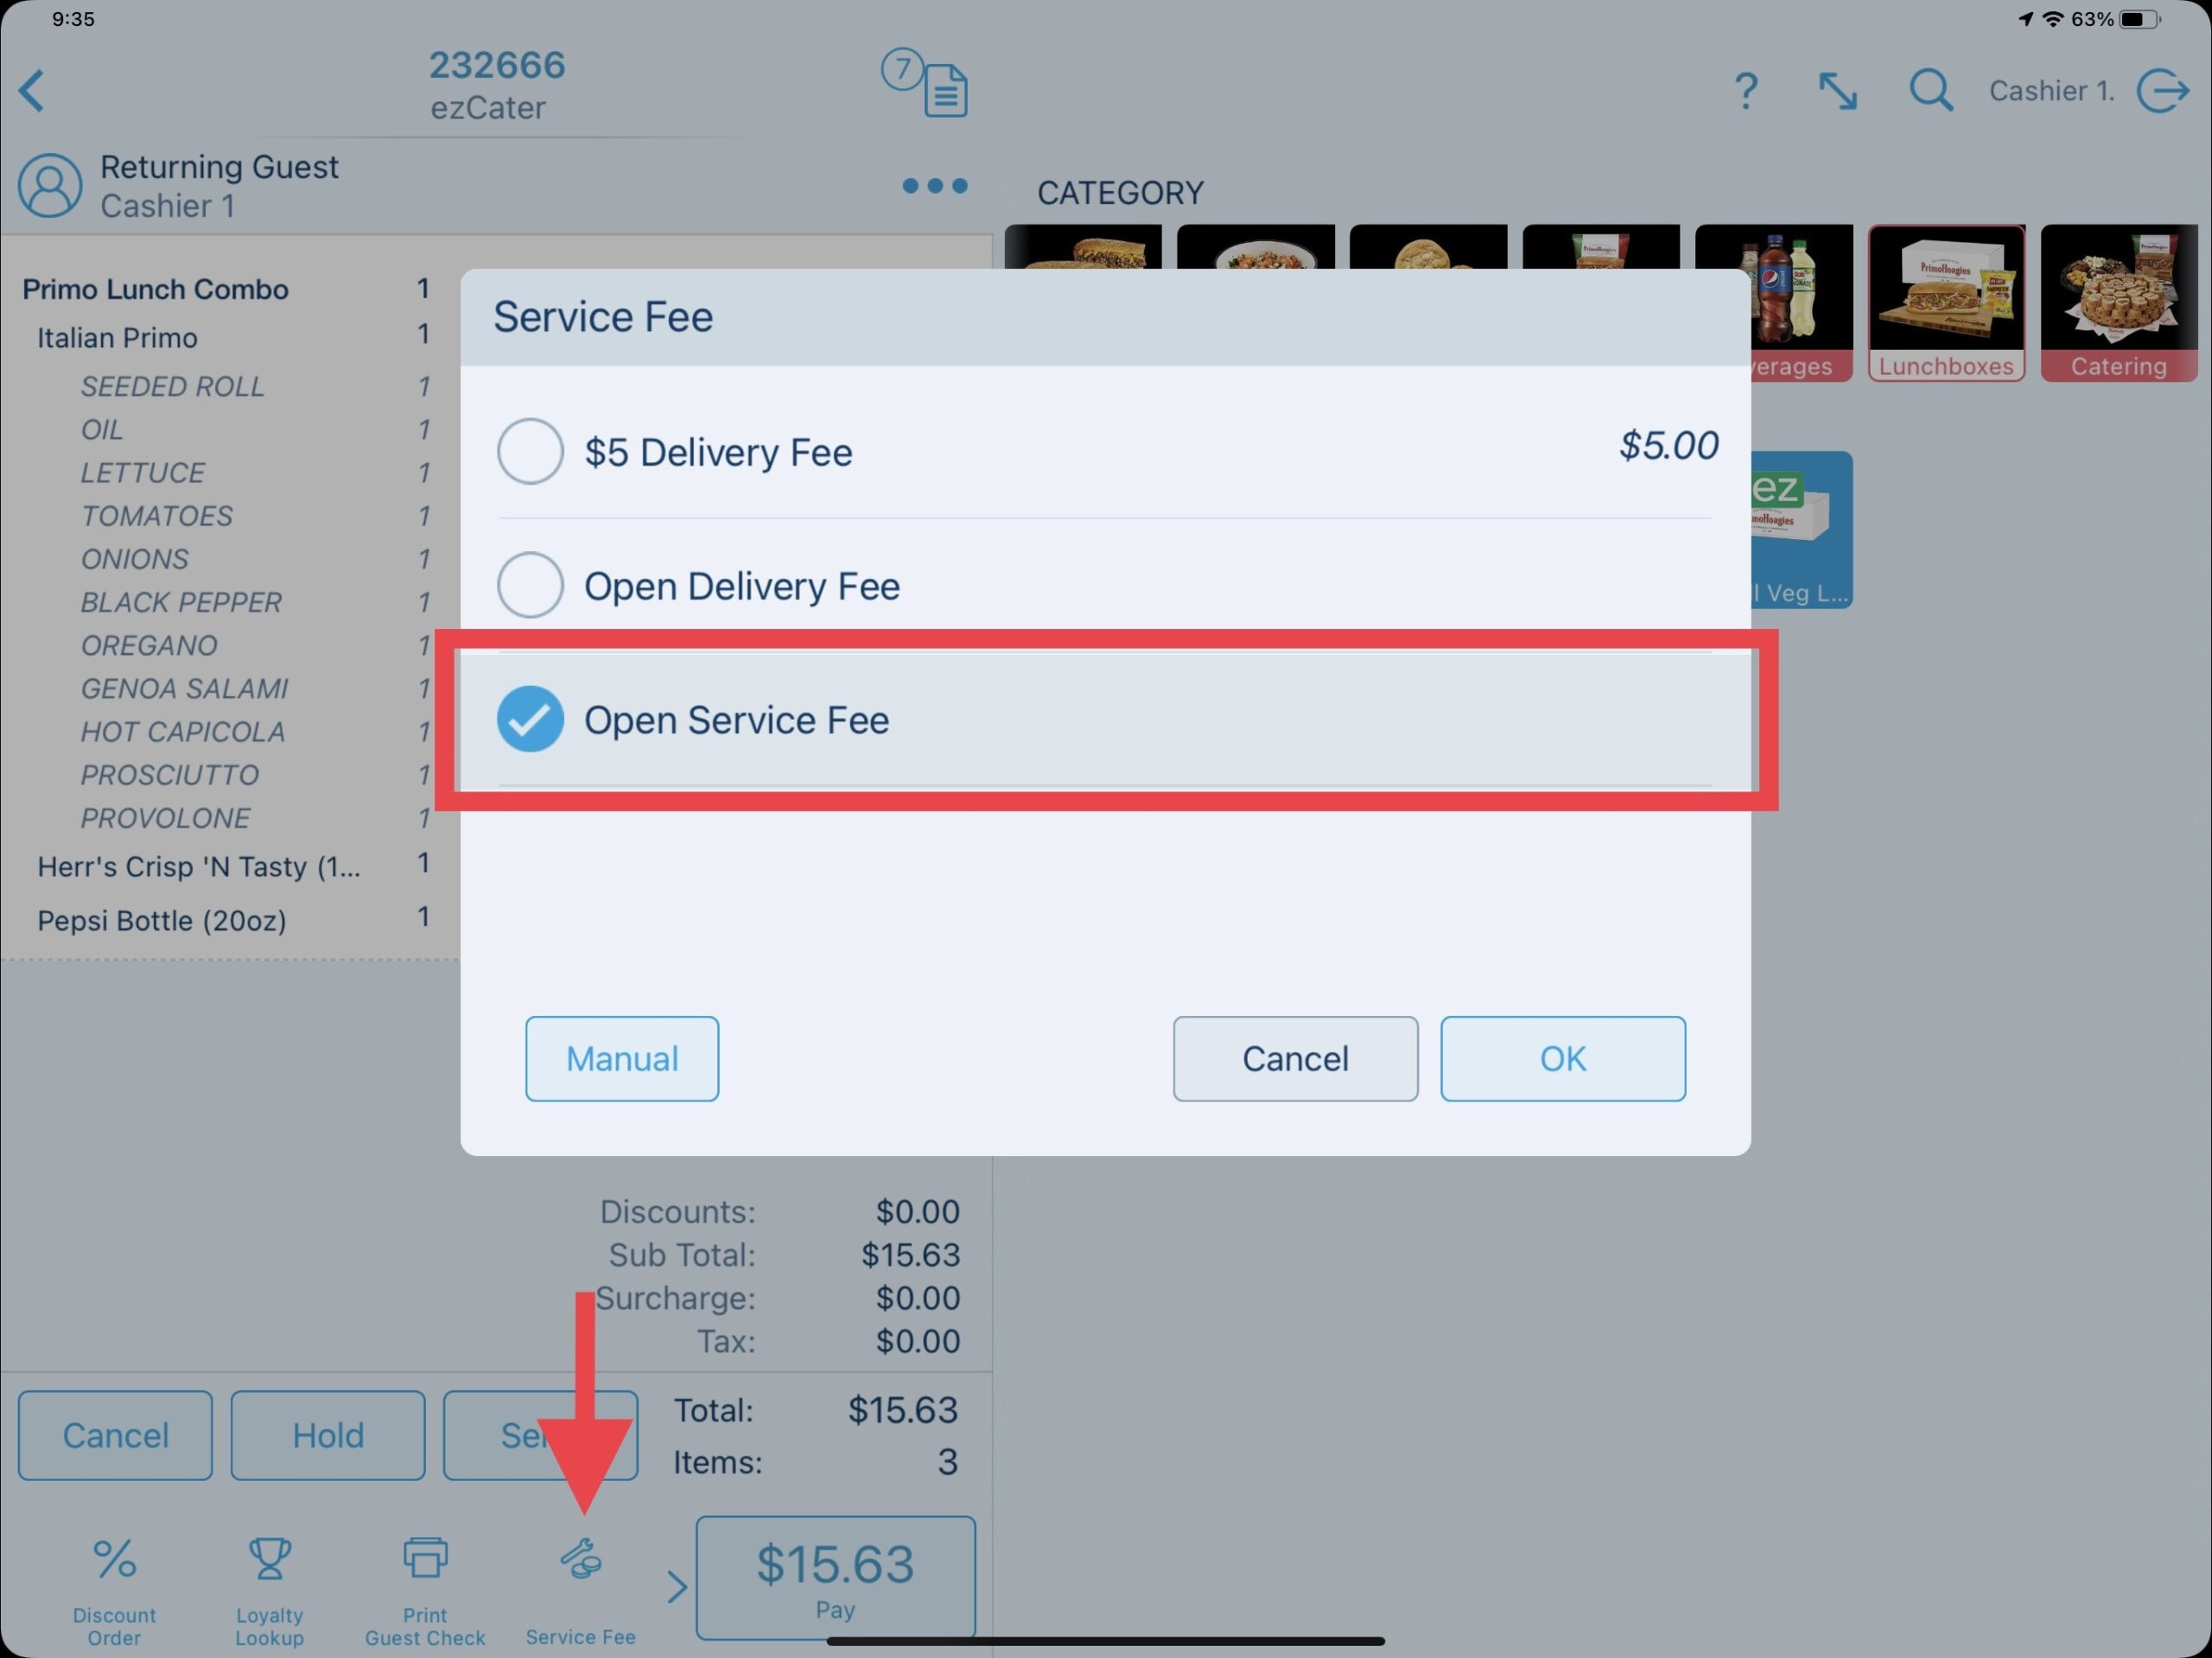
After assigning the ezCater dining option to the order, products can then be added including ezCater lunchboxes found under the Lunchboxes category. To apply the delivery fee, select the Service Fee action button on the bottom left and apply the Open Service Fee as needed.
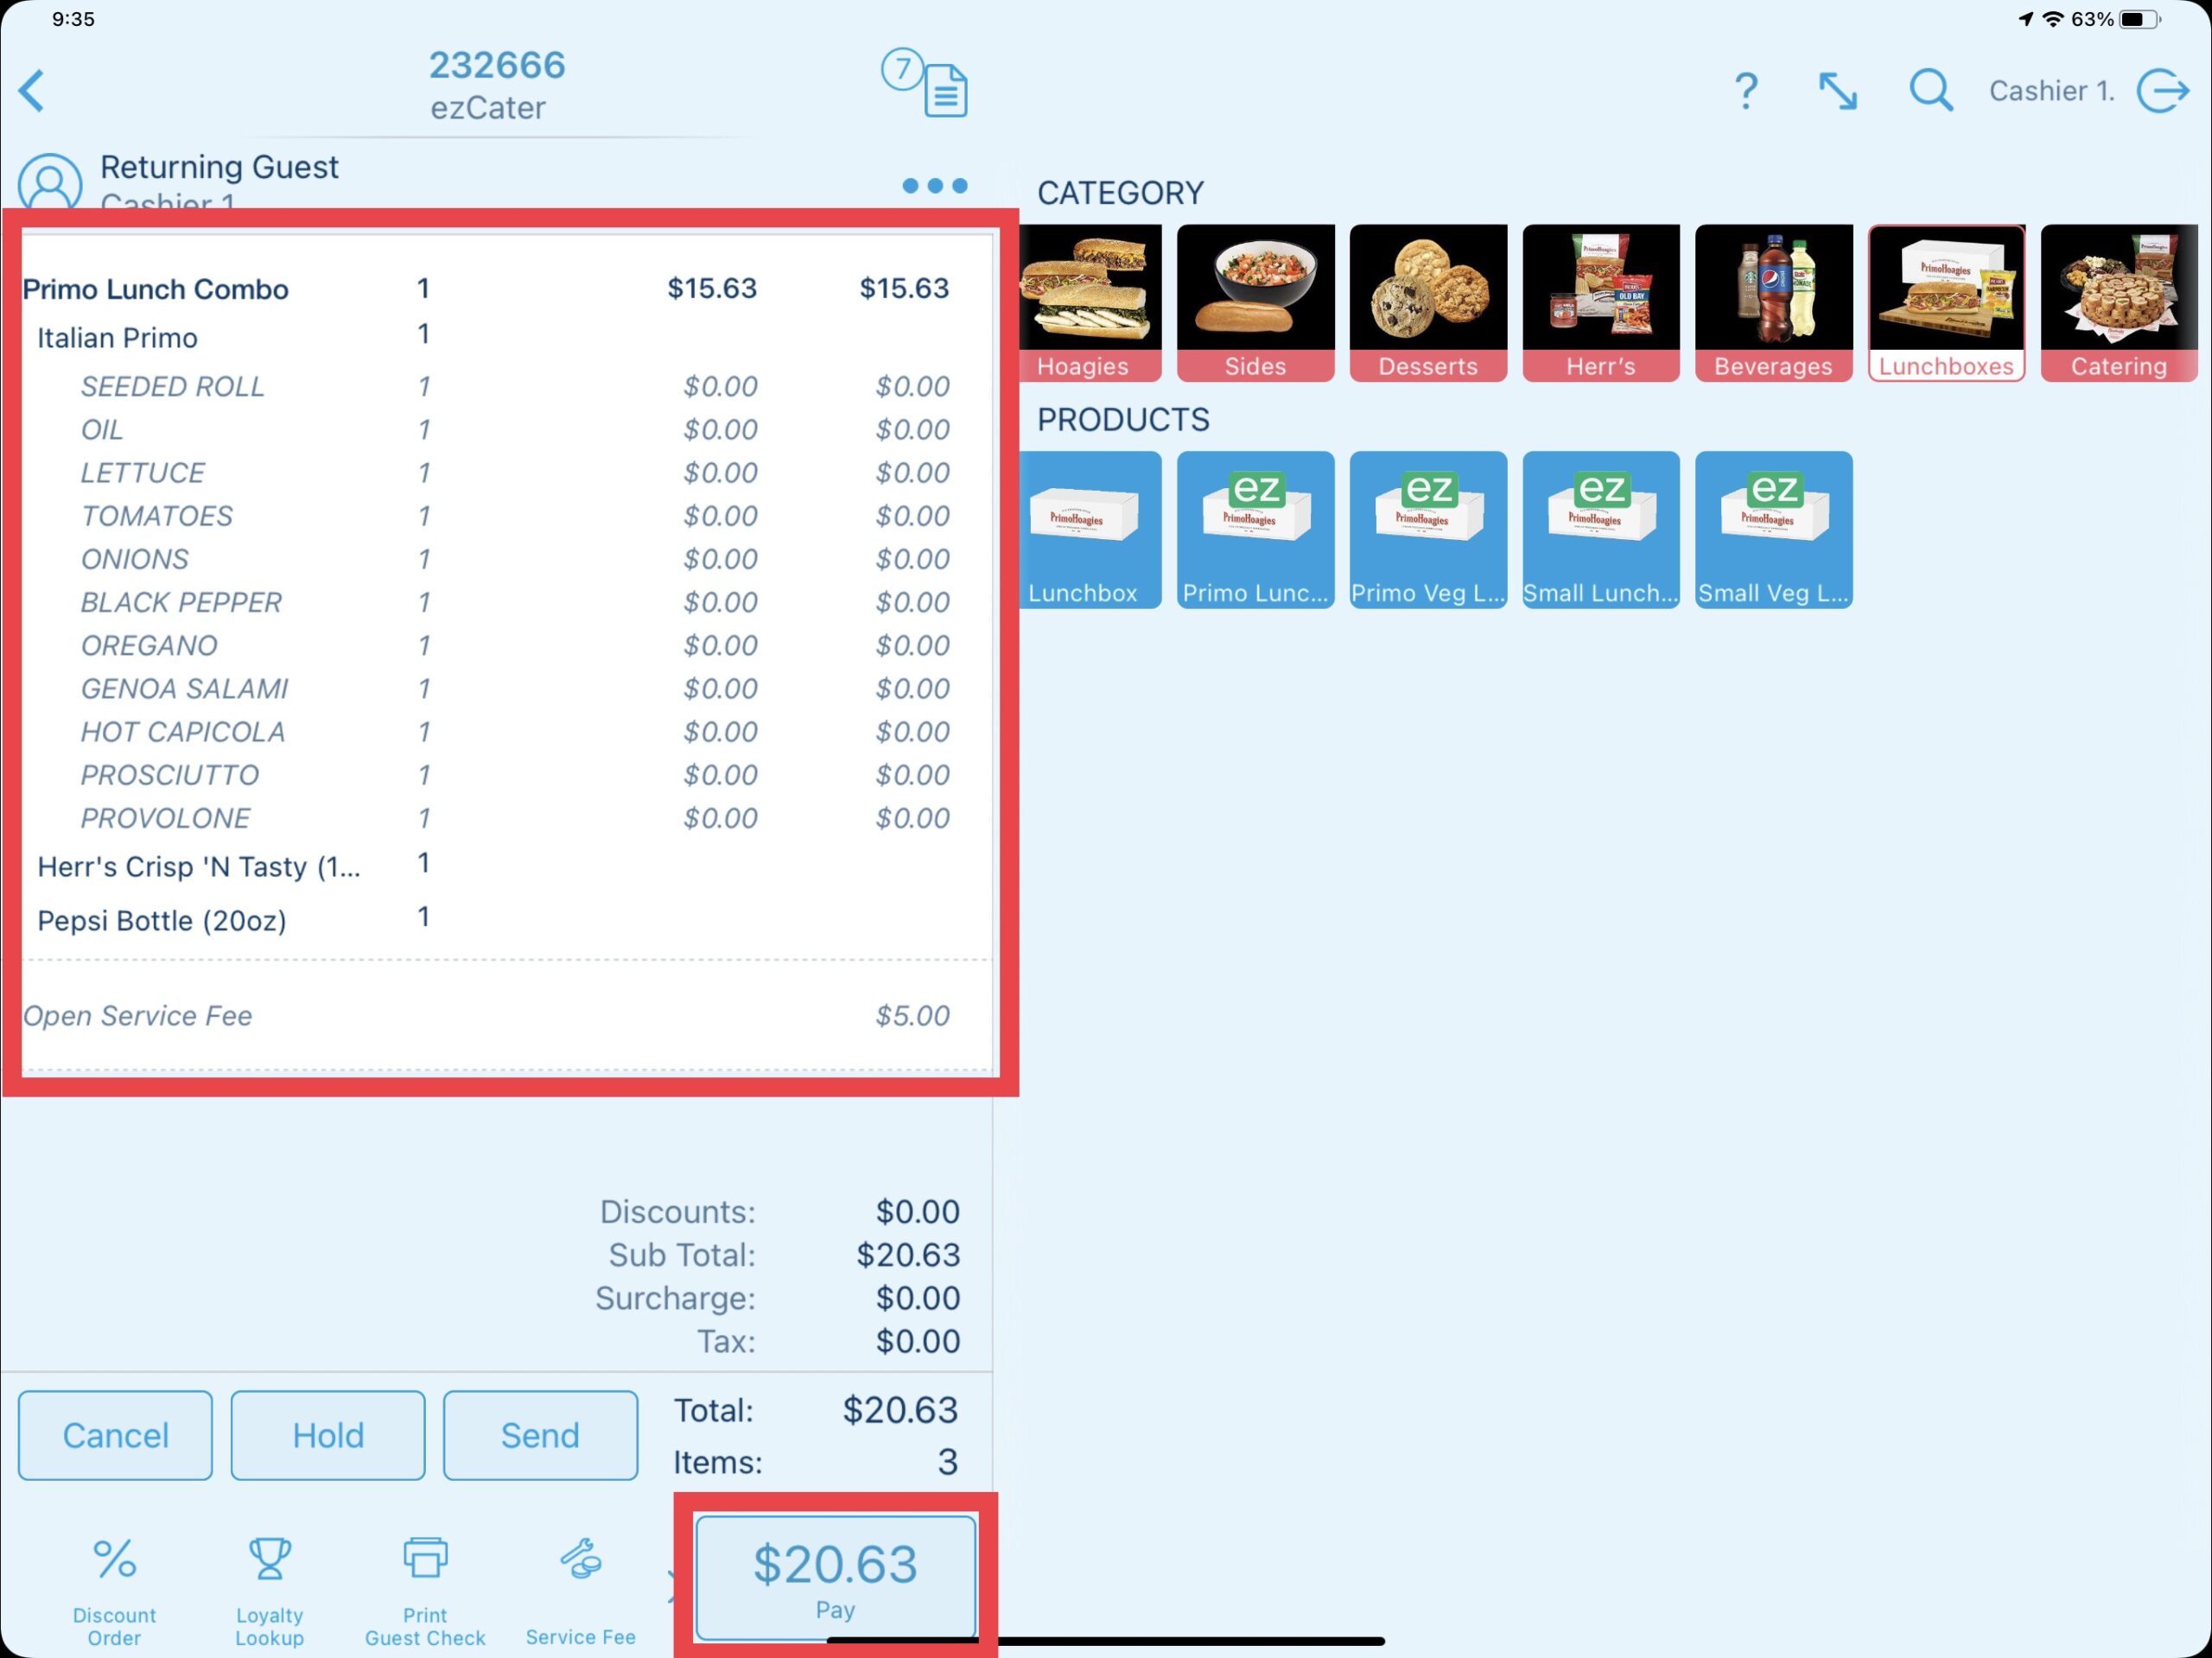
The added products and service fee are now added to the order. Proceed to the payment screen or Hold or Send the order as needed. Keep in mind you will be required to enter a call name or customer name to the order as well as attach a Como loyalty member if needed.
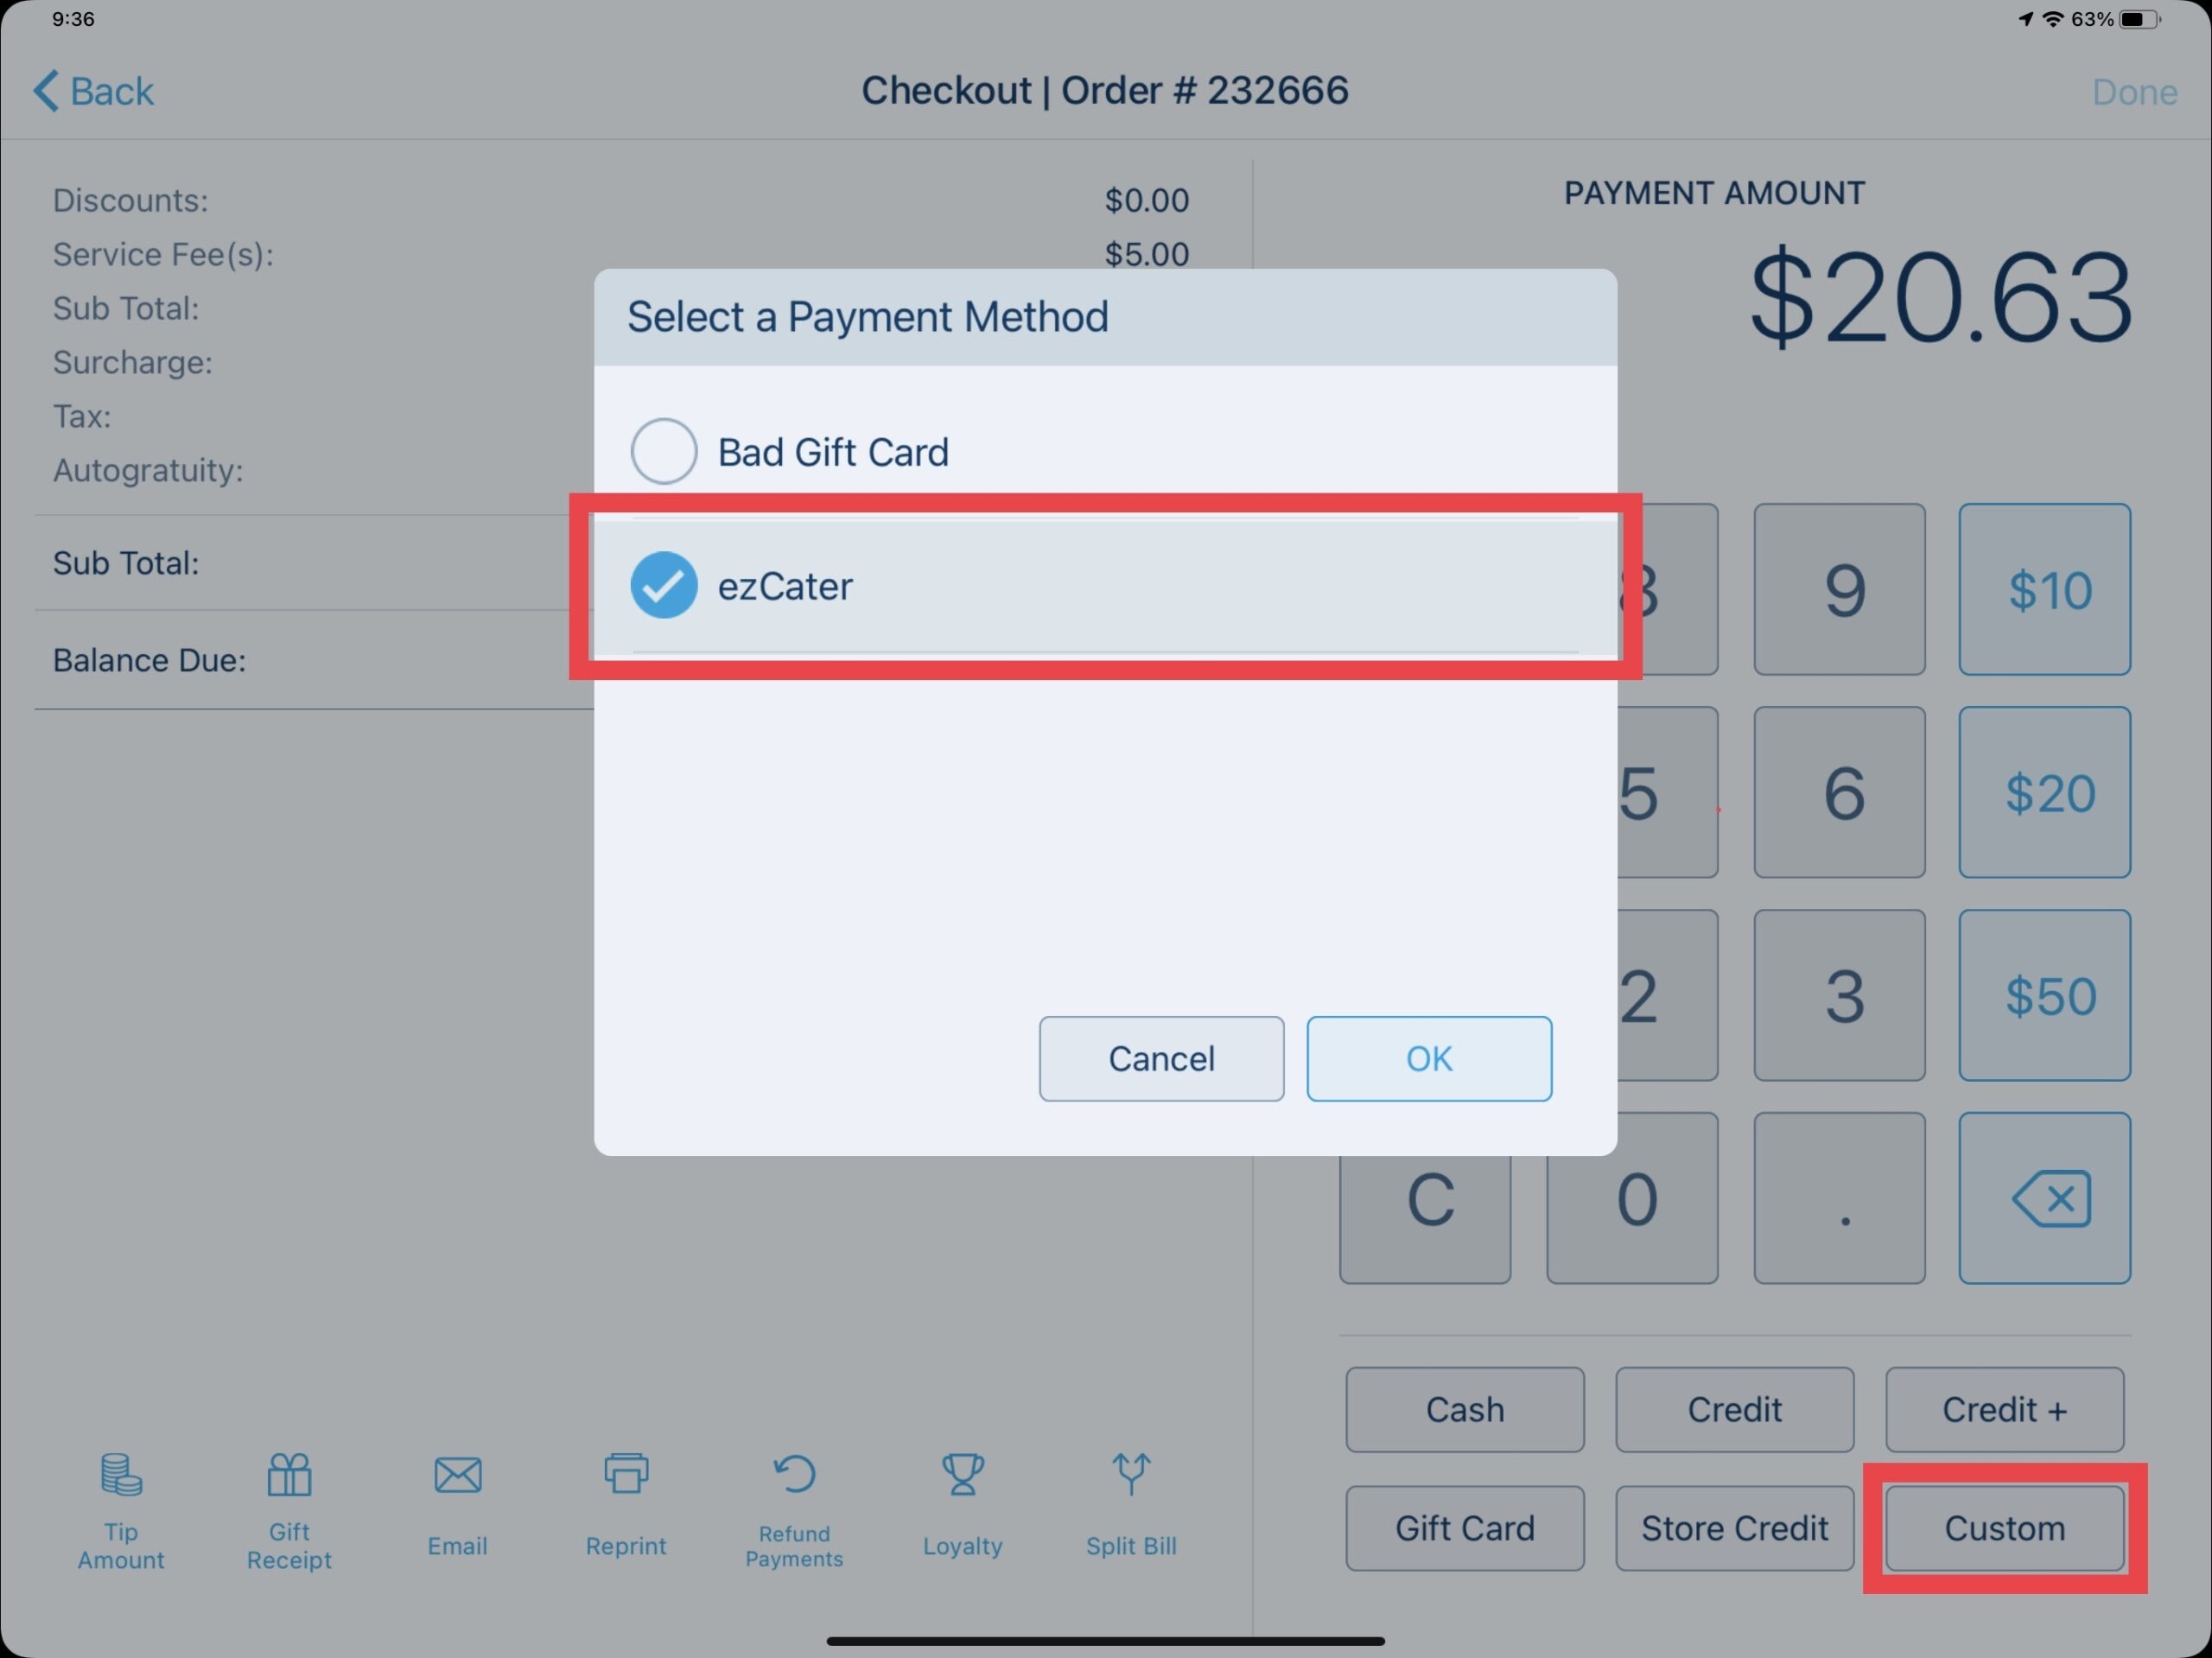
Use the Custom payment button on the payment screen to pay the order to the ezCater payment method.
Depending on the business setup, the cashier iPad or the customer display iPad will prompt for any additional tip to be added as well as a receipt choice.
Updated 06/15/2022

Summary
A house account is a line of credit that you can extend to your customers, where they can take now and pay later. In essence, a house account acts as a long term tab. This feature must be enabled by DBS before it can be used.
Creating & Applying A House Account
In order to apply a house account to an order, a customer must be added, then select pay.
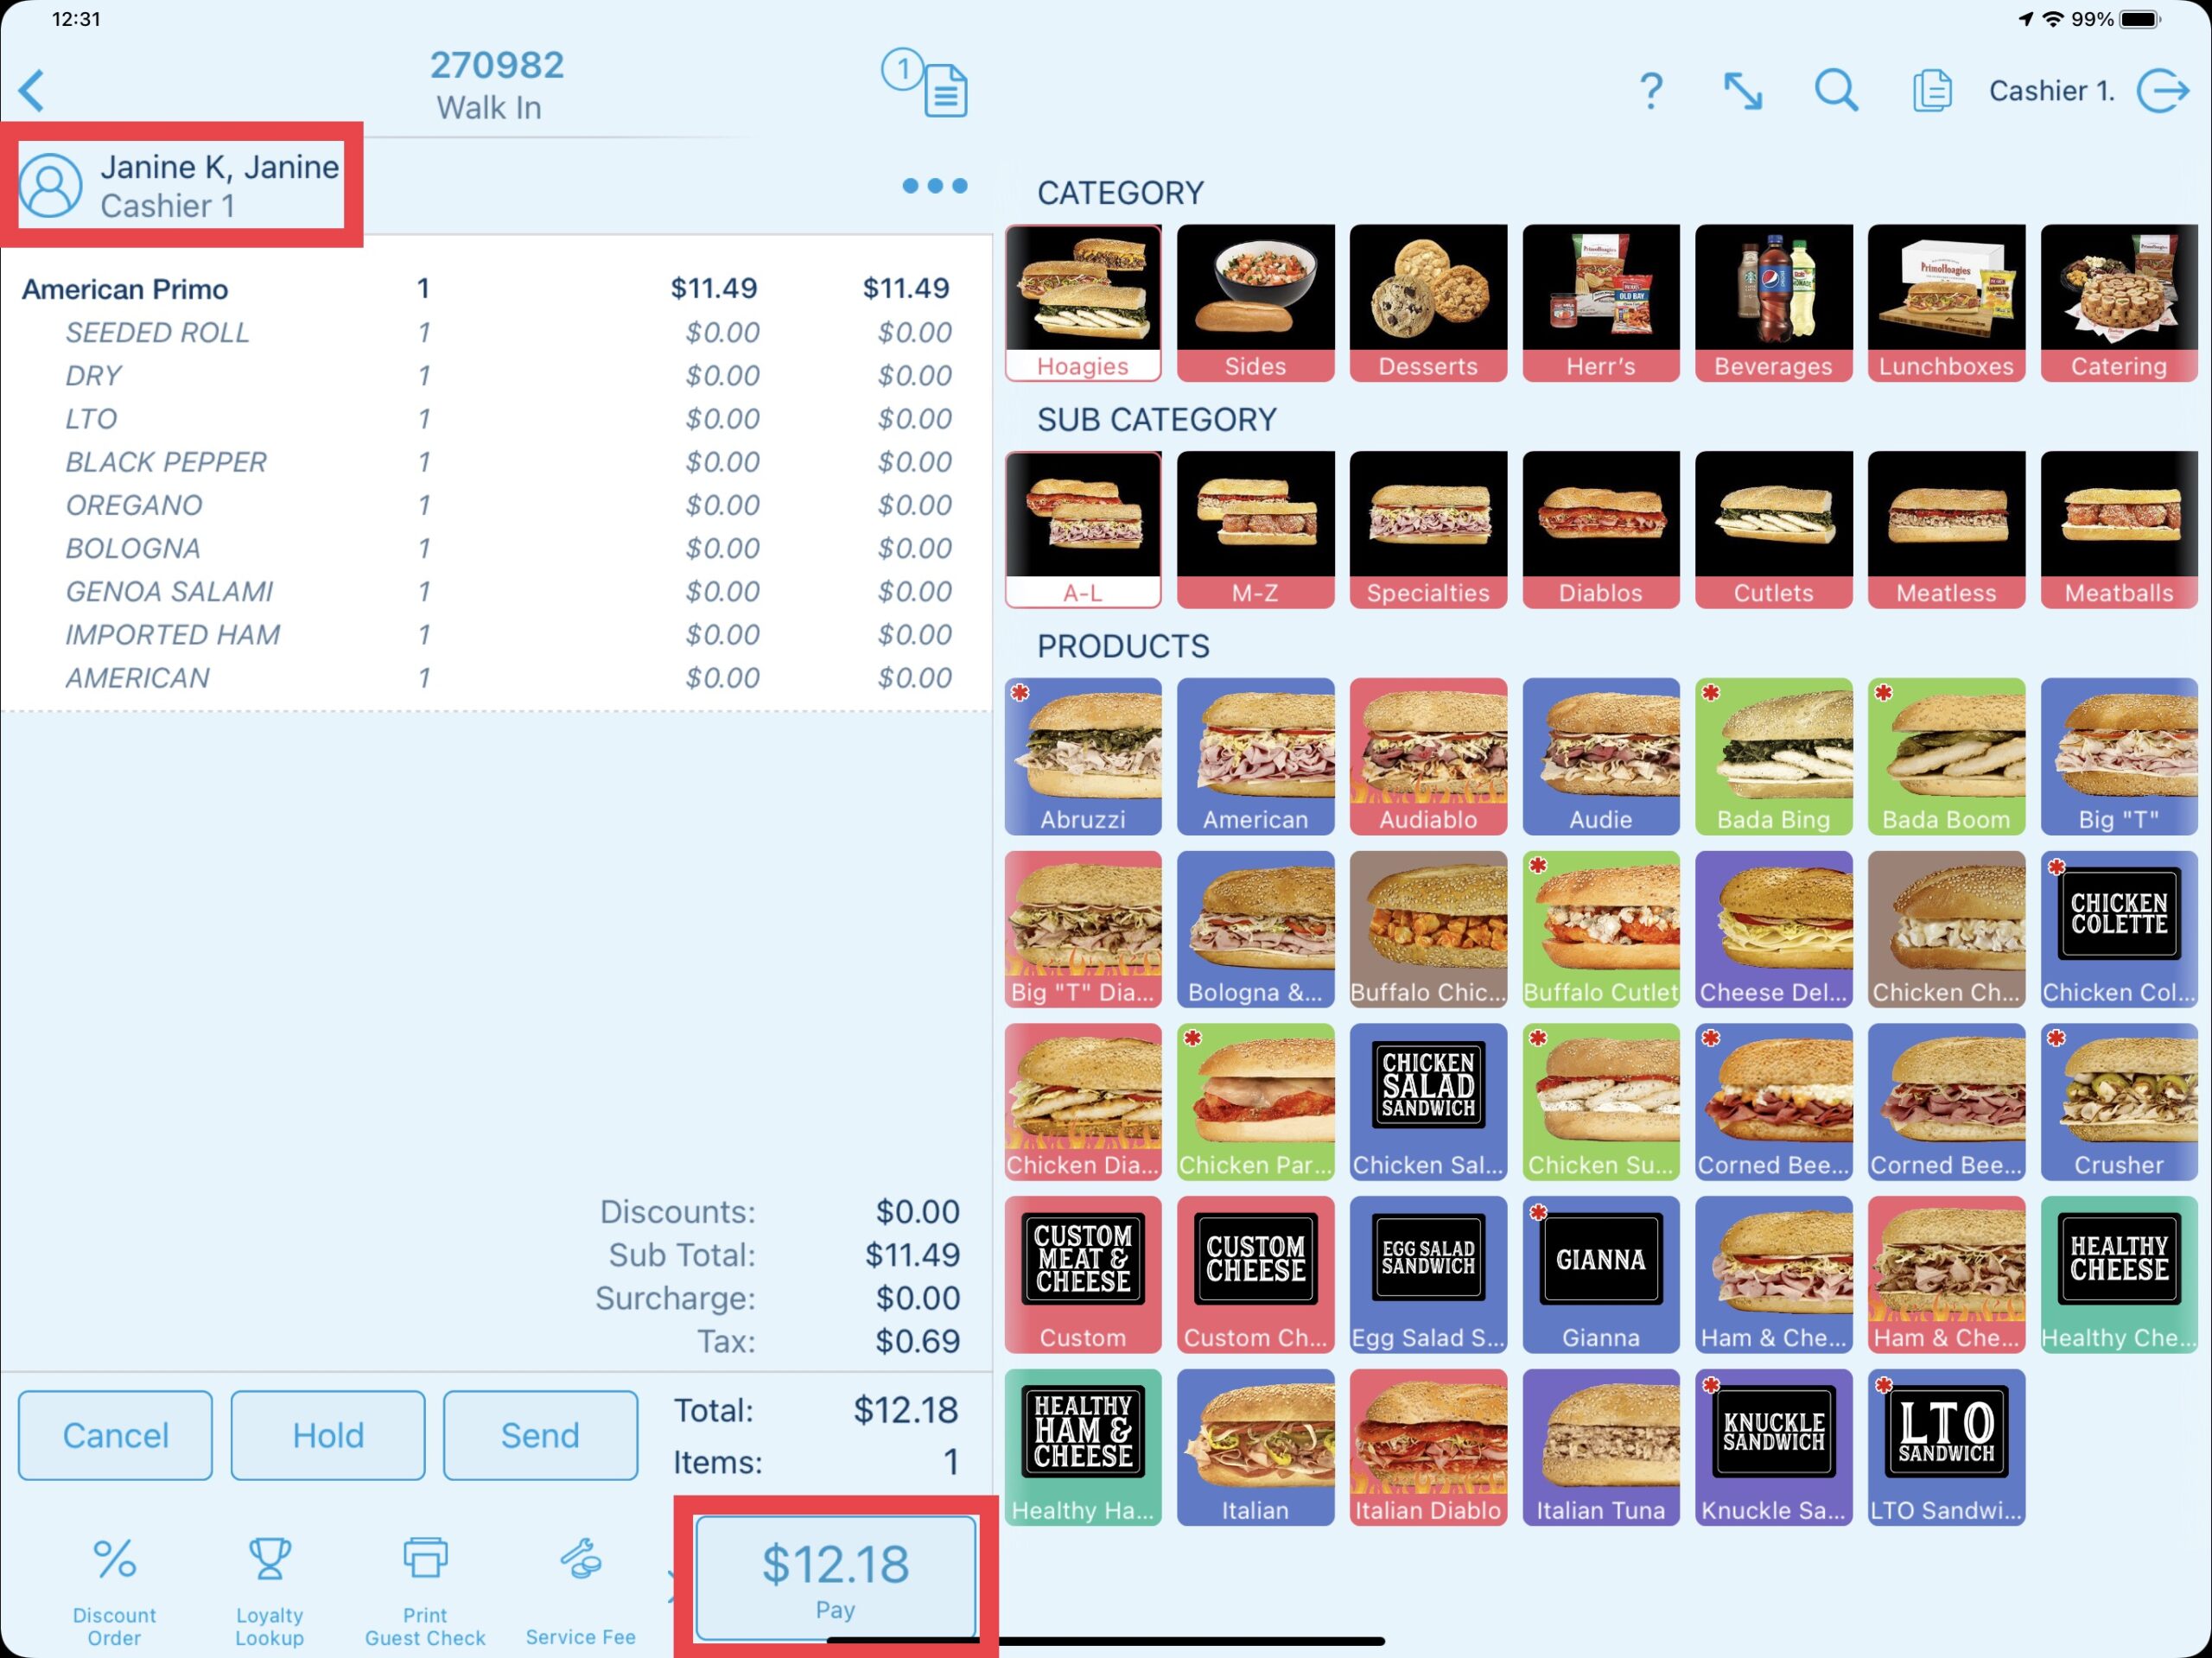
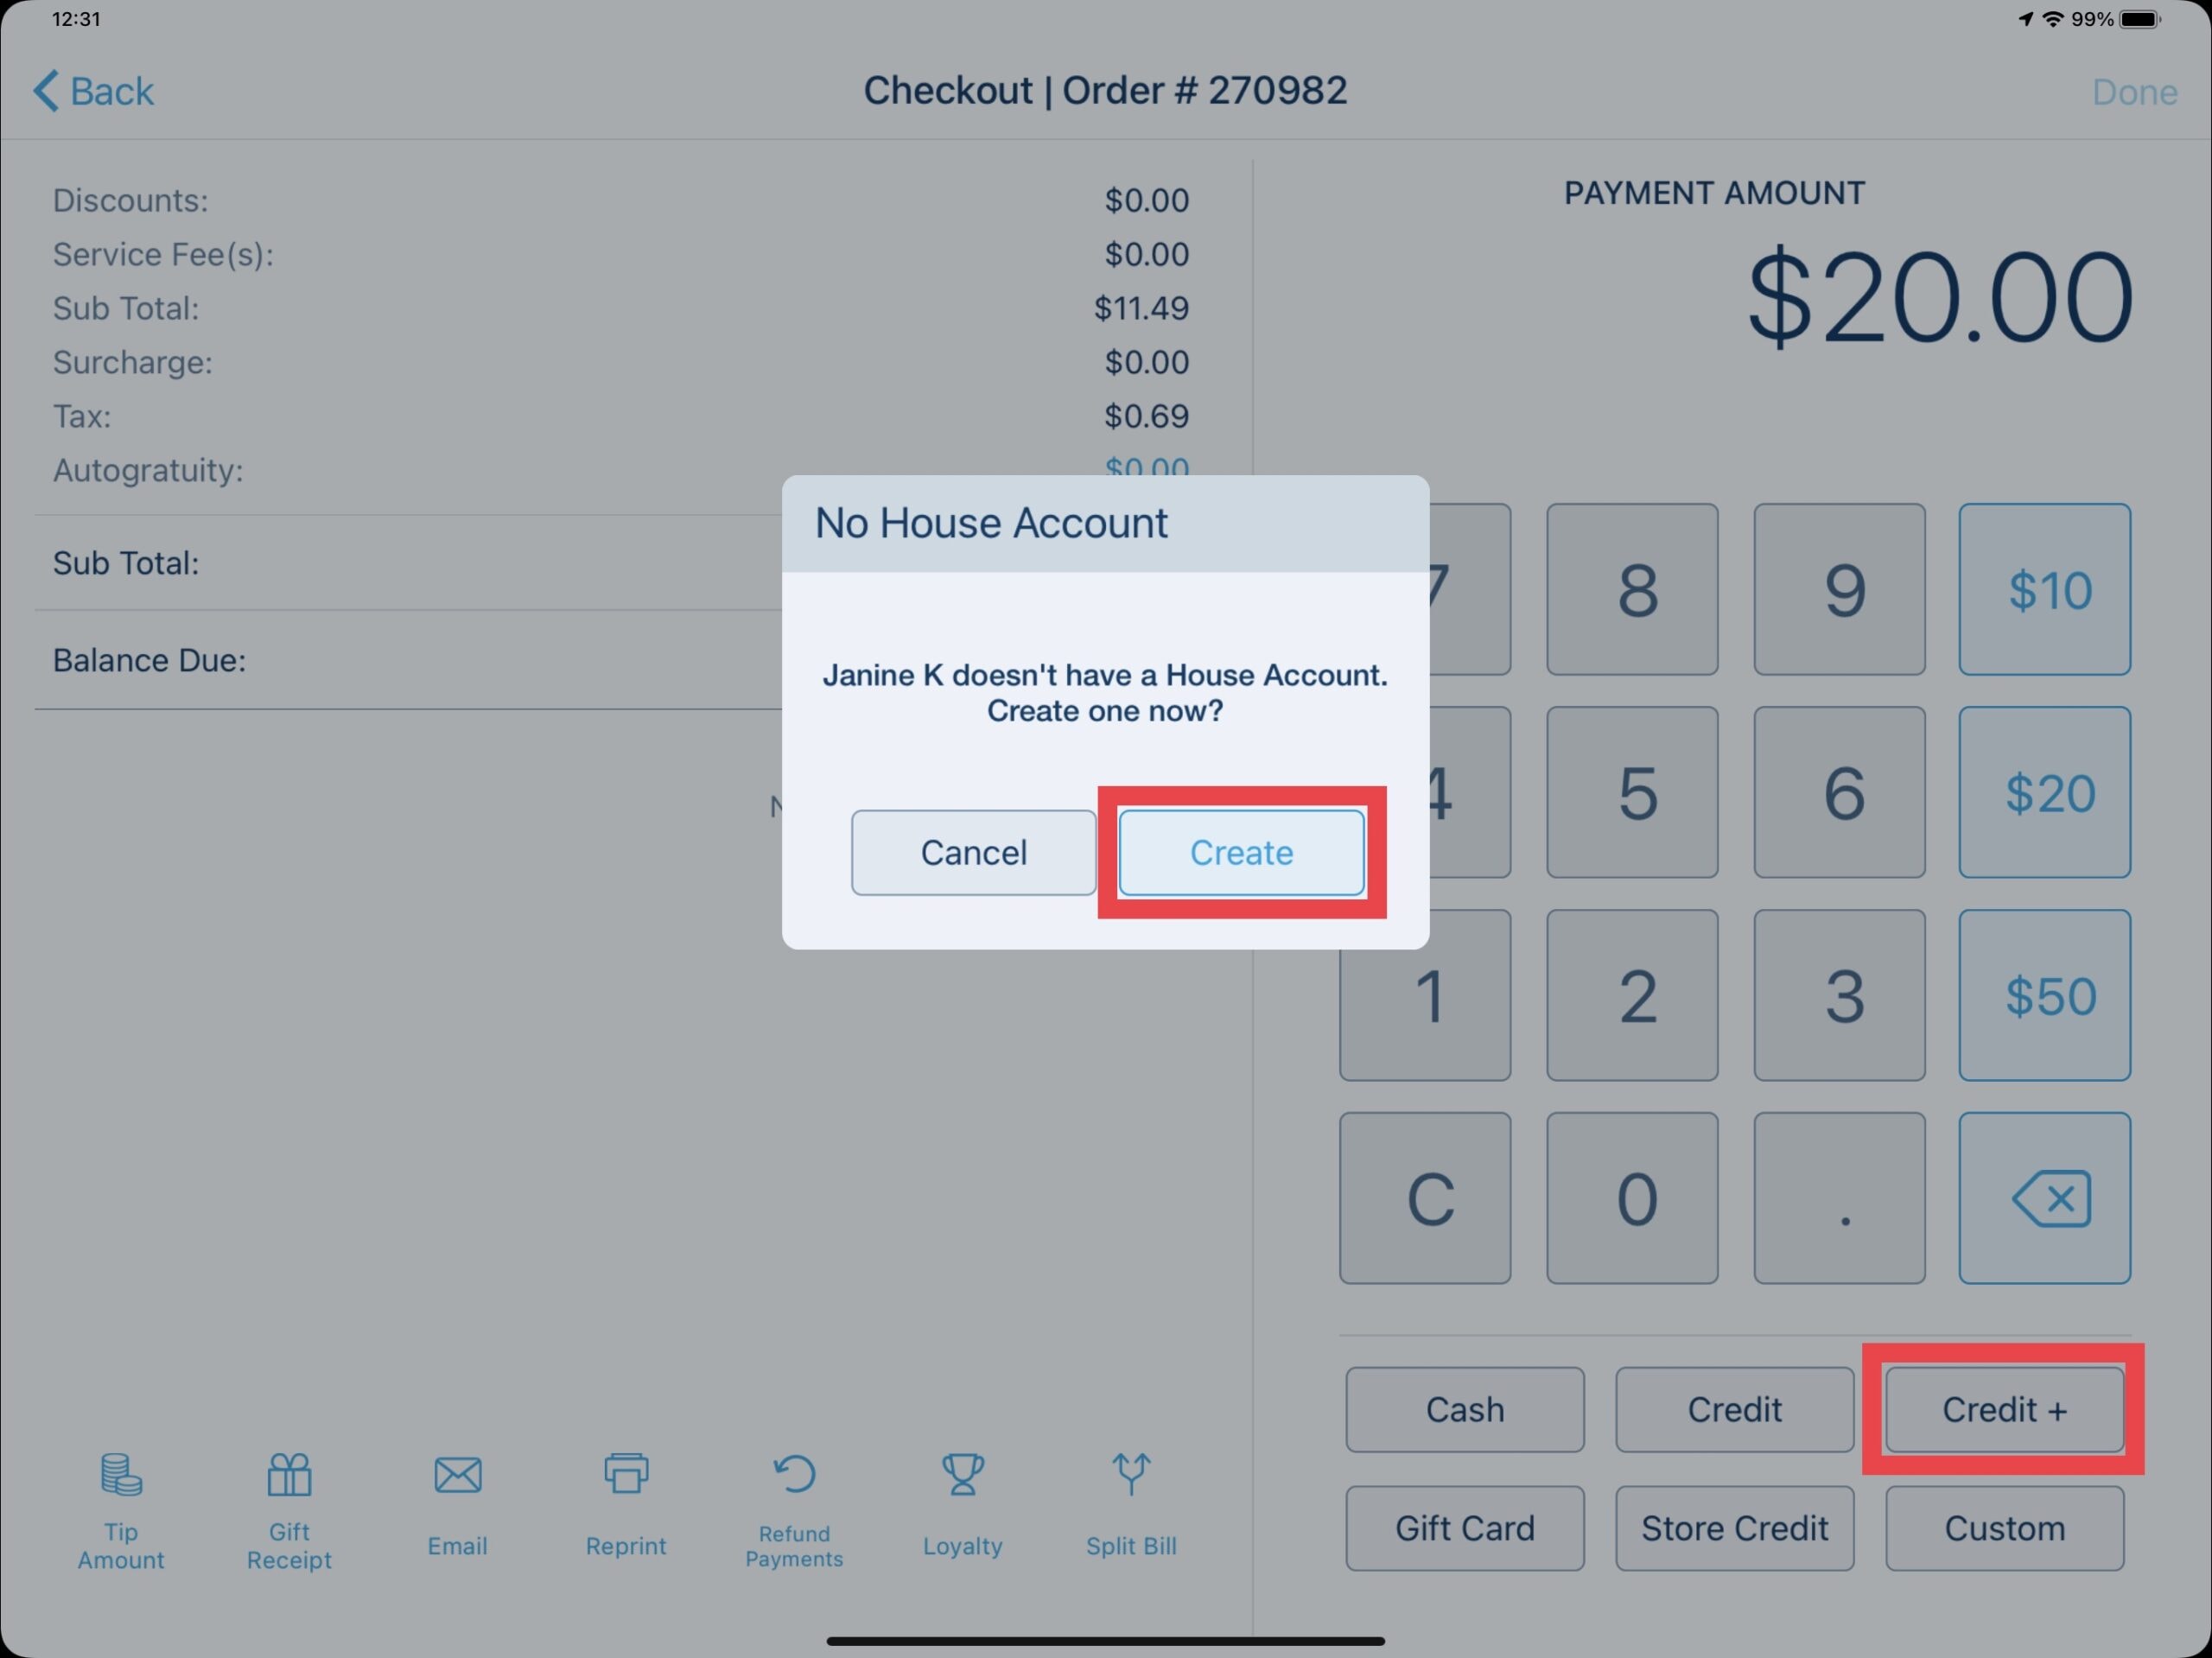
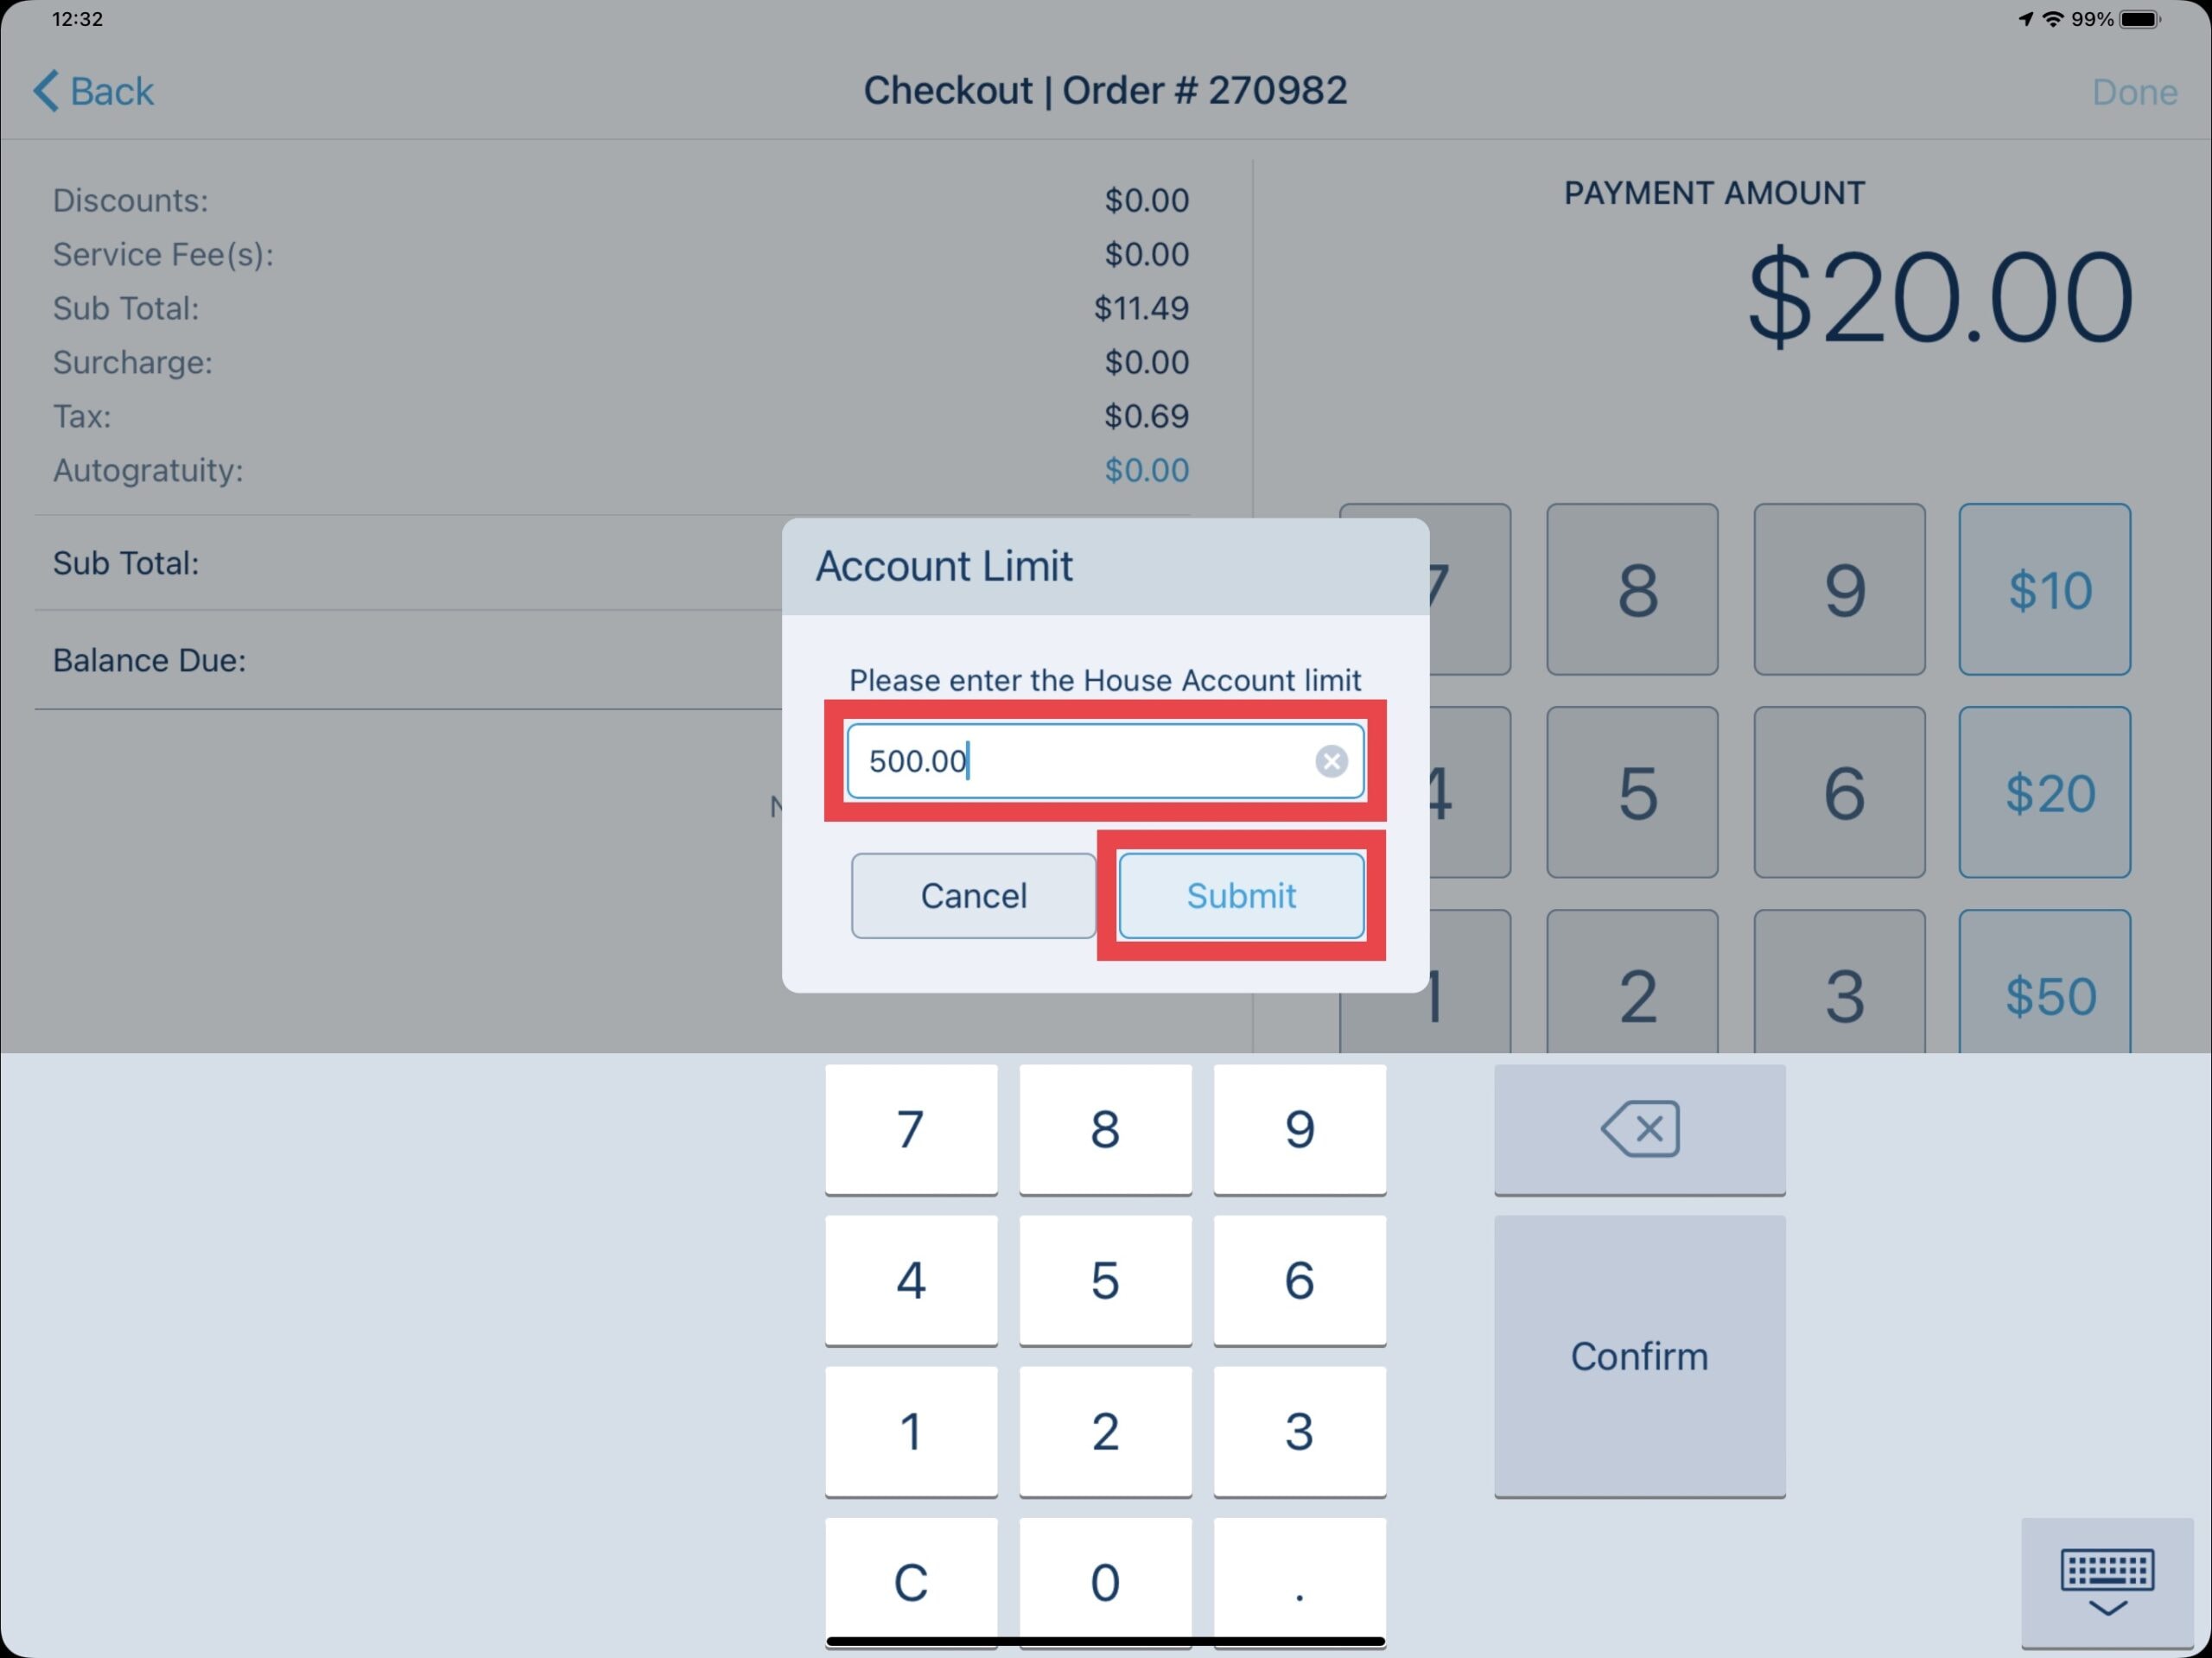
Once you are ready to pay the order, the Credit + option will allow payment to the customers house account or allow the creation of a new house account. Credit limits can also be set per house account. Enter a manager PIN or higher if required.
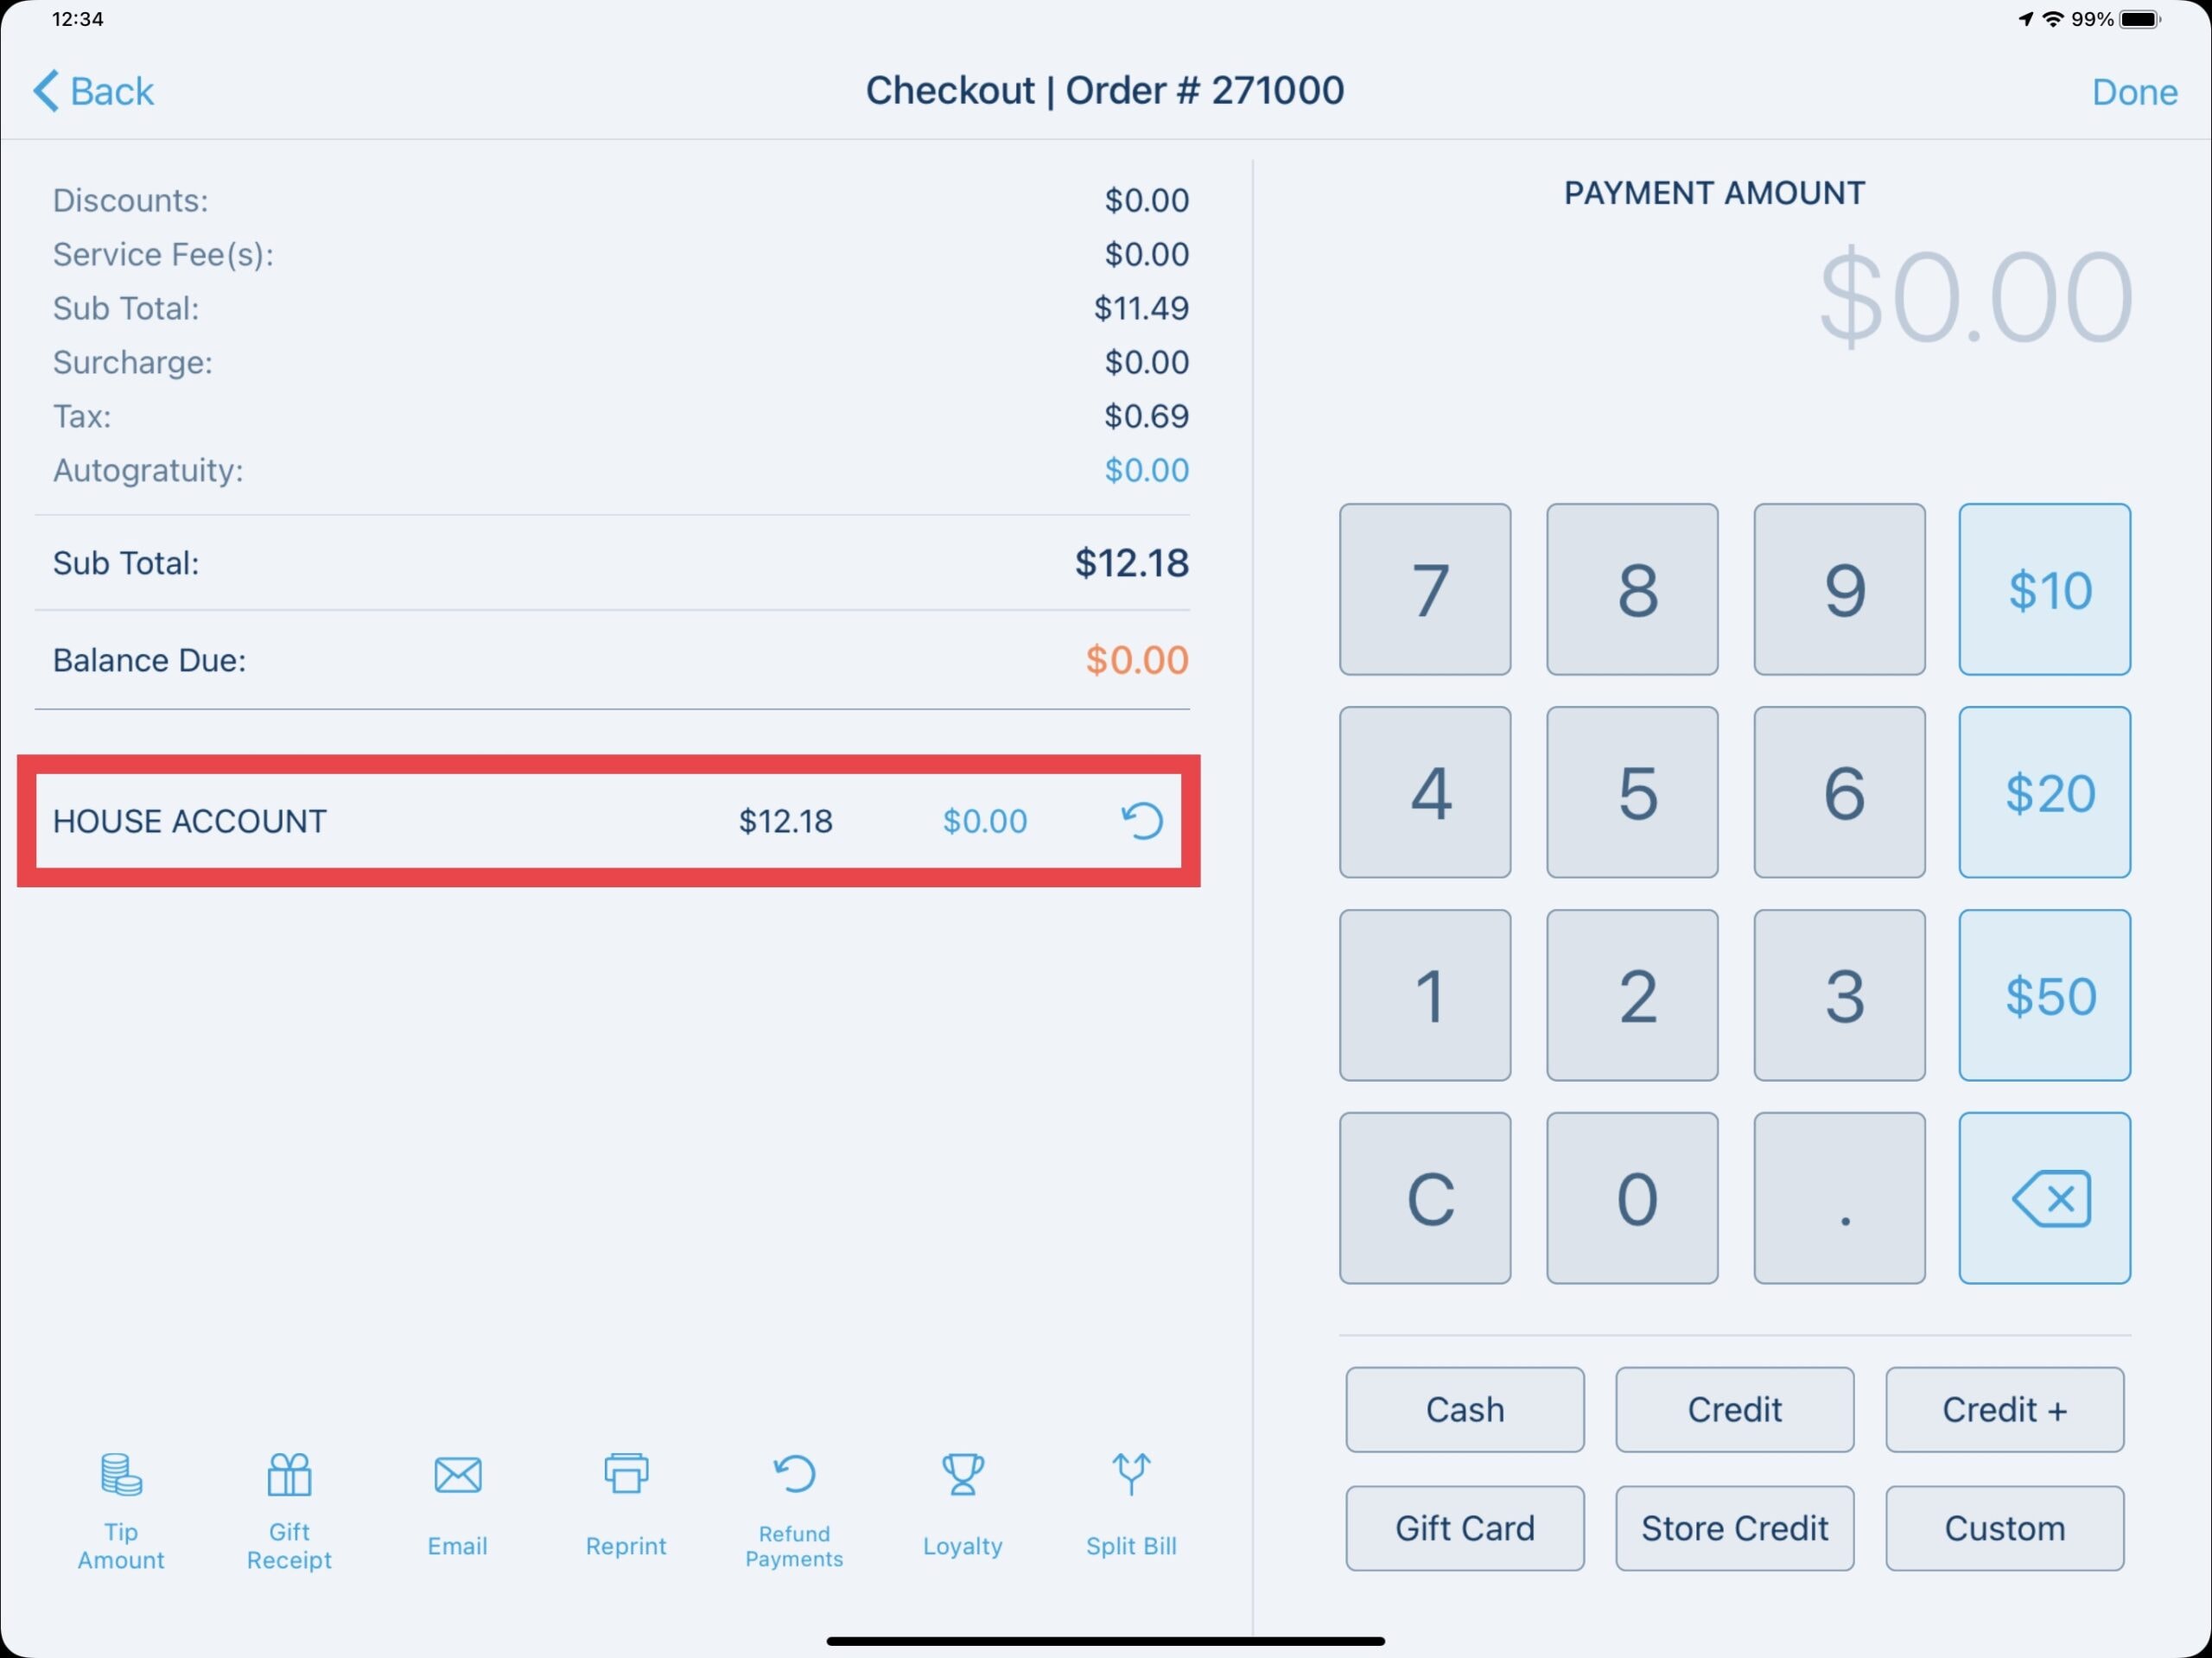
The order payment will automatically be applied to the house account.
Balance & Payment Into A House Account
Applying a payment to a house account can be done at the POS level by selecting the customer details prior to starting an order or under the Manage Customers section on the bottom of the POS Dashboard and searching for the customer.
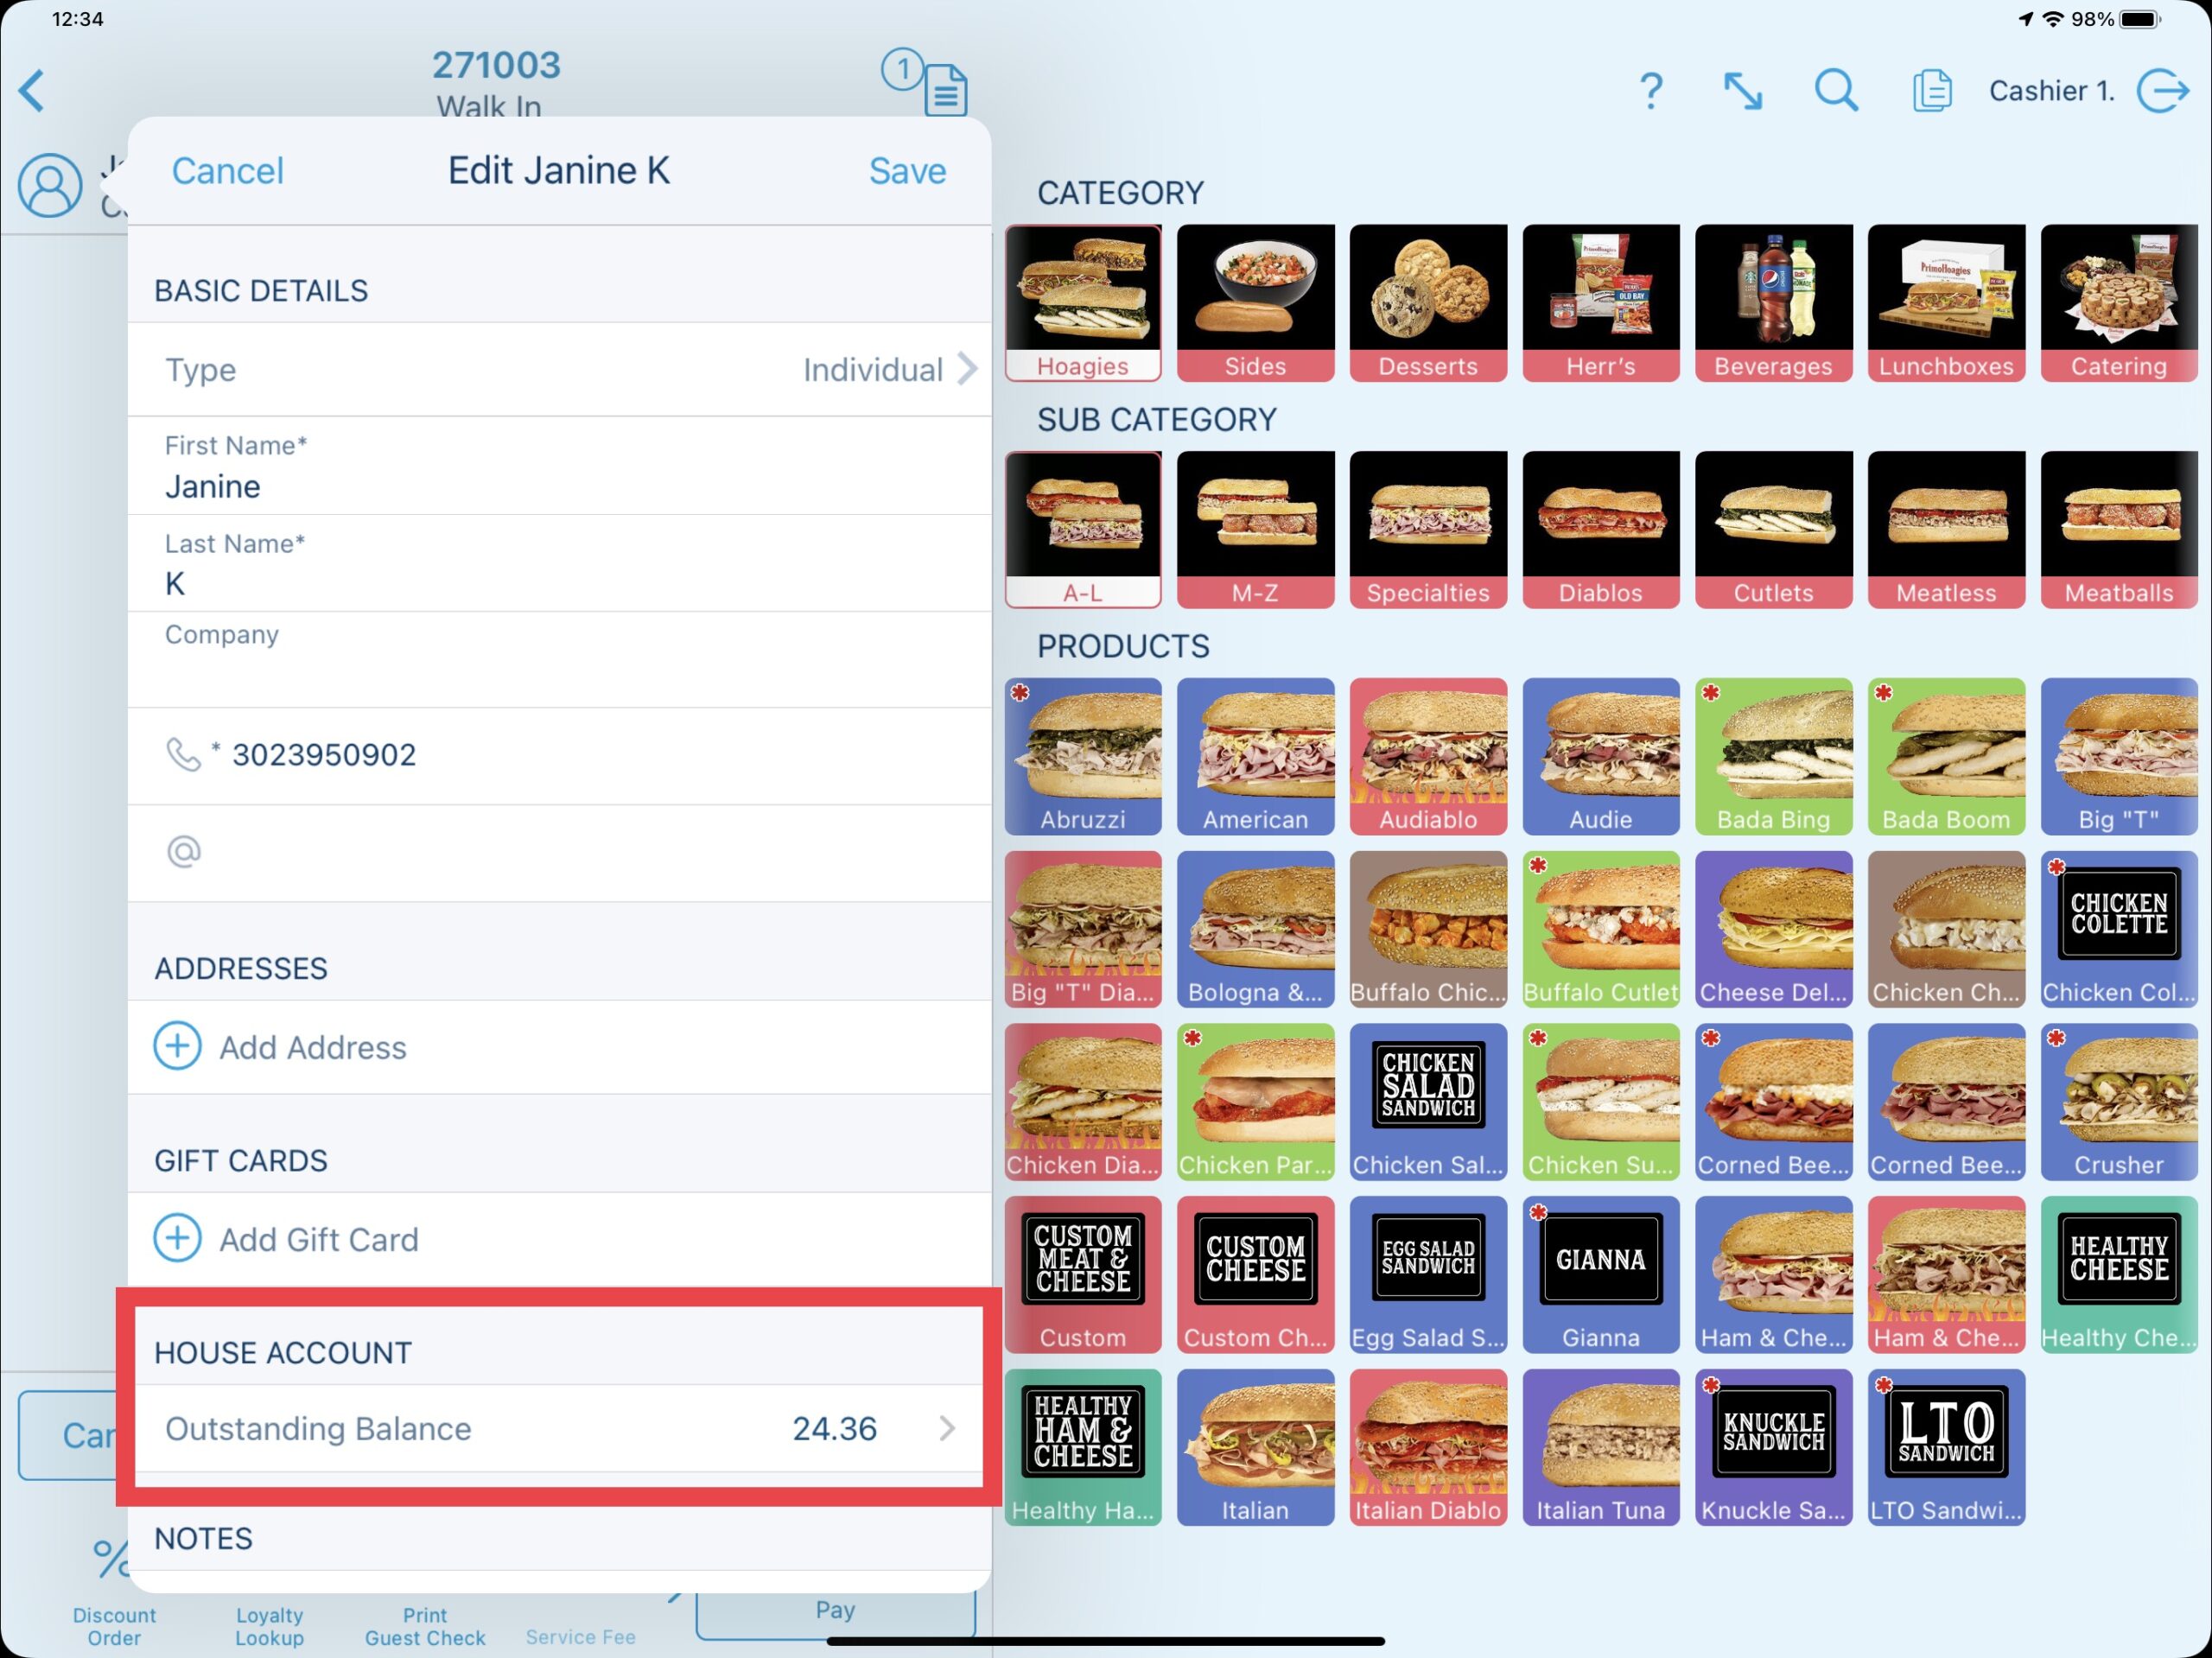
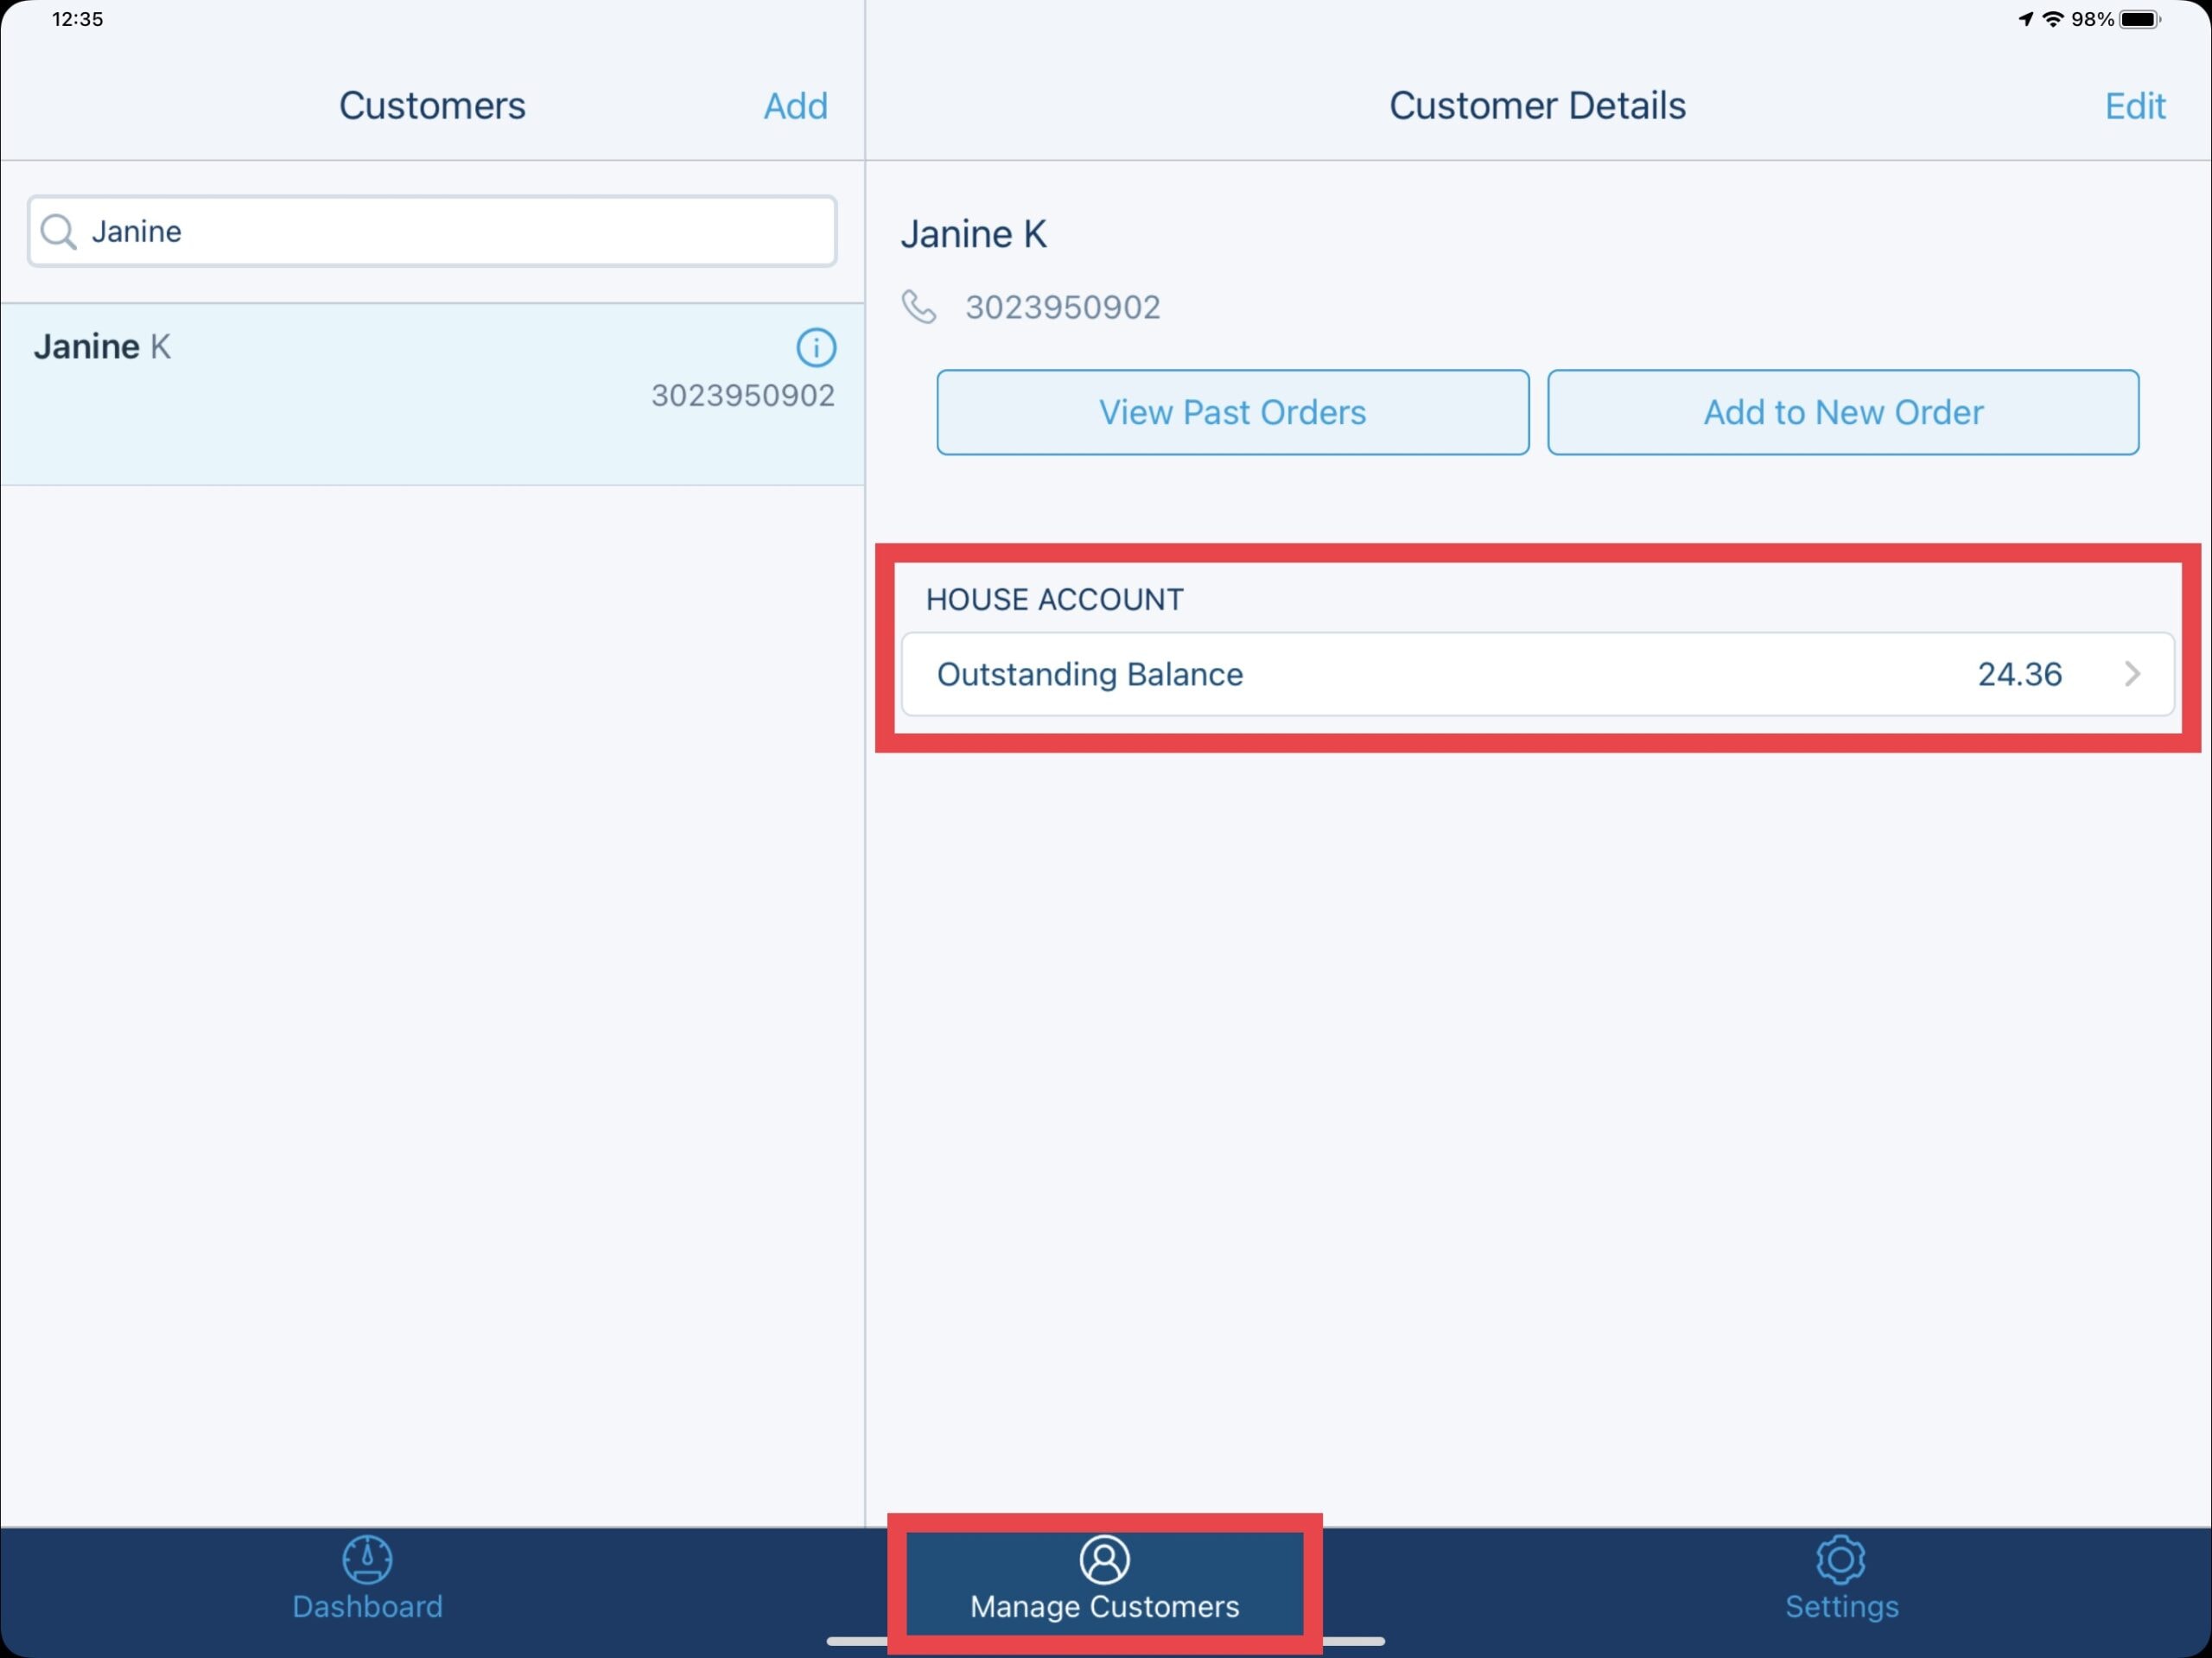
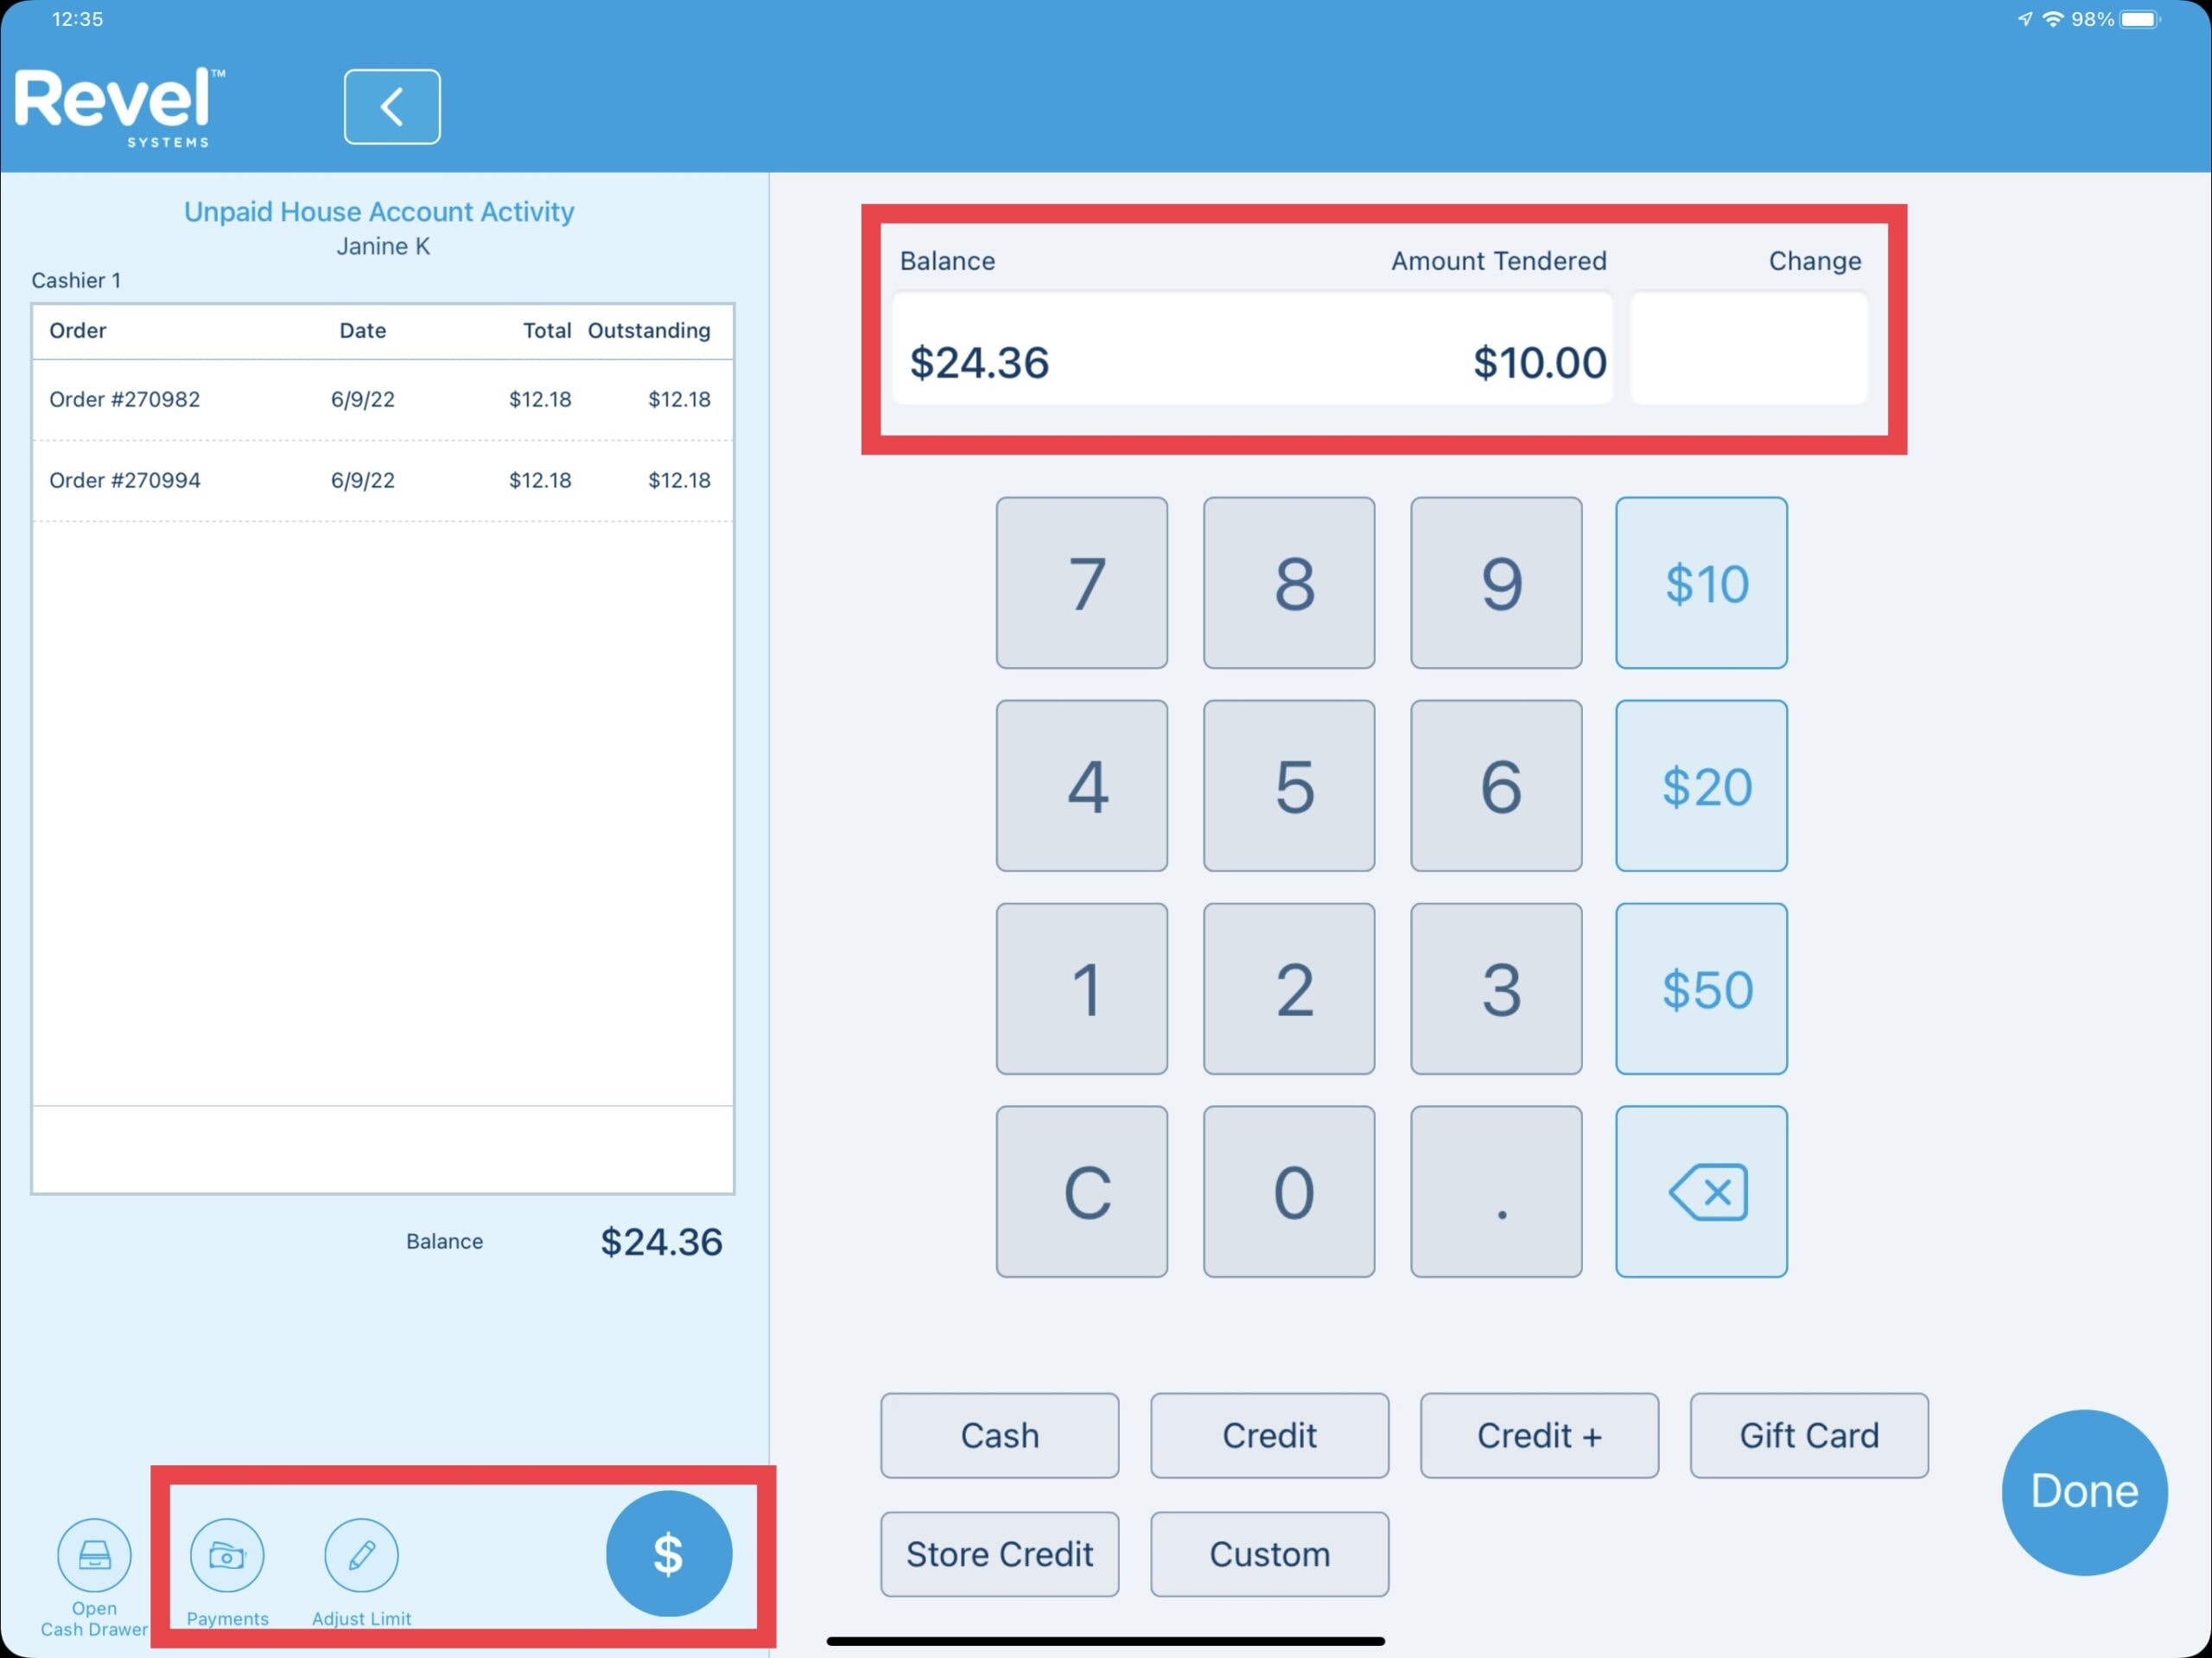
Selecting House Account Outstanding Balance will call the Unpaid House Account Activity window where previous transactions can be viewed, limits can be adjusted, and new payments applied.
Updated 06/15/2022

Summary
A self-service kiosk station is a great way to promote your brand and let your customers order products quickly and easily. The self-service kiosk comes complete with a floor standing cabinet customized for PrimoHoagies, and features interchangeable graphics, a sleek iPad Pro ordering tablet, and an order printer.
Self-Service Kiosk Functionality (Outlined in this article & Option #1 below)
The self-service kiosk has been designed for your customers to order most hoagie products offered. Customers simply walk up to the kiosk, select their hoagies & modifications, attach their customer loyalty account (if needed), then print a custom order ticket. While the hoagies are being made, the customer can pick up any snacks, beverages, sides, etc. then proceed to the cashier for payment & order pickup.
Option #1: Payments at Cashier Station
- Included Hardware: Custom Kiosk Stand, iPad Pro, Printer
- Payments: Pay at cashier register (cash/credit).
- Description: Customer would order hoagies only at the kiosk then print the order ticket. Loyalty can be accepted at the kiosk. The customer takes the order ticket, grabs any other products such as chips, beverages, sides, then proceeds to the cashier to pay for all products.
- Kiosk Location Suggestion: Stand should be closer to the entrance so the order can be entered, then the customer makes his/her way thru the store to pick up products, then proceeds to the cashier register.
Option #2: Full Service Payments
- Included Hardware: Custom Kiosk Stand, iPad Pro, Printer, Scanner, Credit Card Terminal
- Payments: Pay at kiosk (credit) or at cashier register (cash/credit).
- Description: Customer would order hoagies at the kiosk plus scan any chips, beverages, sides. There are no touchable buttons for the scanned products but any product in the store is scannable. Loyalty can be accepted at the kiosk. The custoemr can then pay with credit card at the kiosk or select to proceed to the cashier register to pay with cash or credit.
- Kiosk Location Suggestion: Since payment is accepted at the kiosk, it is suggested that the kiosk be located as close to the cashier registers as possible. The goal is to have them pick up any products, then order the hoagies and pay.
Adding Products & Modifiers
At the beginning of the order, the customer is greeted by a series of rotating branded images. Taping anywhere on the screen will start the ordering process.
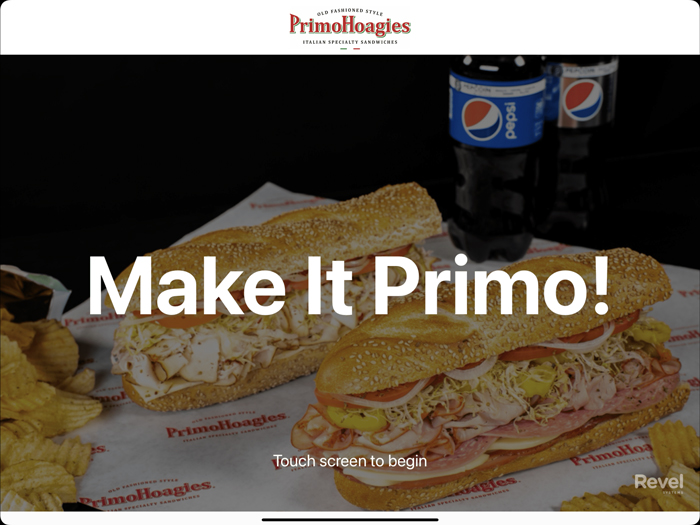
Hoagies are organized into Categories and Subcategories. Start by selecting the desired Category.
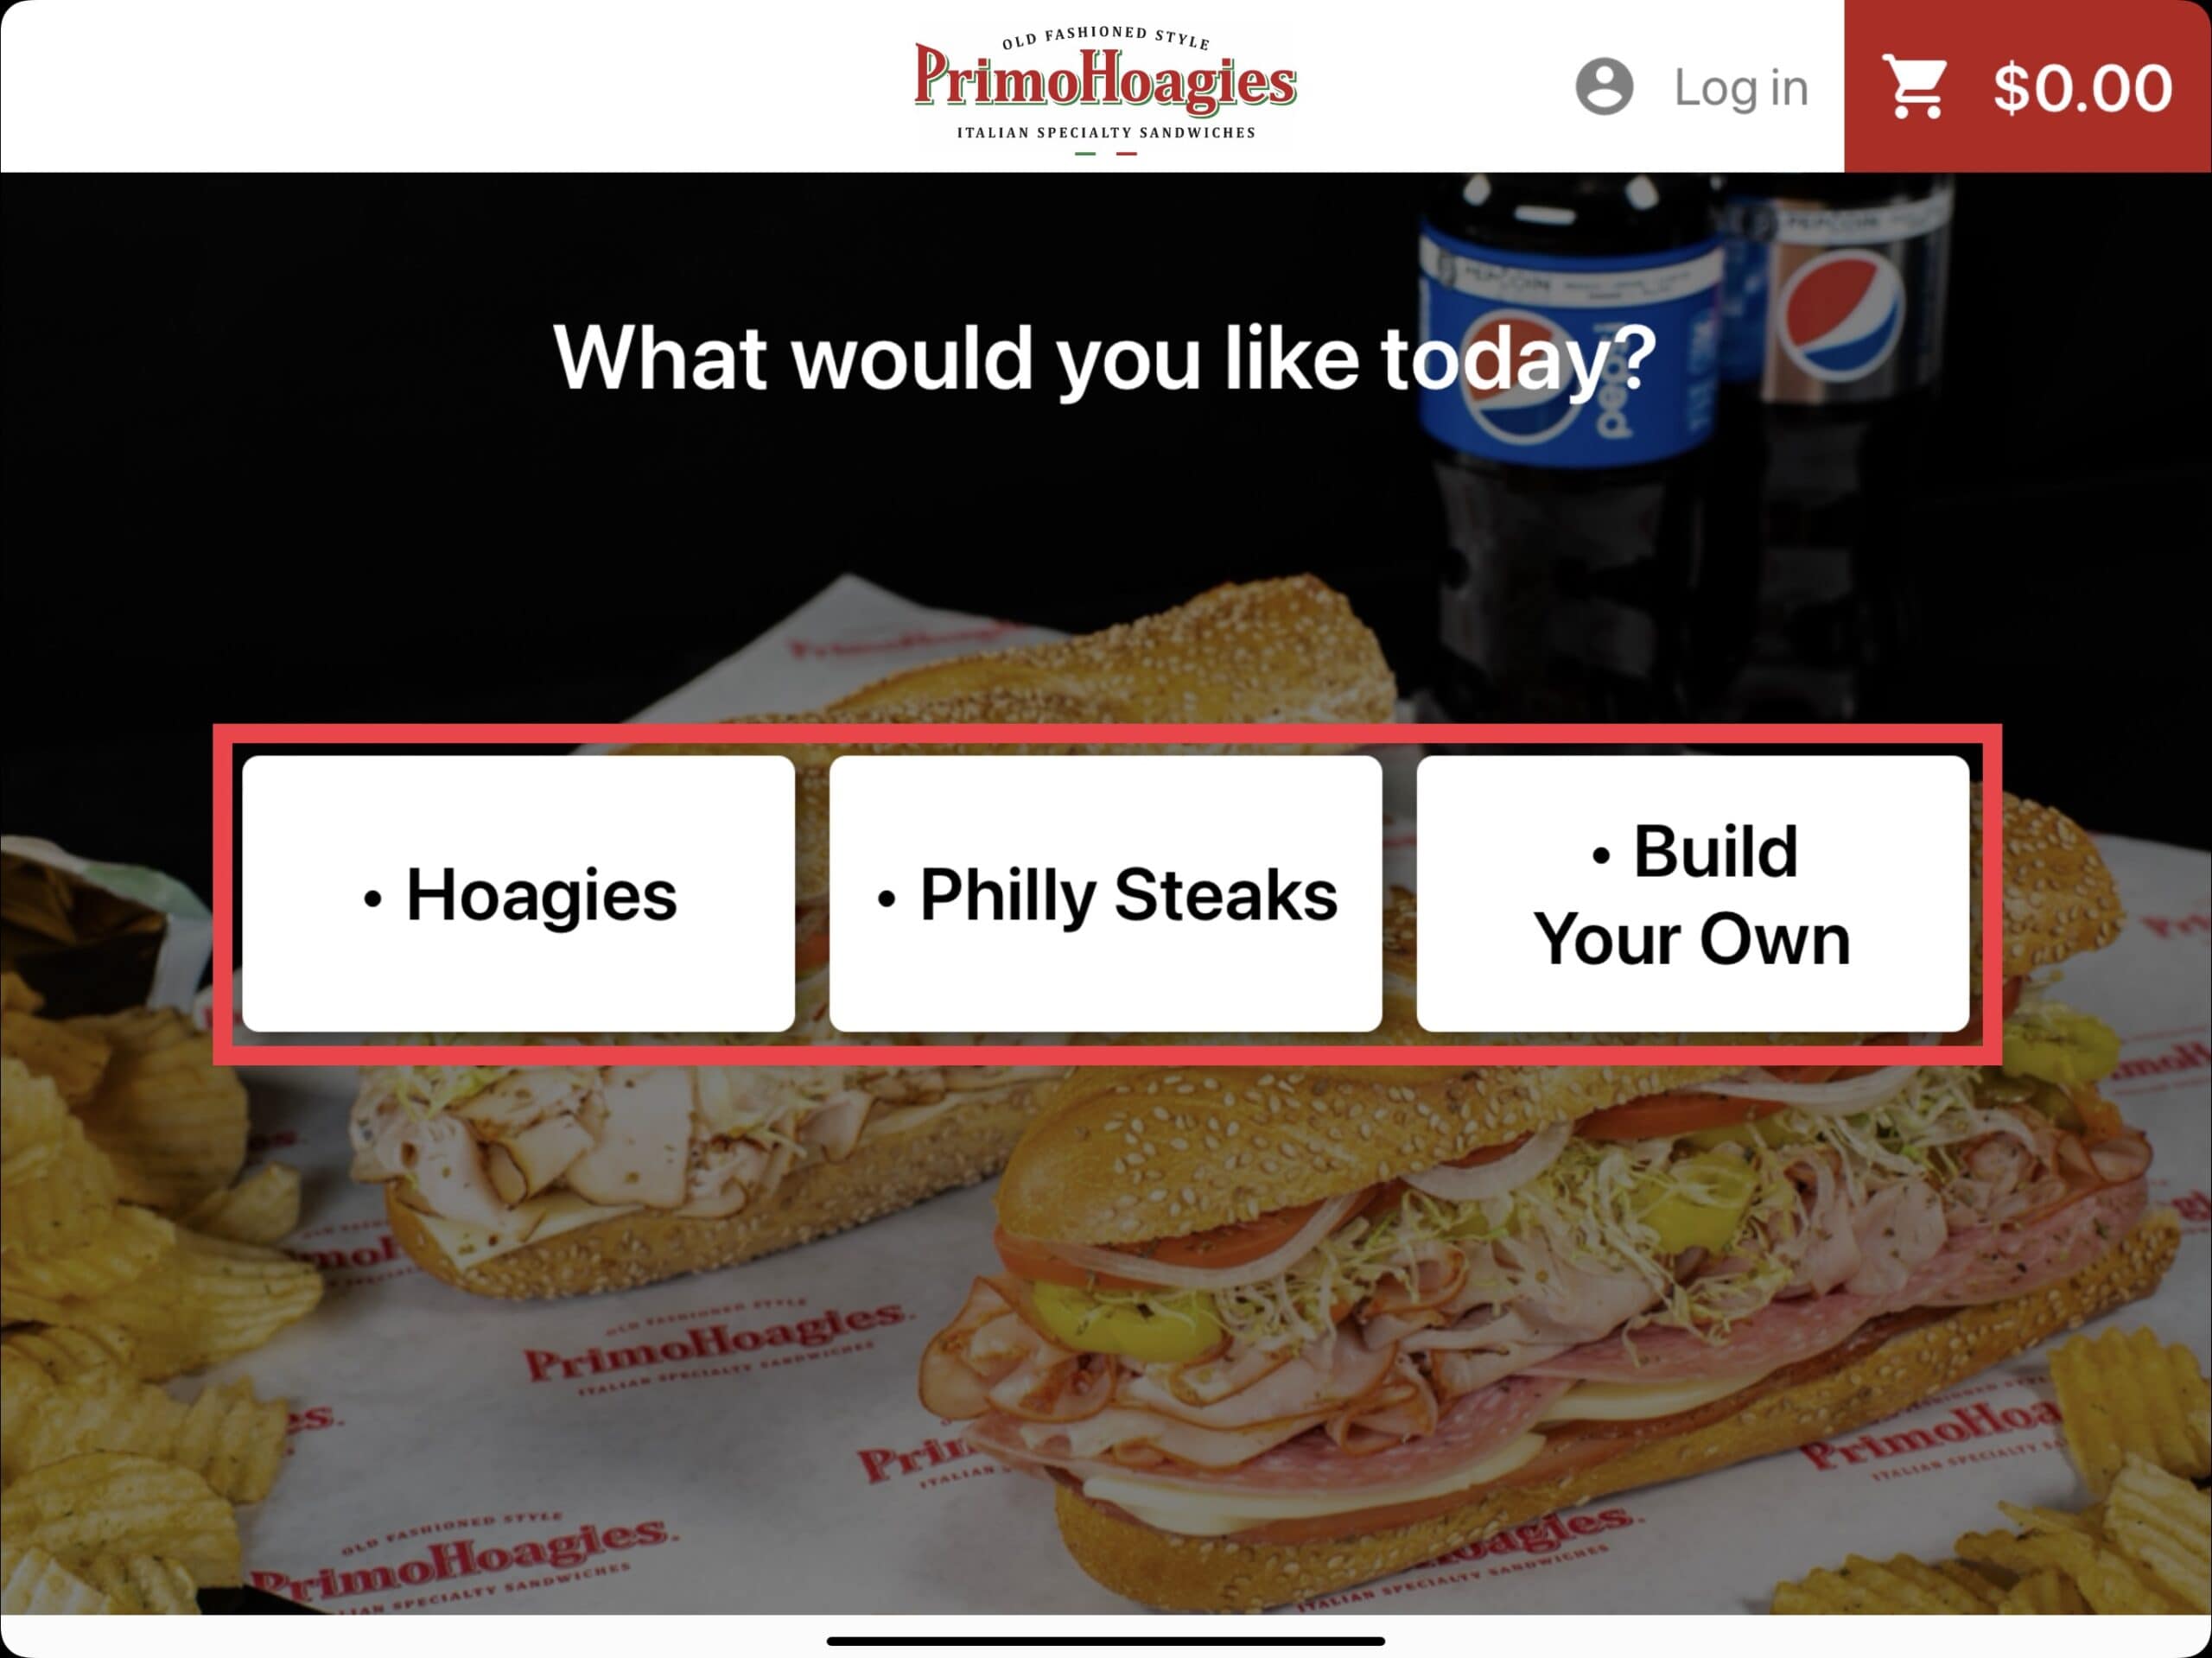
Making the desired Category selection defaults to the first Subcategory and brings up all available products. Navigate the Subcategories using the top headers or return to the Categories by selecting All Categories on the top left. Each Subcategory can be scrolled up and down to reveal additional products.
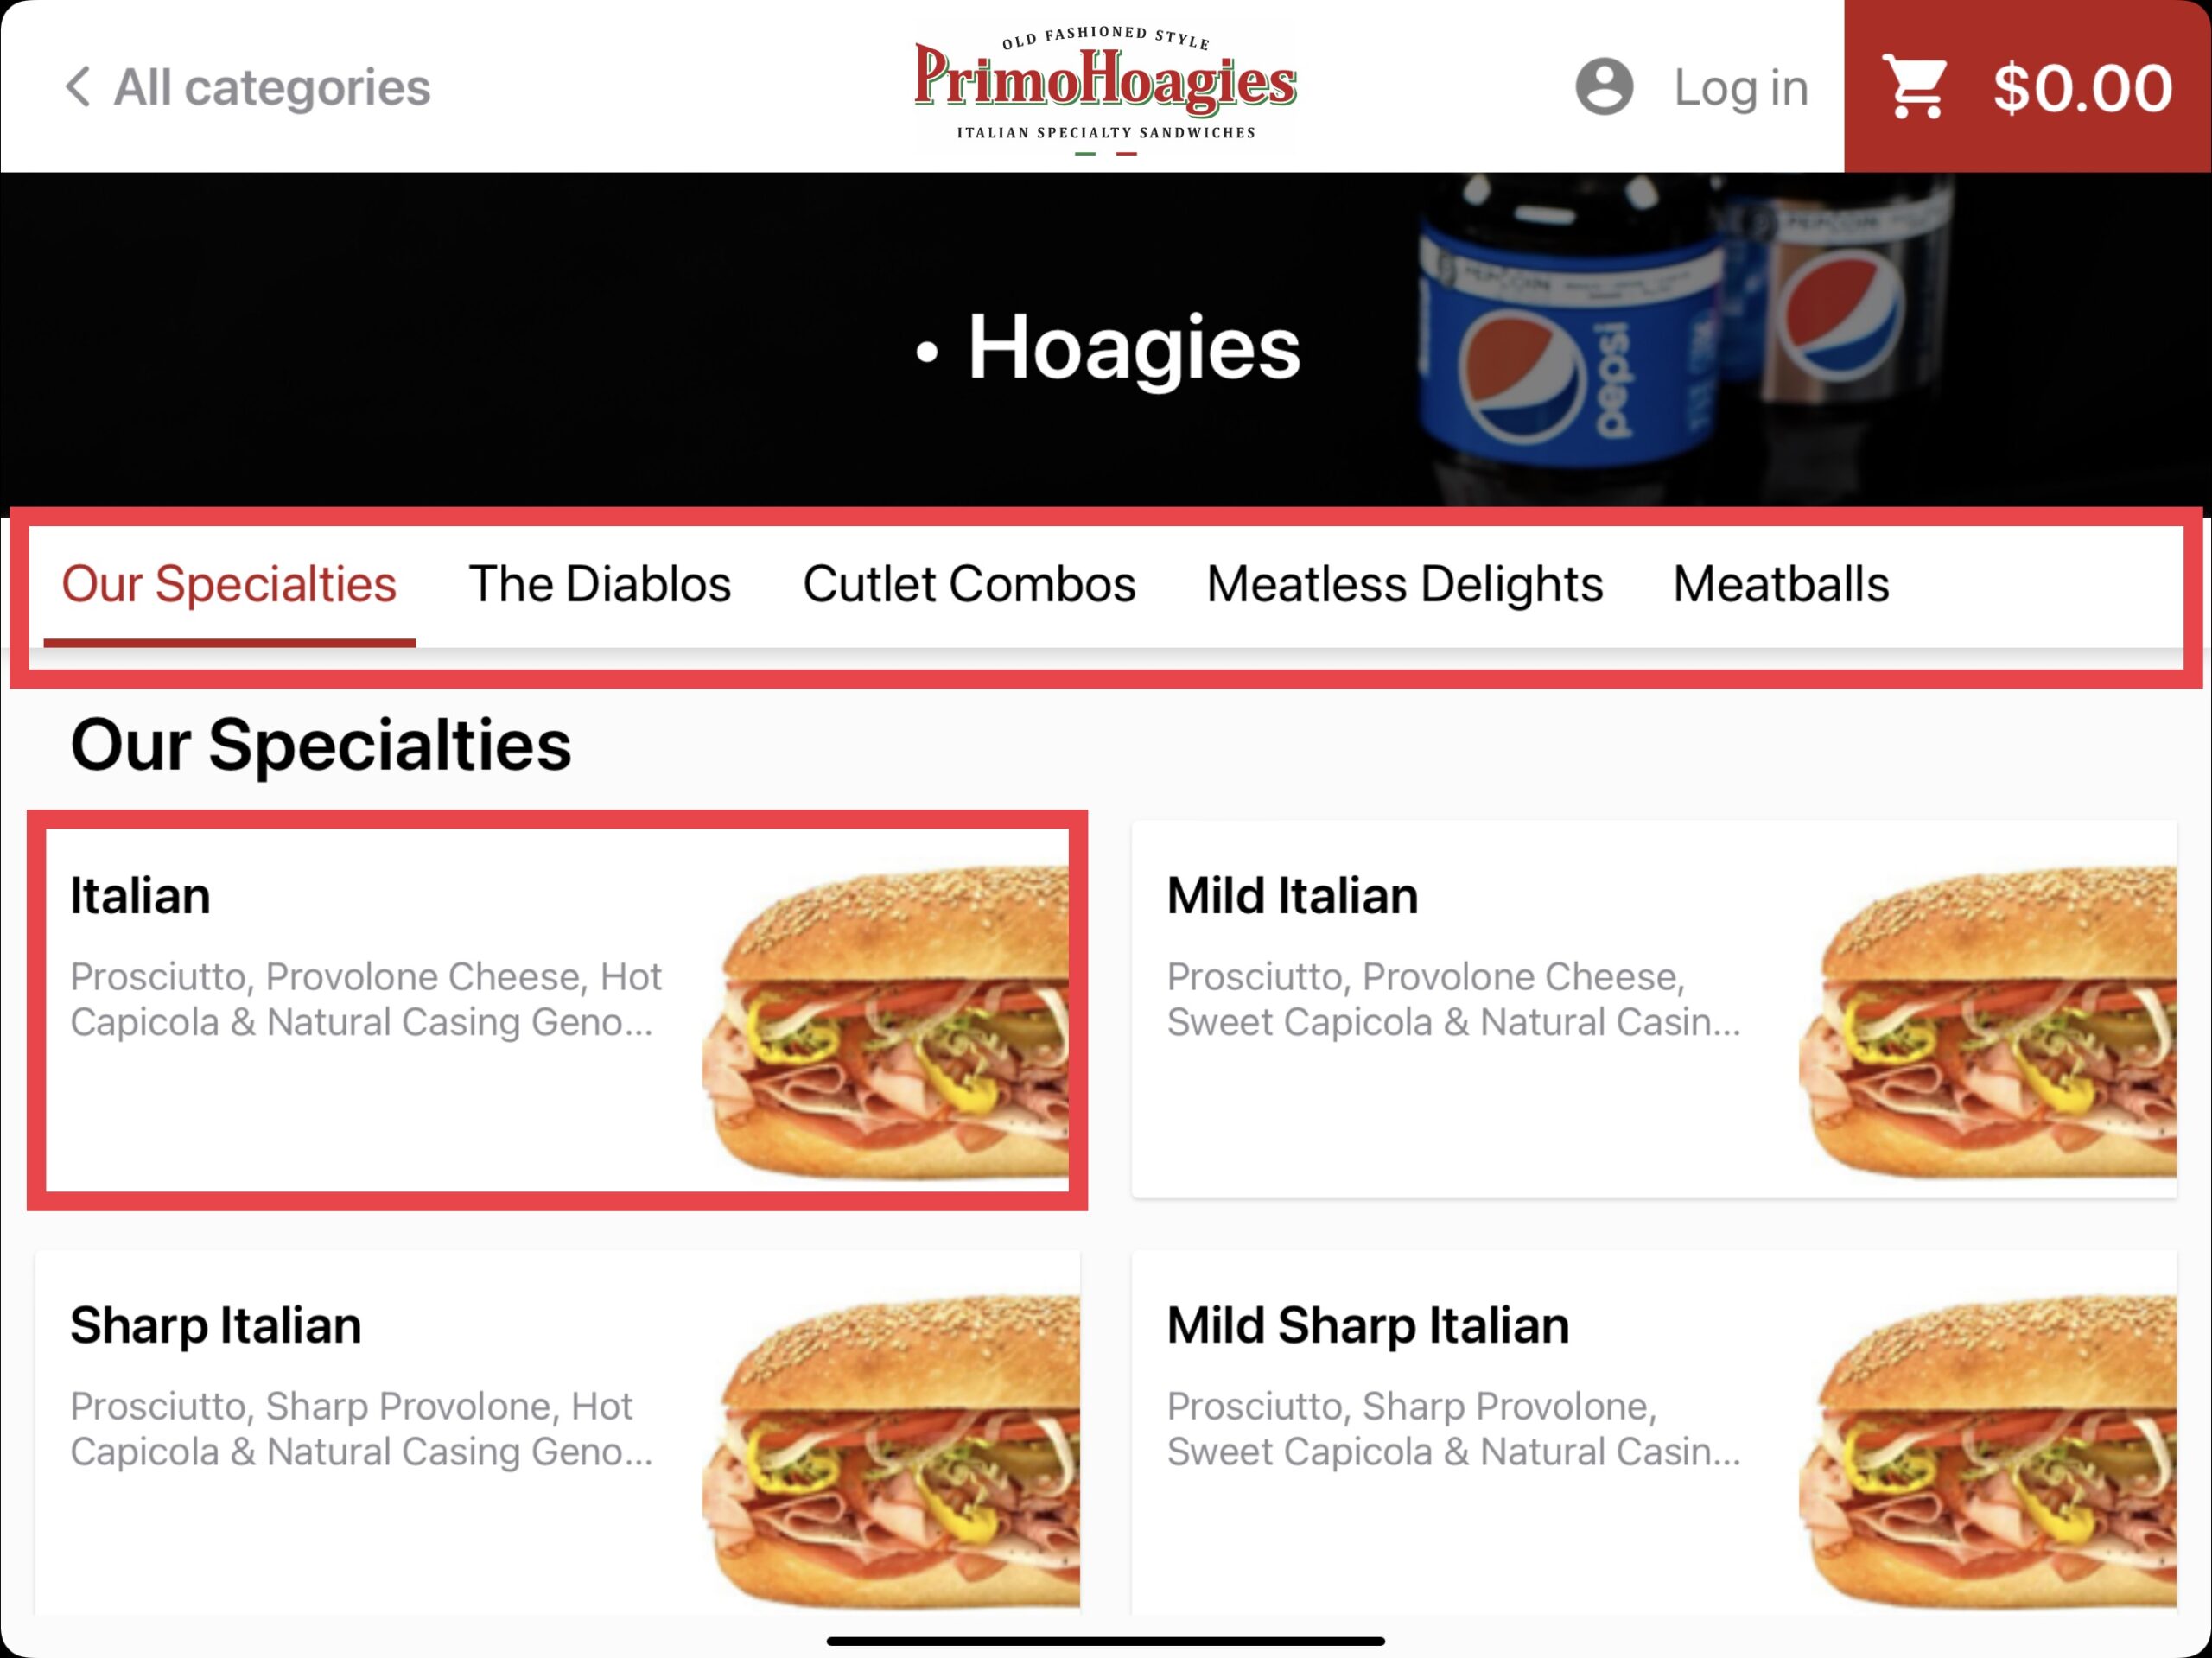
After making the product selection, the user advances to the modifier screen. The left side shows an image of the product, name, description, an additional notes field, quantity toggle, and the Add to Cart button.
Scroll up and down on the right side to navigate each modifier section group. Any instructions such as “Choose 1” are indicated next to each modifier section group header.
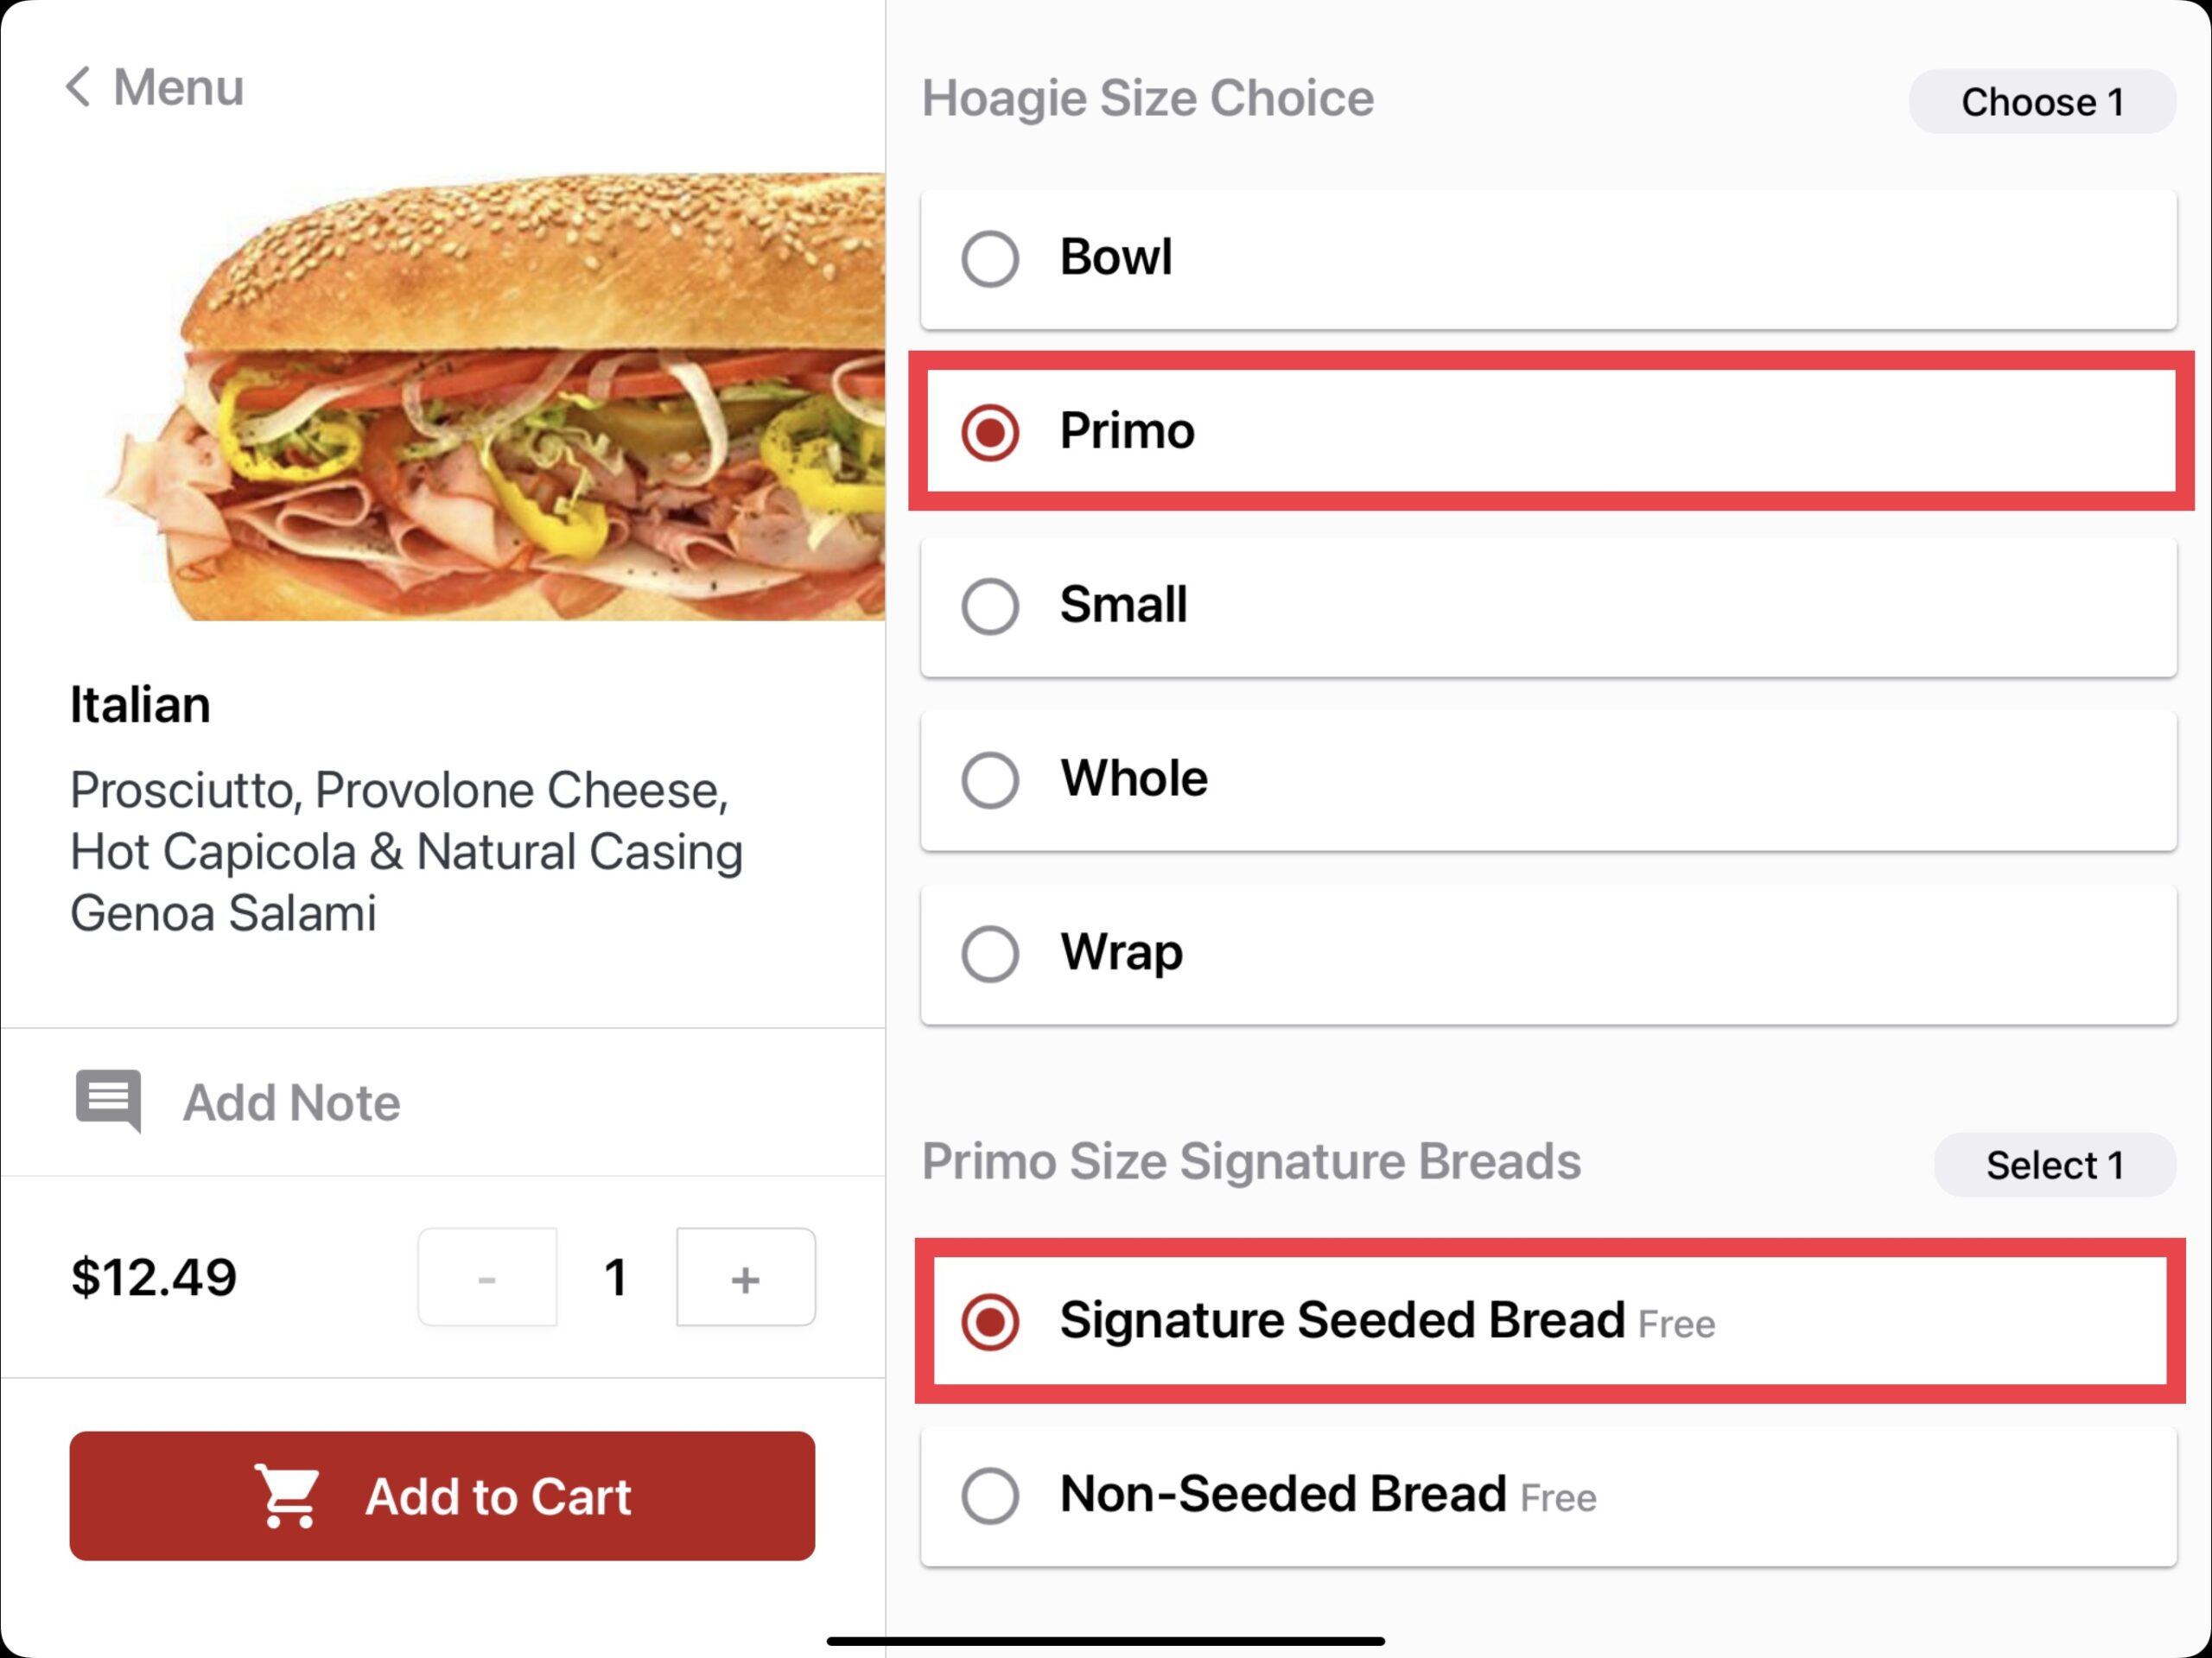
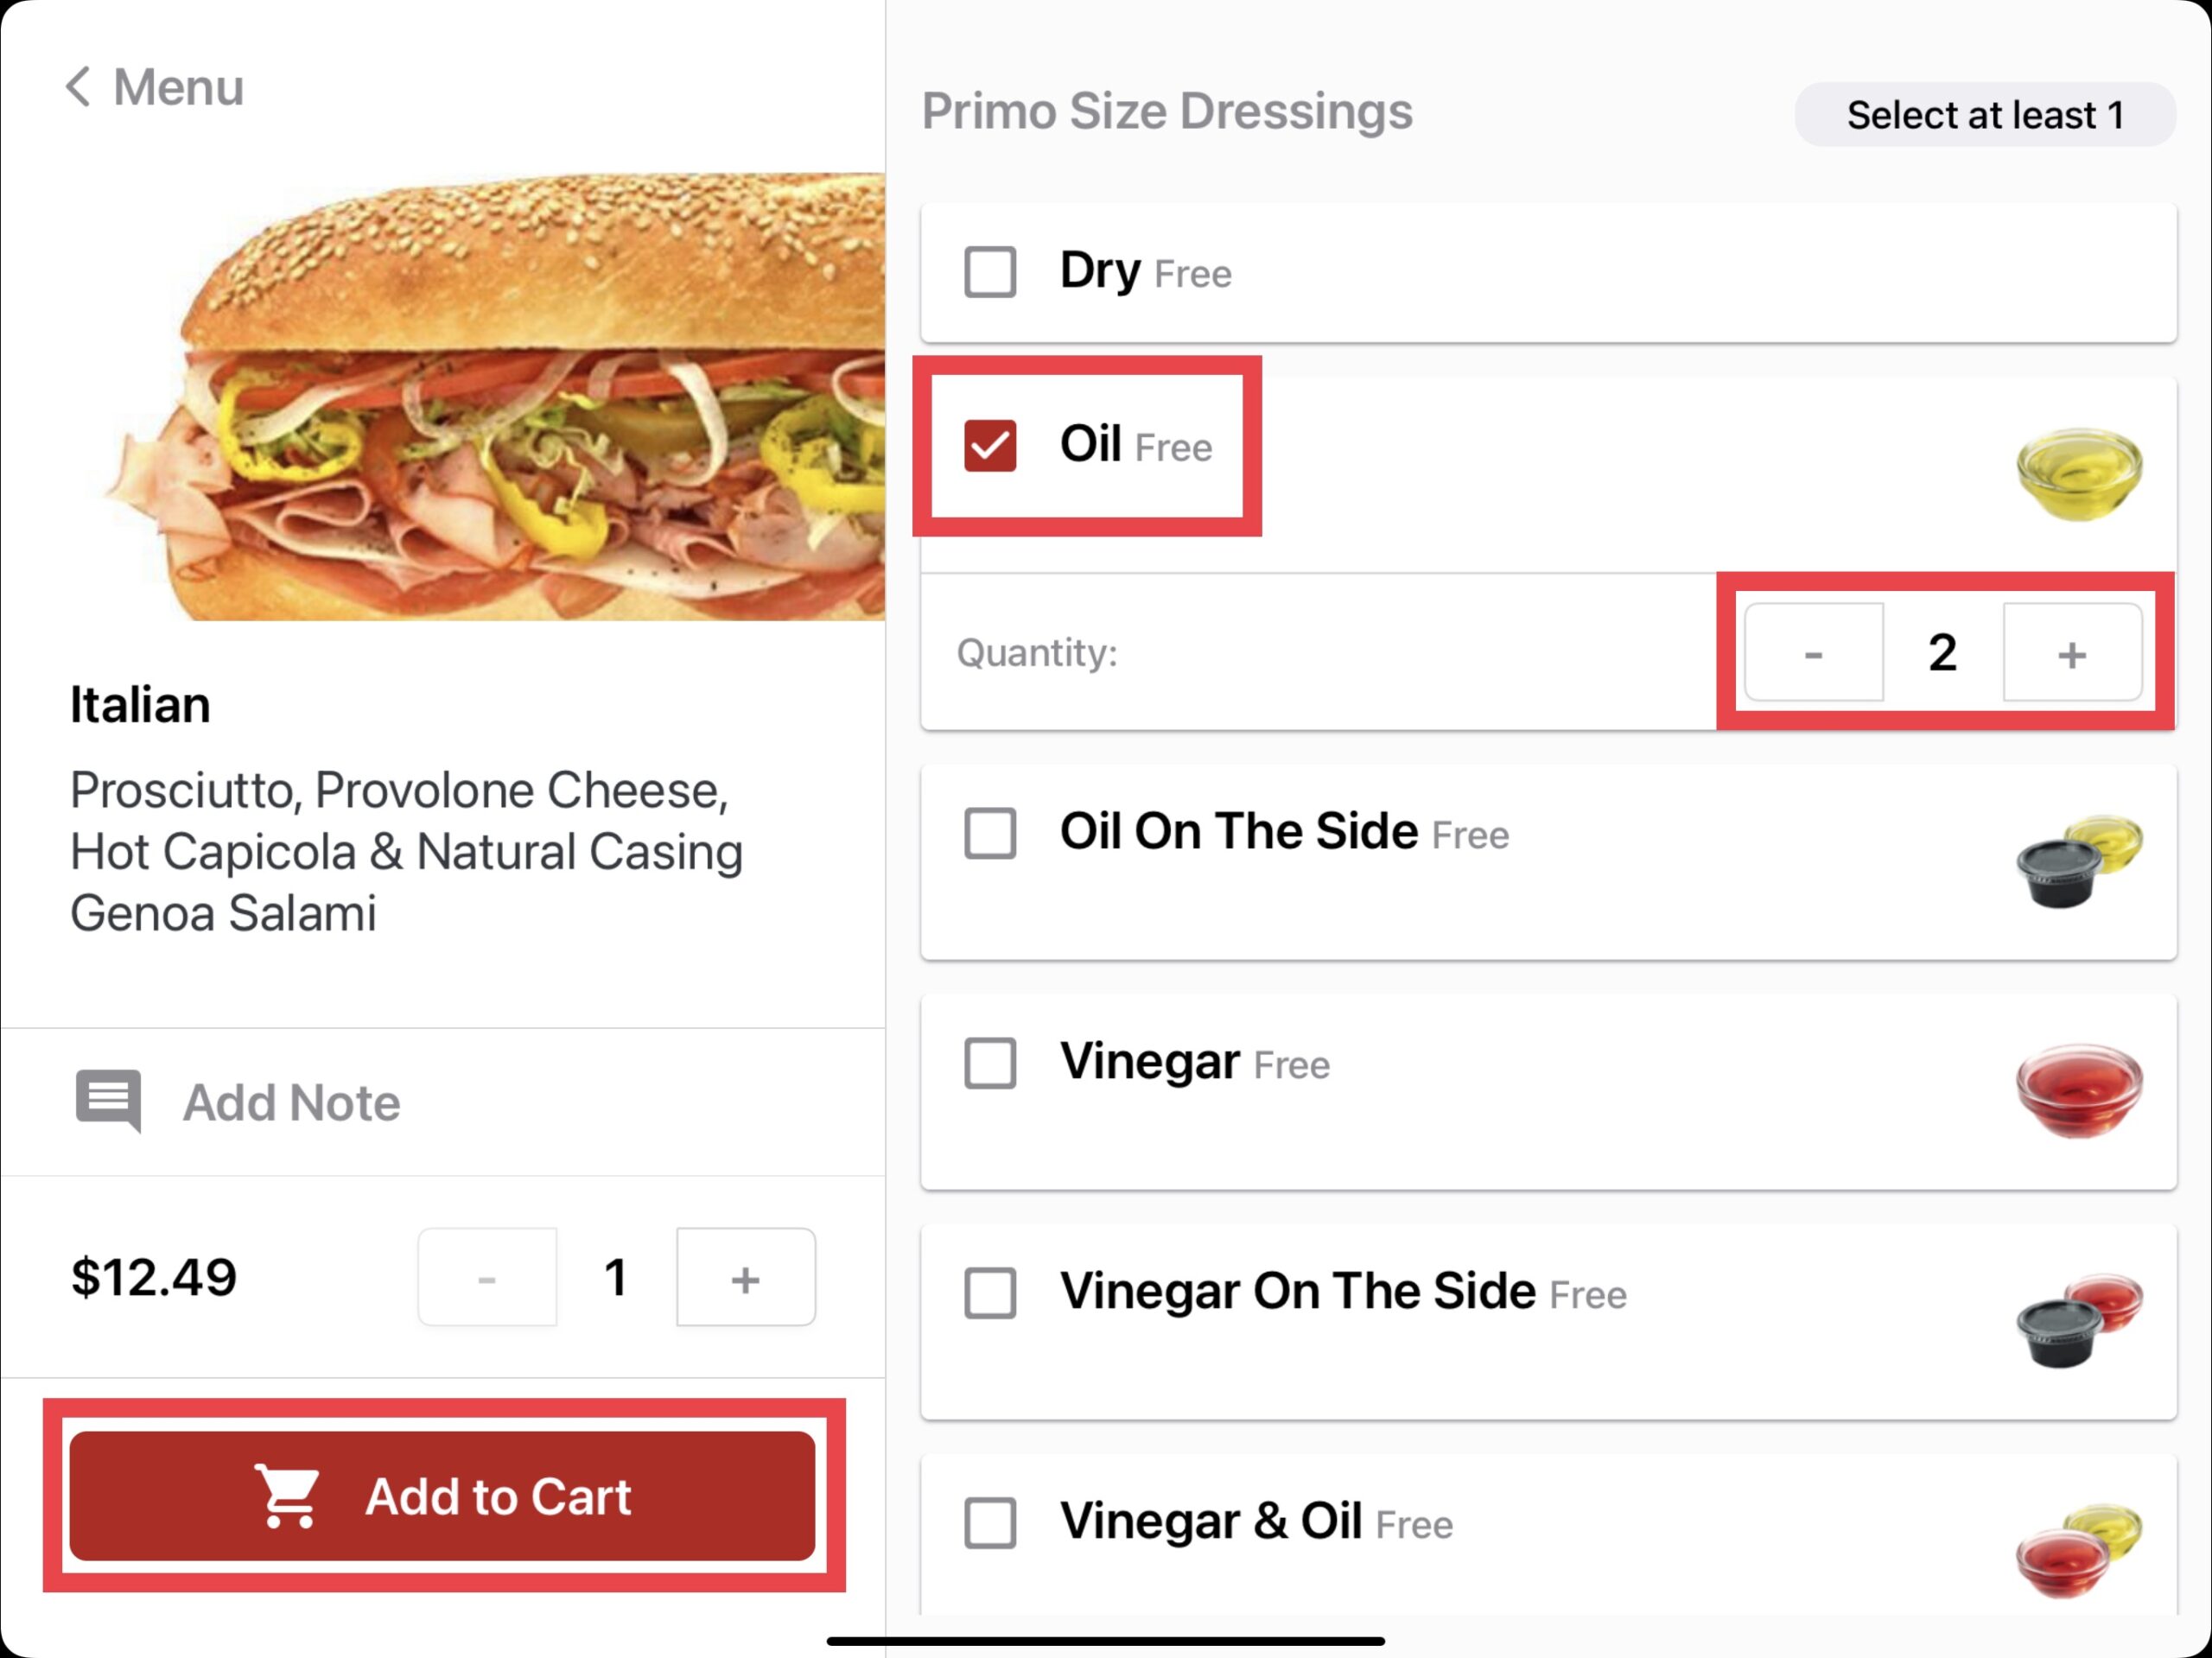
Any default modifiers are pre-selected and can be removed if needed. Certain modifiers also allow for a quantity selection if needed. Once all modification requirements have been completed, select the Add to Cart button.
Customer Loyalty Accounts
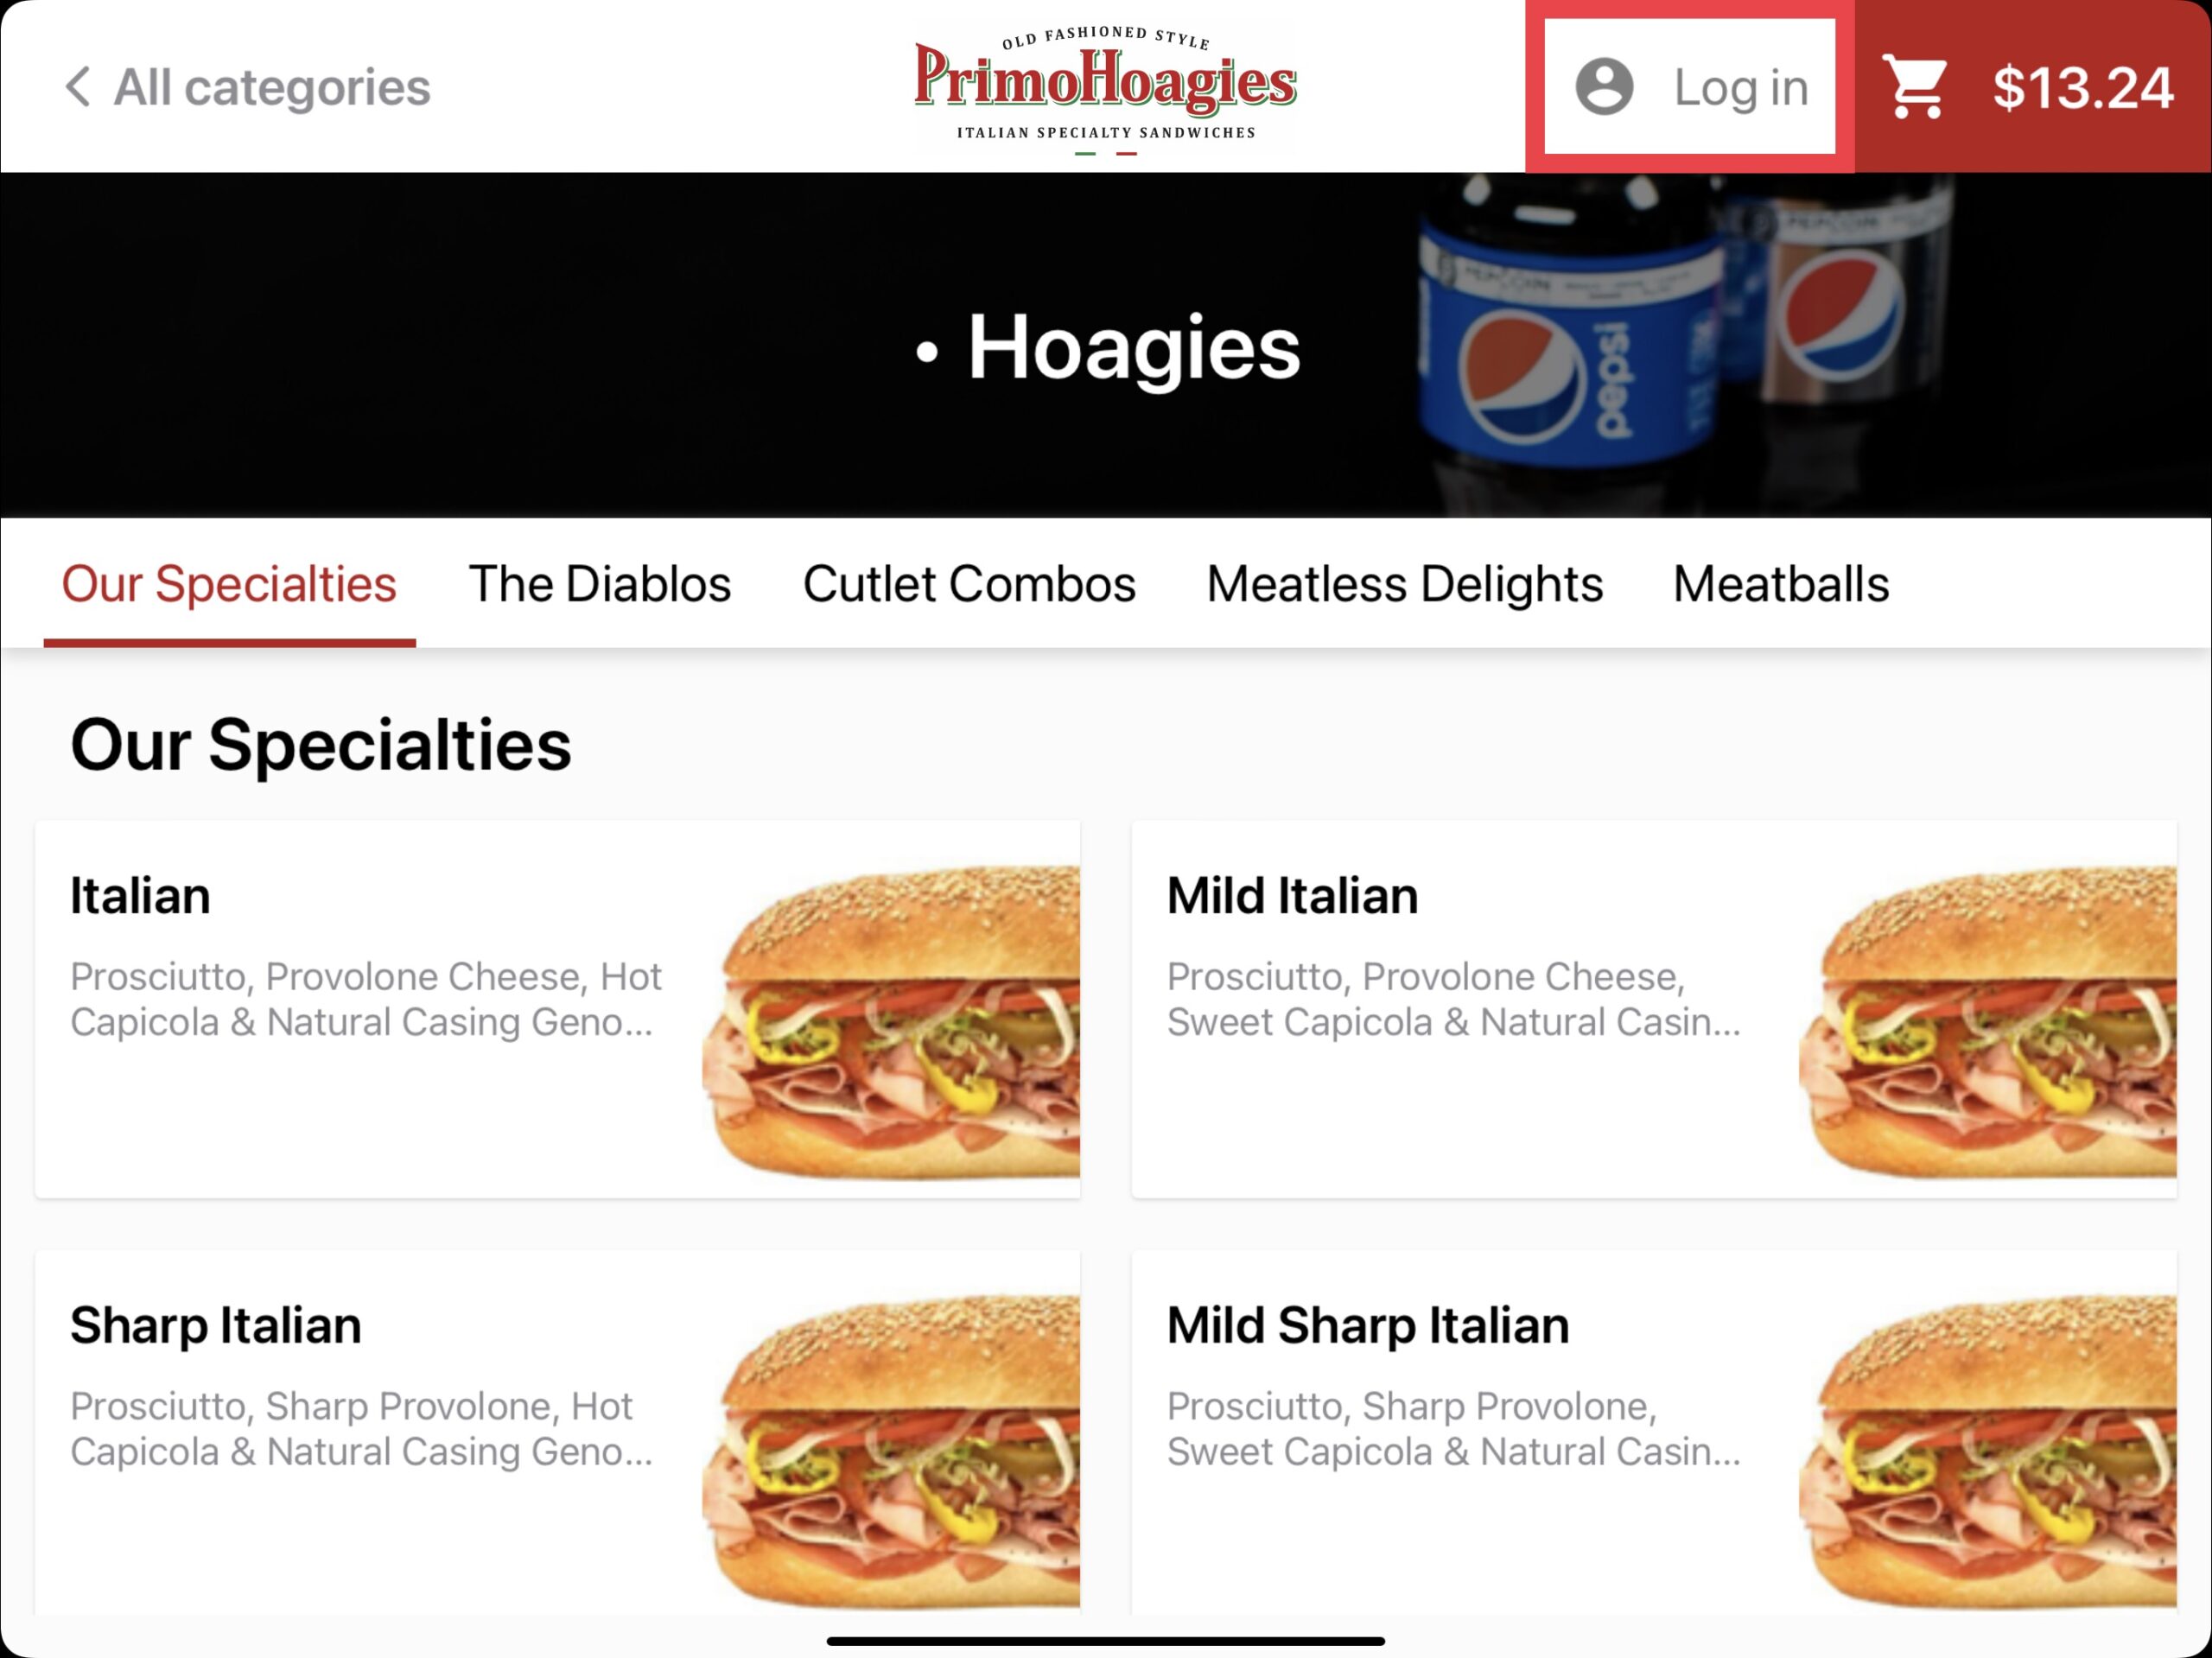
Customers may also choose to associate their customer loyalty account to the order. This can always be added by the cashier at the time of payment later on. To associate the customer loyalty account, select the Log In link on the top right next to the shopping cart.
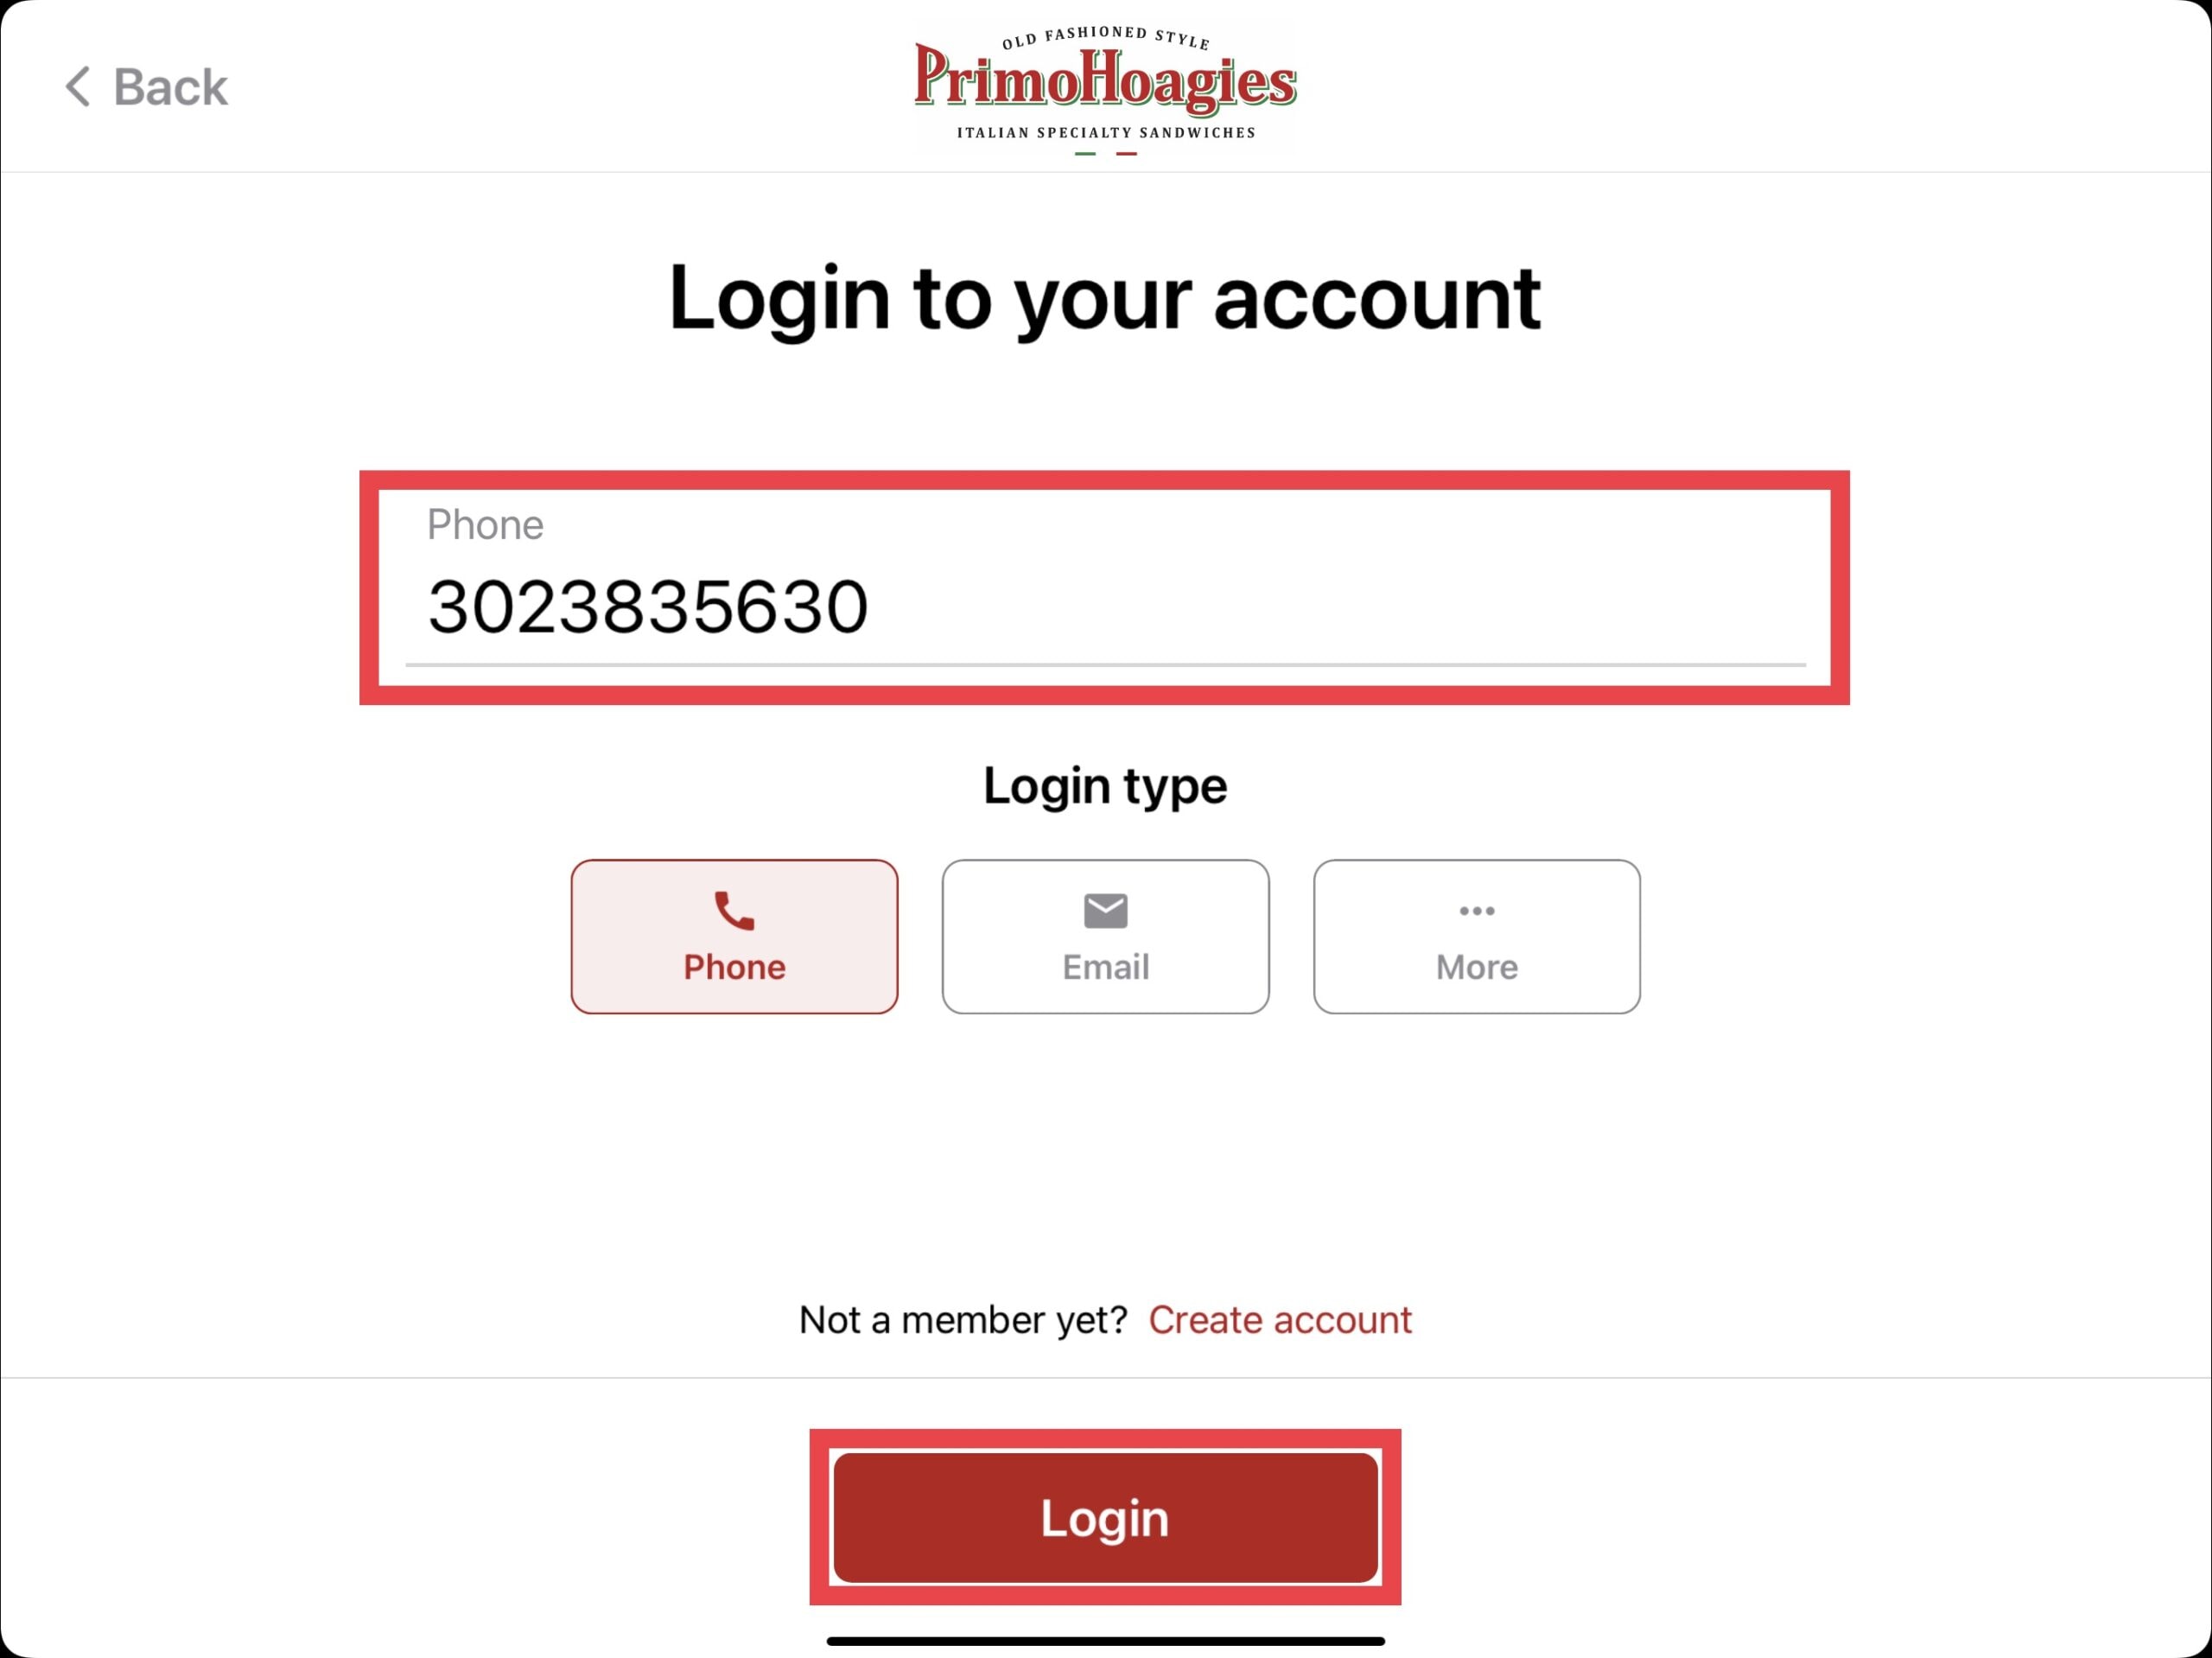
Enter the customer loyalty phone number then select the Login button.
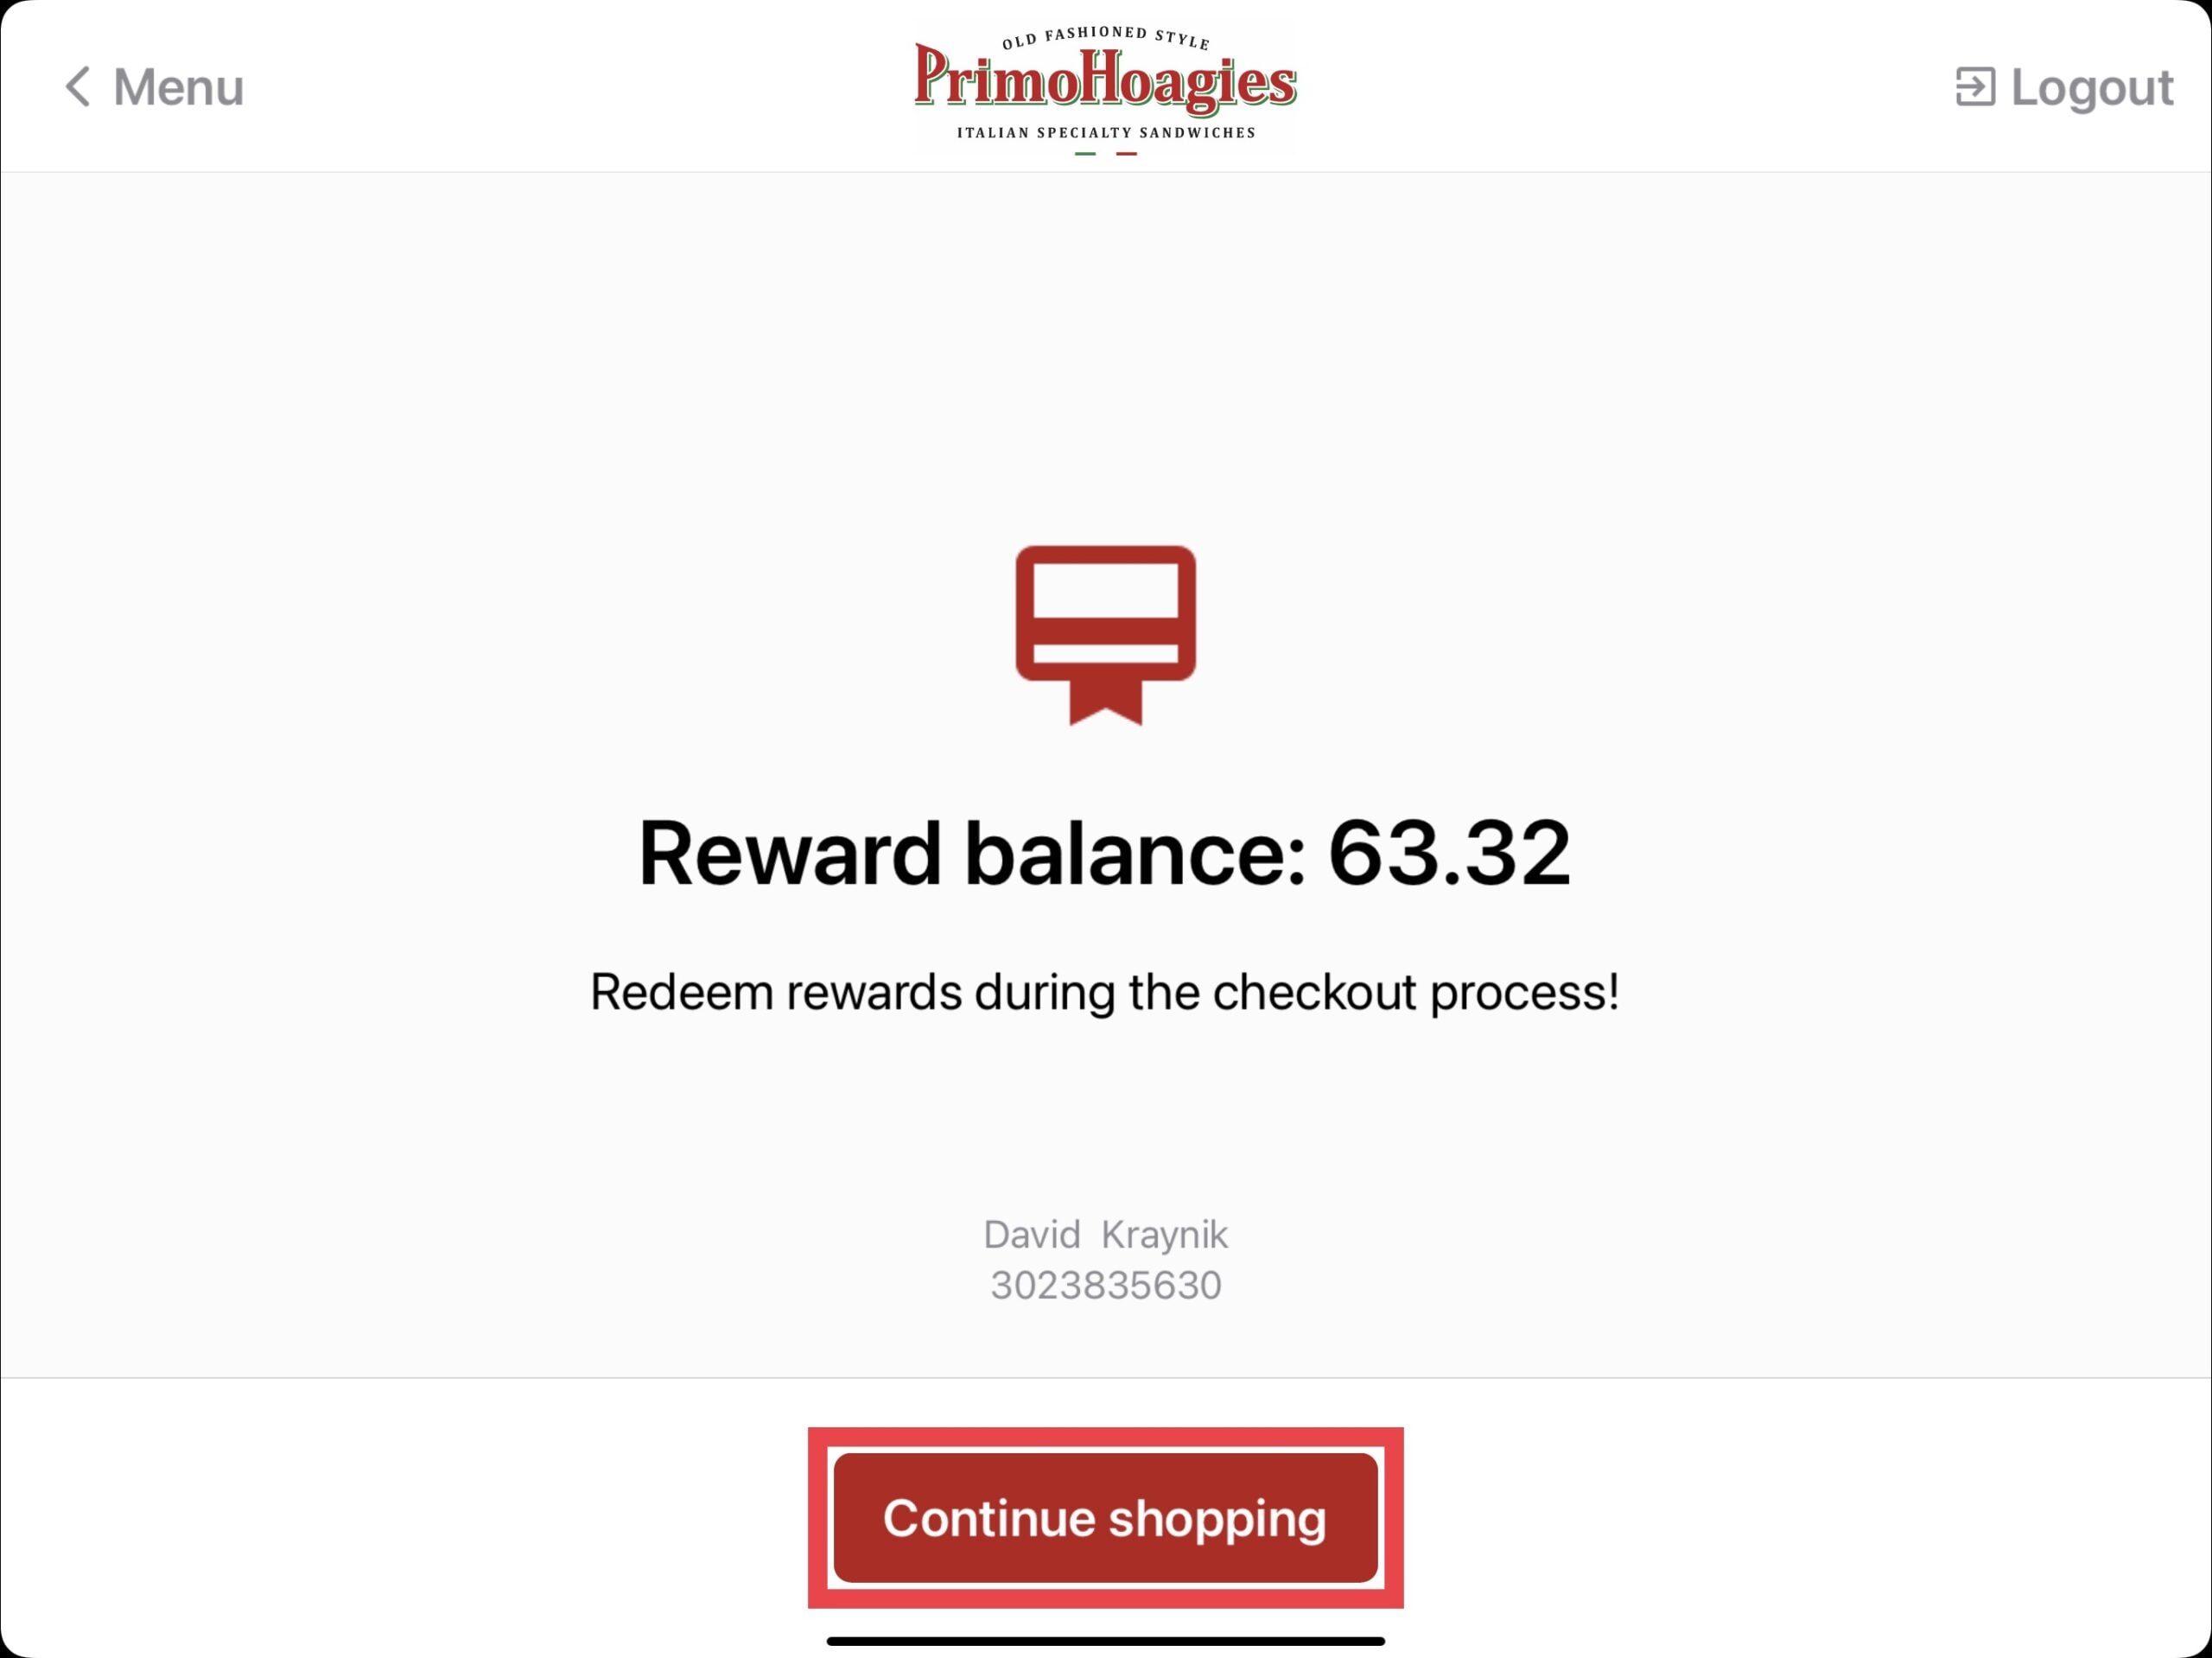
Any rewards balance will be displayed. Select the Continue Shopping button.
Submitting the Order
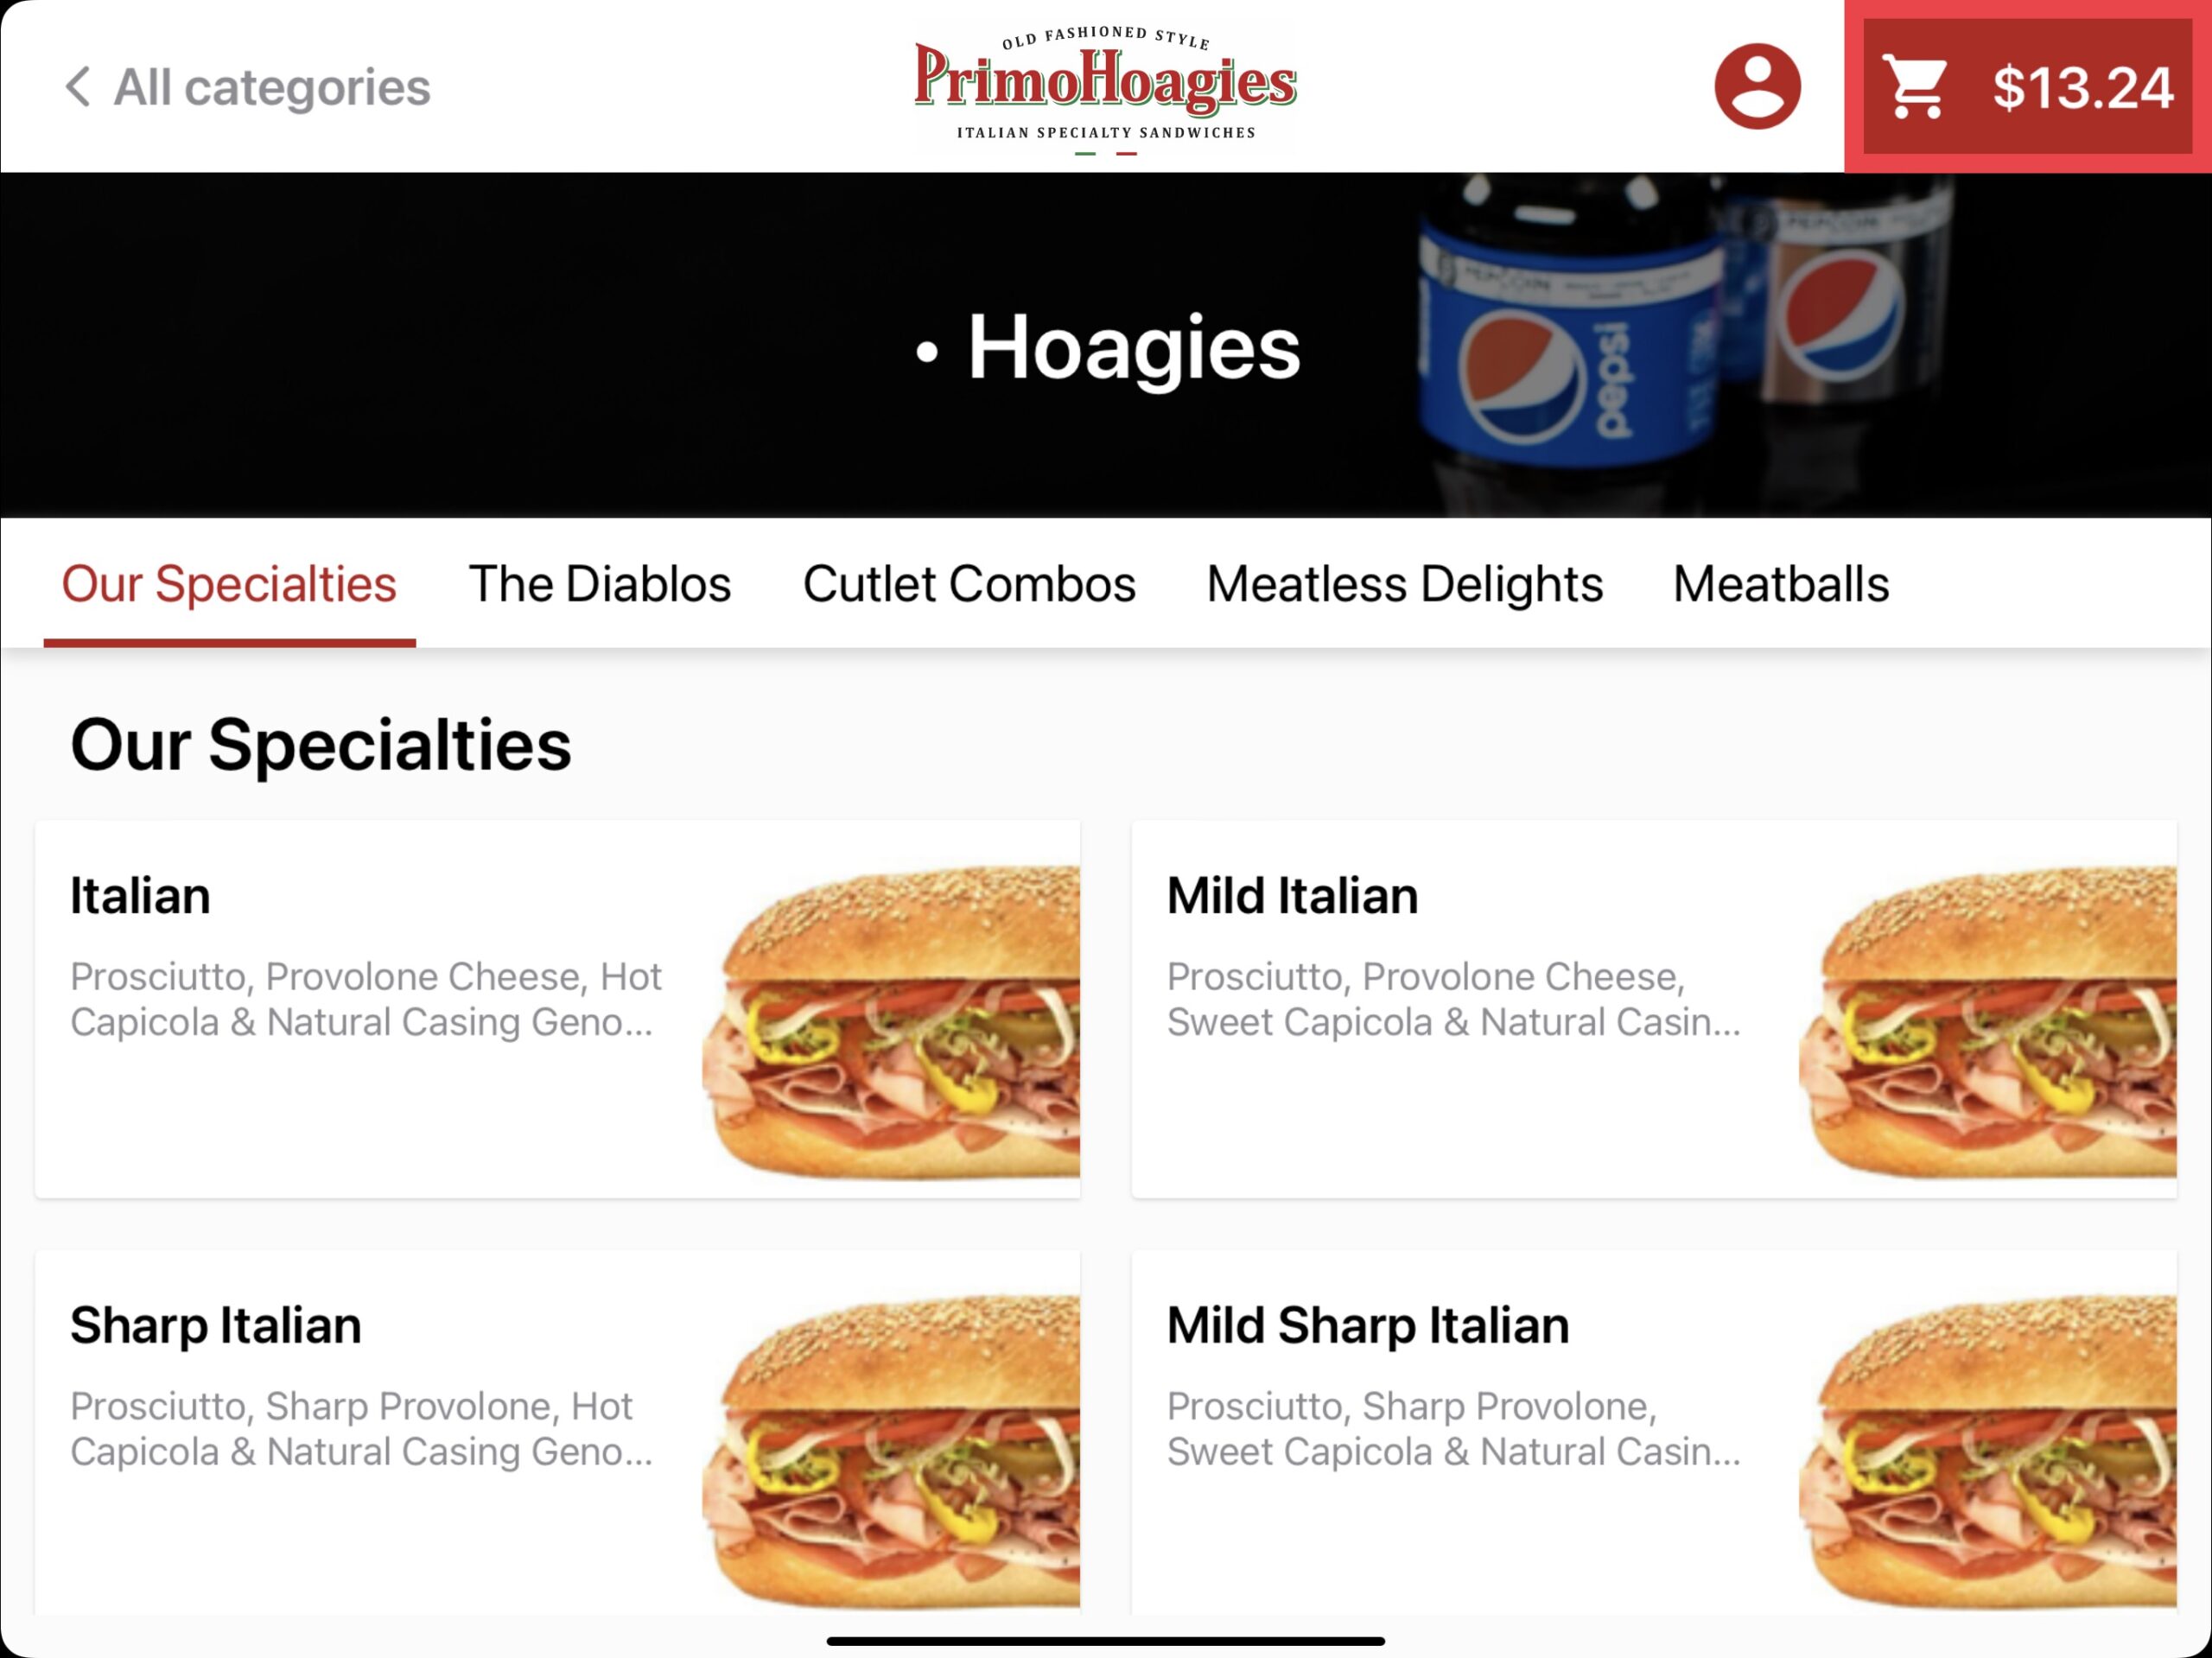
To submit the order, select the shopping cart on the top right corner.
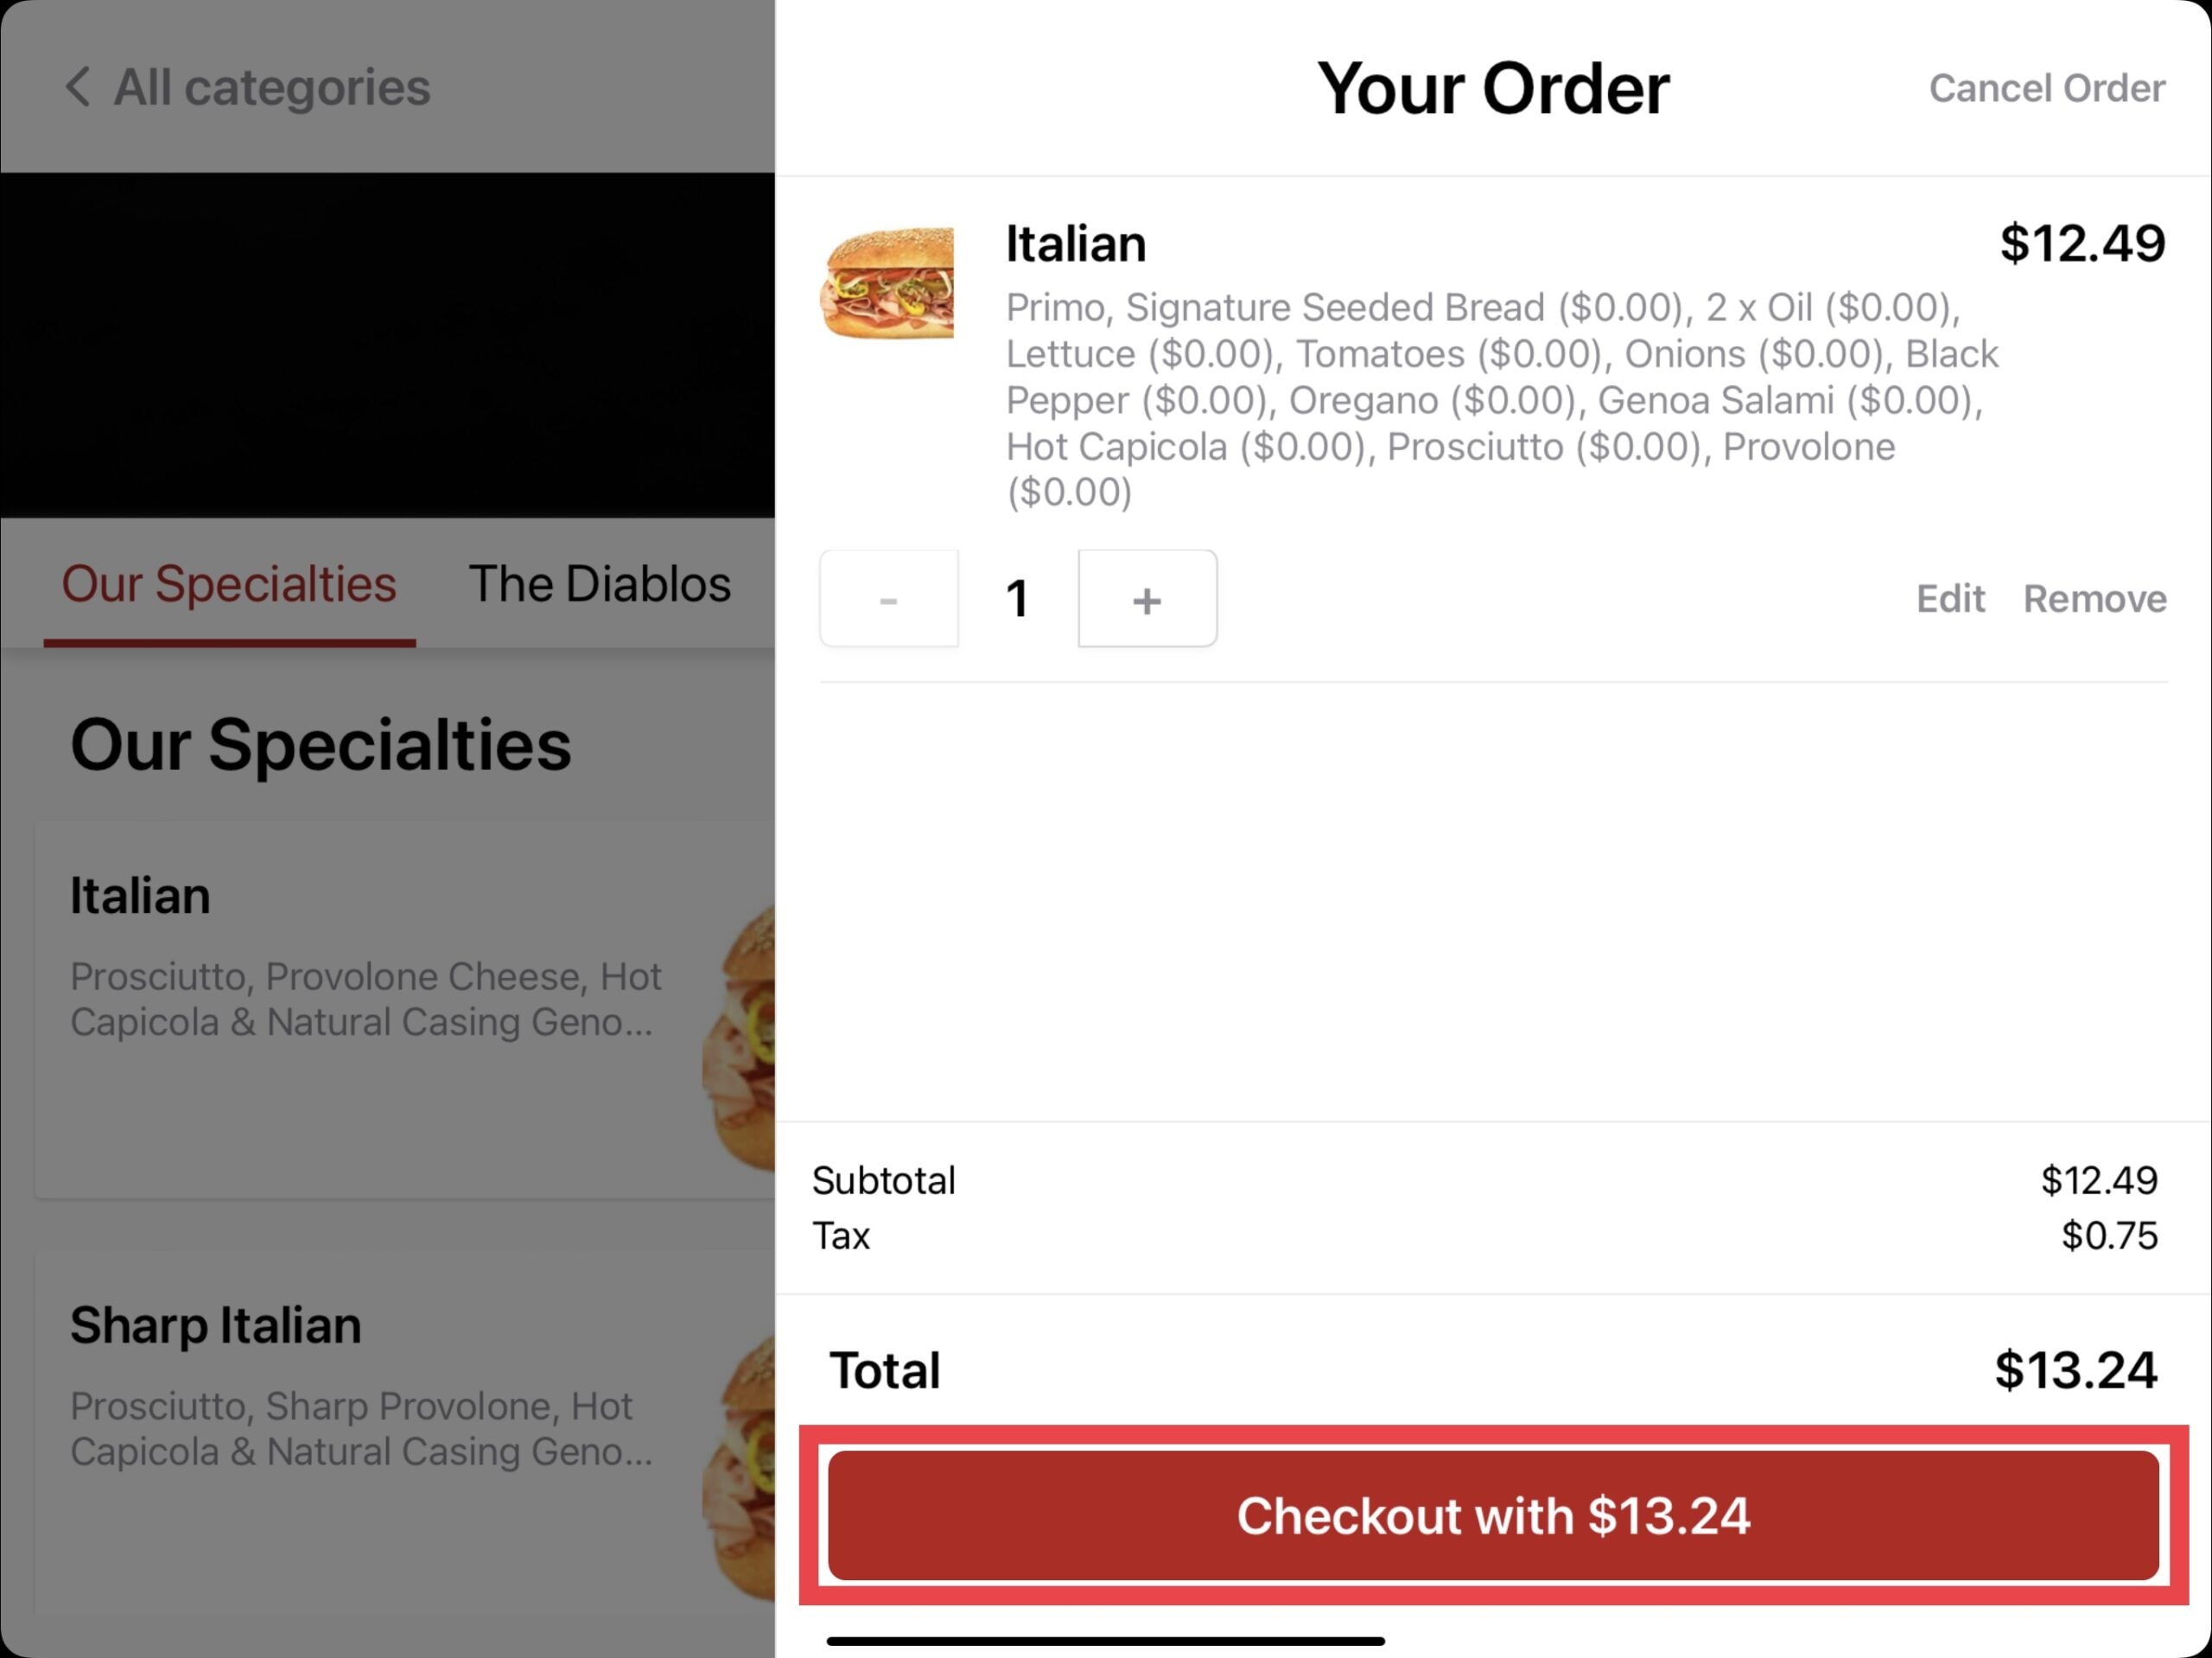
Confirm all order information then select the Checkout button. You may also cancel the order on the top right if needed.
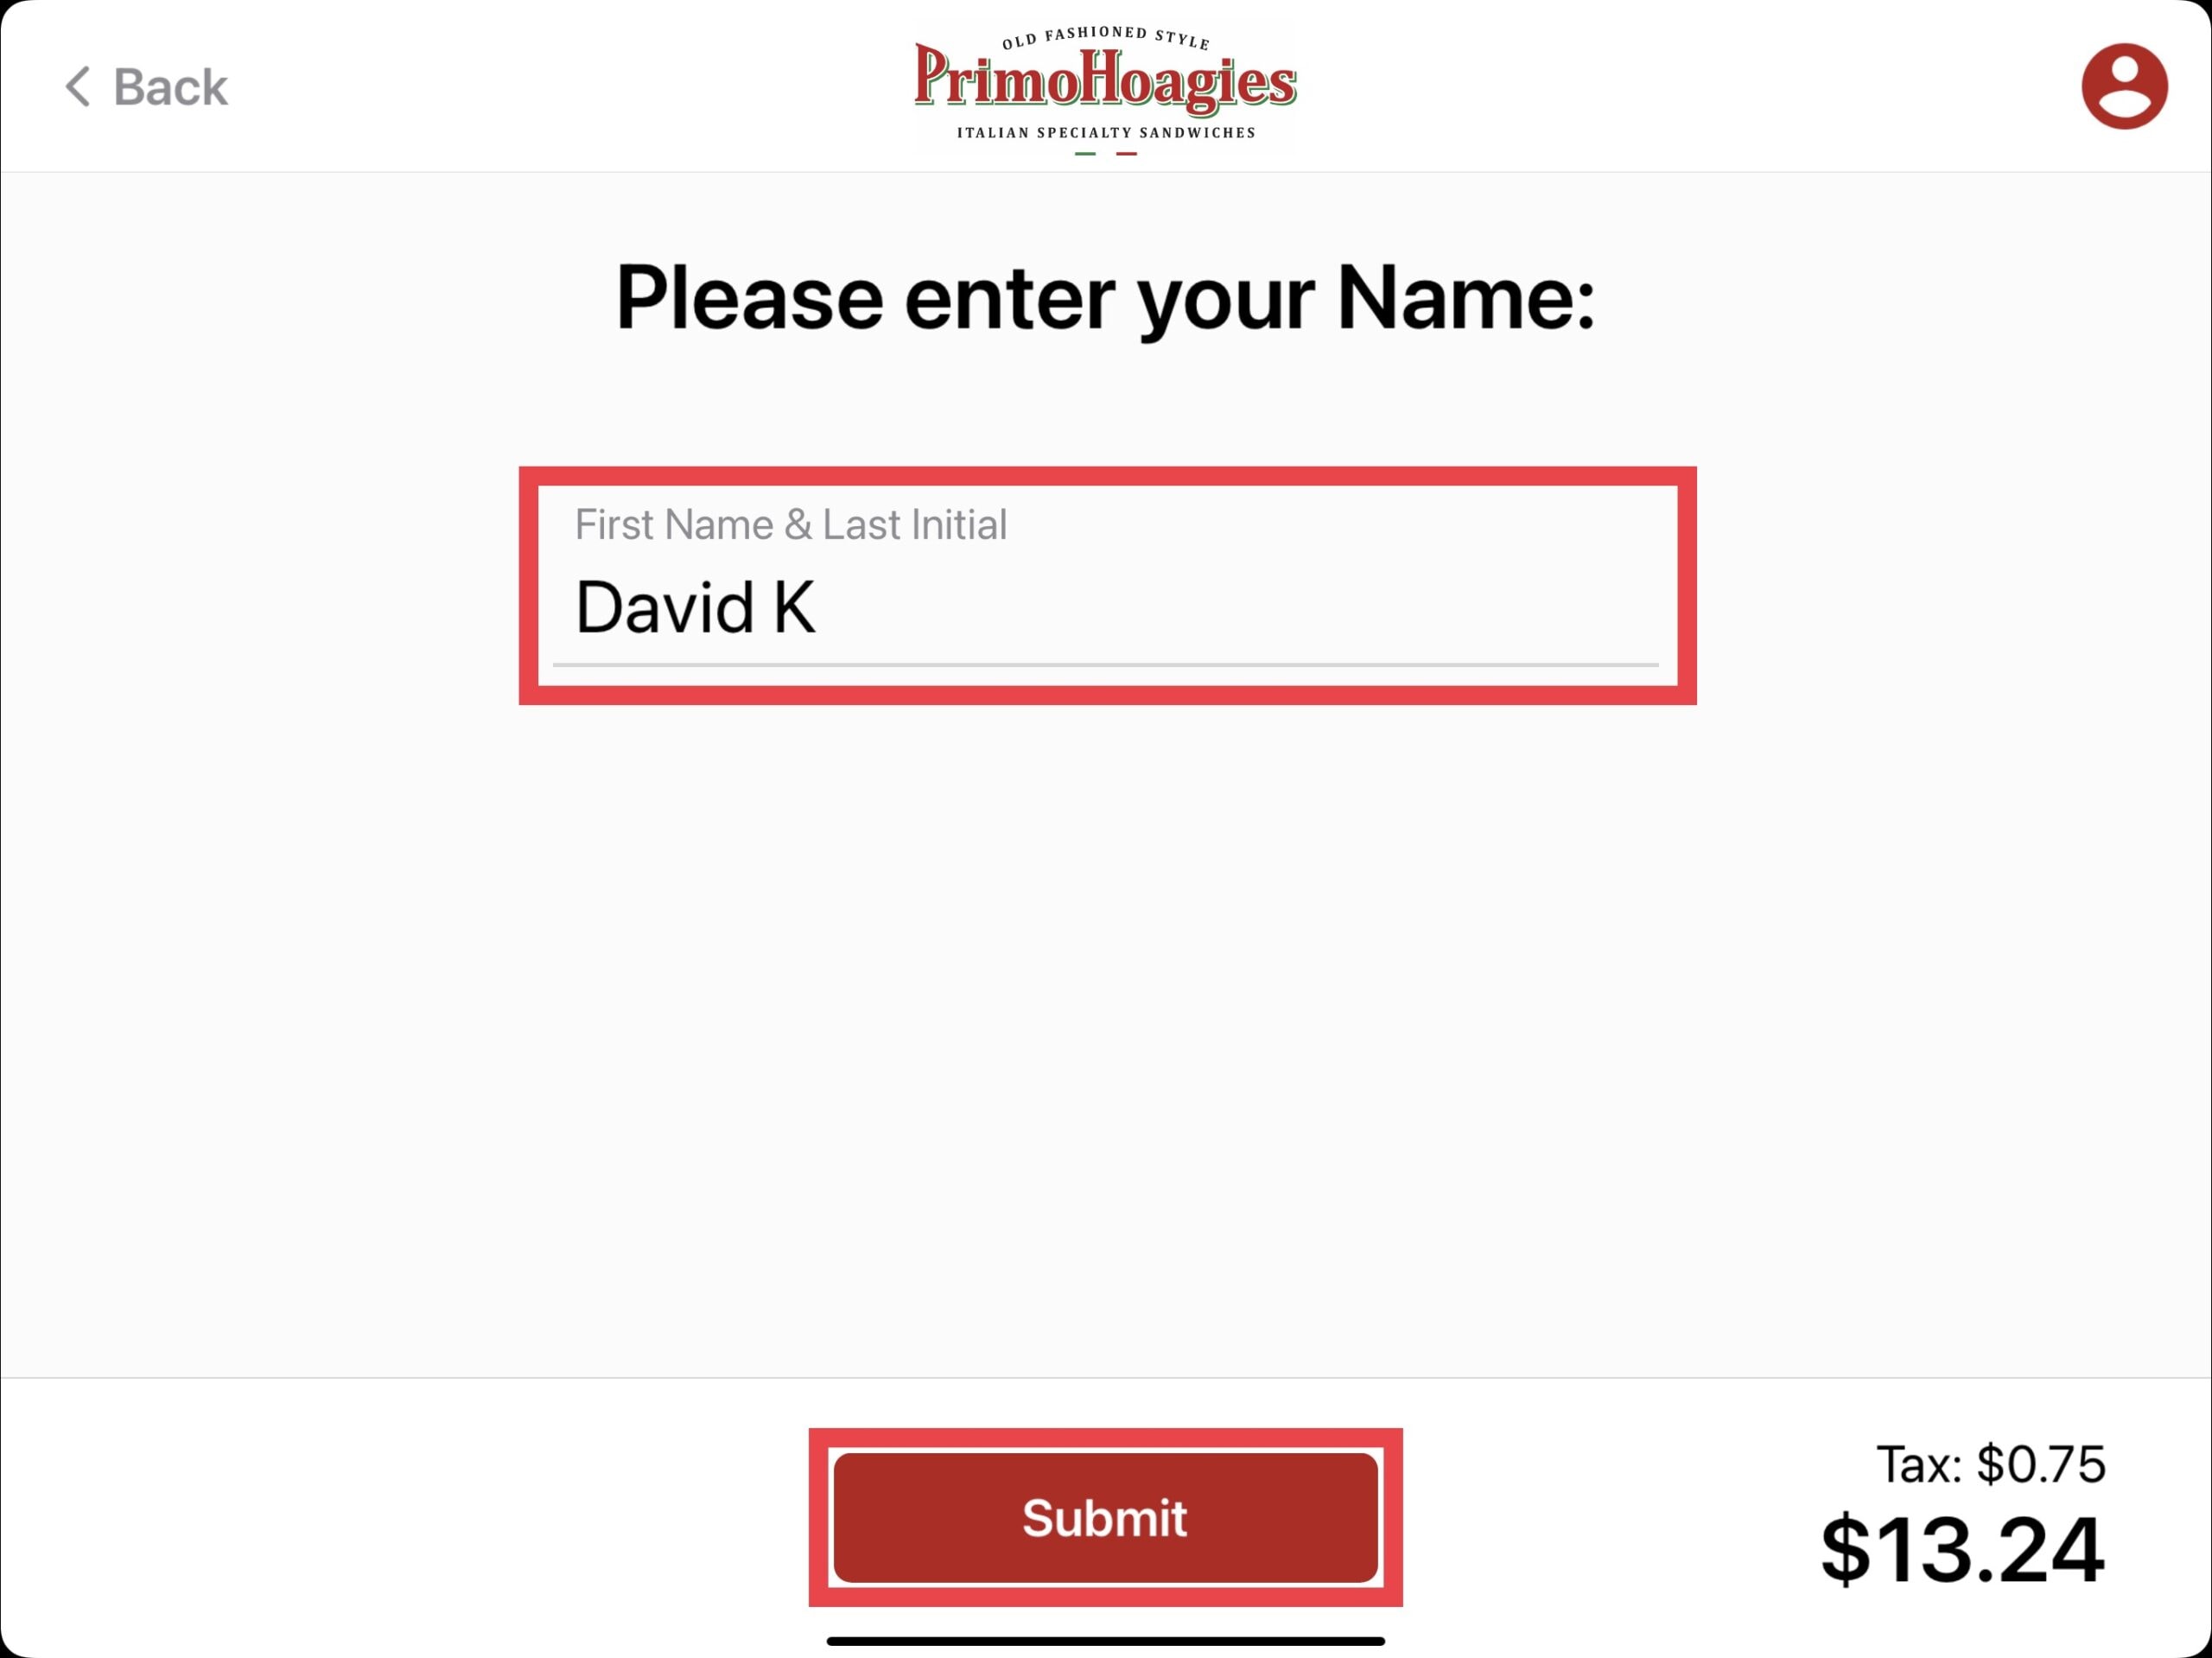
Each order needs a customer name. Enter the First Name & Last Initial for the order then select the Submit button.
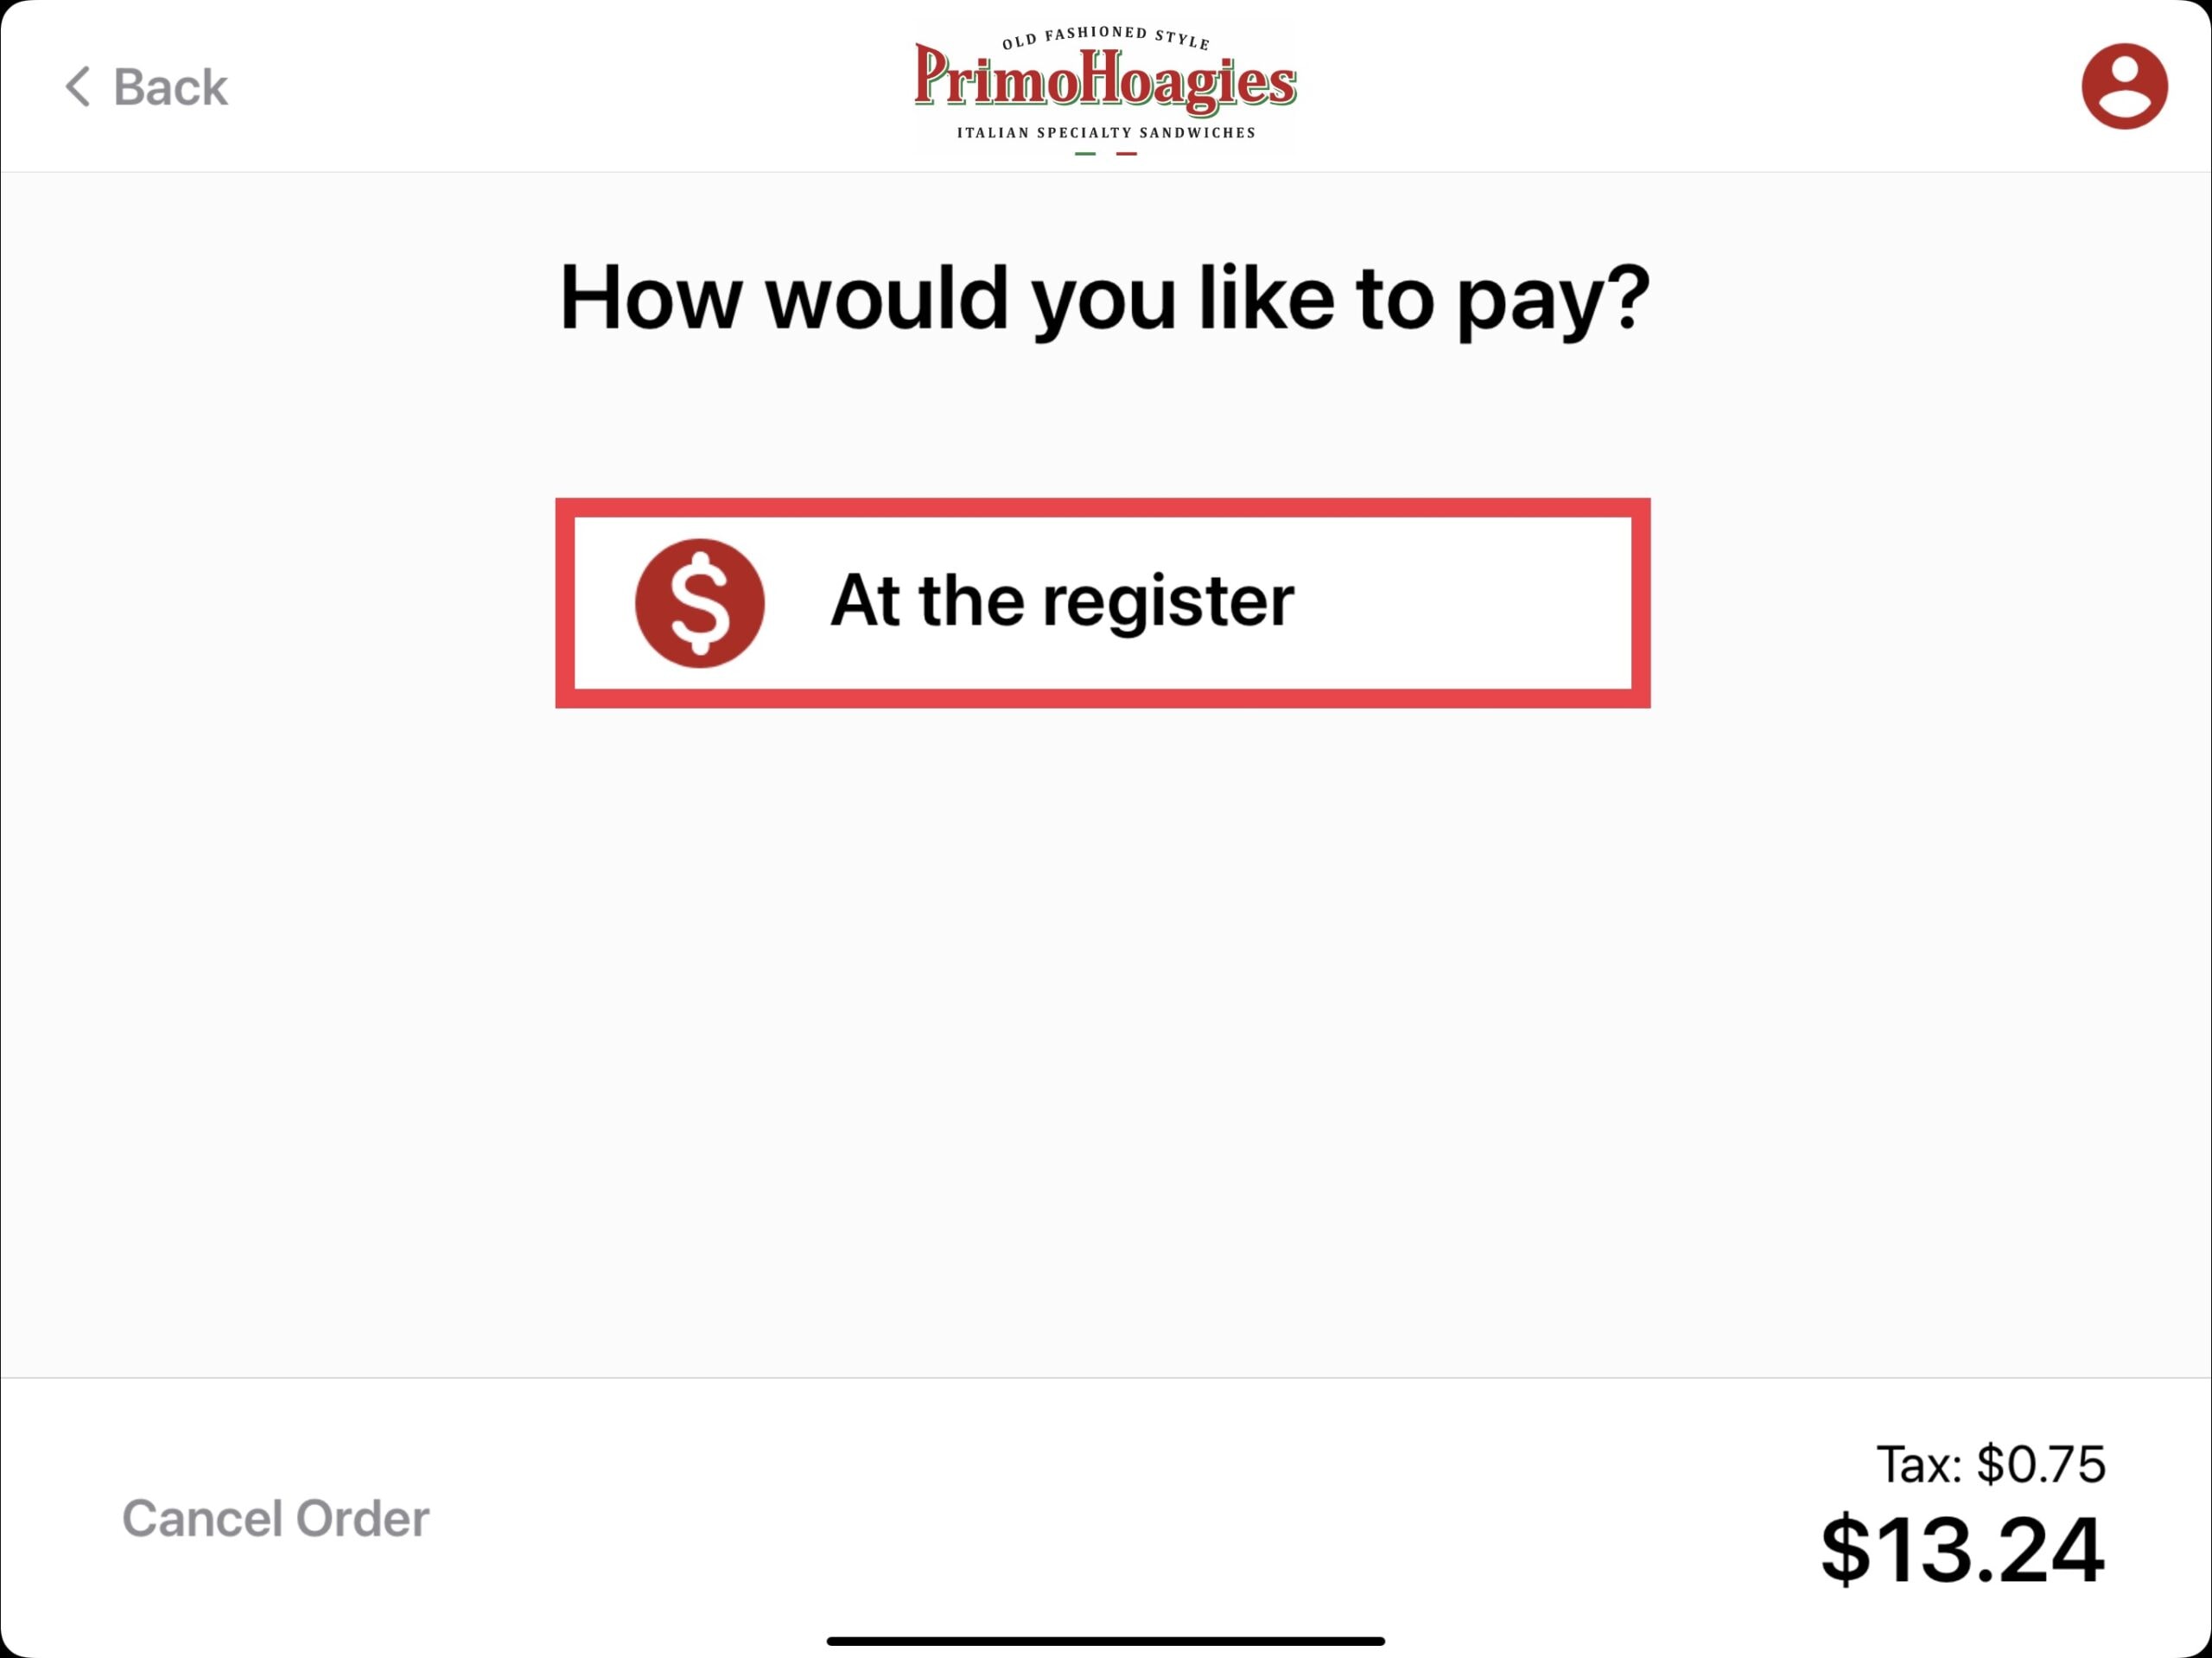
Choose how you would like to pay. By design, the only option is to pay at the register.
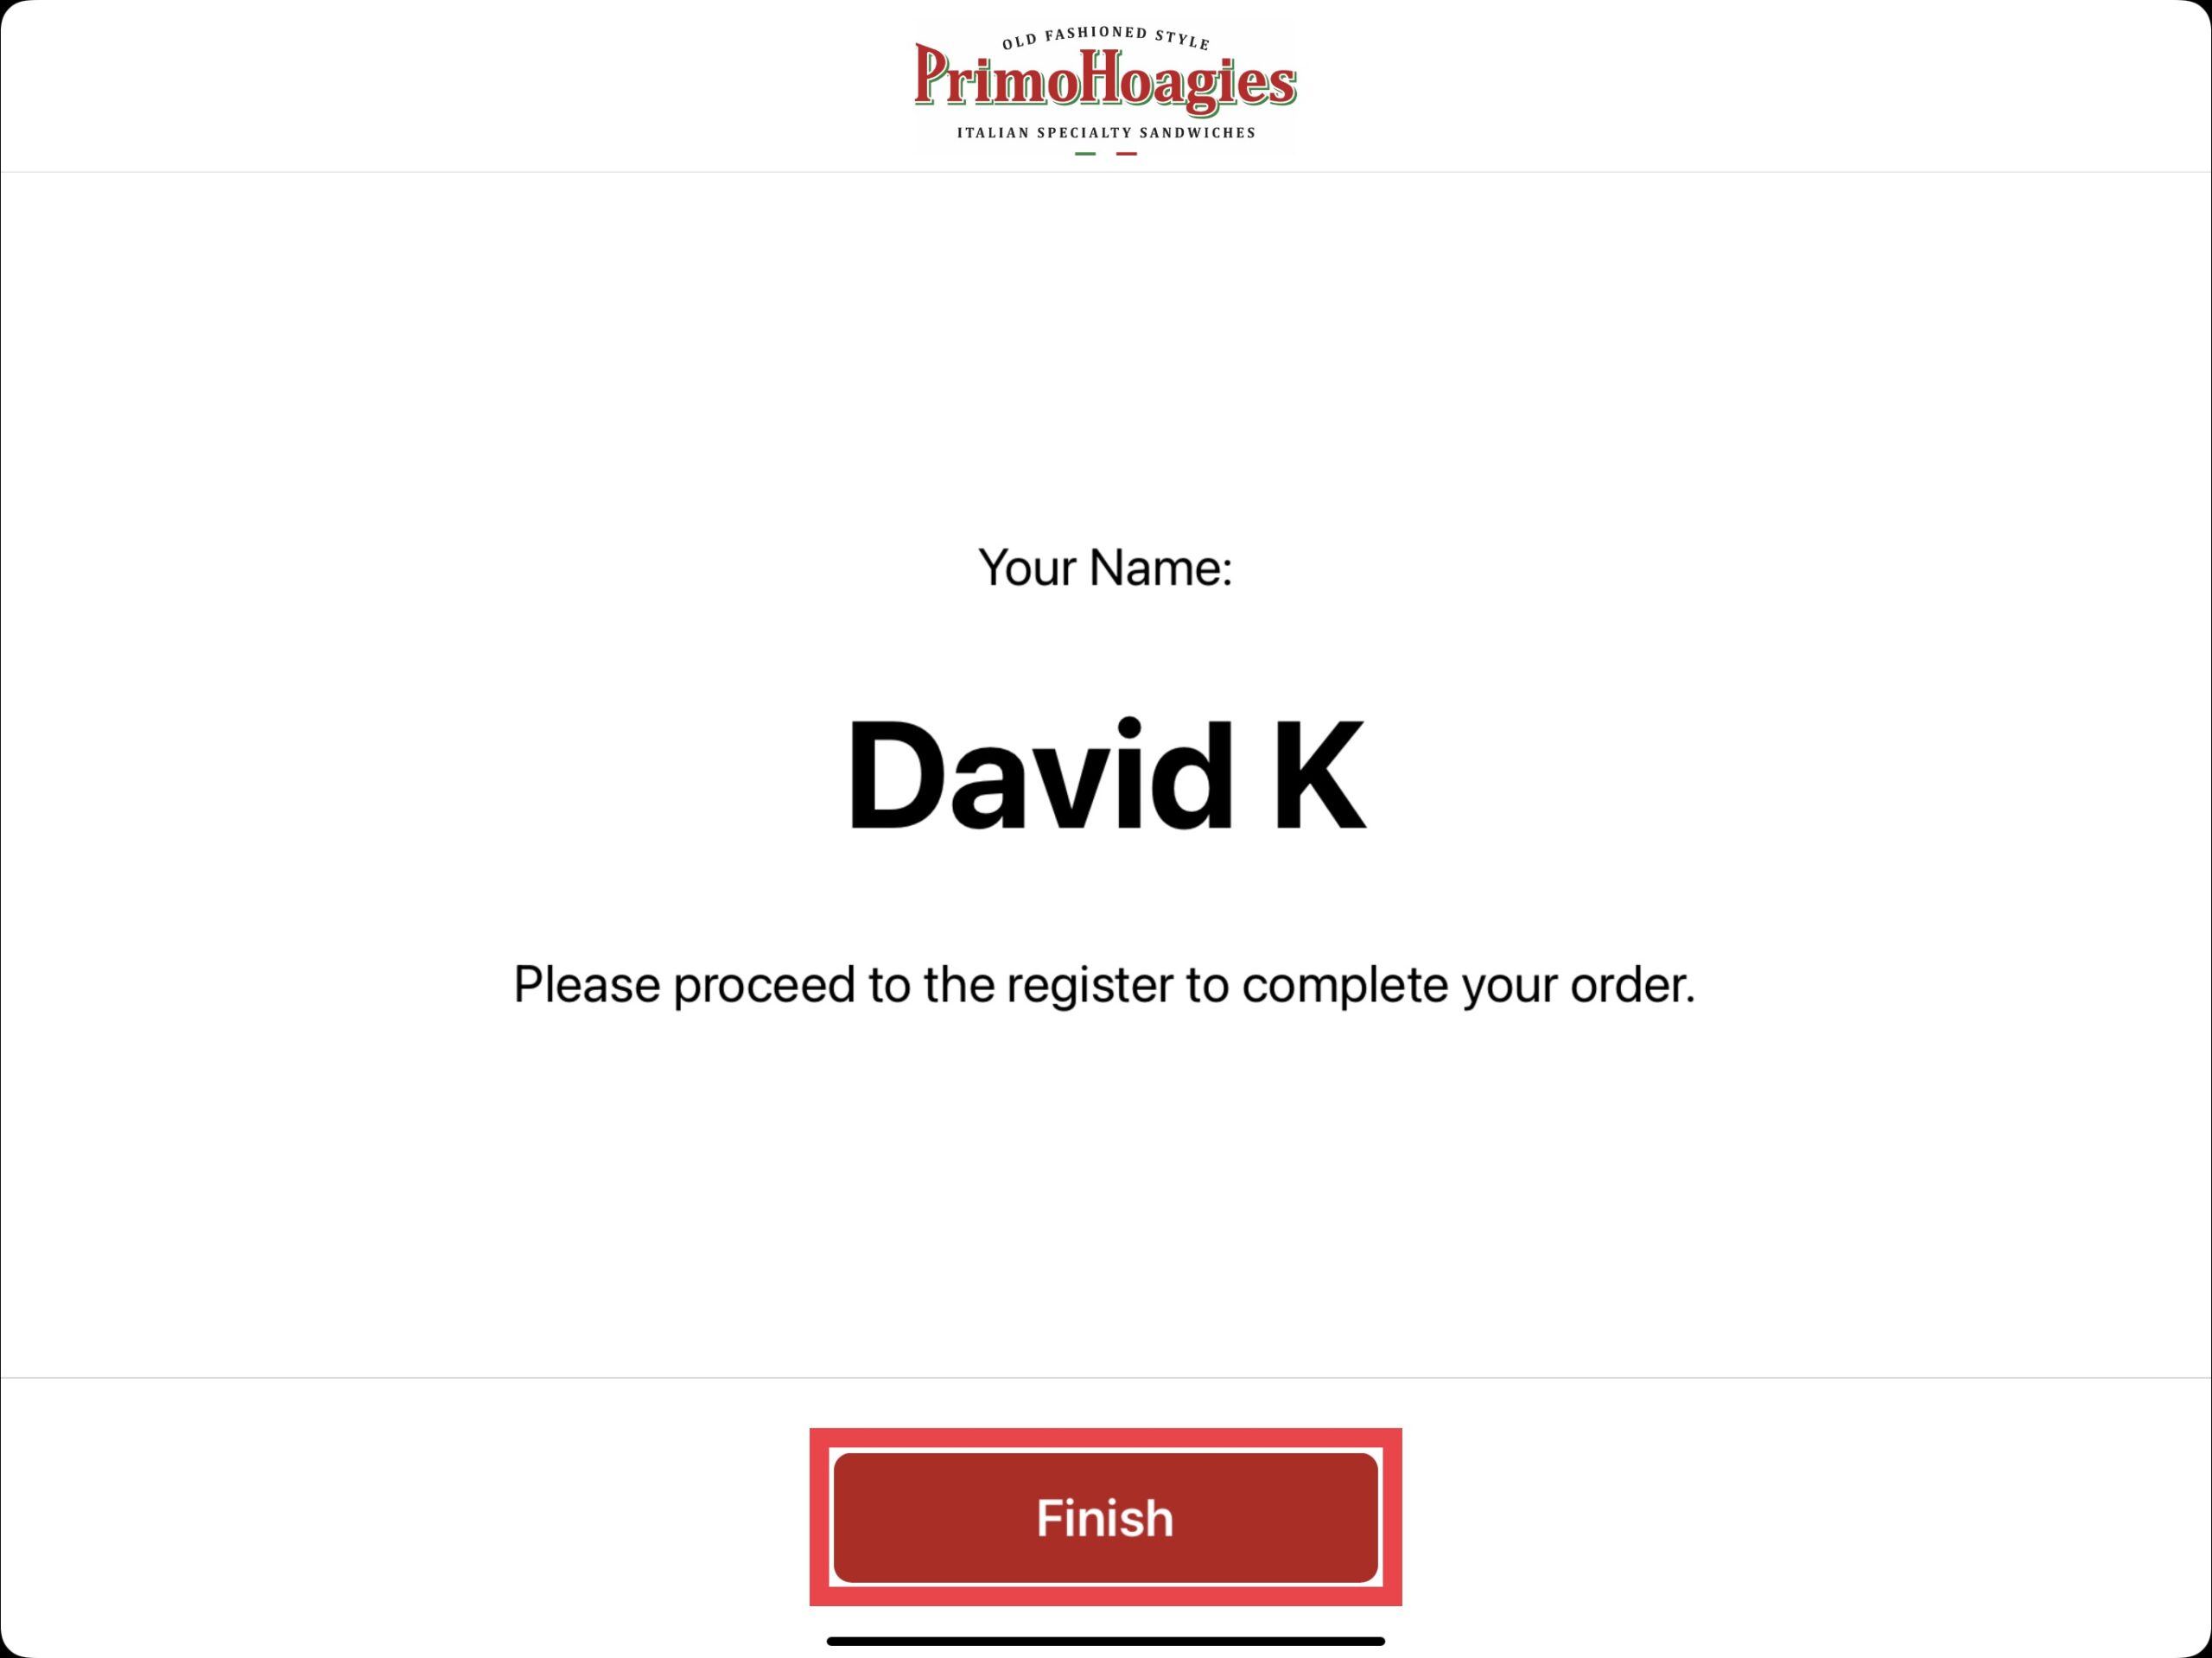
Selecting At The Register brings you to the final confirmation screen to select Finish and print the order ticket. This ticket can be presented to the cashier for payment but is not required (the cashier can look up the order by name, order number, etc. from the cashier iPad).
Automatic Logout
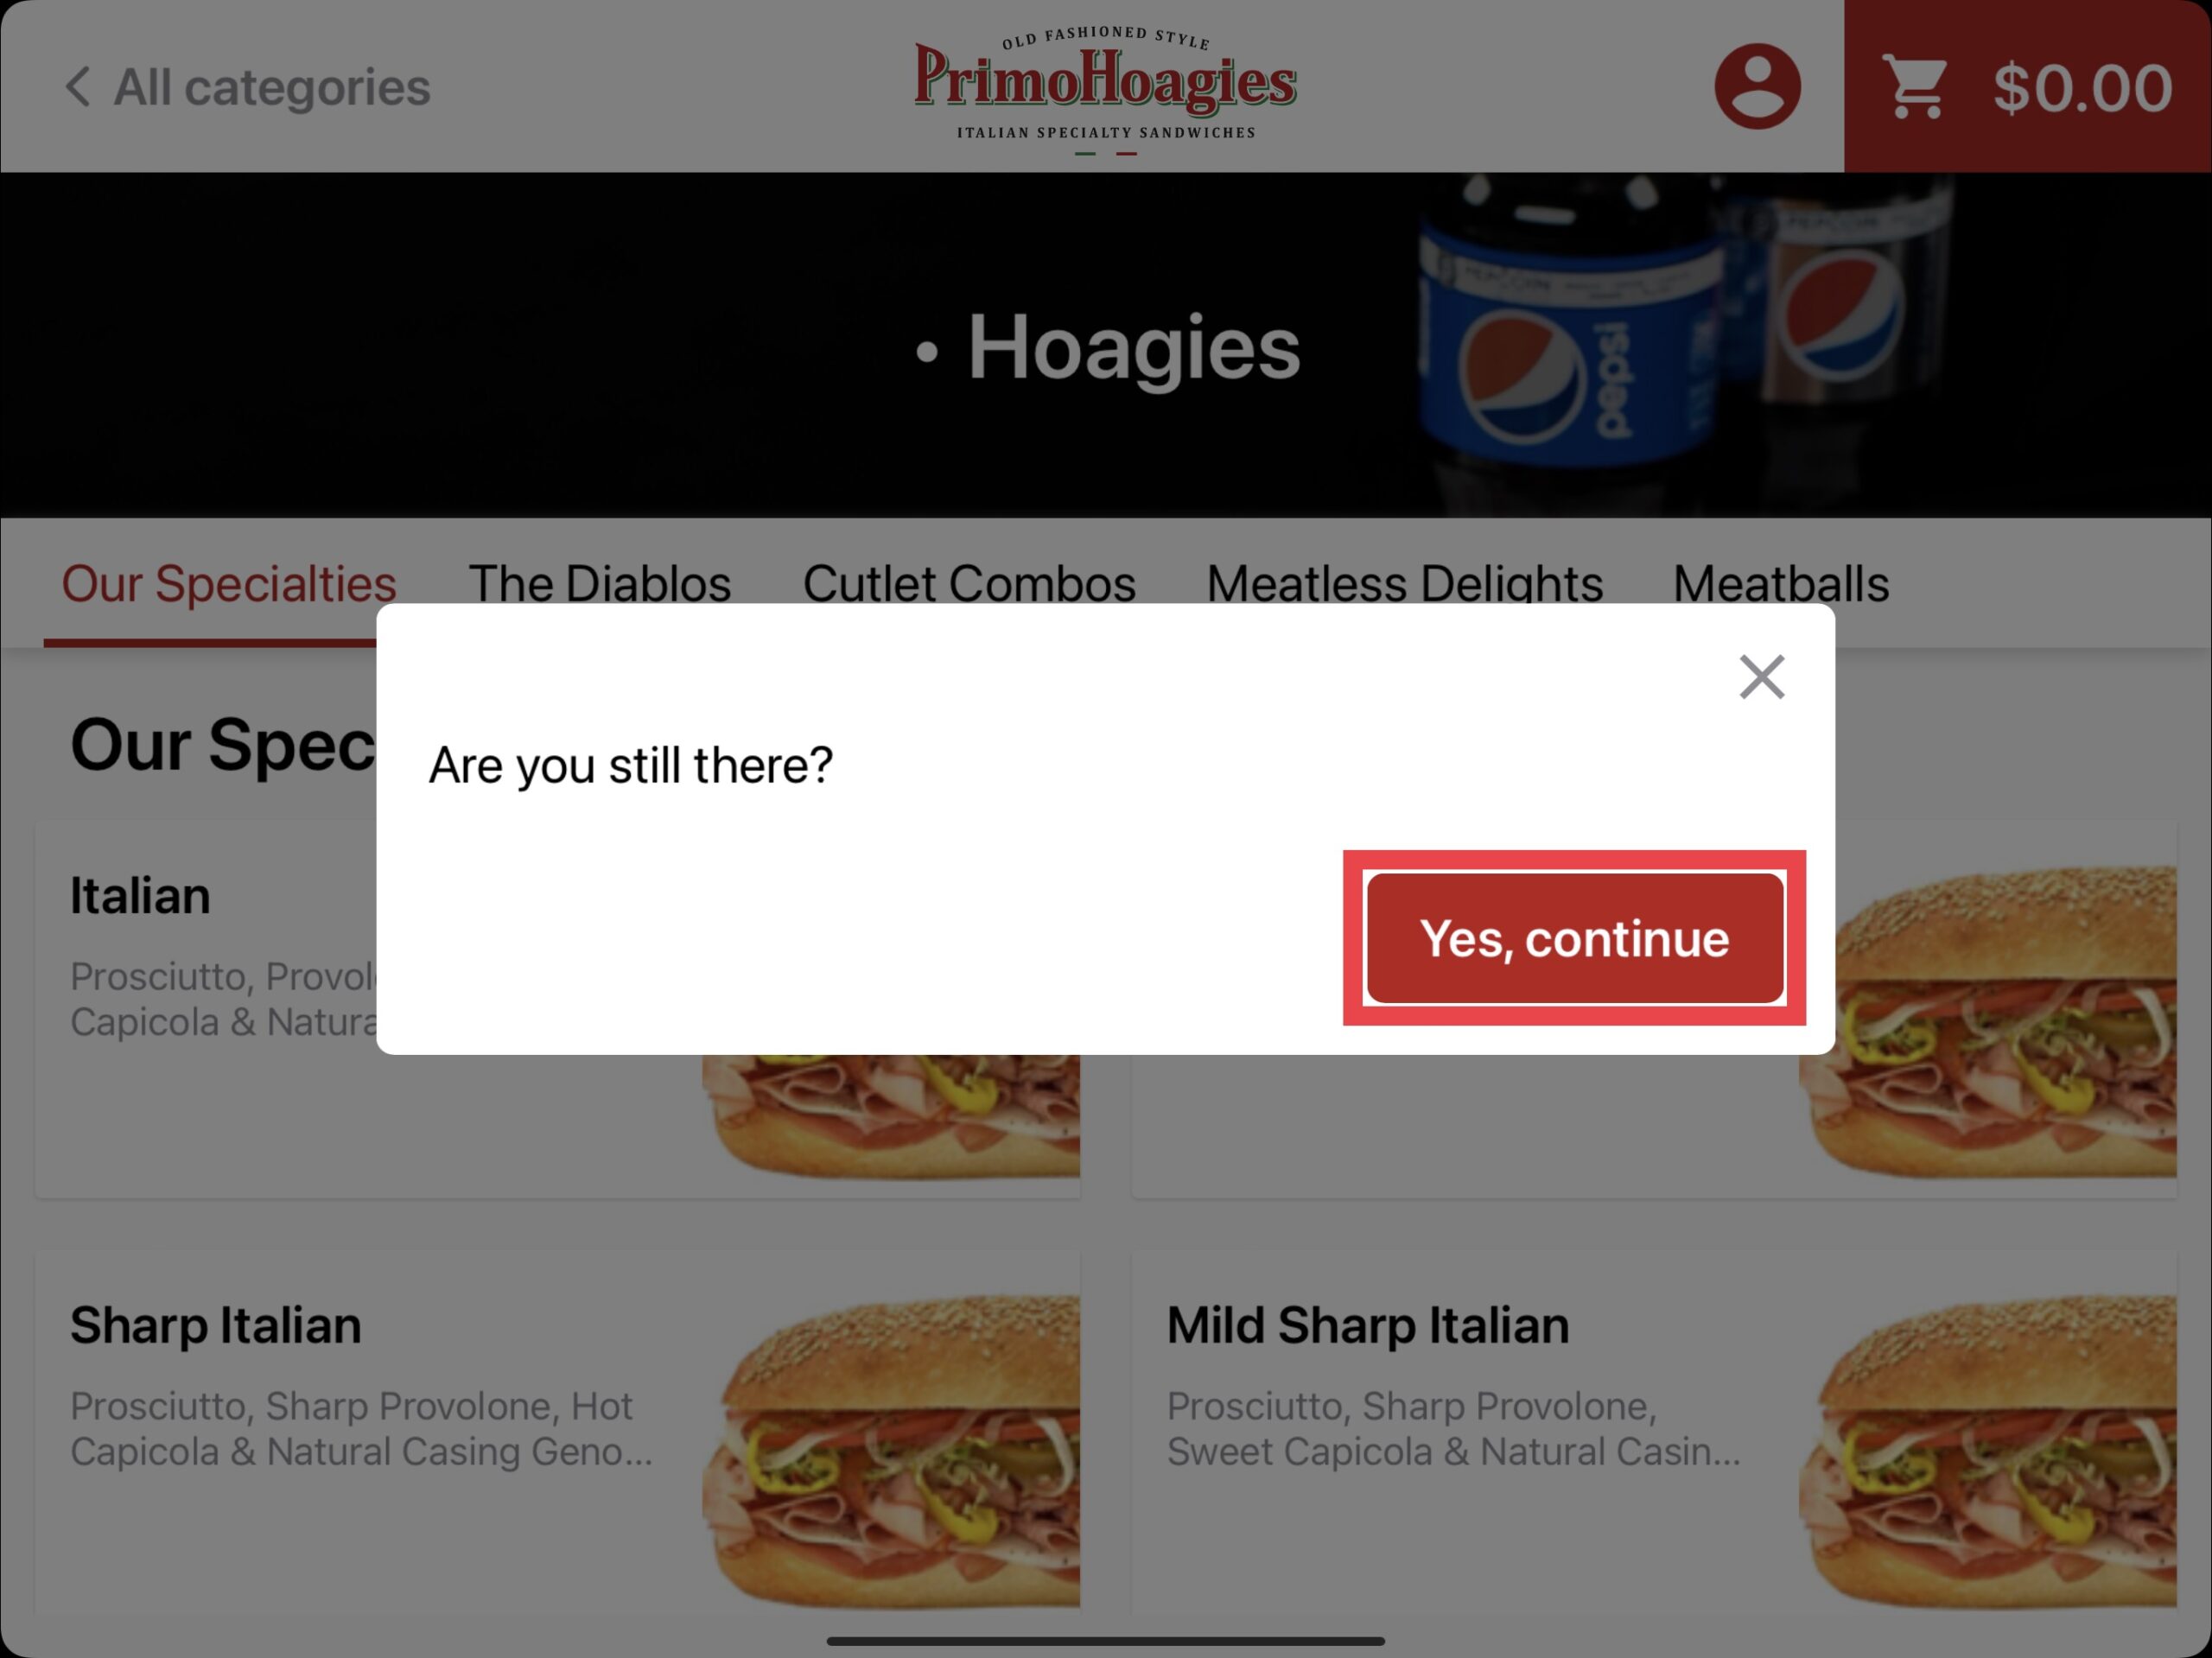
After a period of inactivity, the screen will prompt asking if the customer is still there. If the ordering is to be continued, selecting Yes, Continue will advance the order. If no response is given, the order will automatically be cancelled and return to the rotating branded images.
Updated 01/03/2025

Summary
Returns & Comps can be issued on a specific product(s) or on an entire order at the point of sale level. Returning a product(s) (commonly referred to as refunding) will allow you to return the product(s) to inventory as well as issue a refund of payment to your customer. If you'd like to remove a product(s) from an unpaid order, but the product(s) has already been saved to the order (for example by holding or sending the order), you will need to process a void which follows the same process as a return or comp.
Types of Payment Refunds
When issuing a return or a comp to a paid order, the payment can be refunded in one of two ways.
Option 1 (Suggested): Payment Refund then Product Adjustment
Proceed to the payment screen and select the payment to refund by choosing the back arrow. After the payment has been refunded, go back to the order and make any product adjustments.
Option 2: Product Adjustment then Payment Refund
A product adjustment can be made prior to removing an existing payment. Doing so will trigger a payment refund box. Follow the steps to issue the refund as needed.
Credit card payments made on orders processed at the point of sale can be removed and will submit the refund to the customers credit card. In addition, online orders placed though PrimoHoagies.com can also be refunded directly through the point of sale (up to 15 days) without the need to contact DBS for external credit card refund processing (unless after the 15 day period).
Note: Payments made through any 3rd party applications such as GrubHub, Uber Eats, DoorDash & ezCater are can NOT be refunded through the point of sale. These payments are captured and processed through their respective platforms therefore you will need to contact the 3rd party application to process a customer refund. The Revel Systems order will have a payment attached to it that will need to be removed just like shown above however it will NOT refund the customer credit card.
DoorDash Drive Note: DoorDash Drive orders are fully integrated with PrimoHoagies.com & Revel Systems Online Ordering platform and credit card payments CAN be refunded thru the point of sale. For adjustments on DoorDash Drive, please follow any procedures outlined by PrimoHoagies Corporate
Removing Payment Example (Option 1)
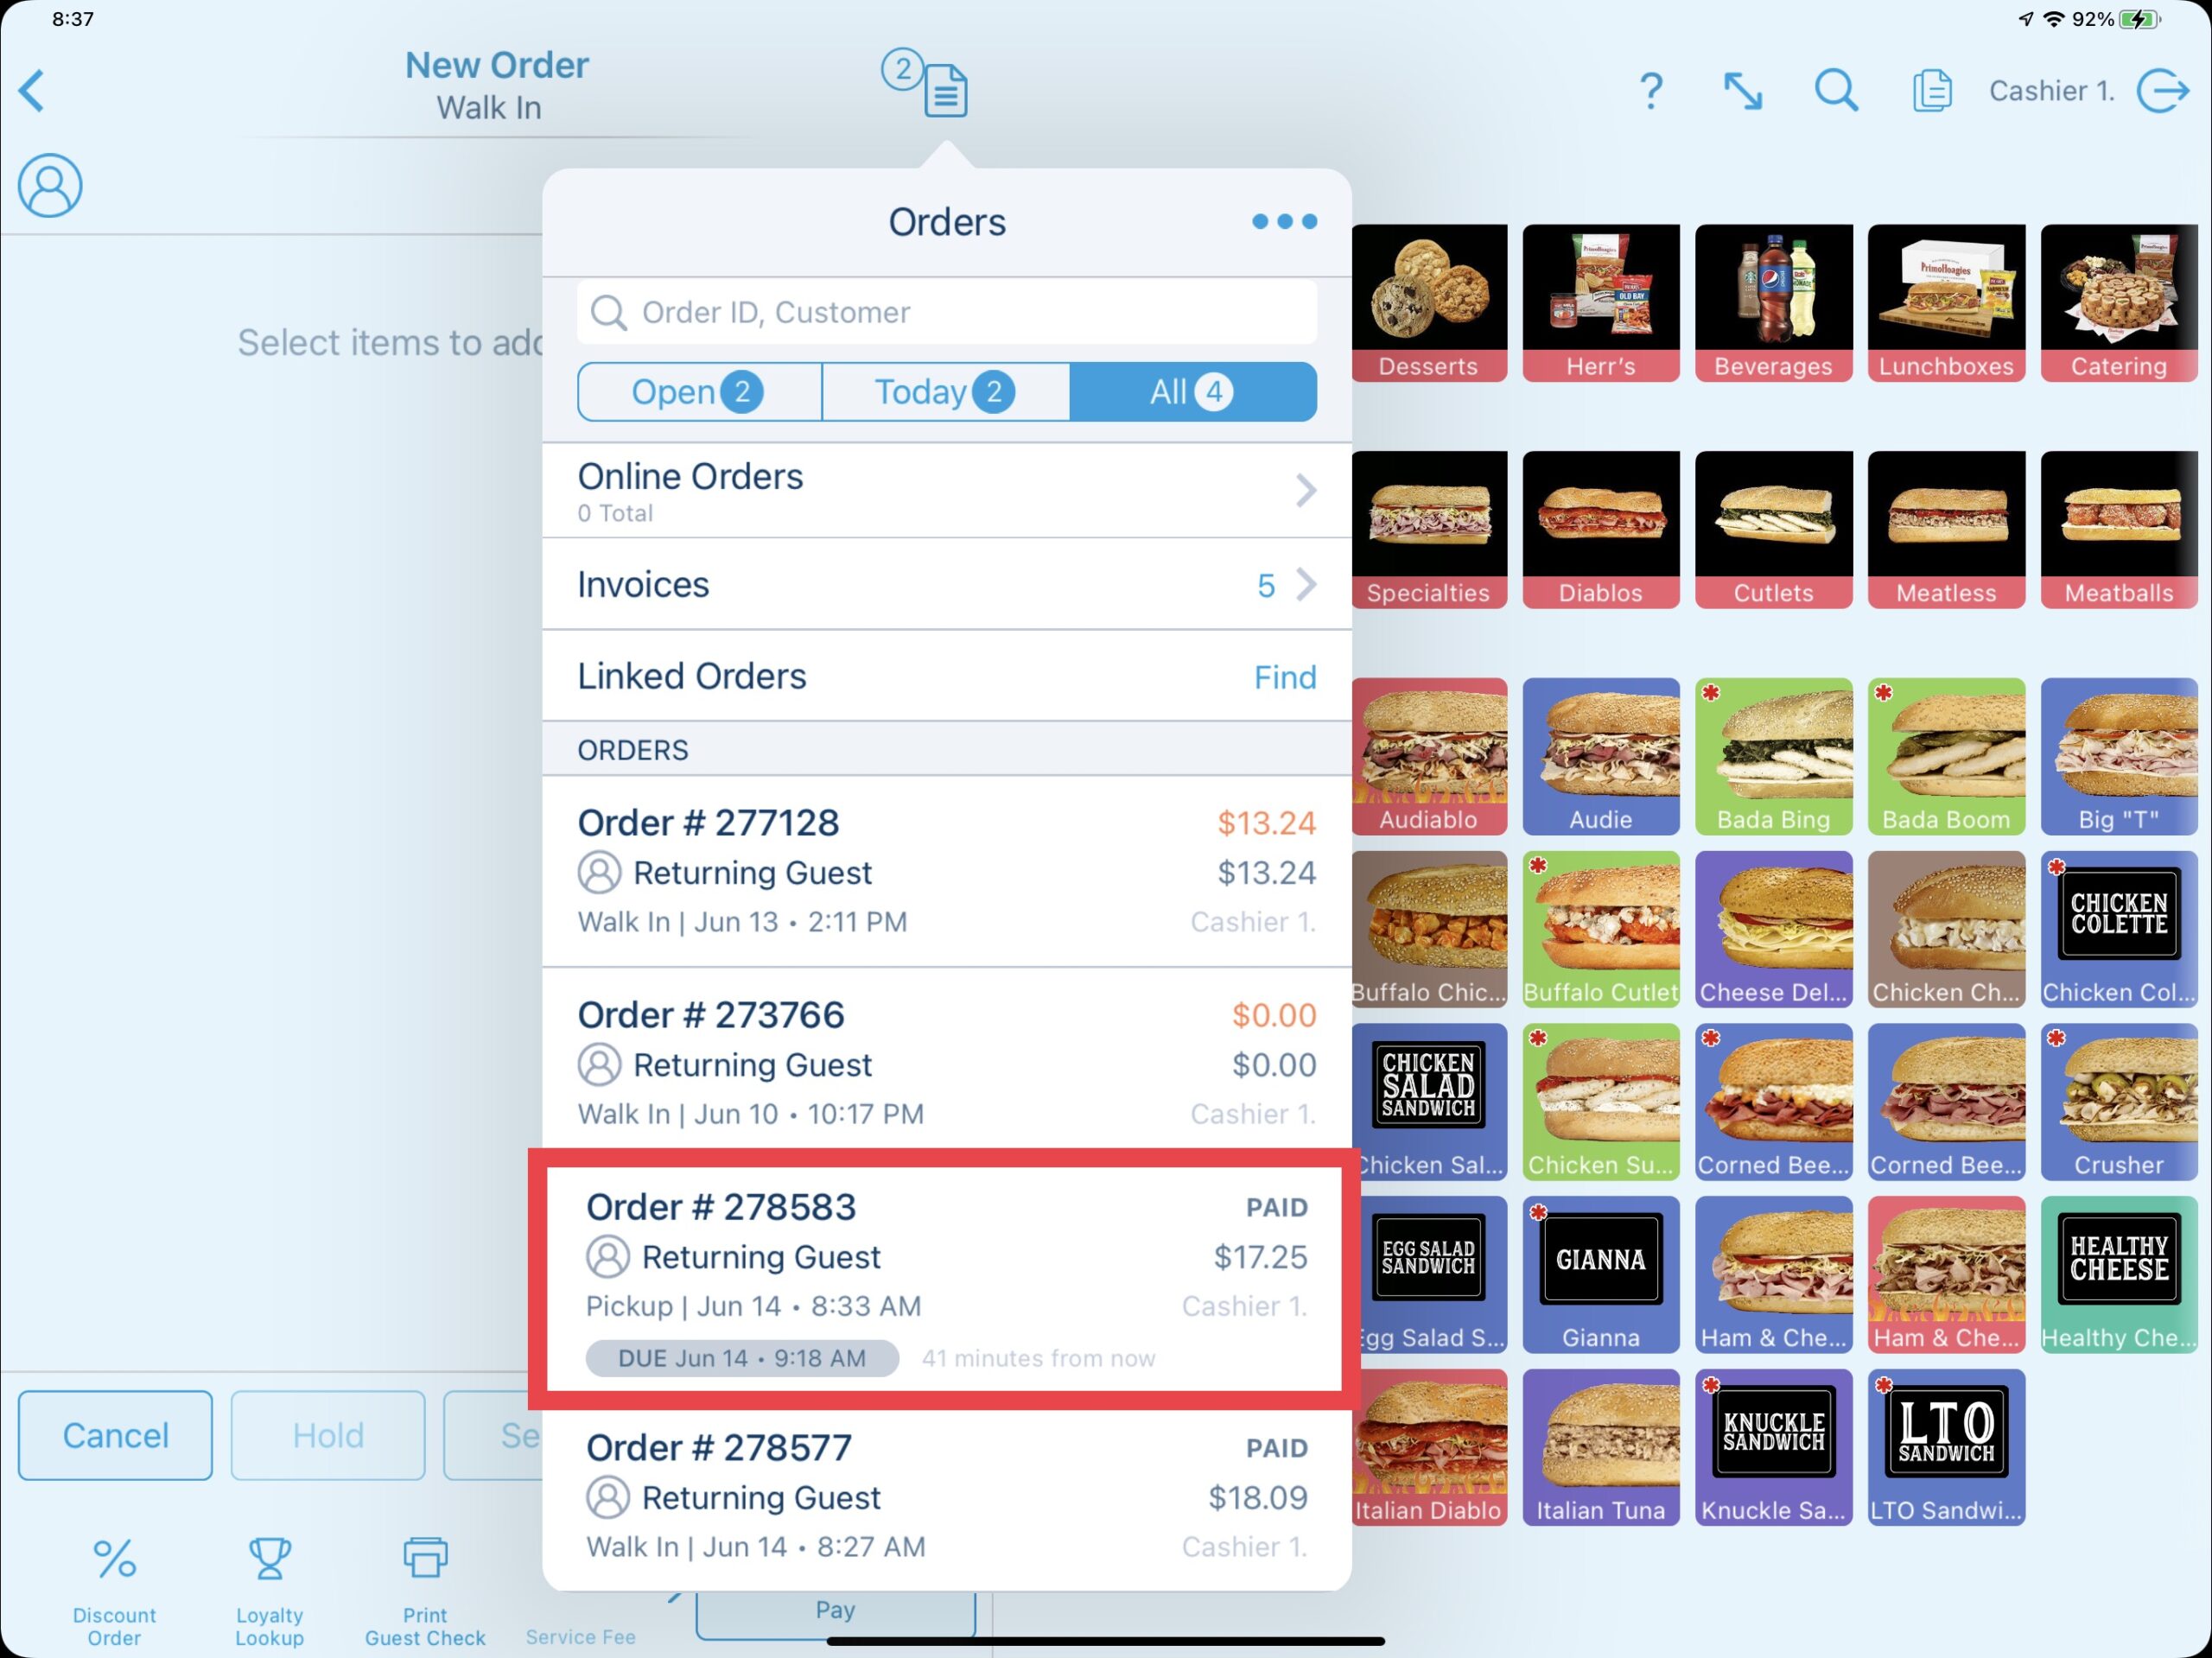
The first step in doing a return or comp is to recall the closed order. Navigate to the recall orders section and select the order to be recalled.
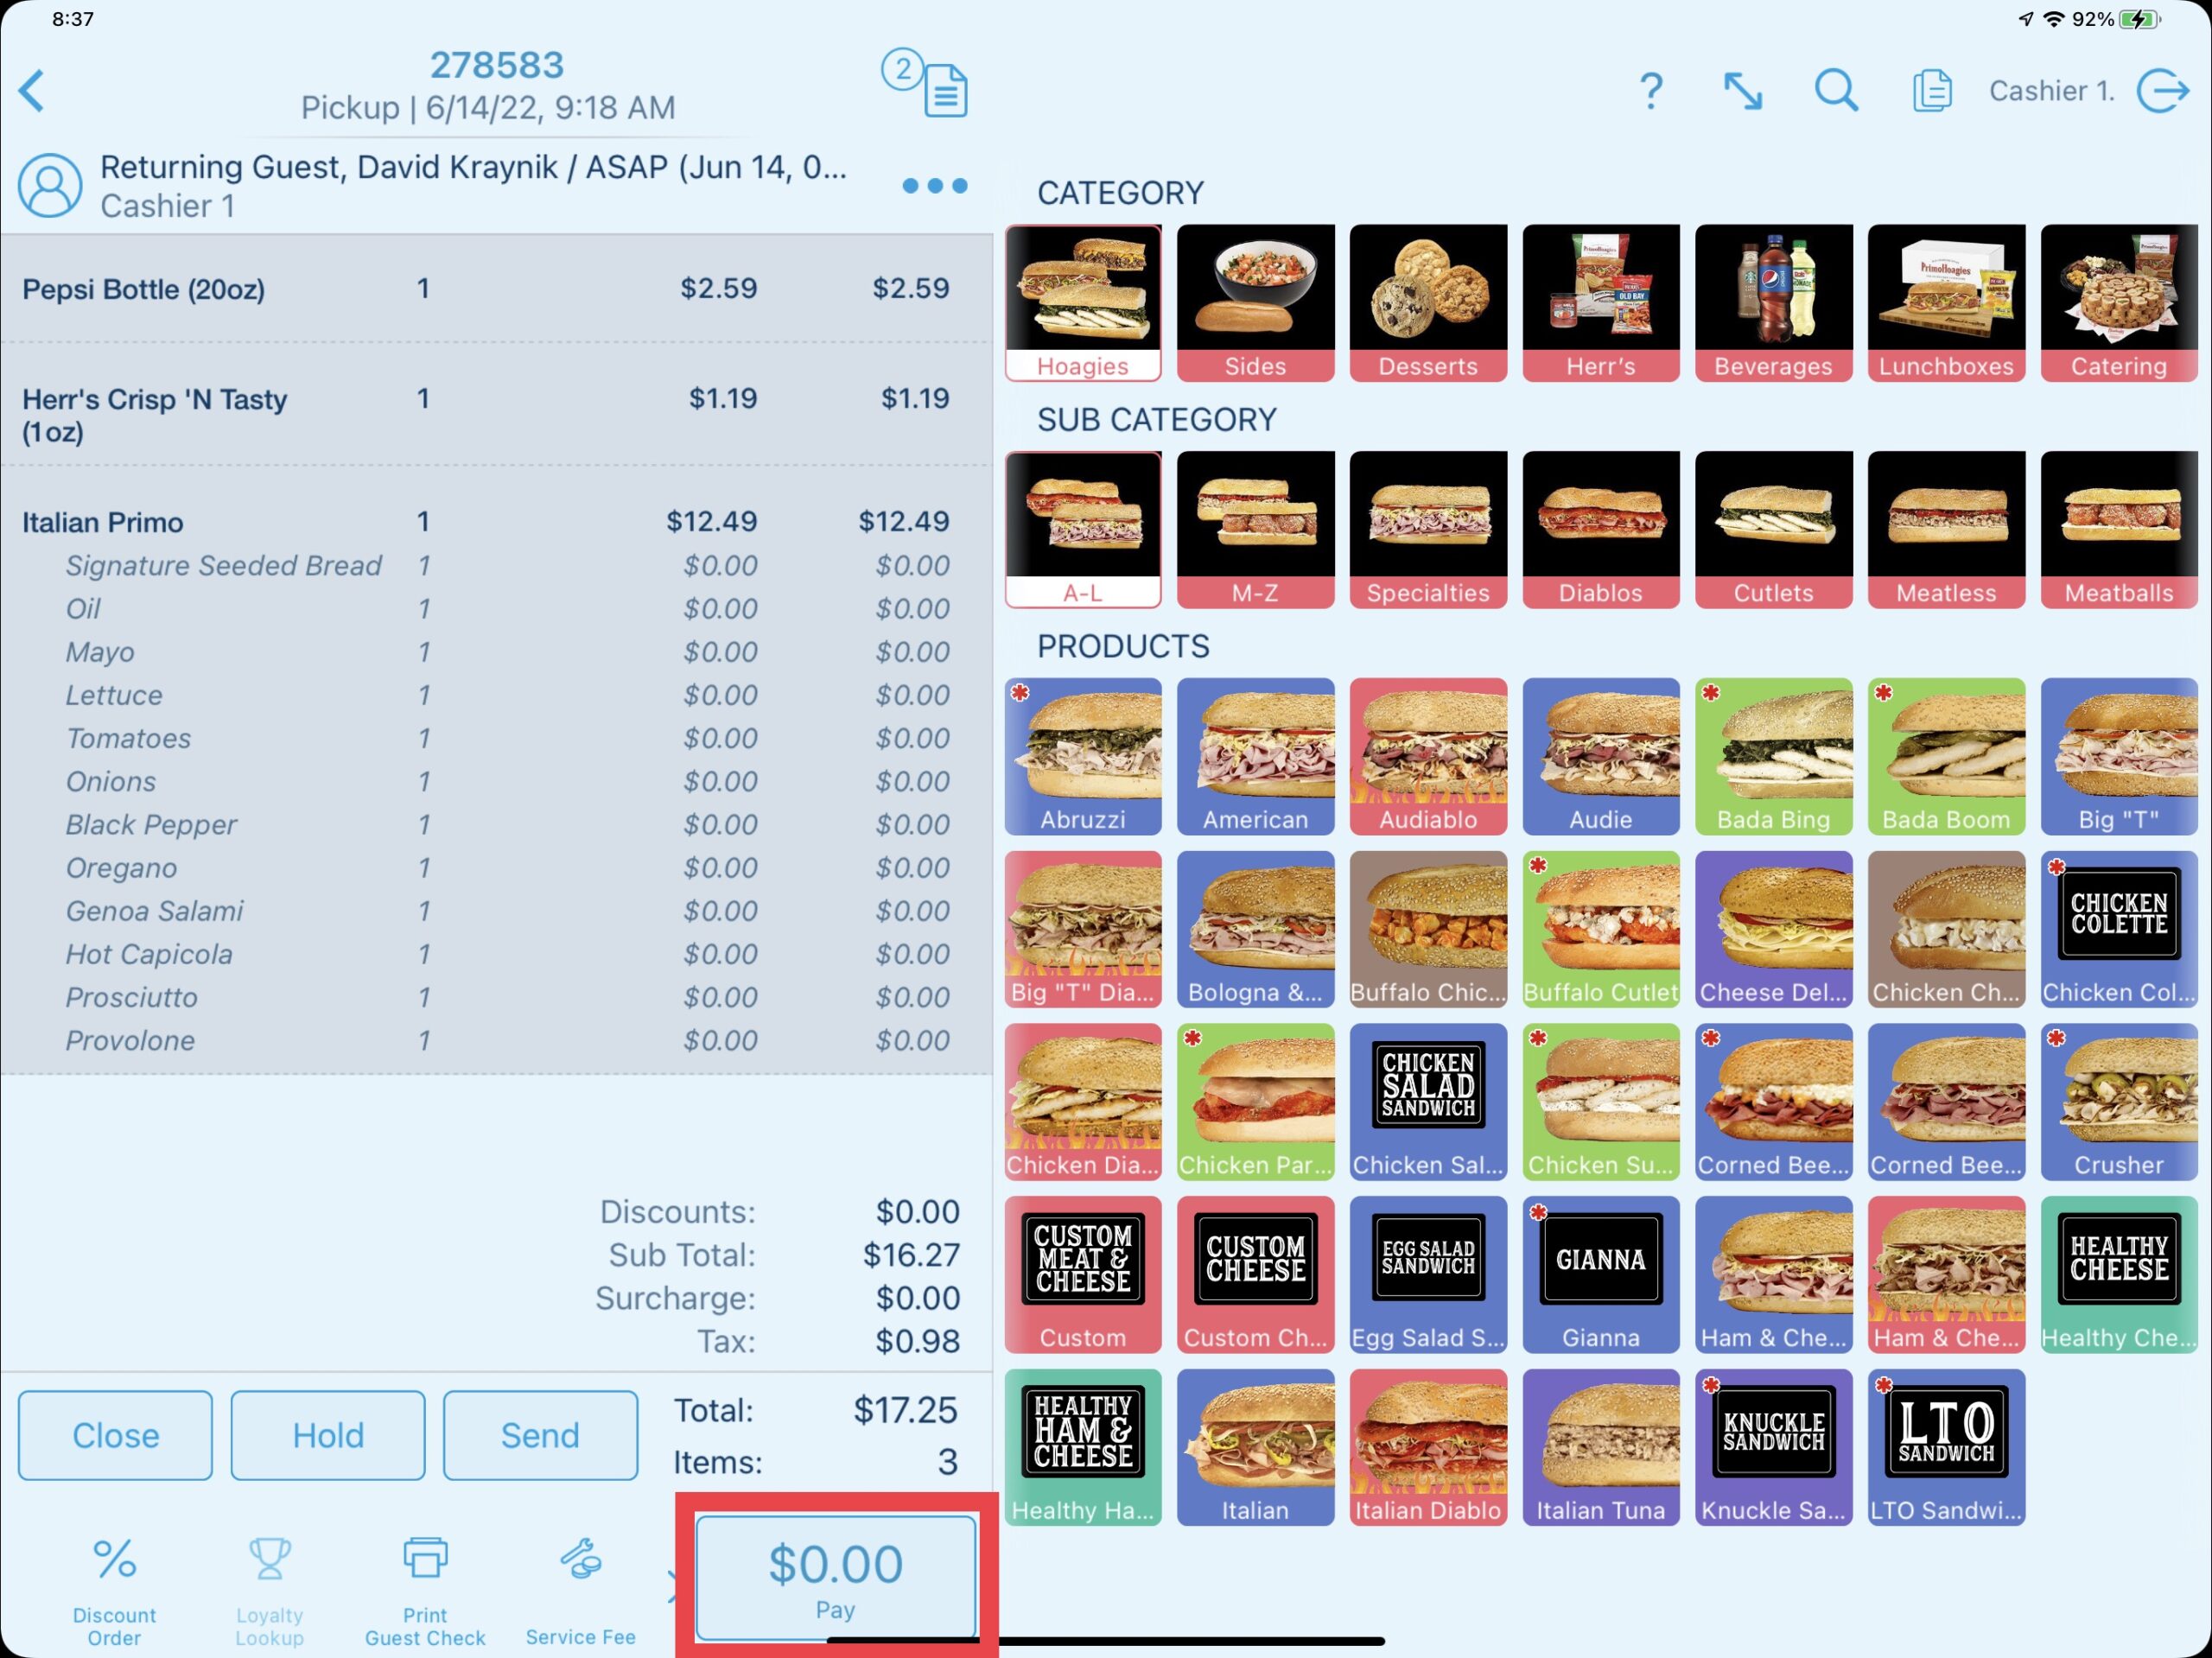
This opens the order. Select Pay on the bottom and proceed to removing the payment. Do NOT return or comp products before this step.
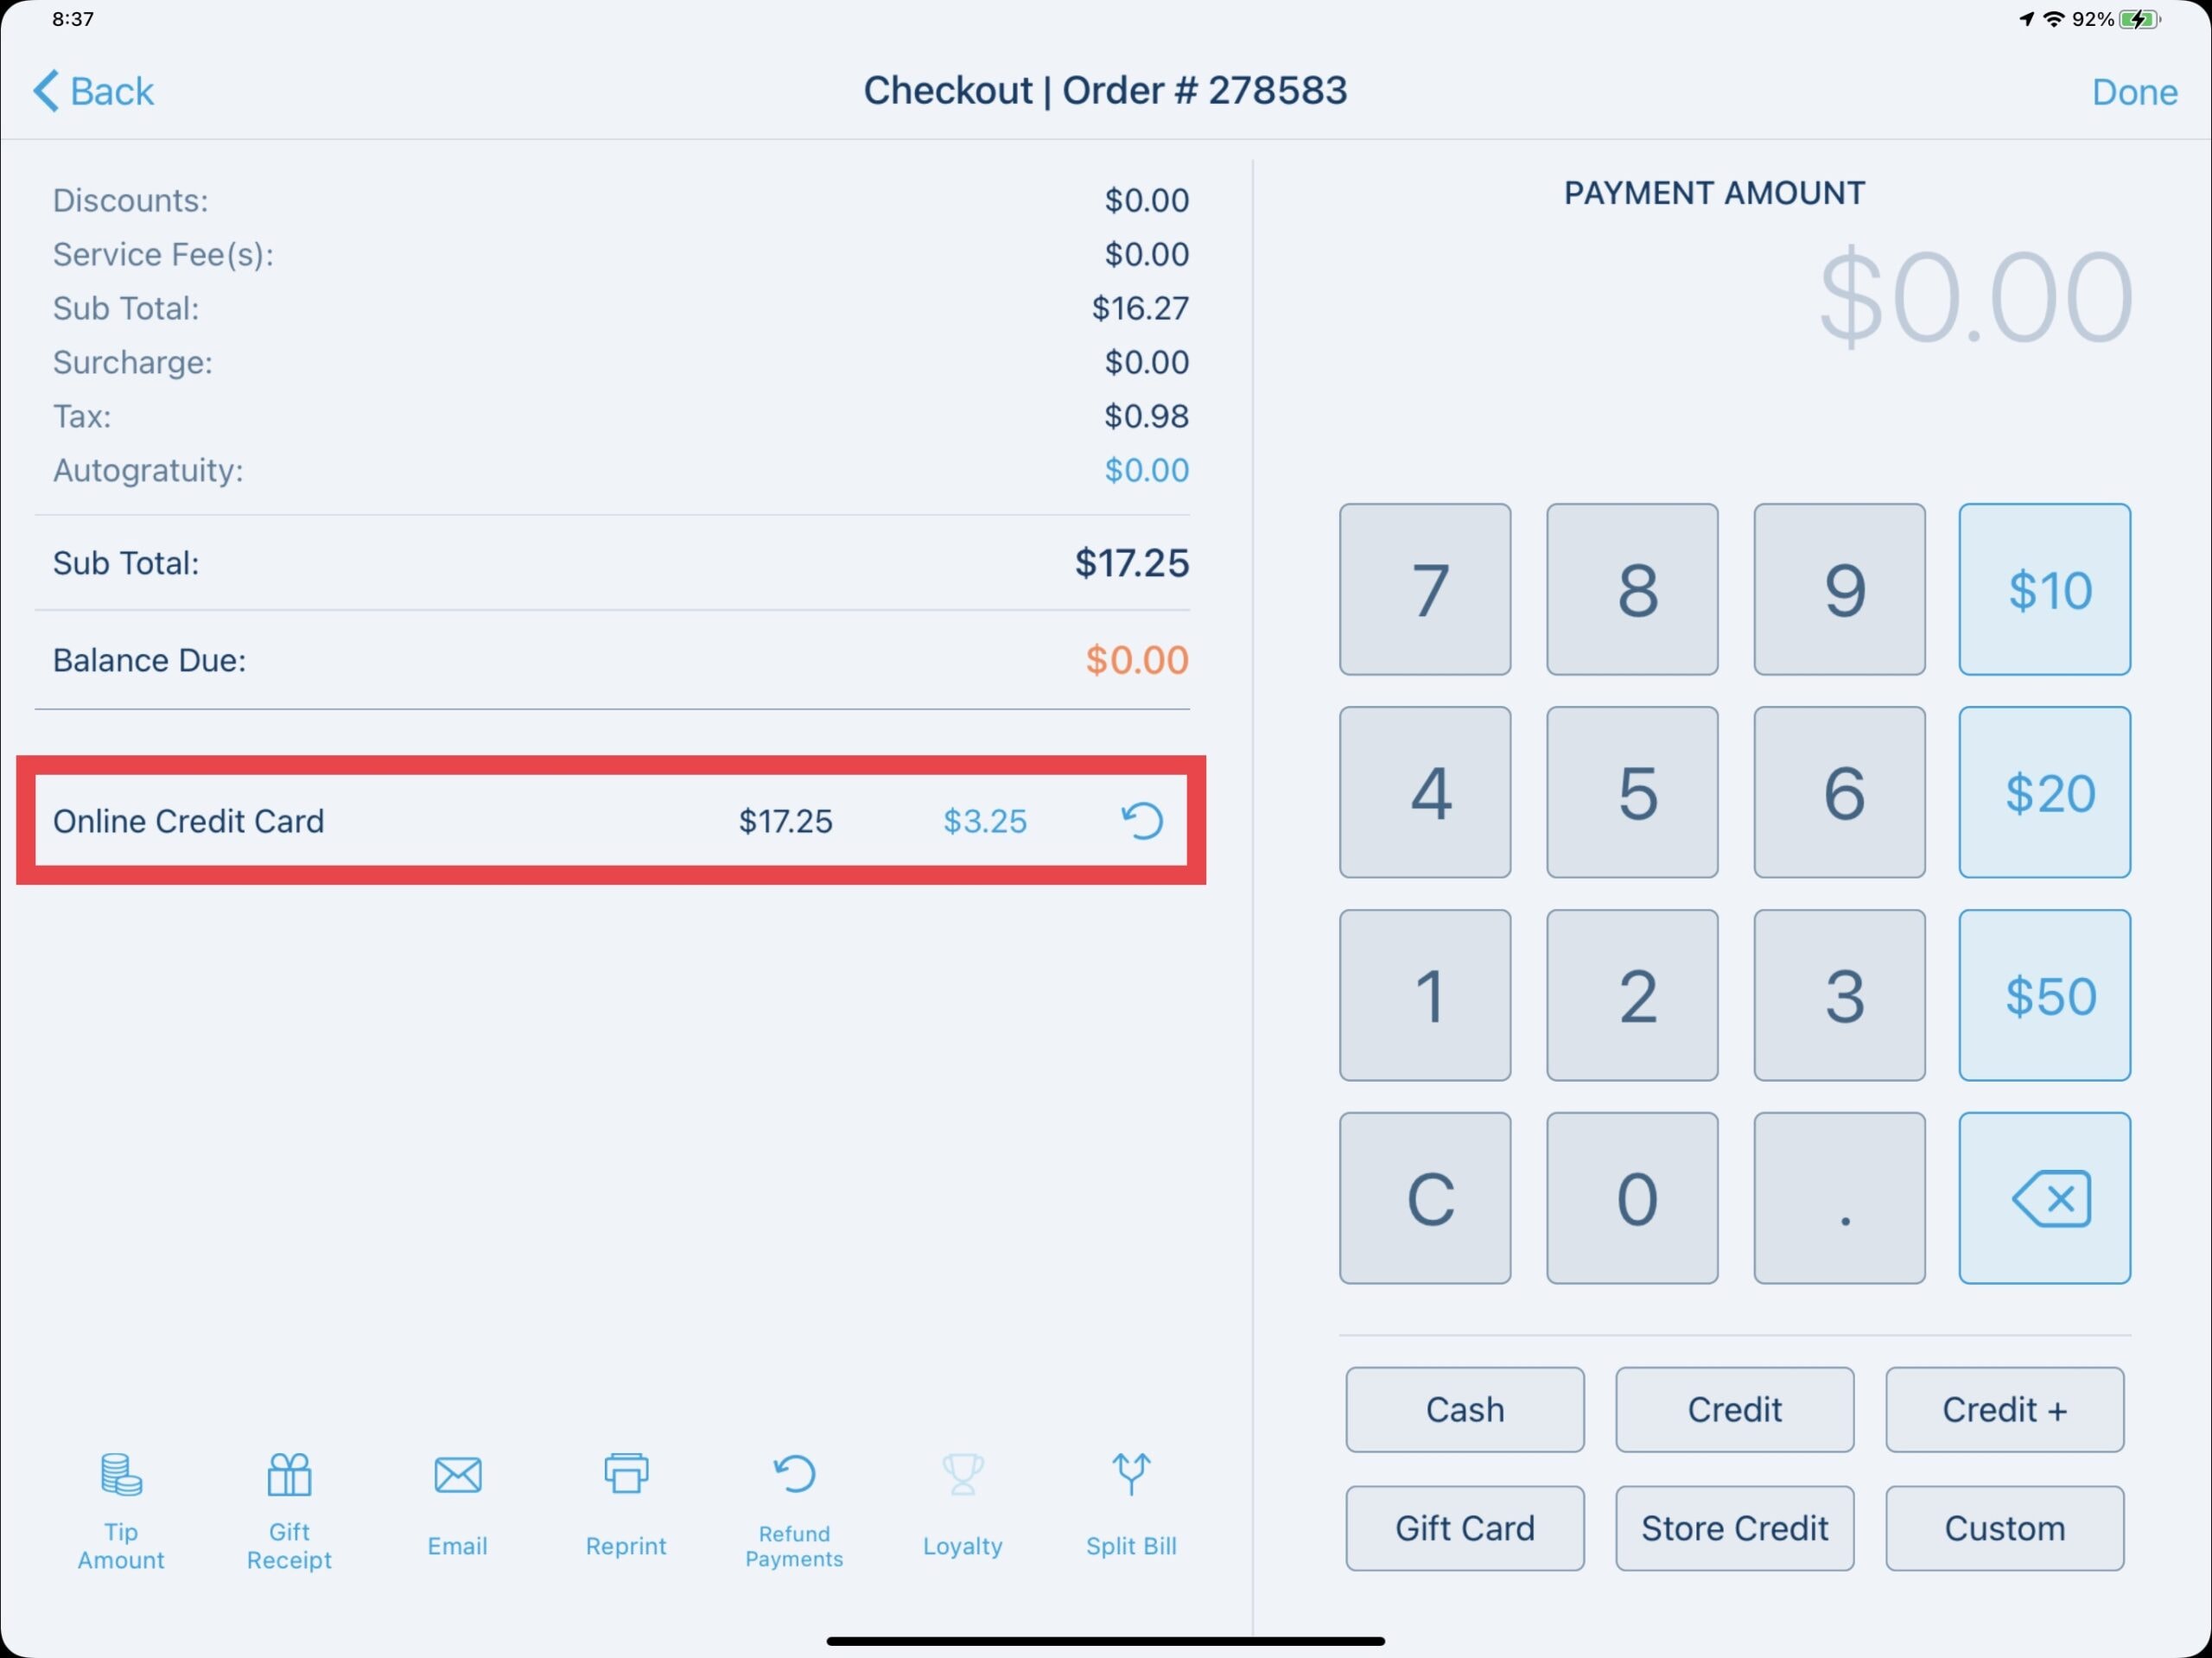
Locate the payment(s) and select the blue rounded back arrow next to the payment(s) to be removed. If prompted, input a manager or higher PIN.
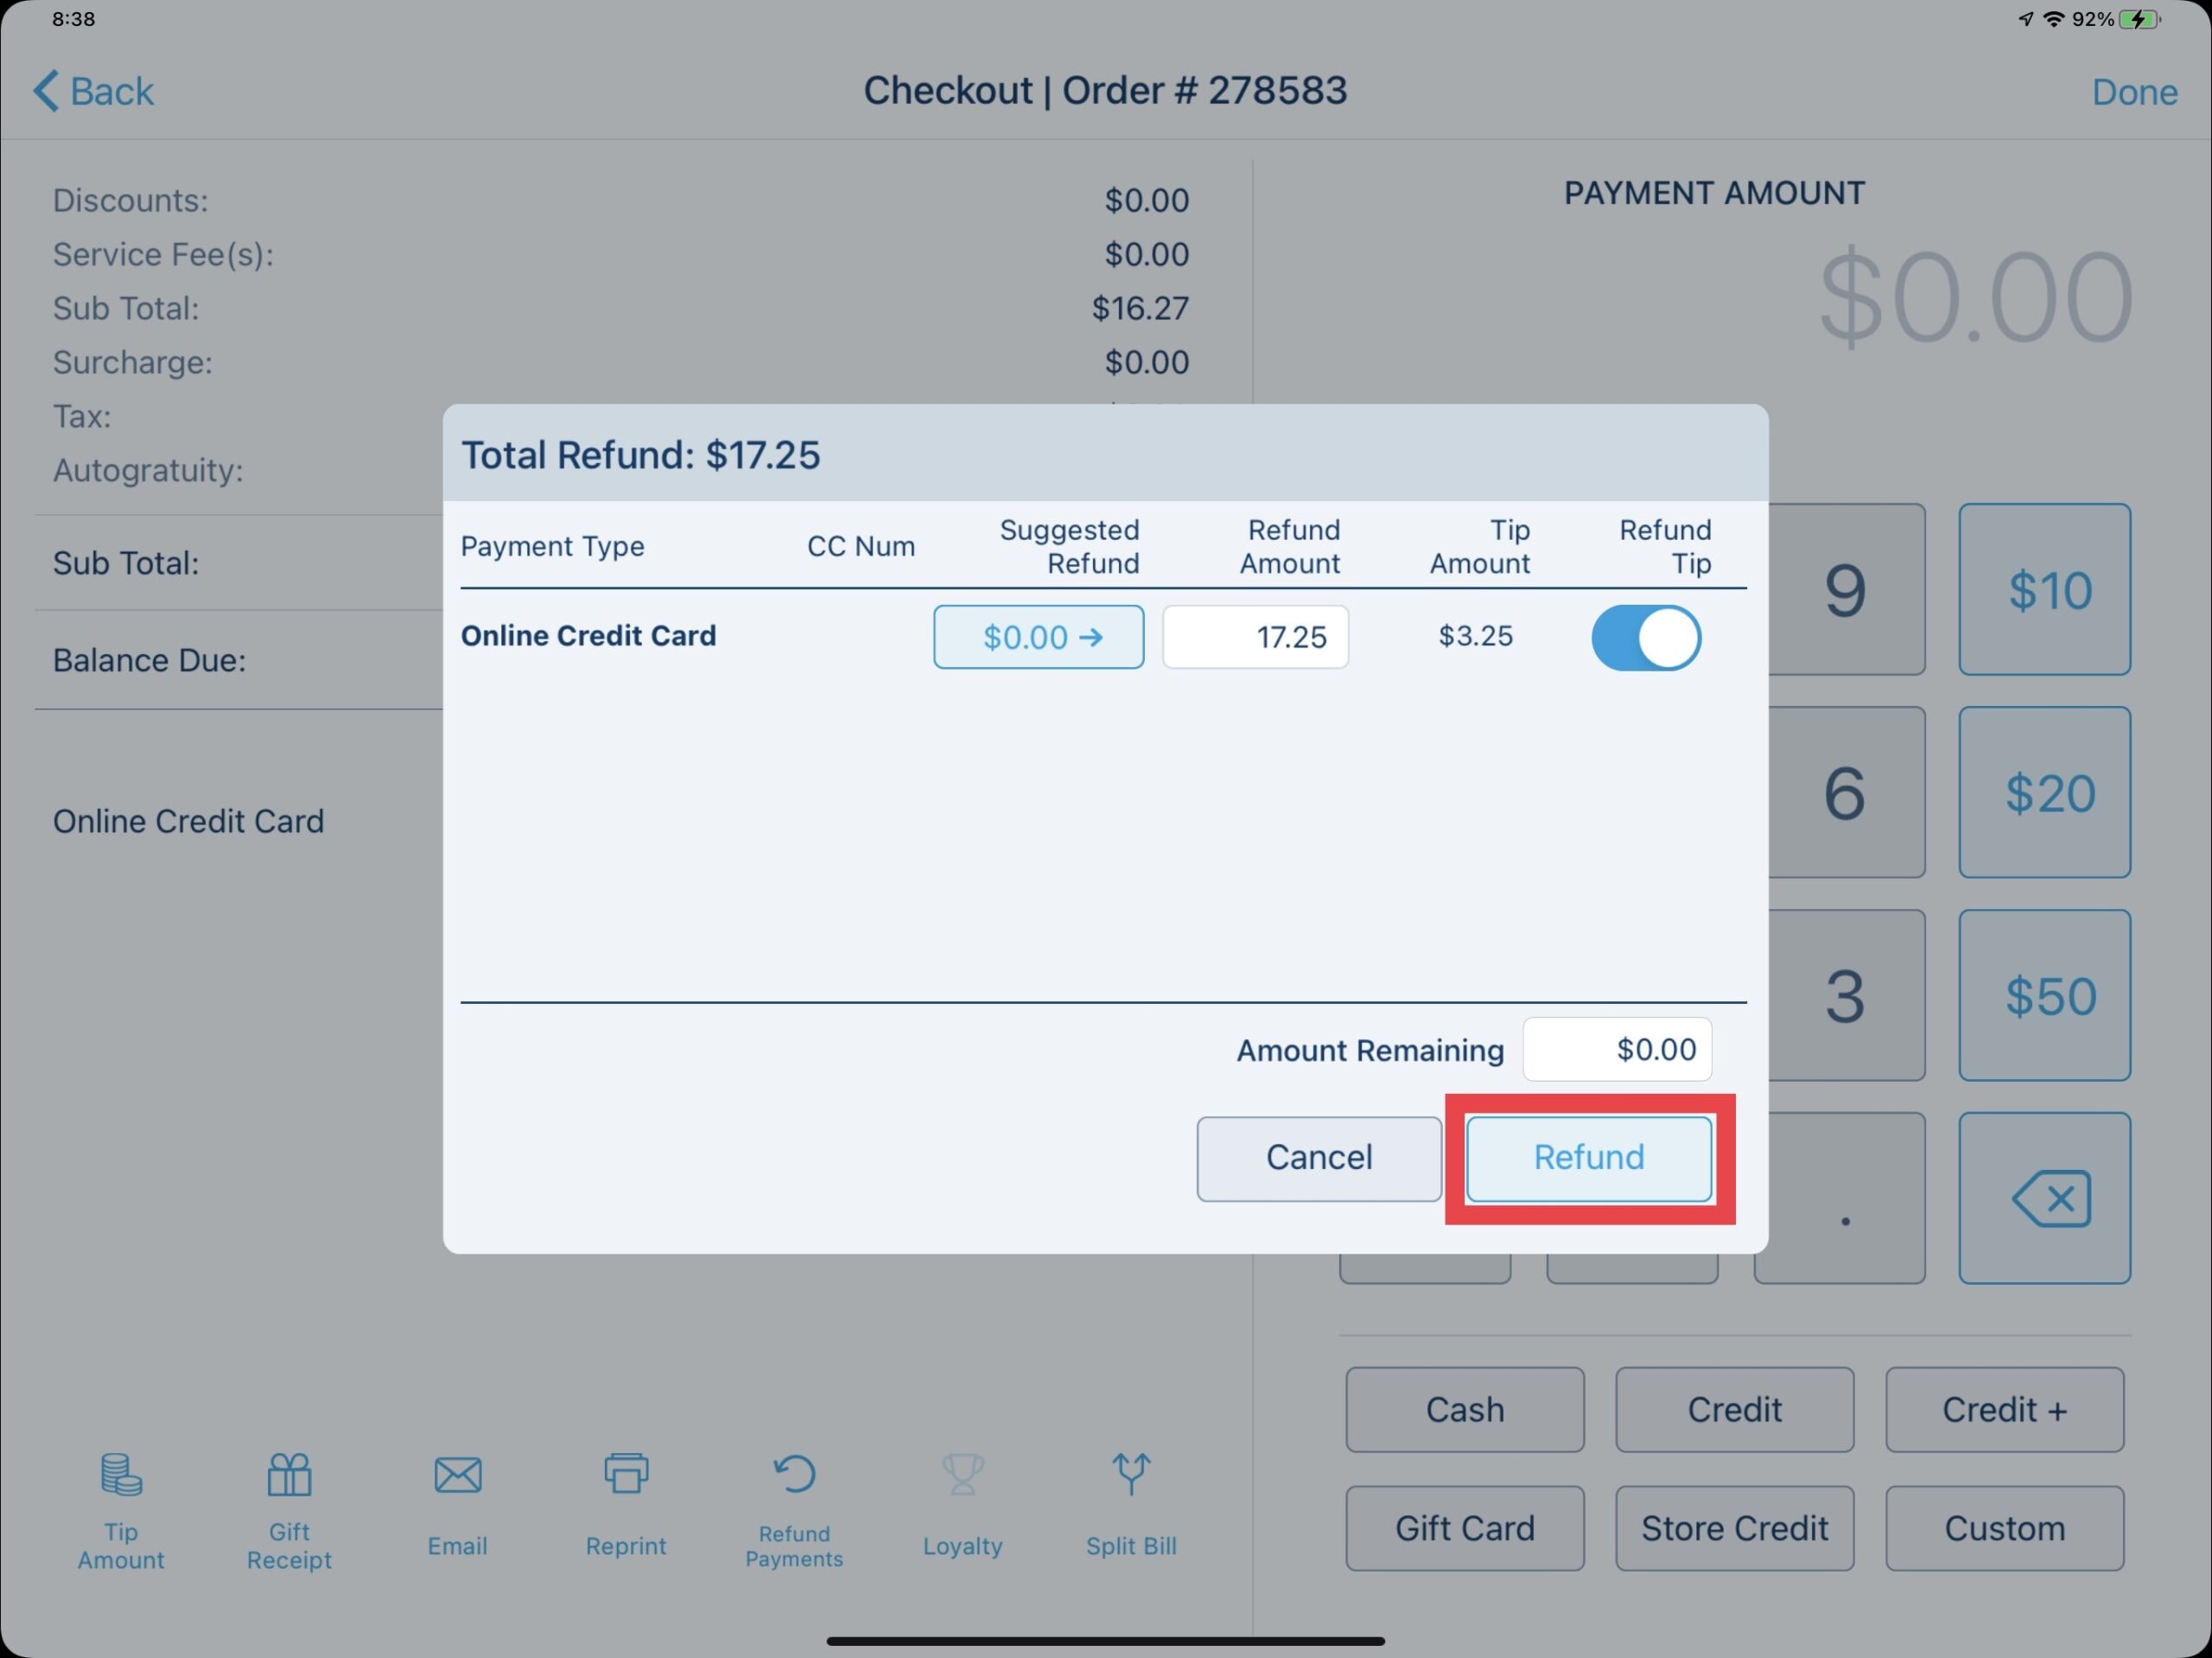
Confirm the refund amount and select Refund.
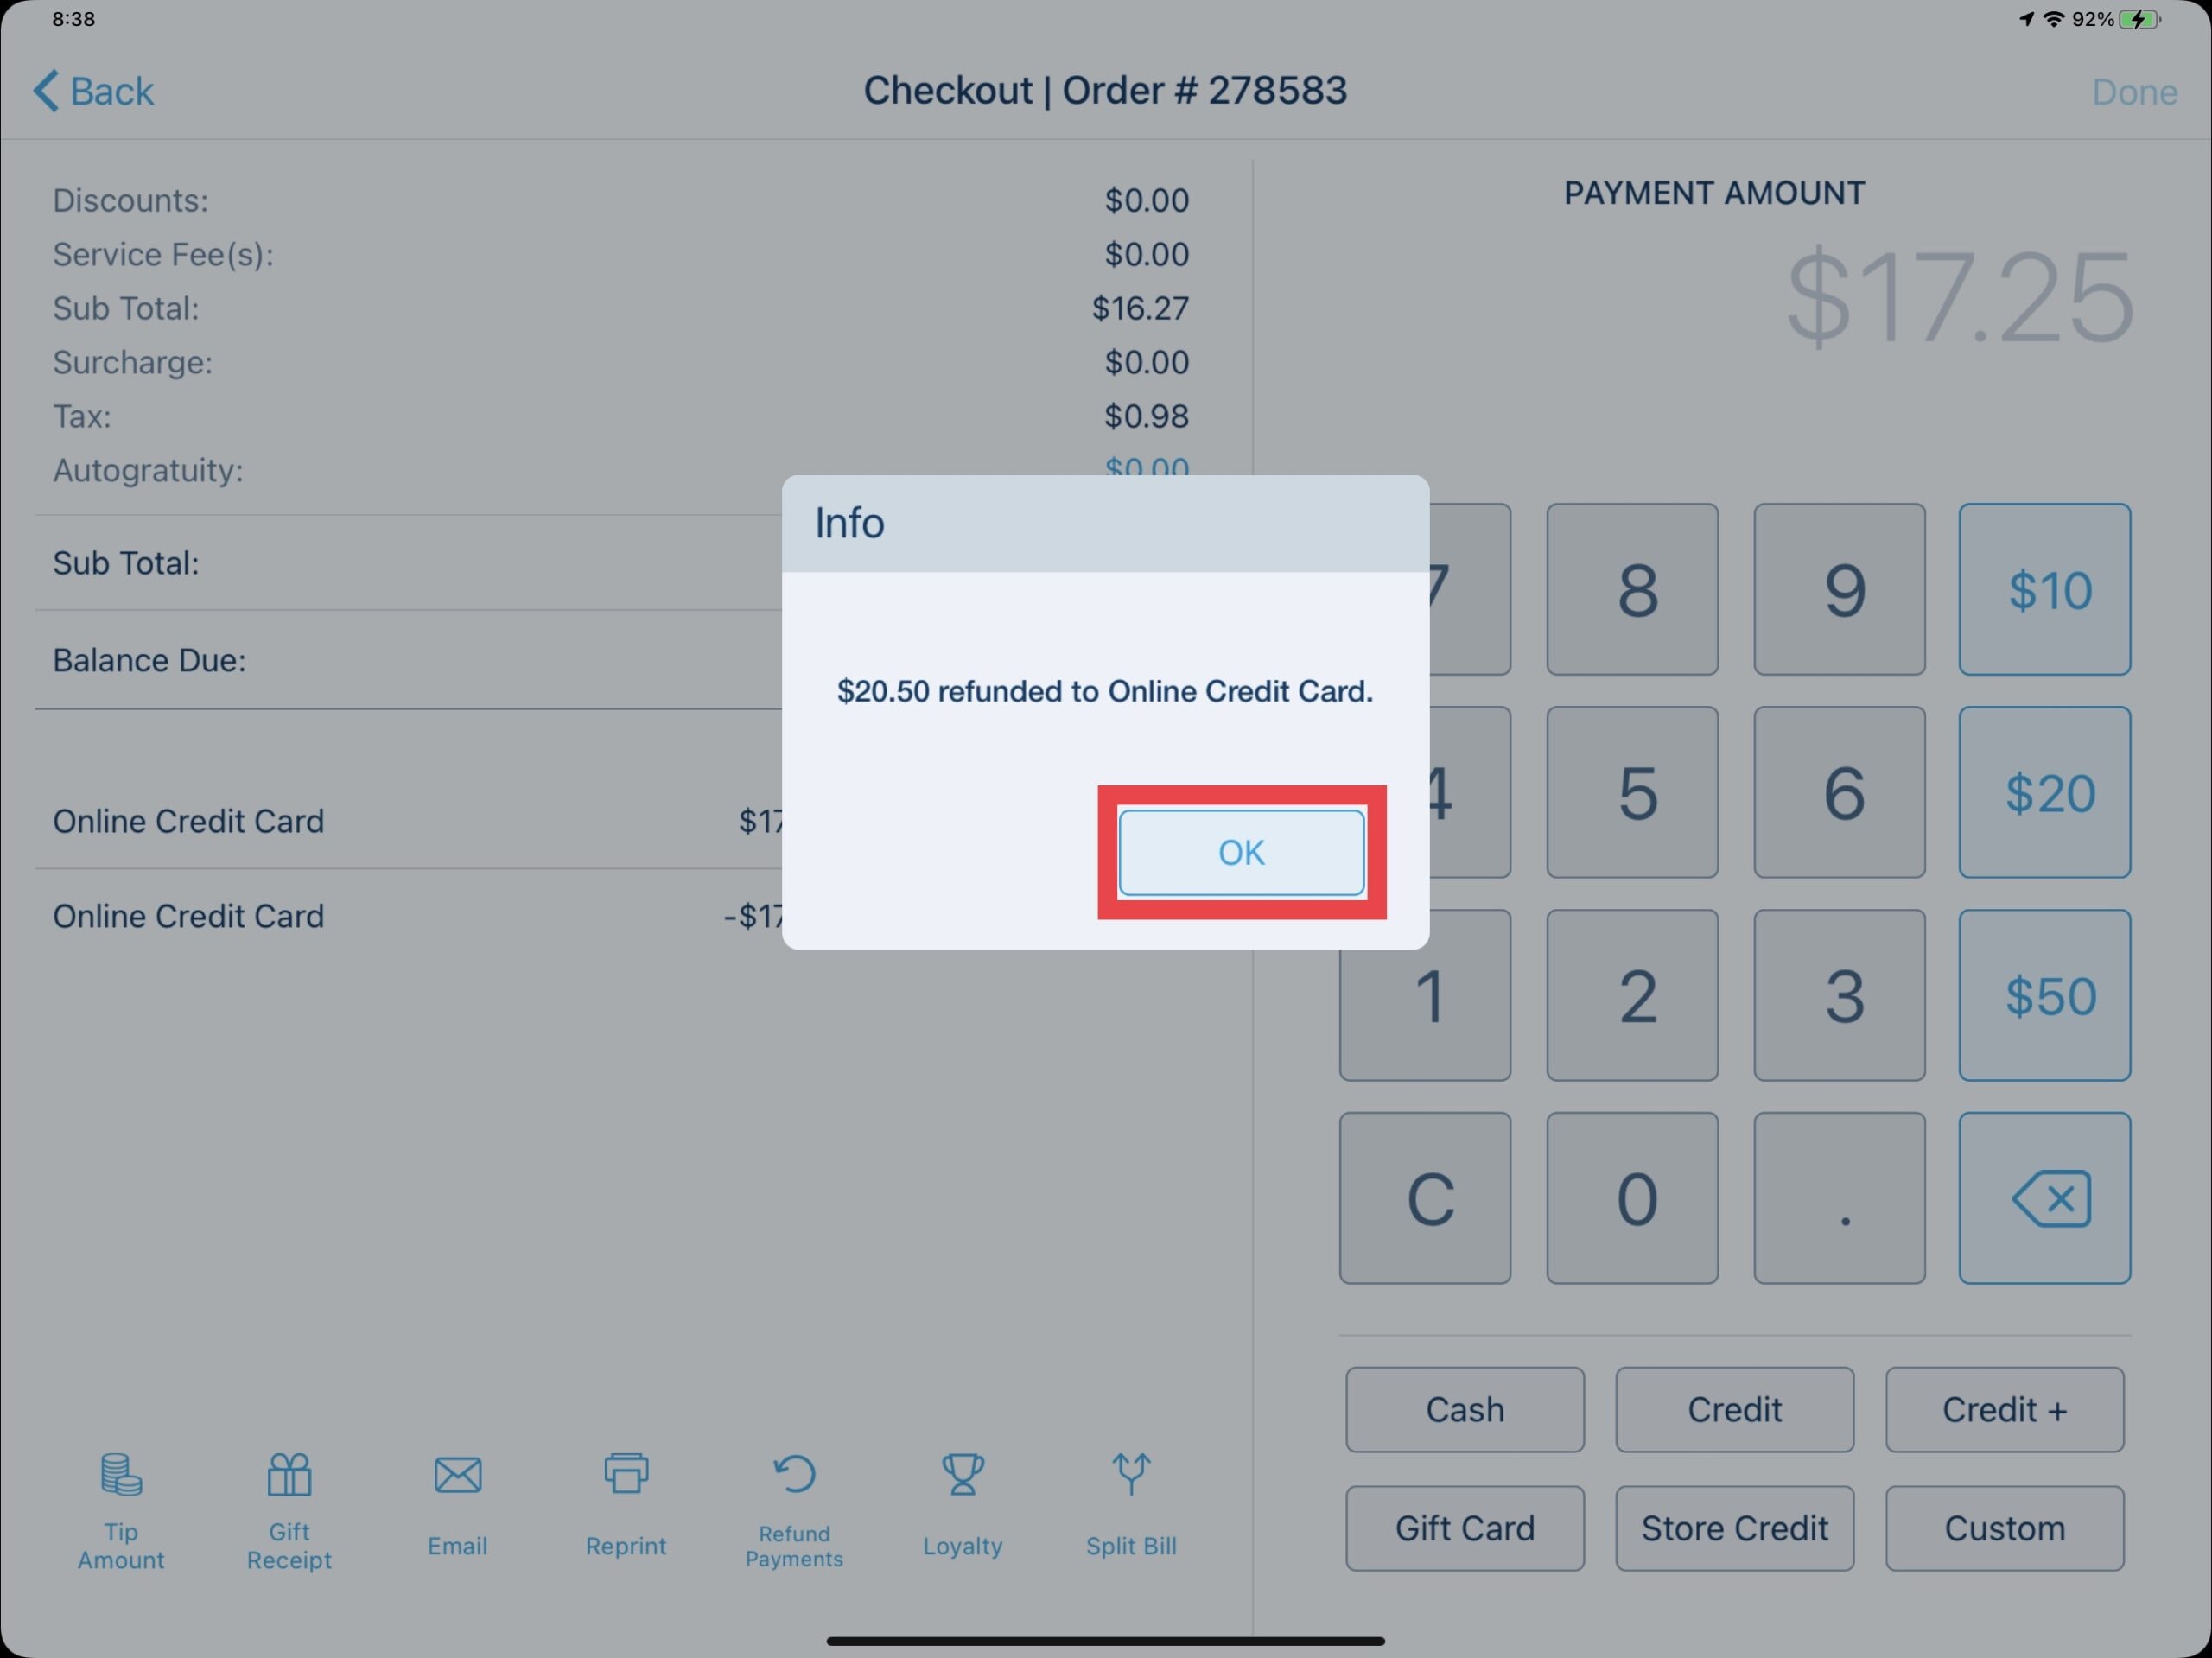
A final prompt shows the amount that has been refunded.
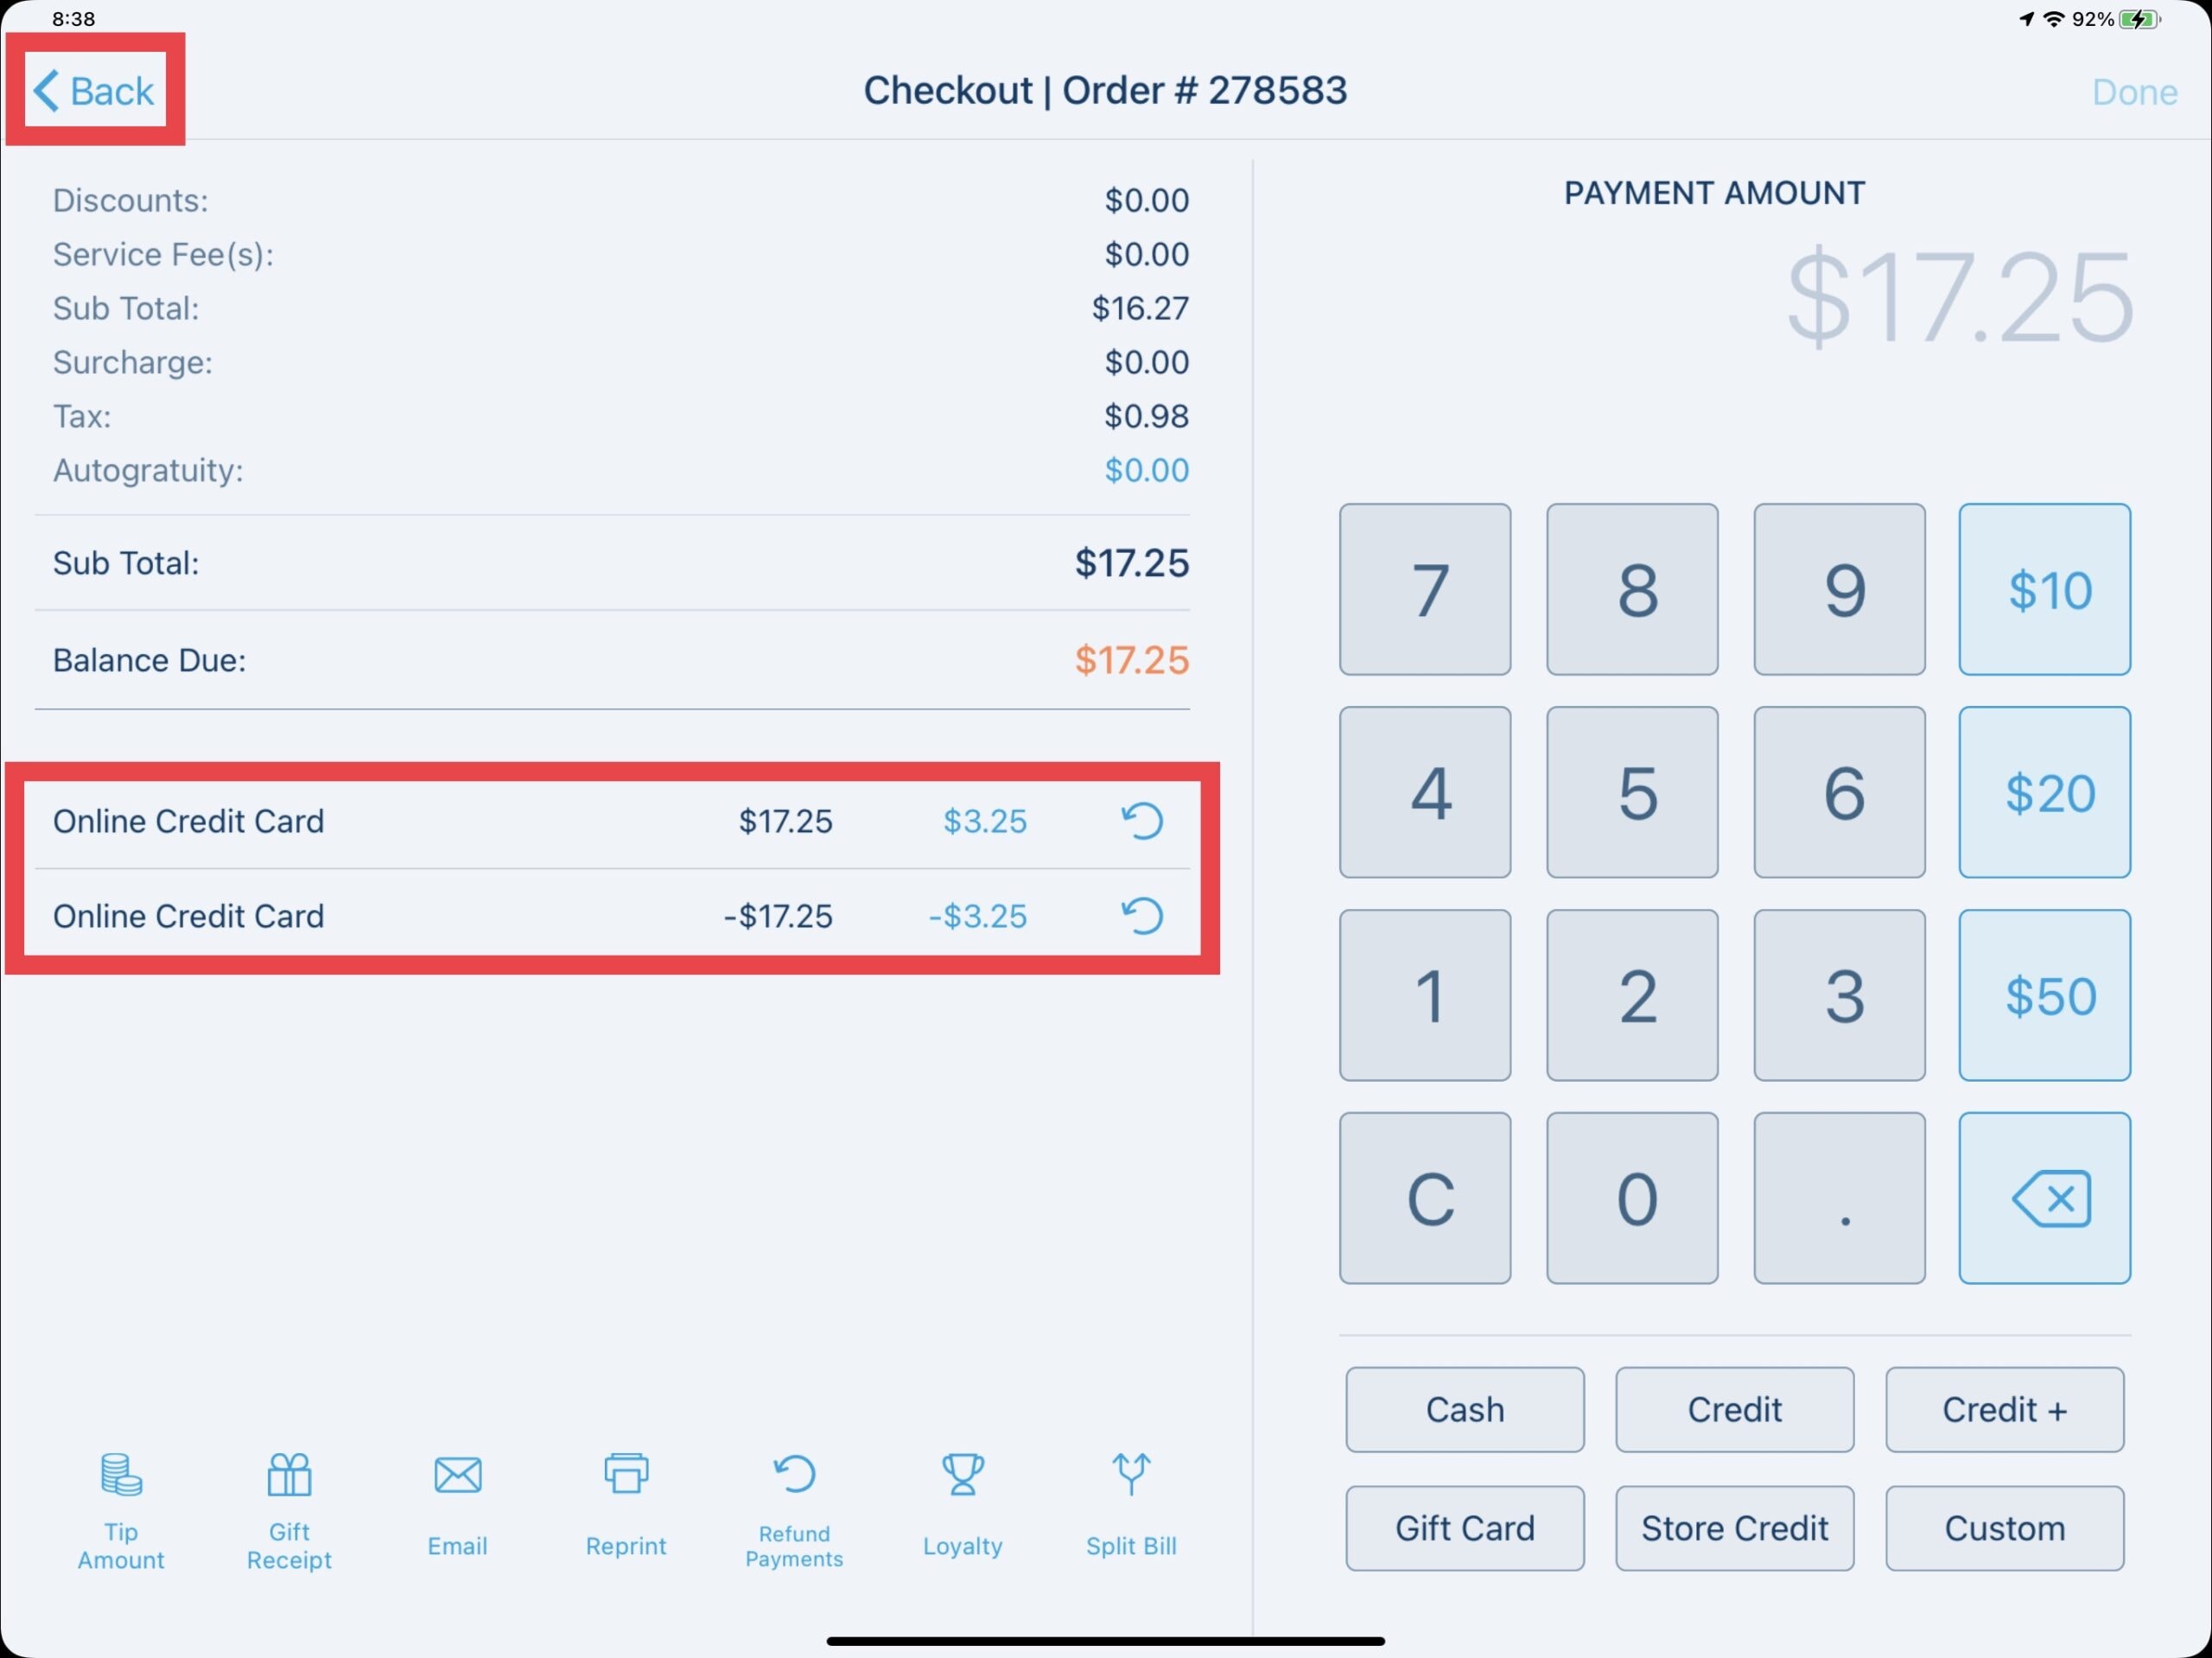
After closing the prompt, you will see the original payment, then the negative refund payment. Select the Back button to navigate back to the order.
Removing Products
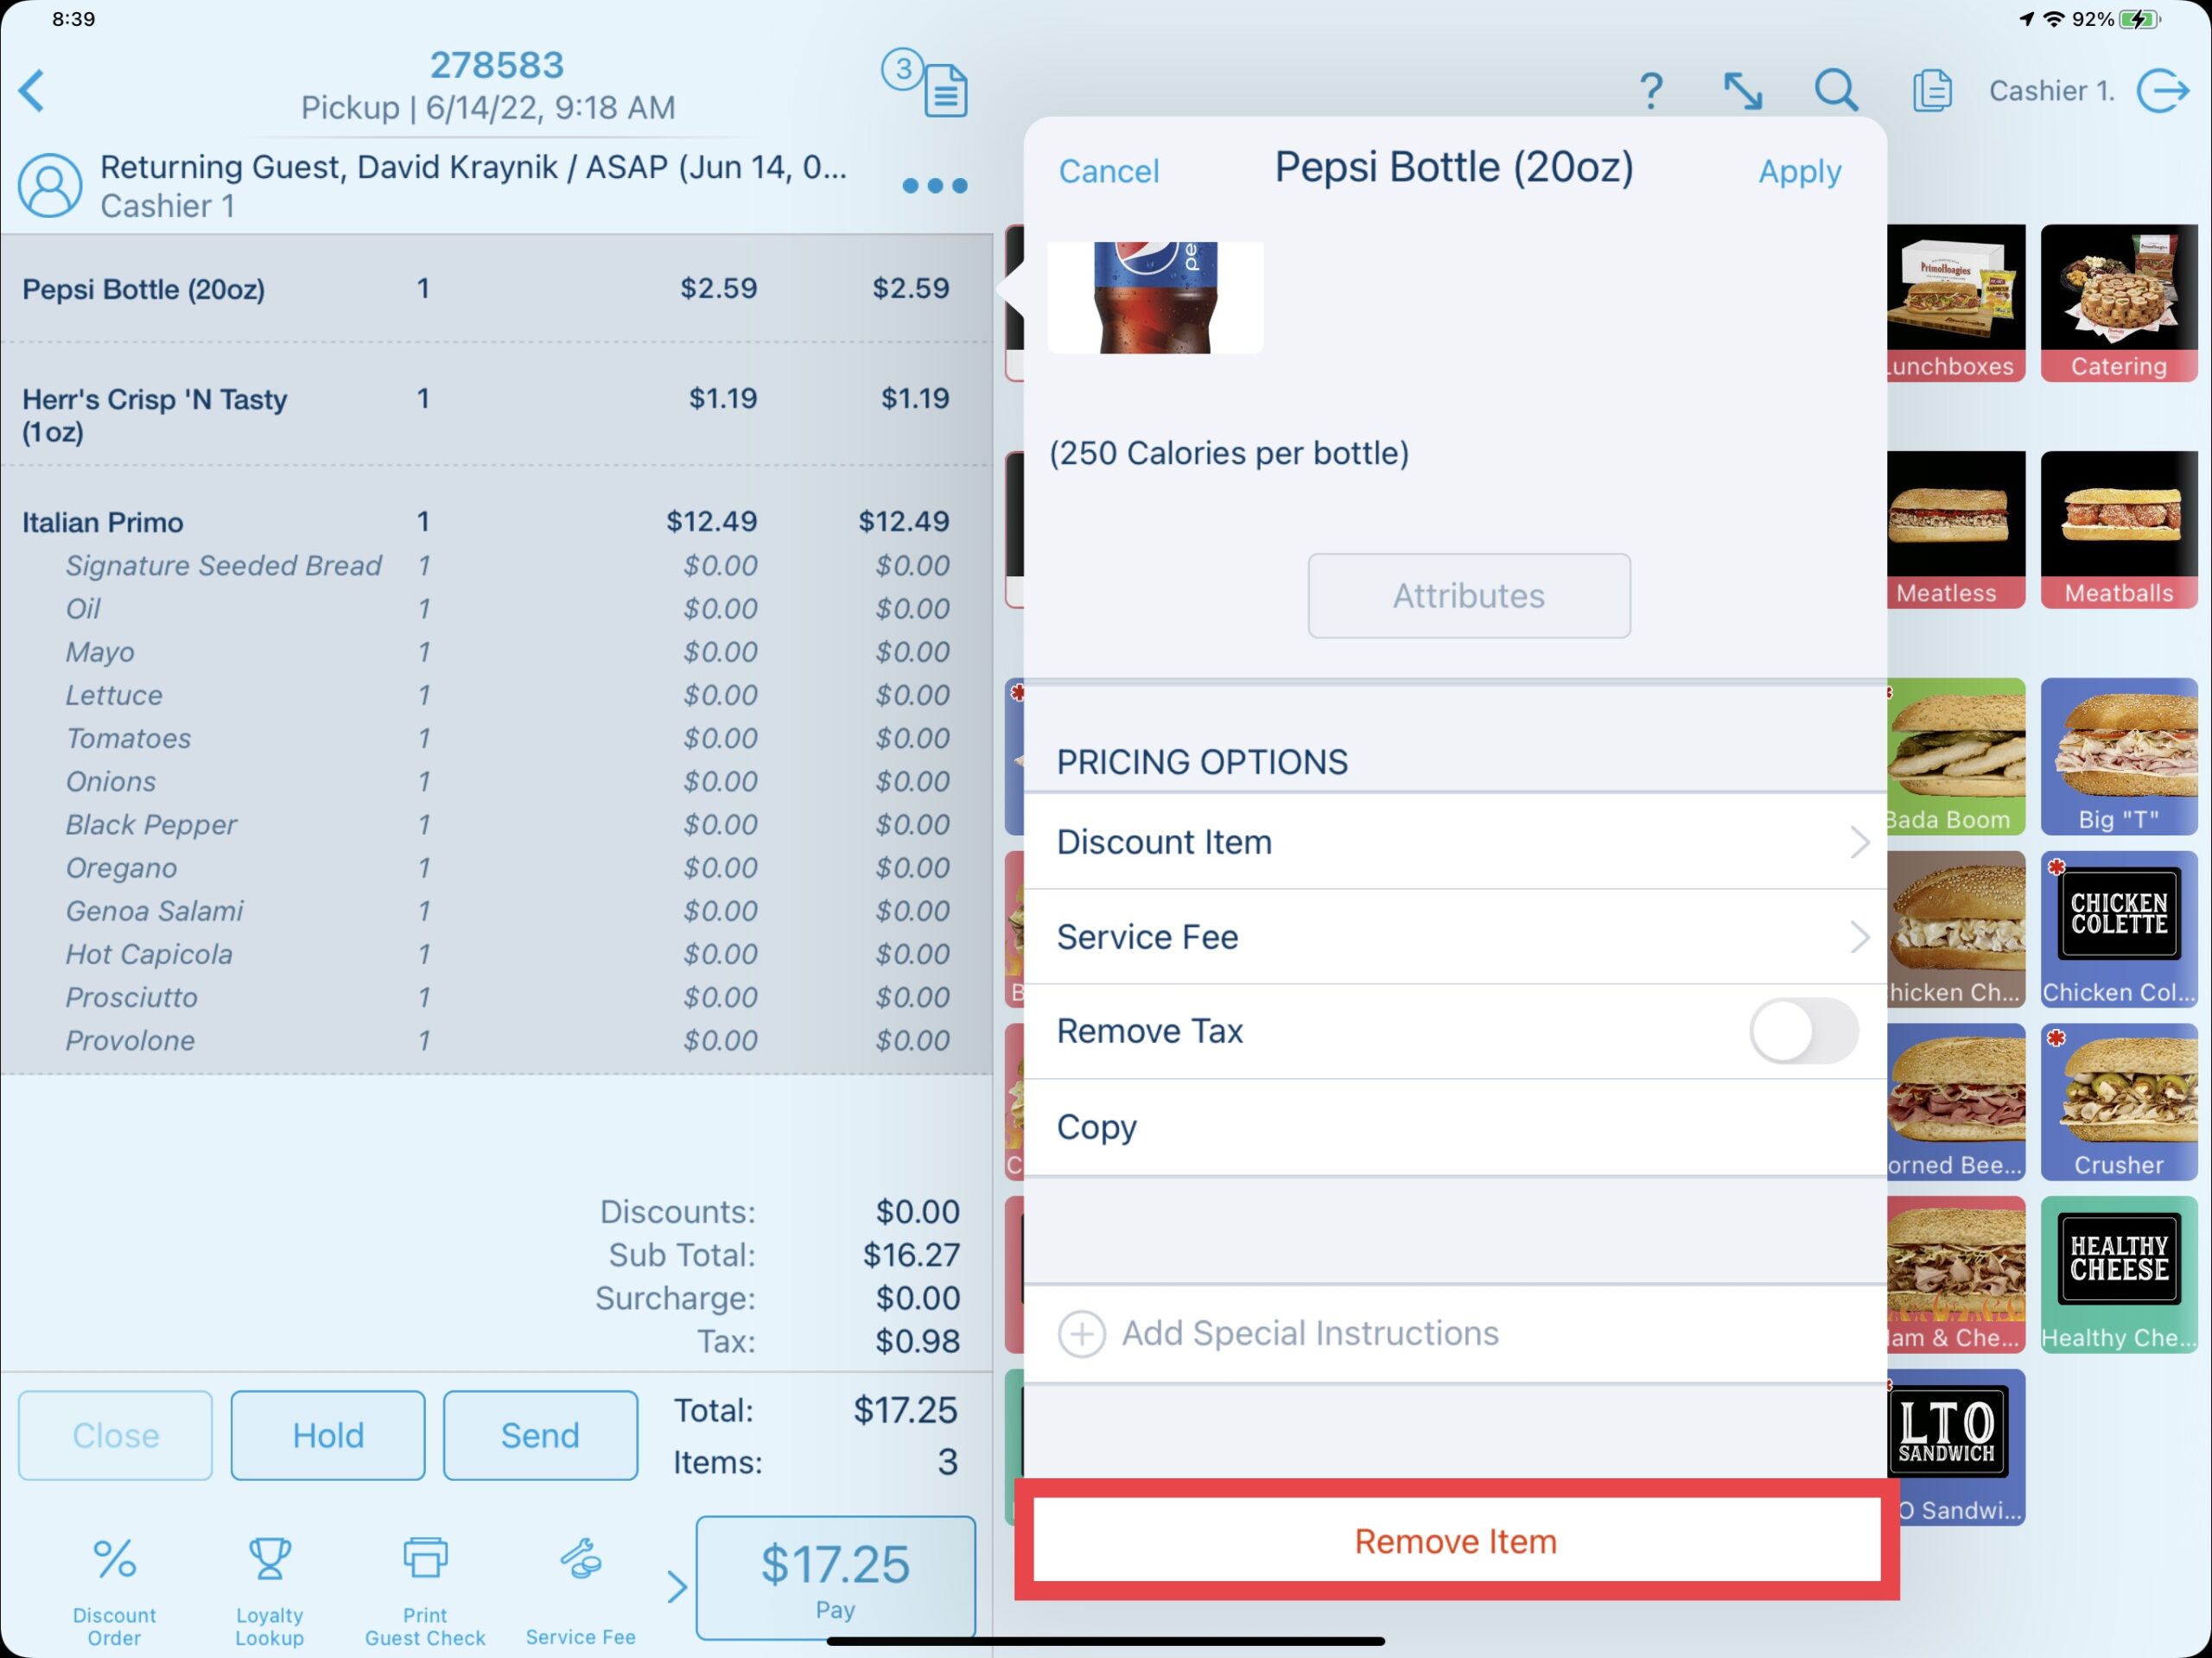
There are a few ways to remove a product(s) from an order. To remove a single product, select the product and scroll to the bottom of the window then select Remove Item.
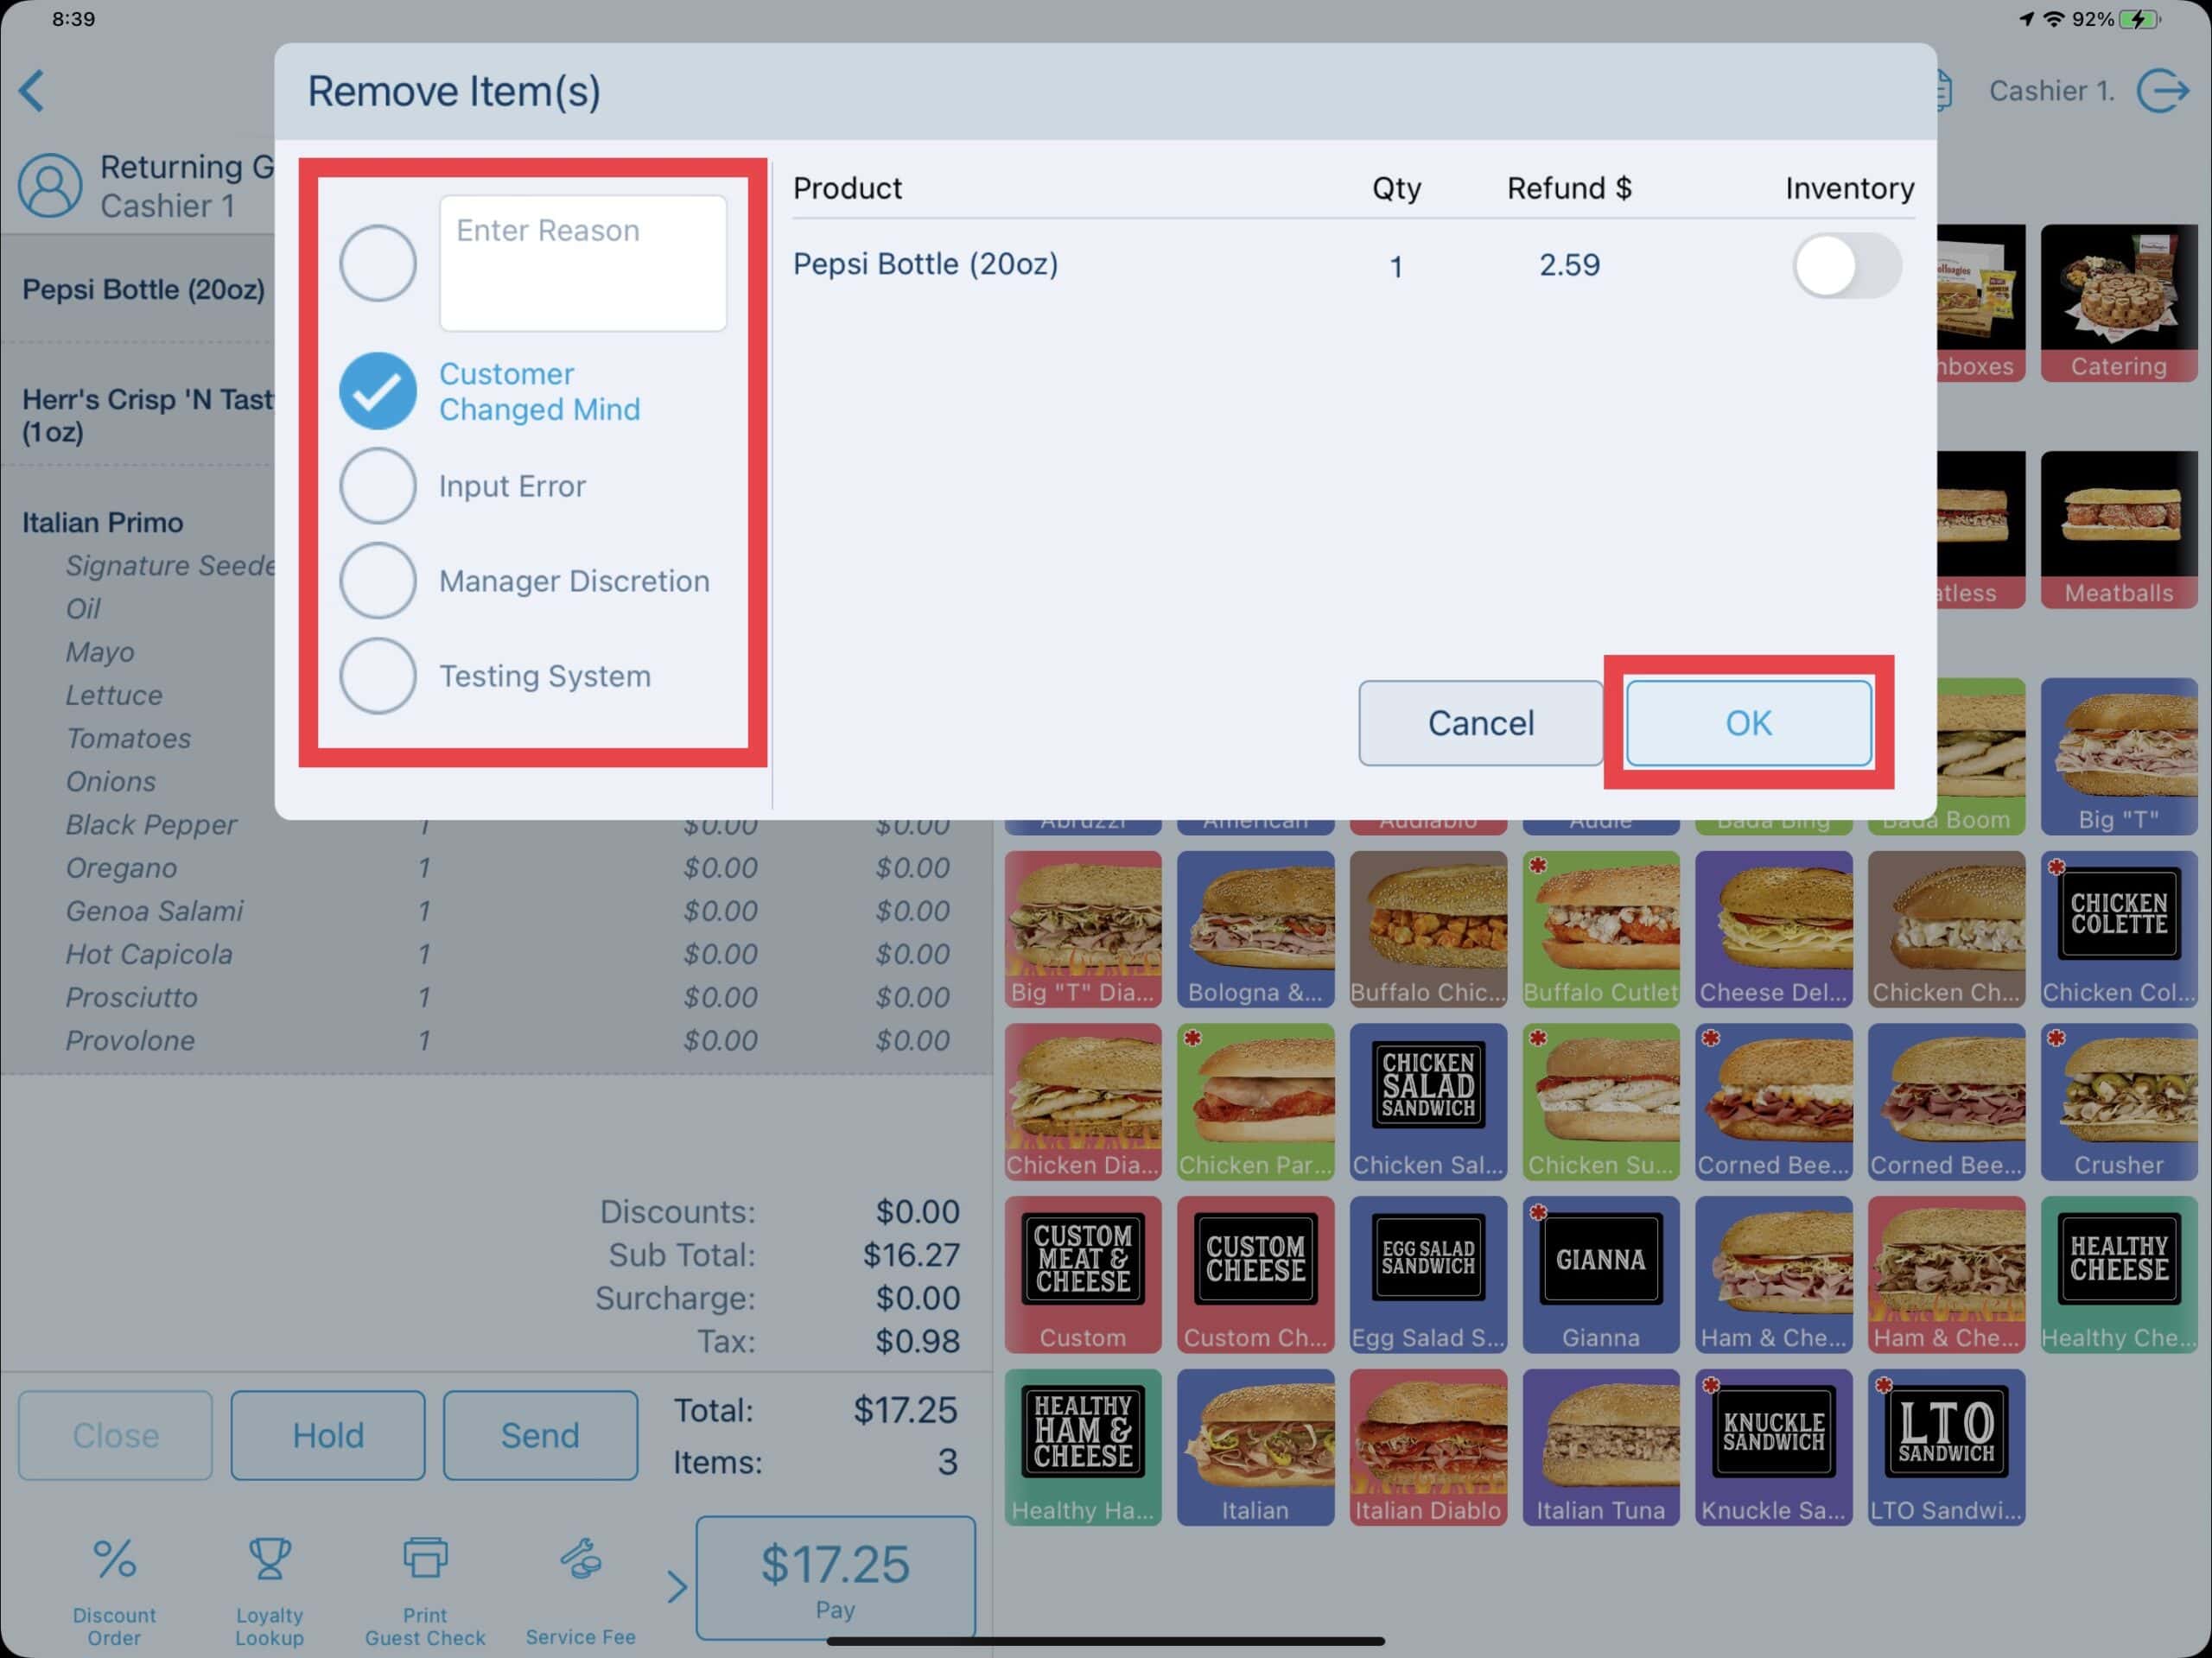
Enter the reason for removing the product(s) or choose from pre-configured reasons. It is not necessary to toggle the Inventory button as the Revel Systems Inventory Module is not being used. Select OK after.
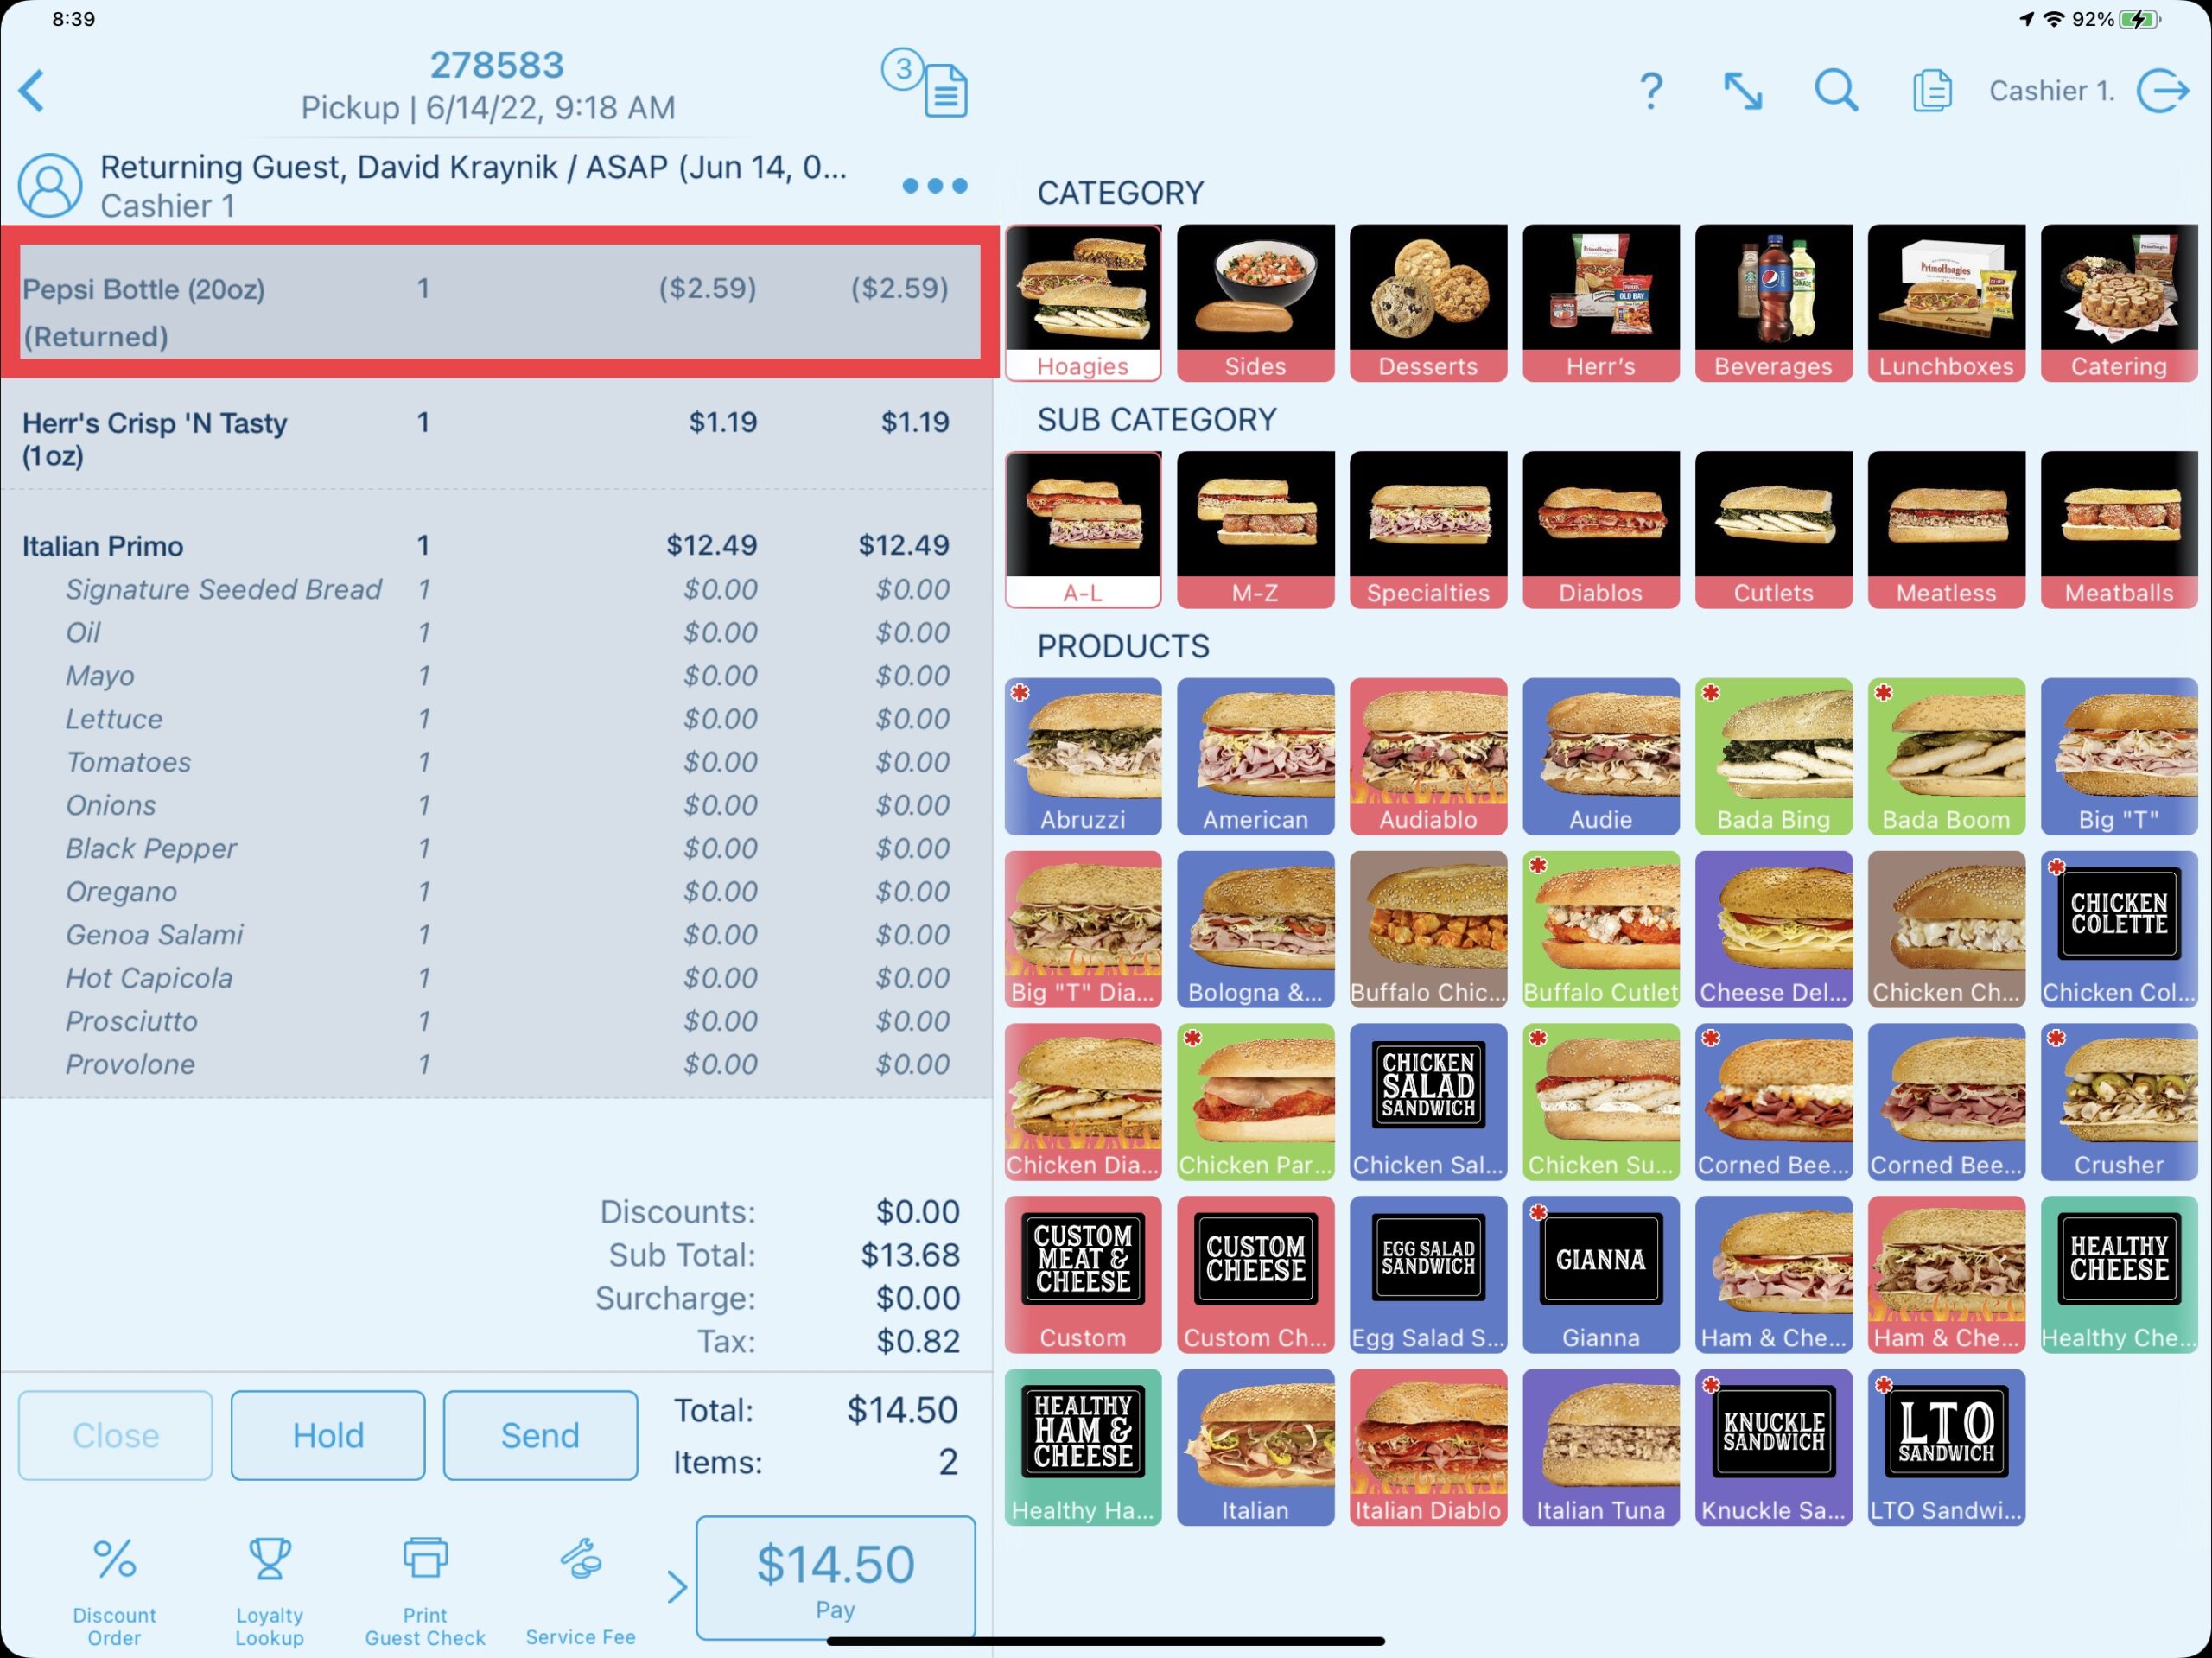
The returned product(s) now show on the order. Continue returning additional product(s) as needed.
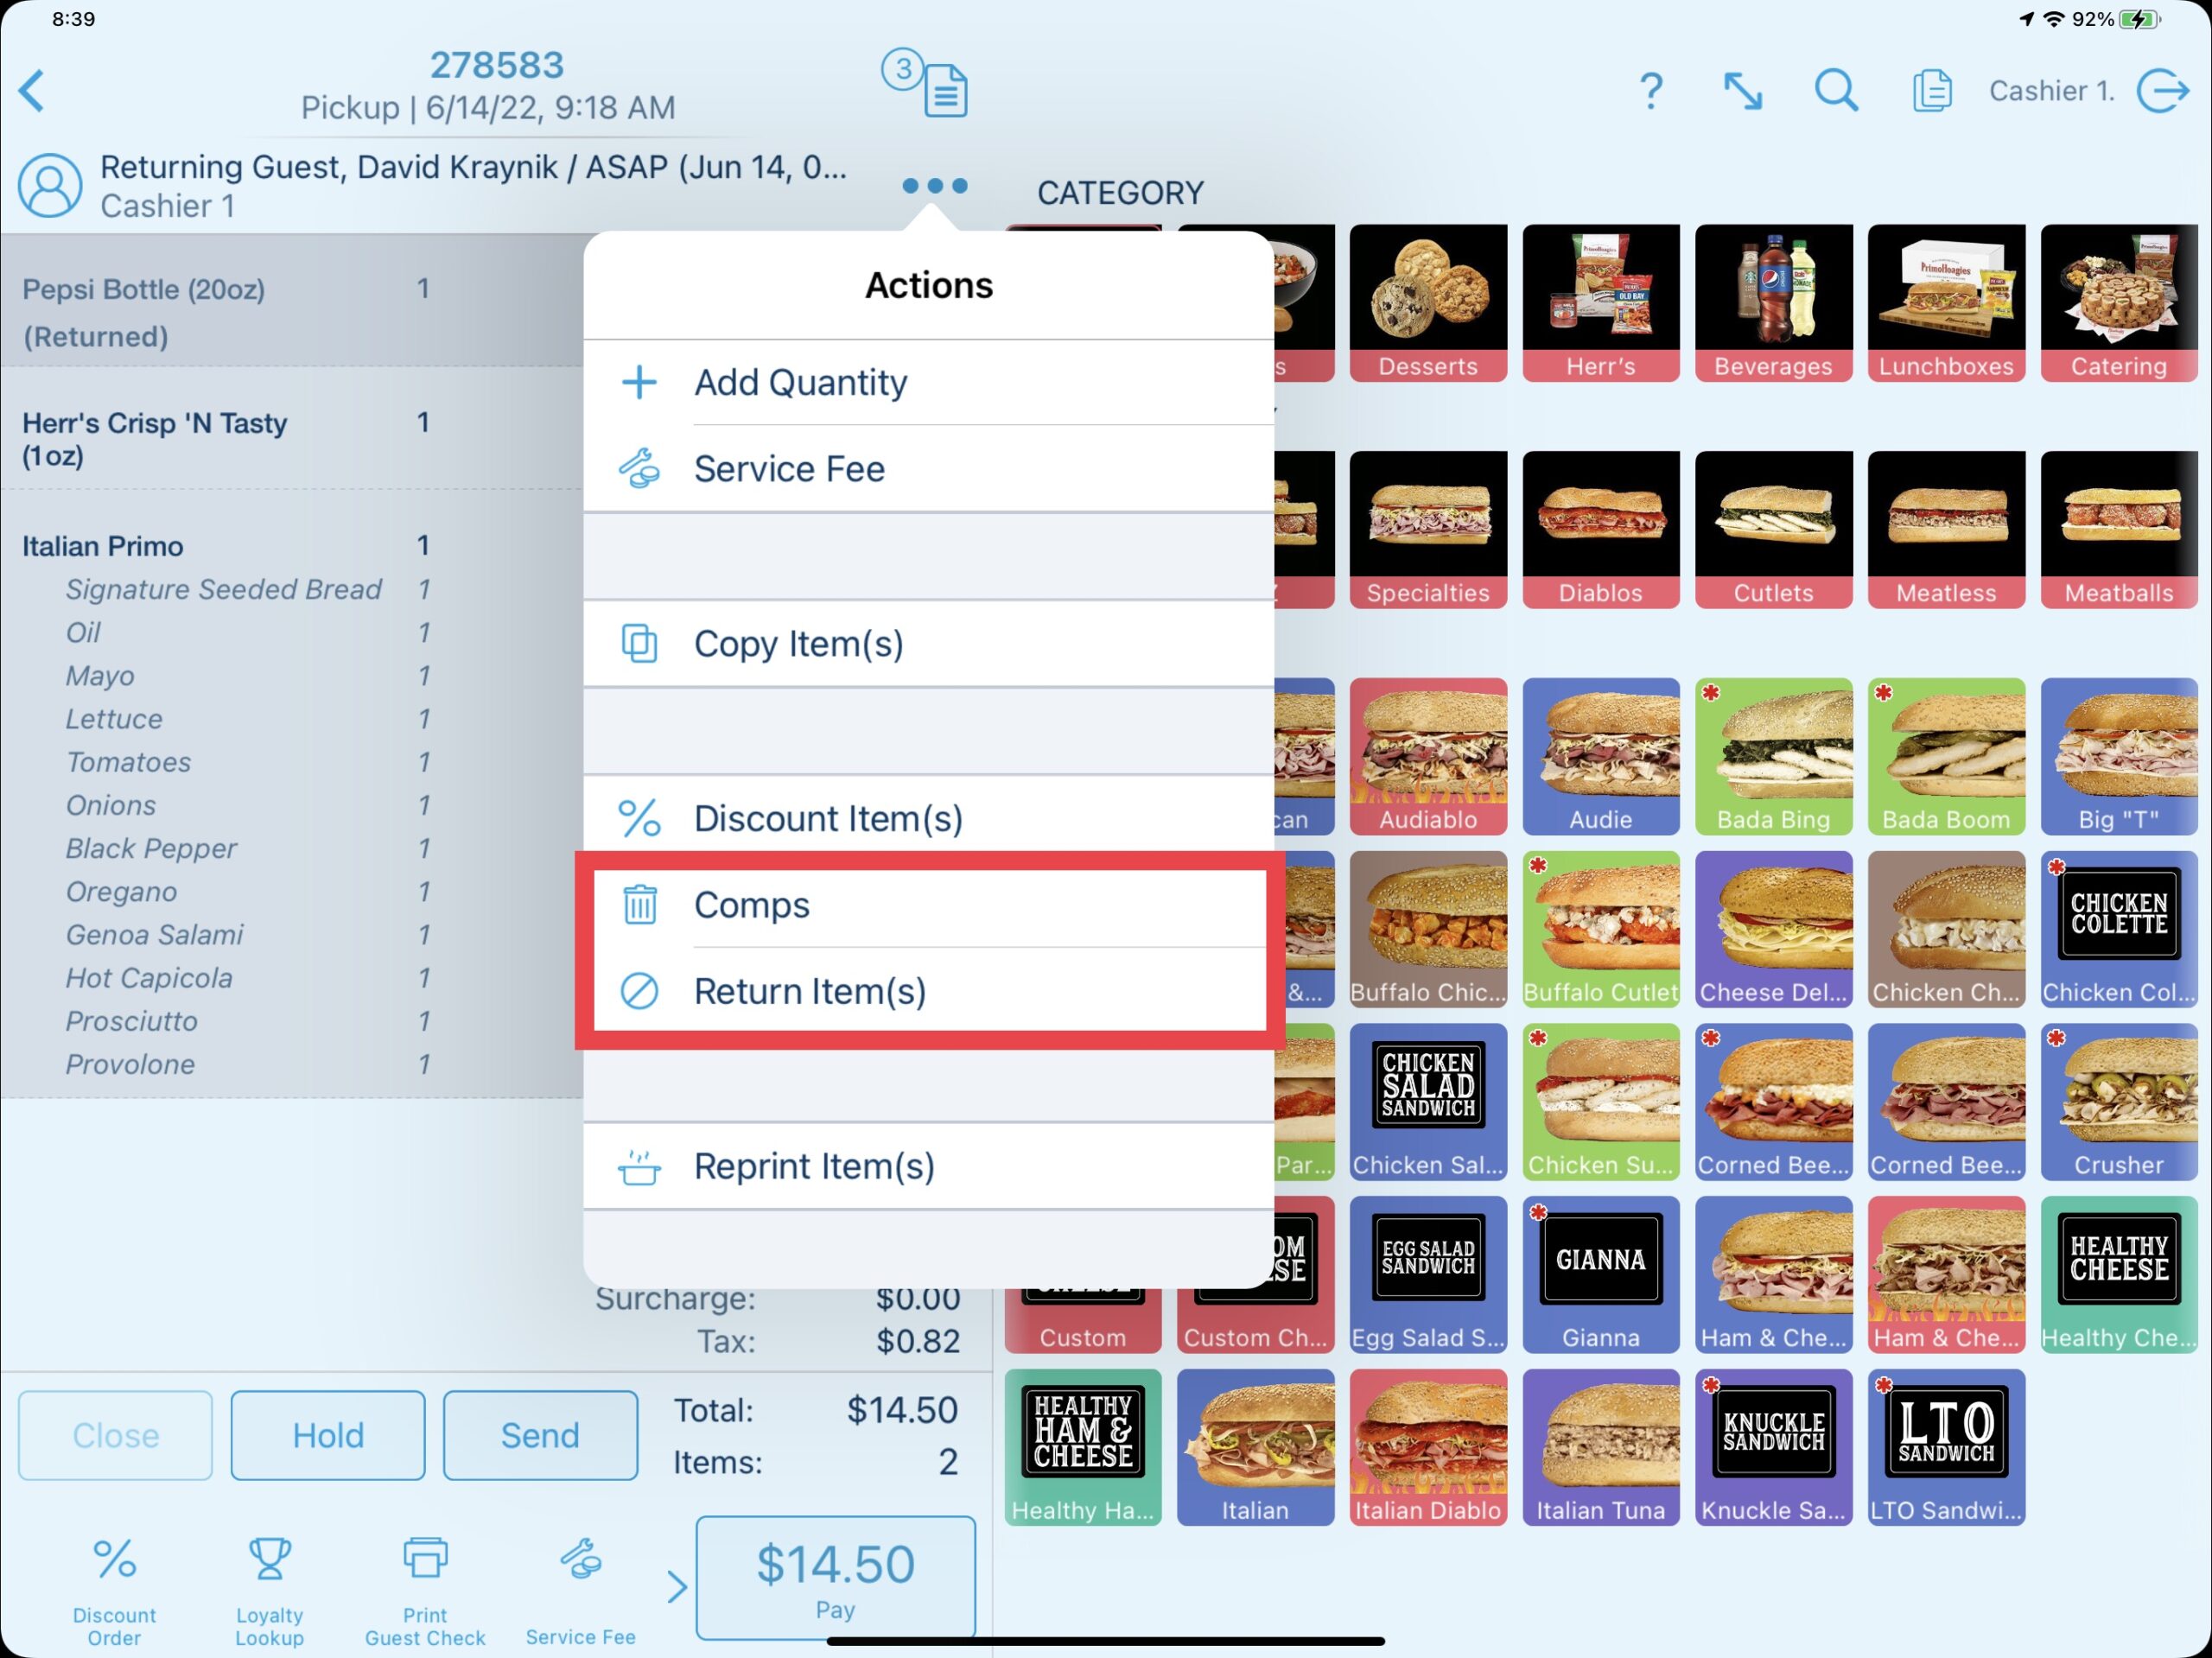
If you need to remove all products from an order, select the blue elipsis icon at the top of the order and select either Comps or Return Item(s) based on your needs.
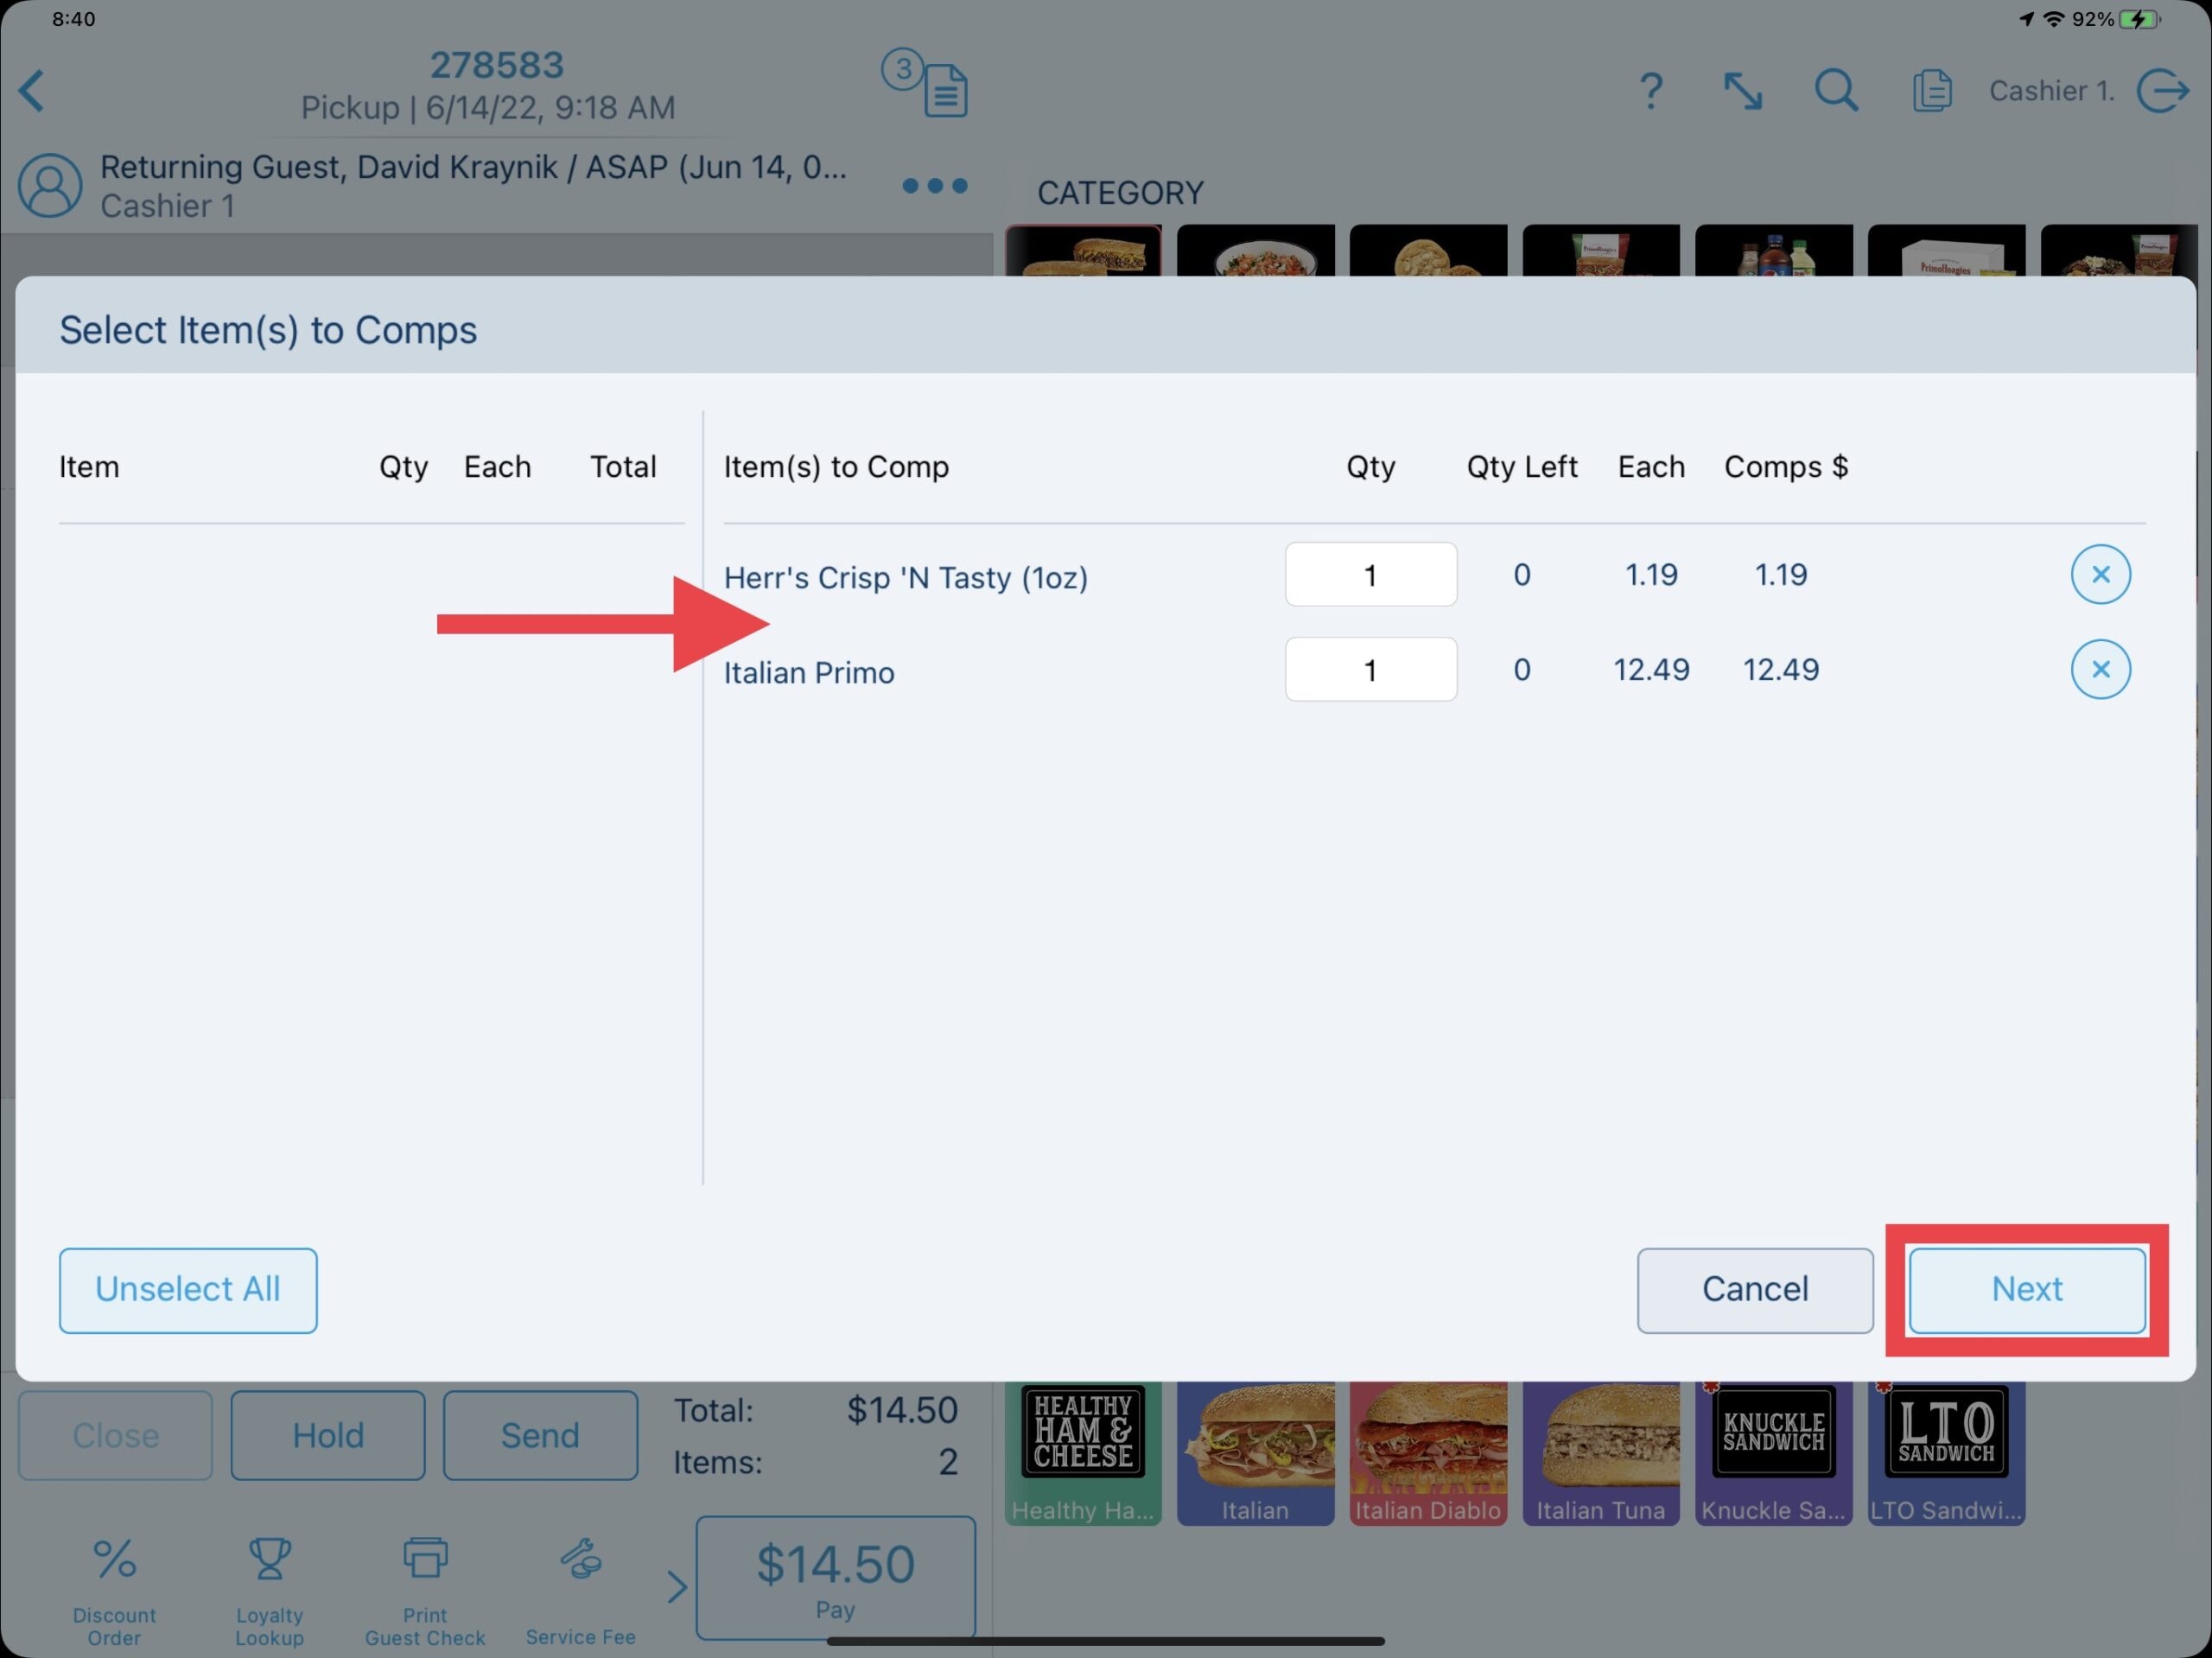
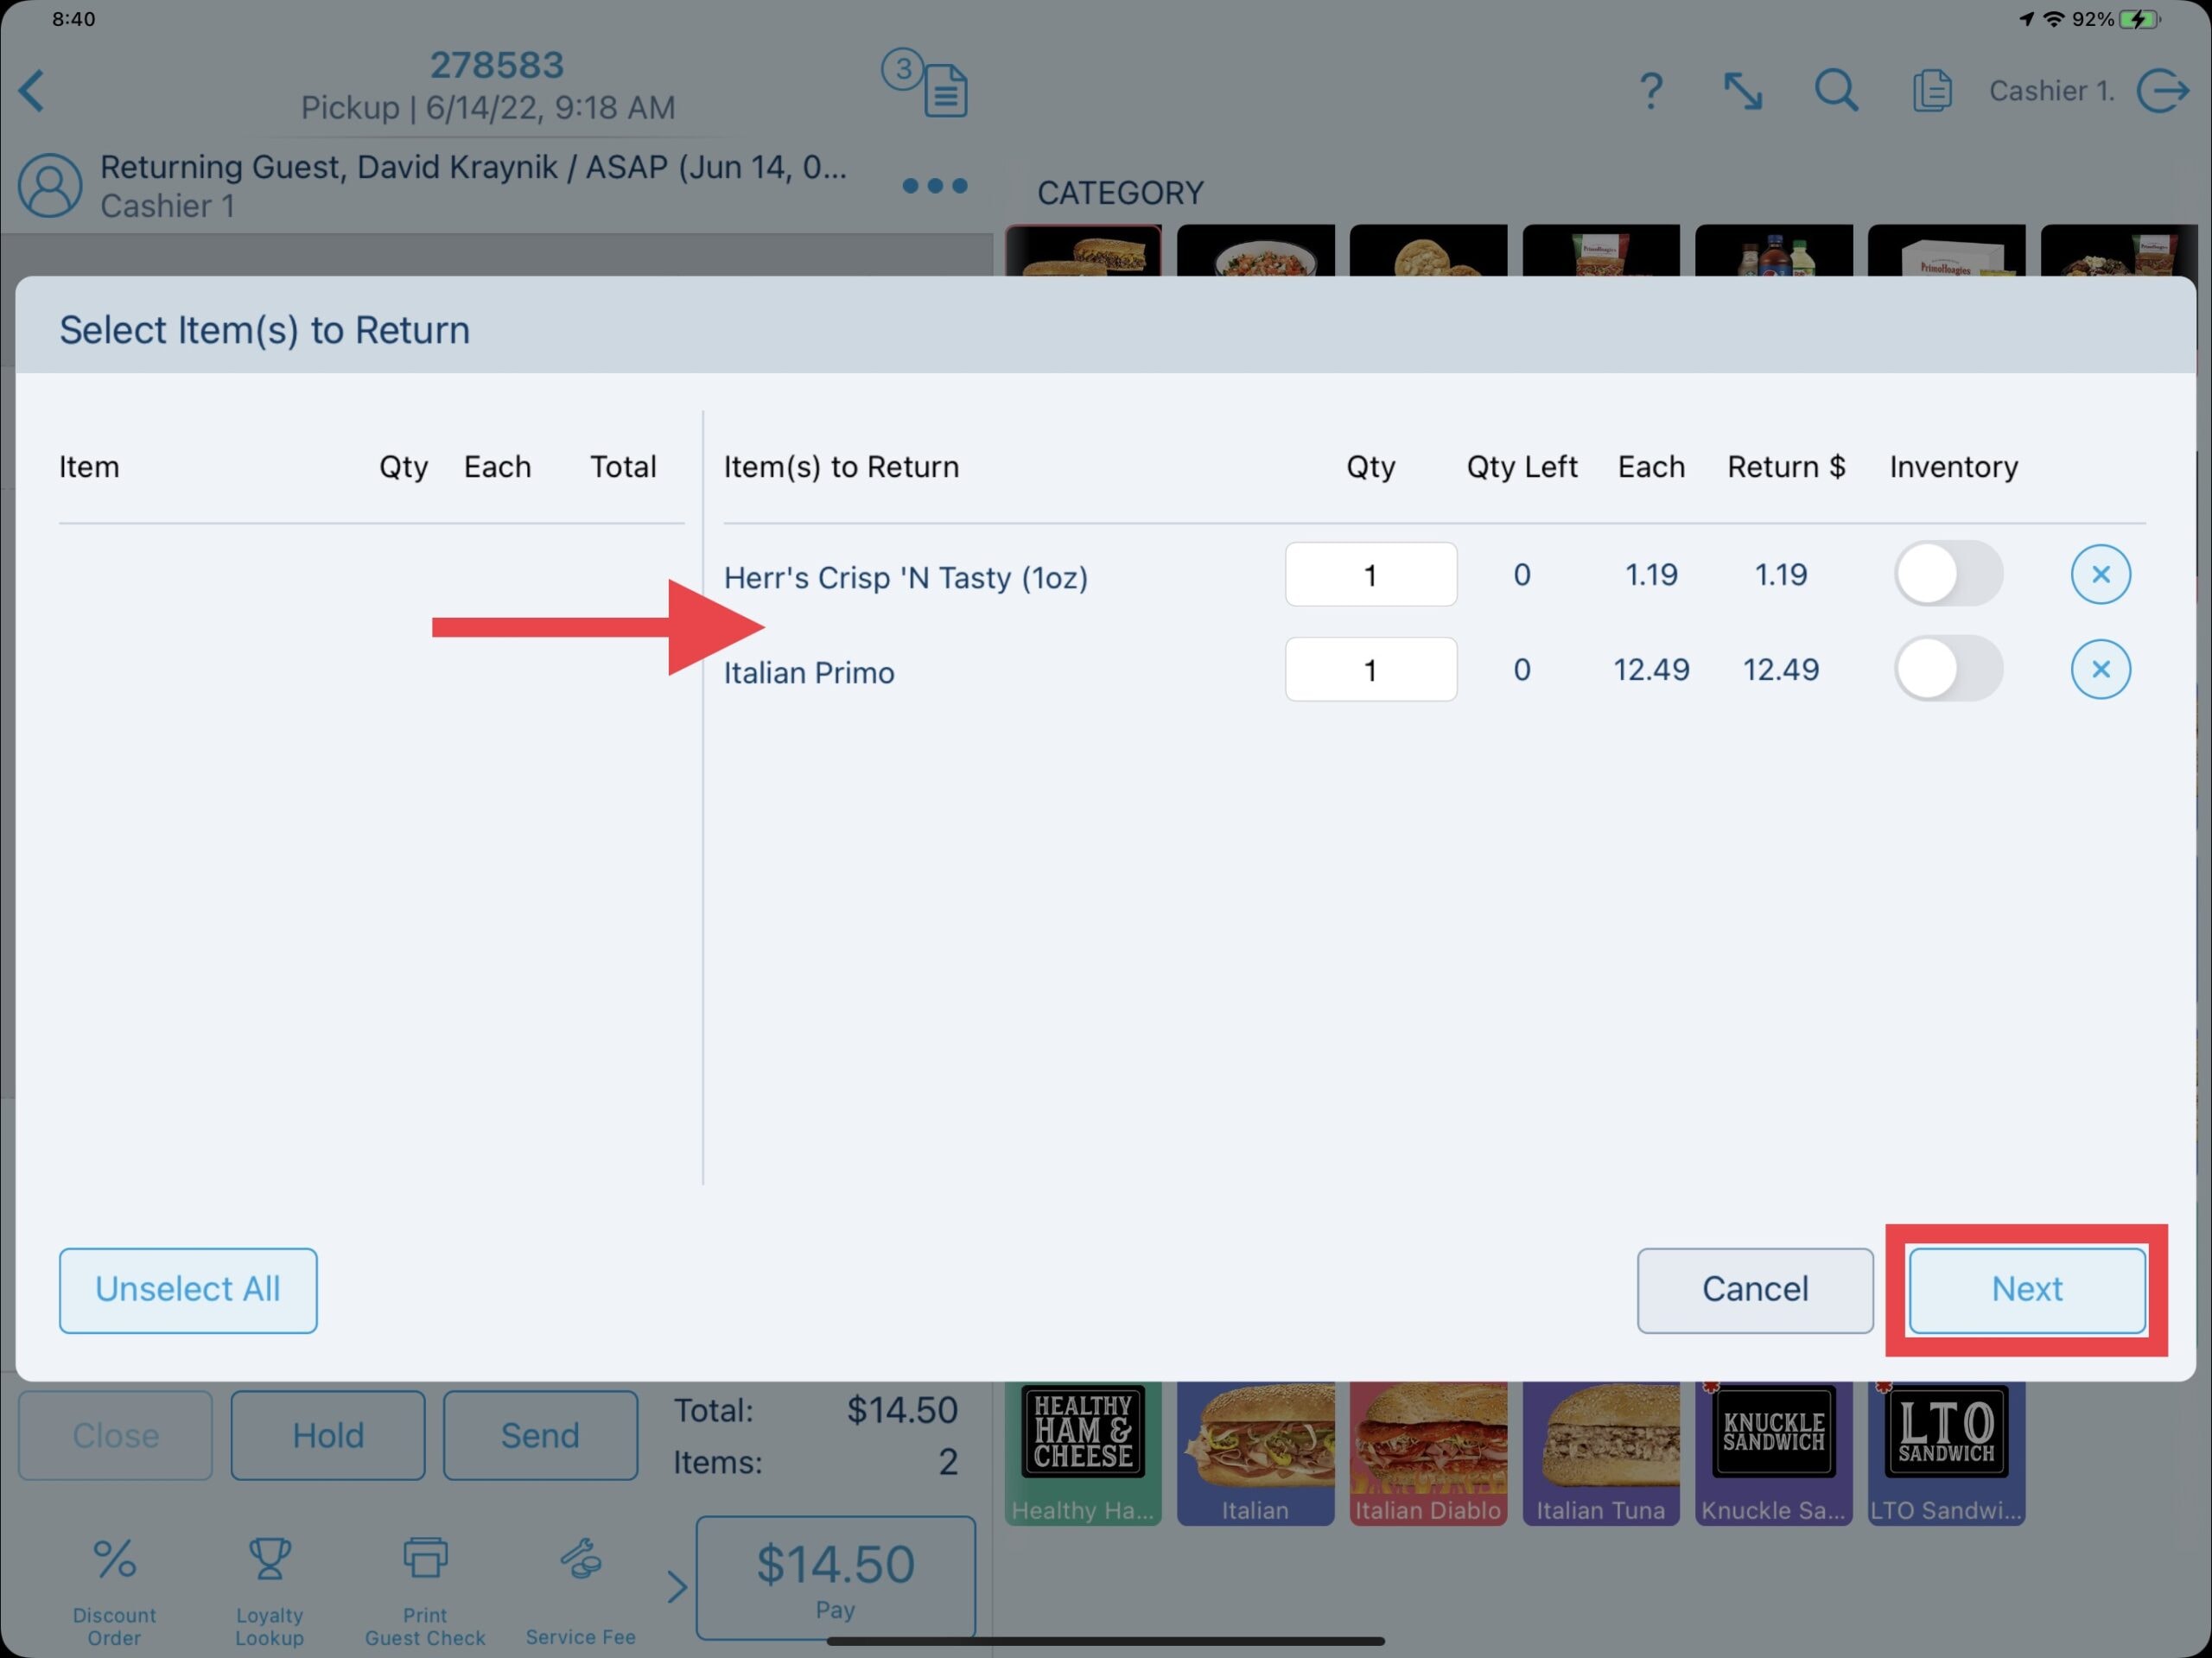
Both choices will prompt you to select the product(s) to comp or return on the left and move them over to the right. Select Next.
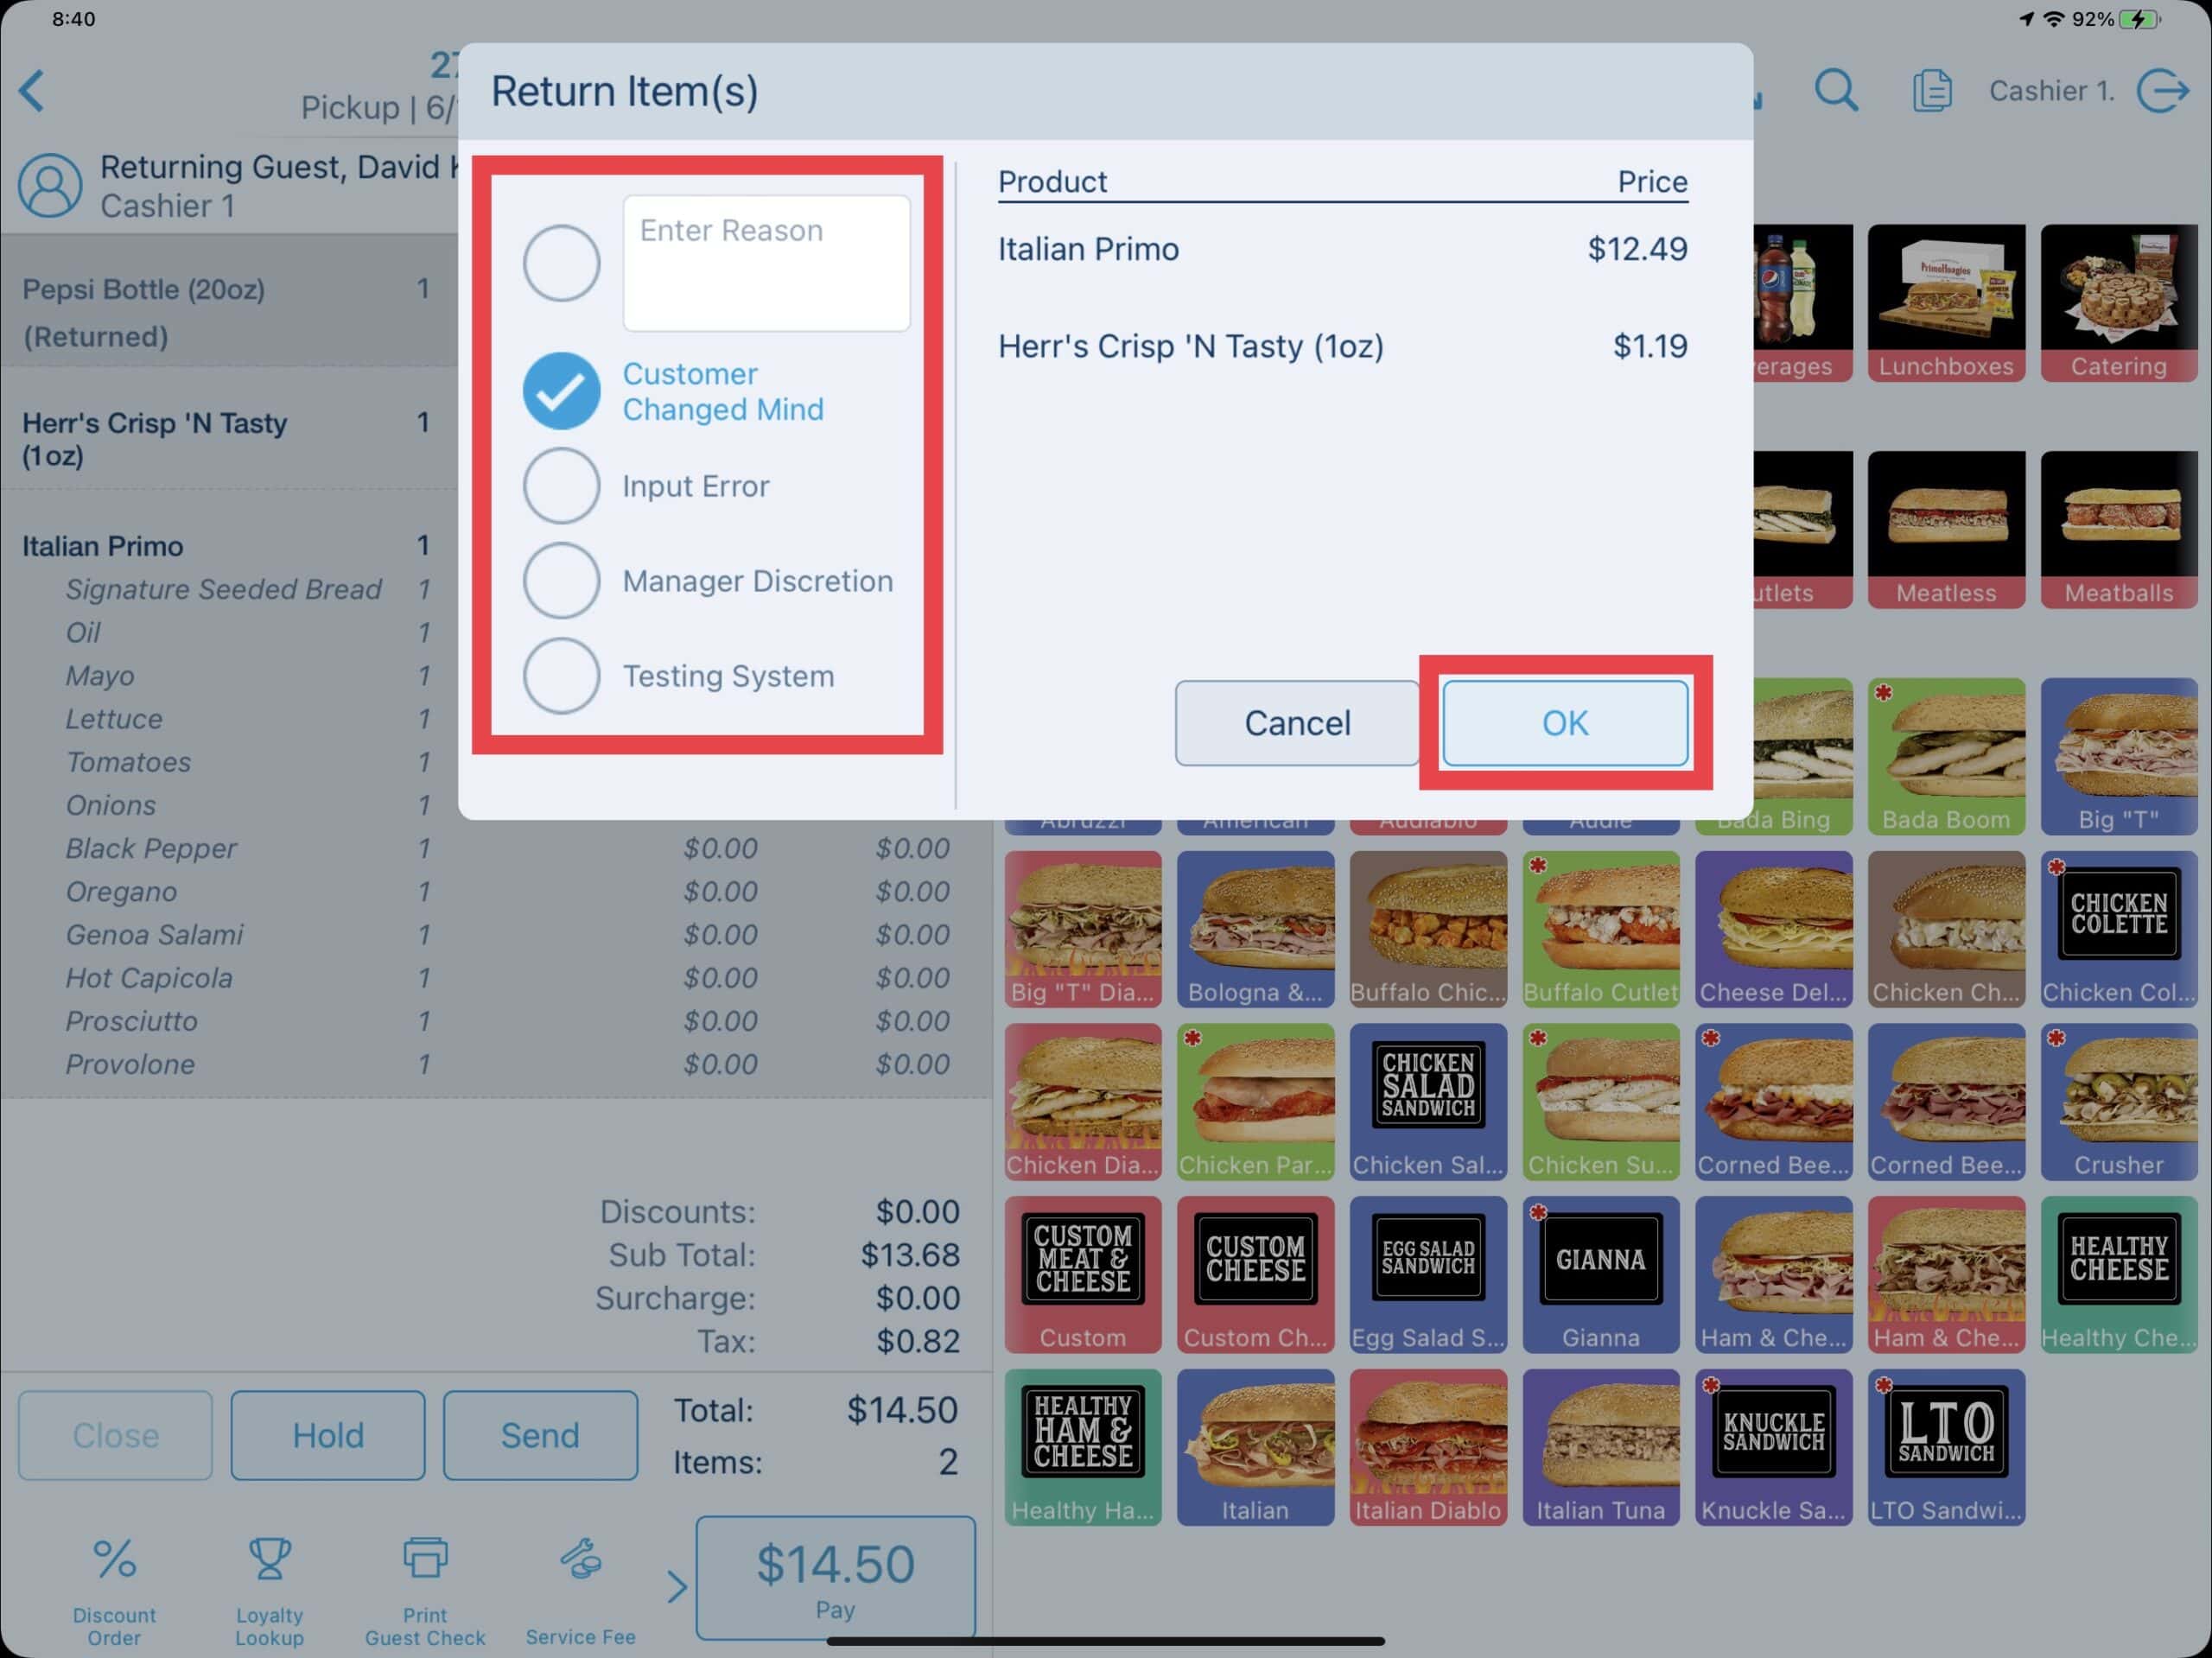
Enter the reason for removing the product(s) or choose from pre-configured reasons. Select OK after.
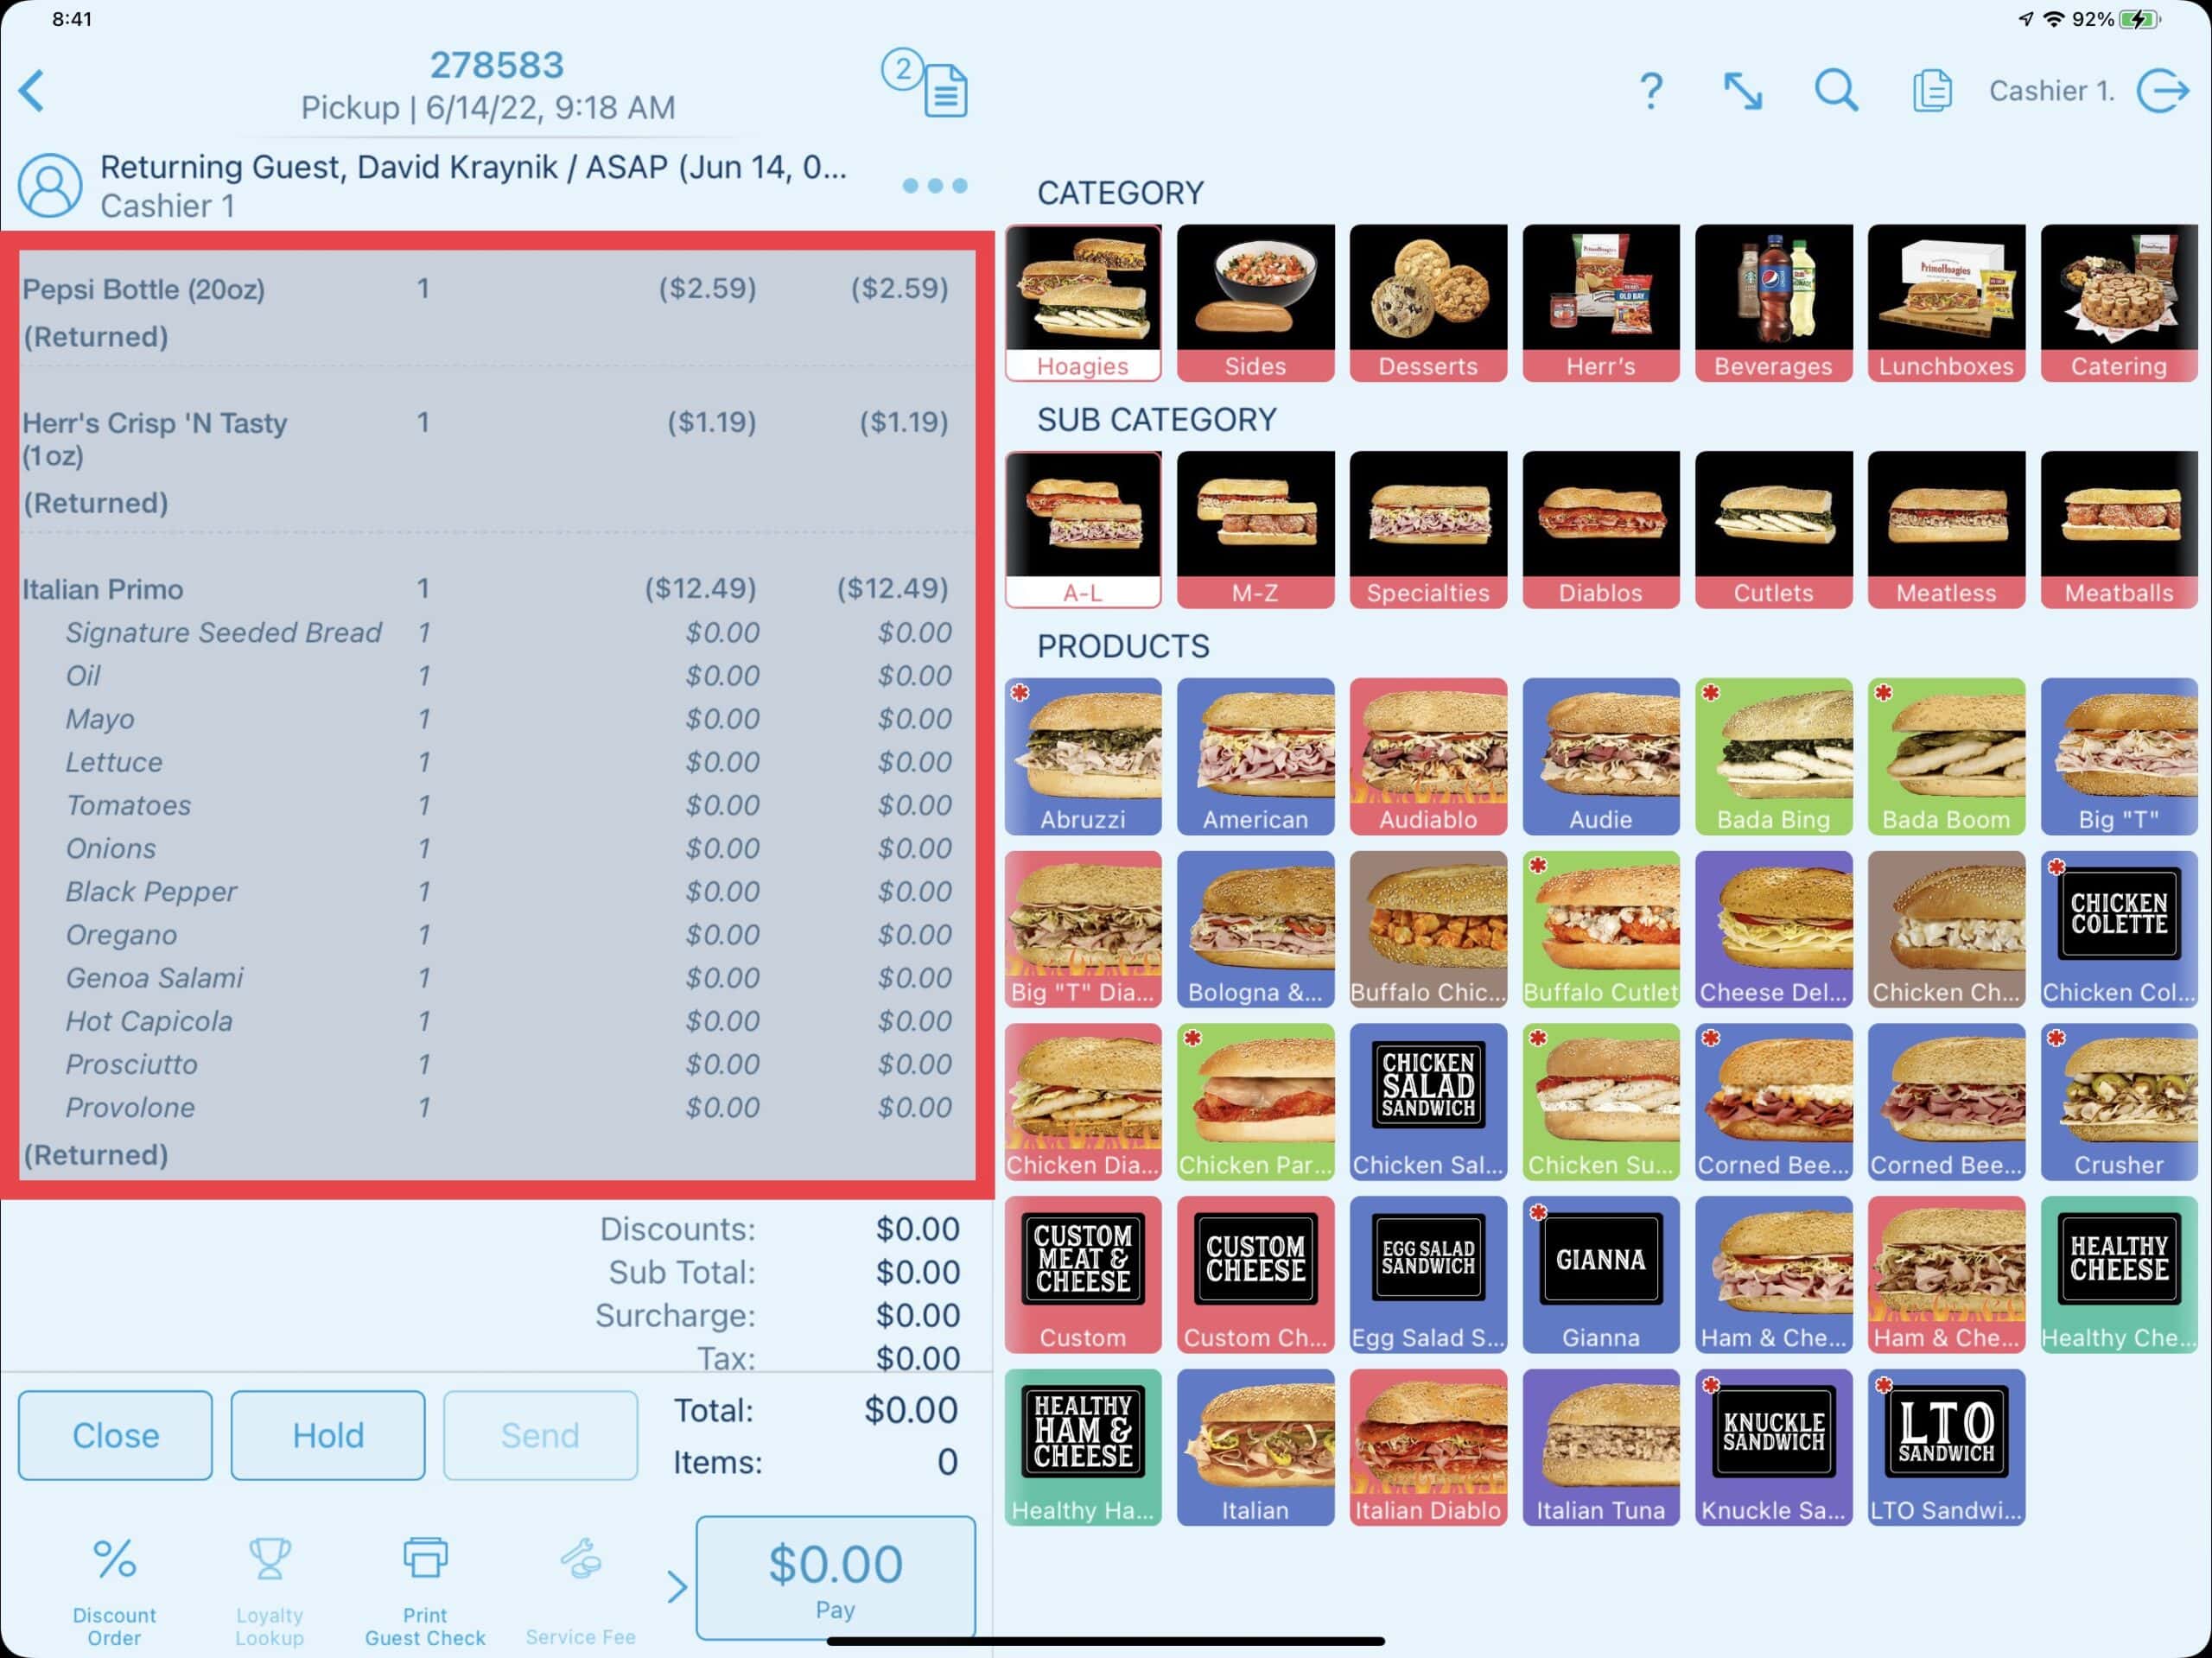
The comp'd or returned product(s) now shows on the order.
Returns With or Without Receipts
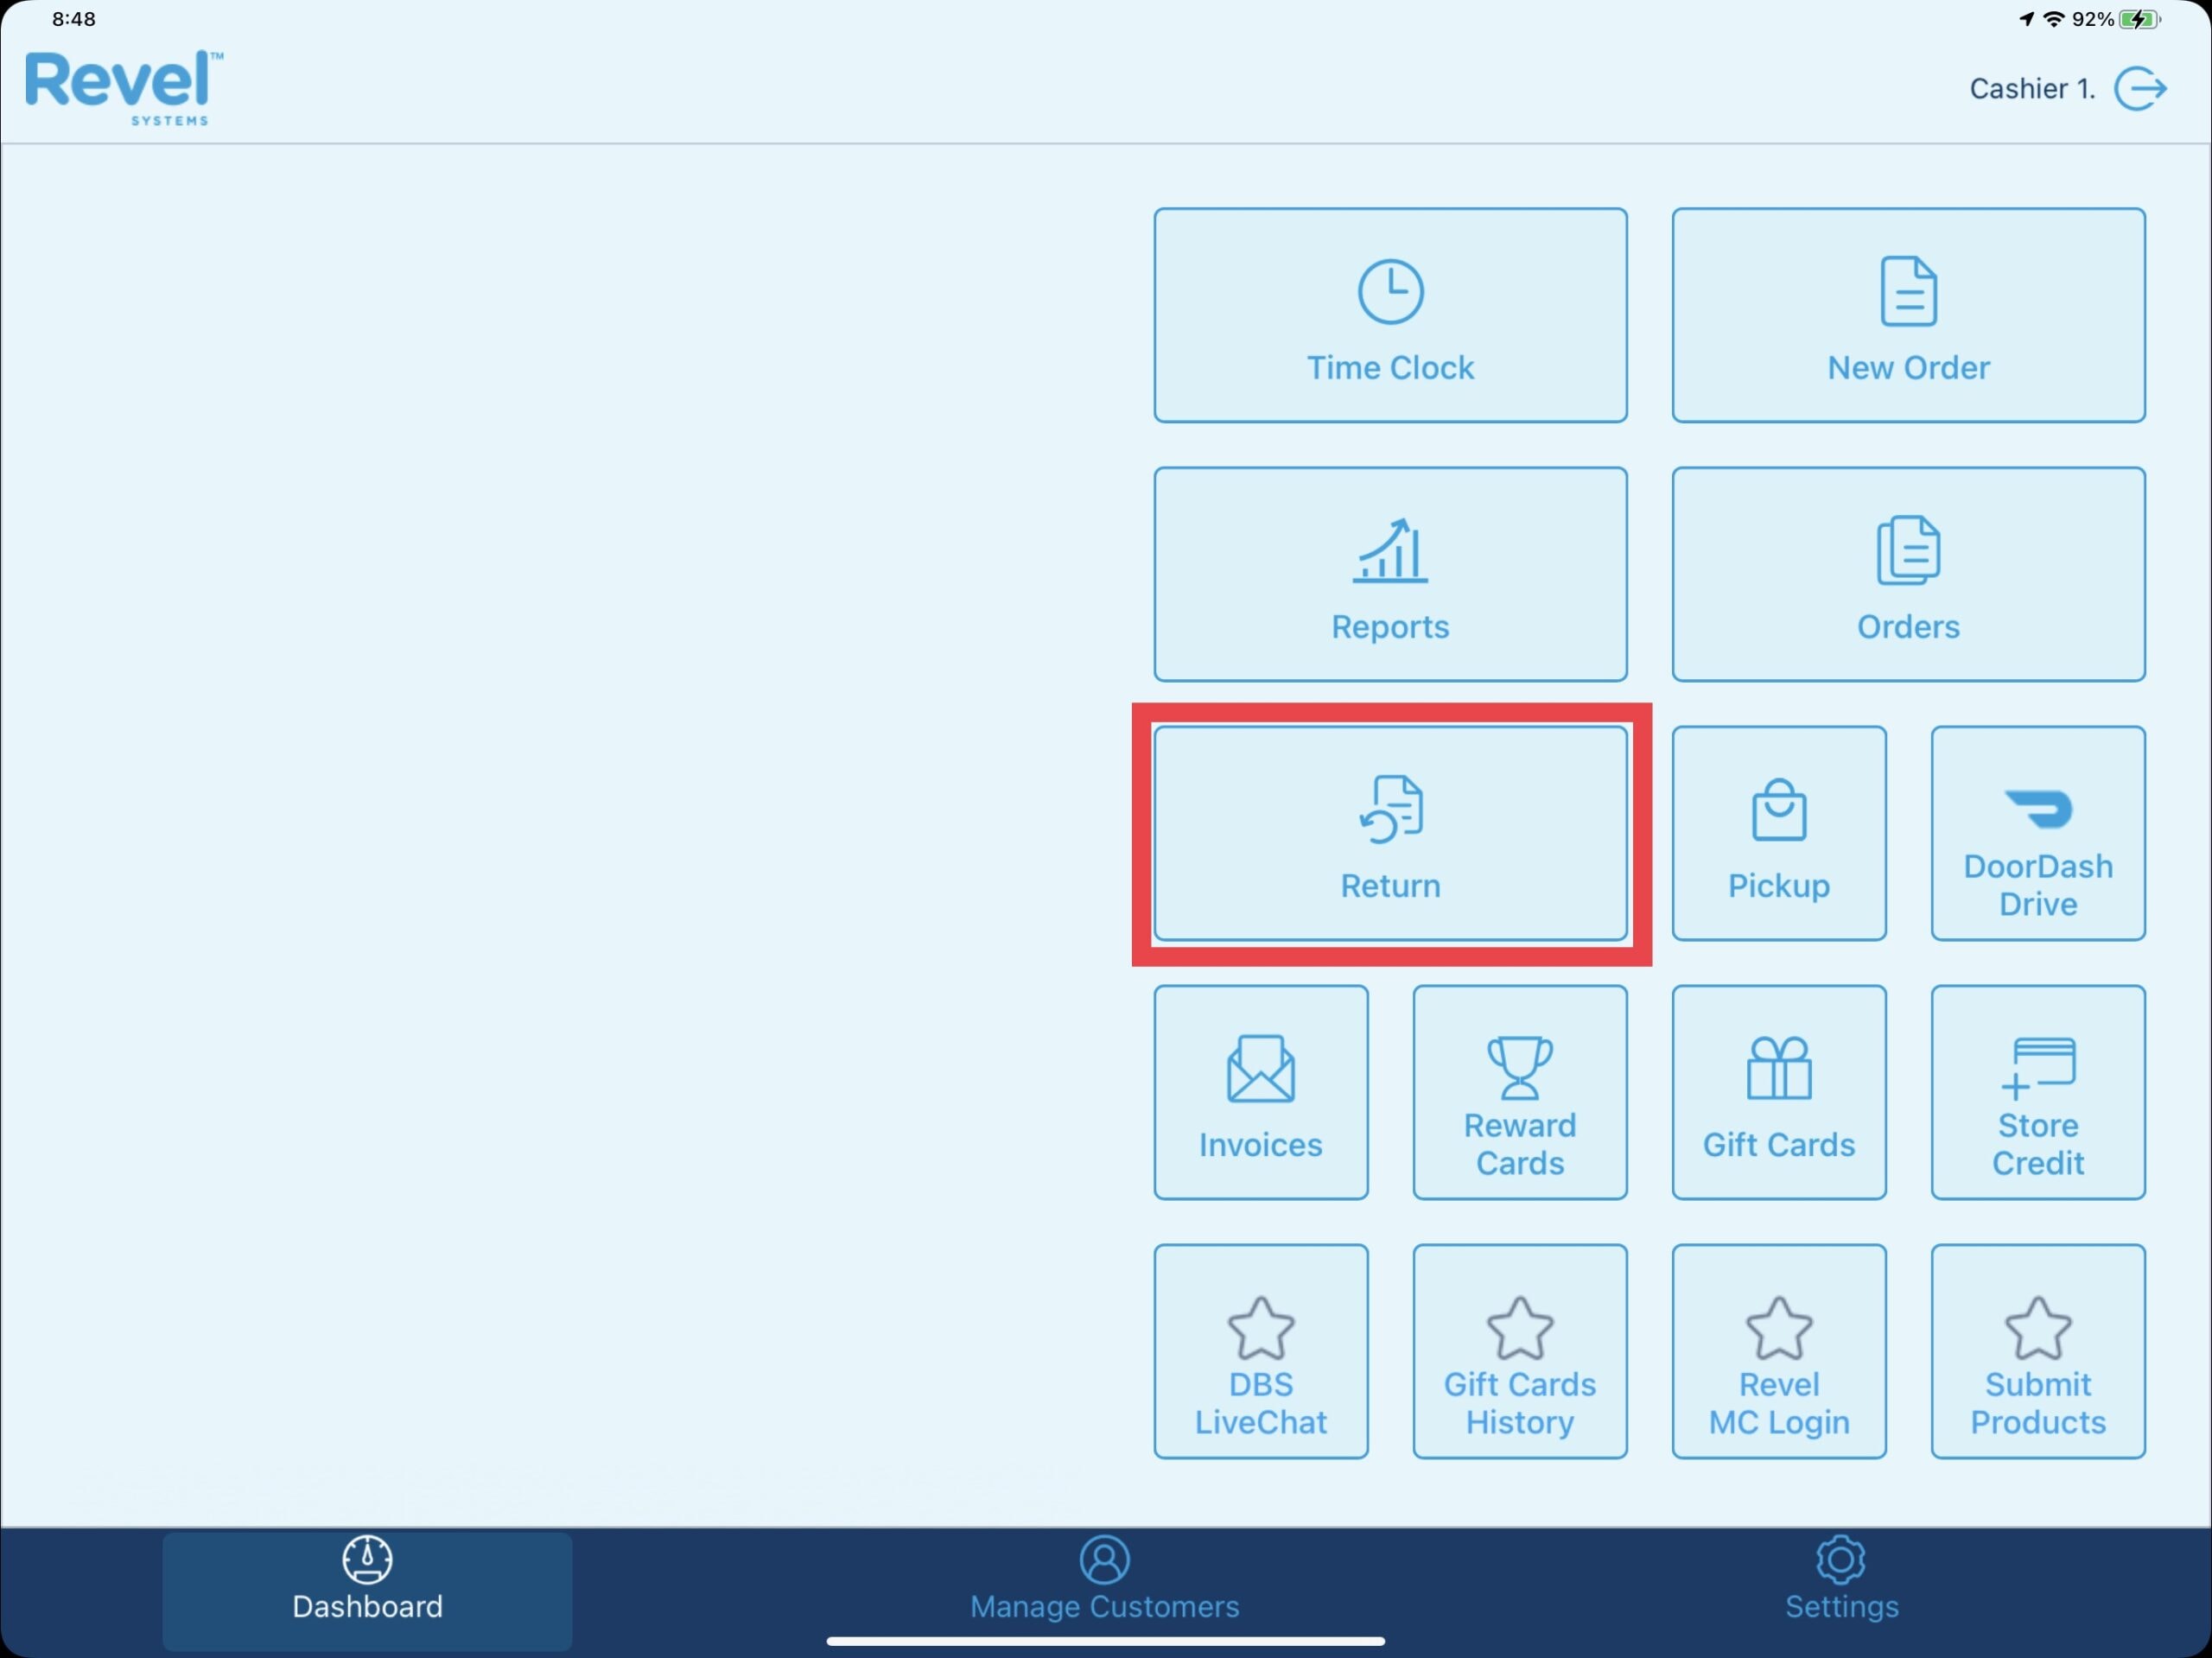
Returns can also be completed from the POS Dashboard with or without a receipt. Navigate to the POS Dashboard and select the Return button.
Enter the order number from the receipt if available and select Submit. This will open up the order so the payment and product(s) can be removed as outlined above.
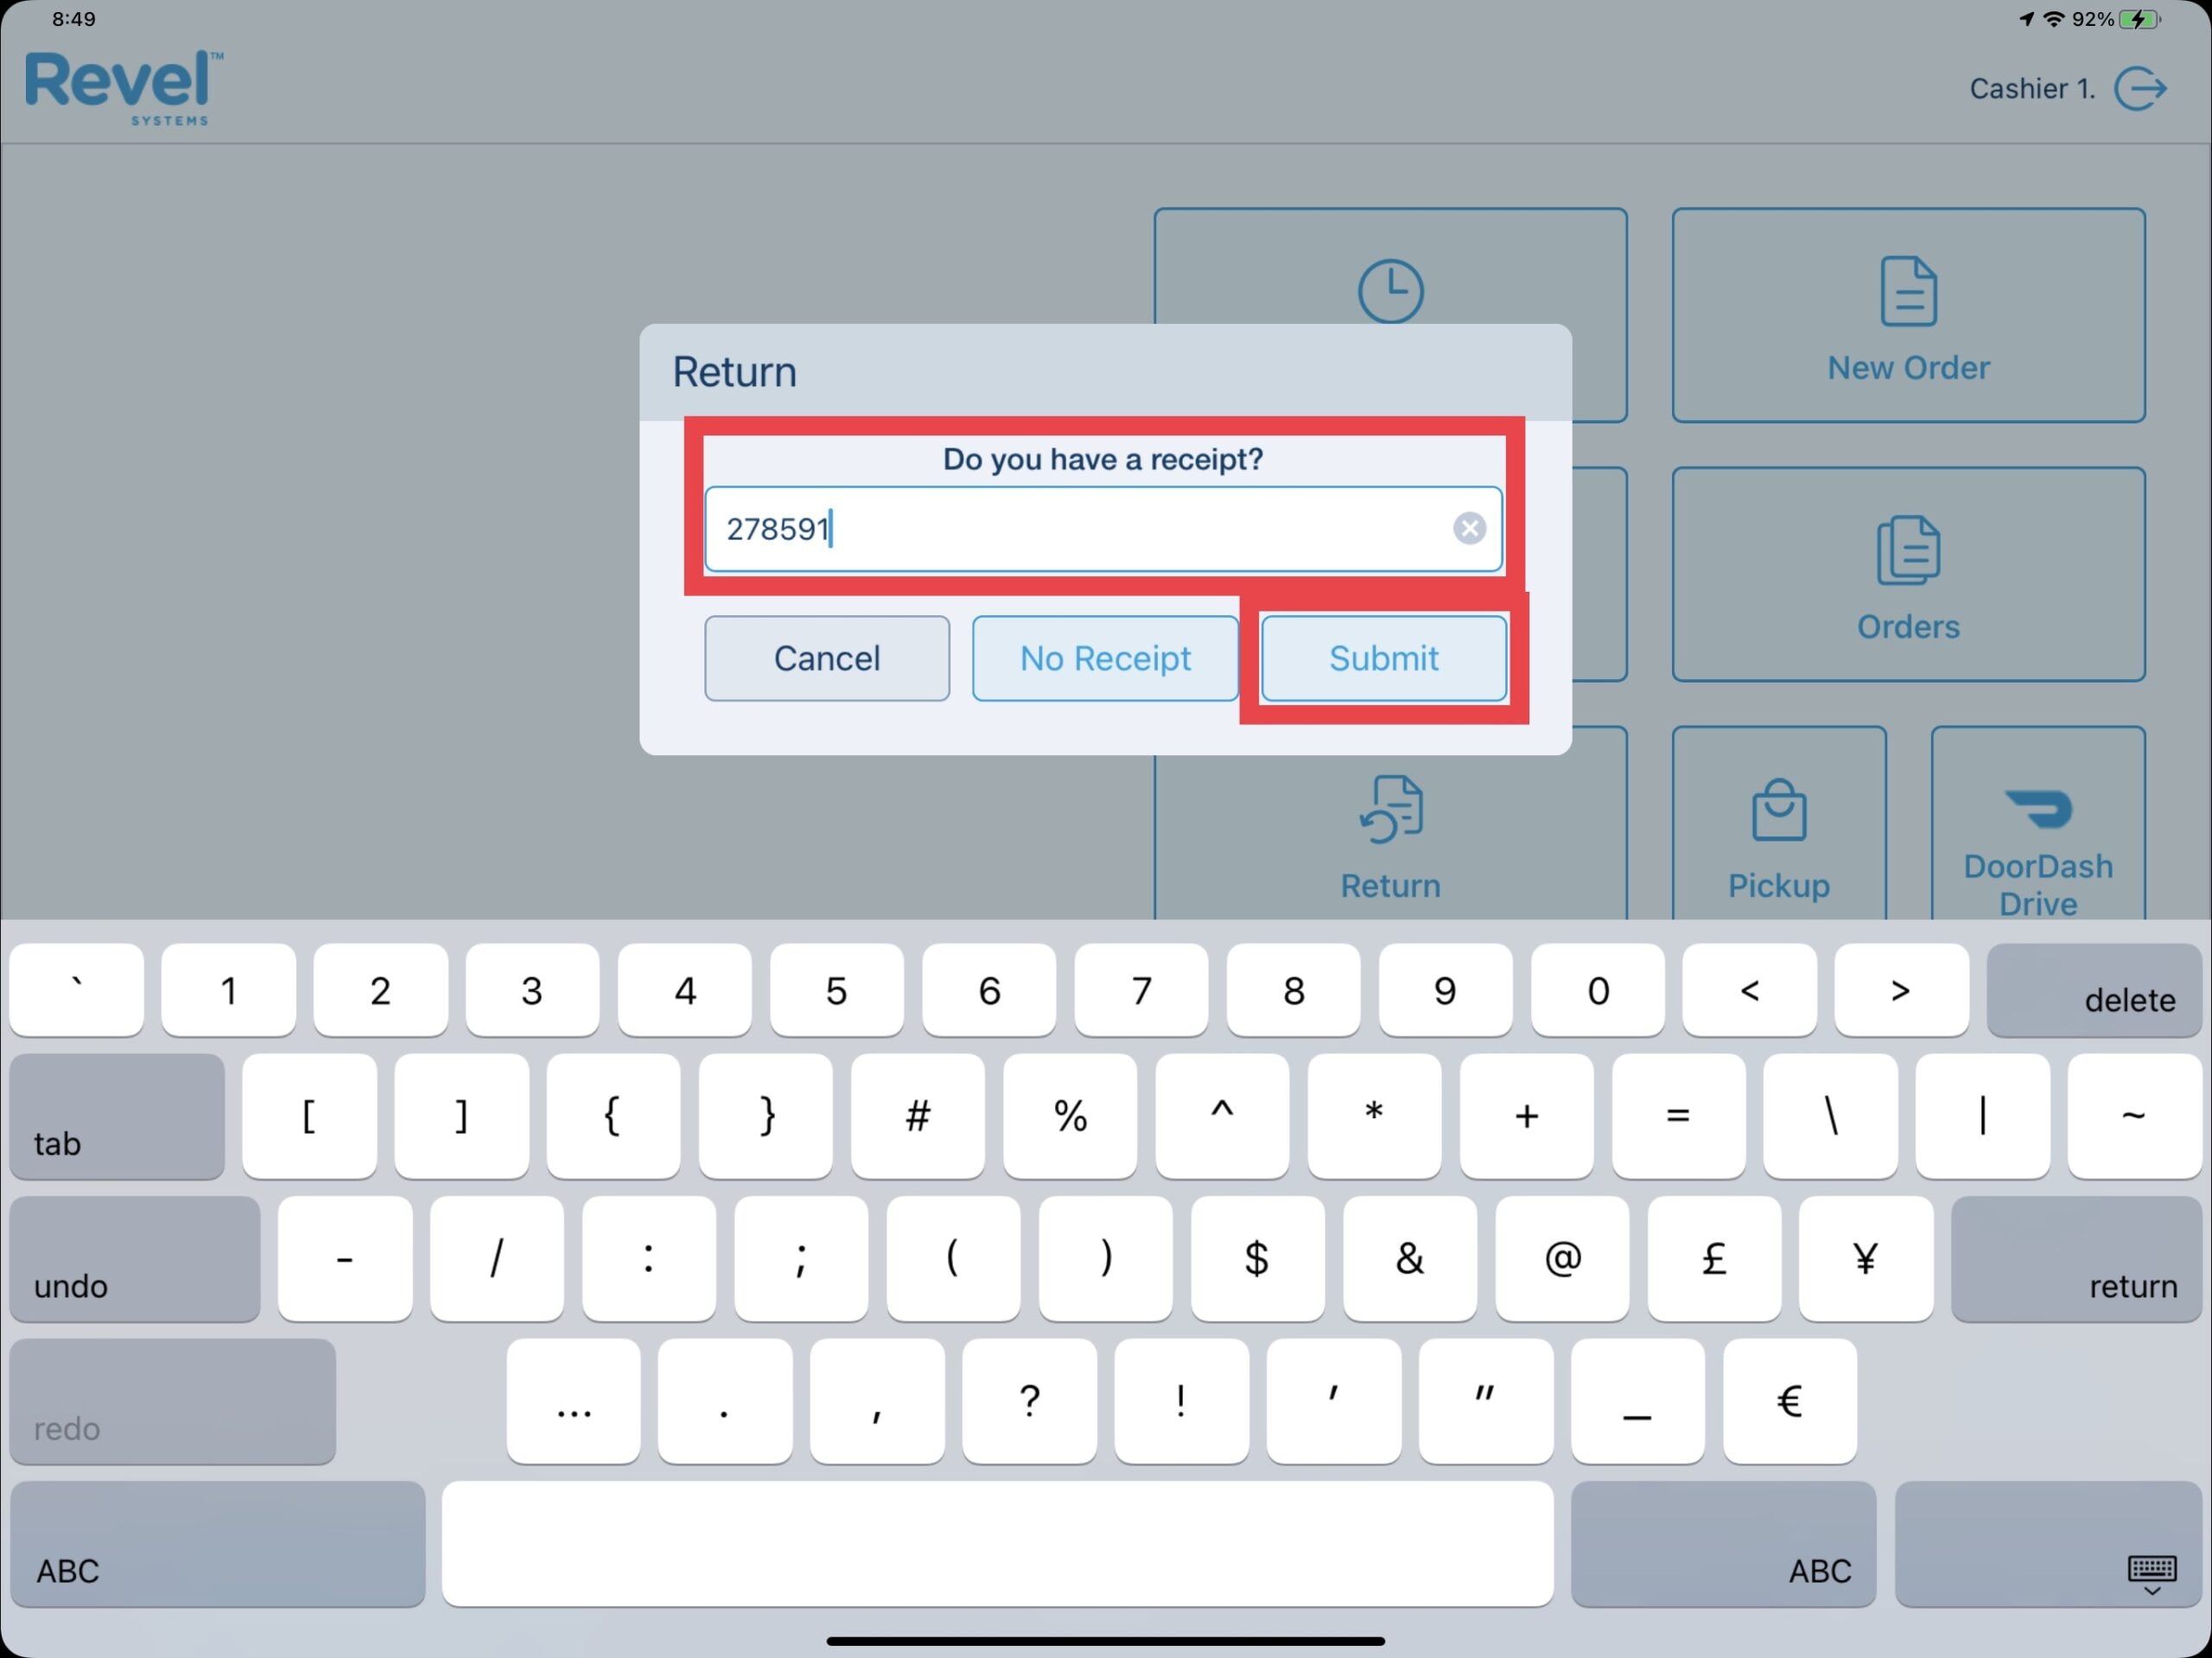
If a receipt or order number is not available, it is still possible to return product(s) by selecting No Receipt.
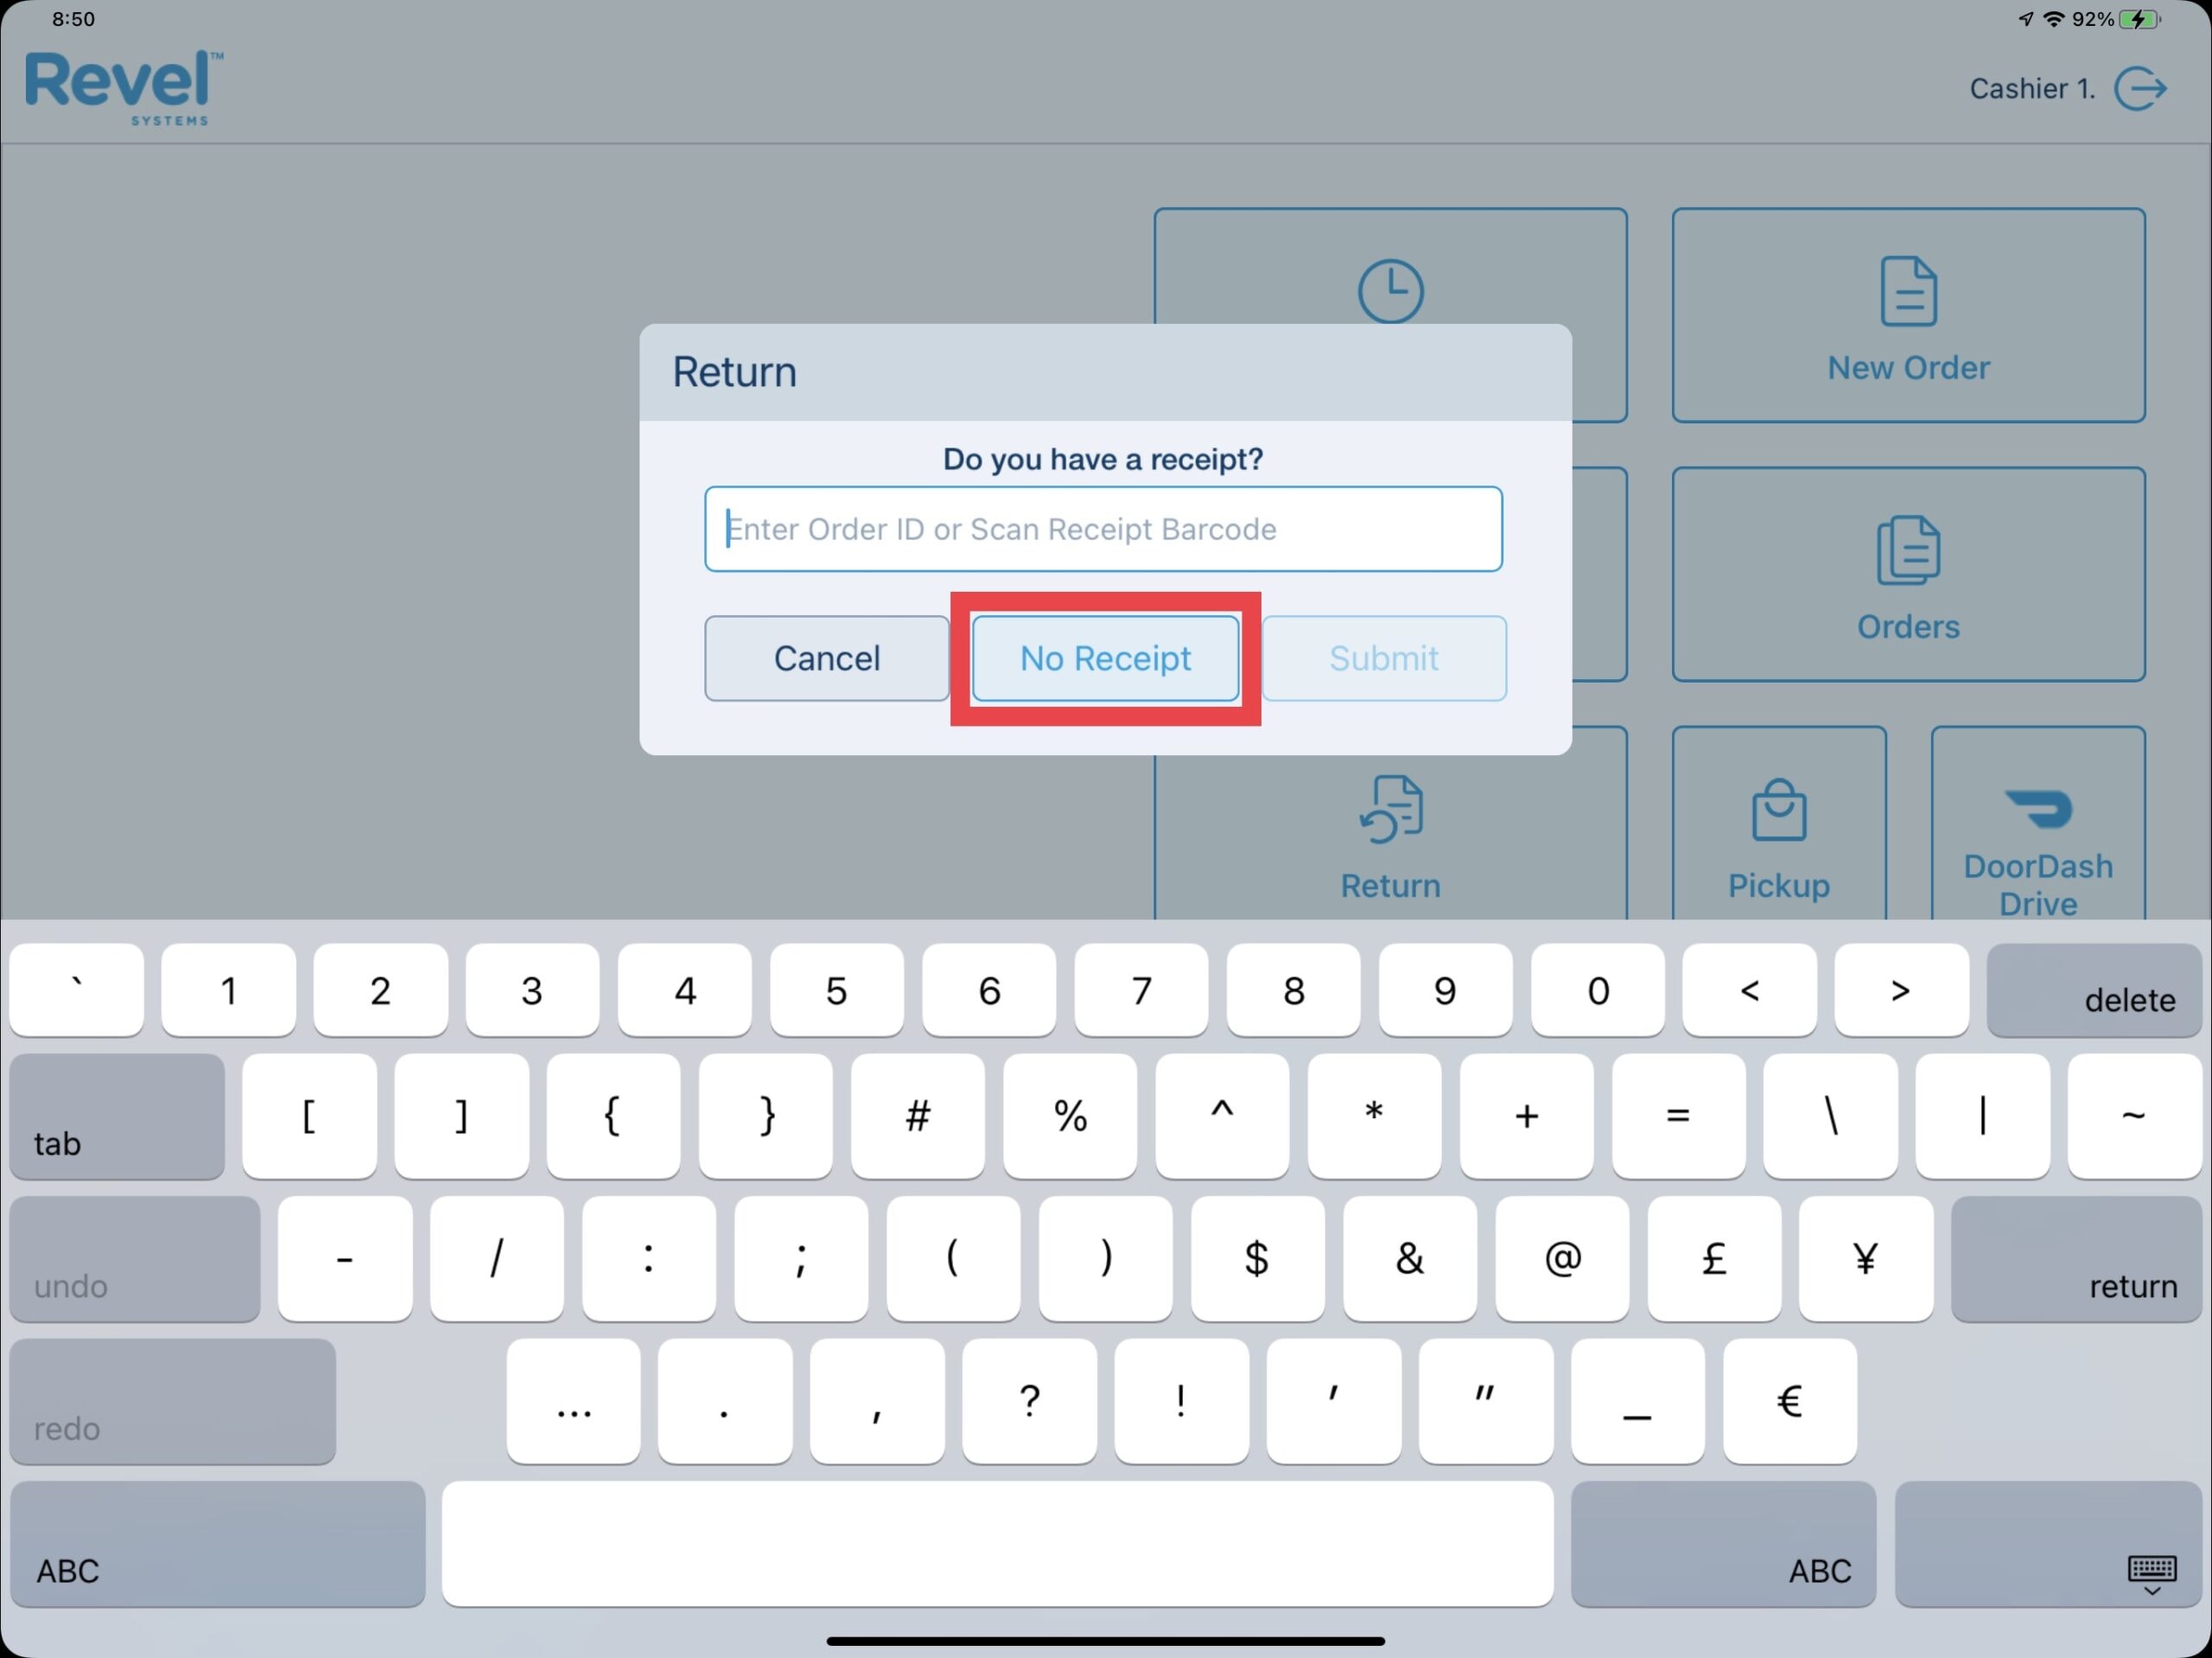
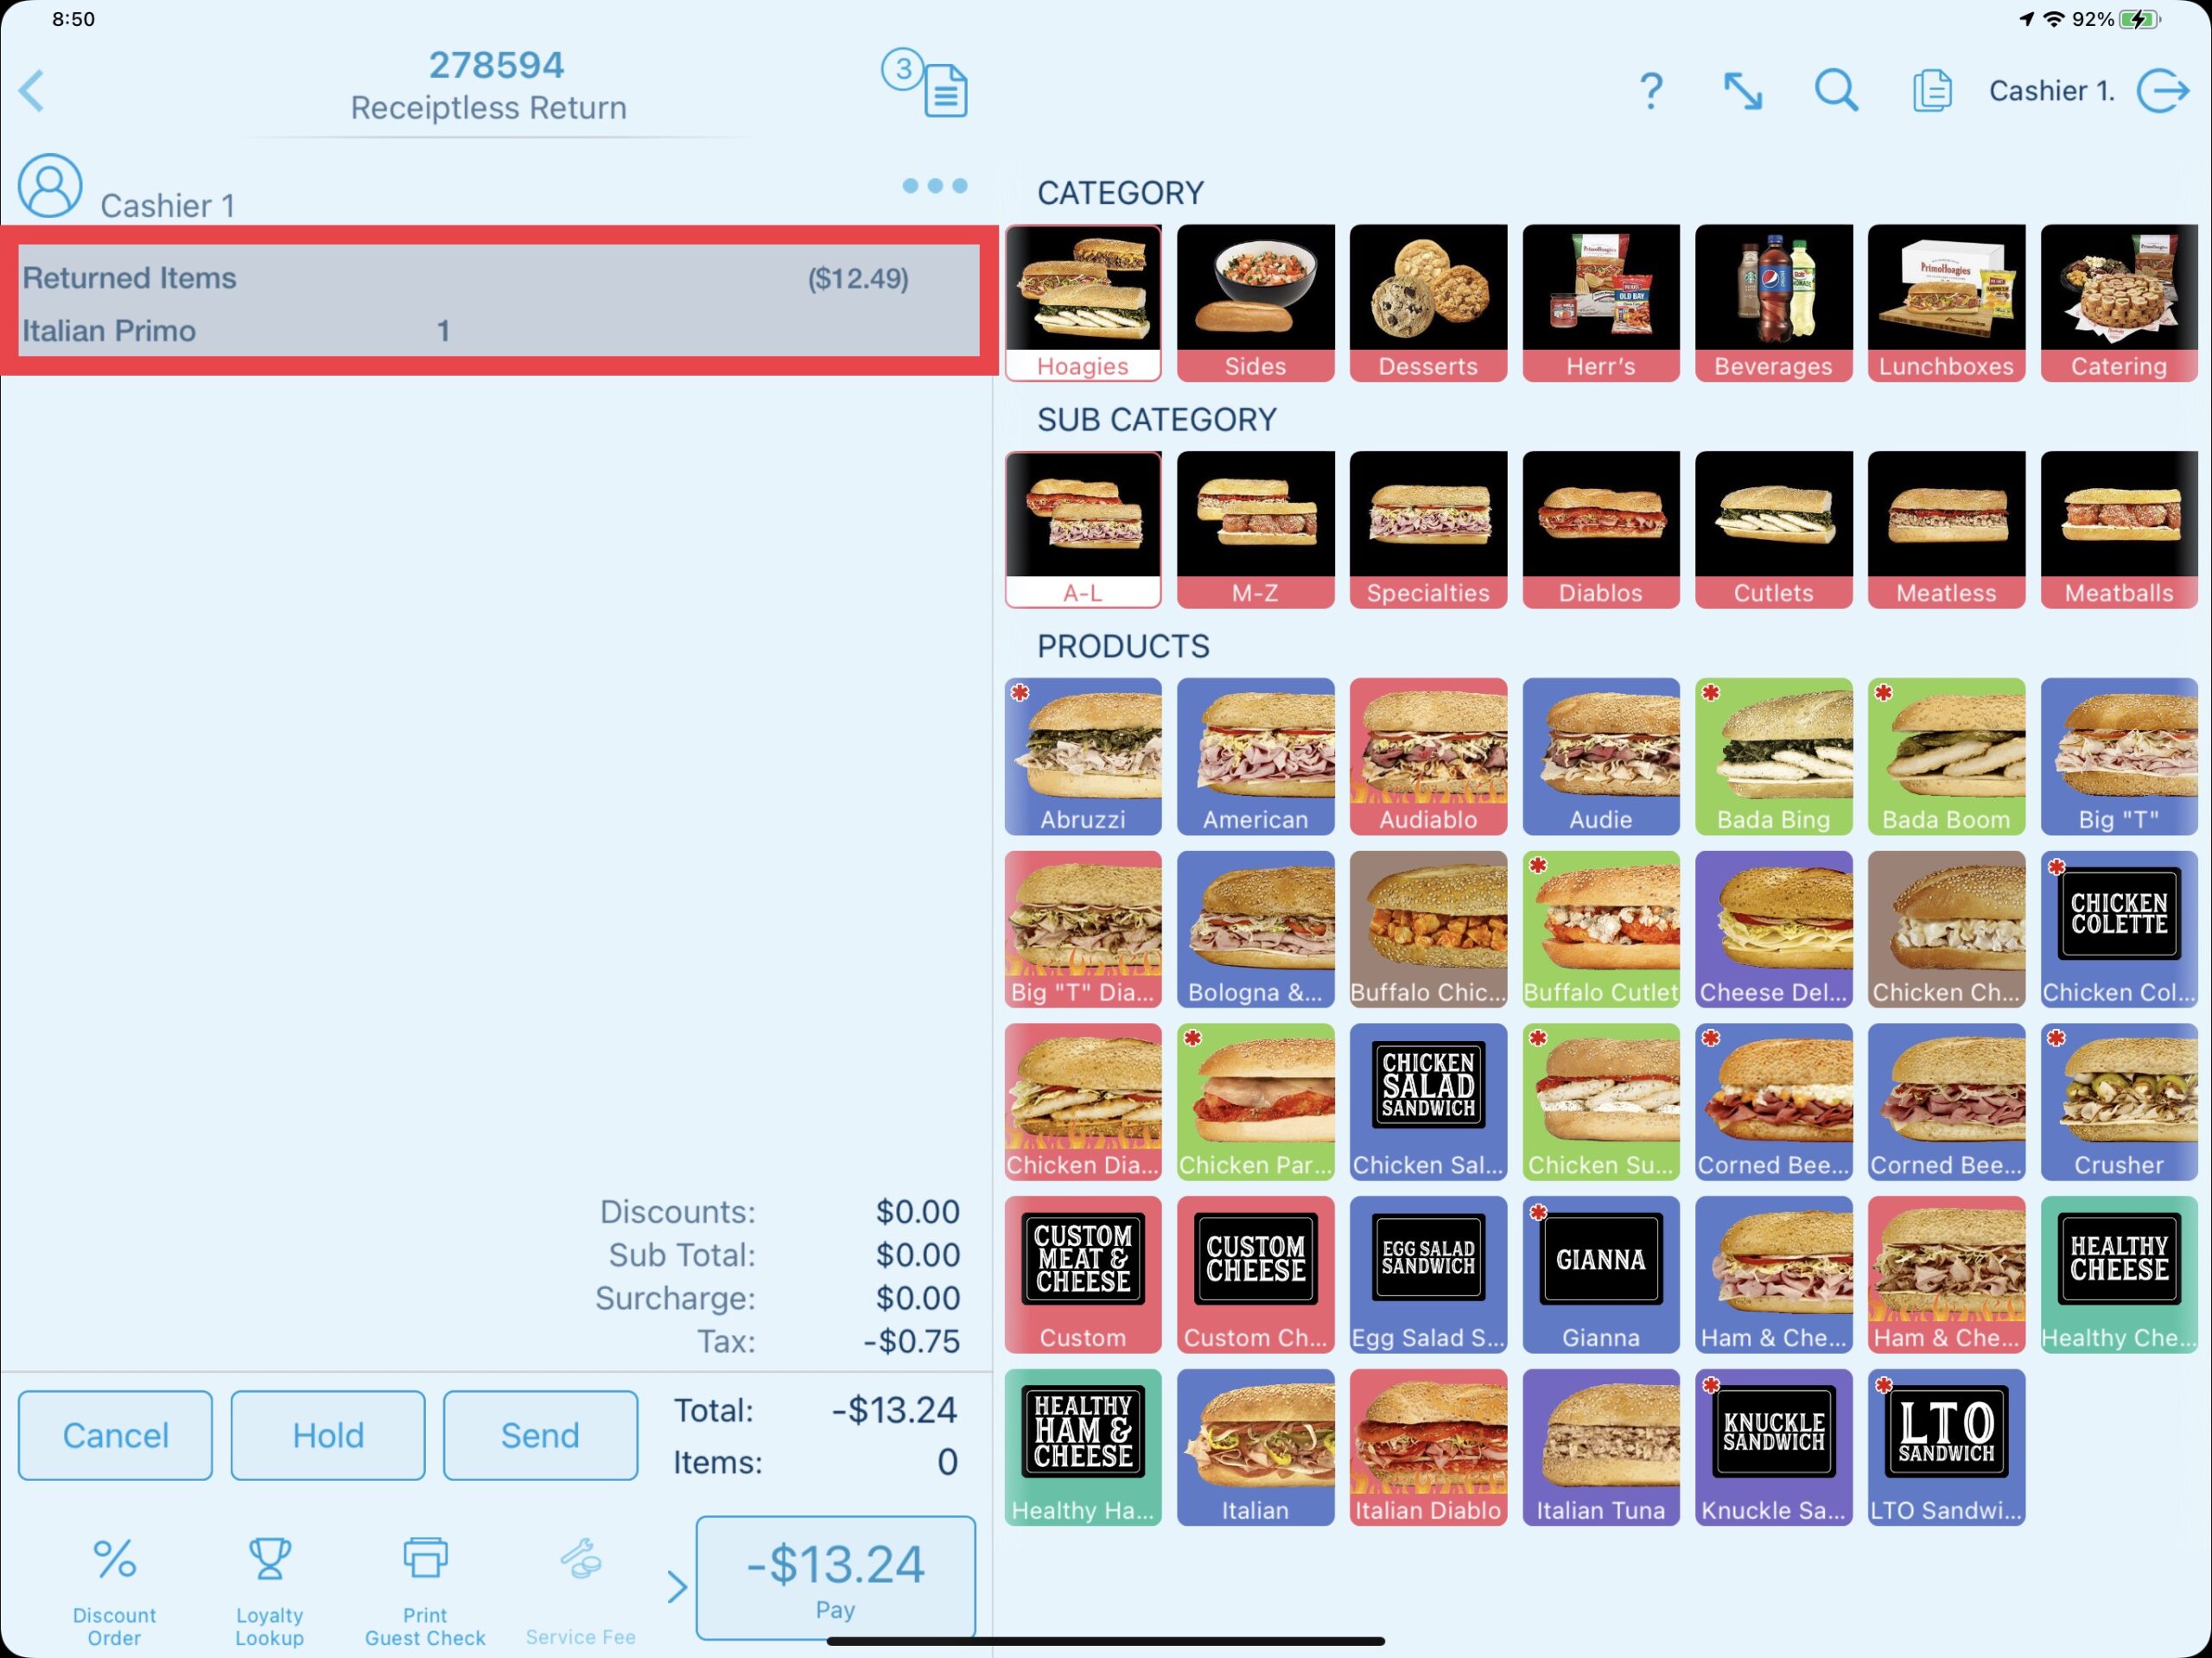
In the Receiptless Return window, search for the product(s) that need to be returned. Products may appear multiple times in the search based on if they are used for in-store or online ordering. Be sure to confirm or edit the price of the product before selecting Return. It is not needed to select the Inventory toggle as the Revel Systems Inventory Module is not being used.
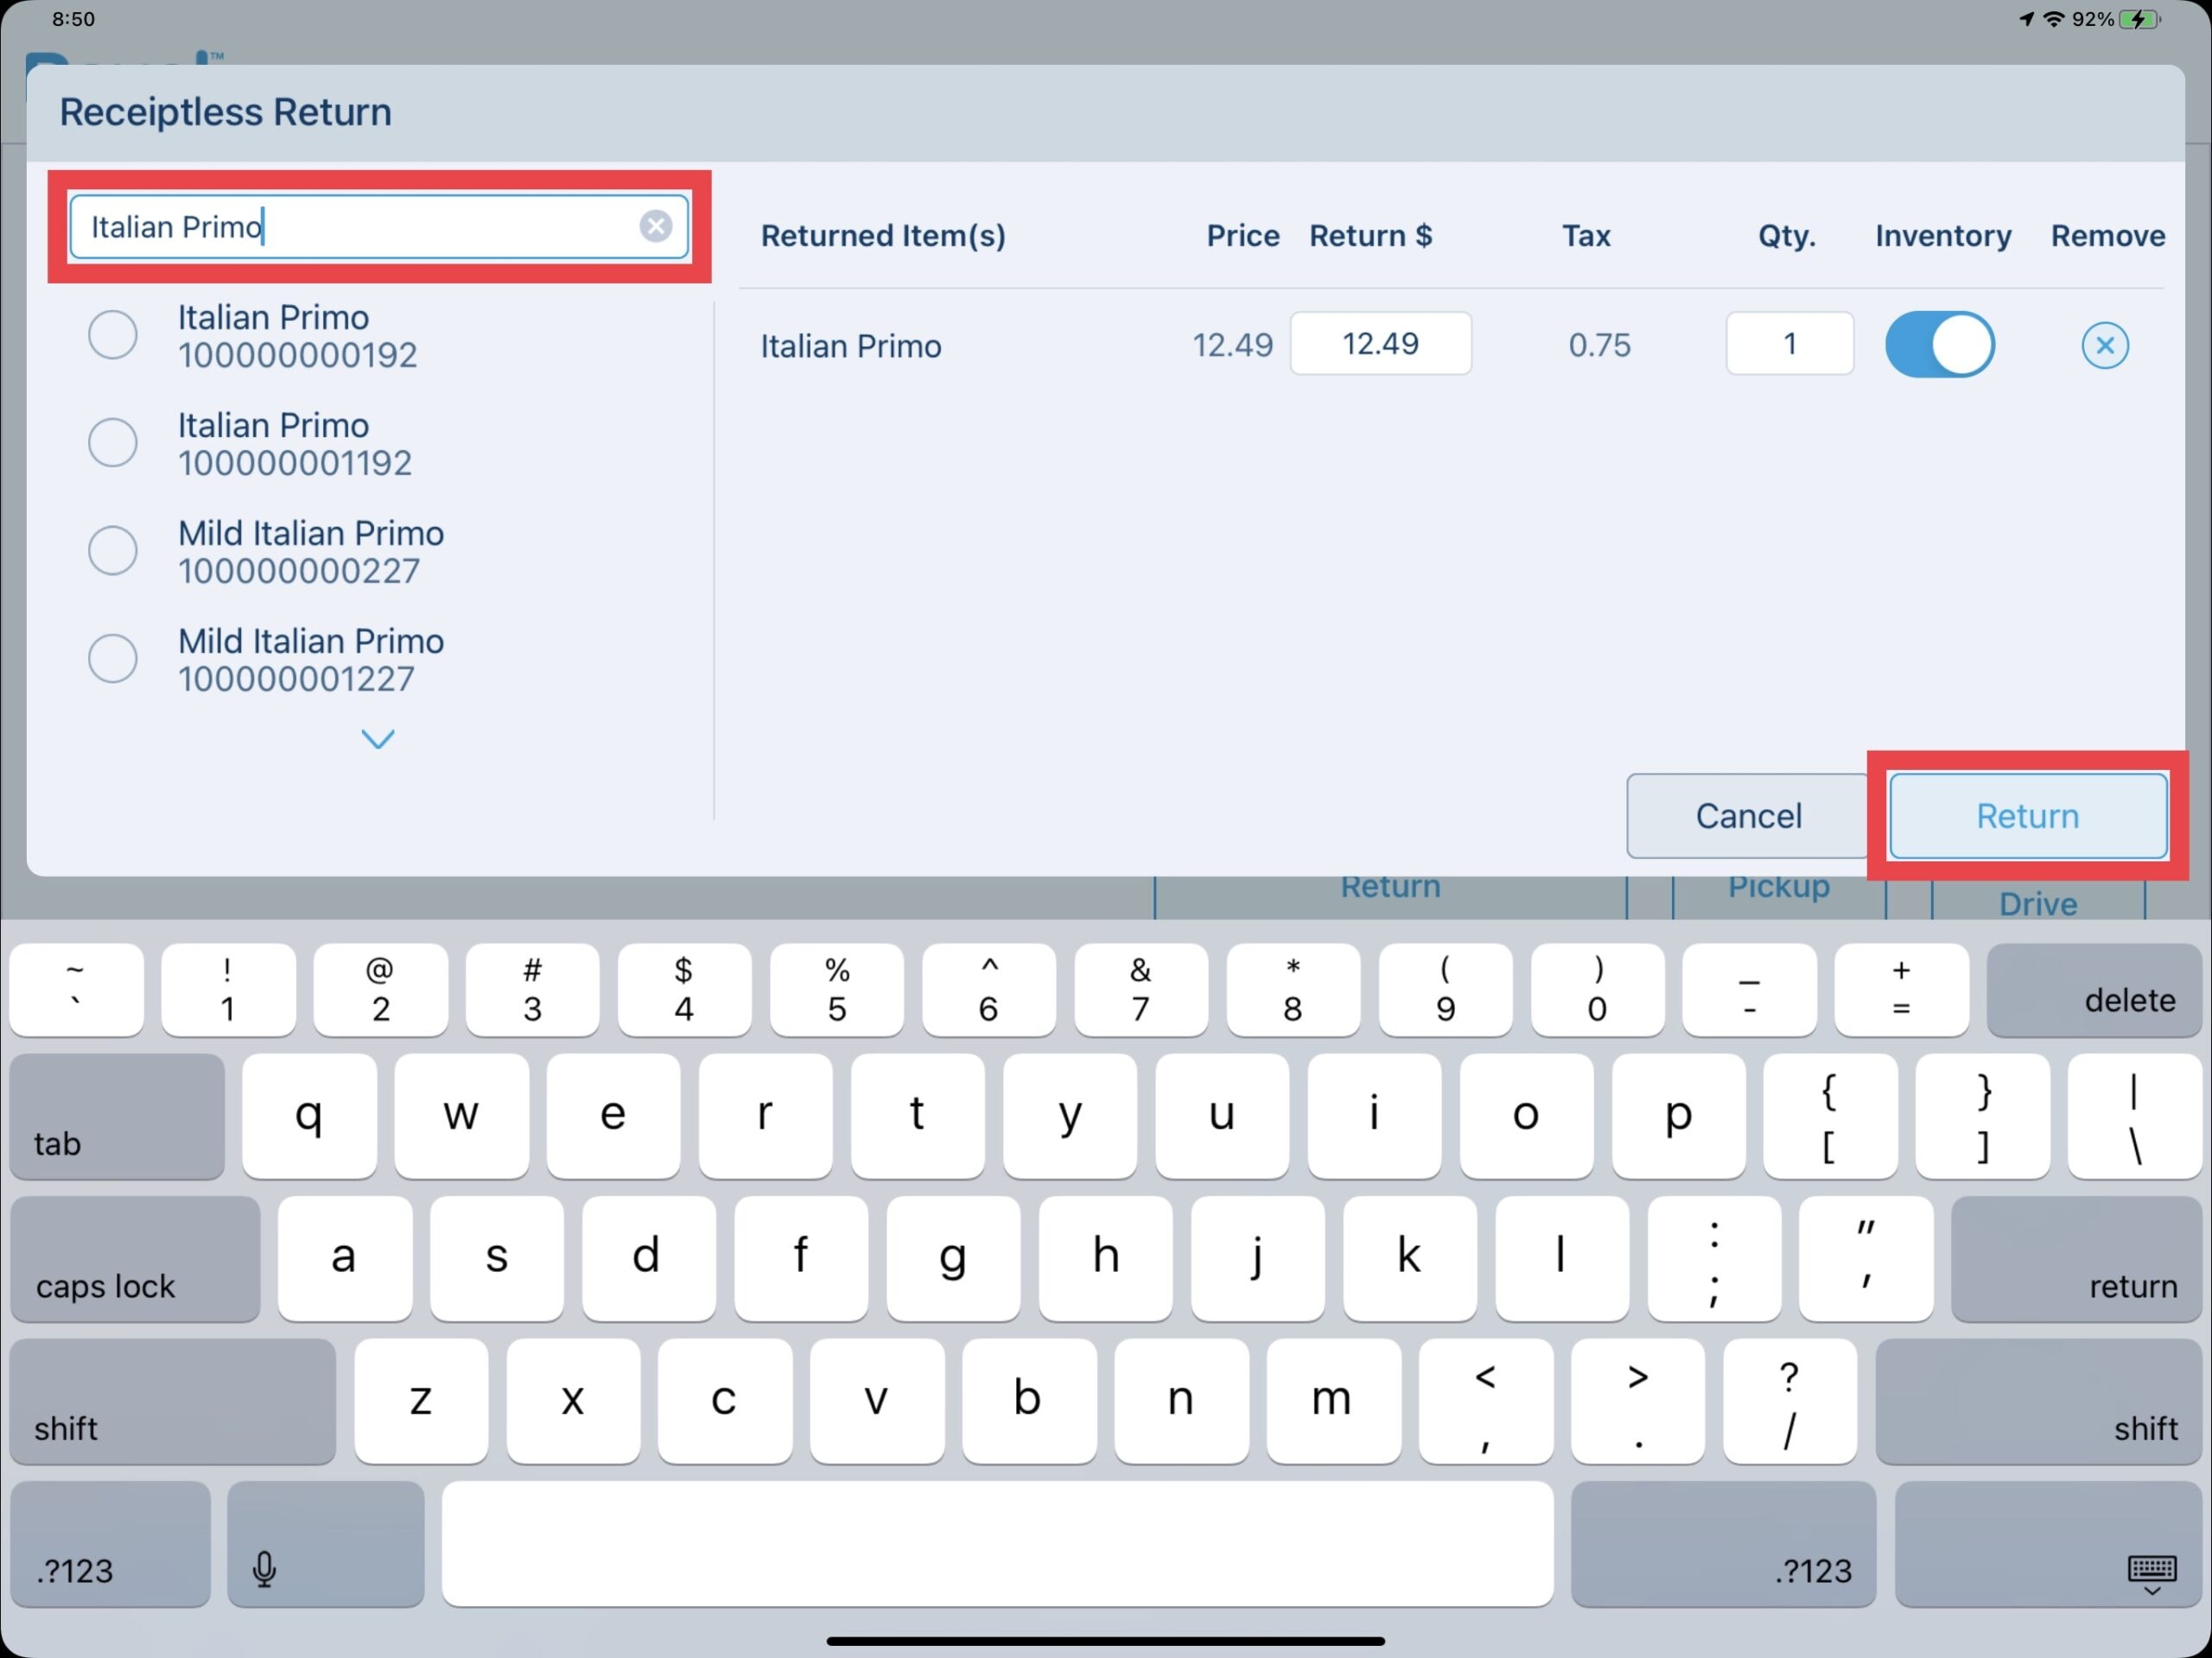
Specify the reason for the return by entering the reason or choose from pre-configured reasons. Select Next after.
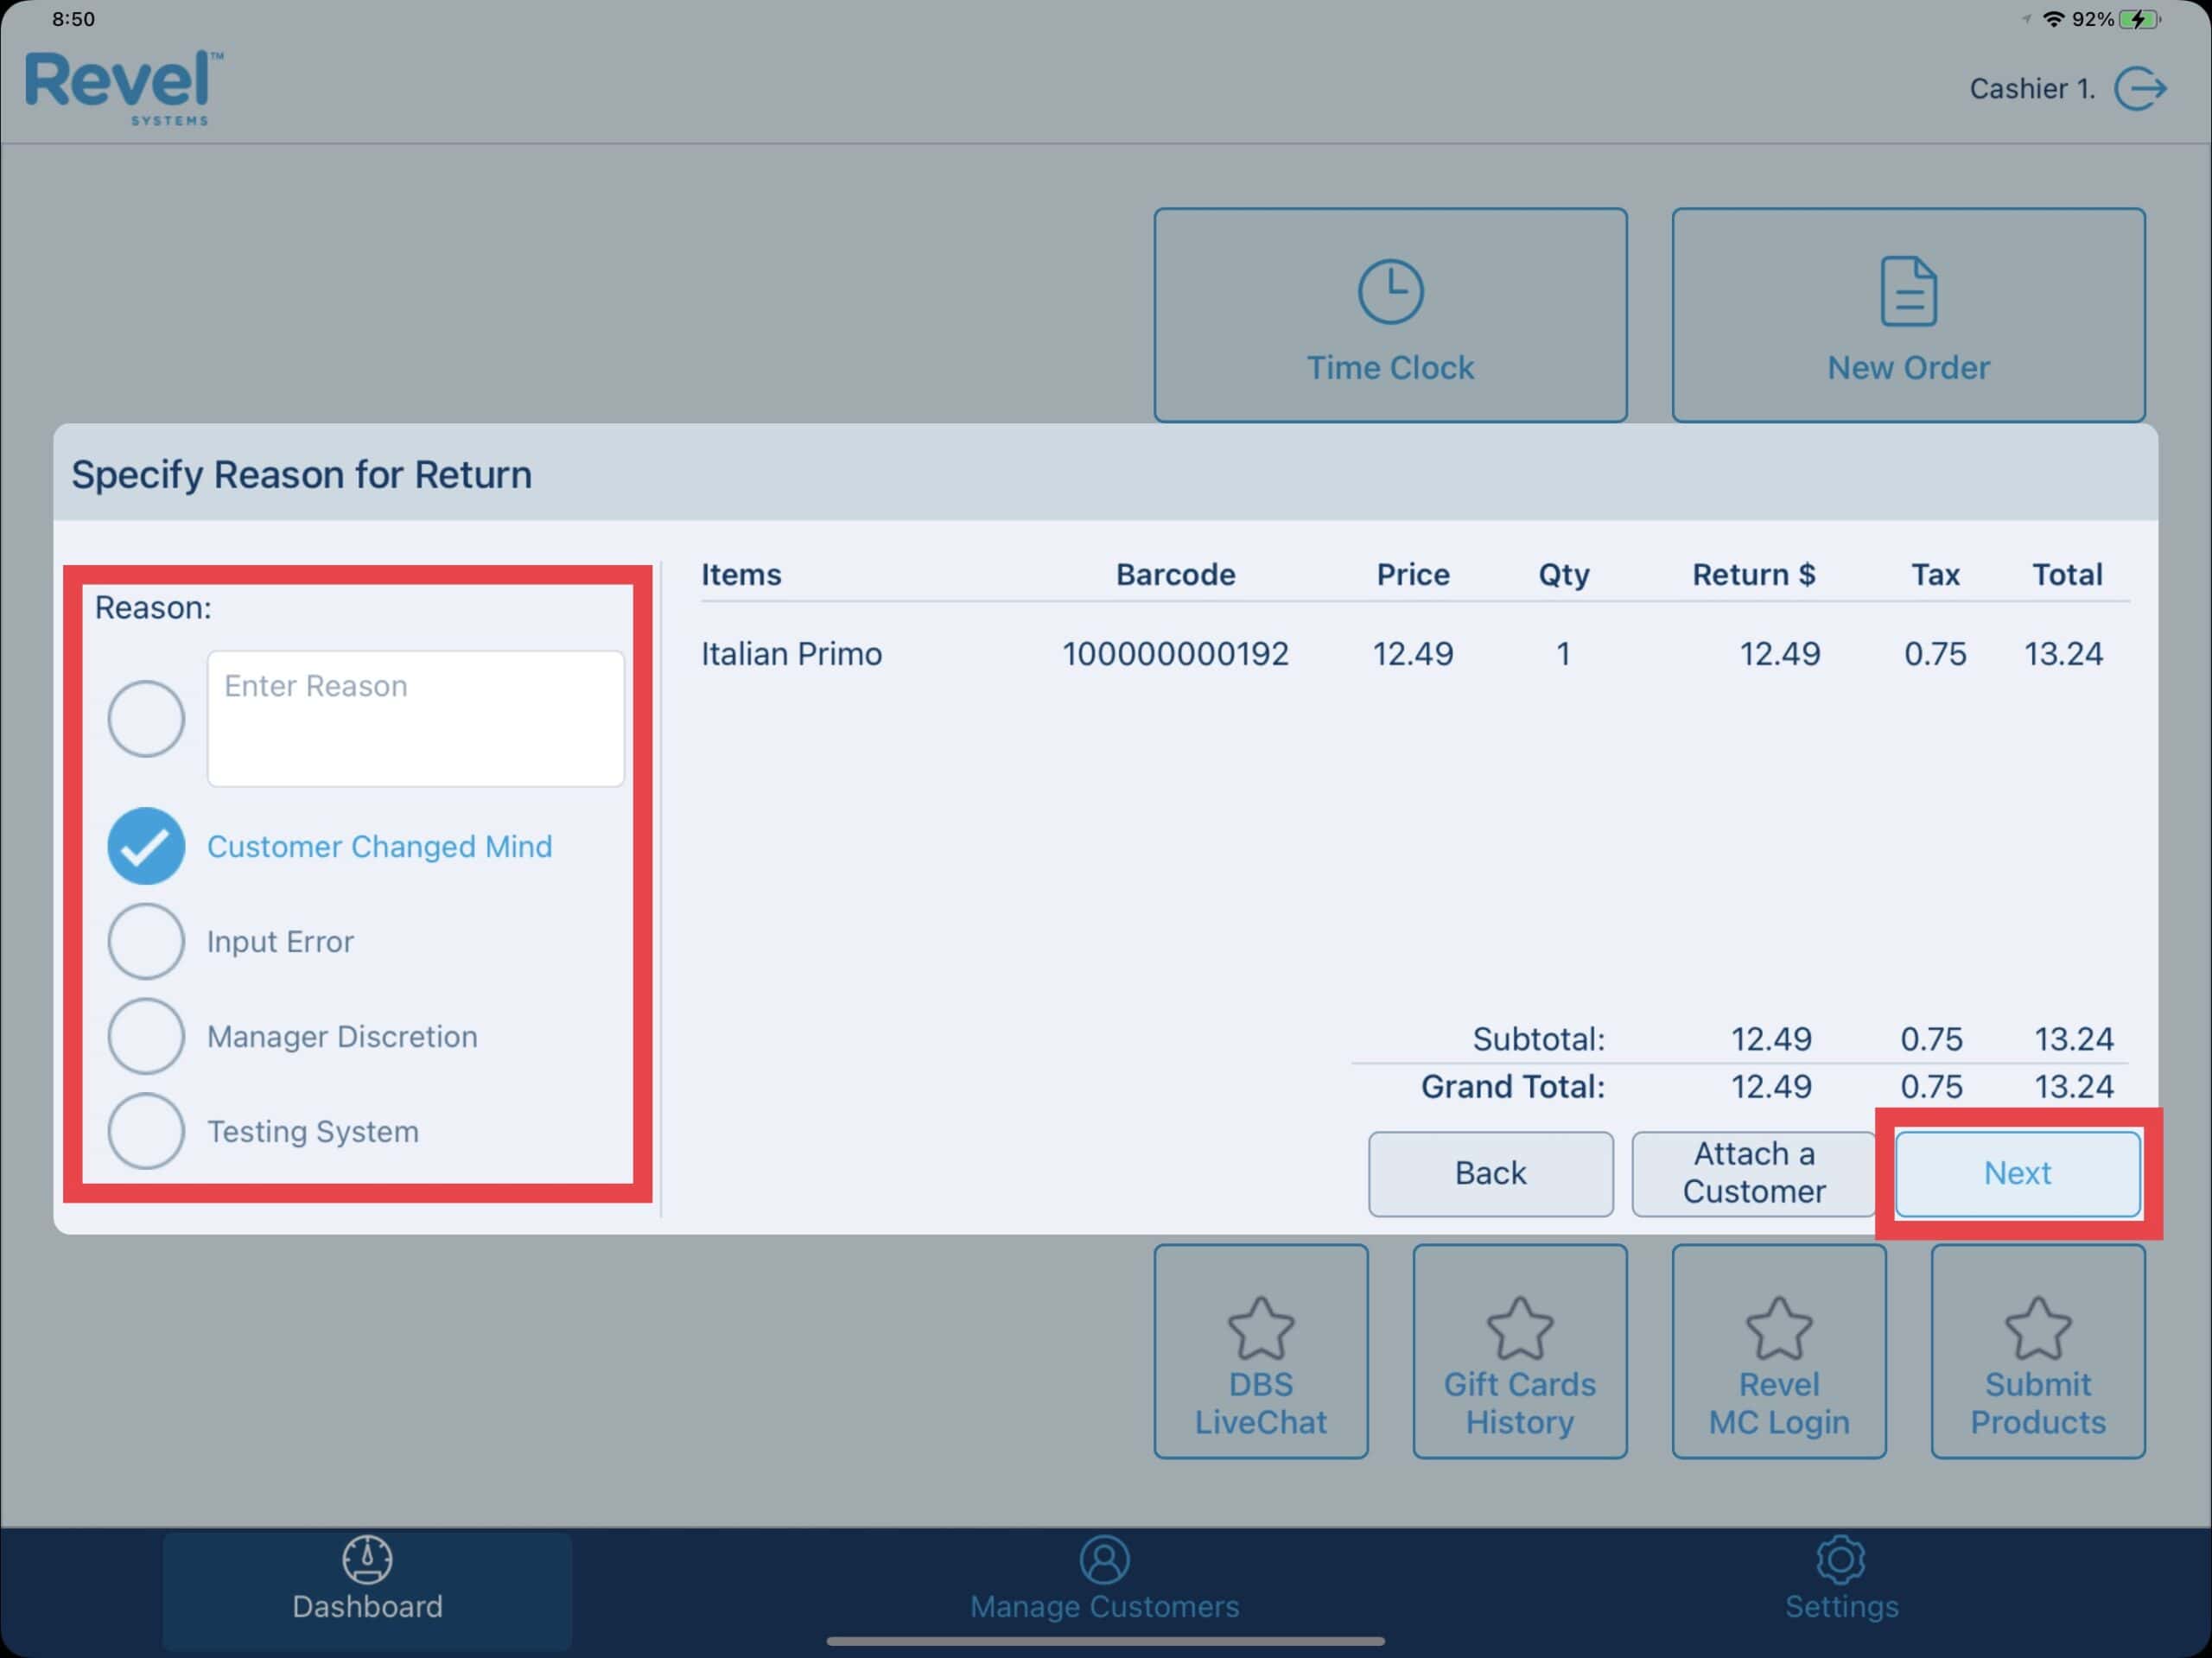
The returned product(s) are displayed on the order and can be refunded accordingly.
Updated 08/01/2024

Summary
The end of day process (referred to as the EOD) must be completed at the close of each business day. This helps ensure consistency between till management and employee logins and logouts. The EOD wizard has a step-by-step process that allows managers to close all open or held tills before closing down for the day, as well as confirm other checks & balances.
An alert in the form of a red bar at the bottom of each point of sale will remind you to run the EOD around the close of business each night. When the EOD is initiated, all logged in point of sale terminals will display an alert indicating they will auto-log off.
Running the End Of Day
To run the EOD process, log in with a manager PIN or higher (this can only be done from the main POS1 iPad). Navigate to the POS Dashboard and next to End of Day Process select Initiate.
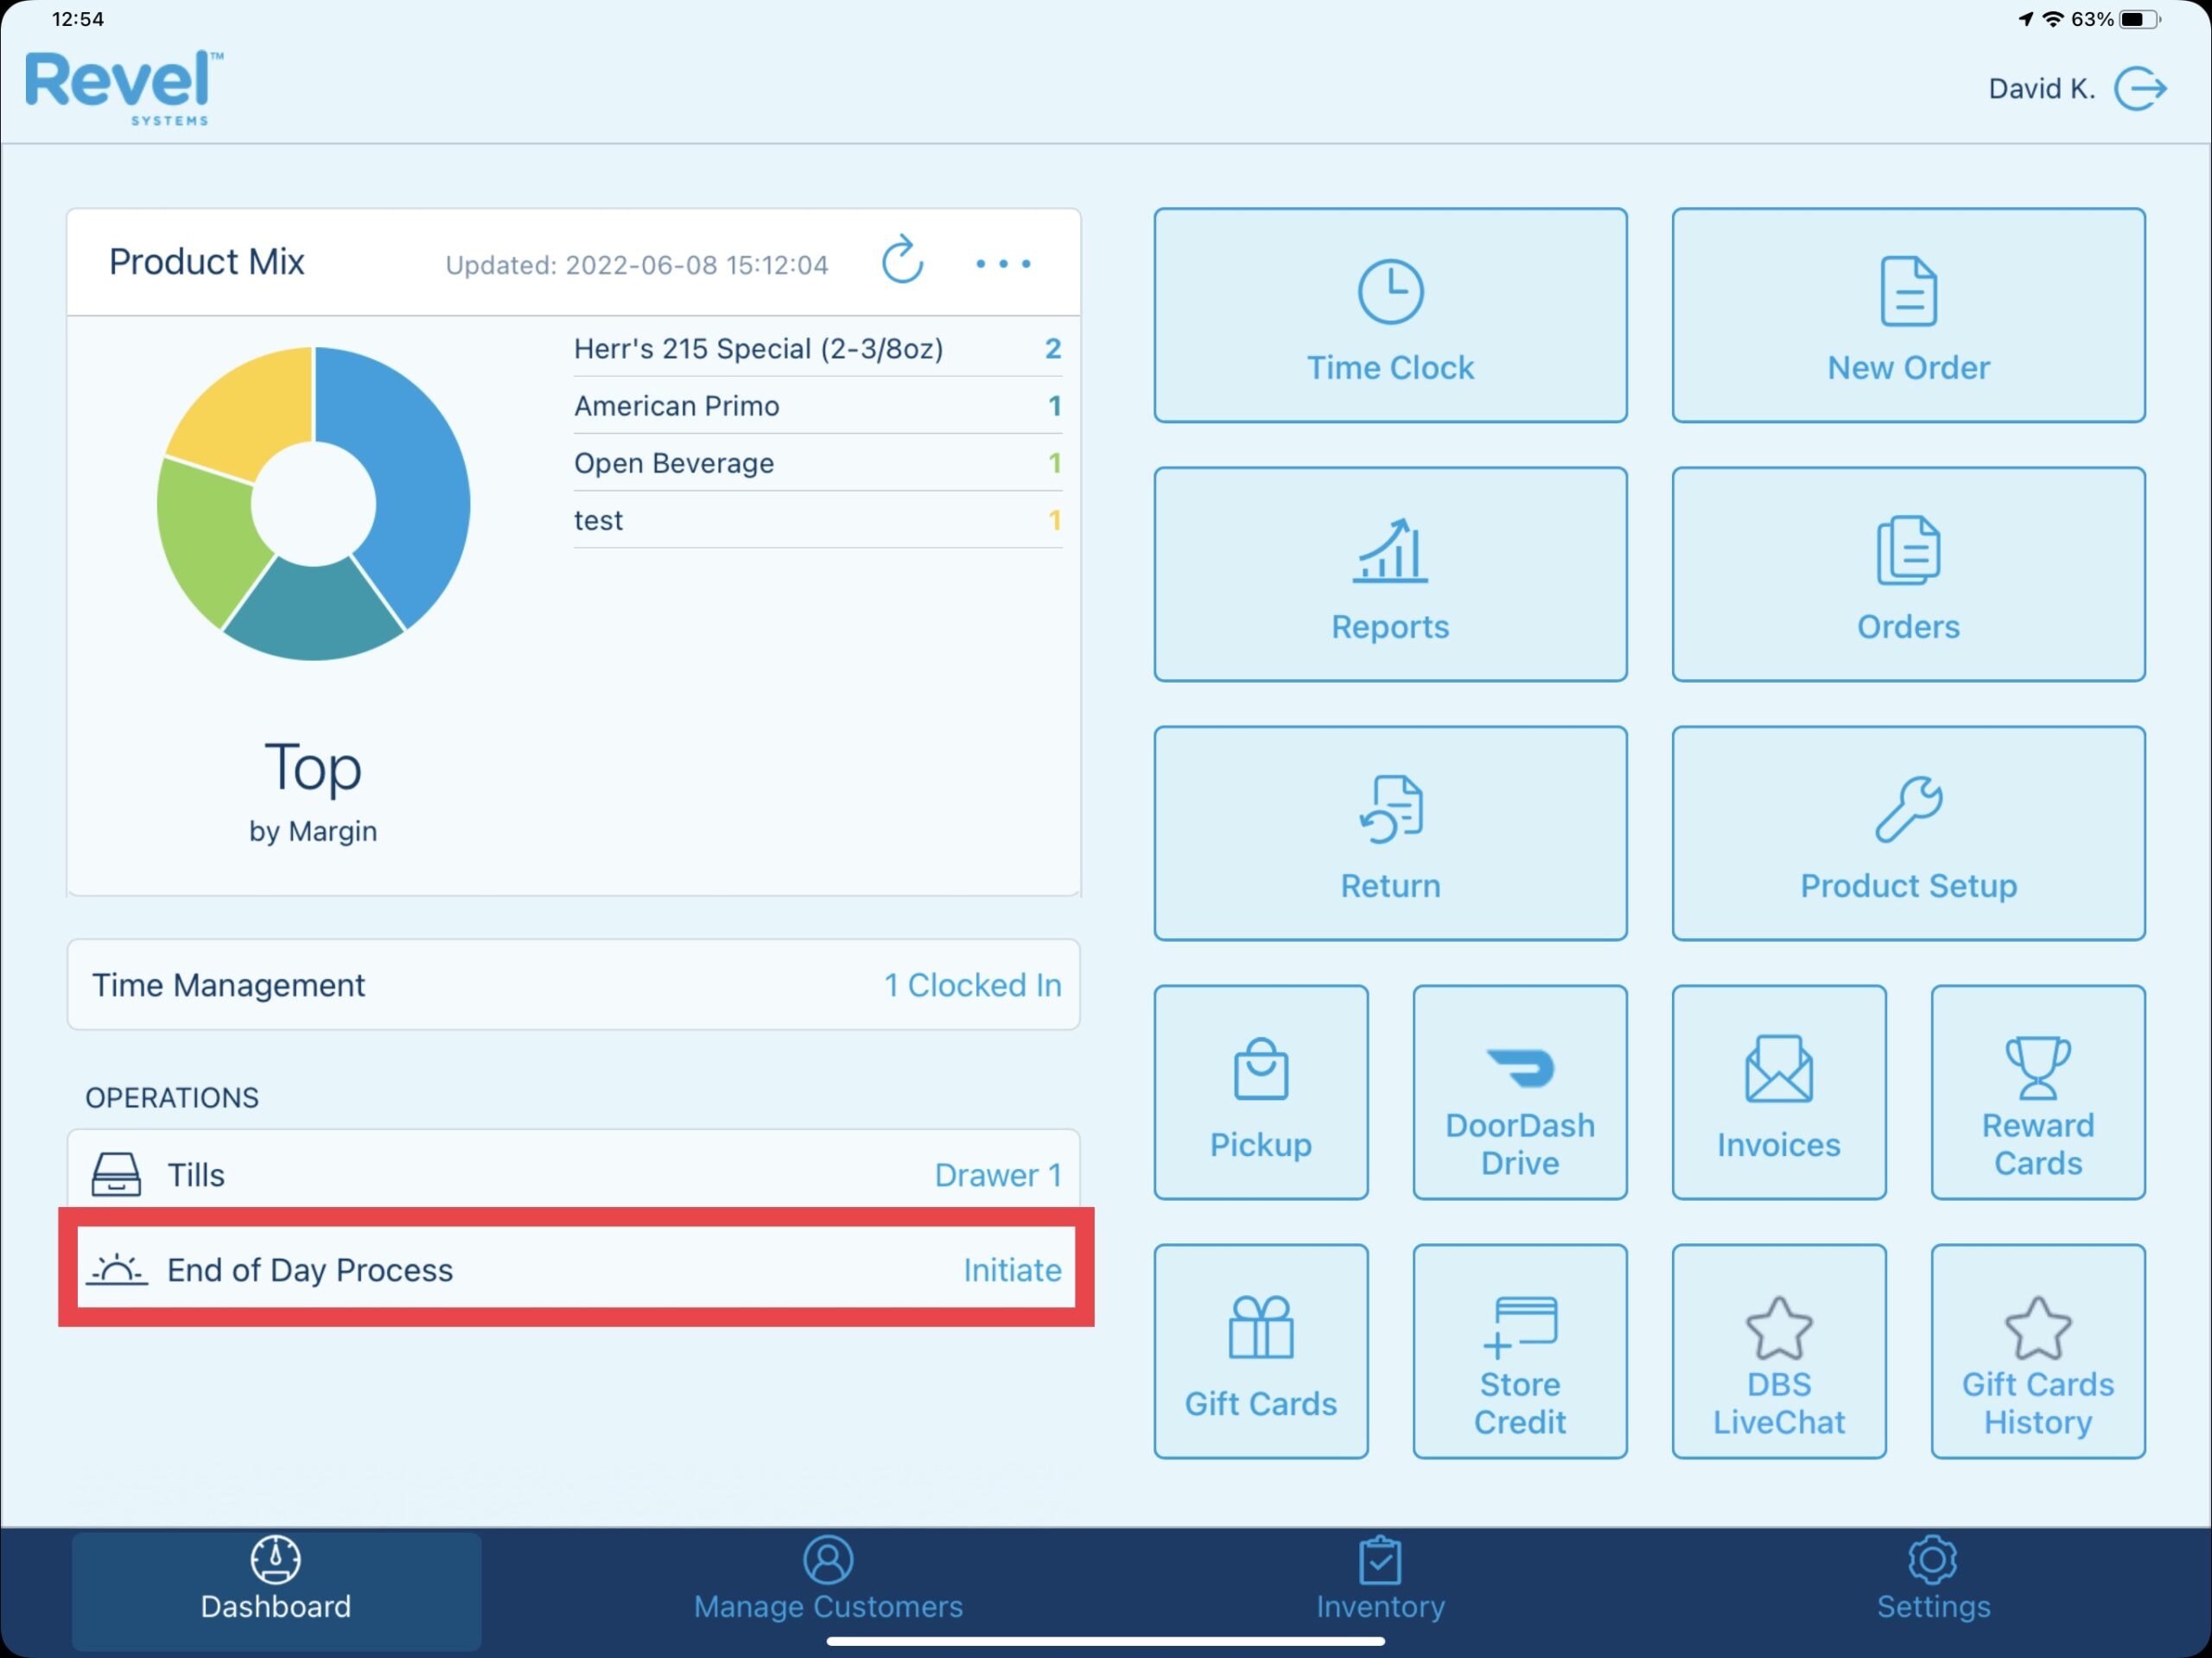
The left-hand section of the End of Day process screen walks you through the required tasks to complete the EOD in the point of sale. Any incomplete actions are displayed in the right-hand section. As each task is completed it, a check mark will appear next to it and the EOD will advance to the next task.
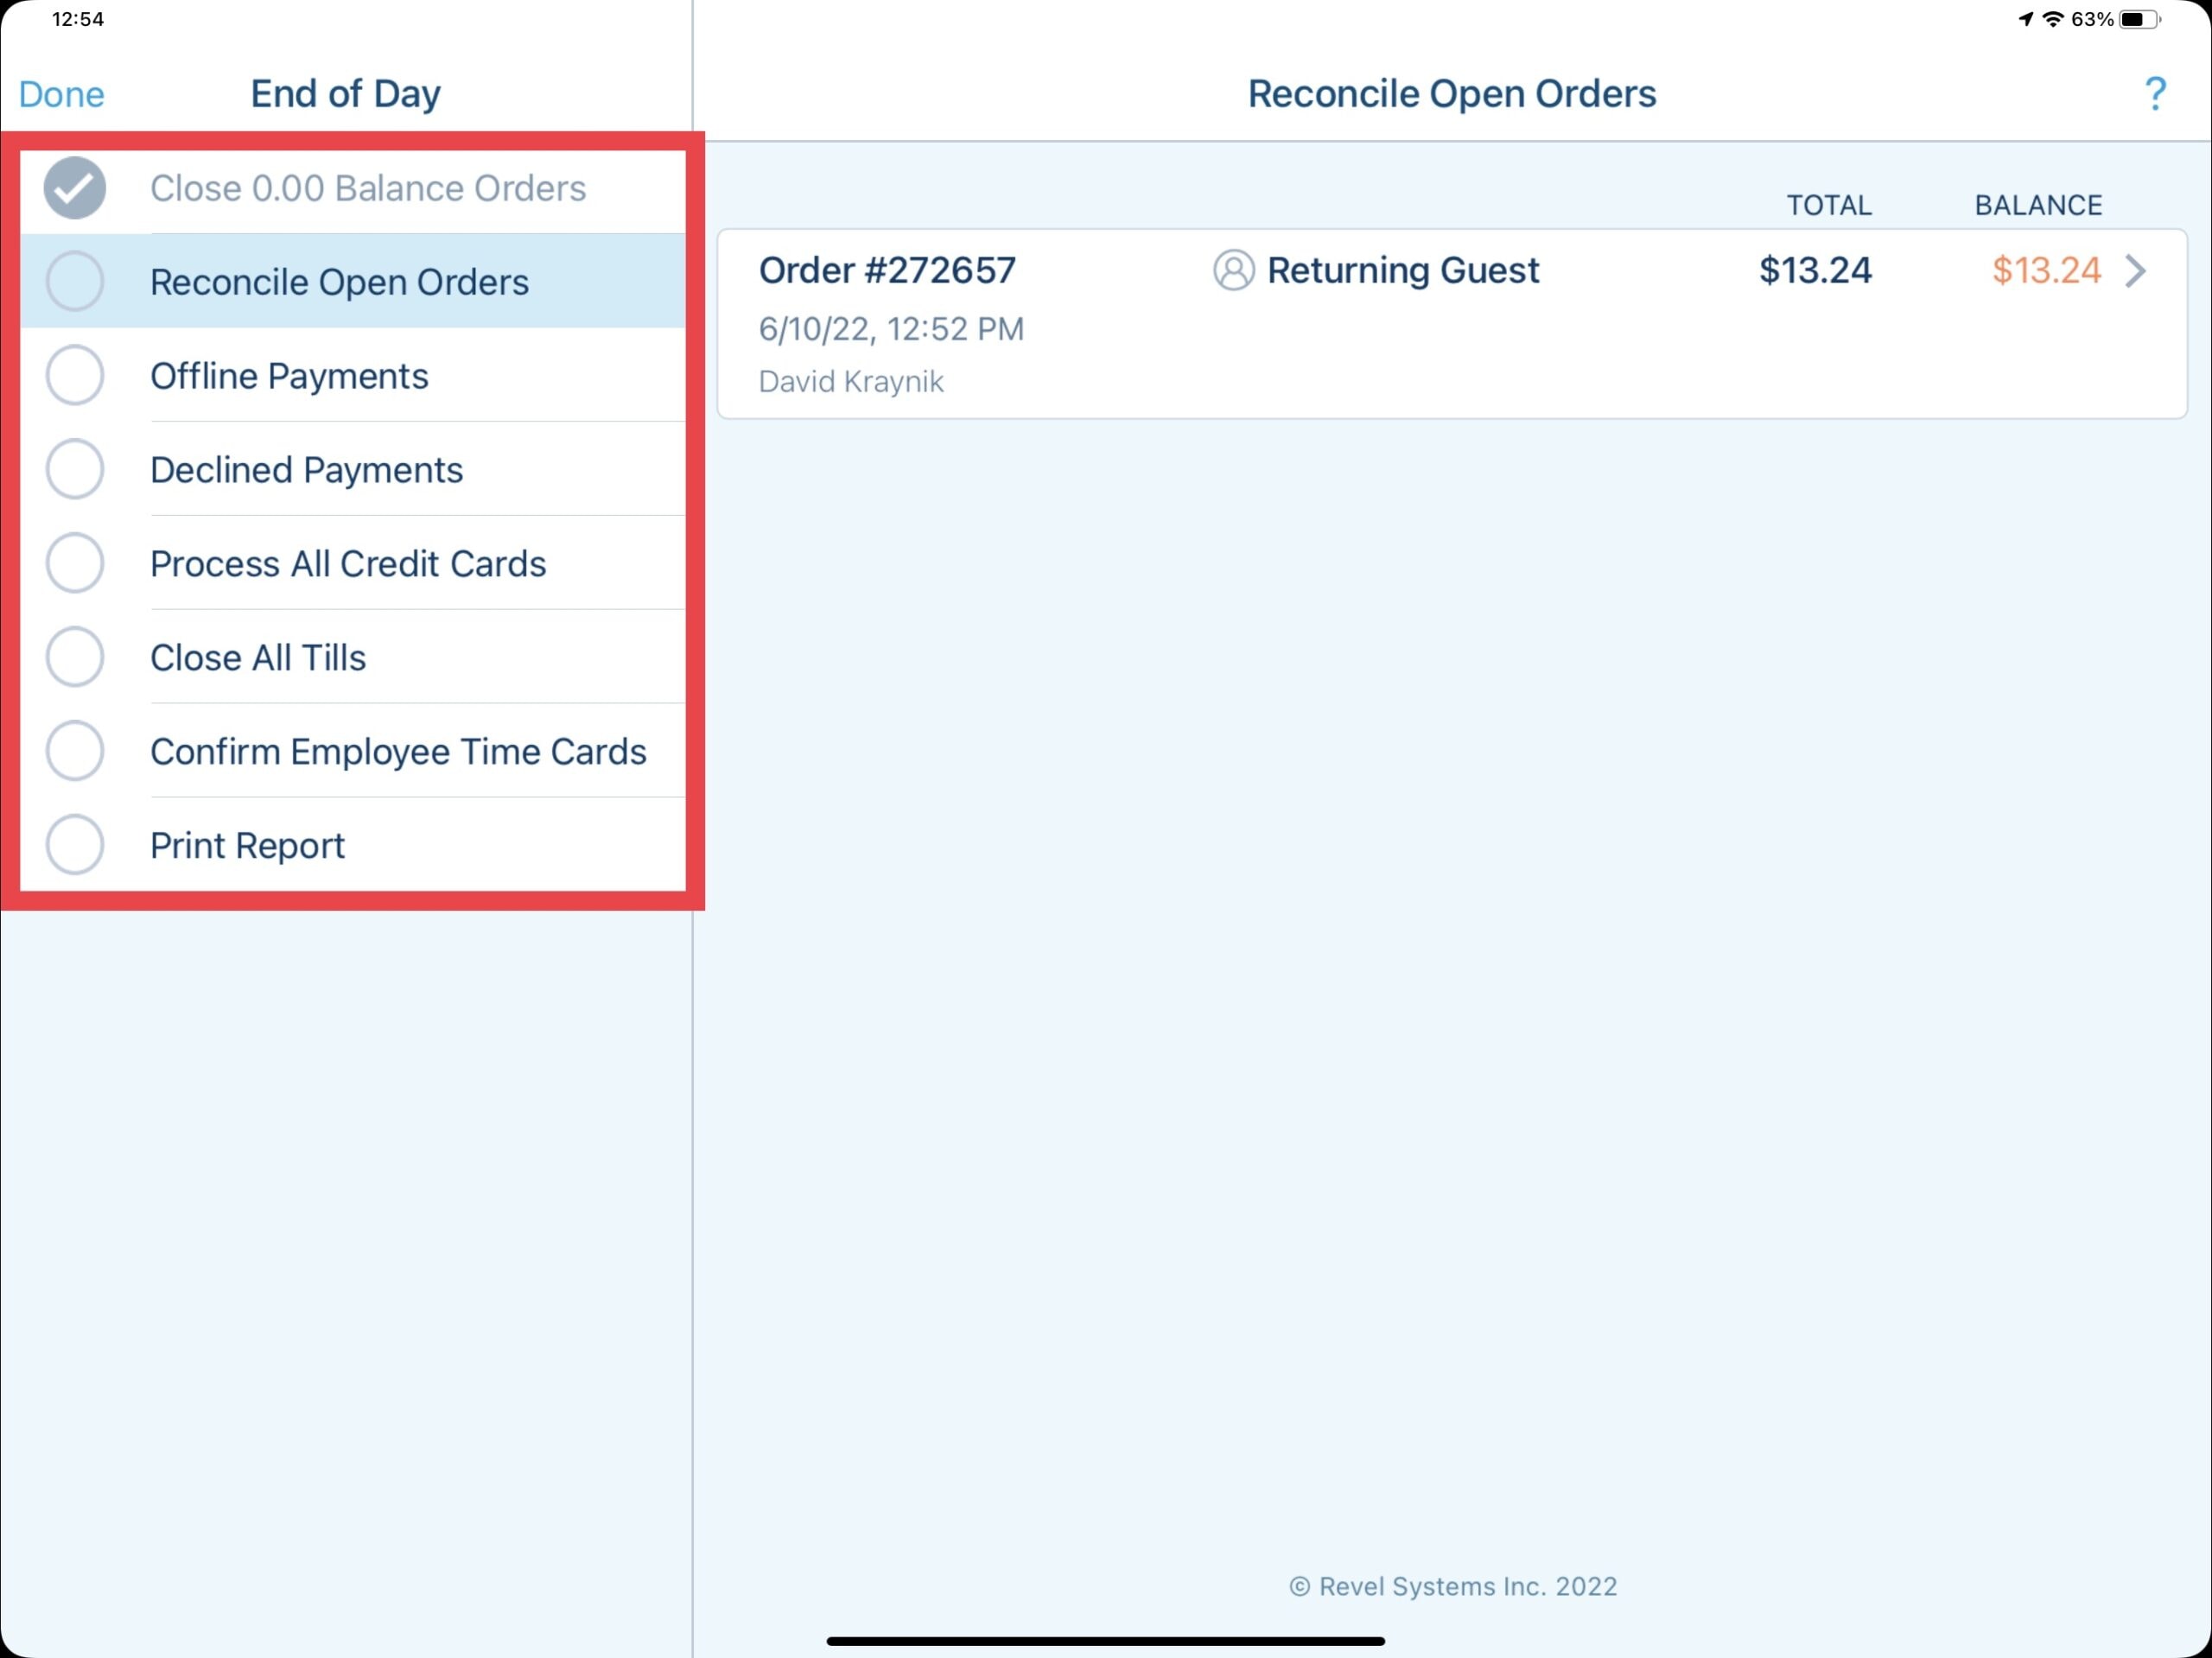
Close 0.00 Balance Orders: If any 0.00 balance orders are in the system, this task will close them automatically. There should not be any 0.00 balance orders in the system as all online orders are automatically closed by the system as they come into the point of sale.
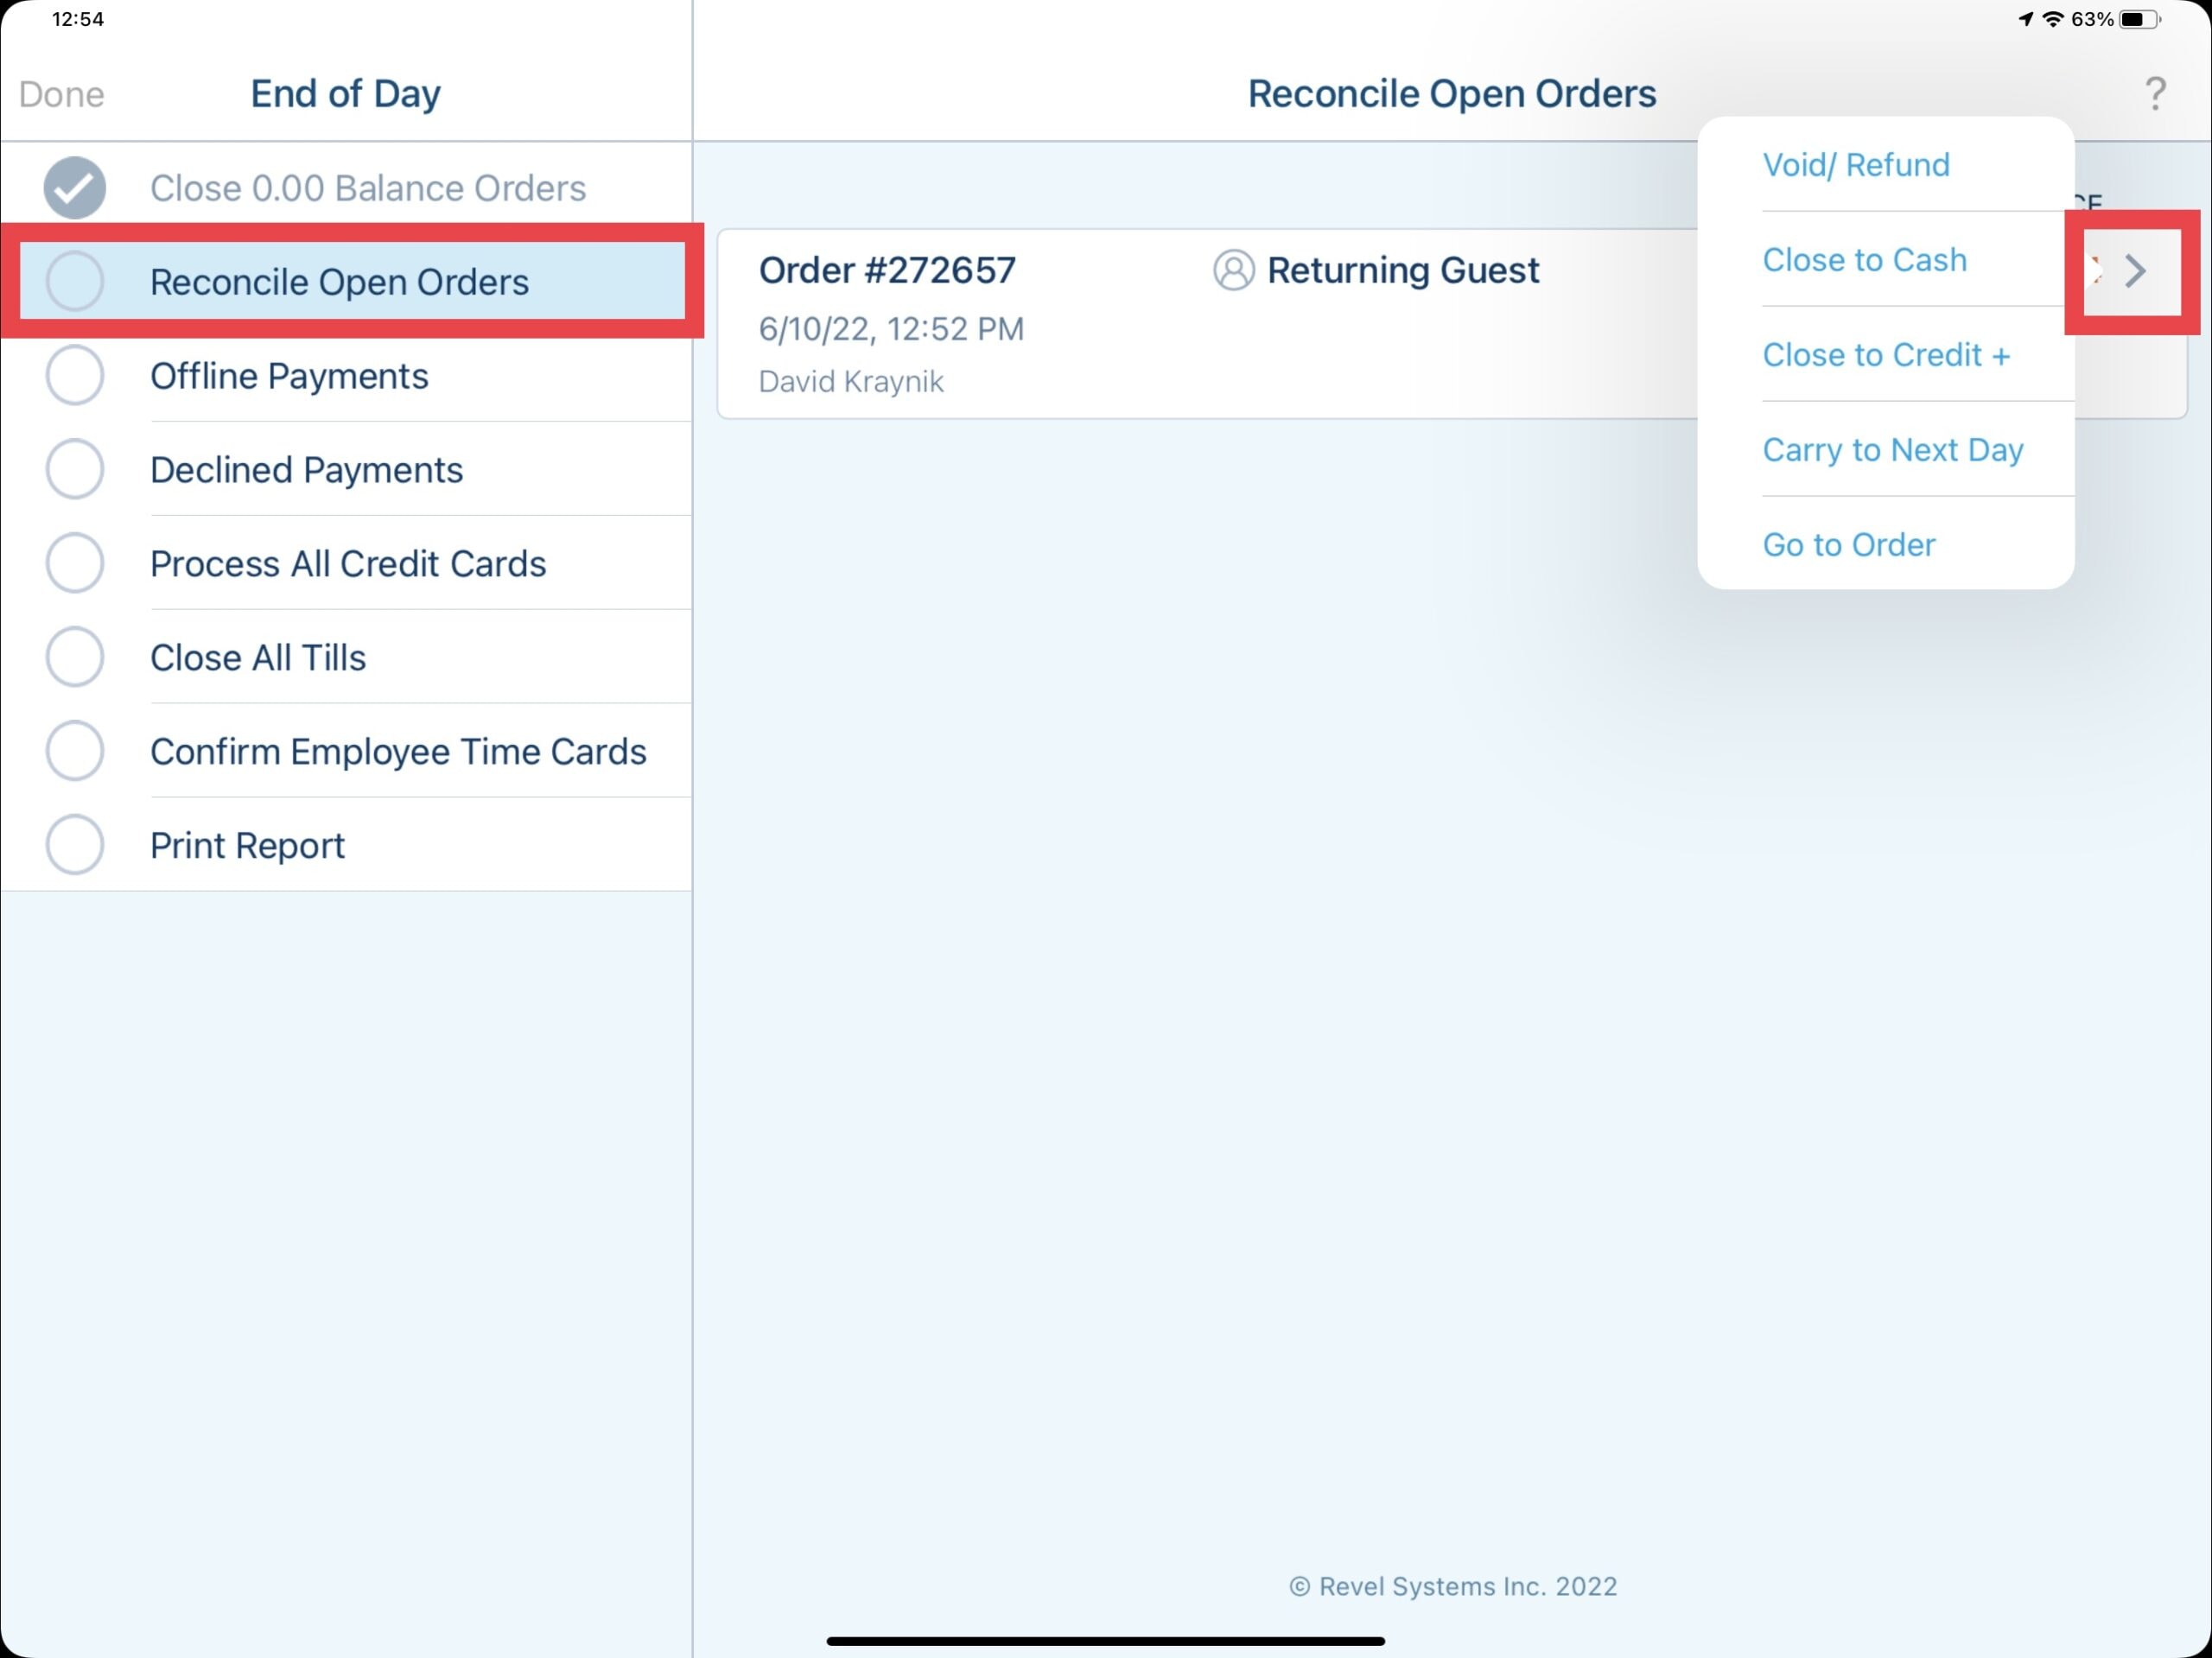
Reconcile Open Orders: If there are any open orders in the system, this task will display them on the right-hand side. Select each order to open it and close it out as needed. Alternatively, selecting the arrow to the right of the open order displays other options for handling the order such as Void/Refund, Close to Cash, Close to Credit +, Carry to Next Day, or Go to Order. Once all orders are closed you will be taken back to the EOD screen.
Offline Payments: This task checks for any offline payments that may have been taken during a transaction. This typically can occur when internet is down. You will be prompted on what to do with each offline payment if there are any. The screen lists the order number, cardholder's name (if saved in the system), the last four digits of the card used, the date and time of payment, and the total payment amount including tips. Tapping the Force option at the top of the screen will process the listed offline payments. If the point of sale is still in offline mode, the EOD process will not be able to be completed.
Declined Payments: This task allows you to address and resolve any payments that were declined. The screen displays the same information about the payment that was described in the Offline Payments section along with the reason it was declined. Tapping the Retry button will cause the point of sale to try and process the payment again. If the payment is still declined, you will need to swipe right to delete the payment from the table in order to compete the EOD process. A warning message will be displayed when trying to delete a payment.
Process All Credit Cards: This task allows you to process all credit cards used for payments. The screen displays all information about payments processed on a credit card along with the payment status. You can add any additional tip amount in the Tip field. Tapping the Capture button will bring up the Capture All Transactions window confirming the capture of the card.
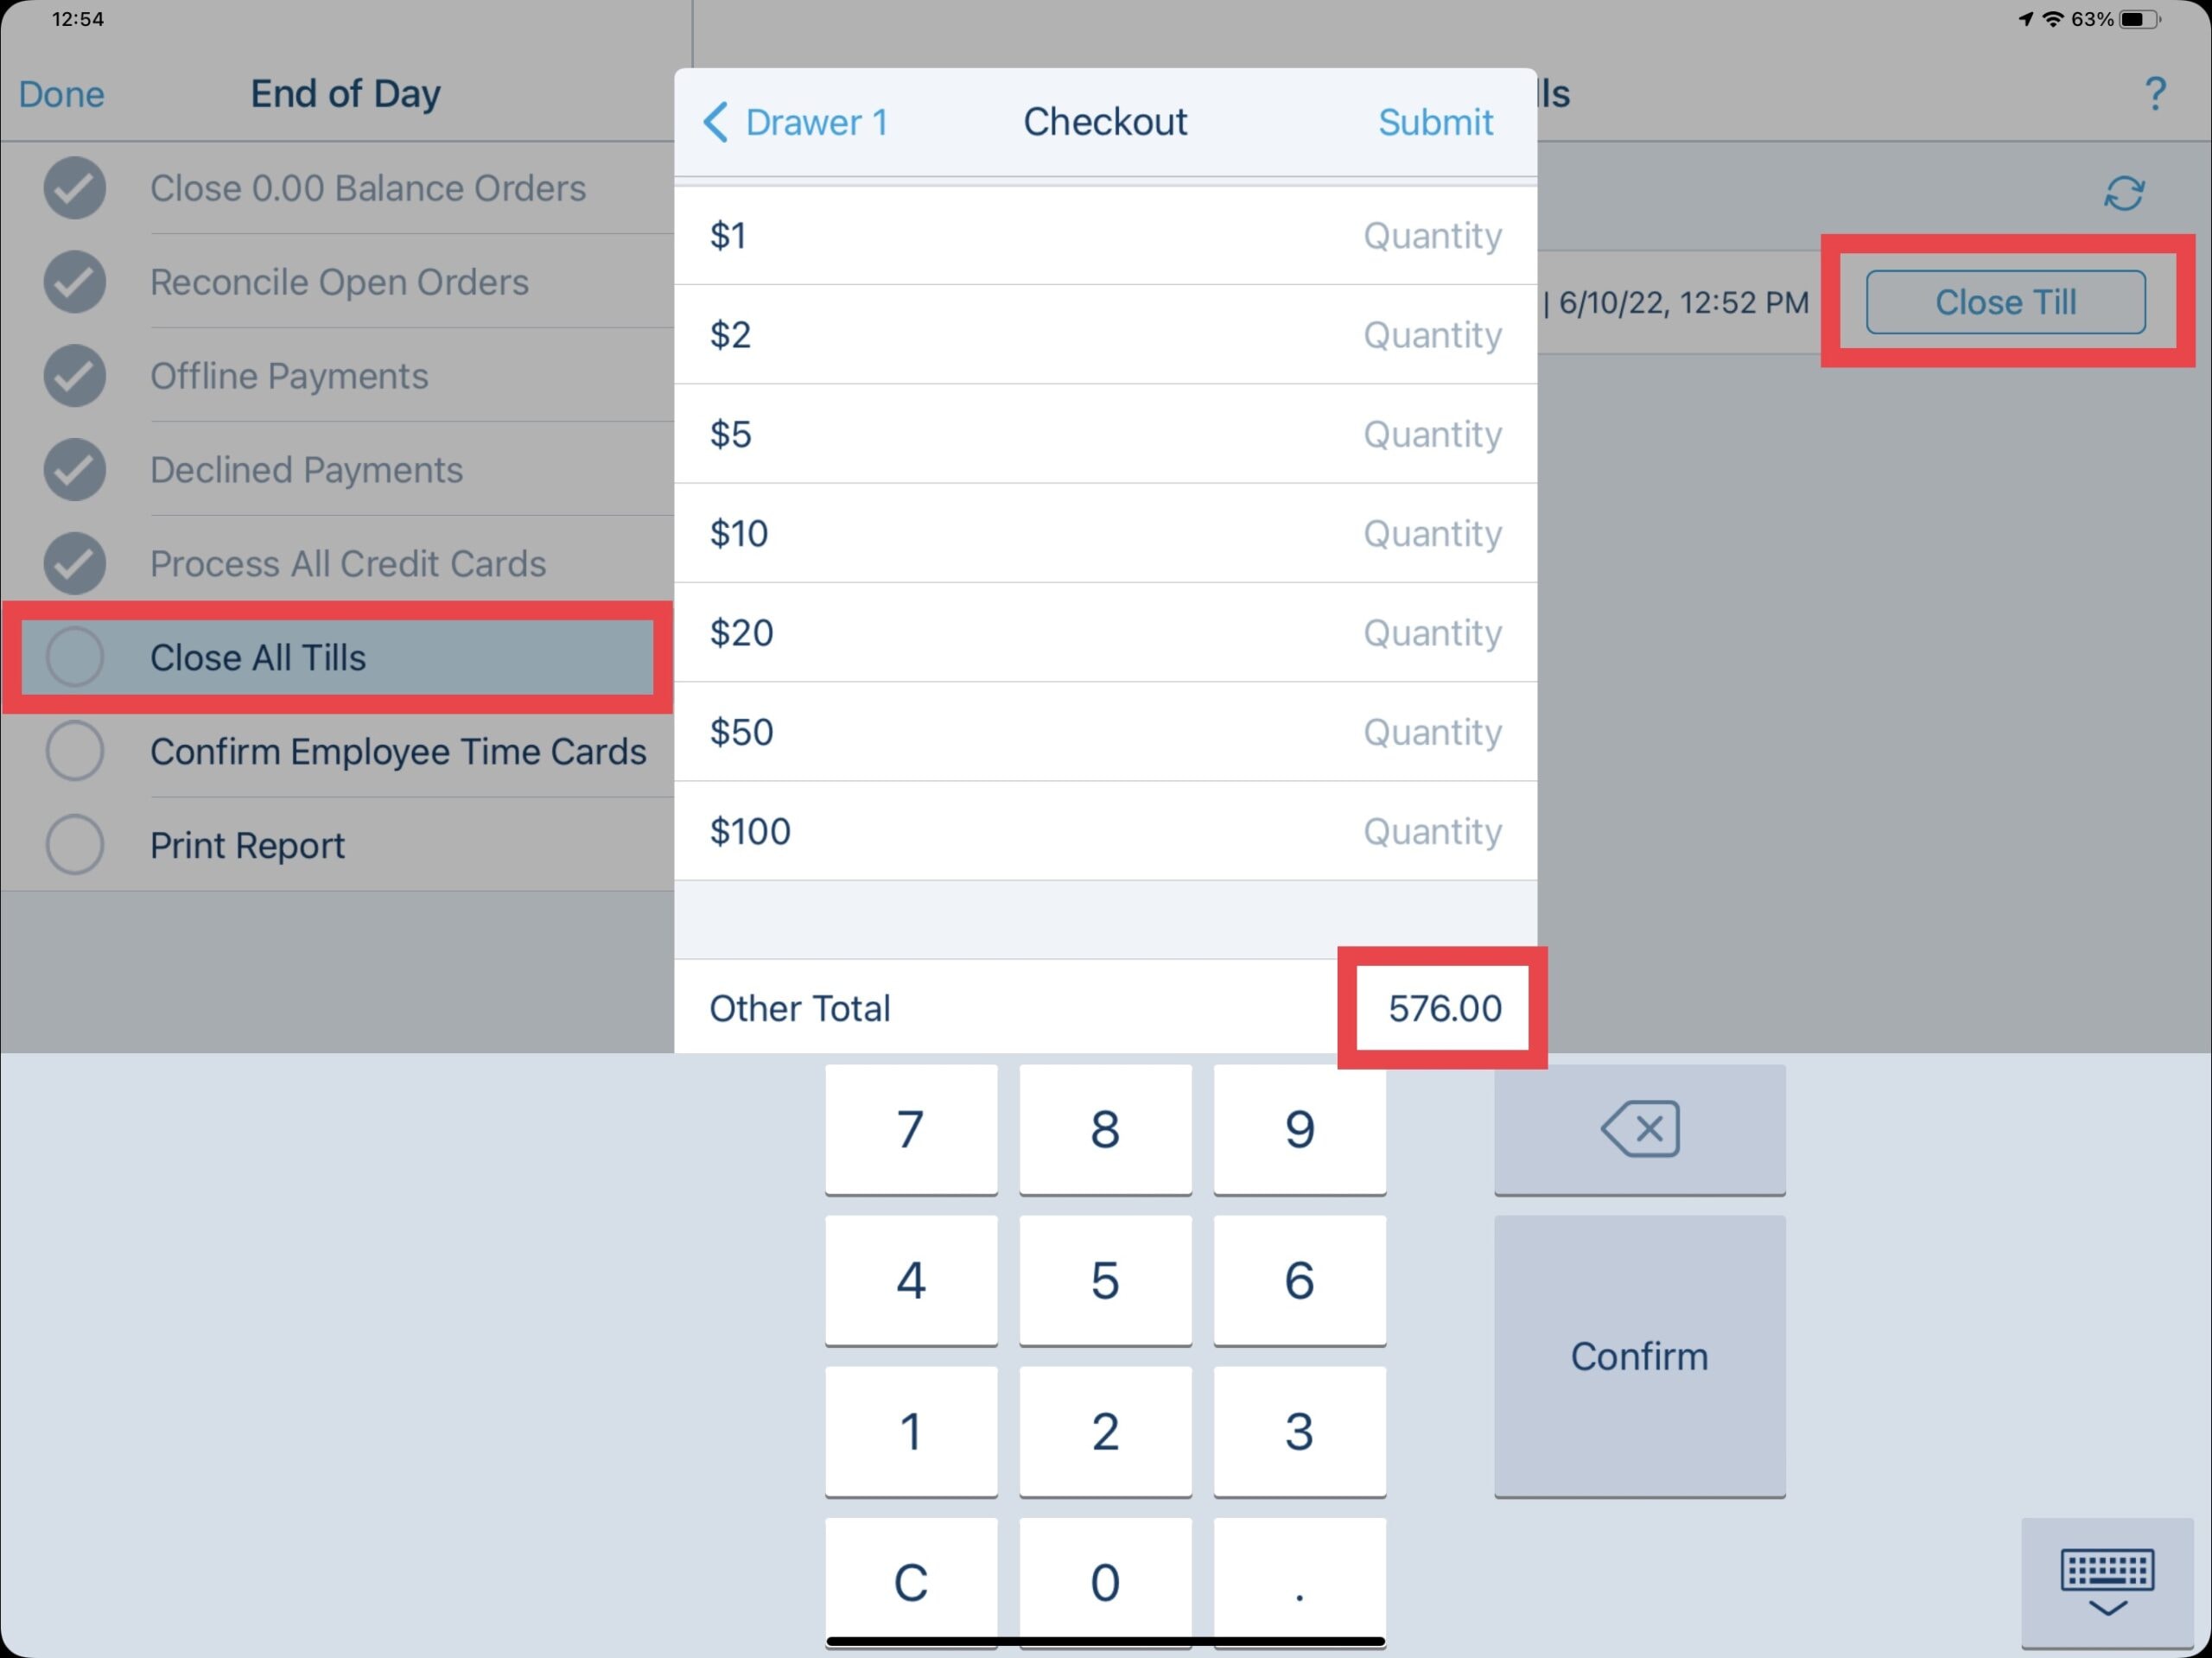
Close All Tills: This task allows you to close all tills (typically POS1 and POS2) from one register. Select Close Till for each till to close. This will allow you to enter the ending cash bank into the Other Total section and submit the closing bank. Repeat for all open tills.
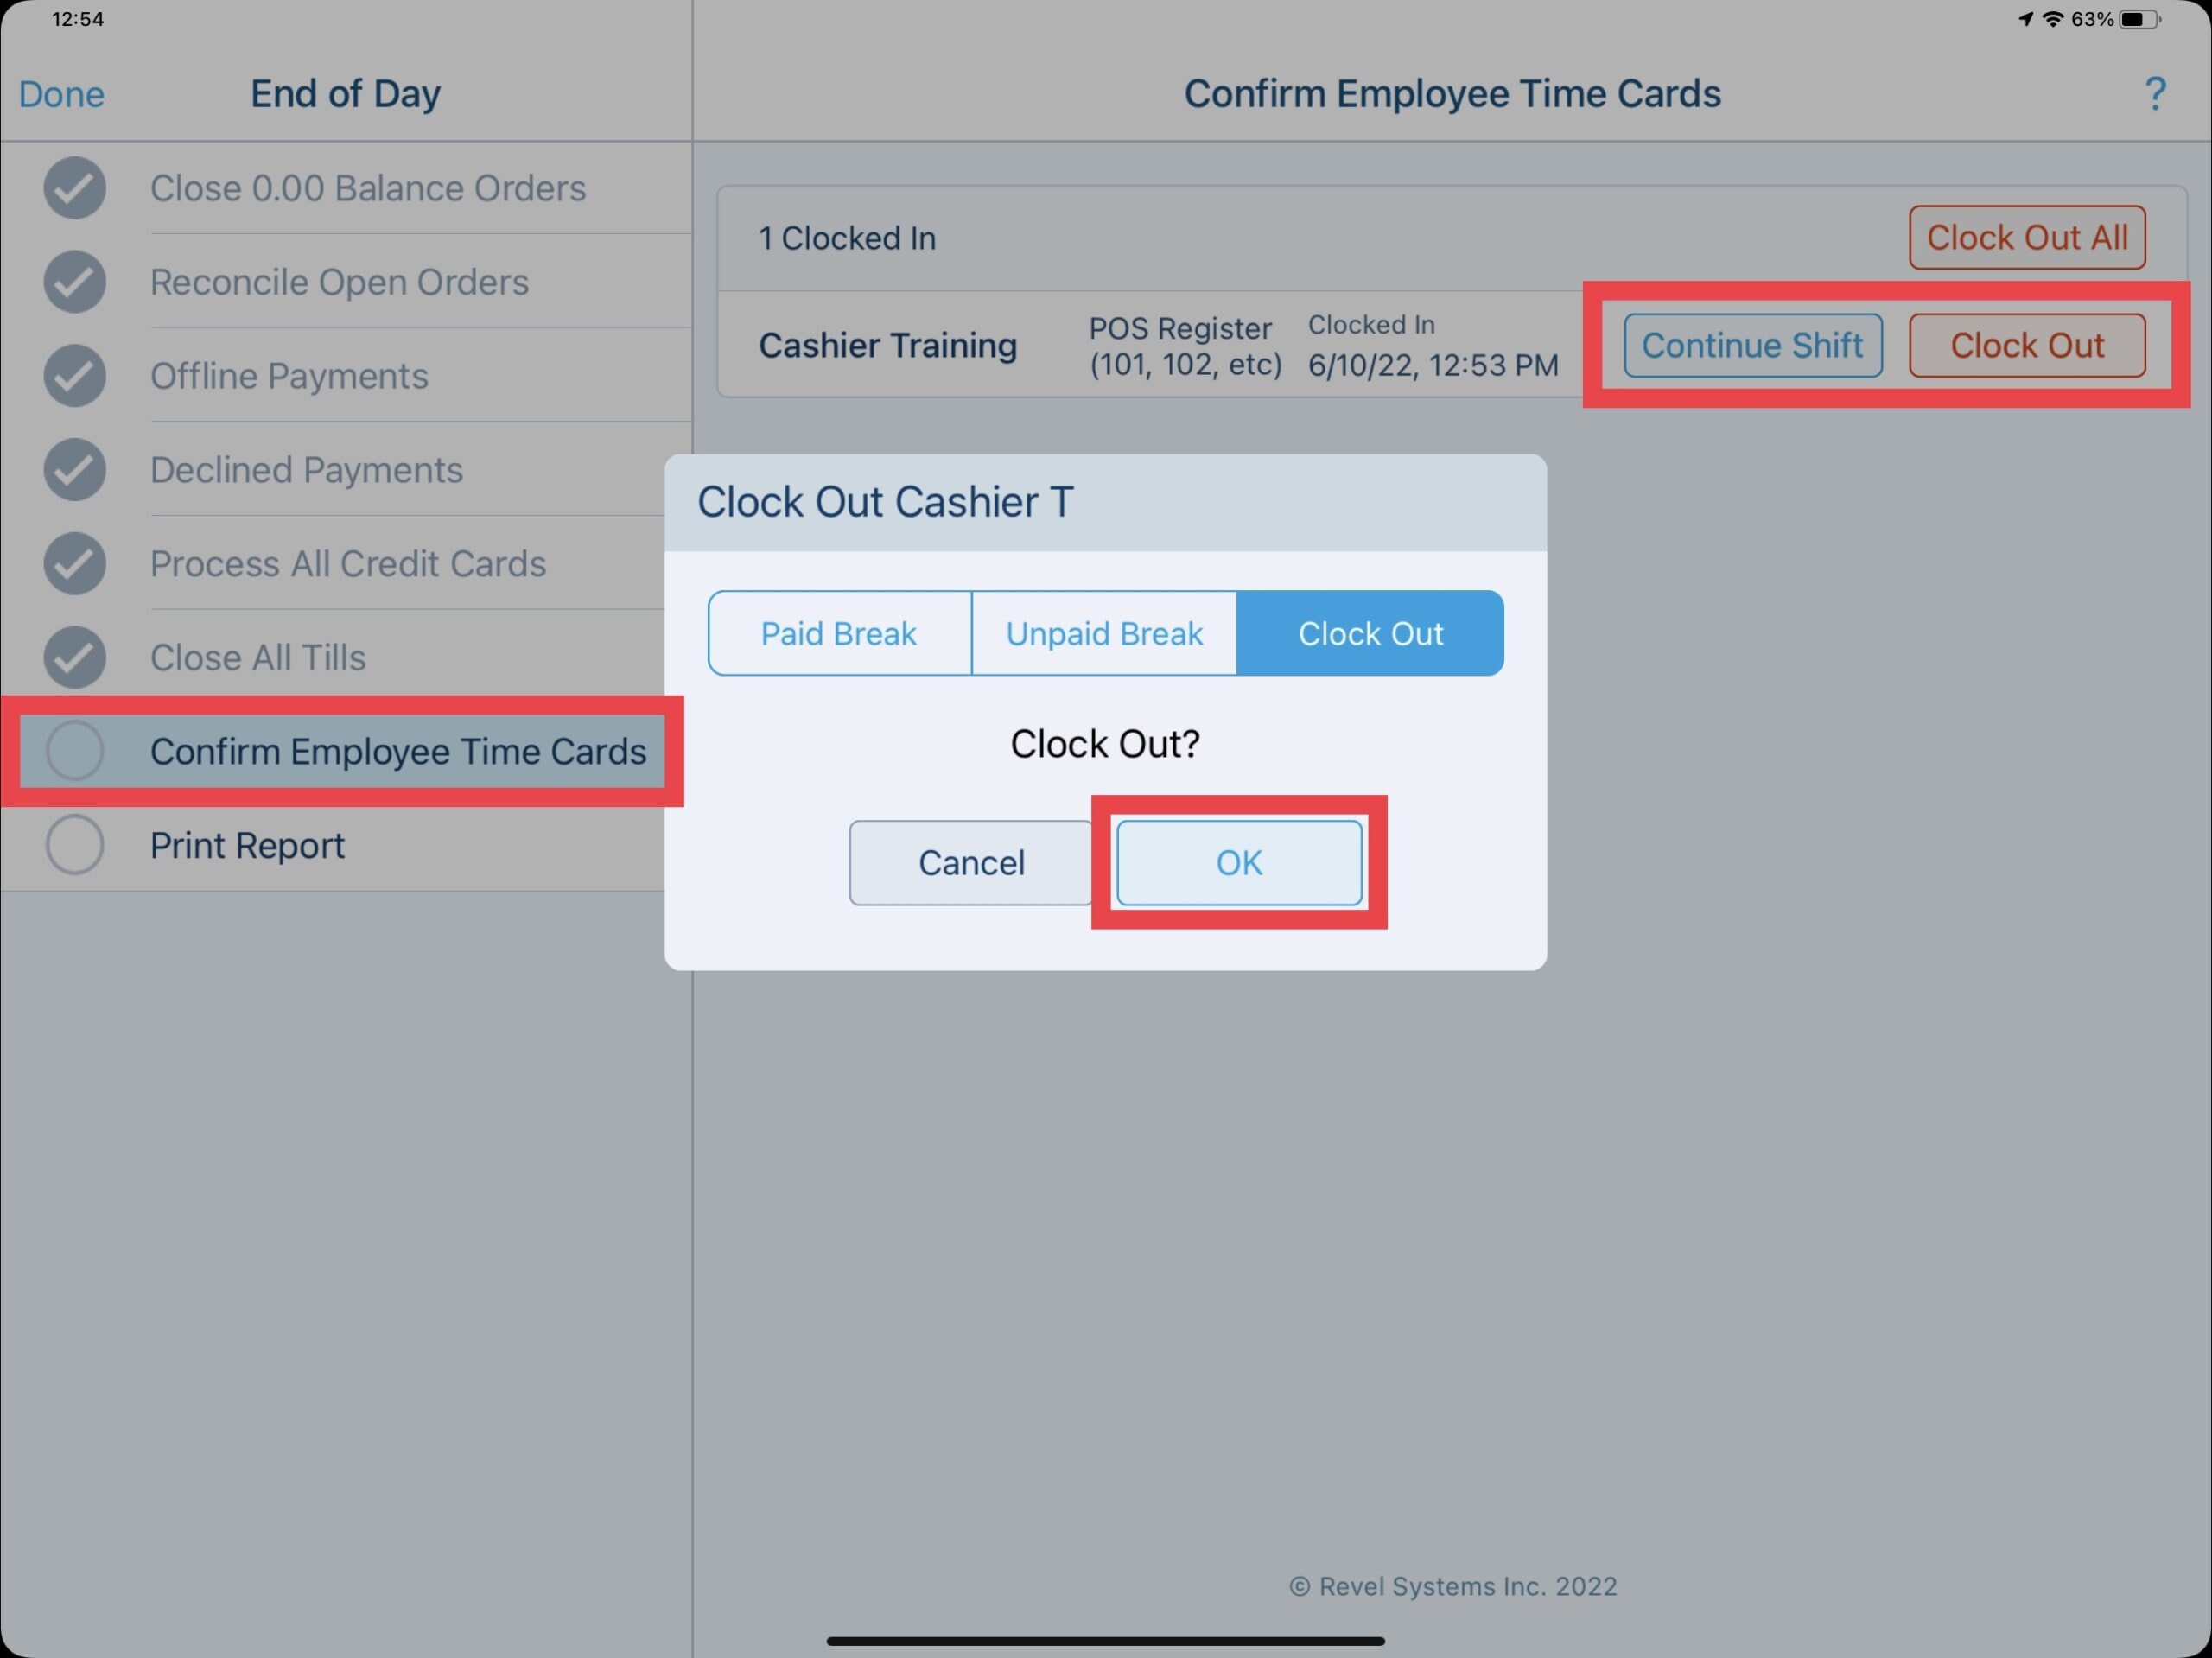
Confirm Employee Time Cards: This task checks to make sure all clocked in employees have successfully clocked out. Any employees still clocked in will be displayed and you will have the option to let them continue their shift or clock them out.
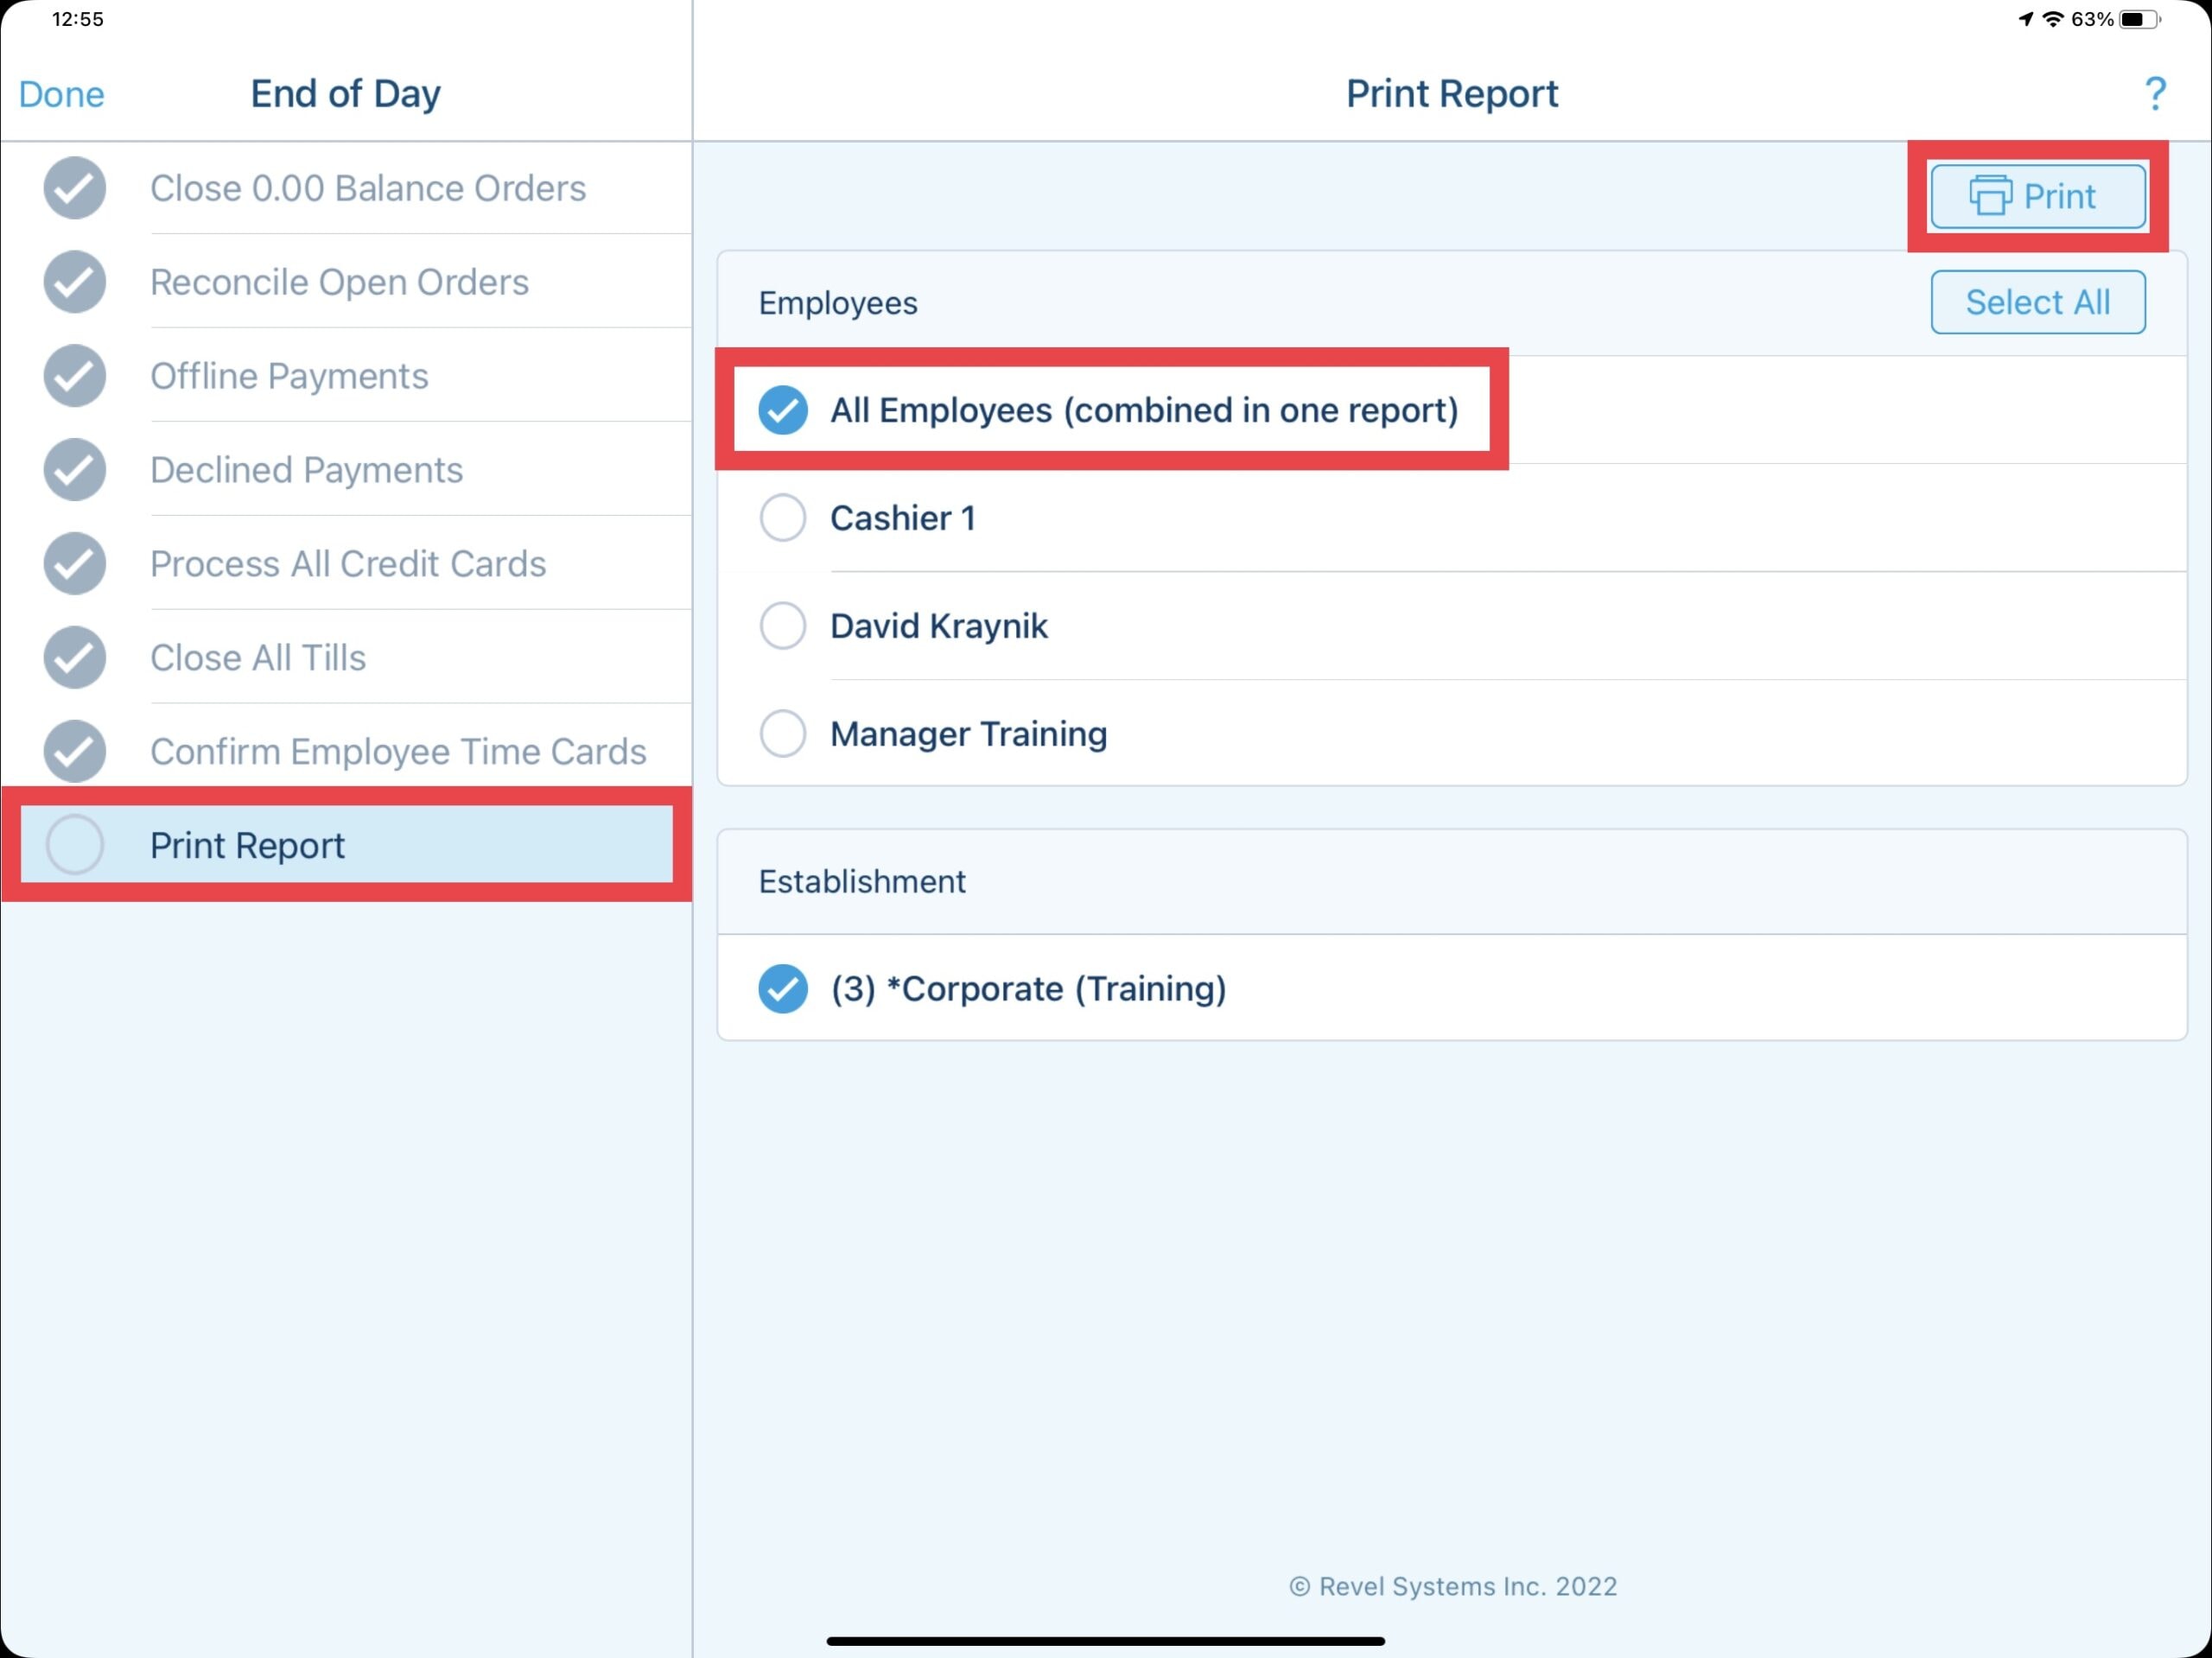
Print Report: The final task of the EOD process is to print the final report. It is most common to select the All Employees (combined into one report) option under the employees section. This ensures that all sales entered into the point of sale since the last EOD process run are accounted for otherwise you can run a separate report for each employee. Selecting Print from on the top right will print the report and send the final log to the management console.
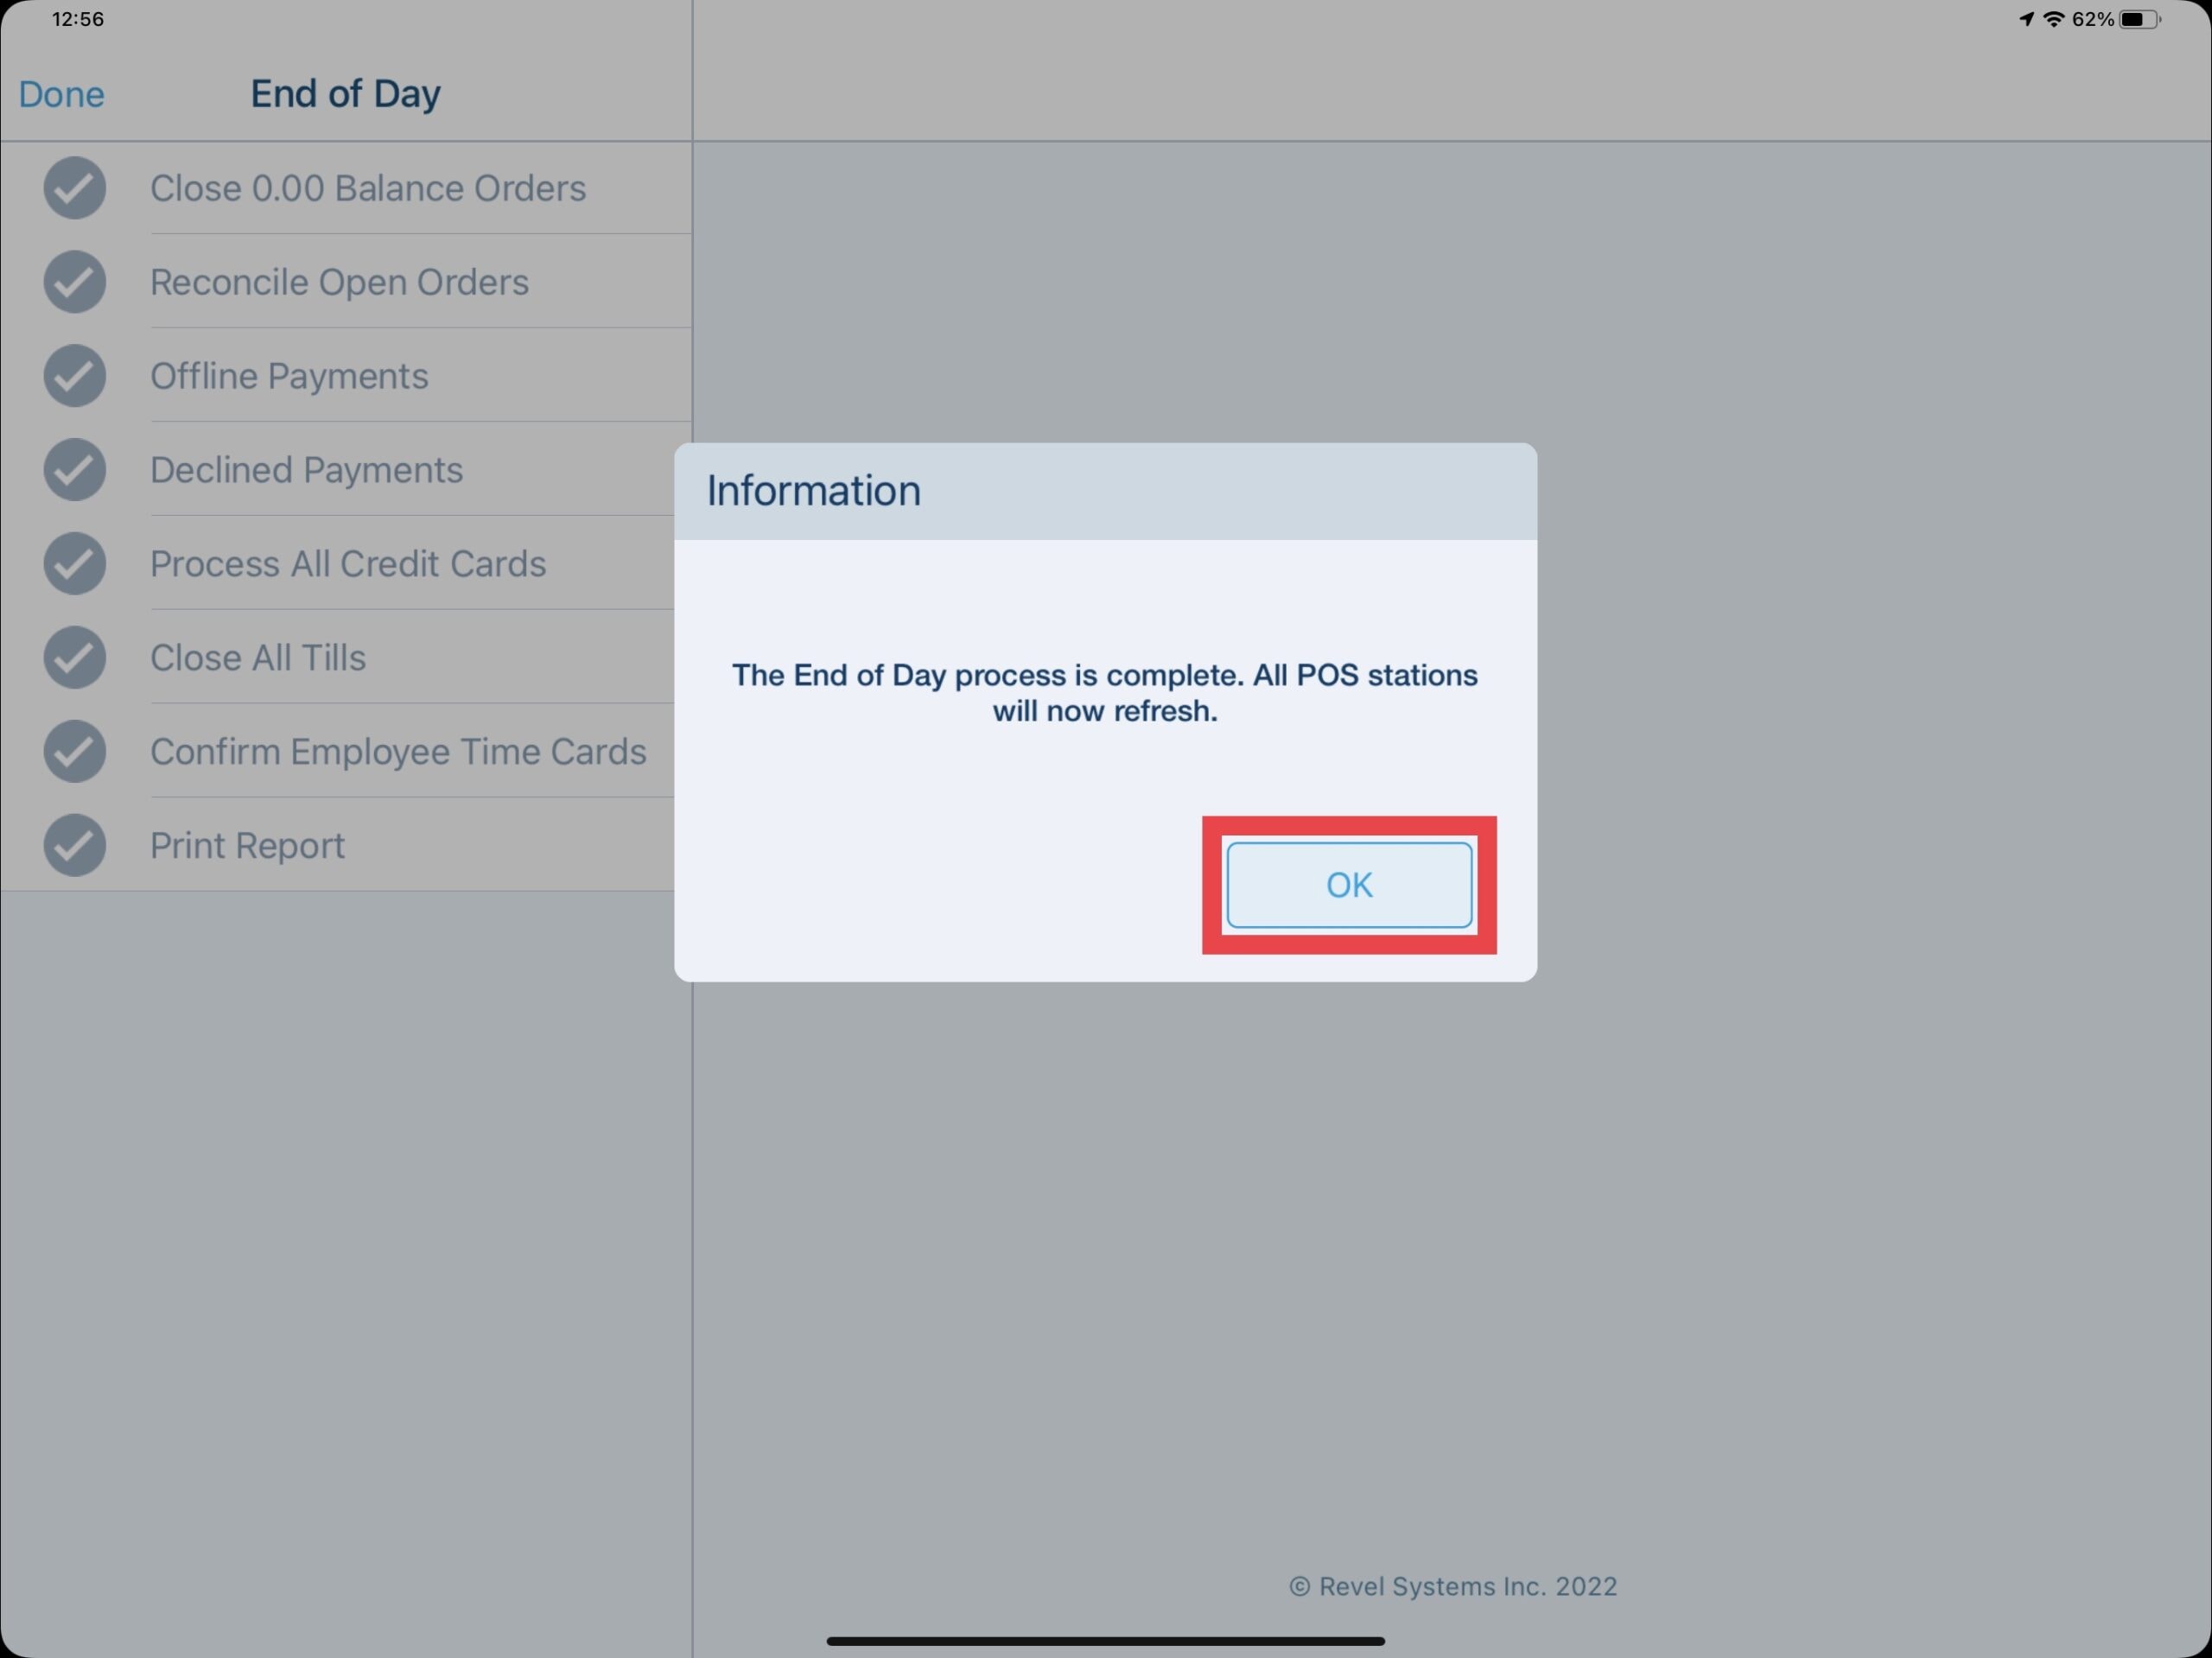
After completing the EOD process, a prompt will let you know that each point of sale will automatically refresh.
Updated 06/15/2022
